


系列文章目录
Hudi第一章:编译安装
Hudi第二章:集成Spark
Hudi第二章:集成Spark(二)
Hudi第三章:集成Flink
Hudi第四章:集成Hive
文章目录
前言
本来关于Flink还有一些内容,但剩下的我了解过之后,觉得并不是很常用,而且 比较杂,所以还是决定需要的时候再学习吧。
一、环境准备
1.拷贝jar包
cp /opt/software/hudi-0.12.0/packaging/hudi-hadoop-mr-bundle/target/hudi-hadoop-mr-bundle-0.12.0.jar /opt/module/hive/lib/
cp /opt/software/hudi-0.12.0/packaging/hudi-hive-sync-bundle/target/hudi-hive-sync-bundle-0.12.0.jar /opt/module/hive/lib/
启动hive
二、Flink集成hive
1.配置模版
## hms mode 配置

CREATE TABLE t1(
  uuid VARCHAR(20),
  name VARCHAR(10),
  age INT,
  ts TIMESTAMP(3),
  `partition` VARCHAR(20)
)
PARTITIONED BY (`partition`)
with(
  'connector'='hudi',
  'path' = 'hdfs://xxx.xxx.xxx.xxx:9000/t1',
  'table.type'='COPY_ON_WRITE',        -- MERGE_ON_READ方式在没生成 parquet 文件前,hive不会有输出
  'hive_sync.enable'='true',           -- required,开启hive同步功能
  'hive_sync.table'='${hive_table}',              -- required, hive 新建的表名
  'hive_sync.db'='${hive_db}',             -- required, hive 新建的数据库名
  'hive_sync.mode' = 'hms',            -- required, 将hive sync mode设置为hms, 默认jdbc
  'hive_sync.metastore.uris' = 'thrift://ip:9083' -- required, metastore的端口
);
2.案例实操
在flinksql客户端中执行。
CREATE TABLE t10(
  id int,
  num int,
  ts int,
  primary key (id) not enforced
)
PARTITIONED BY (num)
with(
  'connector'='hudi',
  'path' = 'hdfs://hadoop102:8020/tmp/hudi_flink/t10',
  'table.type'='COPY_ON_WRITE',
  'hive_sync.enable'='true',
  'hive_sync.table'='h10',
  'hive_sync.db'='default',
  'hive_sync.mode' = 'hms',
  'hive_sync.metastore.uris' = 'thrift://hadoop102:9083'
);
然后随便插入一条数据。
insert into t10 values(1,1,1);
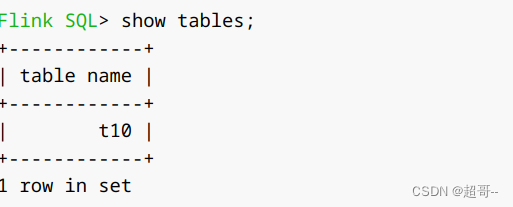
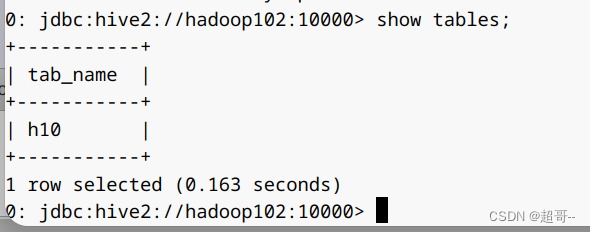
然后我们新开一个窗口,用客户端连接hive,也可以用其它可视化连接器。
bin/beeline -u jdbc:hive2://hadoop102:10000 -n atguigu
可以看到这里已经有一张表同步过来了

三、spark集成hive
1.配置模版
  option("hoodie.datasource.hive_sync.enable","true").                         //设置数据集注册并同步到hive
  option("hoodie.datasource.hive_sync.mode","hms").                         //使用hms
  option("hoodie.datasource.hive_sync.metastore.uris", "thrift://ip:9083"). //hivemetastore地址
  option("hoodie.datasource.hive_sync.username","").                          //登入hiveserver2的用户
  option("hoodie.datasource.hive_sync.password","").                      //登入hiveserver2的密码
  option("hoodie.datasource.hive_sync.database", "").                   //设置hudi与hive同步的数据库
  option("hoodie.datasource.hive_sync.table", "").                        //设置hudi与hive同步的表名
  option("hoodie.datasource.hive_sync.partition_fields", "").               //hive表同步的分区列
  option("hoodie.datasource.hive_sync.partition_extractor_class", "org.apache.hudi.hive.MultiPartKeysValueExtractor"). // 分区提取器 按/ 提取分区
2.案例实操
打开shell后输入以下内容
import org.apache.hudi.QuickstartUtils._
import scala.collection.JavaConversions._
import org.apache.spark.sql.SaveMode._
import org.apache.hudi.DataSourceReadOptions._
import org.apache.hudi.DataSourceWriteOptions._
import org.apache.hudi.config.HoodieWriteConfig._

val tableName = "hudi_trips_cow"
val basePath = "file:///tmp/hudi_trips_cow"
val dataGen = new DataGenerator

val inserts = convertToStringList(dataGen.generateInserts(10))
val df = spark.read.json(spark.sparkContext.parallelize(inserts, 2))
        .withColumn("a",split(col("partitionpath"),"\\/")(0))
        .withColumn("b",split(col("partitionpath"),"\\/")(1))
        .withColumn("c",split(col("partitionpath"),"\\/")(2))
df.write.format("hudi").
  options(getQuickstartWriteConfigs).
  option(PRECOMBINE_FIELD_OPT_KEY, "ts").
  option(RECORDKEY_FIELD_OPT_KEY, "uuid").
  option("hoodie.table.name", tableName).
  option("hoodie.datasource.hive_sync.enable","true").
  option("hoodie.datasource.hive_sync.mode","hms").
  option("hoodie.datasource.hive_sync.metastore.uris", "thrift://hadoop102:9083").
  option("hoodie.datasource.hive_sync.database", "default").
  option("hoodie.datasource.hive_sync.table", "spark_hudi").
  option("hoodie.datasource.hive_sync.partition_fields", "a,b,c").
  option("hoodie.datasource.hive_sync.partition_extractor_class", "org.apache.hudi.hive.MultiPartKeysValueExtractor").
  mode(Overwrite).
  save(basePath)
之后再次去hive查看

四、使用catalog
1.环境配置
需要的jar包。
https://repo.maven.apache.org/maven2/org/apache/flink/flink-sql-connector-hive-3.1.2_2.12/1.13.6/flink-sql-connector-hive-3.1.2_2.12-1.13.6.jar
下载之后需要修改,用压缩软件打开。

将其删除。
然后将整个jar包上传到flink的lib目录下。

2.案例实操
我们这里使用flink进行操作,由于flink是静态加载,所以我们需要从其session。
现在我们默认只有一个catalog
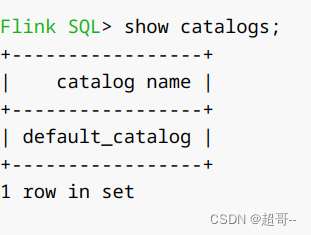
我们创建一个hive的catalog用于和hive连接。
CREATE CATALOG hive_catalog
WITH (
'type' = 'hive',
'default-database' = 'default',
'hive-conf-dir' = '/opt/module/hive/conf'
);
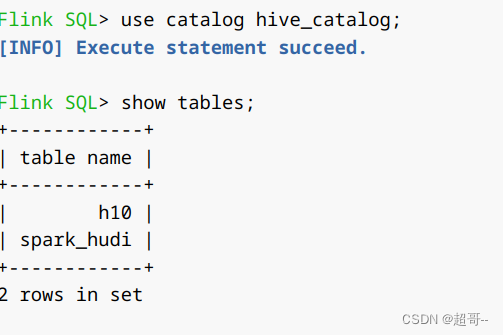
use catalog hive_catalog;

可以看到此时我们的flink已经连接到hive了,这样就不用总是切换了。
总结
hudi的内容暂时就到这里,学习的过程中觉得hudi的技术还不是很成熟,很多地方的依赖需要自己修改,所以这次就不再进行太深层次的学习了。


 3590
3590


 被折叠的 条评论
为什么被折叠?
被折叠的 条评论
为什么被折叠?
 到【灌水乐园】发言


