


前言
在实际产生环境中主要以prometheus监控为主,在使用该监控时,有个很大的问题时,需要手动修改Prometheus.yml文件,将监控指标手动添加进去,当监控指标少的时候,维护和添加都很方便,但是当一套环境中监控指标多大几百个,添加工作繁琐,这时你会想到写个shell脚本,对多个监控指标进行添加,但是你有没有考虑过此时的prometheus.yaml文件的可维护性以及当添加的监控指标越来越多时,prometheus主机的cpu、内存也随之增长,这时你该怎么处理呢?因此,本篇文章带你解决此类问题,准备好开始发车了!!!
<完整代码见资源下载 利用golang-Consul代码实现微服务的Prometheus监控目标的注册以及动态发现与配置>
一、prometheus发现方式
	prometheus主要有以下几种发现方式:
		1)static_configs: #静态服务发现
		2)file_sd_configs: #文件服务发现
		3)dns_sd_configs: DNS #服务发现
		4)kubernetes_sd_configs: #Kubernetes 服务发现
		5)consul_sd_configs: Consul #consul服务发现
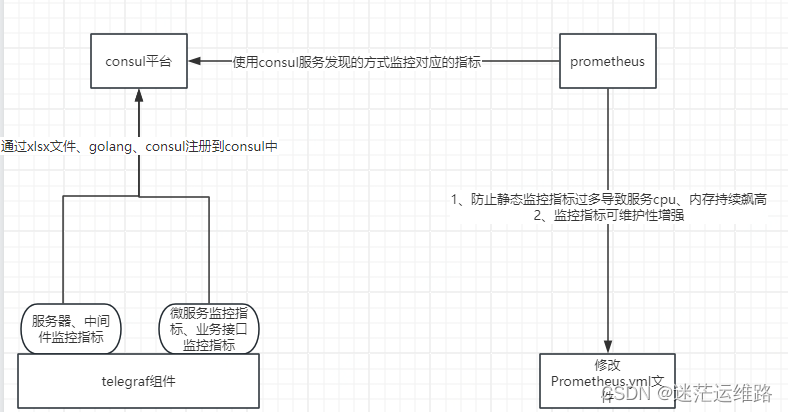
二、监控指标注册架构图
三、部分代码展示
1.核心思想
1、本代码主要是使用golang、xlsx文件、consul三大部分将整理好的监控指标(主机监控、微服务端口监控、业务接口监控、telegraf组件监控等及部分)通过golang调用consulApi注册到consul中
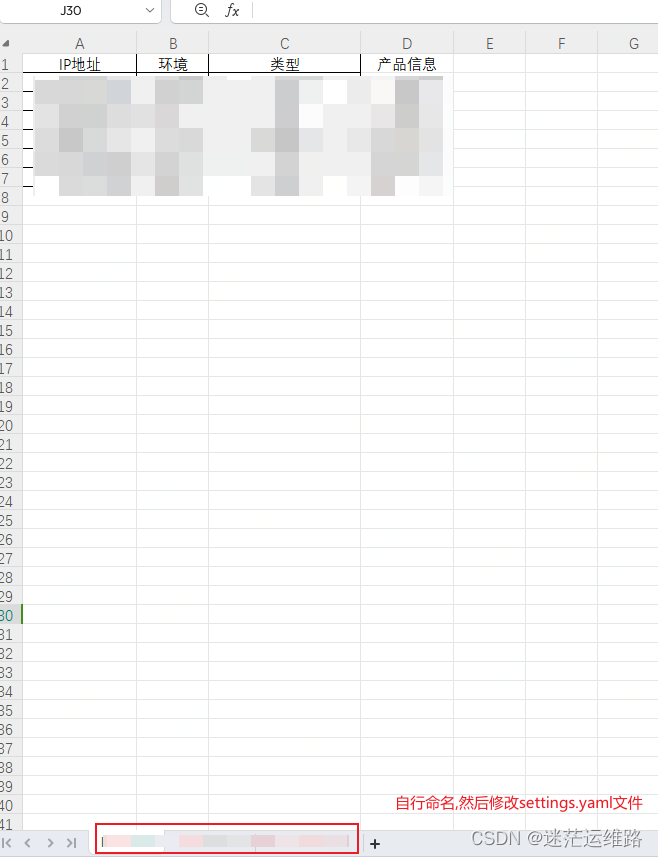
2、xlsx文件中的sheet页必须满足settings.yaml文件中的这部分
sheet_name:
- "hosts_data"
- "service_data"
- "serviceurl_data"
或者自行定义sheet页名称,同时一定要修改settings.yaml文件中的上述部分,二者必须保持一致
3、代码的主要功能就是将整理好的xlsx文件,通过`tools.ProcessExcelFiles(cmdFlags)` 函数将xlsx形式中的文件转换为以json结尾的文件,具体的转换过程看代码即可
4、注册到consul时,首先通过json反序列化操作,拿到对应的json数据值,然后对注册到consul中的五大部分(主机、主机探活、业务接口、微服务端口监控、agent组件监控)分别进行相关拼接操作
5、当拼接操作结束后,调用tools目录下的函数,并传参,实际tools目录下的函数都是调用了consulAPI进行的注册
6、makefile定义了代码的多重操作,但是执行繁琐,因此引入了launch.sh脚本,执行launch.sh xx 即可完成xlsx文件转换、注册功能等。即给Makefile文件外面包了一层launch.sh脚本,执行该脚本实际调用的是Makefile中维护的命令
7、同时,也支持删除注册到consul中的一个或多个service目录名,还支持删除一个或多个注册到的服务实例ID,详情见演示效果2.6
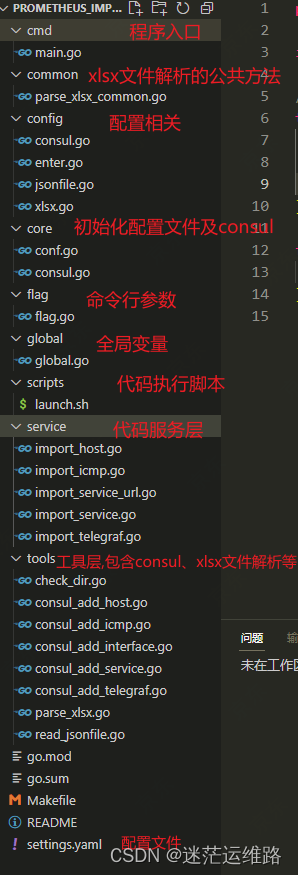
2.代码目录
采用Makefile和launch.sh脚本做到执行代码命令的统一管理
3、程序入口函数剖析
cmd/main.go文件主要是代码的执行入口处,包含配置文件的解析、命令行参数解析、consul初始化、代码的执行入口
package main

import (
	"log"
	"import_consul/core"
	myflags "import_consul/flag"
	"import_consul/global"
	"import_consul/service"
	"import_consul/tools"
)

func main() {
	// 解析命令行参数
	cmdFlags := myflags.Parse()

	//读取配置文件
	core.InitConf()

	// 初始化Consul
	if consulClient, err := core.ConsulConnect(); err != nil {
		log.Fatalf("consul connect failed: %v", err)
		return
	} else {
		// 将初始化的客户端实例赋值给global.ConsulClient,以便全局使用
		global.ConsulClient = consulClient
		log.Println("consul connect success")
	}

	//执行execl转json文件
	tools.ProcessExcelFiles(cmdFlags)

	//其余代码不在展示~~~~
}
4、settings配置文件
consul:
  ip: "xx" #conusl主机ip
  port: xx		   #consul端口
  service_name:        #consul-web界面中的service目录名
    - "Host_Status"
    - "ICMP"
    - "Telegraf"
    - "Service_TCP"
    - "Service_URL"

xlsx:
  xlsxfile_path: "/root/test.xlsx" #xlsx监控指标文件位置
  sheet_name:					   #xlsx文件中的sheet页名称
    - "hostinfo"
    - "serviceinfo"
    - "serviceurlInfo"

jsonfile: 	                      #xlsx文件转为json文件后的保存位置
  hostjson_path: "/root/jsonfile/host.json"
  servicejson_path: "/root/jsonfile/service.json"
  serviceurljson_path: "/root/jsonfile/serviceUrl.json"
5、初始化配置文件及consul
初始化settings.yaml配置文件,主要使用golang的gopkg.in/yaml.v2 标准库,指定yaml文件位置并读取yaml文件进行反序列操作
package core

import (
	"log"
	"os"
	"path/filepath"
	"import_consul/config"
	"import_consul/global"

	"gopkg.in/yaml.v2"
)

func InitConf() {
	// 直接构建配置文件的路径
	ConfigFile := filepath.Join("settings.yaml")
	c := &config.Config{}
	yamlConf, err := os.ReadFile(ConfigFile)
	if err != nil {
		log.Fatalf("get yamlconf error: %s", err)
	}
	err = yaml.Unmarshal(yamlConf, c) //yaml文件反序列化
	if err != nil {
		log.Fatalf("config init Unmarsharl: %v", err)
	}
	log.Print("config init Unmarsharl success")
	global.Config = c
}
初始化consul,主要使用github.com/hashicorp/consul/api consul的标准库,创建一个consul客户端对象
package core

import (
	"import_consul/global"

	"github.com/hashicorp/consul/api"
)

// consul 初始化
func ConsulConnect() (*api.Client, error) {
	config := api.DefaultConfig()
	config.Address = global.Config.Consul.URL()
	if client, err := api.NewClient(config); err != nil {
		return nil, err
	} else {
		return client, nil
	}
}
6、全局变量
因为文件都已分层处理,为了方便程序间调用相应的文件,因此在此处将Config、consul客户端对象进行全局处理,使用时直接global.Config.xxx 或global.CounsulClient.xxx即可
package global

import (
	"import_consul/config"

	"github.com/hashicorp/consul/api"
)

var (
	Config       *config.Config //接收读取到的config文件
	ConsulClient *api.Client    //consul客户端
)
7、配置config
主要是根据settings.yaml文件中定义的变量进行结构体配置,enter.go文件是config目录下结构体文件的总入口,与global中的全局变量Config遥相呼应
enter.go
	package config

	//配置入口初始化 采用结构体

	type Config struct {
		Consul   Consul   `yaml:"consul"`
		Xlsx     Xlsx     `yaml:"xlsx"`
		JsonFile JsonFile `yaml:"jsonfile"`
	}
consul.go
#consul结构体字段
	package config

	import "fmt"

	//连接consul的ip、端口
	type Consul struct {
		IP          string   `yaml:"ip"`
		Port        int      `yaml:"port"`
		ServiceName []string `yaml:"service_name"`
	}

	func (c *Consul) URL() string {
		return fmt.Sprintf("%s:%d", c.IP, c.Port)
	}
其余的结构体不在展示,自行按照settings.yaml编写对应的struct结构体即可
8、公共方法目录common
此目录下的parse_xlsx_common.go文件主要是针对定义的sheet页来做相关操作,使用xlsx标准库获取到对应sheet页中的行、列数,然后循环获取每个表格中的数据,调用 writeJSONToFile()方法,将获取到的数据转换为json形式的文件并保存
package common

import (
	"bufio"
	"encoding/json"
	"log"
	"os"

	"github.com/tealeg/xlsx/v3"
)

// 处理hostinfo表格
func ParseHostInfo(sheet *xlsx.Sheet, fileName string) error {
	hostDist := make(map[string][]string)
	// 从第二行开始遍历(假设第一行是标题行)
	for rowNumber := 1; rowNumber < sheet.MaxRow; rowNumber++ {
		row, _ := sheet.Row(rowNumber)
		ip := row.GetCell(0).String()
		env := row.GetCell(1).String()
		hostType := row.GetCell(2).String()
		productInfo := row.GetCell(3).String()

		hostDist[ip] = []string{env, hostType, productInfo}
	}

	// 将hostDist序列化为JSON并写入文件
	if err := writeJSONToFile(hostDist, fileName); err != nil {
		log.Fatalf("ParseHostInfo Failed to write JSON to file: %v", err)
	}
	log.Printf("ParseHostInfo Success to write JSON to file: %v", hostDist)
	return nil
	//其余代码不在展示~~~~
}
9、工具目录tools
这个目录下主要用于存放实现代码所需要的工具文件,例如:golang解析xlsx文件、读取json文件、创建目录文件、consul注册监控指标文件工具等,如下所示
golang解析xlsx文件
package tools

import (
	"fmt"
	"log"
	"sync"

	"import_consul/common"
	myflags "import_consul/flag"
	"import_consul/global"

	"github.com/tealeg/xlsx/v3"
)

//定义xlsx转json所需要的结构体
type ExcelToJson struct {
	File  *xlsx.File
	Sheet *xlsx.Sheet
}
//创建工厂函数,实例化结构体
func newExcelToJson(filePath, sheetName string) (*ExcelToJson, error) {
	file, err := xlsx.OpenFile(filePath)
	if err != nil {
		log.Fatalf("open xlsx file failed:%v\n", err)
		return nil, err
	}
	log.Printf("open xlsx file success:%s\n", filePath)
	sheet, ok := file.Sheet[sheetName]
	if !ok {
		return nil, fmt.Errorf("sheet %s not found", sheetName)
	}

	return &ExcelToJson{File: file, Sheet: sheet}, nil
}

// 调用common包中的ParseHostInfo方法 将xlsx中的hostinfo页解析并存到host.json文件中
func (e *ExcelToJson) ParseXLSXHost() error {
	if err := EnsureDir(global.Config.JsonFile.Hostjson_Path); err != nil {
		return fmt.Errorf("failed to ensure directory for host json: %w", err)
	}
	return common.ParseHostInfo(e.Sheet, global.Config.JsonFile.Hostjson_Path)
}

// 处理Execl文件的逻辑函数入口,使用协程和互斥锁,提高执行效率
var mutex sync.Mutex // 声明互斥锁
func ProcessExcelFiles(cmdFlags myflags.CmdFlags) {
	//创建匿名切片结构体并初始化
	sheetActions := []struct {
		Flag   bool
		Sheet  string
		Action func(*ExcelToJson) error
	}{
		{cmdFlags.ParseHost, global.Config.Xlsx.SheetName[0], (*ExcelToJson).ParseXLSXHost},
	}
	var wg sync.WaitGroup
	//定义保存error的管道
	errChan := make(chan error, len(sheetActions))
	for _, action := range sheetActions {
		if action.Flag {
			wg.Add(1)
			//开启协程
			go func(action struct {
				Flag   bool
				Sheet  string
				Action func(*ExcelToJson) error
			}) {
				defer wg.Done()
				e, err := newExcelToJson(global.Config.Xlsx.XlsxFile_Path, action.Sheet)
				if err != nil {
					log.Fatalf("实例化ExcelToJson结构体失败,%v\n", err)
					errChan <- err
					return
				}
				if err := action.Action(e); err != nil {
					errChan <- err
					return
				}

				// 示例:安全更新共享资源
				mutex.Lock() // 在访问共享资源前加锁
				mutex.Unlock() // 完成后解锁
			}(action)
		}
	}

	wg.Wait()
	close(errChan)
	//循环打印管道中的错误并输出
	for err := range errChan {
		if err != nil {
			log.Fatalf("Error processing sheet: %v", err)
		}
	}
}
//其余代码不在展示~~~~
此处更重要的是数据清洗转换,设置好指标注册到consul中Tag标签都展示什么,因为这关系到prometheus采集到数据后,在grafana中怎么对图形进行处理
监控指标向consul注册
package tools
import (
"log"
"import_consul/global"
"github.com/hashicorp/consul/api"
)
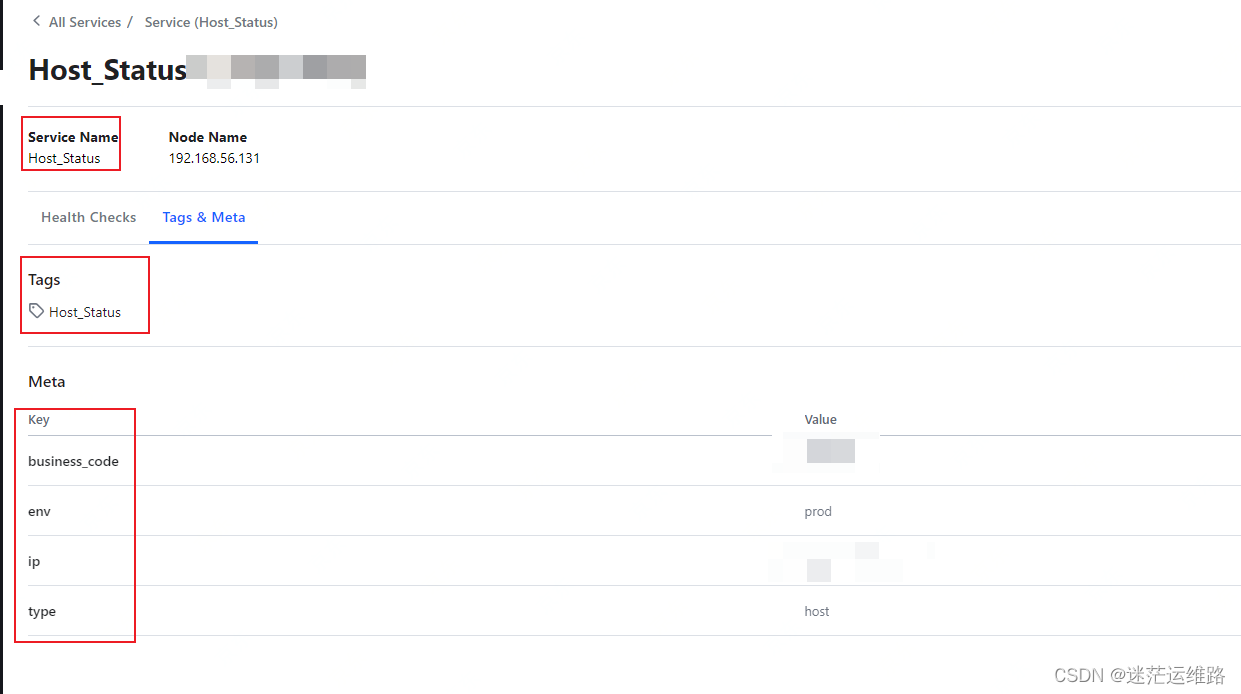
func Add_host(ip, env, HostType, businesscode string) {
// 构造服务注册的配置
registration := &api.AgentServiceRegistration{
ID: global.Config.Consul.ServiceName[0] + ip, // 唯一服务ID
Name: global.Config.Consul.ServiceName[0], // 服务名称
Address: ip,
Tags: []string{global.Config.Consul.ServiceName[0]},
Meta: map[string]string{
"ip": ip,
"env": env,
"type": HostType,
"business_code": businesscode,
},
}
// 调用Consul客户端及consul的注册服务函数Agent().ServiceRegister(registration)
if err := global.ConsulClient.Agent().ServiceRegister(registration); err != nil {
log.Fatalf("Error registering host with Consul:%v\n", err)
return
}
log.Printf("Host %s registered successfully\n", ip)
}
//其余代码不在展示~~~~
当用上述代码对注册到consul中的相关标签进行清洗转换后,就如下图所示
10、service层展示
通过自定义类型HostInfo,调用tools目录中json文件处理函数ReadJSONFile(),对json文件进行处理,处理完成后,调用tools目录下的Add_host()函数,实现监控指标的注册
package service

import (
	"log"
	"import_consul/global"
	"import_consul/tools"
)

// HostInfo 用于映射YAML文件结构
type HostInfo map[string][]string

// Host 读取并解析host.yaml,然后添加每个主机
func Host() {

	var results HostInfo
	err := tools.ReadJSONFile(global.Config.JsonFile.Hostjson_Path, &results)
	if err != nil {
		log.Fatalf("Error reading adn parsing JSON file: %s,error: %v\n", global.Config.JsonFile.Hostjson_Path, err)
	}
	log.Printf("Success reading and parsing JSON file: %s\n", global.Config.JsonFile.Hostjson_Path)

	for hostIP, info := range results {
		if len(info) >= 3 {
			tools.Add_host(hostIP, info[0], info[1], info[2])
		}
	}
}
//其余代码不在展示~~~~
11、命令行参数
因为有xlsx文件转换json文件的代码、各监控指标注册consul的代码,每次执行并不需要全部执行,因为引入命令行参数的标准库,想要执行哪些代码,直接编译程序代码,然后./xxx -parseHost=true即可执行对应的代码
package flag

import (
	"flag"
)

// CmdFlags 用于保存命令行参数
type CmdFlags struct {
	ParseHost         bool
}

// Parse 解析命令行参数
func Parse() CmdFlags {
	var cmdFlags CmdFlags

	//只有parseHost=true时才会执行
	flag.BoolVar(&cmdFlags.ParseHost, "parseHost", false, "Parse hosts from XLSX and convert to YAML")
	flag.Parse()

	return cmdFlags
}
12、Makefile示例
# 定义变量
BINARY_NAME ?= default_app_name #如果BINARY_NAME没有在命令行中指定,则使用default_app_name为默认值

GOBUILD=go build -o $(BINARY_NAME) ./cmd
GOCLEAN=go clean
GORUN=go run ./cmd/...
GOGET=go get
CMD=./$(BINARY_NAME)

# 默认目标
all: build

# 构建二进制文件
build:
	$(GOBUILD)


# 清理构建文件
clean:
	$(GOCLEAN)
	rm -f $(BINARY_NAME)

# 依赖获取,如果有外部依赖可以使用
#./...: 这是go get命令的参数,指示go get搜索当前目录(以及所有子目录)中的所有Go文件,并分析它们的导入声明
deps:
	$(GOGET) ./...

# 根据需要执行的特定服务,可以添加更多的运行目标
run-execlTohostJson:
	$(CMD) -parseHost=true


run-execToAllJson:
	$(CMD) 	-parseHost=true -parseService=true -parseServiceURL=true

run-host:
	$(CMD) -registerHost=true

//其余的不展示~~~
13、脚本示例
主要将makefile中的指令集中到脚本中,执行方便,不容易出错.前提是服务器必须提前安装好make gcc等基础命令
#!/bin/bash

# 检查是否传递了参数
if [ "$#" -lt 1 ]; then
    echo "Usage: $0 {build|clean|run|deps|run-execlTohostJson|...|run-all} [BINARY_NAME]"
    exit 1
fi

ACTION=$1
BINARY_NAME=${2:-} # 如果提供了第二个参数,使用它作为BINARY_NAME

# 获取脚本所在的目录
SCRIPT_DIR="$(cd "$(dirname "${BASH_SOURCE[0]}")" && pwd)"

# 推断 Makefile 所在的目录(假设 Makefile 在脚本目录的上一级)
MAKEFILE_DIR="$(dirname "$SCRIPT_DIR")"

# nohup.out 文件路径
NOHUP_FILE="$SCRIPT_DIR/nohup.out"

# binary_name 文件路径,用于存储和读取 BINARY_NAME
BINARY_NAME_FILE="$SCRIPT_DIR/.binary_name"

# 检查 nohup.out 文件是否存在,如果不存在则创建
if [ ! -f "$NOHUP_FILE" ]; then
    touch "$NOHUP_FILE"
fi

# 如果提供了 BINARY_NAME,则将其保存到文件中
if [ -n "$BINARY_NAME" ]; then
    echo "$BINARY_NAME" > "$BINARY_NAME_FILE"
elif [ -f "$BINARY_NAME_FILE" ]; then
    # 如果没有提供 BINARY_NAME 但文件存在,则从文件中读取
    BINARY_NAME=$(cat "$BINARY_NAME_FILE")
fi

# 根据参数执行相应的 make 命令
case "$ACTION" in
    build)
        echo "===== Starting $ACTION with BINARY_NAME=$BINARY_NAME at $(date) =====" >> "$NOHUP_FILE"
        BINARY_NAME=$BINARY_NAME make -C "$MAKEFILE_DIR" $ACTION &>> "$NOHUP_FILE"
        ;;
    clean)
        # 清理时,需要确保使用之前存储的 BINARY_NAME
        if [ -n "$BINARY_NAME" ]; then
            echo "===== Cleaning with BINARY_NAME=$BINARY_NAME at $(date) =====" >> "$NOHUP_FILE"
            BINARY_NAME=$BINARY_NAME make -C "$MAKEFILE_DIR" $ACTION &>> "$NOHUP_FILE"
            # 清理操作完成后,删除 BINARY_NAME 文件
            rm -f "$BINARY_NAME_FILE"
        else
            echo "No BINARY_NAME specified or found. Please provide a binary name or run a build first."
            exit 1
        fi
        ;;
    run|deps|run-execlTohostJson|run-registerServices|run-all)
        echo "===== Starting $ACTION with BINARY_NAME=$BINARY_NAME at $(date) =====" >> "$NOHUP_FILE"
        BINARY_NAME=$BINARY_NAME make -C "$MAKEFILE_DIR" $ACTION &>> "$NOHUP_FILE"
        ;;
    del-serviceOrId)
        echo "===== Starting $ACTION with BINARY_NAME=$BINARY_NAME at $(date) =====" >> "$NOHUP_FILE"
        $MAKEFILE_DIR/$BINARY_NAME -deregistryAllOrById=true ${@:3} &>> "$NOHUP_FILE"
        ;;
    *)
        echo "Invalid option: $ACTION"
        echo "Usage: $0 {build|clean|run|deps|run-execlTohostJson|...|run-all} [BINARY_NAME]"
        exit 1
        ;;
esac
四、演示效果
1、上传代码,并整理xlsx文件
	1、上传代码至prometheus或与pormetheus机器相同的机器
	2、机器必须已安装golang环境 go>=1.18版本
	3、整理xlsx文件,xlsx模板如下截图所示


2、脚本执行命令
上传完代码后,cd /xxx/xxx/xxx/ 目录下
2.1 创建go.mod文件并下载标准库
[root@python2 import_consul]# go mod init import_consul
[root@python2 import_consul]# go mod tidy  #下载依赖
2.2 执行构建代码为二进制程序命令
执行launch.sh脚本时必须按如下形式执行
[root@python2 root]#  chmod+ x  scripts/launch.sh
[root@python2 root]# sh scripts/launch.sh build(参数) service_register_consul(程序二进制名)
2.3 执行xlsx文件解析为json文件命令
第一种: 只解析某一个sheet页
	[root@python2 root]# sh scripts/launch.sh run-execlTohostJson(参数) service_register_consul(程序二进制名)
第二种: 解析全部sheet页
	[root@python2 root]#sh scripts/launch.sh run-execlToALLJson(参数) service_register_consul(程序二进制名)
2.4 执行获取json文件内容并注册到consul
第一种: 只注册某个监控指标
	[root@python2 root]# sh scripts/launch.sh run-host(参数) service_register_consul(程序二进制名)
第二种: 注册全部指标
	[root@python2 root]# sh scripts/launch.sh run-registerServices(参数) service_register_consul(程序二进制名)
2.5 注册验证
	1、查看scripts/nphup.out文件中命令执行是否有报错
	2、查看consul中是否已注册到指标

2.6 删除注册到consul中的一个或多个服务
可以添加一个或多个服务目录名
第一种:删除注册到consul中的某个目录
	[root@python2 prometheus_import_consul]# sh scripts/launch.sh del-serviceOrId(参数) prometheus_consul Host_Status(consul中的service目录名)


可以添加一个或多个实例ID
第二种:删除注册到consul中的某个实例ID
	[root@python2 prometheus_import_consul]# sh scripts/launch.sh del-serviceOrId(参数) prometheus_consul Host_Status10.192.10.100(service目录名下的实例ID)


2.7 扩展情况说明
如下截图所示,显示服务健康检查失败,这是因为我在指标注册到consul的代码中配置了健康检查机制checks,又因为本地开发环境与预发环境的网段不通,所有才会导致健康检查失败,并不是代码是失败的。
	指标注册到consul的代码的健康检查 部分代码示例:
	Check: &api.AgentServiceCheck{
			TTL:                            "10s", //心跳检测时间
			DeregisterCriticalServiceAfter: "5m", // 如果服务1分钟内处于critical状态,则自动注销
		},

至此,整个代码的演示也就完成了
总结
写这个代码的原因有两个,其一就是我刚开始所说的维护prometheus.yml文件的成本越来越高,且服务器资源日益不足;其二刚才最近在学习golang,也借此机会提高一下golang的基础语法知识以及标准库的使用方法。因此才有此代码的诞生.主要给大家一个思路,像代码中的consul标签处理部分也仅适用于我司,如果要想看源码.见本博客下载即可。


 2819
2819

 被折叠的 条评论
为什么被折叠?
被折叠的 条评论
为什么被折叠?
 到【灌水乐园】发言


