


1:【mybatis】在mybatis逆向工程生成类型的时候 出现 .java.1等等 说明其他数据库有一样的表名 要在 jdbcCoonection加以下的
<property name="nullCatalogMeansCurrent" value="true"/>
列如
 <jdbcConnection driverClass="com.mysql.cj.jdbc.Driver"                    connectionURL="jdbc:mysql://localhost:3306/ssm?
serverTimezone=UTC"
                        userId="root"
                        password="123456yql">
            <property name="nullCatalogMeansCurrent" value="true"/>
</jdbcConnection>
2:【mysql】数据库的表数据删除后 解决自增问题
SET @auto_id = 0;
UPDATE t_emp
SET emp_id = (@auto_id := @auto_id + 1);
ALTER TABLE t_emp
    AUTO_INCREMENT = 1;
3.【Mybatis】数据封装时数据库表字段和POJO中实体类属性命名不一致的几种解决方案
解决方案一:命名一致
我们可以把POJO中的实体类命名和数据库表中字段的命名调整一致,但是数据库表字段的命名方式并不是驼峰式命名方式,不符合Java中对于类属性的命名规则,因此不推荐使用。

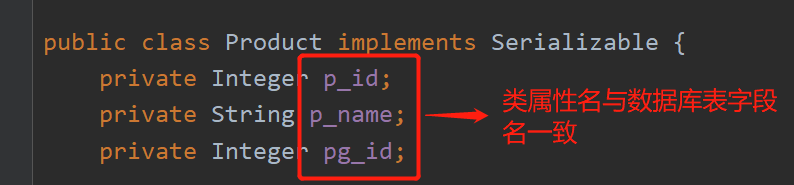
解决方案二:给表中字段取别名
我们可以通过在表对应的mapper.xml配置文件中通过标签给字段取别名的方式,使得重新命名的表字段别名与实体类中的属性名保持一致,再通过****标签引入sql代码块,这样也可以达到数据正常封装的效果。
<!--    通过<sql>标签给数据库表中字段取别名,设置id属性-->
    <sql id="columns">
        p_id as pid,
        p_name as pname,
        pg_id as pgid
    </sql>
<!--    再通过<include>标签引入sql代码块-->
<select id="queryProduct" resultType="product1">
    select <include refid="columns"/> from product where ${column} = #{value}
</select>
以下是通过在mybatis配置文件中加入中的logImpl设置为STDOUT_LOGGING是为了使日志输出mybatis生产的sql语句,这样就可以通过日志输出看到在list中拿到了正常封装的数据对象。
<settings>
    <setting name="logImpl" value="STDOUT_LOGGING"/>
</settings>
解决方案三:通过resultMap来调整字段名与属性名映射一致
我们可以通过标签来将数据库表中字段映射到对应的实体类属性上,完成数据库查询数据的封装,如果实体类的属性中存在自定义类属性,那么也可以通过resultMap进行数据的层层映射,封装到对应自定义类中的基本类型数据中。
<resultMap id="productName" type="product1">
    <id property="pid" column="p_id"/>
    <result property="pname" column="p_name"/>
    <result property="pgid" column="pg_id"/>
</resultMap>
<select id="selectProductById" parameterType="int" resultMap="productName">
    select * from product where p_id = #{id}
</select>
解决方案四:使用Mybatis特殊设置
在Mybatis核心配置文件标签内设置mapUnderscoreToCamelCase属性的值为true,那么数据库就会将表字段的分割式命名(例如:p_id)自动映射到实体类的驼峰式命名(例如:pId)上,且不区分驼峰式命名的大小写。
<settings>
    <setting name="mapUnderscoreToCamelCase" value="true"/>
</settings>
4.[Tomcat] 虚拟机配置 -Dfile.encoding=UTF-8
5.[idea] tomcat配置 On ‘Update‘ action 只有两个
IDEA 无法热加载自动更新,On ‘update’ action:选项里面没有update classes and resources这一选项
1.出现的问题

2.原因: 在Tomcat Deployment选项部署项目选择了只有War包的项目

- 解决方法:在Tomcat 的 Deployment选项部署项目选择War exploded的项目

- 重启Idea后效果

6.【boostrap】glyphicons-halflings-regular.eot 加载不出来
如果 glyphicons-halflings-regular.eot 加载不出来 就是登录界面图标没出来 看看F12 网络他的请求地址对不对,不对的去改bootstrap/css/bootstrap.css.map 搜索 Glyphicons Halflings 换成这个 (改成自己的路径)
@font-face {
  font-family: 'Glyphicons Halflings';
  src: url('../fonts/glyphicons-halflings-regular.eot');
  src: url('../fonts/glyphicons-halflings-regular.eot?#iefix') format('embedded-opentype'), url('../fonts/glyphicons-halflings-regular.woff2') format('woff2'), url('../fonts/glyphicons-halflings-regular.woff') format('woff'), url('../fonts/glyphicons-halflings-regular.ttf') format('truetype'), url('../fonts/glyphicons-halflings-regular.svg#glyphicons_halflingsregular') format('svg');
}
7.【mysql】创建存储过程 来插入数据
DELIMITER //
CREATE PROCEDURE insert_data(IN max_num INT)
BEGIN
DECLARE i INT DEFAULT 0;
SET autocommit = 0;
REPEAT
SET i = i + 1;
insert into my_table(login_acct, user_pswd, user_name, email) values (CONCAT('asd', i),CONCAT('asd', i),CONCAT('asd', i),CONCAT('asd', i));
UNTIL i = max_num
END REPEAT;
COMMIT;
END
8.[Thyemeleaf] 分页
在 Thymeleaf 中,您可以使用条件语句来根据当前页码的位置显示不同数量的分页链接。例如,如果您有一个名为 currentPage 的变量,它表示当前页码,以及一个名为 totalPages 的变量,它表示总页数,则可以这样做:
<ul>
    <li th:if="${currentPage == 1}">
        <span th:each="page : ${#numbers.sequence(1, 3)}">
            <a th:href="@{/search(page=${page})}" th:text="${page}">Page</a>
        </span>
    </li>
    <li th:if="${currentPage > 1 and currentPage < totalPages}">
        <span th:each="page : ${#numbers.sequence(currentPage - 2, currentPage + 2)}">
            <a th:href="@{/search(page=${page})}" th:text="${page}">Page</a>
        </span>
    </li>
    <li th:if="${currentPage == totalPages}">
        <span th:each="page : ${#numbers.sequence(totalPages - 2, totalPages)}">
            <a th:href="@{/search(page=${page})}" th:text="${page}">Page</a>
        </span>
    </li>
</ul>
在上面的示例中,我们使用 th:if 属性来判断当前页码的位置。如果当前页码是第一页,则我们使用 th:each="page : ${#numbers.sequence(1, 3)}" 来显示前三页的分页链接。如果当前页码在中间,则我们使用 th:each="page : ${#numbers.sequence(currentPage - 2, currentPage + 2)}" 来显示前后两页共五页的分页链接。如果当前页码是最后一页,则我们使用 th:each="page : ${#numbers.sequence(totalPages - 2, totalPages)}" 来显示最后三页的分页链接。
请注意,您需要根据您的具体需求修改上面的示例,以便指定正确的 URL 和查询参数。
9.springmvc不拦截静态资源
有几种方法可以配置Spring MVC不拦截静态资源。一种方法是在拦截器中添加静态资源的排除(涉及spring-mvc.xml)。另一种方法是使用默认的servlet来处理静态资源(涉及spring-mvc.xml和web.xml)。第三种方法是更改Spring的全局拦截设置,仅拦截以*.do结尾的请求(涉及web.xml)1。
针对这三种方案的优劣分析:第一种方案配置比较臃肿,多个拦截器时增加文件行数,不推荐使用;第二种方案使用默认的Servlet进行资源文件的访问,Spring拦截所有请求,然后再将资源文件交由默认的Sevlet进行处理,性能上少有损耗;第三种方案Spring只是处理以’.do’结尾的访问,性能上更加高效,但是再访问路径上必须都以’.do’结尾,URL不太文雅;综上所述,推荐使用第二和第三中方案1。
第一种方法是在拦截器中添加静态资源的排除(涉及spring-mvc.xml)。在spring-mvc.xml文件中,可以使用mvc:resources来设置静态资源,然后在mvc:interceptors中添加mvc:interceptor,并在其中使用mvc:exclude-mapping来排除静态资源的拦截。例如,可以使用<mvc:exclude-mapping path=“/**/*.css”/>来排除对所有CSS文件的拦截。
第二种方法是使用默认的servlet来处理静态资源(涉及spring-mvc.xml和web.xml)。在spring-mvc.xml文件中,可以使用mvc:default-servlet-handler/来启用默认的Servlet。然后,在web.xml文件中,可以添加来增加对静态资源的处理。例如,可以使用*.css来指定默认的Servlet处理所有CSS文件。
第三种方法是更改Spring的全局拦截设置,仅拦截以*.do结尾的请求(涉及web.xml)。在web.xml文件中,可以修改来更改Spring的全局拦截设置。例如,可以使用*.do来指定Spring仅拦截以.do结尾的请求。这样,Spring就只会处理以.do结尾的请求,不再维护静态资源。
10.element vue 分页
    <!-- 引入样式 -->
    <link rel="stylesheet" href="https://unpkg.com/element-ui/lib/theme-chalk/index.css">
    <!-- 引入组件库 -->
    <script src="https://unpkg.com/element-ui/lib/index.js"></script>
									<el-pagination id="app"
                                                    @size-change="handleSizeChange"
                                                    @current-change="handleCurrentChange"
                                                    :current-page="currentPage"
                                                    :page-sizes="[10, 20, 30, 40]"
                                                    :page-size="pageSize"
                                                    layout="sizes, prev, pager, next, jumper, ->, total, slot"
                                                    :total="PageMAX">
                                            </el-pagination>

<script type="module">
    new Vue({
        el: '#app',
        data() {
            return {
                searchKey: '',
                tableData: [],
                PageMAX: 0,
                currentPage: 1,
                pageSize: 10
            };
        },
        mounted() {
            this.getData();
        },
        methods: {
            async getData() {
                const response = await axios.get('/api/page', {
                    params: {
                        key: this.searchKey,
                        page: this.currentPage,
                        size: this.pageSize,
                    }
                });
                this.tableData = response.data.records;
                this.PageMAX = response.data.pages;
            },
            handleSizeChange(val) {
                this.pageSize = val;
                this.getData();
            },
            handleCurrentChange(val) {
                this.currentPage = val;
                this.getData();
            },
            handleSearch() {
                this.currentPage = 1;
                this.getData();
            }
        }
    })
</script>
11.html引入qs库,使用方法
12.axios post 传入对象
  axios.post('/user',
                    {
                        "admin": this.admin
                    },
                    {
                        headers:{
                            "Content-Type": "application/json"
                        }
                    }
@ResponseBody
//执行更新
@RequestMapping(value = "/user",method = RequestMethod.POST)
public Object updateUser(@RequestBody Map<String,Object> params){
    // System.out.println(admin);
    // TAdmin admin = (TAdmin) params.get("admin");
    String text = String.valueOf(params.get("admin"));
    Gson gson = new Gson();
    TAdmin admin = gson.fromJson(text, TAdmin.class);
    boolean update = tAdminService.updateById(admin);
    Map<String,Object> result = new HashMap<>();
    result.put("state",update);
    result.put("data",admin);
    return result;
}
13.axios.delete 不能在请求体传参 要通用方法
axios({
    method: 'delete',
    url: '/role',
    data:{
        "roles": this.multipleSelection
    }
})
@ResponseBody
@DeleteMapping ("/role")
public Object deleteRole(@RequestBody Map<String,Object> roles) {
    return "200";
}

14.如果文件导入 404 改完记得清除缓存
15.vue项目配合thymeleaf模板前端获取Controller里Model的传值 (string)
以下面代码为例
model.addAttribute("access_token", 'access_token')`
前端可以绑定到span标签(input也是可以的,由于该数据不想显示出来所以直接隐藏掉就可以了),页面使用window.document.getElementById获取数据
<span style="display: none" th:text="${access_token}" id="access_token"></span>

const access_token = window.document.getElementById('access_token').innerText
16.vue 获取model中的对象什么的
Vue:这样定义属性 一定要加上 <script th:inline=“javascript”>
<script th:inline="javascript">
    var listMenu = [[${listMenu}]];

</script>
17.vue select 穿梭
你想在两个<select>元素之间穿梭选项,你可以使用Vue的数据绑定和事件处理功能来实现。例如,你可以使用以下代码来创建两个下拉列表,并在它们之间穿梭选项:
<div class="panel-body" id="app">
                    <form role="form" class="form-inline">
                        <div class="form-group">
                            <label for="exampleInputPassword1">未分配角色列表</label><br>
                            <select v-model="selectedRoleId" class="form-control" multiple size="10"
                                    style="width:120px;overflow-y:auto;">
                                <option v-for="role in UnAssignRole" :value="role.id">{{role.name}}</option>
                            </select>
                        </div>
                        <div class="form-group">
                            <ul>
                                <li class="btn btn-default glyphicon glyphicon-chevron-right" @click="toRightBtn"></li>
                                <br>
                                <li class="btn btn-default glyphicon glyphicon-chevron-left"
                                    style="margin-top:20px;" @click="toLeftBtn"></li>
                            </ul>
                        </div>
                        <div class="form-group" style="margin-left:40px;">
                            <label for="exampleInputPassword1">已分配角色列表</label><br>
                            <select v-model="transferredRoleId" class="form-control" multiple size="10"
                                    style="width:120px;overflow-y:auto;">
                                <option v-for="role in assignRole" :value="role.id">{{role.name}}</option>
                            </select>

                        </div>
                    </form>
                </div>
data() {
  return {
    selectedRoleId: null,
    transferredRoleId: null,
    roles: [
      { id: 1, name: '角色1' },
      { id: 2, name: '角色2' },
      { id: 3, name: '角色3' }
    ],
    transferredRoles: []
  };
},
methods: {
  transfer() {  var assignRole = [[${assignRoleList}]]
    var UnAssignRole = [[${unAssignRoleList}]]
    new Vue({
        el: "#app",
        data() {
            return {
                transferredRoleId: [],
                selectedRoleId: [],
                assignRole: assignRole,
                UnAssignRole: UnAssignRole
            };

        },
        methods: {
            toRightBtn(){
                this.selectedRoleId.forEach((selectedRoleId) => {
                    const roles = this.UnAssignRole.find(role => role.id === selectedRoleId)
                    this.assignRole.push(roles);
                    this.UnAssignRole = this.UnAssignRole.filter(role => role.id !== selectedRoleId);
                    this.selectedRoleId = [];
                })
            }
        }
    })
          this.selectedRoleId.forEach((selectedRoleId) => {
                    const roles = this.UnAssignRole.find(role => role.id === selectedRoleId)
                    this.assignRole.push(roles);
                    this.UnAssignRole = this.UnAssignRole.filter(role => role.id !== selectedRoleId);
                    this.selectedRoleId = [];
                })
    }
  }
}
在上面的代码中,我们首先创建了两个<select>元素,并使用v-model指令将它们分别绑定到selectedRoleId和transferredRoleId数据属性上。然后,我们在两个下拉列表之间添加了一个按钮,用来触发穿梭操作。
当用户点击按钮时,我们会调用transfer方法来执行穿梭操作。在这个方法中,我们首先根据selectedRoleId的值来查找被选中的角色对象。如果找到了这个角色对象,我们就将它从roles数组中移除,并添加到transferredRoles数组中。最后,我们将selectedRoleId的值重置为null。
18.JavaScript删除列表元素的几种方法
①length
通过减小列表的长度length强制删除最后一个元素
var colors = ["red","blue","green"];
//1--减小length强制删除最后一个元素
colors.length -= 1;
print(1,colors);

②delete关键词
根据下标删除,改位置会被undefine替代,列表长度不变
//2--delete关键词
colors = ["red","blue","green"];
delete colors[0];
print(2,colors);
console.log(colors[0]);

③栈方法
pop()方法默认移除并返回列表最后一项
//3--栈方法
colors = ["red","blue","green"];
var item = colors.pop();
print(3,colors);
console.log(item);

④队列方法
shift()方法默认移除并返回列表的第一项
//4--队列方法
colors = ["red","blue","green"];
var item = colors.shift();
print(4,colors);
console.log(item);

⑤splice(a,b)方法
向splice()传递两个参数,第一个是开始的下标a,第二个为个数b,则会移除并返回列表第a个元素开始往后的b个元素,返回值为列表 (可以指定删除)
//5-splice()方法
colors = ["red","blue","green"];
var item = colors.splice(0,1);
print(5,colors);
console.log(item);

指定删除
               var index = this.roleIdList.indexOf(transferredRoleId) //查询下标
                    this.roleIdList.splice(index,1) //删除
⑥通过迭代判断删除
通过forEach方法,删除符合条件的元素
//6--迭代方法
colors = ["red","blue","green"];
colors.forEach(function (item,index,arr){
    if (item == "green") {
        arr.splice(index,1);
    }
});
print(6,colors);

通过filter方法,返回符合条件的元素列表
colors = ["red","blue","green"];
colors = colors.filter(function (item) {
    return item != "green";
});
print(6,colors);

⑦通过给原型Array添加方法来删除
通过给原型Array添加用于删除的方法来删除元素,好处在于可以复用
用于删除的方法可以很多,此处展示的为其中一种
//7--原型方法
Array.prototype.remove = function (index) {
    if (isNaN(index) || index > this.length) {
        return false;
    }else {
        for (i = 0, n = 0; i < this.length; i++) {
            if (this[i] != this[index]) {
                this[n++] = this[i];
            }
        }
        this.length -= 1;
    }
};
colors = ["red","blue","green"];
colors.remove(1);
print(7,colors);

19.ZTree的使用 (树状显示)
① 创建一个中间表 在 Menu 类中使用 List
public class Menu {
// 主键
private Integer id;
// 父节点的 id
private Integer pid;
// 节点名称
private String name;
// 节点附带的 URL 地址,是将来点击菜单项时要跳转的地址
private String url;
// 节点图标的样式
private String icon;
// 存储子节点的集合,初始化是为了避免空指针异常
private List<Menu> children = new ArrayList<>();
// 控制节点是否默认为打开装,设置为 true 表示默认打开
private Boolean open = true;
}
②获取root 根节点
public ResultEntity<Menu> getWholeTreeNew() {
// 1.查询全部的 Menu 对象
List<Menu> menuList = menuService.getAll();
// 2.声明一个变量用来存储找到的根节点
Menu root = null;
// 3.创建 Map 对象用来存储 id 和 Menu 对象的对应关系便于查找父节点
Map<Integer, Menu> menuMap = new HashMap<>();
// 4.遍历 menuList 填充 menuMap
for (Menu menu : menuList) {
Integer id = menu.getId();
menuMap.put(id, menu);
}
// 5.再次遍历 menuList 查找根节点、组装父子节点
for (Menu menu : menuList) {
// 6.获取当前 menu 对象的 pid 属性值
Integer pid = menu.getPid();
// 7.如果 pid 为 null,判定为根节点
if(pid == null) {
root = menu;
// 8.如果当前节点是根节点,那么肯定没有父节点,不必继续执行
continue ;
}
// 9.如果 pid 不为 null,说明当前节点有父节点,那么可以根据 pid 到 menuMap 中
查找对应的 Menu 对象
Menu father = menuMap.get(pid);
// 10.将当前节点存入父节点的 children 集合
father.getChildren().add(menu);
}
// 11.经过上面的运算,根节点包含了整个树形结构,返回根节点就是返回整个树
return ResultEntity.successWithData(root);
}
③引入 zTree 环境
<link rel="stylesheet" href="ztree/zTreeStyle.css"/>
<script type="text/javascript" src="ztree/jquery.ztree.all-3.5.min.js"></script>

         <div class="panel-body">
                    <ul id="treeDemo" class="ztree"></ul>
         </div>
④显示树状
//获取数据
function getTree() {
    $.ajax({
        url: "/menu/tree",
        type: "get",
        dataType: "json",
        success: function (response) {
            var result = response.result;
            if (result === "SUCCESS") {

                var zNodes = response.data;
                $.fn.zTree.init($("#treeDemo"), setting, zNodes);
            }
            if (result === "FAILED") {
                layer.msg(response.message);
            }
        }
    })
}
20.docker mysql 连接不上
docker 中安装MySQL :
docker pull mysql

docker run --name mysql -p 3306:3306 -e MYSQL_ROOT_PASSWORD=123456 -d mysql
在docker中安装了mysql后,用SQLyog去连接的时候出现如下错误。

解决方法:
1、查看我们想要连接的mysql是否启动
#查看在运行的容器
docker ps -s
2、进入容器
docker exec -it 容器号或名 /bin/bash

docker exec -it b30062adc08c /bin/bash
docker exec -it mysql /bin/bash
3、进入mysql
mysql -uroot -p

#输入密码(跟之前在windows上运行mysql是一样的)
4、查看MySQL的信息
select host,user,plugin,authentication_string from mysql.user;

备注:host为 % 表示不限制ip localhost表示本机使用 plugin非mysql_native_password 则需要修改密码
6、修改密码
mysql> use mysql;
mysql> alter user 'root'@'%' identified with mysql_native_password by '123456';
mysql> flush privileges;
mysql> select host,user,plugin,authentication_string from mysql.user;

再次用navicat远程连接mysql就成功了
21.升级Spring Cloud Alibaba 2021.1,Spring Boot 2.7.10碰到的一系列兼容性问题及解决方案
1.bootstrap.yml不生效
发现读取不到Nacos配置中心的配置,后续发现控制台也不显示Nacos相关信息
原因
从Spring Boot 2.4版本开始,配置文件加载方式进行了重构。
<!-- 引入bootstrap -->
<dependency>
    <groupId>org.springframework.cloud</groupId>
    <artifactId>spring-cloud-starter-bootstrap</artifactId>
</dependency>
2.通过spring gateway访问其他服务503 service unavailable
原因
Spring Cloud 2020.0.0版本之前会自动引入Netflix Ribbon依赖,Netflix Ribbon功能跟loadbalancer一样,因Netflix公司停止维护Ribbon后, 在Spring Cloud 2020.0.0版本之后Spring使用loadbalancer替代了Ribbon, 但是loadbalancer依赖需要手动引入。
解决方案
# 引入loadbalancer

<dependency>
    <groupId>org.springframework.cloud</groupId>
    <artifactId>spring-cloud-loadbalancer</artifactId>
</dependency>
后续问题
增加loadbalancer后启动提示:Spring Cloud LoadBalancer is currently working with the default cache. You can switch to using Caffeine cache, by adding it and org.springframework.cache.caffeine.CaffeineCacheManager to the classpath
解决方案是引入caffeine,或者关闭cache
<dependency>
    <groupId>com.github.ben-manes.caffeine</groupId>
    <artifactId>caffeine</artifactId>
    <version>3.1.0</version>
</dependency>
访问其他服务时提示:LoadBalancerCacheManager not available, returning delegate without caching
<dependency>
  <groupId>org.springframework</groupId>
  <artifactId>spring-context-support</artifactId>
  <version>5.2.21.RELEASE</version>
</dependency>
tId>spring-cloud-loadbalancer
### 后续问题

增加loadbalancer后启动提示:Spring Cloud LoadBalancer is currently working with the default cache. You can switch to using Caffeine cache, by adding it and org.springframework.cache.caffeine.CaffeineCacheManager to the classpath

解决方案是引入caffeine,或者关闭cache

```xml
<dependency>
    <groupId>com.github.ben-manes.caffeine</groupId>
    <artifactId>caffeine</artifactId>
    <version>3.1.0</version>
</dependency>
访问其他服务时提示:LoadBalancerCacheManager not available, returning delegate without caching
<dependency>
  <groupId>org.springframework</groupId>
  <artifactId>spring-context-support</artifactId>
  <version>5.2.21.RELEASE</version>
</dependency>
22.vue-cli 初始化失败
Failed to download repo vuejs-templates/webpacke: Response code 404 (Not Found)
执行下面三个命令来检查环境:
node -v(小写v) ;如果没有显示node版本,先去官网下载安装node
vue -V(大写V) ;如果没有显示vue版本,npm i vue-cli -g安装
webpack -v(小写v); 如果需要重新安装,就用 npm install webpack -g 和 npm i -g webpack-cli
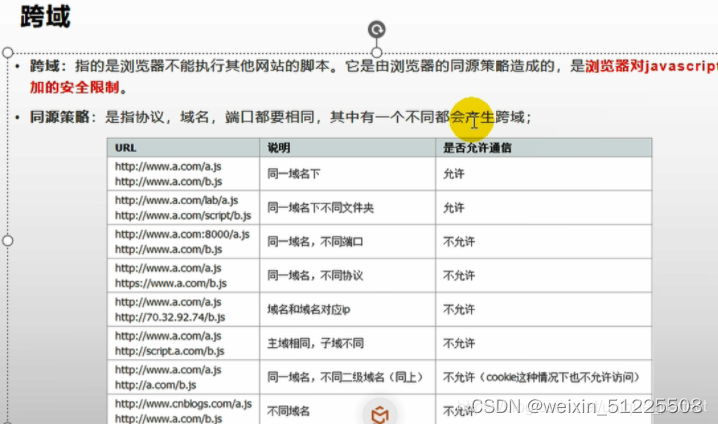
23 .跨域 从8001访问88,引发CORS跨域请求,浏览器会拒绝跨域请求
跨域
问题描述:已拦截跨源请求:同源策略禁止读取位于 http://localhost:88/api/sys/login 的远程资源。(原因:CORS 头缺少 ‘Access-Control-Allow-Origin’)。
问题分析:这是一种跨域问题。访问的域名和端口和原来的请求不同,请求就会被限制
跨域:指的是浏览器不能执行其他网站的脚本。它是由浏览器的同源策略造成的,是浏览器对js施加的安全限制。(ajax可以)
同源策略:是指协议,域名,端囗都要相同,其中有一个不同都会产生跨域;
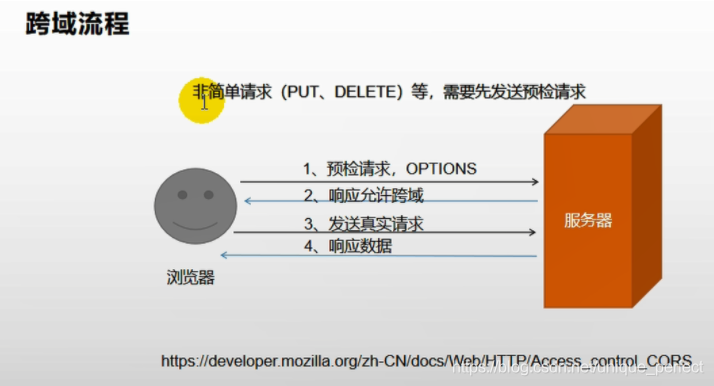
跨域流程: 这个跨域请求的实现是通过预检请求实现的,先发送一个OPSTIONS探路,收到响应允许跨域后再发送真实请求
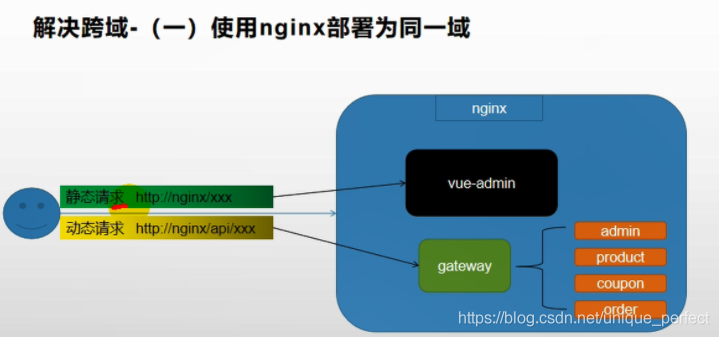
前面跨域的解决方案: 方法1:设置nginx包含admin和gateway 方法2:让服务器告诉预检请求能跨域
![[外链图片转存中...(img-IPF73Ejp-1682435503330)]](https://img-blog.csdnimg.cn/4bdd5ddde37f4c1ebd7ca45407d94c3b.png)
解决方法:在网关中定义“GulimallCorsConfiguration”类,该类用来做过滤,允许所有的请求跨域。
@Configuration // gateway
public class GulimallCorsConfiguration {

    @Bean // 添加过滤器
    public CorsWebFilter corsWebFilter(){
        // 基于url跨域,选择reactive包下的
        UrlBasedCorsConfigurationSource source=new UrlBasedCorsConfigurationSource();
        // 跨域配置信息
        CorsConfiguration corsConfiguration = new CorsConfiguration();
        // 允许跨域的头
        corsConfiguration.addAllowedHeader("*");
        // 允许跨域的请求方式
        corsConfiguration.addAllowedMethod("*");
        // 允许跨域的请求来源
        corsConfiguration.addAllowedOrigin("*");
        // 是否允许携带cookie跨域
        corsConfiguration.setAllowCredentials(true);

       // 任意url都要进行跨域配置
        source.registerCorsConfiguration("/**",corsConfiguration);
        return new CorsWebFilter(source);
    }
}
24.【跨域问题】When allowCredentials is true, allowedOrigins cannot contain the special value “*“ since that
在springboot中配置跨域时,出现When allowCredentials is true, allowedOrigins cannot contain the special value “*” since that cannot be set on the “Access-Control-Allow-Origin” response header. To allow credentials to a set of origins, list them explicitly or consider using “allowedOriginPatterns” instead.
浏览器显示500服务器报错
需要将配置类中的corsConfiguration.addAllowedOrigin(“”);修改成为corsConfiguration.addAllowedOriginPattern(“”);
修改前的代码:
@Bean
    public CorsWebFilter corsWebFilter() {
        UrlBasedCorsConfigurationSource source = new UrlBasedCorsConfigurationSource();
        // 配置跨域
        CorsConfiguration corsConfiguration = new CorsConfiguration();
        // 允许哪个请求头
        corsConfiguration.addAllowedHeader("*");
        // 允许哪个方法进行跨域
        corsConfiguration.addAllowedMethod("*");
        // 允许哪个请求来源进行跨域
       	corsConfiguration.addAllowedOrigin("*");
        // 是否允许携带cookie进行跨域
        corsConfiguration.setAllowCredentials(true);

        source.registerCorsConfiguration("/**",corsConfiguration);
        return new CorsWebFilter(source);
    }
修改后:
 @Bean
    public CorsWebFilter corsWebFilter() {
        UrlBasedCorsConfigurationSource source = new UrlBasedCorsConfigurationSource();
        // 配置跨域
        CorsConfiguration corsConfiguration = new CorsConfiguration();
        // 允许哪个请求头
        corsConfiguration.addAllowedHeader("*");
        // 允许哪个方法进行跨域
        corsConfiguration.addAllowedMethod("*");
        // 允许哪个请求来源进行跨域
        // corsConfiguration.addAllowedOrigin("*");
        corsConfiguration.addAllowedOriginPattern("*");
        // 是否允许携带cookie进行跨域
        corsConfiguration.setAllowCredentials(true);

        source.registerCorsConfiguration("/**",corsConfiguration);
        return new CorsWebFilter(source);
    }
25.gateway Unable to find RoutePredicateFactory with name path(报错解决)
path中的p没有大写Path
![[外链图片转存失败,源站可能有防盗链机制,建议将图片保存下来直接上传(img-anACxwC0-1682435397219)(A:\study\学习笔记\问题解决.assets\c9de3885eda741979d3dde0e8d3d1297.png)]](https://img-blog.csdnimg.cn/4208638b71cc4b809c8ba86d43d05fe1.png)
- Path=/user/**,还有‘=’ 中间不能有空格
26.vue设置axios请求接口基址和代理接口地址
适用于vue-cli3以上版本搭建的项目
一、接口基址(单个接口地址)
如果你的项目只有一个服务器访问地址(接口地址),不调用别的接口地址的话可以直接在src下的main.js中设置axios的默认基址
//main.js中
import axios from 'axios'
Vue.prototype.$axios = axios
axios.defaults.baseURL='http://localhost:3000';//设置基址
例子如下
//example.vue
<template>
  <div></div>
</template>

<script>
export default {
  name: 'example',
  data(){
    return{
    }
  },
  mounted(){
   this.login()
  },
  methods:{
    //登录接口
    login(){
      this.$axios.post('/login',{
          id:111,
          psw:'1111111'
      }).then(res=>{
        console.log(res)
      })

    }
  }
}
</script>
二、代理接口地址
如果你的项目需要访问多个地址,即调用多个不同的接口来进行数据的交互,这个时候应该设置代理地址
在项目根目录下新建一个vue.config.js文件

//vue.config.js
module.exports = {
   devServer: {
    host: 'localhost',
    port: 8080,//本地运行的端口
    open: true, //配置自动启动浏览器
    hotOnly:false,
    //接口代理
      proxy: {
        '/news': {
          target: 'http://v.juhe.cn/toutiao',//设置要代理访问的接口---这是头条的接口
          changeOrigin: true,
          pathRewrite: {
            '^/news': ''//重写访问地址,在请求时可以省略target的地址,直接以/news开头
          }
        },
        '/api': {
          target: 'http://localhost:3000',//设置要代理访问的接口----这是我自己的接口
          changeOrigin: true,
          pathRewrite: {
            '^/api': ''  //重写访问地址,在请求时可以省略target的地址,直接以/api开头
          }
        }
      }
   },
例子如下
//example.vue
<template>
  <div></div>
</template>

<script>
export default {
  name: 'example',
  data(){
    return{
    }
  },
  mounted(){
   this.login()
   this.getnews();
  },
  methods:{
    getnews(){
      //获取头条信息
      this.$axios.get('/news/index',{params:{
        key:'d2f47f5d5981c66091cfa284cecfd781',
        type:'头条'
      }}).then(res=>{
        console.log(res)
      })
    },
    //登录接口
    login(){
      this.$axios.post('/api/login',{
          id:111,
          psw:'111111'
      }).then(res=>{
        console.log(res)
      })

    }
  }
}
</script>
27.axios 发送 错误JSON parse error: Cannot deserialize value of type Interage
原因是
public Result delete(@RequestBody Long[] ids){
        //效验数据
        AssertUtils.isArrayEmpty(ids, "id");

        categoryService.deleteMenuById(Arrays.asList(ids));

        return new Result();
    }
用List[] 接收
之前axios 是 data:{} 带了key 所以接收不到
  data: {
    firstName: 'Fred'
  },

  // 发送请求体数据的可选语法
  // 请求方式 post
  // 只有 value 会被发送,key 则不会
  data: 'Country=Brasil&City=Belo Horizonte',
28.element中switch v-model绑定的值为数字类型情形
在用到el-switch组件时,需要绑定数据为number类型,但总也绑不成功
element官方文档上说:设置该组件的active-value和inactive-value属性,可接受Boolean, String或Number类型的值。
找的解决办法:
1,使用number将绑定的v-model改为number类型
<el-switch
        active-value=1
        inactive-value=0
        v-model.number=scope.row.locked>
</el-switch>
这样没用,连switch按钮都绑定不上去
2、后来发现,当value为Number类型的时候active-value和inactive-value前边必须加:单项绑定一下才可以。
而active-value和inactive-value等号后边的值得引号是可有可无的。
<el-switch
      :active-value=1
      :inactive-value=0
      v-model="scope.row.locked">
</el-switch>
Vue中的数据绑定
绑定数据有三种方式:
- 插值,也就是{{name}}的形式,以文本的形式和实例data中对应的属性进行绑定
- v-bind
- v-model
v-bind
eg:v-bind:class 可简写为 :class
当加上v-bind:之后,它的值classe不是字符串,而是vue实例对应的data.classed的这个变量。也就是说data.classed是什么值,它就会给class属性传递什么值,当data.classed发生变化的时候,class属性也发生变化,这非常适合用在通过css来实现动画效果的场合。他只是单向变动
v-bind支持的类型
html中的属性、css的样式、对象、数组、number 类型、bool类型
v-bind使用:
// 绑定文本
<p v-bind="message"></p>

// 绑定属性
<p v-bind:src="http://...."></p>
<p v-bind:class="http://...."></p>
<p v-bind:style="http://...."></p>

// 绑定表达式
:class{className:true}
v-model
主要是用在表单元素中,它实现了双向绑定。在同事使用v-bind和v-model中,v-model建立的双向绑定对输入型元素input, textarea, select等具有优先权,会强制实行双向绑定。很多时候v-model使用在表单的中实现双向绑定。
<input v-model="something">
29.nacos 新获取配置
        extension-configs:
          - data-id: datasource.yaml
            group: dev
            refresh: true
30.springboot 整合cos
开通腾讯云COS
创建存储桶

请求域名可做拼接文件访问URL使用
然后下一步即可

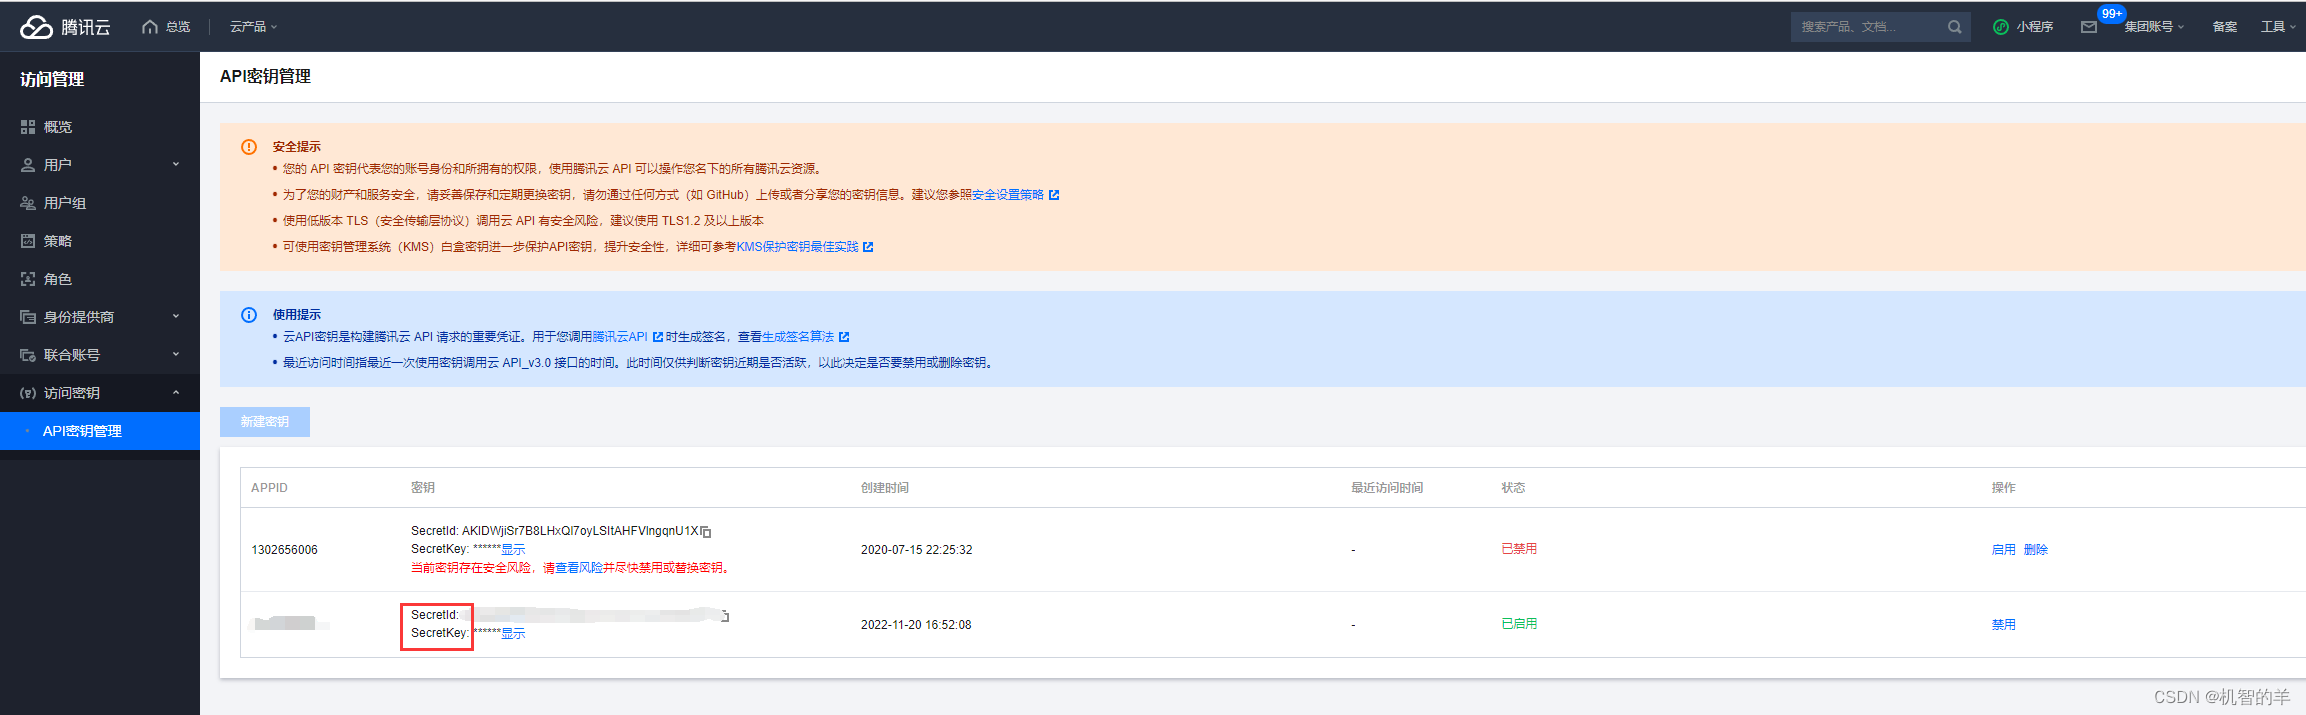
上传文件时需要以上红框参数
导入依赖
<dependency>
       <groupId>com.qcloud</groupId>
       <artifactId>cos_api</artifactId>
       <version>5.6.89</version>
</dependency>
配置文件yml
tencent:
  cos:
    file:
      keyId: keyId
      keySecret: keySecret
      bucketName: ed-1302656006
      regionId: ap-guangzhou
      cosHost: https://{请求域名} #例:https://ed-1302656006.cos.ap-guangzhou.myqcloud.com
配置类
@Component
@ConfigurationProperties(prefix = "tencent.cos.file")
@Data
public class CosConfig {

    private String keyId;
    private String keySecret;
    private String bucketName;
    private String regionId;
    private String cosHost;
}
Controller
实际需分层(service/impl),这里仅为记录
@PutMapping()
public String uploadCosFile(@RequestPart("file") MultipartFile multipartFile) {
    COSClient cosClient = initCosClient();
    // spring直接使用File接收文件传参,会有问题(No primary or single unique constructor found for class java.io.File)不知道具体原因,之后再看。
    // 腾讯云上传方法参数需要File,做一个转换操作
    File file = MultipartFileToFile(multipartFile);
    PutObjectRequest putObjectRequest = new PutObjectRequest(cosConfig.getBucketName(), key, file);
    //对象键(Key)是对象在存储桶中的唯一标识。例如,在对象的访问域名 examplebucket-1250000000.cos.ap-guangzhou.myqcloud.com/images/picture.jpg 中,对象键(key)为 images/picture.jpg
    //如果images文件夹不存在则创建
    cosClient.putObject(putObjectRequest);
    client.shutdown();  // 关闭cos客户端
    //ResponseParam为自定义返回json格式
    return cosConfig.getCosHost() + "/" + key;
}
/**
* 获取腾讯云COS客户端
* @return COSClient
*/
private COSClient initCosClient() {
    COSCredentials cred = new BasicCOSCredentials(cosConfig.getKeyId(), cosConfig.getKeySecret());
    Region region = new Region(cosConfig.getRegionId());
    ClientConfig clientConfig = new ClientConfig(region);
    clientConfig.setHttpProtocol(HttpProtocol.https);
    return new COSClient(cred, clientConfig);
}
/**
* 接口只能接受MultipartFile, 腾讯云需要File
* 故 MultipartFile => File
* @param multiFile 上传文件
* @return file
*/
public static File MultipartFileToFile(MultipartFile multiFile) {
    // 获取文件名
    String fileName = multiFile.getOriginalFilename();
    // 获取文件后缀
    String suffix = fileName.substring(fileName.lastIndexOf("."));
    try {
         // 防止生成的临时文件重复,文件名随机码, UUID
        File file = File.createTempFile(UUID.randomUUID().toString().replaceAll("-", ""), suffix);
        multiFile.transferTo(file);
        return file;
    } catch (Exception e) {
        e.printStackTrace();
        throw new 自定义异常(code, "MultipartFileToFile 文件转换异常");
    }
}
转载 https://blog.csdn.net/Memory_y/article/details/127955778?spm=1001.2101.3001.6650.3&utm_medium=distribute.pc_relevant.none-task-blog-2%7Edefault%7ECTRLIST%7ERate-3-127955778-blog-121015175.235%5Ev32%5Epc_relevant_default_base3&depth_1-utm_source=distribute.pc_relevant.none-task-blog-2%7Edefault%7ECTRLIST%7ERate-3-127955778-blog-121015175.235%5Ev32%5Epc_relevant_default_base3&utm_relevant_index=6
32.OSS上传
后端
在“ gulimall-third-party”命名空间中,创建“ gulimall-third-party.yml”文件
spring:
  cloud:
    alicloud:
      access-key:
      secret-key:
      oss:
        endpoint:
        bucker:
@Data
@Component
@ConfigurationProperties(prefix = "oss.yaml")
@RefreshScope
public class OssConfig {
    @Value("${spring.cloud.alicloud.oss.endpoint}")
    String endpoint;

    @Value("${spring.cloud.alicloud.oss.bucket}")
    String bucket;

    @Value("${spring.cloud.alicloud.access-key}")
    String accessId;
    @Value("${spring.cloud.alicloud.secret-key}")
    String accessKey;
}
@Service
public class OssServiceImpl implements OssService {
    @Resource
    OssConfig ossConfig;
    @Resource
    OSSClient ossClient;
    //获取签名
    @Override
    public Map<String, String> getPolicy() {
        String host = "https://" + ossConfig.getBucket() + "." + ossConfig.getEndpoint(); // host的格式为 bucketname.endpoint

        String format = new SimpleDateFormat("yyyy-MM-dd").format(new Date());
        String dir = "product/"+format; // 用户上传文件时指定的前缀。

        Map<String, String> respMap = null;
        try {
            long expireTime = 30;
            long expireEndTime = System.currentTimeMillis() + expireTime * 1000;
            Date expiration = new Date(expireEndTime);
            PolicyConditions policyConds = new PolicyConditions();
            policyConds.addConditionItem(PolicyConditions.COND_CONTENT_LENGTH_RANGE, 0, 1048576000);
            policyConds.addConditionItem(MatchMode.StartWith, PolicyConditions.COND_KEY, dir);

            String postPolicy = ossClient.generatePostPolicy(expiration, policyConds);
            byte[] binaryData = postPolicy.getBytes("utf-8");
            String encodedPolicy = BinaryUtil.toBase64String(binaryData);
            String postSignature = ossClient.calculatePostSignature(postPolicy);

            respMap = new LinkedHashMap<String, String>();
            respMap.put("accessid", ossConfig.getAccessId());
            respMap.put("policy", encodedPolicy);
            respMap.put("signature", postSignature);
            respMap.put("dir", dir);
            respMap.put("host", host);
            respMap.put("expire", String.valueOf(expireEndTime / 1000));

        } catch (Exception e) {
            // Assert.fail(e.getMessage());
            System.out.println(e.getMessage());
        } finally {
            ossClient.shutdown();
        }
        return respMap;
    }
}
 @Autowired
    OssService ossService;
    @GetMapping("/policy")
    public Map<String,String> getPolicy(){
        return ossService.getPolicy();
    }
前端上传
<template>
  <div>
    <el-upload
      action="#"
      :data="dataObj"
      list-type="picture"
      :multiple="false"
      :show-file-list="showFileList"
      :file-list="fileList"
      :before-upload="beforeUpload"
      :on-remove="handleRemove"
      :on-success="handleUploadSuccess"
      :on-preview="handlePreview"
    >
      <el-button size="small" type="primary">点击上传</el-button>
      <div slot="tip" class="el-upload__tip">
        只能上传jpg/png文件,且不超过10MB
      </div>
    </el-upload>
    <el-dialog :visible.sync="dialogVisible">
      <img width="100%" :src="fileList[0].url" alt="" />
    </el-dialog>
  </div>
</template>
<script>
import { policy } from './policy'
import { getUUID } from '@/utils'

export default {
  name: 'singleUpload',
  props: {
    value: String,
  },
  computed: {
    imageUrl() {
      return this.value
    },
    imageName() {
      if (this.value != null && this.value !== '') {
        return this.value.substr(this.value.lastIndexOf('/') + 1)
      } else {
        return null
      }
    },
    fileList() {
      return [
        {
          name: this.imageName,
          url: this.imageUrl,
        },
      ]
    },
    showFileList: {
      get: function() {
        return (
          this.value !== null && this.value !== '' && this.value !== undefined
        )
      },
      set: function(newValue) {},
    },
  },
  data() {
    return {
      dataObj: {
        policy: '',
        signature: '',
        key: '',
        ossaccessKeyId: '',
        dir: '',
        host: '',
        // callback:'',
      },
      dialogVisible: false,
    }
  },
  methods: {
    emitInput(val) {
      this.$emit('input', val)
    },
    handleRemove(file, fileList) {
      this.emitInput('')
    },
    handlePreview(file) {
      this.dialogVisible = true
    },
    //上传前操作获取签名
    beforeUpload(file) {
      let _self = this
      return new Promise((resolve, reject) => {
        this.$axios({
          url: '/thirdparty/oss/policy',
          method: 'get',
        })
          .then((response) => {
            _self.dataObj.policy = response.data.policy
            _self.dataObj.signature = response.data.signature
            _self.dataObj.ossaccessKeyId = response.data.accessid
            _self.dataObj.key =
              response.data.dir + '/' + getUUID() + '_${filename}'
            _self.dataObj.dir = response.data.dir
            _self.dataObj.host = response.data.host
            resolve(true)
          })
          .catch((err) => {
            reject(false)
          })
      })
    },
    handleUploadSuccess(res, file) {
      console.log('上传成功...')
      this.showFileList = true
      this.fileList.pop()
      this.fileList.push({
        name: file.name,
        url:
          this.dataObj.host +
          '/' +
          this.dataObj.key.replace('${filename}', file.name),
      })
      this.emitInput(this.fileList[0].url)
    },
  },
}
</script>
<style></style>
33.JSR303
问题引入:填写form时应该有前端校验,后端也应该有校验
前端
前端的校验是element-ui表单验证
Form 组件提供了表单验证的功能,只需要通过 rules 属性传入约定的验证规则,并将 Form-Item 的 prop 属性设置为需校验的字段名即可。
后端
@NotNull等
步骤1:使用校验注解
在Java中提供了一系列的校验方式,它这些校验方式在“javax.validation.constraints”包中,提供了如@Email,@NotNull等注解。
<!--jsr3参数校验器-->
<dependency>
    <groupId>org.springframework.boot</groupId>
    <artifactId>spring-boot-starter-validation</artifactId>
</dependency>
里面依赖了hibernate-validator
在非空处理方式上提供了@NotNull,@NotBlank和@NotEmpty
1 @NotNull
The annotated element must not be null. Accepts any type.
注解元素禁止为null,能够接收任何类型
2 @NotEmpty
the annotated element must not be null nor empty.
该注解修饰的字段不能为null或""
Supported types are:
支持以下几种类型
CharSequence (length of character sequence is evaluated)字符序列(字符序列长度的计算)
Collection (collection size is evaluated)
集合长度的计算
Map (map size is evaluated)
map长度的计算
Array (array length is evaluated)
数组长度的计算
3 @NotBlank
The annotated element must not be null and must contain at least one non-whitespace character. Accepts CharSequence.
该注解不能为null,并且至少包含一个非空格字符。接收字符序列。
@Valid
步骤2:controller中加校验注解@Valid,开启校验,
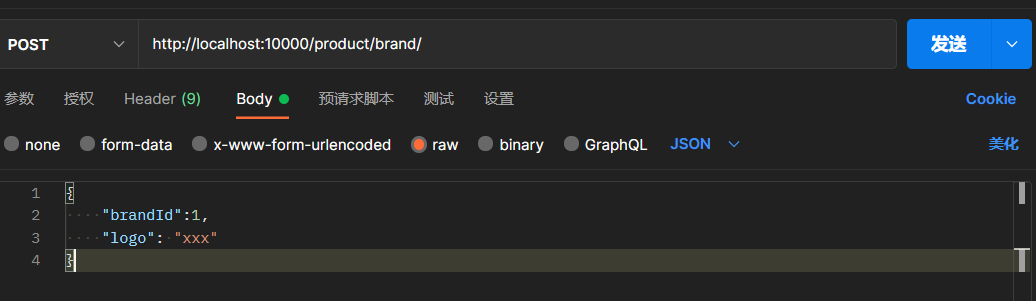
@RequestMapping("/save")
public R save(@Valid @RequestBody BrandEntity brand){
brandService.save(brand);
return R.ok();
}
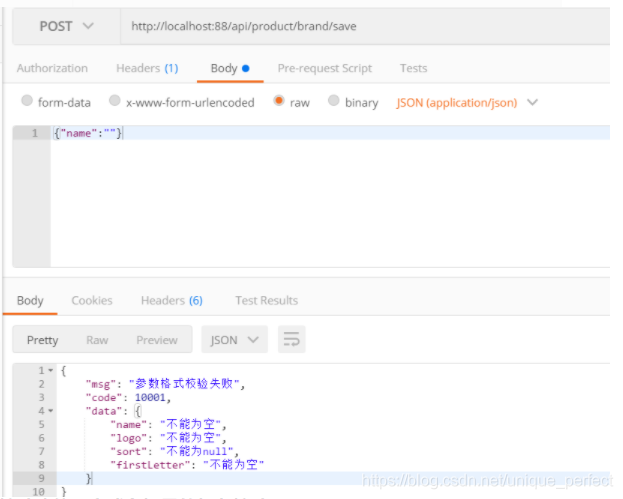
测试: http://localhost:88/api/product/brand/save
![[外链图片转存失败,源站可能有防盗链机制,建议将图片保存下来直接上传(img-qaGnf67J-1683015652991)(null)]](https://img-blog.csdnimg.cn/04dc1609be224306a282d0b1ebd4a4df.png)
validator”的“\org\hibernate\validator\ValidationMessages_zh_CN.properties”文件中。在该文件中定义了很多的错误规则:
javax.validation.constraints.AssertFalse.message = 只能为false
javax.validation.constraints.AssertTrue.message = 只能为true
想要自定义错误消息,可以覆盖默认的错误提示信息,如@NotBlank的默认message是
public @interface NotBlank {
String message() default "{javax.validation.constraints.NotBlank.message}";
}
可以在添加注解的时候,修改message:
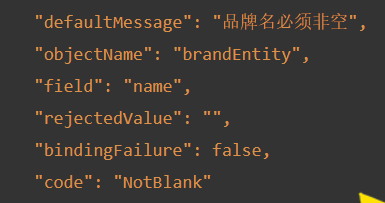
@NotBlank(message = "品牌名必须非空")
private String name;
但是这种返回的错误结果并不符合我们的业务需要。
BindResult
步骤3:给校验的Bean后,紧跟一个BindResult,就可以获取到校验的结果。拿到校验的结果,就可以自定义的封装。
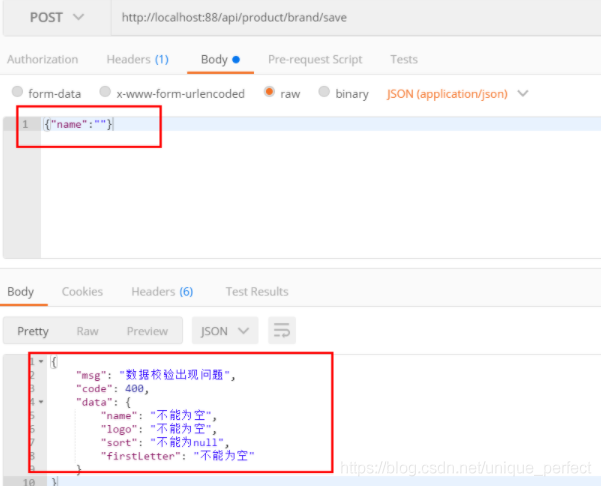
@RequestMapping("/save")
public R save(@Valid @RequestBody BrandEntity brand, BindingResult result){
    if( result.hasErrors()){
       Map<String,String> map=new HashMap<>();                //1.获取错误的校验结果
        result.getFieldErrors().forEach((item)->{
        //获取发生错误时的message
        String message = item.getDefaultMessage();              //获取发生错误的字段
        String field = item.getField();            				map.put(field,message);
    });
    return R.error(400,"提交的数据不法").put("data",map);
}else {

}
brandService.save(brand);
return R.ok();}
这种是针对于该请求设置了一个内容校验,如果针对于每个请求都单独进行配置,显然不是太合适,实际上可以统一的对于异常进行处理。
统一异常处理@ControllerAdvice
步骤4:统一异常处理
可以使用SpringMvc所提供的@ControllerAdvice,通过“basePackages”能够说明处理哪些路径下的异常。
1 抽取一个异常处理类
@Slf4j
    @RestControllerAdvice(basePackages = "com.atguigu.gulimall.product.controller")
    public class GulimallExceptionControllerAdvice {

        @ExceptionHandler(value = Exception.class) // 也可以返回ModelAndView
        public R handleValidException(MethodArgumentNotValidException exception) {

            Map<String, String> map = new HashMap<>();
            // 获取数据校验的错误结果
            BindingResult bindingResult = exception.getBindingResult();
            bindingResult.getFieldErrors().forEach(fieldError -> {
                String message = fieldError.getDefaultMessage();
                String field = fieldError.getField();
                map.put(field, message);
            });

            log.error("数据校验出现问题{},异常类型{}", exception.getMessage(), exception.getClass());

            return R.error(400, "数据校验出现问题").put("data", map);
        }
    }
2 测试: http://localhost:88/api/product/brand/save
3 默认异常处理
   @ExceptionHandler(value = Throwable.class)
    public R handleException(Throwable throwable){
        log.error("未知异常{},异常类型{}",throwable.getMessage(),throwable.getClass());
        return R.error(400,"数据校验出现问题");
    }
4 错误状态码
上面代码中,针对于错误状态码,是我们进行随意定义的,然而正规开发过程
中,错误状态码有着严格的定义规则,如该在项目中我们的错误状态码定义

为了定义这些错误状态码,我们可以单独定义一个常量类,用来存储这些错误状态码
package com.yxj.common.exception;

/***
 * 错误码和错误信息定义类
 * 1. 错误码定义规则为5为数字
 * 2. 前两位表示业务场景,最后三位表示错误码。例如:100001。10:通用 001:系统未知异常
 * 3. 维护错误码后需要维护错误描述,将他们定义为枚举形式
 * 错误码列表:
 *  10: 通用
 *      001:参数格式校验
 *  11: 商品
 *  12: 订单
 *  13: 购物车
 *  14: 物流
 */
public enum BizCodeEnum {

    UNKNOW_EXEPTION(10000,"系统未知异常"),

    VALID_EXCEPTION( 10001,"参数格式校验失败");

    private int code;
    private String msg;

    BizCodeEnum(int code, String msg) {
        this.code = code;
        this.msg = msg;
    }

    public int getCode() {
        return code;
    }

    public String getMsg() {
        return msg;
    }
}
自定义校验功能
场景:要校验showStatus的01状态,可以用正则,但我们可以利用其他方式解决
复杂场景。比如我们想要下面的场景
显示状态[0-不显示;1-显示]
@NotNull(groups = {AddGroup.class, UpdateStatusGroup.class})
@ListValue(vals = {0,1}, groups = {AddGroup.class, UpdateGroup.class, UpdateStatusGroup.class})
private Integer showStatus;
添加依赖
<dependency>
    <groupId>javax.validation</groupId>
    <artifactId>validation-api</artifactId>
    <version>2.0.1.Final</version>
</dependency>
1 编写自定义的校验注解
必须有3个属性
message()错误信息
groups()分组校验
payload()自定义负载信息
@Documented
@Constraint(validatedBy = { ListValueConstraintValidator.class})
@Target({ METHOD, FIELD, ANNOTATION_TYPE, CONSTRUCTOR, PARAMETER, TYPE_USE })
@Retention(RUNTIME)
public @interface ListValue {
    // 使用该属性去Validation.properties中取
    String message() default "{com.atguigu.common.valid.ListValue.message}";

    Class<?>[] groups() default { };

    Class<? extends Payload>[] payload() default { };

    int[] value() default {};
}
该属性值取哪里取呢?
common创建文件ValidationMessages.properties
里面写上com.atguigu.common.valid.ListValue.message=必须提交指定的值 [0,1]
2 编写自定义的校验器
public class ListValueConstraintValidator implements ConstraintValidator<ListValue,Integer> {
    private Set<Integer> set=new HashSet<>();
    @Override
    public void initialize(ListValue constraintAnnotation) {
        int[] value = constraintAnnotation.value();
        for (int i : value) {
            set.add(i);
        }

    }

    @Override
    public boolean isValid(Integer value, ConstraintValidatorContext context) {


        return  set.contains(value);
    }
}
3 关联校验器和校验注解
@Constraint(validatedBy = { ListValueConstraintValidator.class})
一个校验注解可以匹配多个校验器
4 使用实例
/**

  * 显示状态[0-不显示;1-显示]
    */
    @ListValue(value = {0,1},groups ={AddGroup.class})
    private Integer showStatus;


 1907
1907


 被折叠的 条评论
为什么被折叠?
被折叠的 条评论
为什么被折叠?
 到【灌水乐园】发言


