


Consul集群模式部署
1.规划
1.1 准备
| 节点ip | hostname | agent类型 | 操作系统 |
|---|---|---|---|
| 10.0.0.5 | node-1 | server | CentOS 7.9 |
| 10.0.0.6 | node-2 | server | CentOS 7.9 |
| 10.0.0.7 | node-3 | server | CentOS 7.9 |
1.2 拓扑

2.搭建Consul集群
2.1 安装consul
2.1.1 下载二进制包
下载地址: consul
wget https://releases.hashicorp.com/consul/1.17.1/consul_1.17.1_linux_amd64.zip -O  /usr/local/bin/consul_1.17.1_linux_amd64.zip
cd /usr/local/bin
unzip  consul_1.17.1_linux_amd64.zip && rm -f consul_1.17.1_linux_amd64.zip
#查看版本
consul version
2.1.2 创建Consul用户
groupadd --system consul
useradd -s /sbin/nologin  --system  -g consul  consul
2.1.3 创建Consul数据存储和配置文件目录
mkdir -p /consul/{config,data}
2.2 配置文件
2.2.1 生成Consul secret
#consul在通讯时进行加密, key可以通过consul keygen生成, 同一个集群中的节点必须使用相同的key
consul keygen
2.2.2 server1配置
cat >> /consul/config/consul.json  << EOF
{
    "advertise_addr": "10.0.0.5",
    "bind_addr": "10.0.0.5",
    "bootstrap_expect": 3,
    "client_addr": "0.0.0.0",
    "datacenter": "DC1",
    "node_name": "node-1",
    "data_dir": "/consul/data",
    "domain": "consul",
    "enable_script_checks": true,
    "dns_config": {
        "enable_truncate": true,
        "only_passing": true
    },
    "enable_syslog": true,
    "encrypt": "S6PprGqqzGUtSLLU5lVuhSxzTG6lW7wxmzdoxkr+v00=",
    "leave_on_terminate": true,
    "log_level": "INFO",
    "rejoin_after_leave": true,
    "retry_join": [
     "node-1",
     "node-2",
     "node-3"
    ],
    "server": true,
    "start_join": [
        "node-1",
        "node-2",
        "node-3"
    ],
    "ui": true
}
EOF
2.2.3 server2配置
cat >> /consul/config/consul.json <<EOF
{
    "advertise_addr": "10.0.0.6",
    "bind_addr": "10.0.0.6",
    "bootstrap_expect": 3,
    "client_addr": "0.0.0.0",
    "datacenter": "DC1",
    "node_name": "node-2",
    "data_dir": "/consul/data",
    "domain": "consul",
    "enable_script_checks": true,
    "dns_config": {
        "enable_truncate": true,
        "only_passing": true
    },
    "enable_syslog": true,
    "encrypt": "S6PprGqqzGUtSLLU5lVuhSxzTG6lW7wxmzdoxkr+v00=",
    "leave_on_terminate": true,
    "log_level": "INFO",
    "rejoin_after_leave": true,
    "retry_join": [
     "node-1",
     "node-2",
     "node-3"
    ],
    "server": true,
    "start_join": [
        "node-1",
        "node-2",
        "node-3"
    ],
    "ui": true
}
EOF
2.2.4 server3配置
cat >> /consul/config/consul.json <<EOF
{
    "advertise_addr": "10.0.0.7",
    "bind_addr": "10.0.0.7",
    "bootstrap_expect": 3,
    "client_addr": "0.0.0.0",
    "datacenter": "DC1",
    "node_name": "node-3",
    "data_dir": "/consul/data",
    "domain": "consul",
    "enable_script_checks": true,
    "dns_config": {
        "enable_truncate": true,
        "only_passing": true
    },
    "enable_syslog": true,
    "encrypt": "S6PprGqqzGUtSLLU5lVuhSxzTG6lW7wxmzdoxkr+v00=",
    "leave_on_terminate": true,
    "log_level": "INFO",
    "rejoin_after_leave": true,
    "retry_join": [
     "node-1",
     "node-2",
     "node-3"
    ],
    "server": true,
    "start_join": [
        "node-1",
        "node-2",
        "node-3"
    ],
    "ui": true
}
EOF
2.2.5 配置详解
acl_datacenter:只用于server,指定的datacenter的权威ACL信息,所有的servers和datacenter必须同意ACL datacenter
acl_default_policy:默认是allow
acl_down_policy:
acl_master_token:
acl_token:agent会使用这个token和consul server进行请求
acl_ttl:控制TTL的cache,默认是30s
addresses:一个嵌套对象,可以设置以下key:dns、http、rpc
advertise_addr:等同于-advertise
bootstrap:等同于-bootstrap
bootstrap_expect:等同于-bootstrap-expect
bind_addr:等同于-bind
ca_file:提供CA文件路径,用来检查客户端或者服务端的链接
cert_file:必须和key_file一起
check_update_interval:
client_addr:等同于-client
datacenter:等同于-dc
data_dir:等同于-data-dir
disable_anonymous_signature:在进行更新检查时禁止匿名签名
disable_remote_exec:禁止支持远程执行,设置为true,agent会忽视所有进入的远程执行请求
disable_update_check:禁止自动检查安全公告和新版本信息
dns_config:是一个嵌套对象,可以设置以下参数:allow_stale、max_stale、node_ttl 、service_ttl、enable_truncate
domain:默认情况下consul在进行DNS查询时,查询的是consul域,可以通过该参数进行修改
enable_debug:开启debug模式
enable_syslog:等同于-syslog
encrypt:等同于-encrypt
key_file:提供私钥的路径
leave_on_terminate:默认是false,如果为true,当agent收到一个TERM信号的时候,它会发送leave信息到集群中的其他节点上。
log_level:等同于-log-level
node_name:等同于-node
ports:这是一个嵌套对象,可以设置以下key:dns(dns地址:8600)、http(http api地址:8500)、rpc(rpc:8400)、serf_lan(lan port:8301)、serf_wan(wan port:8302)、server(server rpc:8300)
protocol:等同于-protocol
recursor:
rejoin_after_leave:等同于-rejoin
retry_join:等同于-retry-join
retry_interval:等同于-retry-interval
server:等同于-server
server_name:会覆盖TLS CA的node_name,可以用来确认CA name和hostname相匹配
skip_leave_on_interrupt:和leave_on_terminate比较类似,不过只影响当前句柄
start_join:一个字符数组提供的节点地址会在启动时被加入
statsd_addr:
statsite_addr:
syslog_facility:当enable_syslog被提供后,该参数控制哪个级别的信息被发送,默认Local0
ui_dir:等同于-ui-dir
verify_incoming:默认false,如果为true,则所有进入链接都需要使用TLS,需要客户端使用ca_file提供ca文件,只用于consul server端,因为client从来没有进入的链接
verify_outgoing:默认false,如果为true,则所有出去链接都需要使用TLS,需要服务端使用ca_file提供ca文件,consul server和client都需要使用,因为两者都有出去的链接
watches:watch一个详细名单

Port:
8300: 只存在于Server模式,选取Leader节点(Raft协议)。为Leader节点和Client节点的提供RPC调用
8301: LAN网中集群数据同步的通信端口(Gossip协议),也是加入集群的通信端口。
8302: 只存在于Server模式,WAN网中集群数据同步的通信端口(Gossip协议),也是加入集群的通信端口。主要支持数据中心与数据中心之间交互通过WLAN(8302端口)
8500: 提供Http服务(或web界面)
8600: 提供DNS服务端口
2.3 设置开机自启
cat >> /etc/systemd/system/consul.service  <<EOF
[Unit]
Description=Consul Service
Documentation=https://www.consul.io/
After=network-online.target
Wants=network-online.target

[Service]
Type=simple
User=consul
Group=consul
ExecStart=/usr/local/bin/consul agent -config-dir=/consul/config

ExecReload=/bin/kill -HUP $MAINPID
KillSignal=SIGINT
TimeoutStopSec=5
Restart=on-failure
SyslogIdentifier=consul

[Install]
WantedBy=multi-user.target
EOF
#授权下数据和存储目录
chown -R consul.consul   /consul
#启动
systemctl enable consul.service
systemctl start  consul.service
systemctl status consul.service
2.4 验证查看

#查看成员信息
[root@node-1 ~]# consul members
Node    Address        Status  Type    Build   Protocol  DC   Partition  Segment
node-1  10.0.0.5:8301  alive   server  1.17.1  2         dc1  default    <all>
node-2  10.0.0.6:8301  alive   server  1.17.1  2         dc1  default    <all>
node-3  10.0.0.7:8301  alive   server  1.17.1  2         dc1  default    <all>

#查看Consul集群详细情况
consul operator raft list-peers
Node    ID                                    Address        State     Voter  RaftProtocol  Commit Index  Trails Leader By
node-2  e194d848-5f71-205c-114e-9b501266cf58  10.0.0.6:8300  leader    true   3             433           -
node-1  3c9707ba-37c1-5d16-b23d-8b6af772f129  10.0.0.5:8300  follower  true   3             433           0 commits
node-3  3d610b77-94c5-0764-6005-339af5b8364f  10.0.0.7:8300  follower  true   3             433           0 commits
2.5 设置ACL权限配置
2.5.1 添加acl权限配置
#在所有server节点添加
[root@node-1 ~]# cat >> /consul/config/acl.json  <<EOF
{
  "acl":{
    "enabled": true,
    "default_policy":"deny",
    "enable_token_persistence": true
  }
}
EOF

chown consul.consul  /consul/config/acl.json
2.5.2 重载consul
#所有server节点
consul reload


#验证一下
[root@node-1 ~]# consul operator   raft list-peers
Error getting peers: Failed to retrieve raft configuration: Unexpected response code: 403 (rpc error making call: Permission denied: anonymous token lacks permission 'operator:read'. The anonymous token is used implicitly when a request does not specify a token.)
2.5.3 创建初始Token
#在任意一台server执行即可,此SecretID==Token,为最大权限
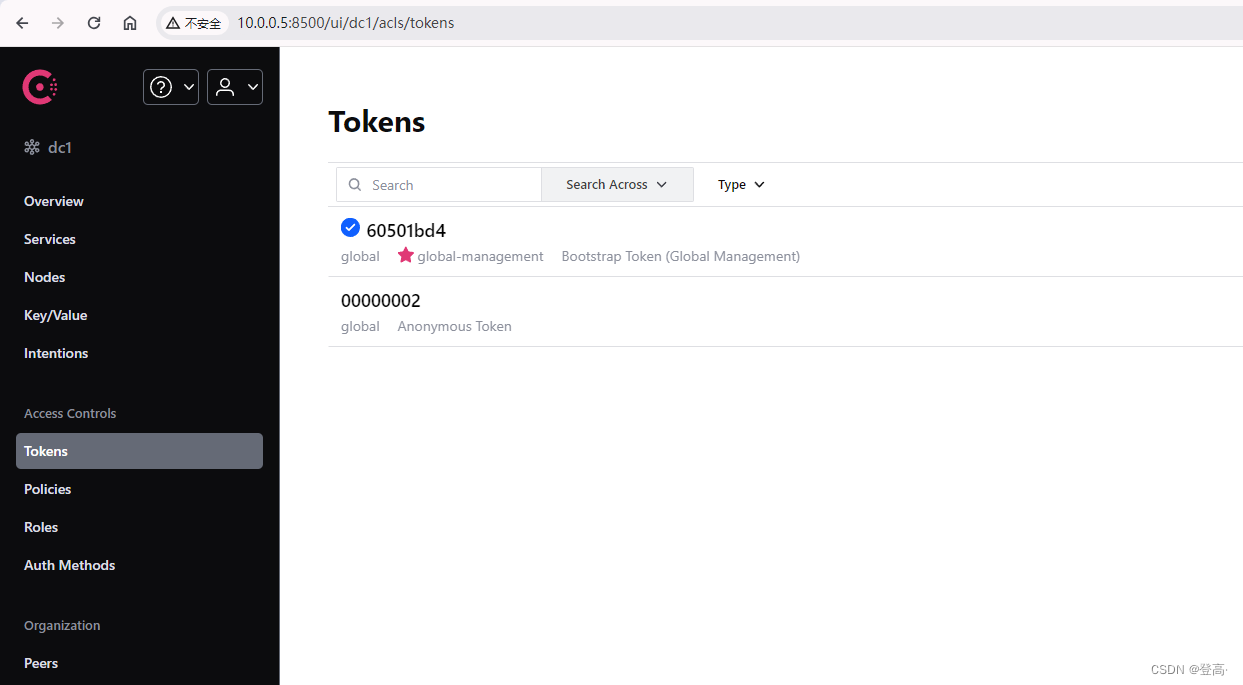
[root@node-1 ~]# consul acl bootstrap
AccessorID: 1f0bf675-c565-c44a-518c-1dfe60501bd4
SecretID: 914bbaae-63b6-5e0a-298f-9b35b24f13aa
Description: Bootstrap Token (Global Management)
Local: false
Create Time: 2023-12-20 14:40:52.625050397 +0800 CST
Policies:
00000000-0000-0000-0000-000000000001 - global-management
2.5.4 修改acl配置
#所有节点都执行
[root@node-1 ~]# cat >>  /consul/config/acl.json  << EOF
{
  "acl":{
    "enabled": true,
    "default_policy":"deny",
    "enable_token_persistence": true,
    "tokens": {
	"master": "914bbaae-63b6-5e0a-298f-9b35b24f13aa"
              }
  }
}
EOF

chown consul.consul  /consul/config/acl.json
2.5.5 重载配置
#重载配置
consul  reload
2.5.6 验证
[root@node-1 ~]# consul members --token=914bbaae-63b6-5e0a-298f-9b35b24f13aa
Node    Address        Status  Type    Build   Protocol  DC   Partition  Segment
node-1  10.0.0.5:8301  alive   server  1.17.1  2         dc1  default    <all>
node-2  10.0.0.6:8301  alive   server  1.17.1  2         dc1  default    <all>
node-3  10.0.0.7:8301  alive   server  1.17.1  2         dc1  default    <all>

[root@node-1 ~]# consul operator   raft list-peers  --token=914bbaae-63b6-5e0a-298f-9b35b24f13aa
Node    ID                                    Address        State     Voter  RaftProtocol  Commit Index  Trails Leader By
node-1  5ce60fe9-49b5-be1c-764c-3da262296de8  10.0.0.5:8300  follower  true   3             286           0 commits
node-2  404632f2-3cdd-2f95-ec6b-93b1dd70d50a  10.0.0.6:8300  leader    true   3             286           -
node-3  7fa7060c-eed4-e1c5-679b-c966afa27f11  10.0.0.7:8300  follower  true   3             286           0 commits
2.5.7 拓展
我们需要了解 polices(策略)、tokens(令牌)、roles(规则)
polices
policy通常有3种:read(只读)、write(读写)、deny(无权)
| 方式 | 配置 | 解释 |
|---|---|---|
| 节点前缀 | node_prefix | 节点前缀为空则代表所有节点,否则以设定前缀开头的所有节点 |
| 服务前缀 | service_prefix | 服务前缀为空则代表所有服务,否则以设定前缀开头的所有服务 |
| 指定服务 | service | 指定的服务 |
| kv前缀 | key_prefix | 以设定前缀开头的所有kv |
| 指定kv | key | 指定的kv |
例如:
#用于服务注册
service_prefix ""{
	policy = "write"
}

#用于key/value获取
key_prefix "" {
	policy = "read"
}
tokens
consul的token就是我们用来进行权限校验的,最高权限的token(bootstrap token)
创建token的时候只需要选择好规则与角色(可选)即可.
roles
角色可以看作是策略的集合,一个角色可以有多个策略,在设置角色的时候我们可以给角色添加多个策略,管理员
可以直接把成员设定为某个角色。


 905
905


 被折叠的 条评论
为什么被折叠?
被折叠的 条评论
为什么被折叠?
 到【灌水乐园】发言


