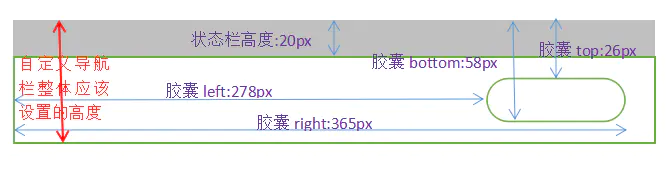
uniapp自定义导航栏 | uni.getSystemInfo() | wx.getMenuButtonBoundingClientRect()

一.自定义导航栏的区域(包括状态栏)在这里插入图片描述

胶囊接口

/*获取菜单按钮(右上角胶囊按钮)的布局位置信息。坐标信息以屏幕左上角为原点 */
wx.getMenuButtonBoundingClientRect();
/* 返回值:width、height、top、right、bottom、left*/

状态栏接口

wx.getSystemInfo({
   success: e => {
     console.log(e.statusBarHeight);/*状态栏高度,如上所示*/
   }
})

计算自定义导航的height值

height:custom.bottom +(custom.top - e.statusBarHeight);
/*即:胶囊下边界+胶囊到状态栏中间的间隔*/

二、自定义导航栏显示内容的区域

在这里插入图片描述

三.总结

custom:获取胶囊接口信息
statusBarHeight:状态栏高度
navigationBarHeight:自定义导航栏高度

// #ifdef MP-WEIXIN
custom = wx.getMenuButtonBoundingClientRect();
navigationBarHeight = custom.bottom + custom.top - e.statusBarHeight;
// #endif

四.相关示例代码

onLaunch: function() {
	console.log('App Launch')
	// 获得设备的信息
	uni.getSystemInfo({
		success: e=> {
			console.log(e)
			this.initSize(e);
		}
	})
},


methods:{
	/**
	 * 存储设备信息 参考colorUI
	 * @param {Object} 
	 */
	initSize(e){
		const systemInfo = e;
		let navigationBarHeight;
		let custom = {};
		// #ifndef MP
		custom = {height: 36,width: 88};
		navigationBarHeight = 44;
		// #endif
		// #ifdef MP-WEIXIN
		custom = wx.getMenuButtonBoundingClientRect();
		navigationBarHeight = custom.bottom + custom.top - e.statusBarHeight*2;
		// #endif	 
		systemInfo.custom = custom;
		systemInfo.navigationBarHeight = navigationBarHeight;
		// 设置全局变量
		Vue.prototype.systemInfo = systemInfo;
	}
}
  • 2
    点赞
  • 10
    收藏
    觉得还不错? 一键收藏
  • 0
    评论
要在 UniApp自定义导航栏并适配高度,你可以按照以下步骤操作: 1. 在 App.vue 文件中,添加一个自定义导航栏组件,如下所示: ```html <template> <div> <custom-nav-bar></custom-nav-bar> <router-view></router-view> </div> </template> <script> import CustomNavBar from '@/components/CustomNavBar.vue' export default { components: { CustomNavBar } } </script> ``` 2. 在 CustomNavBar.vue 组件中,设置导航栏的样式,并使用 `uni.getSystemInfoSync()` 方法获取系统信息,以动态计算导航栏的高度,如下所示: ```html <template> <div class="custom-nav-bar" :style="{ height: navBarHeight + 'px' }"> <div class="custom-nav-bar__left" @click="onLeftClick"> <slot name="left"></slot> </div> <div class="custom-nav-bar__title"> <slot></slot> </div> <div class="custom-nav-bar__right"> <slot name="right"></slot> </div> </div> </template> <script> export default { computed: { navBarHeight() { const systemInfo = uni.getSystemInfoSync() const statusBarHeight = systemInfo.statusBarHeight || 0 const navigationBarHeight = 44 const totalHeight = statusBarHeight + navigationBarHeight return totalHeight } }, methods: { onLeftClick() { uni.navigateBack() } } } </script> <style lang="scss"> .custom-nav-bar { display: flex; align-items: center; justify-content: space-between; padding: 0 16px; background-color: #ffffff; box-shadow: 0 2px 4px rgba(0, 0, 0, 0.1); .custom-nav-bar__left { font-size: 16px; color: #333333; } .custom-nav-bar__title { font-size: 18px; font-weight: 500; color: #333333; } .custom-nav-bar__right { font-size: 16px; color: #333333; } } </style> ``` 3. 在需要使用自定义导航栏的页面中,使用 `uni.getMenuButtonBoundingClientRect()` 方法获取右侧菜单按钮的位置信息,并根据此信息调整页面的样式,使页面内容不被导航栏遮挡,如下所示: ```html <template> <div class="page"> <custom-nav-bar> <template #left> <uni-icons type="back" size="28" color="#333333"></uni-icons> </template> <span>页面标题</span> <template #right> <uni-icons type="ellipsis" size="28" color="#333333"></uni-icons> </template> </custom-nav-bar> <div class="content"> 页面内容 </div> </div> </template> <script> export default { mounted() { const menuButtonInfo = uni.getMenuButtonBoundingClientRect() uni.getSystemInfo({ success: (res) => { const statusBarHeight = res.statusBarHeight || 0 const navBarHeight = this.$refs.navBar.clientHeight const titleBarHeight = statusBarHeight + navBarHeight const contentHeight = res.windowHeight - titleBarHeight - menuButtonInfo.height - (menuButtonInfo.top - statusBarHeight) * 2 this.$refs.content.style.height = contentHeight + 'px' } }) } } </script> <style lang="scss"> .page { height: 100%; .content { background-color: #f5f5f5; padding: 16px; overflow-y: scroll; } } </style> ``` 这样,你就可以自定义导航栏并适配高度了。

“相关推荐”对你有帮助么?

  • 非常没帮助
  • 没帮助
  • 一般
  • 有帮助
  • 非常有帮助
提交
评论
添加红包

请填写红包祝福语或标题

红包个数最小为10个

红包金额最低5元

当前余额3.43前往充值 >
需支付:10.00
成就一亿技术人!
领取后你会自动成为博主和红包主的粉丝 规则
hope_wisdom
发出的红包
实付
使用余额支付
点击重新获取
扫码支付
钱包余额 0

抵扣说明:

1.余额是钱包充值的虚拟货币,按照1:1的比例进行支付金额的抵扣。
2.余额无法直接购买下载,可以购买VIP、付费专栏及课程。

余额充值