


提示:文章写完后,目录可以自动生成,如何生成可参考右边的帮助文档
1. 前言!!!
来缕一缕系统调用的一个过程
1.当系统调用函数被调用时,如wtite(int,char*,int),会被unistd.h所定义的宏展开
		#define syscall3(type,  name,  atype,a,  btype,b,  ctype,c)
			type name(atype a, btype b, ctype c){
				long __res;
				__asm__ ("int 0x80"
				: "=a"(__res)) : ""(__NR_##name),"b"((long)(a)),"c"((long)(b)),
				"d"((long)(c));
				if(__res >= 0) return (type)__res
				errno = -__res; return -1;
			}
这里可以看到系统调用通过int 0x80 中断来进入内核
操作系统提供的中断(0x80)入口 (80号中断描述符的特权级为3),使得用户态程序可以进入到内核态
1.如上,系统调用号放在%ax寄存器,触发 int 0x80 中断
2. 处理 int 0x80中断 ,在系统初始化时int 0x80中断的权限级(DPL)被设置为3,所以可以访问内核空间
3.  调用中断处理函数,通过系统调用号去 查询系统调用函数表,然后去调用真正的系统函数 ,将函数结果保存在%ax寄存器内 返回用户
来看一下int 0x80号中断所执行的中断处理函数,它在system_call.s 中
system_call:
        cmpl $nr_system_calls-1,%eax
        ja bad_sys_call
        push %ds
        push %es
        push %fs
        pushl %edx
        pushl %ecx              # push %ebx,%ecx,%edx as parameters
        pushl %ebx              # to the system call
        movl $0x10,%edx         # set up ds,es to kernel space
        mov %dx,%ds
        mov %dx,%es
        movl $0x17,%edx         # fs points to local data space
        mov %dx,%fs
        call sys_call_table(,%eax,4)
        pushl %eax
        movl current,%eax
        cmpl $0,state(%eax)             # state
        jne reschedule
        cmpl $0,counter(%eax)           # counter
#push %ebx,%ecx,%edx as parameters系统调用参数通过 这三个寄存器传递
call sys_call_table(,%eax,4) 这一句就是根据eax寄存器存放的系统调用号,去执行所对应的系统调用函数。
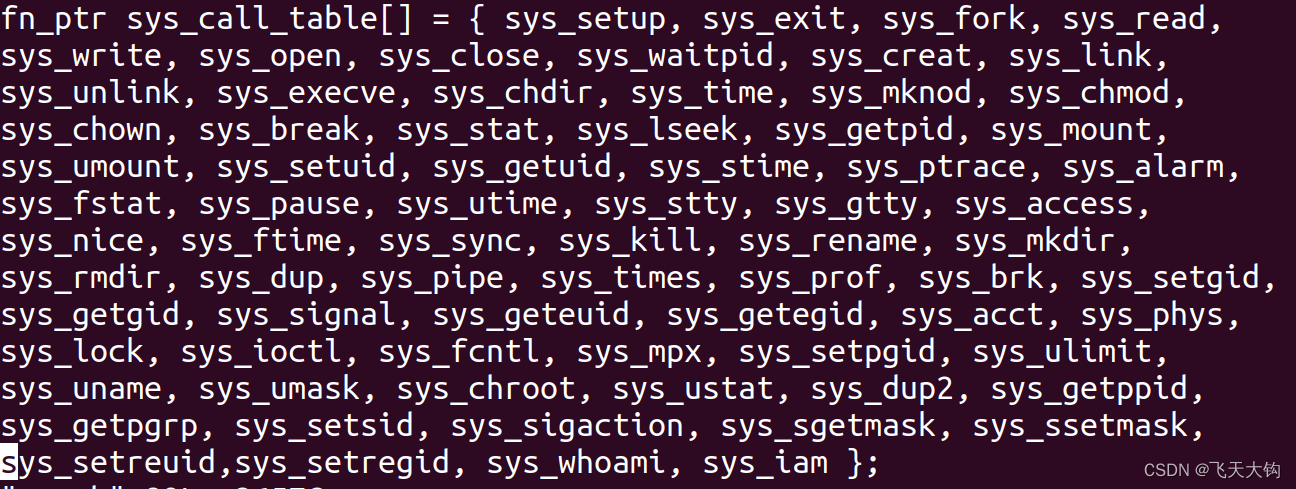
这张系统调用表sys_call_table 存放在linux-0.11/include/linux/sys.h中
然后将会去调用我们所实现的系统调用函数了。
提示:以下是本篇文章正文内容,下面案例可供参考
一、添加的系统调用
1. 编写提供给上层用户接口的测试函数
/* iam.c iam函数 */
#define __LIBRARY__
#include <unistd.h>
_syscall1(int, iam, const char*, name);

int main(int argc, char *argv[])
{
    /*调用系统调用iam()*/
    iam(argv[1]);
    return 0;
}
/* whoami.c whoami函数*/
#define __LIBRARY__
#include <unistd.h>
#include <stdio.h>

_syscall2(int, whoami,char *,name,unsigned int,size);

int main(int argc, char *argv[])
{
    char username[64] = {0};
    /*调用系统调用whoami()*/
    whoami(username, 24);
    printf("%s\n", username);
    return 0;
}
_syscall2(int, whoami,char *,name,unsigned int,size); 是一个宏在unistd.h中定义
#define _syscall2(type,name,atype,a,btype,b) \
type name(atype a,btype b) \
{ \
long __res; \
__asm__ volatile ("int $0x80" \
        : "=a" (__res) \
        : "0" (__NR_##name),"b" ((long)(a)),"c" ((long)(b))); \
if (__res >= 0) \
        return (type) __res; \
errno = -__res; \
return -1; \
}
2.添加系统调用号
在unistd.h文件中 添加
#define __NR_whoami     72
#define __NR_iam        73
在sys.h文件中的系统调用表添加函数入口地址

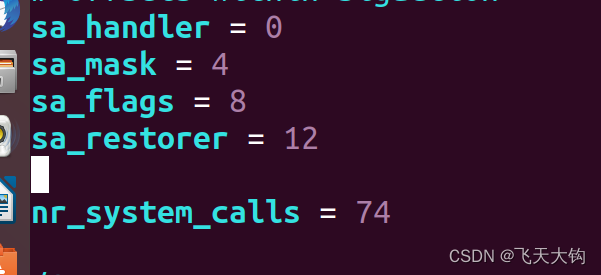
在system_call.s 中要加上系统调用的总数量
3.实现系统调用函数
创建一个who.c放在linux-0.11/kernel/下 在里面实现俩个系统函数
#define __LIBRARY__
#include <asm/segment.h>
#include <unistd.h>
#include <errno.h>
#include <string.h>

char m_name[24];

//将参数name的内容拷贝到m_name中
// 返回值: 拷贝的字符数,若字符数大小超过23,返回-1,同时设置errno为EINVAL
int sys_iam(const char* name){

	int i;
	char temp[30];

	for(i=0; i<30; i++){
		temp[i] = get_fs_byte(name+i);
		if(temp[i] == '\0') break;
	}

	i = 0;
	while(i<30 && temp[i] != '\0') i++;
	int len = i;


	if(len > 23){
		errno = EINVAL;
		return -1;
	}

	strcpy(m_name,temp);
	return i;

}


//将m_name 拷贝到name指向的用户空间中,size指定name的大小,防止越界
//成功返回拷贝字节数,失败返回-1,并设置errno为EINVAL
int sys_whoami(char* name,unsigned int size){
	int len = 0;

//	for(;m_name[len]!='\0';len++);
	while(m_name[len] != '\0')
		len++;

	if(len > size){
		errno = EINVAL;
		return -1;
	}
	int  i = 0;
	for(i=0;i<size;i++){
		put_fs_byte(m_name[i],name+i);
		if(m_name[i] == '\0')
			break;
	}
	return i;
}
4.重新编译
修改makefile
OBJS  = sched.o system_call.o traps.o asm.o fork.o \
        panic.o printk.o vsprintf.o sys.o exit.o \
        signal.o mktime.o
改为
OBJS  = sched.o system_call.o traps.o asm.o fork.o \
        panic.o printk.o vsprintf.o sys.o exit.o \
        signal.o mktime.o who.o
### Dependencies:
exit.s exit.o: exit.c ../include/errno.h ../include/signal.h \
  ../include/sys/types.h ../include/sys/wait.h ../include/linux/sched.h \
  ../include/linux/head.h ../include/linux/fs.h ../include/linux/mm.h \
  ../include/linux/kernel.h ../include/linux/tty.h ../include/termios.h \
  ../include/asm/segment.h
改为
### Dependencies:
who.s who.o: who.c ../include/linux/kernel.h ../include/unistd.h
exit.s exit.o: exit.c ../include/errno.h ../include/signal.h \
  ../include/sys/types.h ../include/sys/wait.h ../include/linux/sched.h \
  ../include/linux/head.h ../include/linux/fs.h ../include/linux/mm.h \
  ../include/linux/kernel.h ../include/linux/tty.h ../include/termios.h \
  ../include/asm/segment.h
可以重新编译了,make all 一下
5.测试
将编写的接口测试函数挂载到linux-0.11中
在oslab/,输入命令sudo ./mount-hdc挂载。把测试文件拷贝进linux-011中,因为要在那里测试系统调用。在linxu-0.11中编译执行
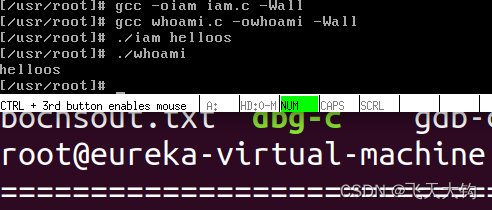
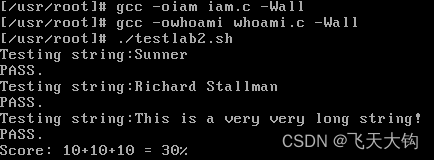
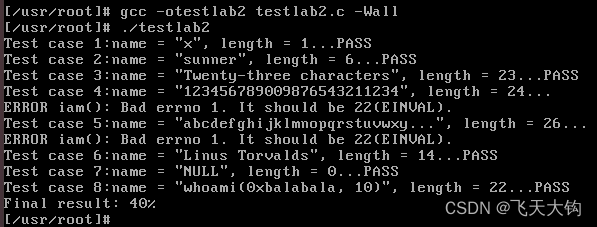
执行testlab2.sh
执行testlab.c
6.实验报告
问题:从Linux 0.11现在的机制看,它的系统调用最多能传递几个参数?你能想出办法来扩大这个限制吗? 用文字简要描述向Linux 0.11添加一个系统调用foo()的步骤。
在linux 0.11 下 的系统调用最多可以传递3个参数,通过bx,cx,dx通用寄存器传递。
如何扩大:
1.将寄存器拆分,分为高位和低位
2.将参数通过结构体指针打包,通过传递指针来实现参数扩大
总结
暂时先这样,不太会写文章,再补充


 395
395


 被折叠的 条评论
为什么被折叠?
被折叠的 条评论
为什么被折叠?
 到【灌水乐园】发言


