


springboot 整合Quartz
Scheduled 定时任务器
- Scheduled是Spring3.0后内置的定时任务器。通过Scheduled可以完成周期的执行一些功能。存在于spring-conext-support.jar中。
- 在SpringBoot中使用Scheduled非常简单,只需要在对应的方法上添加@Scheduled注解在配置对应的参数就可以完成。
@Component
public class DemoSchedule {

    // @Scheduled(cron="* * * * * *") //每隔1秒执行一次
     @Scheduled(cron="0/2 * * * * *") //每隔2秒执行一次
    public void helloSchedule(){
        System.out.println("helloSchedule  : "+new Date());
    }
}
@SpringBootApplication
@EnableScheduling
public class SpringbootssmApplication {

    public static void main(String[] args) {
        SpringApplication.run(SpringbootssmApplication.class, args);
    }

}
Cron表达式
Cron表达式是一个字符串,分为6或7个域,每一个域代表一个含义
corn从左到右(用空格隔开):
秒 分 小时 月份中的日期 月份 星期中的日期 年份
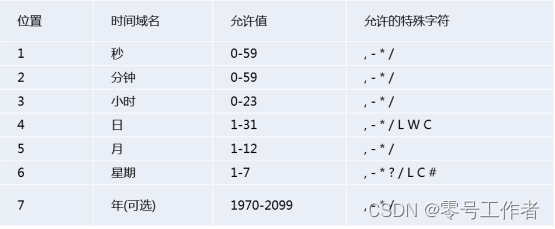
Cron表达式的时间字段除允许设置数值外,还可使用一些特殊的字符,提供列表、范围、通配符等功能,细说如下:
- 星号(*):可用在所有字段中,表示对应时间域的每一个时刻,例如,*在分钟字段时,表示“每分钟”;
- 问号(?):该字符只在日期和星期字段中使用,它通常指定为“无意义的值”,相当于占位符;
- 减号(-):表达一个范围,如在小时字段中使用“10-12”,则表示从10到12点,即10,11,12;
- 逗号(,):表达一个列表值,如在星期字段中使用“MON,WED,FRI”,则表示星期一,星期三和星期五;
- 斜杠(/):x/y表达一个等步长序列,x为起始值,y为增量步长值。如在秒字段中使用0/15,则表示为0,15,30和45秒,而5/15在分钟字段中表示5,20,35,50,你也可以使用*/y,它等同于0/y;
- L:该字符只在日期和星期字段中使用,代表“Last”的意思,但它在两个字段中意思不同。L在日期字段中,表示这个月份的最后一天,如一月的31号,非闰年二月的28号;如果L用在星期中,则表示星期天,等同于7。但是,如果L出现在星期字段里,而且在前面有一个数值X,则表示“这个月的最后X天”,例如,6L表示该月的最后星期五;
Cron表达式的时间字段除允许设置数值外,还可使用一些特殊的字符,提供列表、范围、通配符等功能,细说如下:(接上) - W:该字符只能出现在日期字段里,是对前导日期的修饰,表示离该日期最近的工作日。例如15W表示离该月15号最近的工作日,如果该月15号是星期六,则匹配14号星期五;如果15日是星期日,则匹配16号星期一;如果15号是星期二,那结果就是15号星期二。但必须注意关联的匹配日期不能够跨月,如你指定1W,如果1号是星期六,结果匹配的是3号星期一,而非上个月最后的那天。W字符串只能指定单一日期,而不能指定日期范围
- LW组合:在日期字段可以组合使用LW,它的意思是当月的最后一个工作日;
- 井号(#):该字符只能在星期字段中使用,表示当月某个工作日。如6#3表示当月的第三个星期五(6表示星期五,#3表示当前的第三个),而4#5表示当月的第五个星期三,假设当月没有第五个星期三,忽略不触发;
Cron表达式的时间字段除允许设置数值外,还可使用一些特殊的字符,提供列表、范围、通配符等功能,细说如下:(接上) - C:该字符只在日期和星期字段中使用,代表“Calendar”的意思。它的意思是计划所关联的日期,如果日期没有被关联,则相当于日历中所有日期。例如5C在日期字段中就相当于日历5日以后的第一天。1C在星期字段中相当于星期日后的第一天。
Cron表达式对特殊字符的大小写不敏感,对代表星期的缩写英文大小写也不敏感。
例子:
-@Scheduled(cron = “0 0 1 1 1 ?”)//每年一月的一号的1:00:00 执行一次
- @Scheduled(cron = “0 0 1 1 1,6 ?”) //一月和六月的一号的1:00:00 执行一次
- @Scheduled(cron = “0 0 1 1 1,4,7,10 ?”) //每个季度的第一个月的一号的1:00:00 执行一次
Quartz
Quartz是OpenSymphony开源组织在Job scheduling领域又一个开源项目。可以方便的集成在Java项目中完成任务调度功能。总体功能和java.util.Timer很像,但是要比Timer功能更加强大。且不像Scheduler执行一个固定的任务,在Quartz可以对任务进行操作,新增任务,删除任务等。
例如:
- 每天固定时间执行任务!
- 每隔2天执行一次任务!
这些都是任务调度。Quartz都可以轻松地完整这些事情。
Quartz核心包含四个概念。
- Job 表示一个工作,要执行的具体内容。此接口中只有一个方法,如下:
- Job Detail 表示一个具体的可执行的调度程序,Job 是这个可执行程调度程序所要执行的内容,另外 Job Detail 还包含了这个任务调度的方案和策略。
- Trigger 代表一个调度参数的配置,什么时候去调。
- Scheduler 代表一个调度容器,一个调度容器中可以注册多个 Job Detail 和 Trigger。当 Trigger 与 Job Detail 组合,就可以被 Scheduler 容器调度了。
添加依赖
<!-- https://mvnrepository.com/artifact/org.springframework.boot/spring-boot-starter-quartz -->
        <dependency>
            <groupId>org.springframework.boot</groupId>
            <artifactId>spring-boot-starter-quartz</artifactId>
            <version>2.7.5</version>
        </dependency>
自定义工作
/**
 * 自定义job
 */
@Component
public class MyJob extends QuartzJobBean {
    @Override
    protected void executeInternal(JobExecutionContext jobExecutionContext) throws JobExecutionException {
        //完成任务的代码操作
        System.out.println("MyJob execute!" + new Date());
    }
}
配置类
@Configuration
public class QuartzConfig {


    /**
     *  返回一个JobDetail 对象交给spring容器管理
     * @return
     */
    @Bean
    public JobDetail getJobDetail(){
        //new job新的作业
        return JobBuilder.newJob(MyJob.class).withIdentity("myJob").storeDurably().build();
    }

    /**
     * CronTrigger 对象给spring来管理
     * @return
     */
    @Bean
    public CronTrigger getCronTrigger(){
        //1.获取CronScheduleBuilder对象

        //0/2 * * * * ? 每隔2秒钟执行一次
        CronScheduleBuilder cronScheduleBuilder = CronScheduleBuilder.cronSchedule("0/2 * * * * ?").withMisfireHandlingInstructionDoNothing();

        //2.获取CronTrigger对象
        //getJobDetail  ->JobDetail
        CronTrigger cronTrigger = TriggerBuilder.newTrigger().forJob(getJobDetail())
                .withIdentity("cronTrigger").withDescription("这是cron触发器").startNow()
                .withSchedule(cronScheduleBuilder).build();

        return cronTrigger;
    }
}
最后不要忘了在xxxApplication.java 启动类前加上@EnableScheduling


 1089
1089


 被折叠的 条评论
为什么被折叠?
被折叠的 条评论
为什么被折叠?
 到【灌水乐园】发言


