


SPI机制
为什么需要SPI机制
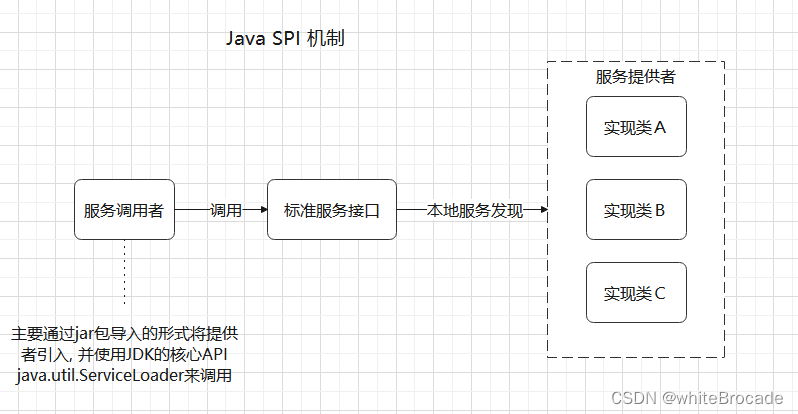
在面向对象编程中,基于开闭原则和解耦的需要,一般建议用接口进行模块之间通信编程,通常情况下调用方模块是不会感知到被调用方模块的内部具体实现
为了实现在模块装配的时候不用在程序里面动态指明,这就需要一种服务发现机制。Java SPI 就是提供了这样一个机制:为某个接口寻找服务实现的机制。这有点类似IOC的思想,将装配的控制权移交到了程序之外。
什么是SPI机制
Java SPI(Service Provider Interface)是 Java 提供的一种轻量级的服务发现机制。它可以让开发者通过约定的方式,在程序运行时动态地加载和替换接口的实现,从而提高程序的扩展性和灵活性
Java SPI 实际上是“基于接口的编程+策略模式+配置文件”组合实现的动态加载机制
要使用Java SPI,需要遵循如下约定:
-
当服务提供者提供了接口的一种具体实现后,在jar包的
META-INF/services目录下创建一个以接口全限定名为命名的文件,内容为实现类全限定名 -
接口实现类所在的jar包放在主程序的
classpath中 -
主程序通过java.util.
ServiceLoder动态装载实现模块,它通过扫描META-INF/services目录下的配置文件找到实现类的全限定名,把类加载到JVM -
SPI的实现类必须携带一个
无参构造方法
JDK SPI机制
搭建一下场景所需要的环境
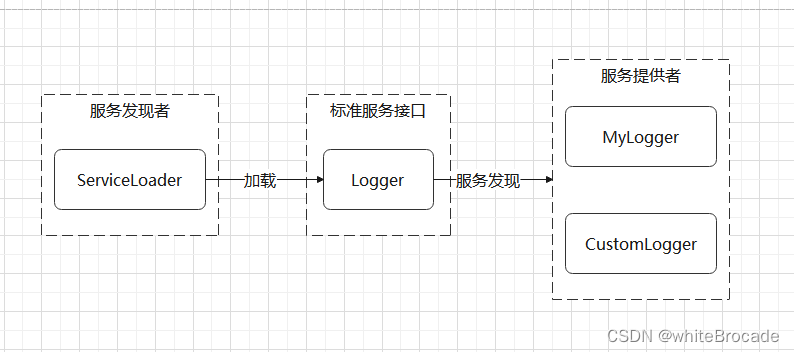
现有一个日志框架Logger, 下有一个Logger接口, 以及两个实现类
package com.whitebrocade;

/**
 * @author whitebrocade
 */
public interface Logger {
    void log(String message);
}


package com.whitebrocade;

/**
 * @author whitebrocade
 */
public class ConsoleLogger implements Logger {
    @Override
    public void log(String message) {
        System.out.println("模拟log输出到控制台:" + message);
    }
}


package com.whitebrocade;

/**
 * @author whitebrocade
 */
public class FileLogger implements Logger {
    @Override
    public void log(String message) {
        System.out.println("模拟log写入文件:" + message);
    }
}
需求: 上述两个Logger实现类不足以满足我们的需求, 想自定义拓展
步骤如下
-
新建自己的类MyLogger以及CustomLogger实现Logger接口
package com.whitebrocade; /** * @author whitebrocade */ public class MyLogger implements Logger { @Override public void log(String message) { System.out.println("自定义log实现:" + message); } } package com.whitebrocade; /** * @author whitebrocade */ public class CustomLogger implements Logger { @Override public void log(String message) { System.out.println("自定义log实现2:" + message); } } -
resource下新建META-INF/services, 注意了两个文件夹的名字一定不能变, 规定死的, 约定大于配置(后续会说明) -
点击MyLogger, Ctrl + Shiht + Alt + C复制Logger的
全限定类名- 例如我是是com.whitebrocade.Logger, 注意了我复制的是
接口的全类名
- 例如我是是com.whitebrocade.Logger, 注意了我复制的是
-
在service新建文件, 文件名为就是刚才复制的
全类名(是的, 你没看错, 文件名就是这么奇怪) -
在刚才的新建的文件里, 再次将MyLogger和CustomLoggerd的全类名复制下去()
-
以我的为例子, resource/META-INF/services/com.whitebrocade.Logger文件中的内容如下,
注意一个全类名一行, 如果后续还有其他的类需要加载, 那么继续按照一下格式添加即可 -
com.whitebrocade.MyLogger
com.whitebrocade.CustomLogger
-
-
新建一个test类用于测试
public class test {
    public static void main(String[] args) {
        ServiceLoader<Logger> loggerServiceLoader = ServiceLoader.load(Logger.class);
        for (Logger logger : loggerServiceLoader) {
            logger.log("Hello, Java SPI!");
        }
    }
}
// 输出结果如下, 说明确实读取到了
自定义log实现:Hello, Java SPI!
自定义log实现2:Hello, Java SPI!
load方法是通过获取当前线程的 线程上下文类加载器 实例来加载的。Java应用运行的初始线程的上下文类加载器默认是系统类加载器。这里其实 破坏了双亲委派模型,因为Java应用收到类加载的请求时,按照双亲委派模型会向上请求父类加载器完成,这里并没有这么做
上述代码的关系如下
JDK SPI机制原理解析
下述的分析基于JDK 11的SPI
// ServiceLoader实现了Iterable接口,可以遍历所有的服务实现者
public final class ServiceLoader<S> implements Iterable<S> {
    // 表示要被加载的服务的类或接口
    private final Class<S> service;
    // 这个ClassLoader用来定位,加载,实例化服务提供者
    private final ClassLoader loader;
    // 访问控制上下文
    private final AccessControlContext acc;

   // 用于迭代器操作的lazy-lookup迭代器
    private Iterator<Provider<S>> lookupIterator1;
    private final List<S> instantiatedProviders = new ArrayList<>();
}
iterator()
newLookupIterator(): 初始迭代器hasNext(): 判断是否有下一个元素next(): 获取下一个元素
public Iterator<S> iterator() {
    // 首次进来初始化
    if (lookupIterator1 == null) {
        lookupIterator1 = newLookupIterator();
    }

    return new Iterator<S>() {

        // record reload count
        final int expectedReloadCount = ServiceLoader.this.reloadCount;

        // index into the cached providers list
        int index;

        /**
        * Throws ConcurrentModificationException if the list of cached
        * providers has been cleared by reload.
        */
        private void checkReloadCount() {
            if (ServiceLoader.this.reloadCount != expectedReloadCount)
                throw new ConcurrentModificationException();
        }

        @Override
        public boolean hasNext() {
            checkReloadCount();
            if (index < instantiatedProviders.size())
                return true;
            // 调用的是java.util.Iterator#hasNext
            return lookupIterator1.hasNext();
        }

        @Override
        public S next() {
            checkReloadCount();
            S next;
            if (index < instantiatedProviders.size()) {
                next = instantiatedProviders.get(index);
            } else {
                next = lookupIterator1.next().get();
                instantiatedProviders.add(next);
            }
            index++;
            return next;
        }

    };
}

private Iterator<Provider<S>> newLookupIterator() {
    assert layer == null || loader == null;
    if (layer != null) {
        return new LayerLookupIterator<>();
    } else {
        Iterator<Provider<S>> first = new ModuleServicesLookupIterator<>();
        Iterator<Provider<S>> second = new LazyClassPathLookupIterator<>();
        return new Iterator<Provider<S>>() {
            @Override
            public boolean hasNext() {
                // second.hasNext()调用的是java.util.ServiceLoader.LazyClassPathLookupIterator#hasNext
                return (first.hasNext() || second.hasNext());
            }
            @Override
            public Provider<S> next() {
                if (first.hasNext()) {
                    return first.next();
                } else if (second.hasNext()) {
                    // 进入java.util.ServiceLoader.LazyClassPathLookupIterator#next
                    return second.next();
                } else {
                    throw new NoSuchElementException();
                }
            }
        };
    }
}
nextProviderClass()
这个方法说明了
- 为什么一定要放在
META-INF/services/下 - 为什么要文件中要填写
全类名
// java.util.ServiceLoader.LazyClassPathLookupIterator#nextProviderClass
private final class LazyClassPathLookupIterator<T>
    implements Iterator<Provider<T>>
{
    // 查找配置文件的目录
    // PREFIX说明了为什么只能放在META-INF/services/目录
    static final String PREFIX = "META-INF/services/";
    // 省略其他代码...

    private Class<?> nextProviderClass() {
        // config初始化
        if (configs == null) {
            try {
                // 路径全名称为:  "META-INF/services/" + 类的名称
                // service.getName()说明了为什么一定要全路径命名
                String fullName = PREFIX + service.getName();
                // loader == null, 说明是bootstrap类加载器
                if (loader == null) {
                    // 从classpath中加载指定的文件
                    configs = ClassLoader.getSystemResources(fullName);
                } else if (loader == ClassLoaders.platformClassLoader()) {
                    if (BootLoader.hasClassPath()) {
                        configs = BootLoader.findResources(fullName);
                    } else {
                        configs = Collections.emptyEnumeration();
                    }
                } else {
                    // 通过名字加载所有文件资源
                    configs = loader.getResources(fullName);
                }
            } catch (IOException x) {
                fail(service, "Error locating configuration files", x);
            }
        }

        // 遍历所有的资源,pending用于存放加载到的实现类
        while ((pending == null) || !pending.hasNext()) {
            if (!configs.hasMoreElements()) {
                // 遍历完所有的文件了,直接返回
                return null;
            }
            // parse方法主要调用了parseLine,功能:
            // 1. 分析每个PREFIX + service.getName() 目录下面的所有文件
            // 2. 判断每个文件是否是合法的java类的全限定名称,如果是就add到pending变量中
            pending = parse(configs.nextElement());
        }
        // 除了第一次进来,后面每次调用都是直接到这一步了
        // cn即className-全类名
        String cn = pending.next();
        try {
            // 通过Class.forName返回配置文件的中的Class对象
            return Class.forName(cn, false, loader);
        } catch (ClassNotFoundException x) {
            fail(service, "Provider " + cn + " not found");
            return null;
        }
    }

    // 省略其他代码...
}
hasNextService
// java.util.ServiceLoader.LazyClassPathLookupIterator#hasNextService
private final class LazyClassPathLookupIterator<T>
    implements Iterator<Provider<T>>
{
    // 省略其它代码...

    @SuppressWarnings("unchecked")
    private boolean hasNextService() {
        while (nextProvider == null && nextError == null) {
            try {
                // 调用nextProviderClass()获取Class对象
                Class<?> clazz = nextProviderClass();
                if (clazz == null)
                    return false;

                if (clazz.getModule().isNamed()) {
                    // ignore class if in named module
                    continue;
                }

                // 判断clazz对象是不是service的实现类或者子类
                // 如果是, 那么就调用实现类初始化
                // 以我们程序为例子
                // clazz就是class com.whitebrocade.MyLogger
                // type就是class com.whitebrocade.Logger
                // cotor就是public com.whitebrocade.MyLogger()
                if (service.isAssignableFrom(clazz)) {
                    // 通过无参构造器初始化clazz
                    Class<? extends S> type = (Class<? extends S>) clazz;
                    Constructor<? extends S> ctor
                        = (Constructor<? extends S>)getConstructor(clazz);
                    ProviderImpl<S> p = new ProviderImpl<S>(service, type, ctor, acc);
                    // 将实现类赋值给nextProvider
                    // 即Logger logger = new MyLogger()意思
                    nextProvider = (ProviderImpl<T>) p;
                } else {
                    fail(service, clazz.getName() + " not a subtype");
                }
            } catch (ServiceConfigurationError e) {
                nextError = e;
            }
        }
        return true;
    }

    // 省略其它代码...
}
nextService
// java.util.ServiceLoader.LazyClassPathLookupIterator#nextService
private final class LazyClassPathLookupIterator<T>
    implements Iterator<Provider<T>> {
    // 省略其它代码...

    private Provider<T> nextService() {
        // 校验一下
        if (!hasNextService())
            throw new NoSuchElementException();

        //
        Provider<T> provider = nextProvider;
        if (provider != null) {
            nextProvider = null;
            // 将provider返回, provider的赋值动作在hasNextService()
            return provider;
        } else {
            ServiceConfigurationError e = nextError;
            assert e != null;
            nextError = null;
            throw e;
        }
    }

    // 省略其它代码...
}
next()
// java.util.ServiceLoader.LazyClassPathLookupIterator#next
private final class LazyClassPathLookupIterator<T>
    implements Iterator<Provider<T>> {
    // 省略其它代码...

    @Override
    public Provider<T> next() {
        if (acc == null) {
            return nextService();
        } else {
            PrivilegedAction<Provider<T>> action = new PrivilegedAction<>() {
                public Provider<T> run() { return nextService(); }
            };
            return AccessController.doPrivileged(action, acc);
        }
    }

    // 省略其它代码...
}
iterator()
public Iterator<S> iterator() {

    // create lookup iterator if needed
    if (lookupIterator1 == null) {
        lookupIterator1 = newLookupIterator();
    }

    return new Iterator<S>() {

        // record reload count
        final int expectedReloadCount = ServiceLoader.this.reloadCount;

        // index into the cached providers list
        int index;

        /**
             * Throws ConcurrentModificationException if the list of cached
             * providers has been cleared by reload.
             */
        private void checkReloadCount() {
            if (ServiceLoader.this.reloadCount != expectedReloadCount)
                throw new ConcurrentModificationException();
        }

        @Override
        public boolean hasNext() {
            checkReloadCount();
            if (index < instantiatedProviders.size())
                return true;
            return lookupIterator1.hasNext();
        }

        @Override
        public S next() {
            checkReloadCount();
            S next;
            if (index < instantiatedProviders.size()) {
                next = instantiatedProviders.get(index);
            } else {
                next = lookupIterator1.next().get();
                instantiatedProviders.add(next);
            }
            index++;
            return next;
        }

    };
}
流程图
文字描述
当首次使用迭代
- 调用iterator()类中newLookupIterator()初始化迭代器, 并返回迭代器
后续流程
- 调用iterator()类中hasNext()判断是否有下一个实现类
- java.util.Iterator#hasNext
- java.util.ServiceLoader.LazyClassPathLookupIterator#hasNext
- java.util.ServiceLoader.LazyClassPathLookupIterator#hasNextService
- nextProvider == null && nextError == null, nextProvider和nextError均为null则表示没有被赋值或者已经处理完上一个服务提供者且没有遇到错误, 进入whihe循环
- java.util.ServiceLoader.LazyClassPathLookupIterator#nextProviderClass
- 初始化nextProvider
- 返回true表示有下一个元素
- 如果有, 那么就调用iterator()类中next()获取下一个实现类
- java.util.Iterator#next
- newLookupIterator中java.util.Iterator#next ->
- second.hasNext()判断是否有下一个实现类
- java.util.ServiceLoader.LazyClassPathLookupIterator#hasNext
- java.util.ServiceLoader.LazyClassPathLookupIterator#hasNextService
- nextProvider == null && nextError == null, 因为nextProvider不为null, 所以不进入while循环
- 返回的是ture
- 因为second.hasNext()返回的是true, 所以会指定second.next()获取下一个实现类:
- java.util.ServiceLoader.LazyClassPathLookupIterator#next
- java.util.ServiceLoader.LazyClassPathLookupIterator#nextService
- 调用java.util.ServiceLoader.LazyClassPathLookupIterator#hasNextService判断是否下一个服务
- nextProvider == null && nextError == null的条件中, 由于nextProvider不为null, 所以不会进入while循环
- 返回true
- 调用java.util.ServiceLoader.LazyClassPathLookupIterator#hasNextService判断是否下一个服务
- 由于hasNextService()返回的是true, 所以!hasNextService()的值为false, 不会进入抛异常
- nextProvider赋值给provider并返回provider
- second.hasNext()判断是否有下一个实现类
优缺点
优点
- 实现简单
缺点
- 无法做到按需加载, 浪费资源
- 虽然例子中只有一个实现类,但是实际情况下可能会有很多实现类,而Java的SPI会一股脑
全实例化,但是这些实现了不一定都用得着,所以就会白白浪费资源
- 虽然例子中只有一个实现类,但是实际情况下可能会有很多实现类,而Java的SPI会一股脑
- 无法按需获取某个具体的实现
- 也就是这么多实现类,到底该用哪个实现呢?如果要判断具体使用哪个,只能依靠接口本身的设计,比如接口可以设计为一个策略接口,又或者接口可以设计带有优先级的,但是不论怎样设计,框架作者都得写代码进行判断
应用场景
虽然说ServiceLoader可能有些缺点,但是还是有使用场景的,比如说:
- 不需要选择具体的实现,每个被加载的实现都需要被用到
- 虽然需要选择具体的实现,但是可以通过对接口的设计来解决
Spring SPI机制
Spring SPI对 Java SPI 进行了封装增强。我们只需要在resource目录下META-INF/spring.factories中配置接口实现类名,即可通过服务发现机制,在运行时加载接口的实现类
- Spring的存放配置的位置和Java SPI中配置存放的位置默认的地方是不一样的, Spring的是在
META-INF/spring.factories - Spring SPI配置名为
spring.factories, 不可以更改 - 配置为Key-Value的格式为
接口全类名=实现类全类名, 多个实现类的化, Value使用逗号间隔
先让我们整一个Spring SPI的Demo玩一下, 把之间的JDK SPI改造成Spring SPI
-
resource目录下的
META-INF下新建spring.factories文件, 文件中输入下述内容com.whitebrocade.Logger=com.whitebrocade.MyLogger, com.whitebrocade.CustomLogger -
新建一个测试方法
@Test
public void test() {
    List<Logger> loggerList = SpringFactoriesLoader.loadFactories(Logger.class, this.getClass().getClassLoader());
    for (Logger logger : loggerList) {
        logger.log("Hello, Spring SPI!");
    }
}

// 输出结果如下
// 自定义log实现:Hello, Spring SPI!
// 自定义log实现2:Hello, Spring SPI!
Spring SPI机制原理解析
loadFactories()
// org.springframework.core.io.support.SpringFactoriesLoader#loadFactories
public static <T> List<T> loadFactories(Class<T> factoryType, @Nullable ClassLoader classLoader) {
    Assert.notNull(factoryType, "'factoryType' must not be null");
    ClassLoader classLoaderToUse = classLoader;
    if (classLoaderToUse == null) {
        // 确定类加载器
        classLoaderToUse = SpringFactoriesLoader.class.getClassLoader();
    }
    // 解析和加载MEAT-INF下的文件
    List<String> factoryImplementationNames = loadFactoryNames(factoryType, classLoaderToUse);
    if (logger.isTraceEnabled()) {
        logger.trace("Loaded [" + factoryType.getName() + "] names: " + factoryImplementationNames);
    }
    List<T> result = new ArrayList<>(factoryImplementationNames.size());
    for (String factoryImplementationName : factoryImplementationNames) {
        result.add(instantiateFactory(factoryImplementationName, factoryType, classLoaderToUse));
    }
    AnnotationAwareOrderComparator.sort(result);
    return result;
}
loadFactoryNames() 和 loadSpringFactories()
public final class SpringFactoriesLoader {
    /*
    * 加载器所需要加载的路径
    */
    public static final String FACTORIES_RESOURCE_LOCATION = "META-INF/spring.factories";


    // org.springframework.core.io.support.SpringFactoriesLoader#loadFactoryNames
    // 使用给定的类加载器从 “meta-inf/spring.factories” 加载给定类型的工厂实现的完全限定类名
    public static List<String> loadFactoryNames(Class<?> factoryType, @Nullable ClassLoader classLoader) {
        String factoryTypeName = factoryType.getName();
        return loadSpringFactories(classLoader).getOrDefault(factoryTypeName, Collections.emptyList());
    }

    // org.springframework.core.io.support.SpringFactoriesLoader#loadSpringFactories
    private static Map<String, List<String>> loadSpringFactories(@Nullable ClassLoader classLoader) {
        MultiValueMap<String, String> result = cache.get(classLoader);
        if (result != null) {
            return result;
        }

        try {
            // 从 META-INF/spring.factories 下读取
            Enumeration<URL> urls = (classLoader != null ?
                                     classLoader.getResources(FACTORIES_RESOURCE_LOCATION) :
                                     ClassLoader.getSystemResources(FACTORIES_RESOURCE_LOCATION));
            result = new LinkedMultiValueMap<>();
            // 获取后进行循环遍历,因为不止一个包有spring.factories文件
            while (urls.hasMoreElements()) {
                URL url = urls.nextElement();
                UrlResource resource = new UrlResource(url);
                Properties properties = PropertiesLoaderUtils.loadProperties(resource);
                // 获取到了key和value对应关系
                for (Map.Entry<?, ?> entry : properties.entrySet()) {
                    String factoryTypeName = ((String) entry.getKey()).trim();
                    // 循环获取配置文件的value,并放进result集合中
                    for (String factoryImplementationName : StringUtils.commaDelimitedListToStringArray((String) entry.getValue())) {
                        result.add(factoryTypeName, factoryImplementationName.trim());
                    }
                }
            }
            // 并缓存起来,以便后续直接获取
            cache.put(classLoader, result);
            return result;
        }
        catch (IOException ex) {
            throw new IllegalArgumentException("Unable to load factories from location [" +
                                               FACTORIES_RESOURCE_LOCATION + "]", ex);
        }
    }
}
instantiateFactory
@SuppressWarnings("unchecked")
private static <T> T instantiateFactory(String factoryImplementationName, Class<T> factoryType, ClassLoader classLoader) {
    try {
        // 判断factoryImplementationClass对象是不是factoryType的实现类或者子类
        Class<?> factoryImplementationClass = ClassUtils.forName(factoryImplementationName, classLoader);
        // factoryImplementationClass是factoryType的子类或实现类
        // 如果是, 那么就调用factoryImplementationClass的无参构造器初始化对象, 并转成factoryType类型
        // 这里的factoryType相当于接口, factoryImplementationClass相当于实现类
        // 对于我们的程序
        // factoryType就是interface com.whitebrocade.Logger
        // factoryImplementationClass就是class com.whitebrocade.MyLogger
        if (!factoryType.isAssignableFrom(factoryImplementationClass)) {
            throw new IllegalArgumentException(
                "Class [" + factoryImplementationName + "] is not assignable to factory type [" + factoryType.getName() + "]");
        }
        return (T) ReflectionUtils.accessibleConstructor(factoryImplementationClass).newInstance();
    }
    catch (Throwable ex) {
        throw new IllegalArgumentException(
            "Unable to instantiate factory class [" + factoryImplementationName + "] for factory type [" + factoryType.getName() + "]",
            ex);
    }
}
优缺点
优点
- 扩展性强:通过Spring SPI机制,开发者可以轻松地为Spring框架或其他基于Spring的应用程序添加新的功能,而无需修改原有的代码
- 解耦:SPI机制使得服务提供者和使用者之间实现了松耦合,服务提供者只需关注自己的实现,而无需知道有哪些具体的使用者在使用自己的服务
- 灵活性高:SPI机制支持动态加载和替换服务提供者,使得应用程序在运行时能够根据实际需求选择合适的服务提供者实现
缺点
- 没有实现获取指定某个指定实现类的功能,所以要想能够找到具体的某个实现类,还得依靠具体接口的设计
应用场景
Spring的SPI机制在内部使用的非常多,尤其在SpringBoot中大量使用,SpringBoot启动过程中很多扩展点都是通过SPI机制来实现的
PS: 后续也会专门写Spring和SpringBoot系列的博客
SpringBoot自动装配
在SpringBoot3.0之前的版本,自动装配是通过SpringFactoriesLoader来加载的
AutoConfigurationImportSelector#getCandidateConfigurations`
// org.springframework.boot.autoconfigure.AutoConfigurationImportSelector#getCandidateConfigurations
protected List<String> getCandidateConfigurations(AnnotationMetadata metadata, AnnotationAttributes attributes) {
    List<String> configurations = new ArrayList<>(
        // 这里使用到了SpringFactoriesLoader.loadFactoryNames()
        SpringFactoriesLoader.loadFactoryNames(getSpringFactoriesLoaderFactoryClass(), getBeanClassLoader()));
    ImportCandidates.load(AutoConfiguration.class, getBeanClassLoader()).forEach(configurations::add);
    Assert.notEmpty(configurations,
                    "No auto configuration classes found in META-INF/spring.factories nor in META-INF/spring/org.springframework.boot.autoconfigure.AutoConfiguration.imports. If you "
                    + "are using a custom packaging, make sure that file is correct.");
    return configurations;
}

/**
* 返回SpringFactoriesLoader用来加载候选配置的类
* @return the factory class
*/
protected Class<?> getSpringFactoriesLoaderFactoryClass() {
    return EnableAutoConfiguration.class;
}
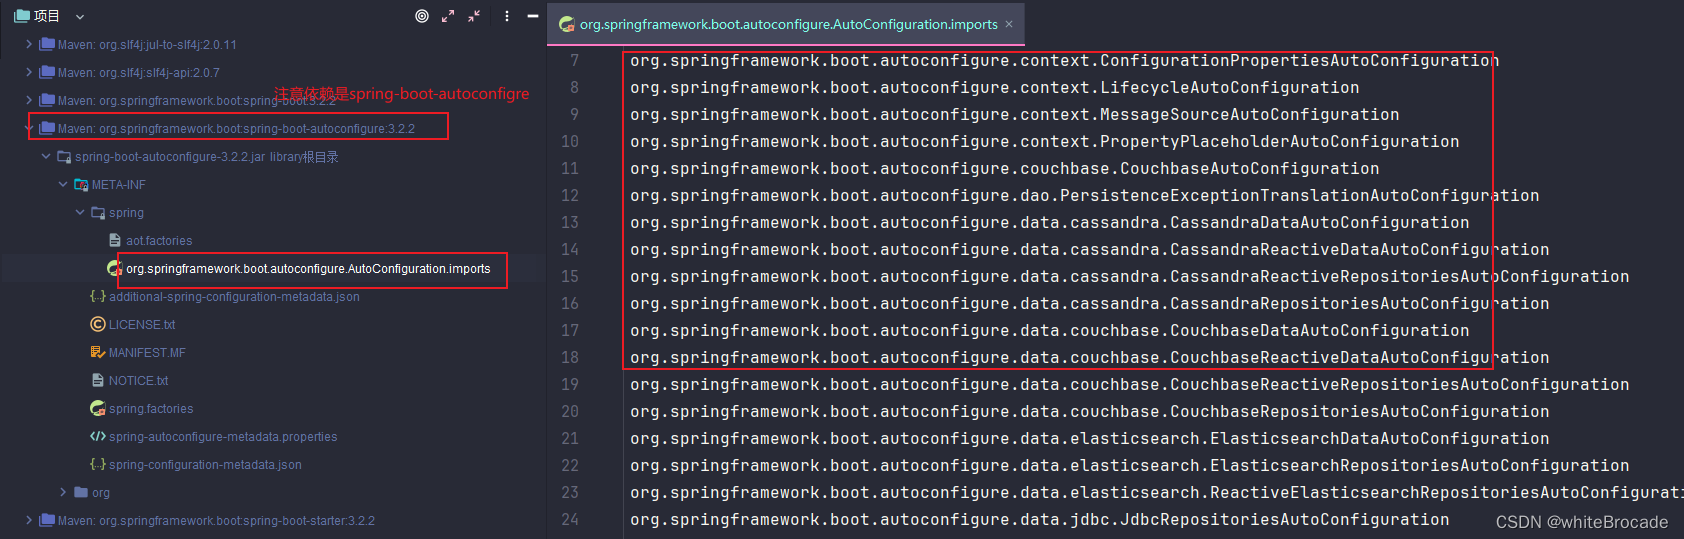
SpringBoot3.0之后不再使用SpringFactoriesLoader,而是Spring重新从META-INF/spring/目录下的org.springframework.boot.autoconfigure.AutoConfiguration.imports文件中读取
AutoConfigurationImportSelector#getCandidateConfigurations
// org.springframework.boot.autoconfigure.AutoConfigurationImportSelector#getCandidateConfigurations
protected List<String> getCandidateConfigurations(AnnotationMetadata metadata, AnnotationAttributes attributes) {
		List<String> configurations = ImportCandidates.load(AutoConfiguration.class, getBeanClassLoader())
			.getCandidates();
		Assert.notEmpty(configurations,
				"No auto configuration classes found in "
						+ "META-INF/spring/org.springframework.boot.autoconfigure.AutoConfiguration.imports. If you "
						+ "are using a custom packaging, make sure that file is correct.");
		return configurations;
	}
ImportCandidates#load
// org.springframework.boot.context.annotation.ImportCandidates
public final class ImportCandidates implements Iterable<String> {
    /*
    * 资源所在位置, 这里的%s是占位符, 后续会使用其他字符代替
    */
    private static final String LOCATION = "META-INF/spring/%s.imports";

    public static ImportCandidates load(Class<?> annotation, ClassLoader classLoader) {
        Assert.notNull(annotation, "'annotation' must not be null");
        // 确定实际上要使用的类加载器
        ClassLoader classLoaderToUse = decideClassloader(classLoader);
        // 构建资源位置, 使用String.format把注解的全限定类名填充到上述模板字符串中
        // 格式: 资源位置位于 META-INF/spring/注解类型的完全限定名.imports
        // 然而这里传递的注解是AutoConfiguration, 全限定类名为org.springframework.boot.autoconfigure.AutoConfiguration
        // 所以拼接完后的资源路径为 META-INF/spring/org.springframework.boot.autoconfigure.AutoConfiguration.imports, 即SpringBoot3.x后续的自动装配类都放在该文件中
        String location = String.format(LOCATION, annotation.getName());
        // findUrlsInClasspath里边会遍历类路径,找到所有与指定位置匹配的URL资源
        Enumeration<URL> urls = findUrlsInClasspath(classLoaderToUse, location);
        List<String> importCandidates = new ArrayList<>();
        // 当获取到类路径上的相关URL资源时,函数通过循环调readCandidateConfigurations(url)方法读取每个URL对应文件的内容。这个方法会读取每行内容(忽略以#开头的注释行),并将非注释行的完全限定类名称添加到名为importCandidates的ArrayList中
        while (urls.hasMoreElements()) {
            URL url = urls.nextElement();
            importCandidates.addAll(readCandidateConfigurations(url));
        }
        return new ImportCandidates(importCandidates);
    }
}
如下图, META-INF/spring/org.springframework.boot.autoconfigure.AutoConfiguration.imports确实有该位置
JDK SPI 和 Spring SPI对比
| Java SPI | Spring SPI | |
|---|---|---|
| 配置位置 | /META-INF/services | SpringBoot3.x之前: spring.factories SpringBoot3.x之后: spring/org.springframework.boot.autoconfigure.AutoConfiguration.imports |
| 接口和配置关系 | 一个配置对应一个接口 | 一个配置对应多个接口 |
| 配置内容 | 接口实现全限定类名 | Key-Value形式, Key为接口全限定类名, Value为实现类全限定类名 |
| 加载机制 | ServiceLoader + 反射 | SpringFactoriesLoader + loadFactoryNames + 反射 |
| 获取接口的实现类的方式 | 不支持, 只能按顺序获取所有实现 | 不支持, 只能按顺序获取所有实现 Spring Boot ClassLoaderh会 优先加载用户的定义的文件, 保证用户定义的文件优先加载 |
SPI 应用场景
日常开发要不要使用SPI?
不推荐, 主要原因还是我们可以使用更优雅的方式来替代SPI机制,比如:
- 动态初始化、策略选择: 我们可以使用策略+工厂模式实现策略的动态选择
- 解耦: 基于良好的设计,可以很容易的实现解耦
框架/组件工具开发要不要使用SPI?
基本都会使用到SPI, 现在的诸多框架及工具就是使用SPI来实现的,引入了SPI机制后,服务接口与服务实现就会达成分离的状态,可以实现解耦以及可扩展机制
Java实现的SPI版本相对比较粗糙和暴力,导致它会把所有接口实现类全部实例化一遍,所以还有框架会对Java的SPI进行封装和优化
参考资料
JDK/Dubbo/Spring 三种 SPI 机制,谁更好?


 2058
2058


 被折叠的 条评论
为什么被折叠?
被折叠的 条评论
为什么被折叠?
 到【灌水乐园】发言


