


MyBatis-Plus快速入门
文章目录
一、mybatis-plus是什么?
MyBatisPlus(简称 MP)是一个 MyBatis的增强工具,在 MyBatis 的基础上只做增强不做改变,为简化开 发、提高效率而生。
就像 魂斗罗 中的 1P、2P,基友搭配,效率翻倍。

特性
-
无侵入:只做增强不做改变,引入它不会对现有工程产生影响,如丝般顺滑
-
损耗小:启动即会自动注入基本 CURD,性能基本无损耗,直接面向对象操作
-
强大的 CRUD 操作:内置通用 Mapper、通用 Service,仅仅通过少量配置即可实现单表大部分 CRUD 操作, 更有强大的条件构造器,满足各类使用需求
-
支持 Lambda 形式调用:通过 Lambda 表达式,方便的编写各类查询条件,无需再担心字段写错
-
支持主键自动生成:支持多达 4 种主键策略(内含分布式唯一 ID 生成器 Sequence),可自由配置,完美解 决主键问题
-
支持 ActiveRecord 模式:支持 ActiveRecord 形式调用,实体类只需继承 Model 类即可进行强大的 CRUD 操 作
-
支持自定义全局通用操作:支持全局通用方法注入( Write once, use anywhere )
-
内置代码生成器:采用代码或者 Maven 插件可快速生成 Mapper 、 Model 、 Service 、 Controller 层代码,支持模板引擎,更有超多自定义配置等您来使用
-
内置分页插件:基于 MyBatis 物理分页,开发者无需关心具体操作,配置好插件之后,写分页等同于普通 List 查询
-
分页插件支持多种数据库:支持 MySQL、MariaDB、Oracle、DB2、H2、HSQL、SQLite、Postgre、 SQLServer 等多种数据库
-
内置性能分析插件:可输出 Sql 语句以及其执行时间,建议开发测试时启用该功能,能快速揪出慢查询
-
内置全局拦截插件:提供全表 delete 、 update 操作智能分析阻断,也可自定义拦截规则,预防误操作
官网
二、mybatis-plus快速使用
1.引入mybatis-plus相关maven依赖
代码如下(示例):
<!‐‐ https://mvnrepository.com/artifact/com.baomidou/mybatis‐plus ‐‐>
<dependency>
<groupId>com.baomidou</groupId>
<artifactId>mybatis‐plus</artifactId>
<version>3.3.1</version>
</dependency>
引入mybatis-plus在spring boot中的场景启动器
<!‐‐ https://mvnrepository.com/artifact/com.baomidou/mybatis‐plus‐boot‐starter ‐‐>
<dependency>
<groupId>com.baomidou</groupId>
<artifactId>mybatis‐plus‐boot‐starter</artifactId>
<version>3.3.1</version>
</dependency>
ps:切记不可再在pom.xml文件中引入mybatis与mybatis-spring的maven依赖,这一点,mybatis-plus的官方文档中已经 说明的很清楚了.
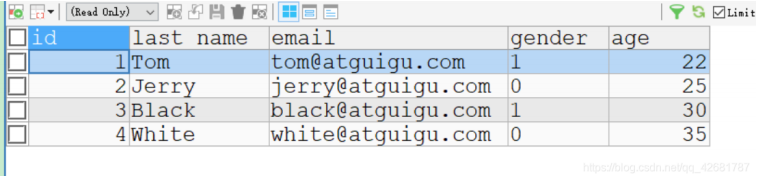
2.创建数据表
(1)SQL语句:
‐‐ 创建表
     CREATE TABLE tbl_employee(
		id INT(11) PRIMARY KEY AUTO_INCREMENT,
		last_name VARCHAR(50),
		email VARCHAR(50),
		gender CHAR(1),
		age INT
	);
	INSERT INTO tbl_employee(last_name,email,gender,age) VALUES('Tom','tom@atguigu.com',1,22);
	INSERT INTO tbl_employee(last_name,email,gender,age) VALUES('Jerry','jerry@atguigu.com',0,25);
	INSERT INTO tbl_employee(last_name,email,gender,age) VALUES('Black','black@atguigu.com',1,30);
	INSERT INTO tbl_employee(last_name,email,gender,age) VALUES('White','white@atguigu.com',0,35);
(2) 数据表结构
3.创建java bean
根据数据表新建相关实体类
package com.example.demo.pojo;

 public Employee() {
    }

    public Employee(Integer id, String lastName, String email, Integer gender, Integer age) {
        this.id = id;
        this.lastName = lastName;
        this.email = email;
        this.gender = gender;
        this.age = age;
    }

    public Integer getId() {
        return id;
    }

    public void setId(Integer id) {
        this.id = id;
    }

    public String getLastName() {
        return lastName;
    }

    public void setLastName(String lastName) {
        this.lastName = lastName;
    }

    public String getEmail() {
        return email;
    }

    public void setEmail(String email) {
        this.email = email;
    }

    public Integer getGender() {
        return gender;
    }

    public void setGender(Integer gender) {
        this.gender = gender;
    }

    public Integer getAge() {
        return age;
    }

    public void setAge(Integer age) {
        this.age = age;
    }

    @Override
    public String toString() {
        return "Employee{" +
                "id=" + id +
                ", lastName='" + lastName + '\'' +
                ", email='" + email + '\'' +
                ", gender=" + gender +
                ", age=" + age +
                '}';
    }
}
4.配置application.proprties
数据源使用druid
spring.datasource.username=root
spring.datasource.password=root
spring.datasource.url=jdbc:mysql://127.0.0.1:3306/my?useUnicode=true&characterEncoding=UTF‐8&useSSL=fa lse&serverTimezone=GMT%2B8
spring.datasource.driver‐class‐name=com.mysql.cj.jdbc.Driver

spring.datasource.type=com.alibaba.druid.pool.DruidDataSource
三、mybatis-plus入门案例(helloworld—CRUD实验)
1.mybatis与mybatis-plus实现方式对比
1)提出问题:
假设我们已存在一张 tbl_employee 表,且已有对应的实体类 Employee,实现 tbl_employee 表的 CRUD 操作我们需要做什么呢?

2)实现方式:
基于 Mybatis 需要编写 EmployeeMapper 接口,并手动编写 CRUD 方法 提供 EmployeeMapper.xml 映 射文件,并手动编写每个方法对应的 SQL 语句. 基于 Mybatis-plus 只需要创建 EmployeeMapper 接口, 并继承 BaseMapper 接口.这就是使用 mybatis-plus 需要完成的所有操作,甚至不需要创建 SQL 映射文件。
2.BaseMapper接口介绍
2.1、如何理解核心接口BaseMapper?
	在使用Mybatis-Plus是,核心操作类是BaseMapper接口,其最终也是利用的Mybatis接口编程的实现机制,其默认提供 了一系列的增删改查的基础方法,
并且开发人员对于这些基础操作不需要写SQL进行处理操作(Mybatis提供的机制就是 需要开发人员在mapper.xml中提供sql语句),那样我们可以猜测
肯定是Mybatis-Plus完成了BaseMapper接口提供的 方法的SQL语句的生成操作。
2.2、BaseMapper接口为我们定义了哪些方法?
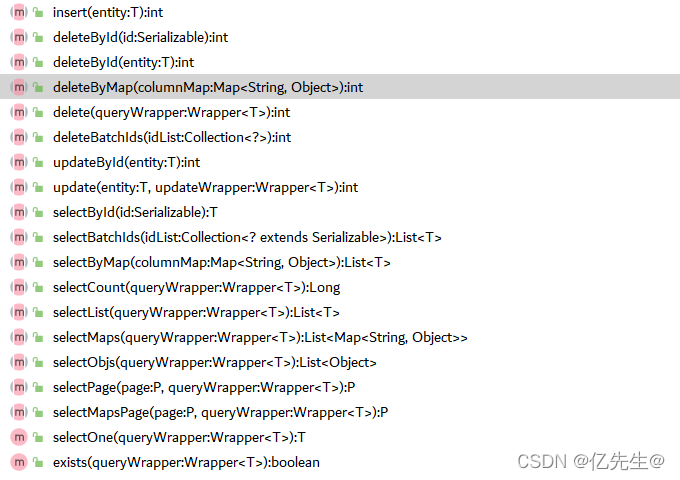
BaseMapper接口源码:
 /*
  * Copyright (c) 2011‐2020, baomidou (jobob@qq.com).
  * <p>
  * Licensed under the Apache License, Version 2.0 (the "License"); you may not
  * use this file except in compliance with the License. You may obtain a copy of
  * the License at
  * <p>
  * https://www.apache.org/licenses/LICENSE‐2.0
  * <p>
  * Unless required by applicable law or agreed to in writing, software
  * distributed under the License is distributed on an "AS IS" BASIS, WITHOUT
  * WARRANTIES OR CONDITIONS OF ANY KIND, either express or implied. See the
  * License for the specific language governing permissions and limitations under
  * the License.
  */
  package com.baomidou.mybatisplus.core.mapper;

  import com.baomidou.mybatisplus.core.conditions.Wrapper;
  import com.baomidou.mybatisplus.core.metadata.IPage;
  import com.baomidou.mybatisplus.core.toolkit.Constants;
  import org.apache.ibatis.annotations.Param;

  import java.io.Serializable;
   import java.util.Collection;
  import java.util.List;
  import java.util.Map;

  /**
  	* Mapper 继承该接口后,无需编写 mapper.xml 文件,即可获得CRUD功能
  	* <p>这个 Mapper 支持 id 泛型</p>
  	*
  	* @author 小亿
  	* @since 2022‐03‐25
  */
   public interface BaseMapper<T> extends Mapper<T> {

  /**
  	* 插入一条记录
  	*
  	* @param entity 实体对象
  */
   int insert(T entity);

   /**
  	* 根据 ID 删除
  	*
  	* @param id 主键ID
  	*/
  	 int deleteById(Serializable id);

  /**
  	* 根据 columnMap 条件,删除记录
  	*
  	* @param columnMap 表字段 map 对象
  */
  	int deleteByMap(@Param(Constants.COLUMN_MAP) Map<String, Object> columnMap);

  /**
  	* 根据 entity 条件,删除记录
  	*
  	* @param wrapper 实体对象封装操作类(可以为 null)
  */
  int delete(@Param(Constants.WRAPPER) Wrapper<T> wrapper);

   /**
   * 删除(根据ID 批量删除)
   *
   * @param idList 主键ID列表(不能为 null 以及 empty)
   */
   int deleteBatchIds(@Param(Constants.COLLECTION) Collection<? extends Serializable> idList);

   /**
   * 根据 ID 修改
   *
   * @param entity 实体对象
   */
   int updateById(@Param(Constants.ENTITY) T entity);

   /**
   * 根据 whereEntity 条件,更新记录
   *
   * @param entity 实体对象 (set 条件值,可以为 null)
   * @param updateWrapper 实体对象封装操作类(可以为 null,里面的 entity 用于生成 where 语句)
   */
   int update(@Param(Constants.ENTITY) T entity, @Param(Constants.WRAPPER) Wrapper<T> updateWrapper);

   /**
   * 根据 ID 查询
   *
   * @param id 主键ID
   */
   T selectById(Serializable id);

   /**
   * 查询(根据ID 批量查询)
   *
   * @param idList 主键ID列表(不能为 null 以及 empty)
   */
   List<T> selectBatchIds(@Param(Constants.COLLECTION) Collection<? extends Serializable> idList);

   /**
   * 查询(根据 columnMap 条件)
   *
   * @param columnMap 表字段 map 对象
   */
   List<T> selectByMap(@Param(Constants.COLUMN_MAP) Map<String, Object> columnMap);

   /**
   * 根据 entity 条件,查询一条记录
   *
   * @param queryWrapper 实体对象封装操作类(可以为 null)
   */
   T selectOne(@Param(Constants.WRAPPER) Wrapper<T> queryWrapper);

   /**
   * 根据 Wrapper 条件,查询总记录数
   *
   * @param queryWrapper 实体对象封装操作类(可以为 null)
   */
   Integer selectCount(@Param(Constants.WRAPPER) Wrapper<T> queryWrapper);

   /**
   * 根据 entity 条件,查询全部记录
   *
   * @param queryWrapper 实体对象封装操作类(可以为 null)
   */
   List<T> selectList(@Param(Constants.WRAPPER) Wrapper<T> queryWrapper);

   /**
   * 根据 Wrapper 条件,查询全部记录
   *
   * @param queryWrapper 实体对象封装操作类(可以为 null)
   */
   List<Map<String, Object>> selectMaps(@Param(Constants.WRAPPER) Wrapper<T> queryWrapper);

   /**
   * 根据 Wrapper 条件,查询全部记录
   * <p>注意: 只返回第一个字段的值</p>
   *
   * @param queryWrapper 实体对象封装操作类(可以为 null)
   */
   List<Object> selectObjs(@Param(Constants.WRAPPER) Wrapper<T> queryWrapper);

   /**
   * 根据 entity 条件,查询全部记录(并翻页)
   *
   * @param page 分页查询条件(可以为 RowBounds.DEFAULT)
   * @param queryWrapper 实体对象封装操作类(可以为 null)
   */
   <E extends IPage<T>> E selectPage(E page, @Param(Constants.WRAPPER) Wrapper<T> queryWrapper);

   /**
   * 根据 Wrapper 条件,查询全部记录(并翻页)
   *
   * @param page 分页查询条件
   * @param queryWrapper 实体对象封装操作类
   */
   <E extends IPage<Map<String, Object>>> E selectMapsPage(E page, @Param(Constants.WRAPPER) Wrapper<T> queryWrapper);
   }
2.3、mybatis-plus中常用的注解
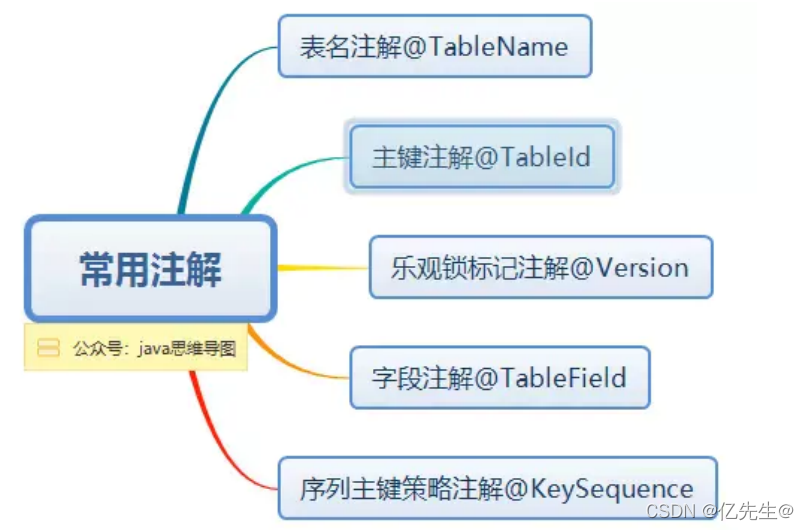
@ @TableName:对数据表名注解

 @TableId:表主键标识

 @TableId(value = "id", type = IdType.AUTO):自增

 @TableId(value = "id", type = IdType.ID_WORKER_STR):分布式全局唯一ID字符串类型

 @TableId(value = "id", type = IdType.INPUT):自行输入

 @TableId(value = "id", type = IdType.ID_WORKER):分布式全局唯一ID 长整型类型

 @TableId(value = "id", type = IdType.UUID):32位UUID字符串

 @TableId(value = "id", type = IdType.NONE):无状态

 @TableField:表字段标识

 @TableField(exist = false):表示该属性不为数据库表字段,但又是必须使用的。

 @TableField(exist = true):表示该属性为数据库表字段。

 @TableField(condition = SqlCondition.LIKE):表示该属性可以模糊搜索。

 @TableField(fill = FieldFill.INSERT):注解填充字段 ,生成器策略部分也可以配置!

 @FieldStrategy:

 @FieldFill

 @Version:乐观锁注解、标记

 @EnumValue:通枚举类注解

 @TableLogic:表字段逻辑处理注解(逻辑删除)

 @SqlParser:租户注解

 @KeySequence:序列主键策略
常用的就三个:@TableName @TableId @TableField
查看更多注解以及详解,请移步至官网:
https://mybatis.plus/guide/annotation.html
2.3.1、在实体类中添加注解,保证属性名与列名一致
由于我们的数据表名于实体类的类名不一致,并且实体类于数据表还存在字段名不对应的情况,因此我们需要引入mybatis- plus的注解.
@Component
@TableName(value = "tbl_employee")
public class Employee {
/*
 * @TableId:
 * value: 指定表中的主键列的列名, 如果实体属性名与列名一致,可以省略不指定.
 * type: 指定主键策略.
 */
	@TableId(value="id" , type =IdType.AUTO)
    private Integer id;
    @TableField(value = "last_name")
    private String lastName;
    private String email;
    private Integer gender;
    private Integer age;

    public Employee() {
    }

    public Employee(Integer id, String lastName, String email, Integer gender, Integer age) {
        this.id = id;
        this.lastName = lastName;
        this.email = email;
        this.gender = gender;
        this.age = age;
    }

    public Integer getId() {
        return id;
    }

    public void setId(Integer id) {
        this.id = id;
    }

    public String getLastName() {
        return lastName;
    }

    public void setLastName(String lastName) {
        this.lastName = lastName;
    }

    public String getEmail() {
        return email;
    }

    public void setEmail(String email) {
        this.email = email;
    }

    public Integer getGender() {
        return gender;
    }

    public void setGender(Integer gender) {
        this.gender = gender;
    }

    public Integer getAge() {
        return age;
    }

    public void setAge(Integer age) {
        this.age = age;
    }

    @Override
    public String toString() {
        return "Employee{" +
                "id=" + id +
                ", lastName='" + lastName + '\'' +
                ", email='" + email + '\'' +
                ", gender=" + gender +
                ", age=" + age +
                '}';
    }
}
2.3.2、增删查改操作
编写EmployeeMapper接口继承BaseMapper接口
package com.example.demo.mapper;

 import org.apache.ibatis.annotations.Mapper;


 import com.baomidou.mybatisplus.core.mapper.BaseMapper;
 import com.example.demo.pojo.Employee;
 /**
 *
 * @author zhou'en'xian
 *基于Mybatis‐plus实现: 让XxxMapper接口继承 BaseMapper接口即可.
 *BaseMapper<T> : 泛型指定的就是当前Mapper接口所操作的实体类类型
 */
  @Mapper
  public interface EmpolyeeMapper extends BaseMapper<Employee> {


  }
准备测试环境:
package com.example.demo;

import org.junit.jupiter.api.Test;
import org.springframework.beans.factory.annotation.Autowired;
import org.springframework.boot.test.context.SpringBootTest;

import com.example.demo.mapper.EmpolyeeMapper;
import com.example.demo.pojo.Employee;

@SpringBootTest
class MybatisplusApplicationTests {
 @Autowired
 private Employee employee;

 @Autowired
 private EmpolyeeMapper empolyeeMapper;

}
2.3.2.1、插入
// 插入一条记录
int insert(T entity);

 @Test
 void insert() {
 	employee.setAge(20);
 	employee.setEmail("123@qq.com");
 	employee.setGender(1);
 	employee.setLastName("张三");
 	empolyeeMapper.insert(employee);
 //int id=employee.getId();此方法可以获取插入当前记录在数据库中的id
 //在mybatis中如果立马获取插入数据的主键id,是不是需要配置呢?感受到mybatis‐plus的强大了吗?


 }
2.3.2.2、修改
// 根据 ID 修改
 int updateById(@Param(Constants.ENTITY) T entity);
 //T entity 实体对象 (set 条件值,可为 null)
 @Test
 void update() {
 	employee.setId(1);
 	employee.setAge(18);
 	employee.setEmail("3123@hpu.edu");
	employee.setGender(0);
 	employee.setLastName("lili");
    empolyeeMapper.updateById(employee);
  }
控制台打印出的sql语句

如果我们不设置实体类的email与gender属性,结果是怎样的呢?
@Test
 void update() {
 	employee.setId(2);
 	employee.setAge(21);
 	//employee.setEmail("3123@hpu.edu");
	//employee.setGender(1);
 	employee.setLastName("bob");
    empolyeeMapper.updateById(employee);
  }
控制台sql语句:

显然,mybatis-plus为我们做了非空判断,空值的话,默认不更新对应的字段.想一想,这是不是类似于mybatis中的动态sql呢? 这种处理效果又会带来什么好处呢?
2.3.2.3、查询
 // 根据 ID 查询
  T selectById(Serializable id);


  // 查询(根据ID 批量查询)
  List<T> selectBatchIds(@Param(Constants.COLLECTION) Collection<? extends Serializable> idList);

  // 查询(根据 columnMap 条件)
  List<T> selectByMap(@Param(Constants.COLUMN_MAP) Map<String, Object> columnMap);
selectById方法
 @Test
  void select() {
  	Employee employee=empolyeeMapper.selectById(4);
  	System.out.println(employee);
 }

selectBatchIds方法
@Test
 void select() {
 	List<Integer>list =new ArrayList<Integer>();
 	list.add(1);
 	list.add(2);
 	list.add(3);
 	List<Employee>li=empolyeeMapper.selectBatchIds(list);
 	for(Employee employee:li) {
 	System.out.println(employee);
 	}
 }

ps:发现该方法底层使用的竟然是sql的in关键字
selectByMap方法
@Test
 void select() {
 	Map<String,Object>map=new HashMap<String, Object>();
 	map.put("age", 22);
 	map.put("id", 16);
 	List<Employee>li=empolyeeMapper.selectByMap(map);
 	for(Employee employee:li) {
 		System.out.println(employee);
 	}
 }

2.3.2.1、删除
 // 删除(根据ID 批量删除)
 int deleteBatchIds(@Param(Constants.COLLECTION) Collection<? extends Serializable> idList);
 // 根据 ID 删除
 int deleteById(Serializable id);
 // 根据 columnMap 条件,删除记录
 int deleteByMap(@Param(Constants.COLUMN_MAP) Map<String, Object> columnMap)
四、不得不提的条件构造器–Wrapper

1.wrapper及其子类介绍
1.1、Wrapper
条件构造抽象类,最顶端父类,抽象类中提供3个方法以及其他方法.

1.2、AbstractWrapper
用于查询条件封装,生成 sql 的 where 条件,QueryWrapper(LambdaQueryWrapper) 和 UpdateWrapper(LambdaUpdateWrapper) 的父类用于生成 sql 的 where 条件, entity 属性也用于生成 sql 的 where 条件

AbstractWrapper比较重要,里面的方法需要重点学习. 该抽象类提供的重要方法如下:

1.3、AbstractLambdaWrapper
Lambda 语法使用 Wrapper统一处理解析 lambda 获取 column。
1.4、LambdaQueryWrapper
看名称也能明白就是用于Lambda语法使用的查询Wrapper
1.5、LambdaUpdateWrapper
Lambda 更新封装Wrapper
1.6、QueryWrapper
Entity 对象封装操作类,不是用lambda语法,自身的内部属性 entity 也用于生成 where 条件
该类的重要方法(select方法):
 select(String... sqlSelect)
 select(Predicate<TableFieldInfo> predicate)
 select(Class<T> entityClass, Predicate<TableFieldInfo> predicate)
 /*
 例: select("id", "name", "age")
 例: select(i ‐> i.getProperty().startsWith("test"))
 */
1.7、UpdateWrapper
Update 条件封装,用于Entity对象更新操作.
该类主要有以下三个重要的方法:
set方法
 set(String column, Object val)
 set(boolean condition, String column, Object val)
 /*
 SQL SET 字段
 例: set("name", "老李头")
 例: set("name", "")‐‐‐>数据库字段值变为空字符串
 例: set("name", null)‐‐‐>数据库字段值变为null
 说明:boolean condition为控制该字段是否拼接到最终的sql语句中
 */
setSql方法
setSql(String sql)
 /*
 设置 SET 部分 SQL
 例: setSql("name = '老李头'")
 */
2.带条件的crud实验
2.1、带条件的查询
// 根据 entity 条件,查询一条记录
 T selectOne(@Param(Constants.WRAPPER) Wrapper<T> queryWrapper);

 // 根据 entity 条件,查询全部记录
 List<T> selectList(@Param(Constants.WRAPPER) Wrapper<T> queryWrapper);

 // 根据 Wrapper 条件,查询全部记录
 List<Map<String, Object>> selectMaps(@Param(Constants.WRAPPER) Wrapper<T> queryWrapper);
 // 根据 Wrapper 条件,查询全部记录。注意: 只返回第一个字段的值
 List<Object> selectObjs(@Param(Constants.WRAPPER) Wrapper<T> queryWrapper);

 // 根据 entity 条件,查询全部记录(并翻页)
 IPage<T> selectPage(IPage<T> page, @Param(Constants.WRAPPER) Wrapper<T> queryWrapper);
 // 根据 Wrapper 条件,查询全部记录(并翻页)
 IPage<Map<String, Object>> selectMapsPage(IPage<T> page, @Param(Constants.WRAPPER) Wrapper<T> queryWr apper);
 // 根据 Wrapper 条件,查询总记录数
 Integer selectCount(@Param(Constants.WRAPPER) Wrapper<T> queryWrapper);
2.2、带条件的更新
 @Test
 void update() {
  UpdateWrapper<Employee> updateWrapper=new UpdateWrapper<Employee>();
  updateWrapper.eq("last_name", "lili").eq("age", 18).set("id", 100).set(false, "email", "000@qq.com");
  empolyeeMapper.update(employee, updateWrapper);

  	}
  }

其中set(“id”, 100).set(false, “email”, “000@qq.com”);中email属性设置为false,从执行的sql可以看出,设置为false不会 拼接到最终的执行sql中
2.3、带条件的删除
 // 根据 entity 条件,删除记录
 int delete(@Param(Constants.WRAPPER) Wrapper<T> wrapper);

 // 根据 columnMap 条件,删除记录
 int deleteByMap(@Param(Constants.COLUMN_MAP) Map<String, Object> columnMap);
五、扩展
1.全局ID生成策略
在全局配置文件中: 就不需要再每个Pojo主键上配置了
 mybatis‐plus:
 global‐config:
 db‐config:
 id‐type: auto
2.逻辑删除
物理删除: 在删除的时候直接将数据从数据库干掉DELTE
逻辑删除: 从逻辑层面控制删除,通常会在表里添加一个逻辑删除的字段比如 enabled 、is_delete ,数据默认是有效的(值为1), 当用户删除时将数据修改UPDATE 0, 在查询的时候就只查where enabled=1.
使用步骤:
可到百度上查
3.执行 SQL 分析打印
 <dependency>
 <groupId>p6spy</groupId>
 <artifactId>p6spy</artifactId>
 <version>最新版本</version>
 </dependency>

添加p6spy : spy.properties
 #3.2.1以上使用
 modulelist=com.baomidou.mybatisplus.extension.p6spy.MybatisPlusLogFactory,com.p6spy.engine.outage.P6Ou tageFactory
 #3.2.1以下使用或者不配置
 #modulelist=com.p6spy.engine.logging.P6LogFactory,com.p6spy.engine.outage.P6OutageFactory
 # 自定义日志打印
 logMessageFormat=com.baomidou.mybatisplus.extension.p6spy.P6SpyLogger
 #日志输出到控制台
 appender=com.baomidou.mybatisplus.extension.p6spy.StdoutLogger
 # 使用日志系统记录 sql
 #appender=com.p6spy.engine.spy.appender.Slf4JLogger
 # 设置 p6spy driver 代理
 deregisterdrivers=true
 # 取消JDBC URL前缀
 useprefix=true
 # 配置记录 Log 例外,可去掉的结果集有error,info,batch,debug,statement,commit,rollback,result,resultset.
 excludecategories=info,debug,result,commit,resultset
 # 日期格式 18 dateformat=yyyy‐MM‐dd HH:mm:ss
 # 实际驱动可多个 20 #driverlist=org.h2.Driver
 # 是否开启慢SQL记录
 outagedetection=true
 # 慢SQL记录标准 2 秒
 outagedetectioninterval=2
4.SQL 日志美化插件


5.数据安全保护
防止删库跑路
5.1、得到16位随机秘钥
 @Test
 void test(){// 生成 16 位随机 AES 密钥
  String randomKey = AES.generateRandomKey();
  System.out.println(randomKey);
 }
  da12166c7db8a58f
5.2、根据秘钥加密 数据库连接信息
@Test
void test(){

 String url = AES.encrypt("jdbc:mysql://localhost:3306/mybatisplus?characterEncoding=utf8&useSSL=false &serverTimezone=UTC&" , "da12166c7db8a58f");
 String uname = AES.encrypt("root" , "da12166c7db8a58f");
 String pwd = AES.encrypt("root" , "da12166c7db8a58f");

 System.out.println(url);
 System.out.println(uname);
 System.out.println(pwd);
 }

5.3、修改配置文件 注意要mpw:开头
username: mpw:0Cj49ihj1Q6UbkRfixFdVg==
password: mpw:yp192XvO1C0jq67MeCvlIg==
url:mpw:nIh0E63gBfvpFbz2tXDyWDN2kFpD+apc9JaRYosGY5sKL3zyNwalK3OfGo27p8AM8BL0llHGFwpfdELaf79NIxm8kfOMh UdOFLNy7g85BTCrEzbYEHqp3THf7KOz80Ka
5.4、在部署的时候需要解密
java ‐jar xxxx.jar ‐‐mpw.key=你的16位随机秘钥, 越少人知道越好
六、代码生成器
package com.tulingxueyuan;

 import com.baomidou.mybatisplus.core.exceptions.MybatisPlusException;
 import com.baomidou.mybatisplus.core.toolkit.StringPool;
 import com.baomidou.mybatisplus.core.toolkit.StringUtils;
 import com.baomidou.mybatisplus.generator.AutoGenerator;
 import com.baomidou.mybatisplus.generator.InjectionConfig;
 import com.baomidou.mybatisplus.generator.config.*;
 import com.baomidou.mybatisplus.generator.config.po.LikeTable;
 import com.baomidou.mybatisplus.generator.config.po.TableInfo;
 import com.baomidou.mybatisplus.generator.config.rules.DateType;
 import com.baomidou.mybatisplus.generator.config.rules.NamingStrategy;

 import java.util.ArrayList;
 import java.util.List;
 import java.util.Scanner;

  /***
  * @Author 小亿 QQ:1901257519
  * @Slogan 学而用之,用而学之
  *
  * pms_product
  */
  public class GeneratorApp {

 /**
 * <p>
 * 读取控制台内容
 * </p>
 */
 public static String scanner(String tip) {
 Scanner scanner = new Scanner(System.in);
 StringBuilder help = new StringBuilder();
 help.append("请输入" + tip + ":");
 System.out.println(help.toString());
 // 判断用户是否输入
 if (scanner.hasNext()) {
 // 拿到输入内容
 String ipt = scanner.next();
 if (StringUtils.isNotBlank(ipt)) {
 return ipt;
 }
 }
 throw new MybatisPlusException("请输入正确的" + tip + "!");
 }

 public static void main(String[] args) {

 String moduleName = scanner("模块名");
 String tableName = scanner("表名(多个用,号分隔,或者按前缀(pms*))");
 String prefixName = scanner("需要替换的表前缀");


 // 代码生成器 55 AutoGenerator mpg = new AutoGenerator();

 // 全局配置
 GlobalConfig gc = new GlobalConfig();
 // 获得当前项目的路径
 String projectPath = System.getProperty("user.dir")+"/05_generator";
 // 设置生成路径
 gc.setOutputDir(projectPath + "/src/main/java");
 // 作者
 gc.setAuthor("xushu");
 // 代码生成是不是要打开所在文件夹
 gc.setOpen(false);
 // 生成Swagger2注解
 gc.setSwagger2(true);
 // 会在mapper.xml 生成一个基础的<ResultMap> 映射所有的字段
 gc.setBaseResultMap(true);
 // 同文件生成覆盖
 gc.setFileOverride(true);
 //gc.setDateType(DateType.ONLY_DATE)
 // 实体名:直接用表名 %s=表名
 gc.setEntityName("%s");
 // mapper接口名
 gc.setMapperName("%sMapper");
 // mapper.xml 文件名
 gc.setXmlName("%sMapper");
// 业务逻辑类接口名
 gc.setServiceName("%sService");
 // 业务逻辑类实现类名
 gc.setServiceName("%sImplService");
 // 将全局配置设置到AutoGenerator
 mpg.setGlobalConfig(gc);


 // 数据源配置
 DataSourceConfig dsc = new DataSourceConfig();
 dsc.setUrl("jdbc:mysql://localhost:3306/bob?characterEncoding=utf8&useSSL=false&serverTimezo ne=UTC&");
 dsc.setDriverName("com.mysql.cj.jdbc.Driver");
 dsc.setUsername("root");
 dsc.setPassword("root");
 mpg.setDataSource(dsc);

 // 包配置
 PackageConfig pc = new PackageConfig();
 // 模块名
 pc.setModuleName(moduleName);
 // 包名
 pc.setParent("com.bob");
 // 完整的报名: com.bob.pms
 mpg.setPackageInfo(pc);


 // 自定义配置
 InjectionConfig cfg = new InjectionConfig() {
 @Override
 public void initMap() {
 // to do nothing
 }
 };

 // 如果模板引擎是 velocity
 String templatePath = "/templates/mapper.xml.vm";
 // 自定义输出配置
 List<FileOutConfig> focList = new ArrayList<>();
 // 自定义配置会被优先输出
 focList.add(new FileOutConfig(templatePath) {
 @Override
 public String outputFile(TableInfo tableInfo) {
 // 自定义输出文件名 , 如果你 Entity 设置了前后缀、此处注意 xml 的名称会跟着发生变化!!
 return projectPath + "/src/main/resources/mapper/" + pc.getModuleName()
 + "/" + tableInfo.getEntityName() + "Mapper" + StringPool.DOT_XML;
 }
 });

 cfg.setFileOutConfigList(focList);
 mpg.setCfg(cfg);

 // 配置模板
 TemplateConfig templateConfig = new TemplateConfig();

 // 把已有的xml生成置空
 templateConfig.setXml(null);
 mpg.setTemplate(templateConfig);

 // 策略配置
 StrategyConfig strategy = new StrategyConfig();
 // 表名的生成策略:下划线转驼峰 pms_product ‐‐ PmsProduct
 strategy.setNaming(NamingStrategy.underline_to_camel);
 // 列名的生成策略:下划线转驼峰 last_name ‐‐ lastName
 strategy.setColumnNaming(NamingStrategy.underline_to_camel);
 //strategy.setSuperEntityClass("你自己的父类实体,没有就不用设置!");
 //strategy.setEntityLombokModel(true);
 // 在controller类上是否生成@RestController
 strategy.setRestControllerStyle(true); 150 // 公共父类 1 //strategy.setSuperControllerClass("你自己的父类控制器,没有就不用设置!");

 if(tableName.indexOf('*')>0){
 // 按前缀生成表
 strategy.setLikeTable(new LikeTable(tableName.replace('*','_')));
 }
 else{
 // 要生成的表名 多个用逗号分隔
 strategy.setInclude(tableName);
 }
 // 设置表替换前缀
 strategy.setTablePrefix(prefixName);
 // 驼峰转连字符 比如 pms_product ‐‐> controller @RequestMapping("/pms/pmsProduct")
 //strategy.setControllerMappingHyphenStyle(true);
 mpg.setStrategy(strategy);

 // 进行生成
 mpg.execute();

 }
 }
`


 2181
2181


 被折叠的 条评论
为什么被折叠?
被折叠的 条评论
为什么被折叠?
 到【灌水乐园】发言


