


原来的每个层都是一个独立的项目—一个终极项目由这些各层独立的项目组
如果发现
这边的centity或cweb是灰色,那么
找到这里,把打勾的取消打勾然后应用就好了。
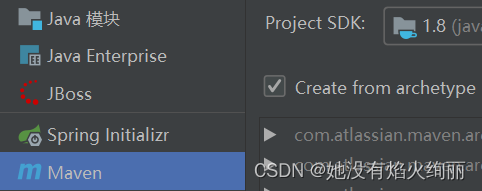
1.File–>new–>project 选择Maven 点击下一个
GorupId:项目路径 eg:com.jr.dz10b
ArtifactId:简单理解为项目名 eg:mavenssm99 点击下一个 完成 --》成功创建一个普通Maven项目然后就能在新项目里看到这个 
点击 Enable Auto-Import 自动导入 等它导入完再做其它操作
导入完成后,在最下面的pom.xml里添加如下代码
<?xml version="1.0" encoding="UTF-8"?>

<project xmlns="http://maven.apache.org/POM/4.0.0" xmlns:xsi="http://www.w3.org/2001/XMLSchema-instance"
         xsi:schemaLocation="http://maven.apache.org/POM/4.0.0 http://maven.apache.org/xsd/maven-4.0.0.xsd">
    <modelVersion>4.0.0</modelVersion>

    <groupId>com.jr.dz10b</groupId>
    <artifactId>mavenssm04</artifactId>
    <version>1.0-SNAPSHOT</version>
    <modules>
        <module>centity</module>
        <module>cmapper</module>
        <module>cvo</module>
        <module>cservice</module>
        <module>cweb</module>
    </modules>
    <packaging>pom</packaging>

    <name>mavenssm04</name>
    <!-- FIXME change it to the project's website -->
    <url>http://www.example.com</url>

    <properties>
        <project.build.sourceEncoding>UTF-8</project.build.sourceEncoding>
        <maven.compiler.source>1.7</maven.compiler.source>
        <maven.compiler.target>1.7</maven.compiler.target>
    </properties>

    <dependencies>
        <dependency>
            <groupId>junit</groupId>
            <artifactId>junit</artifactId>
            <version>4.11</version>
            <scope>test</scope>
        </dependency>

        <!--  spring相关 -->
        <dependency>
            <groupId>org.springframework</groupId>
            <artifactId>spring-context</artifactId>
            <version>5.2.5.RELEASE</version>
        </dependency>
        <dependency>
            <groupId>org.aspectj</groupId>
            <artifactId>aspectjweaver</artifactId>
            <version>1.8.4</version>
        </dependency>
        <dependency>
            <groupId>org.springframework</groupId>
            <artifactId>spring-jdbc</artifactId>
            <version>5.2.5.RELEASE</version>
        </dependency>
        <dependency>
            <groupId>org.springframework</groupId>
            <artifactId>spring-tx</artifactId>
            <version>5.0.5.RELEASE</version>
        </dependency>
        <dependency>
            <groupId>org.springframework</groupId>
            <artifactId>spring-test</artifactId>
            <version>5.2.5.RELEASE</version>
        </dependency>
        <dependency>
            <groupId>org.springframework</groupId>
            <artifactId>spring-webmvc</artifactId>
            <version>5.2.5.RELEASE</version>
        </dependency>

        <!-- servlet和jsp -->
        <dependency>
            <groupId>javax.servlet</groupId>
            <artifactId>javax.servlet-api</artifactId>
            <version>3.1.0</version>
            <scope>provided</scope>
        </dependency>

        <dependency>
            <groupId>javax.servlet.jsp</groupId>
            <artifactId>javax.servlet.jsp-api</artifactId>
            <version>2.2.1</version>
            <scope>provided</scope>
        </dependency>

        <!--  mybatis相关 -->
        <dependency>
            <groupId>org.mybatis</groupId>
            <artifactId>mybatis</artifactId>
            <version>3.4.1</version>
        </dependency>
        <!-- MyBatis 与 Spring 整合 -->
        <dependency>
            <groupId>org.mybatis</groupId>
            <artifactId>mybatis-spring</artifactId>
            <version>1.3.1</version>
        </dependency>

        <dependency>
            <groupId>mysql</groupId>
            <artifactId>mysql-connector-java</artifactId>
            <version>8.0.12</version>
        </dependency>

        <dependency>
            <groupId>com.mchange</groupId>
            <artifactId>c3p0</artifactId>
            <version>0.9.5.2</version>
        </dependency>

        <!--junit测试、jstl标签、log4j日志-->
        <dependency>
            <groupId>junit</groupId>
            <artifactId>junit</artifactId>
            <version>4.12</version>
            <scope>test</scope>
        </dependency>
        <dependency>
            <groupId>javax.servlet</groupId>
            <artifactId>jstl</artifactId>
            <version>1.2</version>
        </dependency>
        <dependency>
            <groupId>log4j</groupId>
            <artifactId>log4j</artifactId>
            <version>1.2.17</version>
        </dependency>

        <!--数据源依赖 -->
        <!-- https://mvnrepository.com/artifact/commons-pool/commons-pool -->
        <dependency>
            <groupId>commons-pool</groupId>
            <artifactId>commons-pool</artifactId>
            <version>1.3</version>
        </dependency>
        <!-- https://mvnrepository.com/artifact/commons-dbcp/commons-dbcp -->
        <dependency>
            <groupId>commons-dbcp</groupId>
            <artifactId>commons-dbcp</artifactId>
            <version>1.2.2</version>
        </dependency>
        <!-- https://mvnrepository.com/artifact/commons-collections/commons-collections -->
        <dependency>
            <groupId>commons-collections</groupId>
            <artifactId>commons-collections</artifactId>
            <version>3.2</version>
        </dependency>
        <dependency>
            <groupId>org.projectlombok</groupId>
            <artifactId>lombok</artifactId>
            <version>1.16.18</version>
            <scope>provided</scope>
        </dependency>
        <!-- https://mvnrepository.com/artifact/com.google.code.gson/gson -->
        <dependency>
            <groupId>com.google.code.gson</groupId>
            <artifactId>gson</artifactId>
            <version>2.1</version>
        </dependency>
    </dependencies>

    <build>
        <resources>
            <resource>
                <directory>src/main/java</directory>
                <includes>
                    <include>**/*.xml</include>
                </includes>
            </resource>
            <resource>
                <directory>src/main/resources</directory>
                <includes>
                    <include>**/*.xml</include>
                    <include>**/*.properties</include>
                </includes>
            </resource>
        </resources>

        <!-- 添加Tomcat插件-->
        <plugins>
            <plugin>
                <groupId>org.apache.tomcat.maven</groupId>
                <artifactId>tomcat7-maven-plugin</artifactId>
                <version>2.2</version>
                <configuration>
                    <port>8081</port>
                    <path>/</path>
                </configuration>
            </plugin>
        </plugins>
    </build>
</project>
2.新建模块centity,选择Maven,然后找到这个 create from archetype打勾
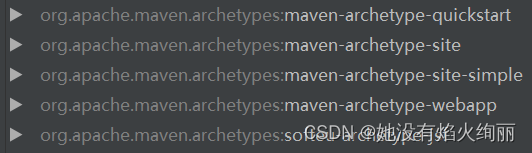
然后找到这里的第一个quickstart,并单击这个,然后 点击下一个 ArtifactId:centity 点击下一个 点击下一个 点击完成 --》
3.新建模块cmapper,选择Maven,然后选择这个
跟2.的操作一样
4.新建模块cservice,选择Maven,然后选择这个
跟2.的操作一样
5.新建模块cweb,选择Maven,然后找到这个 create from archetype打勾
然后找到这里的webapp,并单击这个(新建web项目),然后 点击下一个 ArtifactId:centity 点击下一个 点击下一个 点击完成 --》
6.新建模块cvo,选择Maven,然后选择这个
跟2.的操作一样
至此,所有需要的项目创建完毕,然后优化细节 填充pom.xml文件细节
1.优化centity模块细节
pom.xml文件里的bulid标签全部删掉不要
添加继承:
然后
这里的<groupId>com.jr.dz10b</groupId>删掉
然后添加<packaging>jar<packaging> 也就是如下这样
<?xml version="1.0" encoding="UTF-8"?>

<project xmlns="http://maven.apache.org/POM/4.0.0" xmlns:xsi="http://www.w3.org/2001/XMLSchema-instance"
  xsi:schemaLocation="http://maven.apache.org/POM/4.0.0 http://maven.apache.org/xsd/maven-4.0.0.xsd">
  <modelVersion>4.0.0</modelVersion>
  <parent>
    <groupId>com.jr.dz10b</groupId>
    <artifactId>mavenssm99</artifactId>
    <version>1.0-SNAPSHOT</version>
  </parent>

  <groupId>com.jr.dz10b</groupId>
  <artifactId>centity</artifactId>
  <version>1.0-SNAPSHOT</version>

  <name>centity</name>
  <!-- FIXME change it to the project's website -->
  <url>http://www.example.com</url>
  <packaging>jar</packaging>

  <properties>
    <project.build.sourceEncoding>UTF-8</project.build.sourceEncoding>
    <maven.compiler.source>1.7</maven.compiler.source>
    <maven.compiler.target>1.7</maven.compiler.target>
  </properties>

  <dependencies>
    <dependency>
      <groupId>junit</groupId>
      <artifactId>junit</artifactId>
      <version>4.11</version>
      <scope>test</scope>
    </dependency>
  </dependencies>

</project>
然后在这里修改包名补充实体类
2.优化cvo模块细节 (如果有vo就优化,没有就不用了)
pom.xml文件里的bulid标签全部删掉不要
添加继承,跟上面一样
删掉<groupId>com.jr.dz10b</groupId>
添加jar
有vo类就修改包名然后填充实体类
3.优化cmapper模块细节
pom.xml文件里的bulid标签全部删掉不要
添加继承,跟上面一样
删掉<groupId>com.jr.dz10b</groupId>
添加<packaging>jar<packaging>
添加centity和cvo(有就写,没有就不写)依赖

然后修改包名然后接口和XXXmapper.xml文件填充好
具体代码如下
<?xml version="1.0" encoding="UTF-8"?>

<project xmlns="http://maven.apache.org/POM/4.0.0" xmlns:xsi="http://www.w3.org/2001/XMLSchema-instance"
  xsi:schemaLocation="http://maven.apache.org/POM/4.0.0 http://maven.apache.org/xsd/maven-4.0.0.xsd">
  <modelVersion>4.0.0</modelVersion>
  <parent>
    <groupId>com.jr.dz10b</groupId>
    <artifactId>mavenssm99</artifactId>
    <version>1.0-SNAPSHOT</version>
  </parent>

  <artifactId>cmapper</artifactId>
  <version>1.0-SNAPSHOT</version>

  <name>cmapper</name>
  <!-- FIXME change it to the project's website -->
  <url>http://www.example.com</url>
  <packaging>jar</packaging>

  <properties>
    <project.build.sourceEncoding>UTF-8</project.build.sourceEncoding>
    <maven.compiler.source>1.7</maven.compiler.source>
    <maven.compiler.target>1.7</maven.compiler.target>
  </properties>

  <dependencies>
    <dependency>
      <groupId>junit</groupId>
      <artifactId>junit</artifactId>
      <version>4.11</version>
      <scope>test</scope>
    </dependency>
    <dependency>
      <groupId>com.jr.dz10b</groupId>
      <artifactId>centity</artifactId>
      <version>1.0-SNAPSHOT</version>
    </dependency>

    <dependency>
      <groupId>com.jr.dz10b</groupId>
      <artifactId>cvo</artifactId>
      <version>1.0-SNAPSHOT</version>
    </dependency>
  </dependencies>

</project>
4.优化cservice细节
pom.xml文件里的bulid标签全部删掉不要
添加继承,跟上面一样
删掉<groupId>com.jr.dz10b</groupId>
添加<packaging>jar<packaging>
添加centity和cmapper依赖
修改包名然后将接口和impl包里的实现类填充好
具体代码如下:
<?xml version="1.0" encoding="UTF-8"?>

<project xmlns="http://maven.apache.org/POM/4.0.0" xmlns:xsi="http://www.w3.org/2001/XMLSchema-instance"
  xsi:schemaLocation="http://maven.apache.org/POM/4.0.0 http://maven.apache.org/xsd/maven-4.0.0.xsd">
  <modelVersion>4.0.0</modelVersion>
  <parent>
    <groupId>com.jr.dz10b</groupId>
    <artifactId>mavenssm99</artifactId>
    <version>1.0-SNAPSHOT</version>
  </parent>

  <artifactId>cservice</artifactId>
  <version>1.0-SNAPSHOT</version>

  <name>cservice</name>
  <!-- FIXME change it to the project's website -->
  <url>http://www.example.com</url>
  <packaging>jar</packaging>
  <properties>
    <project.build.sourceEncoding>UTF-8</project.build.sourceEncoding>
    <maven.compiler.source>1.7</maven.compiler.source>
    <maven.compiler.target>1.7</maven.compiler.target>
  </properties>

  <dependencies>
    <dependency>
      <groupId>junit</groupId>
      <artifactId>junit</artifactId>
      <version>4.11</version>
      <scope>test</scope>
    </dependency>
    <dependency>
      <groupId>com.jr.dz10b</groupId>
      <artifactId>centity</artifactId>
      <version>1.0-SNAPSHOT</version>
    </dependency>
    <dependency>
      <groupId>com.jr.dz10b</groupId>
      <artifactId>cmapper</artifactId>
      <version>1.0-SNAPSHOT</version>
    </dependency>
  </dependencies>

</project>
5.优化cweb细节
添加继承,跟上面一样
删掉<groupId>com.jr.dz10b</groupId>
添加<packaging>war<packaging> (这里是.war不是.jar) 自动生成就不用添加了
添加centity和cservice依赖
具体代码实现如下:
<?xml version="1.0" encoding="UTF-8"?>

<project xmlns="http://maven.apache.org/POM/4.0.0" xmlns:xsi="http://www.w3.org/2001/XMLSchema-instance"
  xsi:schemaLocation="http://maven.apache.org/POM/4.0.0 http://maven.apache.org/xsd/maven-4.0.0.xsd">
  <modelVersion>4.0.0</modelVersion>

  <parent>
    <groupId>com.jr.dz10b</groupId>
    <artifactId>mavenssm04</artifactId>
    <version>1.0-SNAPSHOT</version>
  </parent>

  <artifactId>cweb</artifactId>
  <version>1.0-SNAPSHOT</version>
  <packaging>war</packaging>

  <name>cweb Maven Webapp</name>
  <!-- FIXME change it to the project's website -->
  <url>http://www.example.com</url>

  <properties>
    <project.build.sourceEncoding>UTF-8</project.build.sourceEncoding>
    <maven.compiler.source>1.7</maven.compiler.source>
    <maven.compiler.target>1.7</maven.compiler.target>
  </properties>

  <dependencies>
    <dependency>
      <groupId>junit</groupId>
      <artifactId>junit</artifactId>
      <version>4.11</version>
      <scope>test</scope>
    </dependency>
    <dependency>
      <groupId>com.jr.dz10b</groupId>
      <artifactId>centity</artifactId>
      <version>1.0-SNAPSHOT</version>
    </dependency>
    <dependency>
      <groupId>com.jr.dz10b</groupId>
      <artifactId>cservice</artifactId>
      <version>1.0-SNAPSHOT</version>
    </dependency>
  </dependencies>

  <build>
    <finalName>cweb</finalName>
    <pluginManagement><!-- lock down plugins versions to avoid using Maven defaults (may be moved to parent pom) -->
      <plugins>
        <plugin>
          <artifactId>maven-clean-plugin</artifactId>
          <version>3.1.0</version>
        </plugin>
        <!-- see http://maven.apache.org/ref/current/maven-core/default-bindings.html#Plugin_bindings_for_war_packaging -->
        <plugin>
          <artifactId>maven-resources-plugin</artifactId>
          <version>3.0.2</version>
        </plugin>
        <plugin>
          <artifactId>maven-compiler-plugin</artifactId>
          <version>3.8.0</version>
        </plugin>
        <plugin>
          <artifactId>maven-surefire-plugin</artifactId>
          <version>2.22.1</version>
        </plugin>
        <plugin>
          <artifactId>maven-war-plugin</artifactId>
          <version>3.2.2</version>
        </plugin>
        <plugin>
          <artifactId>maven-install-plugin</artifactId>
          <version>2.5.2</version>
        </plugin>
        <plugin>
          <artifactId>maven-deploy-plugin</artifactId>
          <version>2.8.2</version>
        </plugin>
      </plugins>
    </pluginManagement>
  </build>
</project>
然后
在cweb模块下的main文件夹下创建两个文件夹 分别叫java和resources
在项目结构–》模块–》中选择 cweb --> Mark as: java文件夹标注为蓝色的(源码) resources文件夹标注为Resources 然后应用
将所有资源文件全部粘贴到resources文件夹下
在java文件夹下创建com.jr.controller文件夹并将控制器粘贴过来(或是创建) 就像下面这样
然后
在webapp下的web.xml更换成原来的
再将自己需要的jsp文件粘过来就可以了 (资源文件下一期再分享)
至此,准备工作全部做完

然后找到这里的主项目下的Lifecycle下的install生成target
这里生成的一定是.war包

然后找到这几个并一次点击打开,找到tomcat7:run双击运行(如果找不到在右边的Maven)
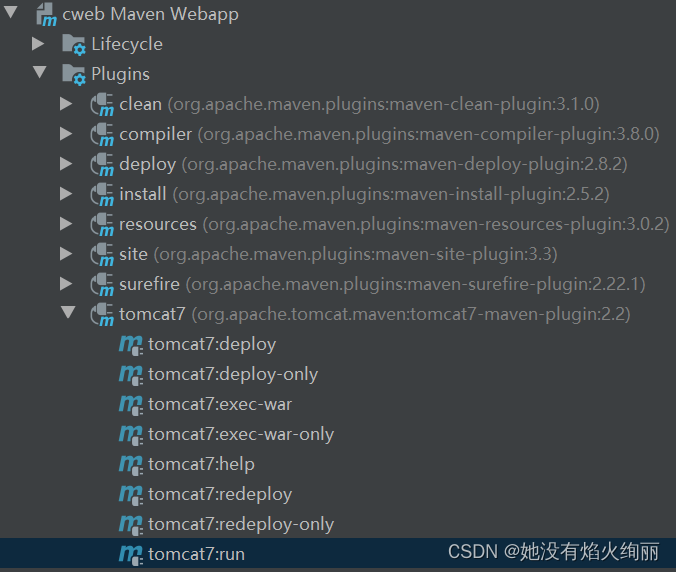
等待出现

点击蓝色文本就跟原来的tomcat一样使用了
(资源文件下一期再分享)


 607
607


 被折叠的 条评论
为什么被折叠?
被折叠的 条评论
为什么被折叠?
 到【灌水乐园】发言


