


💻目录
前言
🌟 本套mode使用的是Alibaba的2021.0.1版,springboot的2.6.3实现(适用于springboot 2.7~2.4),使用到的组件包括OpenFeign(实现远程调用)、loadbalancer(负载均衡)、hystrix(熔断降级)、nacos(注册中心)
nacos的安装和基本配置使用可以查看我这篇博客,或者关注下面的专栏后续会持续更新其他的Spring Cloud 组件介绍以及使用
🍅Nacos下载与安装配置(2.2.3版本示例)
🥒Spring Cloud Alibaba专栏
一、简绍
openFeign是要声明式的web服务客户端,或叫做声明式REST客户端,它让编写web服务客户端变得简单。
能够干什么?
可以让我们实现调用别的服务模块像调用本地模块接口一样方便,并且在配合上
loadbalancer可以实现负载均衡的效果,实现集群化部署,避免请求全部到一个服务;并且通过hystrix实现一个服务降级到效果,可以当请求过多无法按时返回时,实现一个服务降级到效果,以及通过nacos实现一个服务注册的效果。
实现原理
OpenFeign在进行远程调用时主要是采用一种动态代理的方式实现,项目启动时其实就会把被 @FeignClient修饰的接口生成一个代理对象,全部注入到spring容器中,然后在被调用时,在内部会通过这个代理对象把接口调用转化为一个远程调用到 的Request,并发送给目标服务。
具体代理实现原理可以看下面这个博主讲解,相对比较详细
OpenFeign基本介绍和原理了解
二、代码实现
1、搭建服务模块
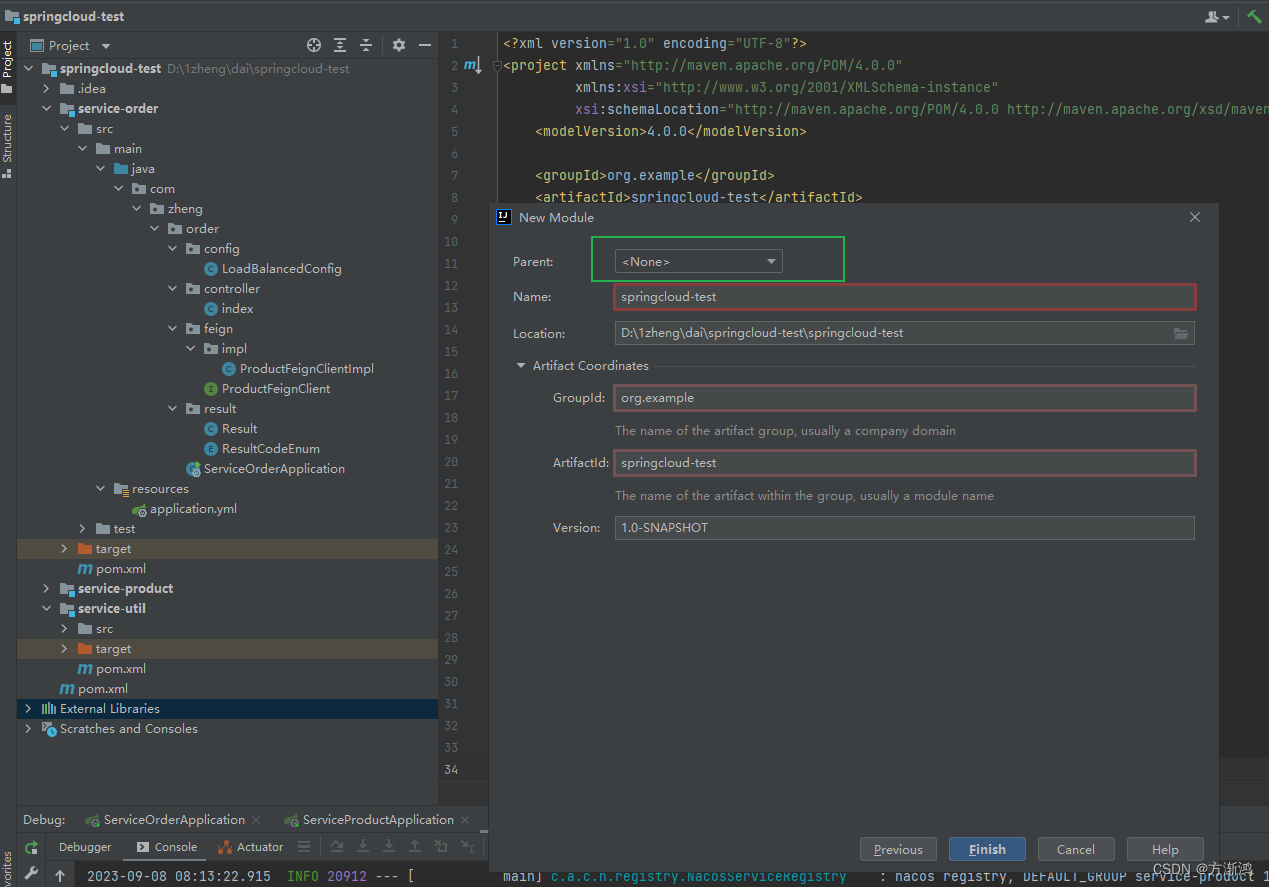
1.1、建立父包
- 首先建立一个父包,用于指定统一版本,避免出现版本
⭐记得使用maven方式建立,然后去自己加依赖指定版本,不同版本之间差距很大
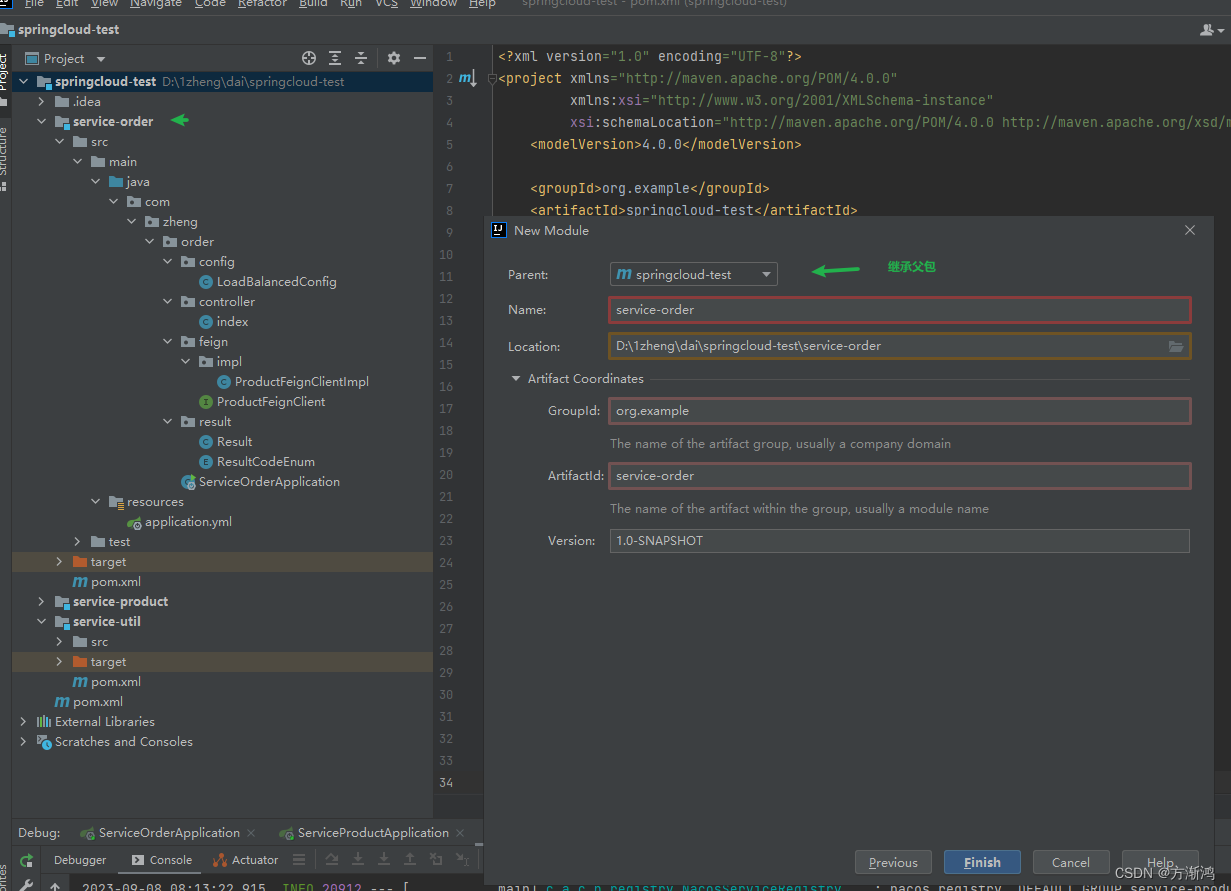
1.2、建立两个子包(service-order、service-product)
记得依赖父包,便于指定版本
- service-order(订单模块)
-
service-product(产品模块)
-
1.3、添加util 工具类
用于存放统一的model以及统一返回工具类一些其他的工具类
2、添加maven依赖和yml配置文件
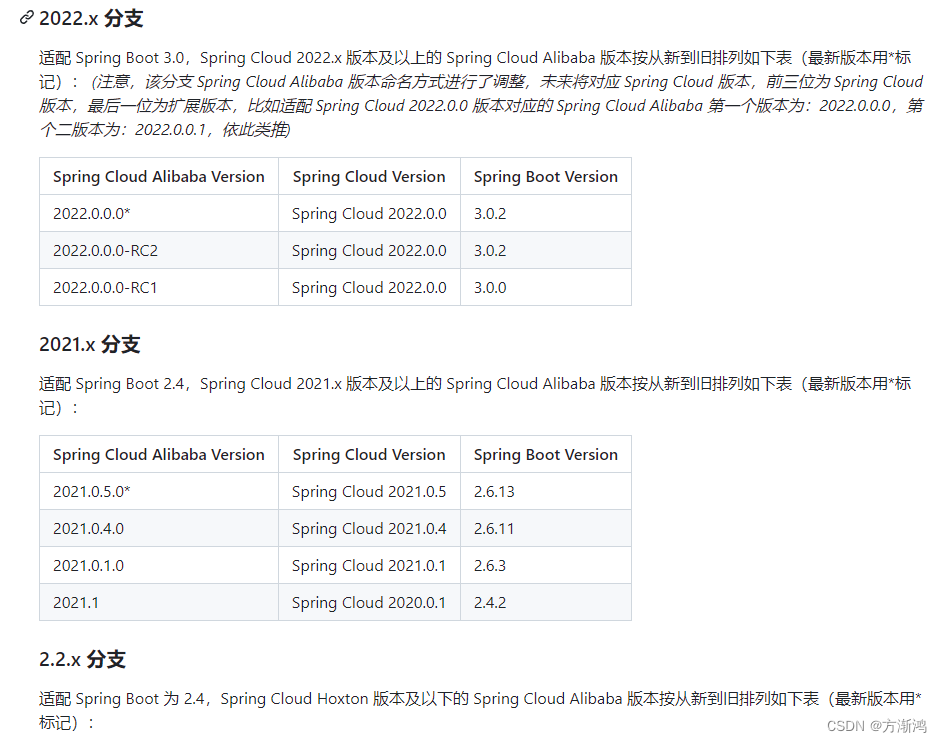
spring的 Spring Boot 3.0,Spring Boot 2.7~2.4和 2.4 是变化比较大的版本,我的这个架构依赖适用于Spring Boot 2.7-2.4之间的版本的,因为
SpringCloudFeign在Hoxton.M2RELEASED版本之后抛弃了Ribbon,使用了spring-cloud-loadbalancer,变动会比较大,也就是Spring Boot 2.4以后都使用的spring-cloud-loadbalancer做的远程调用
- 因为ribbon以及部分组件目前已经没有更新了,所以不建议使用2.4之前的版本,而3.0的最新的也不太建议使用,因为版本过新,相对bug比较多,选择中间的就好
具体需要查看自己spring对应的组件版本可以查看
springcloud组件版本对应说明
2.1、springcloud-test父包配置
- maven
<?xml version="1.0" encoding="UTF-8"?>
<project xmlns="http://maven.apache.org/POM/4.0.0"
         xmlns:xsi="http://www.w3.org/2001/XMLSchema-instance"
         xsi:schemaLocation="http://maven.apache.org/POM/4.0.0 http://maven.apache.org/xsd/maven-4.0.0.xsd">
    <modelVersion>4.0.0</modelVersion>

    <groupId>org.example</groupId>
    <artifactId>springcloud-test</artifactId>
    <packaging>pom</packaging>
    <version>1.0-SNAPSHOT</version>
    <modules>
        <module>service-order</module>
        <module>service-product</module>
        <module>service-util</module>
    </modules>


    <parent>
        <groupId>org.springframework.boot</groupId>
        <artifactId>spring-boot-starter-parent</artifactId>
        <version>2.6.3</version>
        <relativePath/> <!-- lookup parent from repository -->
    </parent>
    <properties>
        <java.version>1.8</java.version>
        <project.build.sourceEncoding>UTF-8</project.build.sourceEncoding>
        <cloud.version>2021.0.1</cloud.version>
        <alibaba.version>2021.0.1.0</alibaba.version>
        <mysql.version>8.0.30</mysql.version>
    </properties>


    <dependencyManagement>
        <dependencies>
            <dependency>
                <groupId>org.springframework.cloud</groupId>
                <artifactId>spring-cloud-dependencies</artifactId>
                <version>${cloud.version}</version>
                <type>pom</type>
                <scope>import</scope>
            </dependency>
            <dependency>
                <groupId>com.alibaba.cloud</groupId>
                <artifactId>spring-cloud-alibaba-dependencies</artifactId>
                <version>${alibaba.version}</version>
                <type>pom</type>
                <scope>import</scope>
            </dependency>
        </dependencies>
    </dependencyManagement>
</project>
2.2、服务模块配置
2.2.1、service-order订单模块配置
因为为了测试方便,我没有使用到数据库,所以就没加sql相关的依赖和配置,如果自己需要使用到,自行添加就行
- maven
2.4之前openfeign是内置了Ribbon是可以不用加loadbalancer依赖的,但之后的版本弃用了,所以需要添加
<?xml version="1.0" encoding="UTF-8"?>
<project xmlns="http://maven.apache.org/POM/4.0.0"
         xmlns:xsi="http://www.w3.org/2001/XMLSchema-instance"
         xsi:schemaLocation="http://maven.apache.org/POM/4.0.0 http://maven.apache.org/xsd/maven-4.0.0.xsd">
    <parent>
        <artifactId>springcloud-test</artifactId>
        <groupId>org.example</groupId>
        <version>1.0-SNAPSHOT</version>
    </parent>
    <modelVersion>4.0.0</modelVersion>

    <artifactId>service-order</artifactId>

    <properties>
        <maven.compiler.source>8</maven.compiler.source>
        <maven.compiler.target>8</maven.compiler.target>
    </properties>
    <dependencies>
        <dependency>
            <groupId>org.springframework.boot</groupId>
            <artifactId>spring-boot-starter-web</artifactId>
            <scope>provided</scope>
        </dependency>
        <dependency>
            <groupId>org.projectlombok</groupId>
            <artifactId>lombok</artifactId>
        </dependency>
<!--        远程调用-->
        <dependency>
            <groupId>org.springframework.cloud</groupId>
            <artifactId>spring-cloud-starter-openfeign</artifactId>
            <scope>provided</scope>
        </dependency>
        <!--        nacos 服务注册 -->
        <dependency>
            <groupId>com.alibaba.cloud</groupId>
            <artifactId>spring-cloud-starter-alibaba-nacos-discovery</artifactId>
        </dependency>
<!--        引用util工具包-->
        <dependency>
            <groupId>org.example</groupId>
            <artifactId>service-util</artifactId>
            <version>1.0-SNAPSHOT</version>
        </dependency>
<!--        熔断降级-->
        <dependency>
            <groupId>org.springframework.cloud</groupId>
            <artifactId>spring-cloud-starter-netflix-hystrix</artifactId>
            <version>2.2.9.RELEASE</version>
        </dependency>
        <!--      负载均衡-->
        <dependency>
            <groupId>org.springframework.cloud</groupId>
            <artifactId>spring-cloud-starter-loadbalancer</artifactId>
        </dependency>


    </dependencies>
</project>
- yml
配置注册nacos和feign开启负载均衡和熔断的相关配置
server:
  port: 8201

spring:
  application:
    name: service-order
  profiles:
    active: dev

#   nacos配置
  cloud:
    nacos:
      discovery:
        server-addr: localhost:8848
#        开启负载均衡(默认是不开启的)
feign:
  circuitbreaker:
    enabled: true

#   熔断配置
hystrix:
  command:
    default:
      execution.isolation.thread.timeoutInMilliseconds: 3000 # 设置Hystrix超时时间(毫秒)
    ProductFeignClient#getProducts:
      execution.isolation.thread.timeoutInMilliseconds: 1000 # 为特定的Feign方法设置超时时间
2.2.1、service-product产品模块配置
-mavne的依赖和xml和前面的order模块一样,就是端口和name不同
server:
  port: 8203

spring:
  application:
    name: service-product

#   注入到nacos
  cloud:
    nacos:
      discovery:
        server-addr: localhost:8848
2.2.1、service-util工具模块配置
- maven
加个lombok就行,没有yml
<?xml version="1.0" encoding="UTF-8"?>
<project xmlns="http://maven.apache.org/POM/4.0.0"
         xmlns:xsi="http://www.w3.org/2001/XMLSchema-instance"
         xsi:schemaLocation="http://maven.apache.org/POM/4.0.0 http://maven.apache.org/xsd/maven-4.0.0.xsd">
    <parent>
        <artifactId>springcloud-test</artifactId>
        <groupId>org.example</groupId>
        <version>1.0-SNAPSHOT</version>
    </parent>
    <modelVersion>4.0.0</modelVersion>

    <artifactId>service-util</artifactId>

    <properties>
        <maven.compiler.source>8</maven.compiler.source>
        <maven.compiler.target>8</maven.compiler.target>
    </properties>

    <dependencies>
        <dependency>
            <groupId>org.projectlombok</groupId>
            <artifactId>lombok</artifactId>
            <version>1.18.16</version>
        </dependency>
    </dependencies>
</project>
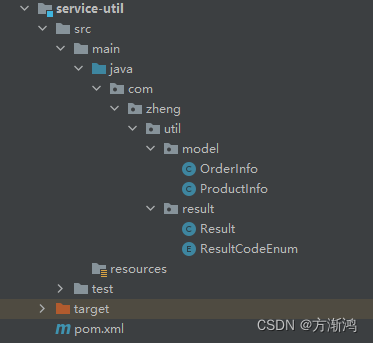
3、添加service-util工具模块代码
3.1、添加实体
- OrderInfo
@Data
public class OrderInfo {

    private Long id;
    /**订单号*/
    private String orderNo;
    /**产品列表*/
    private List<ProductInfo> productInfoList;
    /**收货人姓名*/
    private String receiverName;
}
- ProductInfo
@Data
@AllArgsConstructor
@NoArgsConstructor
public class ProductInfo {

    private Long id;
    /**销量*/
    private Integer sale;

    /**价格*/
    private Integer price;
    /**名称*/
    private String name;
    /**类型*/
    private Integer type;
    /**端口*/
    private Integer port;
}
3.2、添加统一返回类
- Result
@Data
public class Result<T> {
    //状态码
    private Integer code;
    //信息
    private String message;
    //数据
    private T data;

    private Result(){}

    //设置数据,返回对象的方法
    public static <T> Result<T> build(T data, ResultCodeEnum resultCodeEnum) {
        //创建Result对象,设置值,返回对象
        Result<T> result = new Result<>();
        //判断返回结果中是否需要数据
        if (data != null) {
            //设置数据到result对象
            result.setData(data);
        }
        //设置其他值
        result.setCode(resultCodeEnum.getCode());
        result.setMessage(resultCodeEnum.getMessage());
        //返回设置值之后的对象
        return result;
    }

    //成功的方法
    public static <T> Result<T> ok(T data) {
        return build(data, ResultCodeEnum.SUCCESS);
    }

    //成功的方法
    public static <T> Result<T> ok() {
        return build(null, ResultCodeEnum.SUCCESS);
    }

    //失败的方法
    public static <T> Result<T> fail(T data) {
        return build(data, ResultCodeEnum.FAIL);
    }
}
- ResultCodeEnum
@Getter
public enum  ResultCodeEnum {

    SUCCESS(200,"成功"),
    FAIL(201, "失败"),
    ;

    private Integer code;
    private String message;

    ResultCodeEnum(Integer code, String message) {
        this.code = code;
        this.message = message;
    }
}
4、添加service-order功能代码
4.1、启动类
- 添加feign和nacos注解
@SpringBootApplication
@EnableDiscoveryClient //启动nacos注解
@EnableFeignClients //开启feign的客户端
public class ServiceOrderApplication {
    public static void main(String[] args) {
        SpringApplication.run(ServiceOrderApplication.class,args);
    }

}
4.2、添加配置类
- 添加LoadBalancedConfig 负载均衡
用于配置负载均衡,负载均衡的策略这里写了两个,也可以使用权重或者自定义策略;还有远程调用时的重试策略相关配置,
Default()方法可以传参数自行配置
@Configuration
public class LoadBalancedConfig {
    /**
     * 配置负载均衡策略
     * @param environment
     * @param loadBalancerClientFactory
     * @return ReactorLoadBalancer<ServiceInstance>
     */
    @Bean
    ReactorLoadBalancer<ServiceInstance> randomLoadBalancer(Environment environment,
                                                            LoadBalancerClientFactory loadBalancerClientFactory) {
        String name = environment.getProperty(LoadBalancerClientFactory.PROPERTY_NAME);
//          轮询负载均衡
        RoundRobinLoadBalancer roundRobinLoadBalancer = new RoundRobinLoadBalancer(loadBalancerClientFactory
                .getLazyProvider(name, ServiceInstanceListSupplier.class),
                name);
//        随机
//        RandomLoadBalancer randomLoadBalancer = new RandomLoadBalancer(loadBalancerClientFactory
//                .getLazyProvider(name, ServiceInstanceListSupplier.class),
//                name);
        return roundRobinLoadBalancer;
    }
    /**
     *  请求失败时,默认重试策略(默认重试5次)
     * @Param * @param null
     * @return
     */

    @Bean
    public Retryer feignRetryer(){
        //每次重试之间等待 500 毫秒。
		//最大等待时间为 1 毫秒。
      	// 最多尝试 3 次。
        return new Retryer.Default(500,1,3);
    }
}
4.3、添加controller
添加了两个接口,一个是用于测试,当前模块是否可以正常被调用接口的,一个是测试远程调用是否会有问题,并且也没有写service层,直接进行调用feign进行远程调用
@RestController
@RequestMapping("/admin/acl/index")
public class index {

    @Resource
    private ProductFeignClient productFeignClient;

    /**
     * 测试订单服务是否有问题
     * @author yingfeng
     * @return * @return Result
     */
    @PostMapping("/login")
    public Result login(){
        HashMap<String, String> map = new HashMap<>(16);
        map.put("token","token-admin");

        System.out.println();
        return Result.ok(map);
    }
    /**
     * 测试远程调用接口的接口
     * @version 1.0
     */
    @GetMapping("/getorderinfo/{type}")
    public Result getrderinfo(@PathVariable Integer type){

        OrderInfo orderInfo = new OrderInfo();
        //因为返回的是list,所以如果远程调用超时,或者报错时,进入熔断所以会返回一个空集合
        List<ProductInfo> productInfoList  = productFeignClient.getProductInfoList(type);
        if(CollectionUtils.isEmpty(productInfoList)){
            return Result.ok("当前人数过多,稍后重试!");
        }
            orderInfo.setOrderNo("dd131312");
            orderInfo.setId(1234l);
            orderInfo.setProductInfoList(productInfoList);
            orderInfo.setReceiverName("张三");
        return Result.ok(orderInfo);
    }
}
4.4、添加feign进行远程调用
@FeignClient:启用远程调用(启动类需要有@EnableFeignClients,才会生效)
- name/value:指定注册到注册中心的服务的名称,如果项目使用了负载均衡,name属性会作为微服务的名称,用于服务发现
- url: url一般用于调试,可以手动指定
@FeignClient调用的地址- fallback: 定义容错的处理类,当调用远程接口失败或超时时,会调用对应接口的容错逻辑,fallback指定的类必须实现
@FeignClient标记的接口(也就是发生熔断时,会执行该类)
@GetMapping地址需要记得写全,,方法名称要和被调用的接口一致
@FeignClient(value = "service-product",fallback  = ProductFeignClientImpl.class)
@LoadBalancerClient(name = "service-product",configuration = LoadBalancedConfig.class)
public interface ProductFeignClient {

    @GetMapping("/admin/Product/innet/getProductInfoList/{type}")
    public List<ProductInfo> getProductInfoList(@PathVariable Integer type);
}
⭐value 指定了nacos的服务名
4.5、添加ProductFeignClientImpl(用于熔断时降级)
@Slf4j
@Service
public class ProductFeignClientImpl implements ProductFeignClient {

    @Override
    public List<ProductInfo> getProductInfoList(Integer type) {
        log.info("请求接口失败,进入熔断!");
        List<ProductInfo> productInfoList = new ArrayList<>();
        return productInfoList;
    }
}
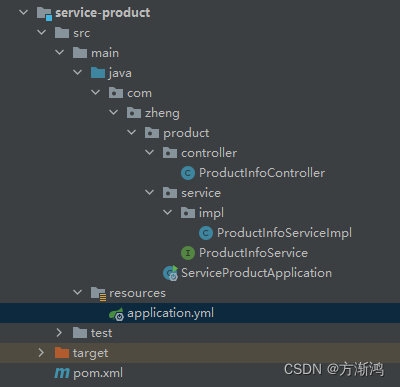
5、添加service-product服务功能代码
5.1、启动类
和上面的一样,占位置就不出现放上来了
5.2、添加controller
用于给order进行远程调用接口,因为是内部调用便于取出,就直接返回对应的参数,不需要返回统一result处理类
@RestController
@RequestMapping("/admin/Product")
public class ProductInfoController {

    @Resource
    private ProductInfoService productInfoService;

    @GetMapping("/innet/getProductInfoList/{type}")
    public List<ProductInfo> getProductInfoList(@PathVariable Integer type){

        List<ProductInfo> productInfoList = productInfoService.getProductInfoList(type);
        System.out.println("查询产品详情:"+productInfoList);
	//如果传入的类型未查询到,自定义返回一个运行时异常
        if (CollectionUtils.isEmpty(productInfoList)){
            throw new RuntimeException();
        }

        return productInfoList;
    }
}
5.3、添加service
- 接口
public interface ProductInfoService {
    List<ProductInfo> getProductInfoList(Integer type);
}
- 实现类
因为为了测试方便就没添加数据库调用代码了,这里获取端口是为了,测试查看负载均衡方便
@Service
public class ProductInfoServiceImpl implements ProductInfoService {

//    获取当前服务的端口
    @Value("${server.port}")
    private Integer port;

    @Override
    public List<ProductInfo> getProductInfoList(Integer type) {
        ProductInfo productInfo3 = new ProductInfo(3l,800,20,"哈密瓜1",1,port);
        ProductInfo productInfo1 = new ProductInfo(1l,50,8,"苹果1",1,port);
        ProductInfo productInfo2 = new ProductInfo(2l,200,13,"牛肉1",2,port);
        ProductInfo productInfo4 = new ProductInfo(4l,50,9,"青菜1",2,port);
 /*        实际项目中,会从数据库查出数据 */
        List<ProductInfo> productInfoList = Arrays.asList(productInfo1,productInfo2,productInfo3,productInfo4);

//        根据传入的类型返回指定类型
        List<ProductInfo> result = productInfoList.stream()
                .filter(productInfo -> productInfo.getType() == type)
                .collect(Collectors.toList());

        return result;
    }
}
三、功能测试
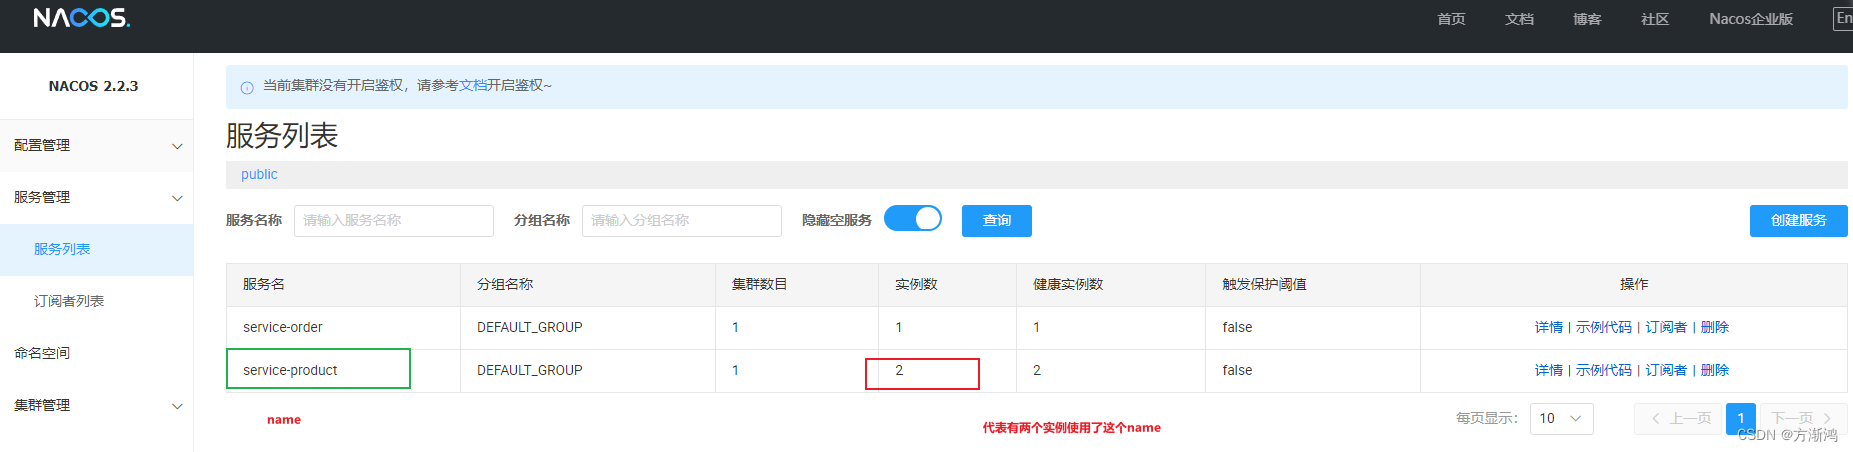
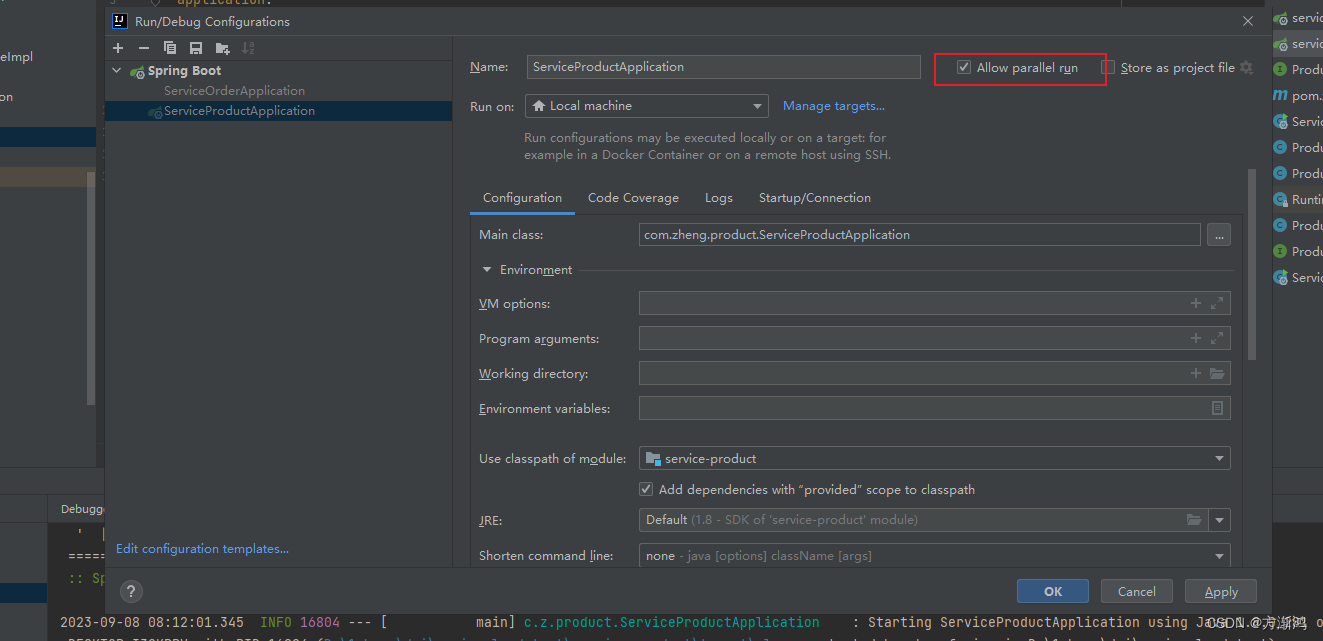
1、启动服务,
service-order启动一个、service-product启动两个

设置访问可以并向启动
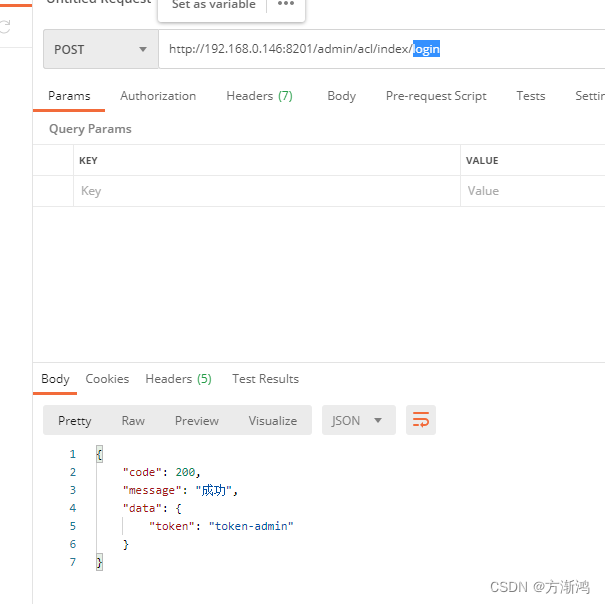
2、接口测试
- 先测试login接口,返回成功代表order没问题
- 测试getorderinfo接口
- 第一次测试
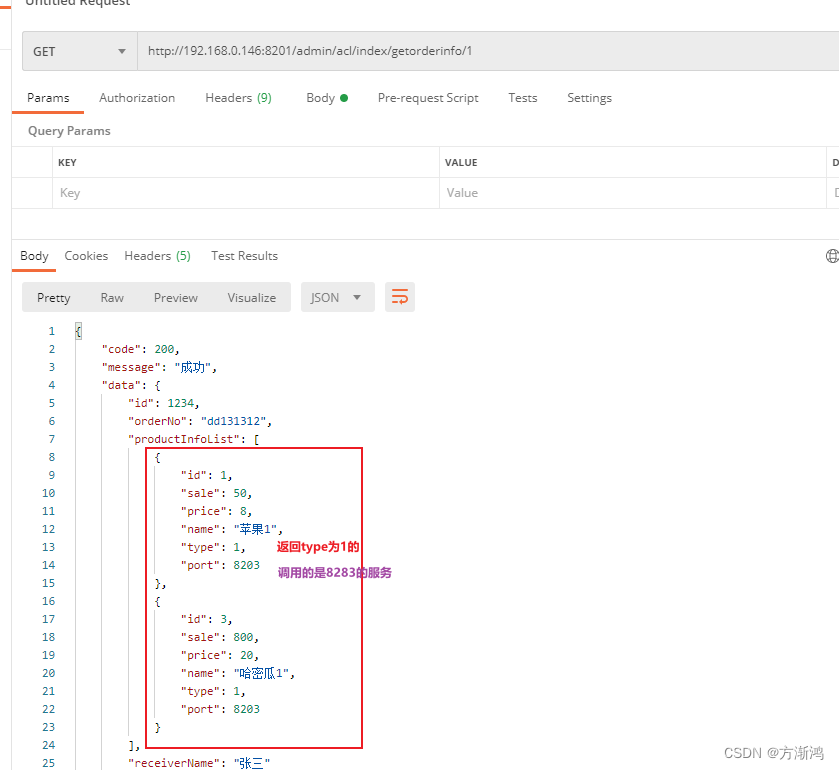
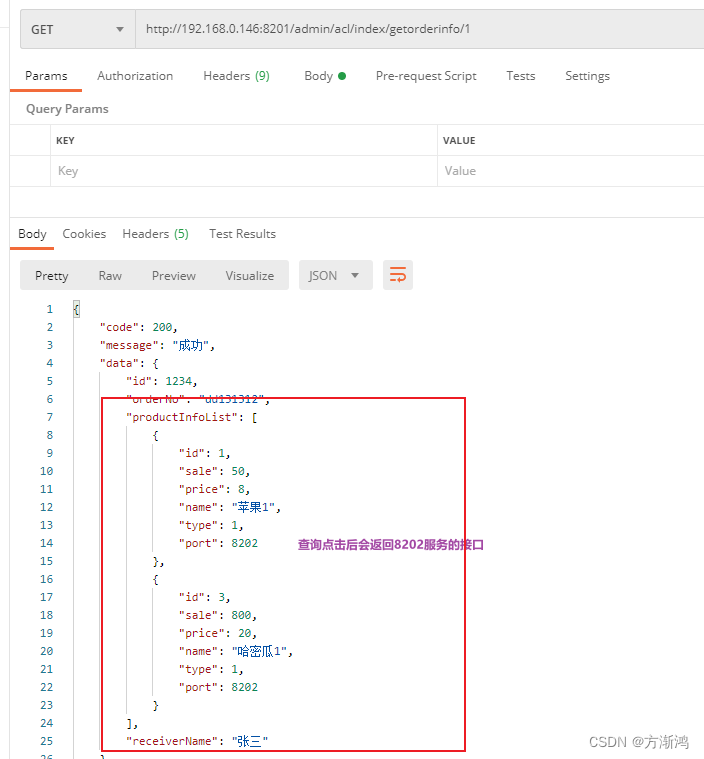
- 第二次测试,因为采用的是轮询的策略,所以会依次轮询调用该服务名称的不同服务
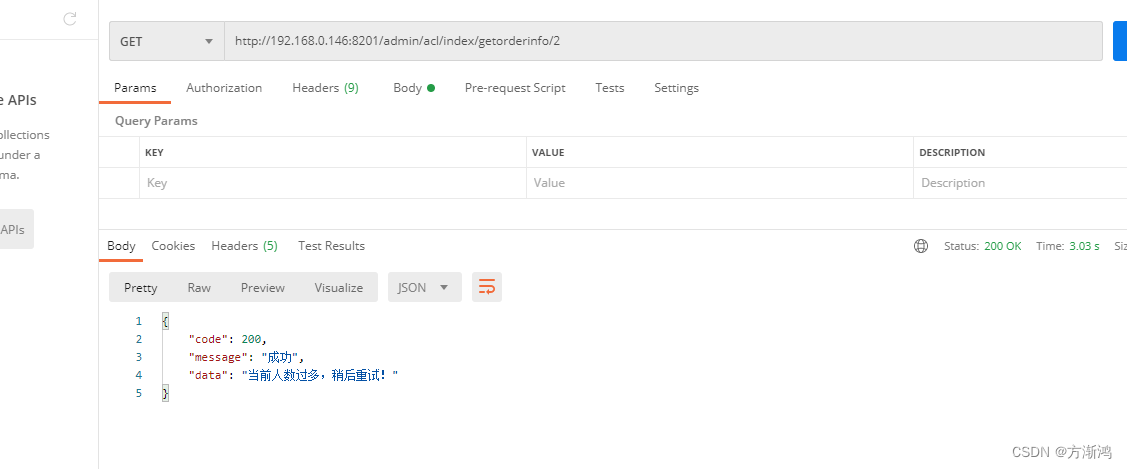
- 当传的type类型是3时,service-product没有这个类型,会返回自定义的异常,然后order就会进入熔断降级的代码


然后返回熔断的数据

- 如果请求超时也会进入熔断
在getProductInfoList方法上打上断点,让不能返回,实现请求超时
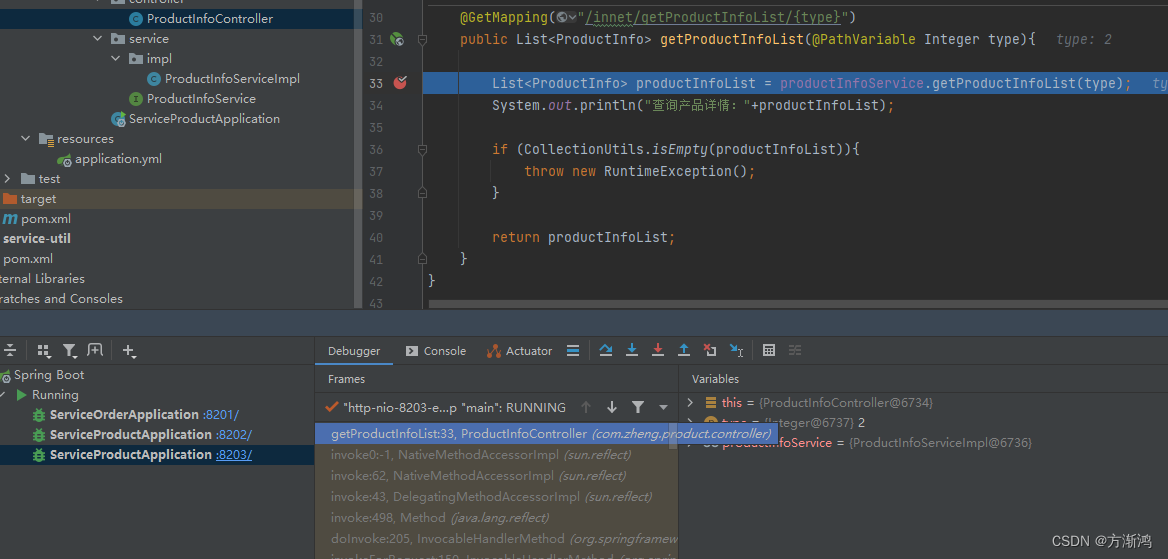
因为设置的是三秒未返回,所以会在三秒后进入熔断


 617
617


 被折叠的 条评论
为什么被折叠?
被折叠的 条评论
为什么被折叠?
 到【灌水乐园】发言


