


DRF之三大认证
DRF之三大认证
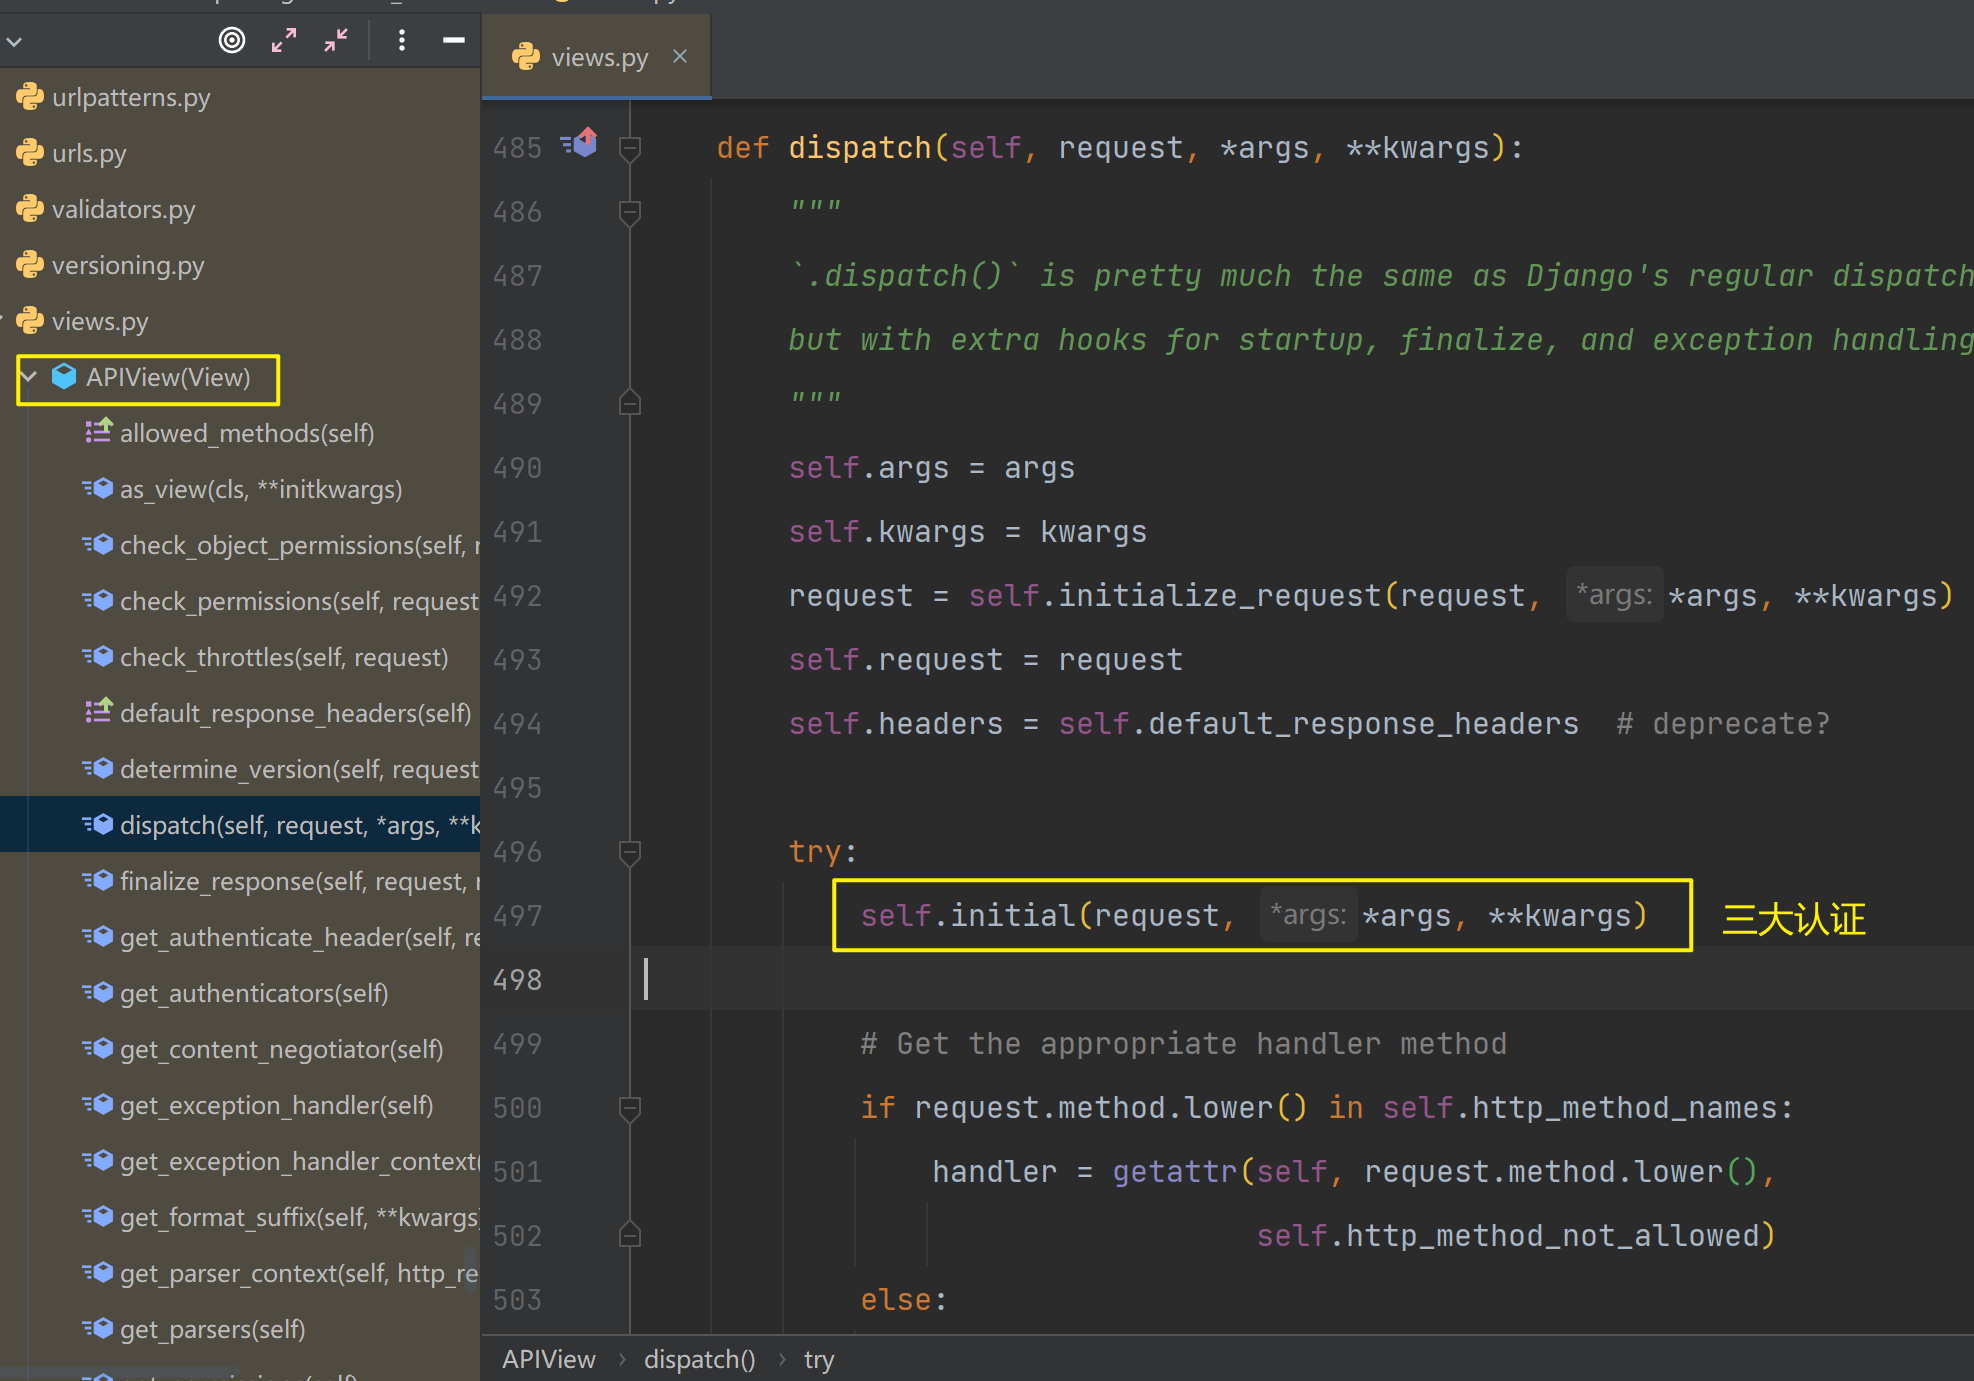
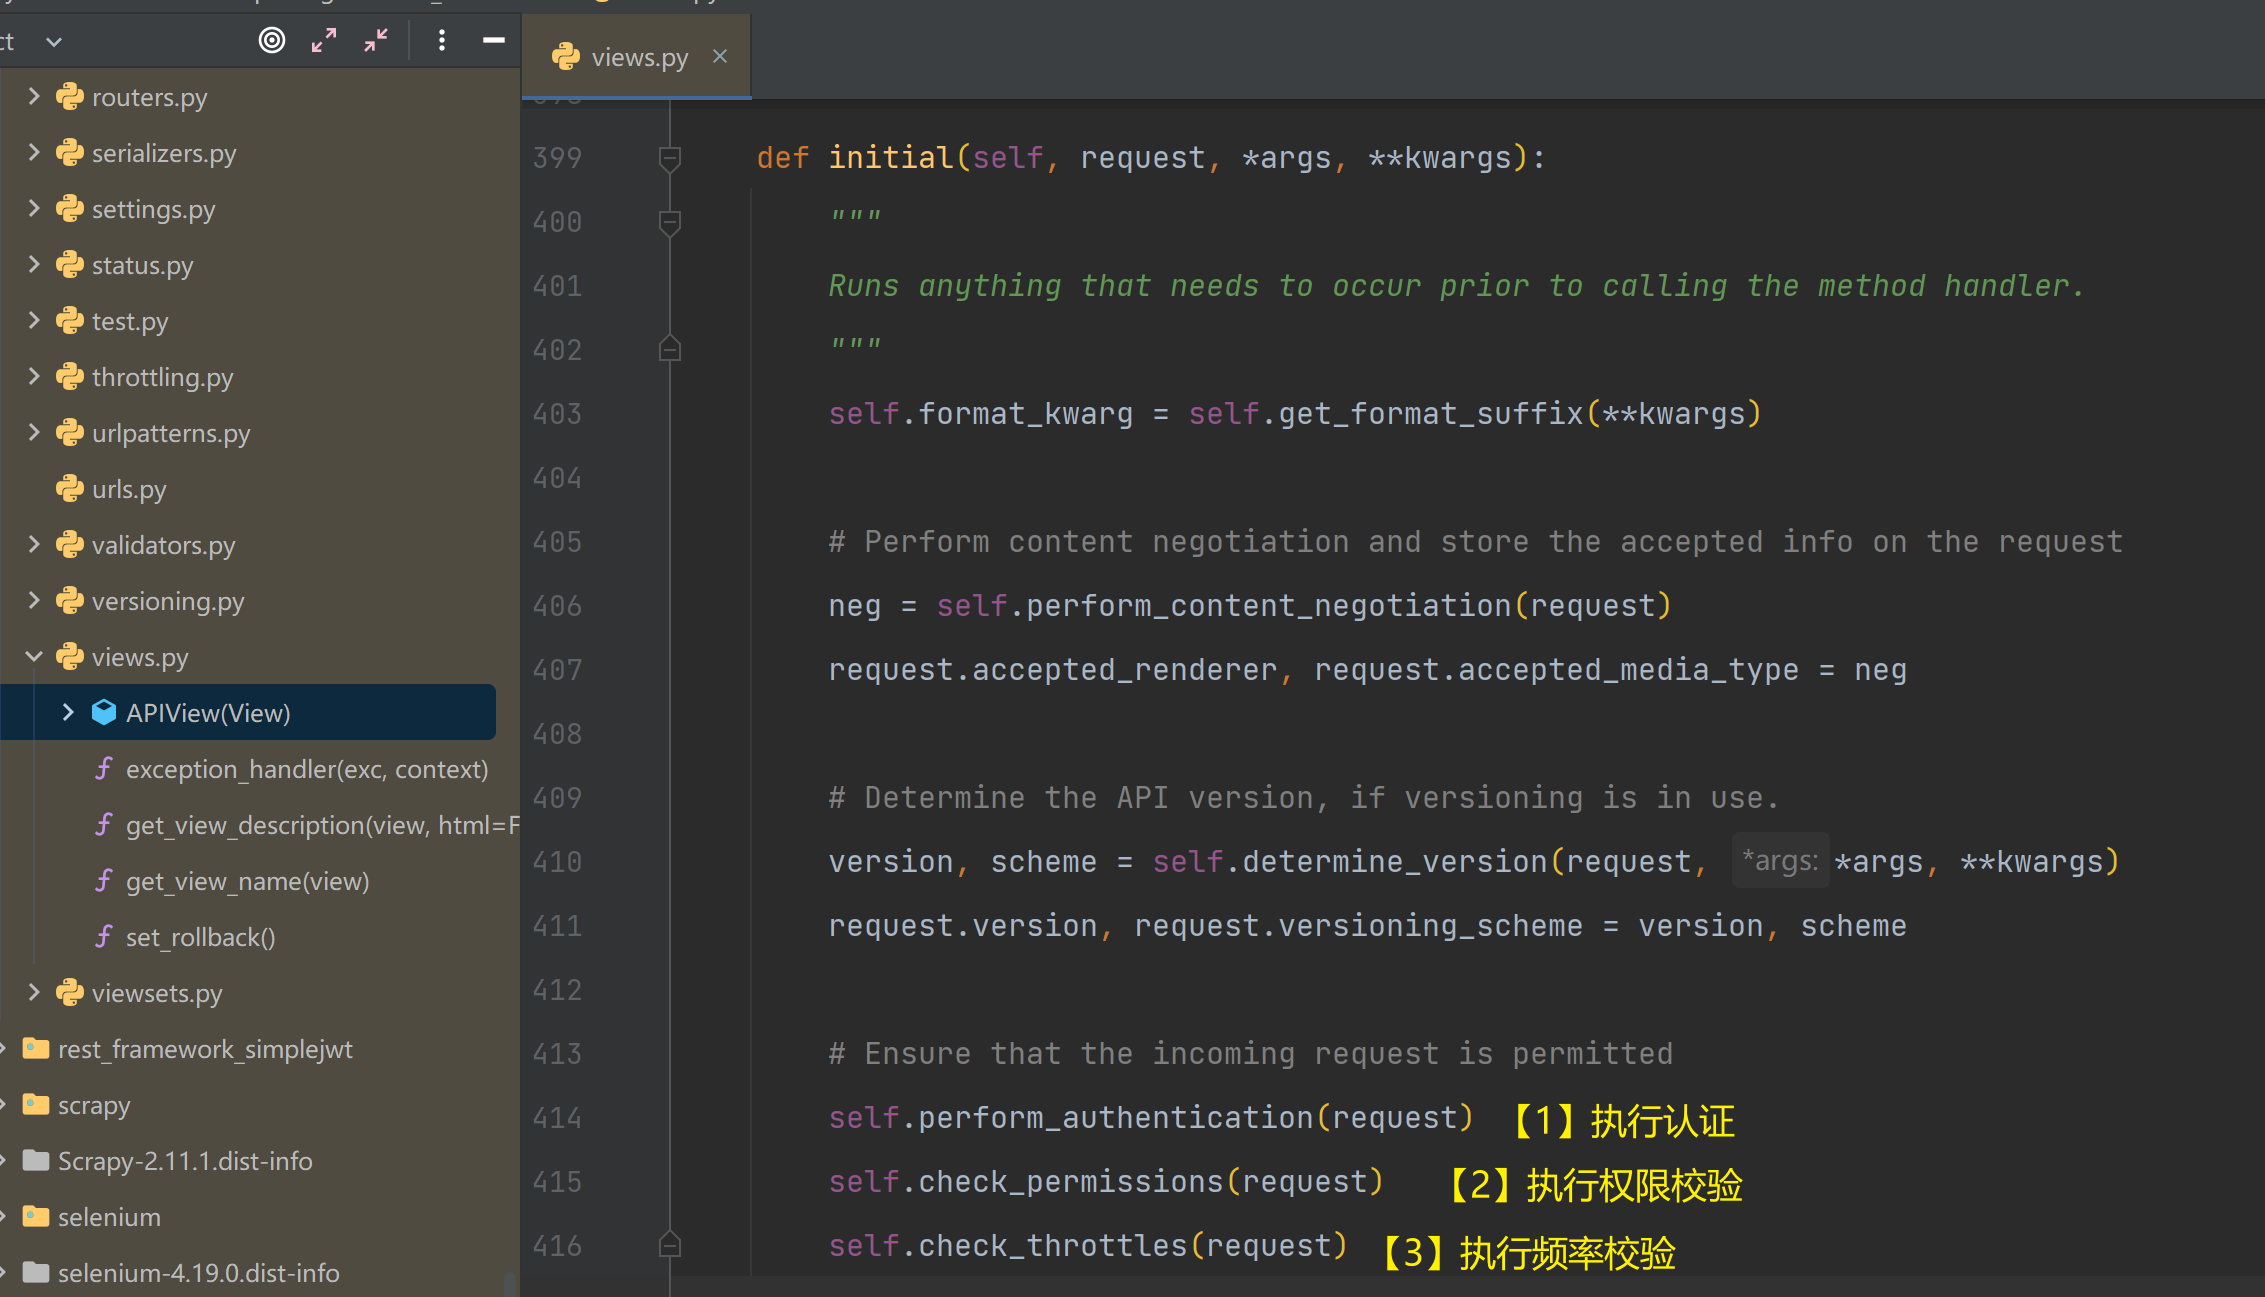
【一】三大认证执行顺序
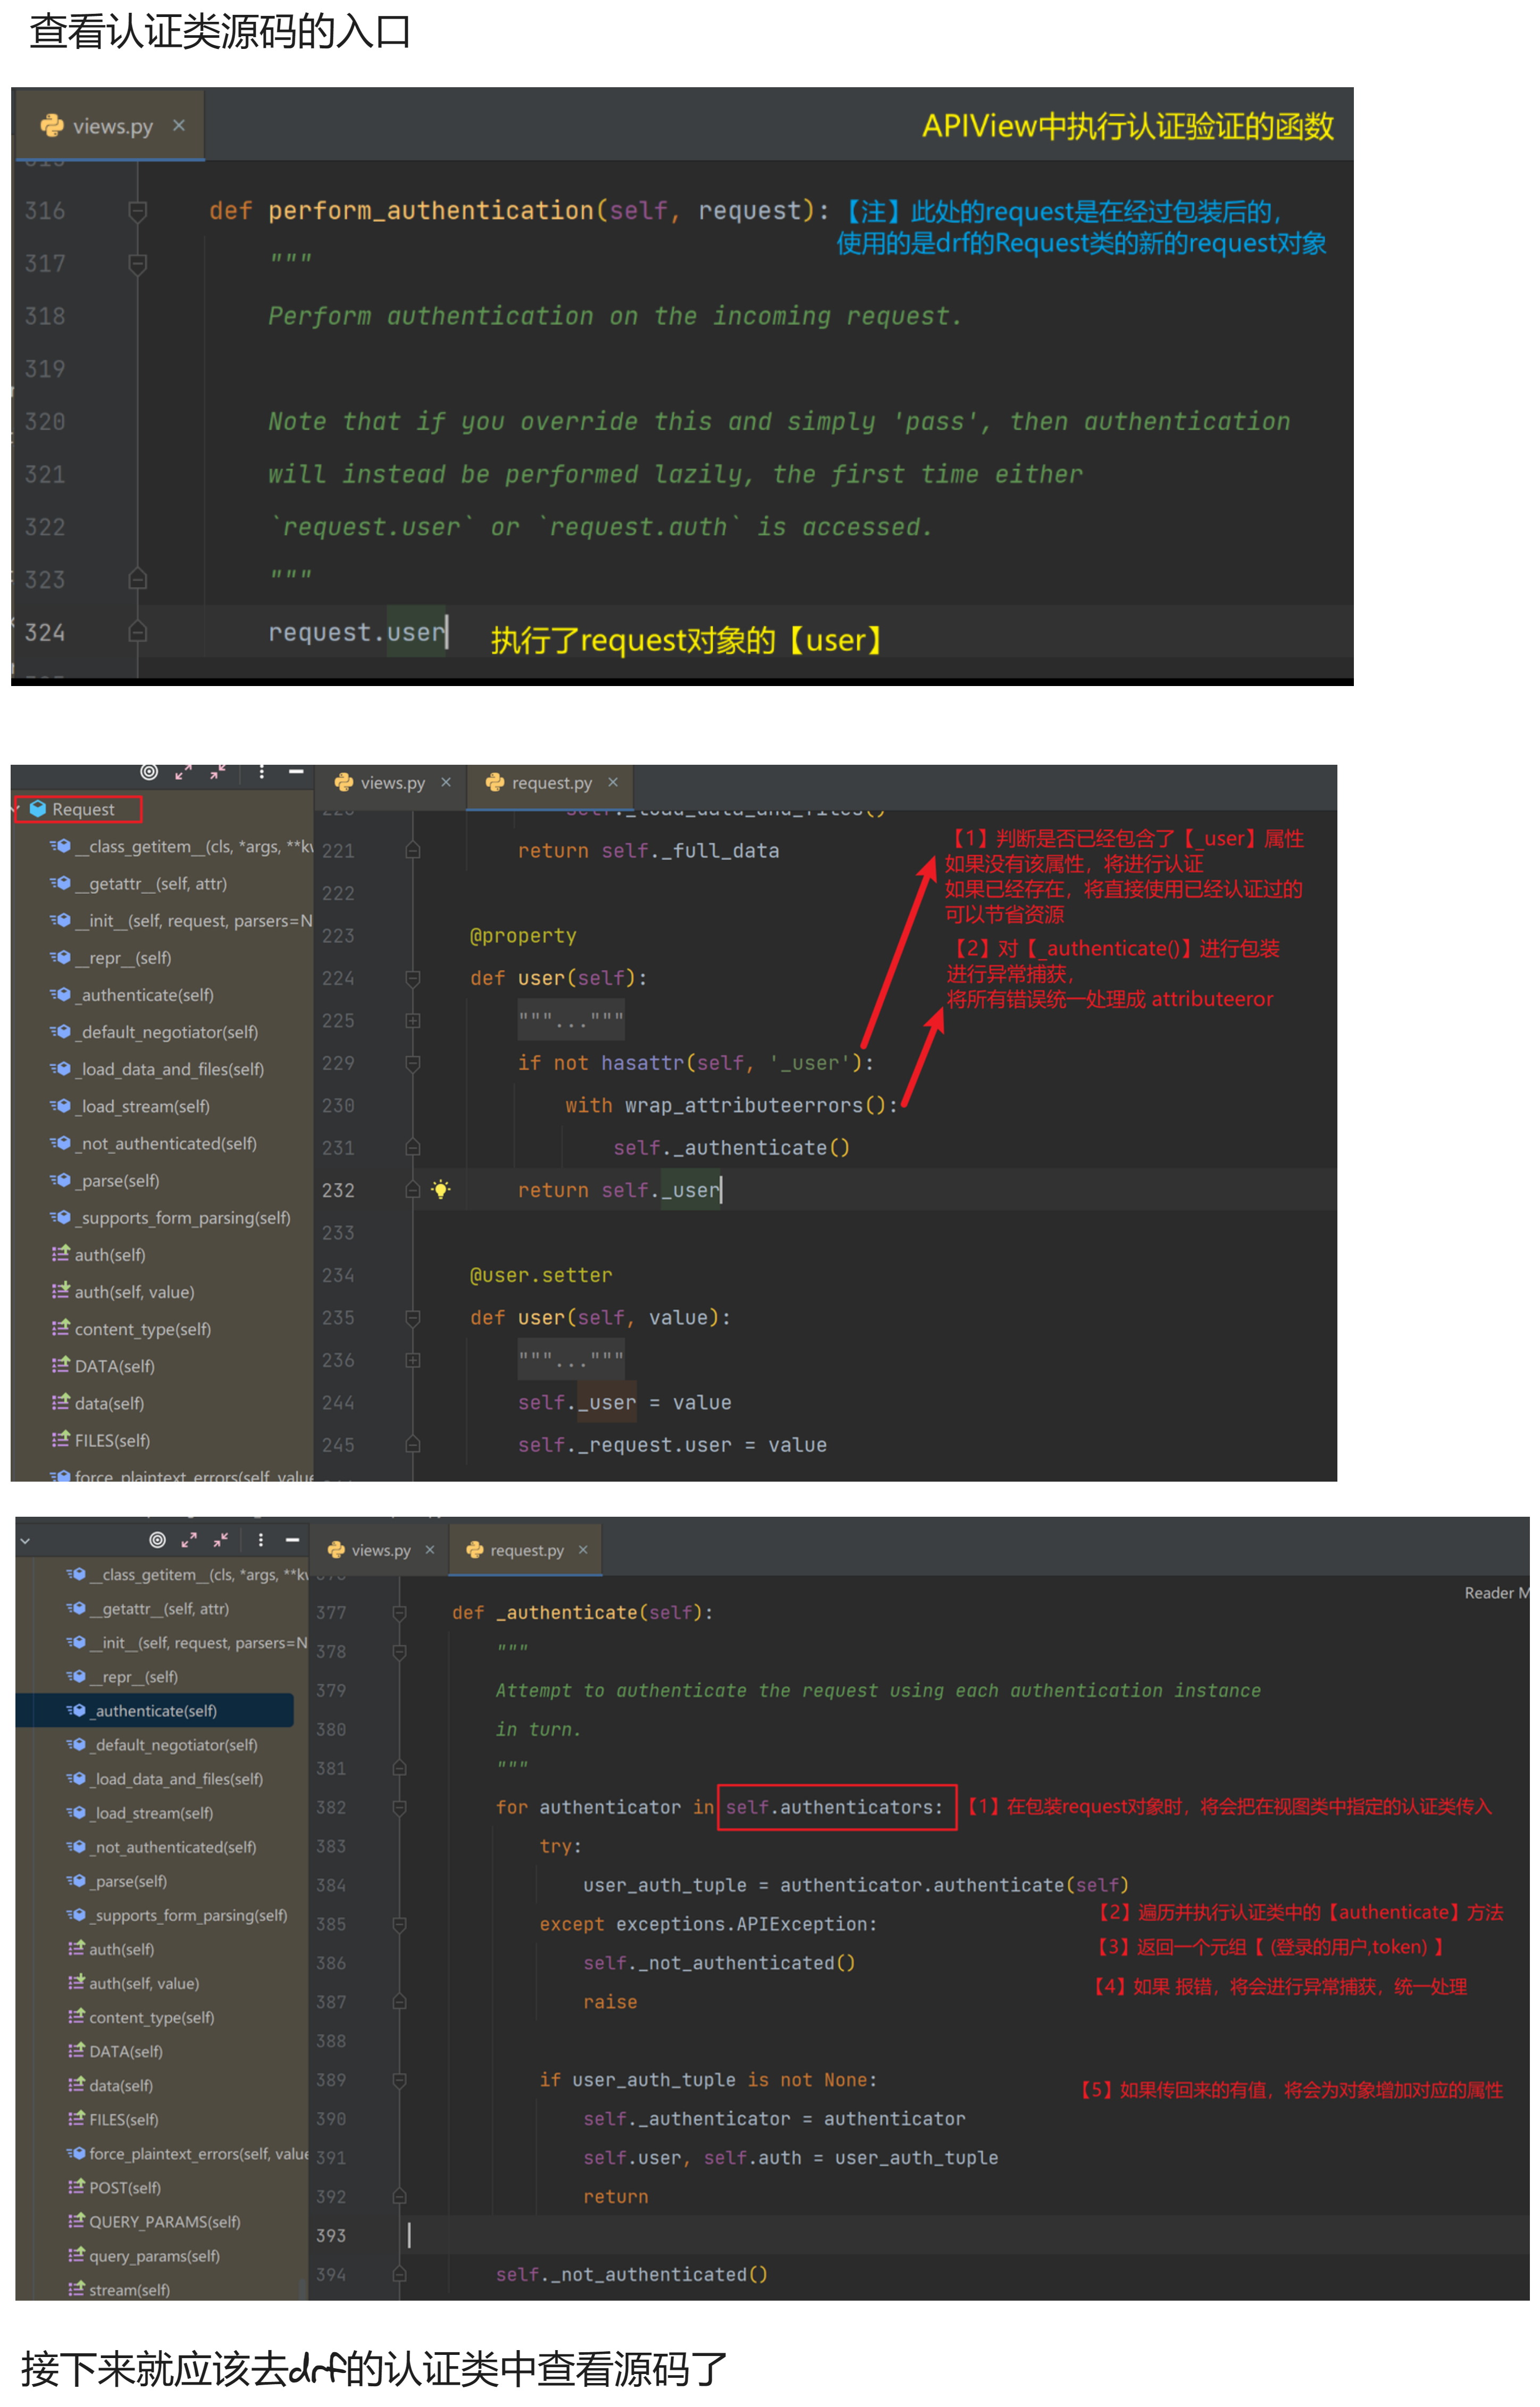
【二】认证
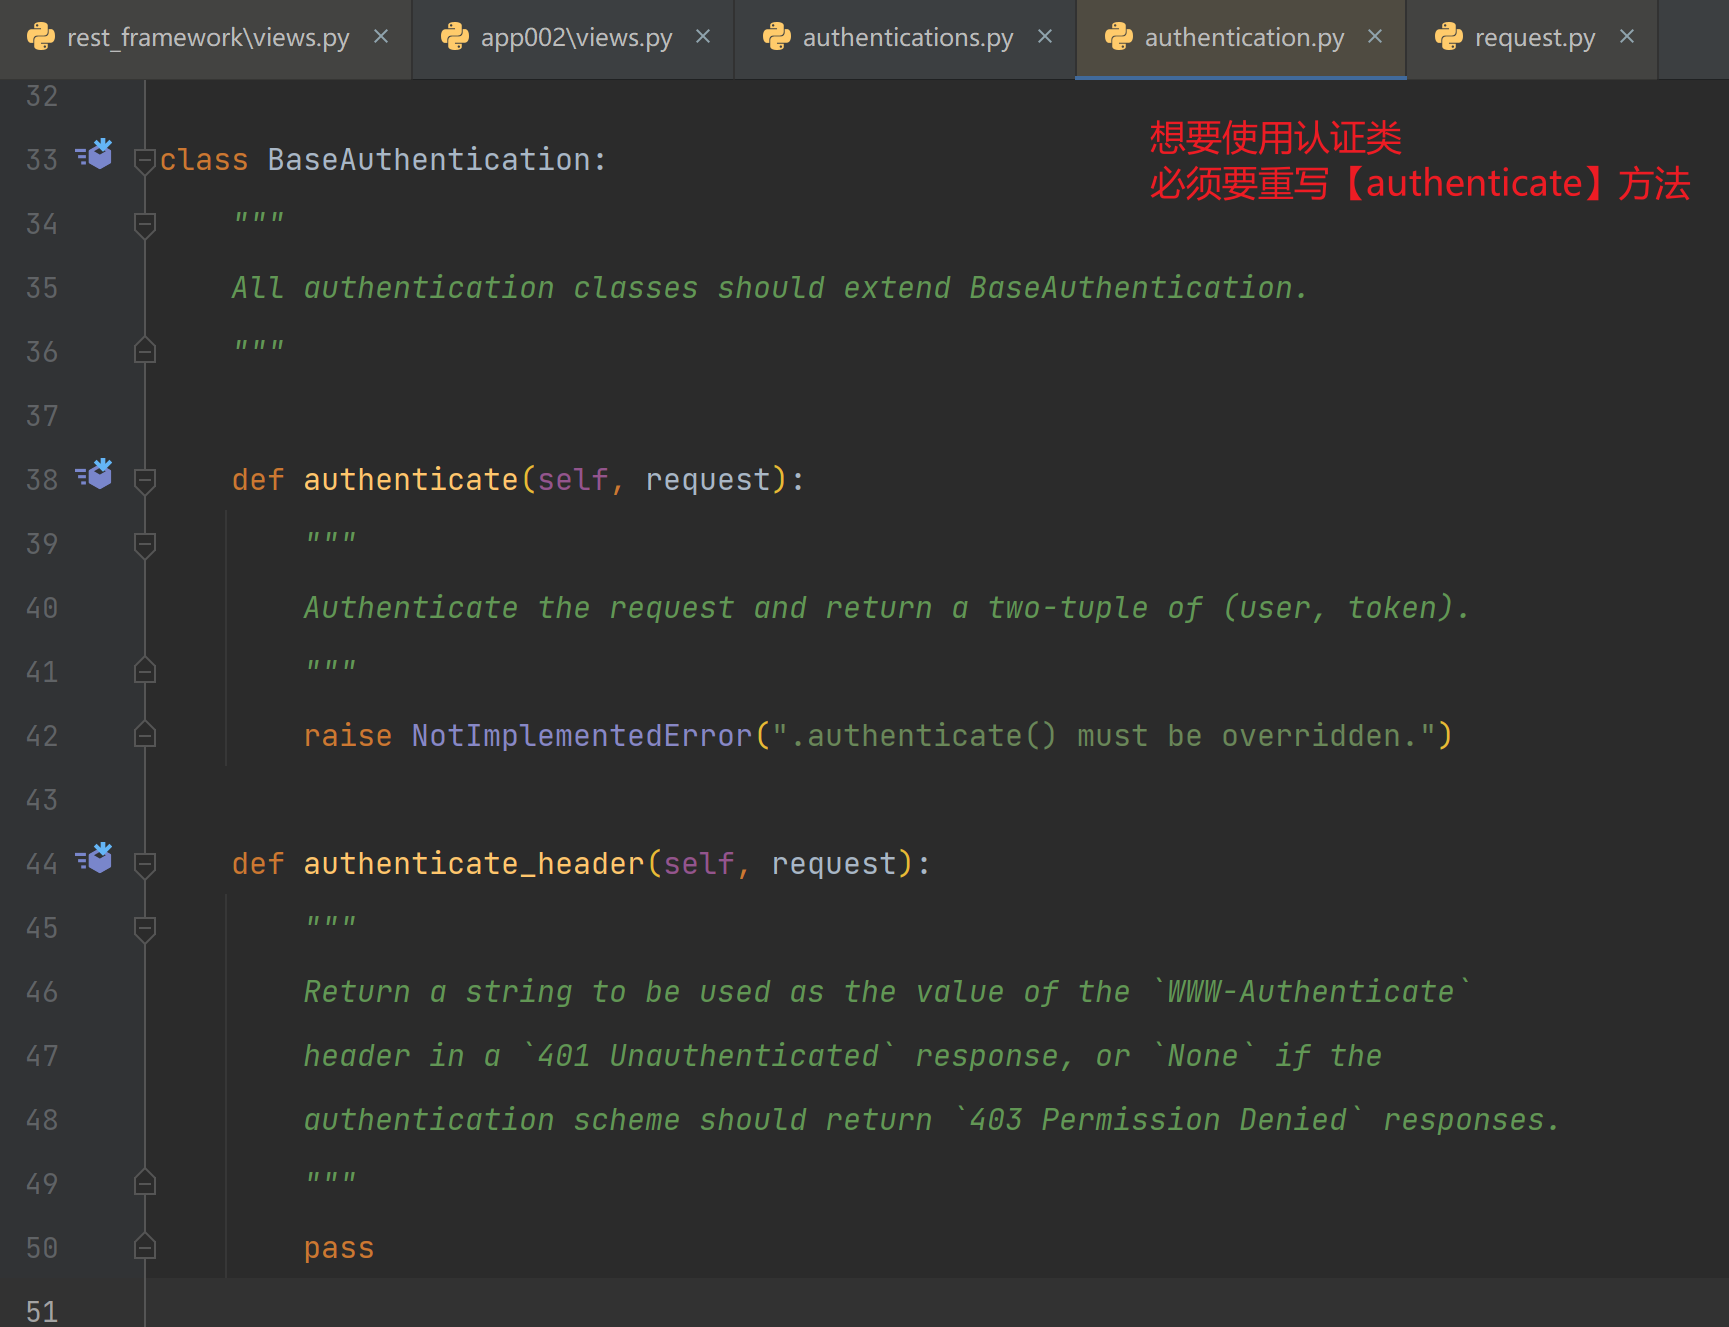
# 我们如果想要自定义认证类,都需要继承 【BaseAuthentication】
from rest_framework.authentication import BaseAuthentication
【1】源码
【2】认证类的使用
###############################  authentications.py ###########
# 导入继承的认证类
from rest_framework.authentication import BaseAuthentication
# 导入认证失败的错误
from rest_framework.exceptions import AuthenticationFailed


class UserAuthenticate(BaseAuthentication):
    # 重写【authenticate】方法
    def authenticate(self, request):
        '''
        进行登录的判断,比如是否携带了token,或是否携带了证明身份信息的东西
        '''
        # 对token 进行校验
        if 'token校验失败':
            # 如果校验失败可以抛出 AuthenticationFailed 异常
            raise AuthenticationFailed('请检查token')
        # 校验通过 返回当前登录用户对象和token
        return user, token
- 局部使用和全局使用
- 可以通过
authentication_classes = []实现局部禁用 - 查找验证类的顺序为,先查找类属性中的,再查找项目配置中的,最后去drf默认配置中查找
- 可以通过
########### views.py ###########

class 视图类(ViewSet):
    # 局部使用 : authentication_classes = []
    authentication_classes = ['认证类']

########### settings.py ###########

# 全局使用
REST_FRAMEWORK = {
    'DEFAULT_AUTHENTICATION_CLASSES': [
        # 认证校验
        # 'app001.authenticate.UserAuthenticate'
    ],
}
【3】实例
#### views.py ####
# 在登录时,签发token

class UserViewV2(ViewSetMixin, ListCreateAPIView):
    queryset = UserInfo.objects.all()
    authentication_classes = []

    @action(methods=['POST'], detail=False)
    def login(self, request):
        username = request.data.get('username')
        password = request.data.get('password')
        # 进行用户名和密码校验
        user_obj = auth.authenticate(username=username, password=password)
        if not user_obj:
            return Response({'code': 101, 'msg': '登录失败!用户名或密码错误'})
        user_token = uuid.uuid4()
        # 校验成功签发token
        UserToken.objects.update_or_create(defaults={'token': user_token}, user=user_obj)
        return Response({'code': 100, 'msg': '登录成功!', 'token': user_token})


################# 需要登录才能进入的视图类 #########################
class UserEditViewV2(ViewSetMixin, RetrieveUpdateDestroyAPIView):
    queryset = UserInfo.objects.all()
    serializer_class = UpdatePasswordSerializerV2
    # 局部使用:指定类属性 【authentication_classes】
    authentication_classes = [UserAuthenticate]

    @action(methods=['PUT'], detail=False)
    def password(self, request, *args, **kwargs):
        ser = self.get_serializer(instance=request.user, data=request.data)
        ser.is_valid(raise_exception=True)
        ser.save()
        return Response({'code': 100, 'msg': '修改成功'})
################ authentications.py ###################
from rest_framework.authentication import BaseAuthentication
from rest_framework.exceptions import AuthenticationFailed
from .models import UserToken


# 继承 【BaseAuthentication】
class UserAuthenticate(BaseAuthentication):
    # 重写 【authenticate】方法
    def authenticate(self, request):
        token = request.META.get('HTTP_TOKEN')
        user_token_obj = UserToken.objects.filter(token=token).first()
        if not user_token_obj:
            raise AuthenticationFailed('请检查token')
        user = user_token_obj.user
        return user, token
【三】权限
# 我们如果想要自定义权限类,都需要继承 【BaseAuthentication】
from rest_framework.permissions import BasePermission
【1】源码
【2】权限类的使用
############### permissions.py ###########
class CommonPermission(BasePermission):
    def has_permission(self, request, view):
        '''
        :param request: 当前请求request对象
        :param view: 视图类
        :return: 布尔值
        '''
        # 可以通过【request.user】中获取到当前登录用户的登录信息
        ### 因为用户需要先通过认证类后才执行权限校验
        # 可以通过【view.basename】获取到视图类的basename属性
        self.message = '可以指定提示信息'
        self.code = '可以指定返回的响应码'
        return True  # 表示权限通过  # 可以访问
    	return False # 表示权限不允许  # 不可以访问
- 局部使用和全局使用
- 可以通过
permission_classes= []实现局部禁用
- 可以通过
########### views.py ###########

class 视图类(ViewSet):
    authentication_classes = ['认证类']
    permission_classes = ['权限类']

########### settings.py ###########

# 全局使用
REST_FRAMEWORK = {
    'DEFAULT_AUTHENTICATION_CLASSES': [
        # 认证校验
        'app001.authenticate.UserAuthenticate'
    ],
    'DEFAULT_PERMISSION_CLASSES': [
        # 权限校验
        'app001.permissions.CommonPermission'
    ],
}
【3】实例
################ permissions.py #################
# 根据用户表中的is_superuser字段进行权限校验
class CommonPermission(BasePermission):
    def has_permission(self, request, view):
        user = request.user
        # 管理员 都可以操作
        if user.is_superuser:
            return True
        else:
            # 普通用户可以查看或删除车型
            if view.basename == 'car_model' and request.method == 'DELETE':
                return True
            elif request.method != 'GET':
                return False
            else:
                return True
【四】频率
# 我们如果想要自定义频率类,都需要继承 【BaseThrottle】
from rest_framework.throttling import BaseThrottle
# 或者继承已经封装完毕的 【SimpleRateThrottle】
from rest_framework.throttling import SimpleRateThrottle
【1】源码

【2】频率类的使用(SimpleRateThrottle)
class CommonThrottle(SimpleRateThrottle):
    # 重写类属性 【rate】
    rate = '5/m'  # '次数/每多少秒'  # 's': 1, 'm': 60, 'h': 3600, 'd': 86400

    # 重写 【get_cache_key】方法
    def get_cache_key(self, request, view):
        return '返回唯一用户访问的唯一标识  如ip,设备id号'
【2.1】SimpleRateThrottle 实例
############### throttle.py #############
class CommonThrottle(SimpleRateThrottle):
    rate = '5/d'  # 意味着 同一天 同一个ip  只可以访问5次

    def get_cache_key(self, request, view):
        return request.META.get("REMOTE_ADDR")
【2.2】SimpleRateThrottle 源码分析
【3】继承BaseThrottle自定义频率类
- 重写频率类的,最关键方法就是
allow_request方法,在其中构建限制逻辑即可 - 直接上实例,该实例大部分参考
SimpleRateThrottle
不必为仿照而瞧不起自己,读得懂源码,理清楚其中的逻辑也能帮我们很多
#################### throttle.py ############
from rest_framework.throttling import BaseThrottle


class ExtendsThrottle(BaseThrottle):
    # rate = None  # 速率  # 次数/时间
    rate = '3/m'  # 速率  # 次数/时间
    history = {}

    def __init__(self):
        self.count, self.duration = self.parse_rate(self.rate)

    def parse_rate(self, rate: str):
        '''
        将【'3/s'】解析成 次数和持续时间
        :param rate: '3/m'  每分钟限制访问3此
        :return: (次数,持续时间)
        '''
        if not rate:
            return None, None
        time_dict = {'s': 1, 'm': 60, 'h': 3600, 'd': 86400}
        count, duration = rate.split('/')
        return int(count), time_dict[duration]

    def get_ident(self, request):
        # 继承父类的获取ip或xff的函数
        # 可以不写,但是为了方便自己理解
        return super().get_ident(request)

    def allow_request(self, request, view):
        '''
        允许访问的主要逻辑代码
        :return: 执行允许通过或不允许通过的方法
        '''
        if not self.rate:
            # 如果不填,就不做限制
            return True
        ip = self.get_ident(request)
        if ip not in self.history:
            # 如果没有来过,初始化历史纪录
            self.history[ip] = []
        ip_history = self.history.get(ip)
        # 添加访问的时间戳
        now = time.time()
        # 当访问次数没达到规定的次数时,不做处理
        while len(ip_history) == self.count:
            # print(now - ip_history[0])
            # 如果这一次请求据第一次请求时间小于规定的时间,限制频率
            if now - ip_history[0] < self.duration:
                return False
            else:
                # 如果举例第一次请求时间大于规定时间,那么允许访问
                # 将第一个请求删除,并在列表最后添加当次的时间戳
                ip_history.pop(0)
                break
        # 将当次的时间戳添加并保存
        ip_history.append(now)
        self.history[ip] = ip_history
        # json.dump(self.history, open('app002/history.json', 'w', encoding='utf-8'))
        return True


 1021
1021


 被折叠的 条评论
为什么被折叠?
被折叠的 条评论
为什么被折叠?
 到【灌水乐园】发言


