


文章目录
- @[toc]
- 一、MyBatis 概述
-
- 二、MyBatis 入门程序
-
- 三、使用 Mybatis 完成 CRUD
-
- 四、Mybatis 核心配置文件详解
-
- 五、 在 WEB 中应用 MyBatis (使用 MVC 架构模式)
- 5.1 数据库表的设计和准备数据
- 5.2 环境搭建
- 5.2.1 添加依赖
- 5.2.2 修改 web.xml 配置文件
- 5.2.3 编写 mybatis-config.xml 配置文件
- 5.2.4 在 resources 目录下新建、编辑 jdbc.properties 文件
- 5.2.5 在 resources 目录下新建、编写 Mapper 文件
- 5.2.6 在 resources 目录下新建、编写 logback.xml 配置文件
- 5.2.7 新建dao, servce, web, pojo, utils
- 5.2.8 新建 pojo 类
- 5.2.9 新建 SqlSessionUtil 类
- 5.2.10 在 webapp 中新建 index.html、error1.html、ereror2.html、success.html
- 5.3 后端代码实现
-
- 5.4 完善事务处理
-
- 5.5 MyBatis 作用域(Scope)和生命周期
- 5.6 面向接口的方式进行 CRUD
-
- 六、 MyBatis小技巧
-
- 七、 Mybatis 参数处理
-
- 八、 Mybatis 查询专题
-
- 九、 动态 SQL
-
- 十、 MyBatis 的高级映射及延迟加载
-
- 十一、 Mybatis 的缓存
-
- 十二、 MyBatis 集成 EhCache
文章目录
- @[toc]
- 一、MyBatis 概述
- 二、MyBatis 入门程序
- 三、使用 Mybatis 完成 CRUD
- 四、Mybatis 核心配置文件详解
- 五、 在 WEB 中应用 MyBatis (使用 MVC 架构模式)
- 5.1 数据库表的设计和准备数据
- 5.2 环境搭建
- 5.2.1 添加依赖
- 5.2.2 修改 web.xml 配置文件
- 5.2.3 编写 mybatis-config.xml 配置文件
- 5.2.4 在 resources 目录下新建、编辑 jdbc.properties 文件
- 5.2.5 在 resources 目录下新建、编写 Mapper 文件
- 5.2.6 在 resources 目录下新建、编写 logback.xml 配置文件
- 5.2.7 新建dao, servce, web, pojo, utils
- 5.2.8 新建 pojo 类
- 5.2.9 新建 SqlSessionUtil 类
- 5.2.10 在 webapp 中新建 index.html、error1.html、ereror2.html、success.html
- 5.3 后端代码实现
- 5.4 完善事务处理
- 5.5 MyBatis 作用域(Scope)和生命周期
- 5.6 面向接口的方式进行 CRUD
- 六、 MyBatis小技巧
- 七、 Mybatis 参数处理
- 八、 Mybatis 查询专题
- 九、 动态 SQL
- 十、 MyBatis 的高级映射及延迟加载
- 十一、 Mybatis 的缓存
- 十二、 MyBatis 集成 EhCache
一、MyBatis 概述
1.1 Java 持久层框架
- MyBaits
- Hibernate
- jOOQ
- Guzz
- Spring Data (实现了 JPA 规范)
- Active JDBC
1.2 JDBC 不足
- SQL 语句写死在 Java 程序中,不灵活,违背了开闭原则 OCP。
- 取值、传值繁琐
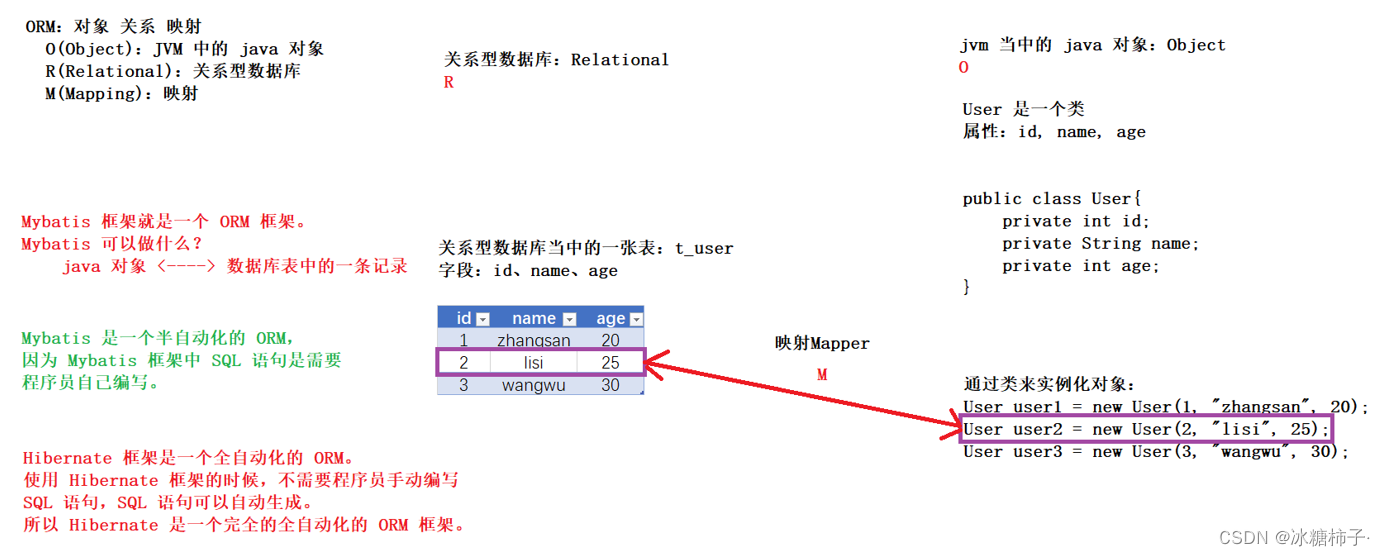
1.3 ORM
O (Object) : JVM 中的 java 对象
R (Relational) : 关系型数据库
M (Mapping) : 映射
MyBaits 就是一个 ORM 框架。
作用: java 对象 <----> 数据库表中的一条记录
MyBatis 是一个 半自动化的 ORM, 因为 MyBatis 框架中 SQL 语句是需要程序员自己编写的。
1.4 MyBatis 框架特点
-
支持定制化 SQL、存储过程、基本映射以及高级映射。
-
避免了几乎所有的 JDBC 代码中手动设置参数以及获取结果集
-
支持 XML 开发,也支持注解式开发。【为了保证 sql 语句的灵活,所以 mybatis 大部分是采用 XML 方式开发】
-
将接口和 Java 中的 POJO 映射成数据库中的记录
-
完全做到 sql 解耦合
二、MyBatis 入门程序
2.1 resources 目录
放到这个目录当中的,一般都是资源文件,配置文件。直接放到 resources 目录下的资源,等同于放到了类的根路径下。
2.2 开发步骤
-
打包方式 jar
-
导入依赖
<!-- mybatis 依赖 --> <dependency> <groupId>org.mybatis</groupId> <artifactId>mybatis</artifactId> <version>3.5.9</version> </dependency> <!-- mysql 依赖 --> <dependency> <groupId>mysql</groupId> <artifactId>mysql-connector-java</artifactId> <version>8.0.28</version> </dependency> -
编写 mybatis 核心配置文件:mybatis-config.xml
- 文件名不是必须叫 mybatis-config.xml 。可以用其他名字。
- 文件存放的位置也不是固定的。可以随意,一般会放到类的根路径下
-
编写 XxxMapper.xml 文件
- 在这个配置文件当中编写 SQL 语句
-
在 mybatis-config.xml 文件中指定 XxxMapper.xml 文件的路径
<!-- resource 属性自动从类的根路径下开始查找资源 --> <mapper resource="CarMapper.xml"/> -
编写 MyBatis 程序。(使用 mybatis 的类库,编写 mybatis 程序,连接数据库,做增删改查)
在 MyBatis 当中,负责执行 SQL 语句的对象叫做什么?
SqlSession
SqlSession 是专门用来执行 SQL 语句的,是一个 Java 程序跟数据库之间的一次会话。
mybatis 的核心对象包括:
- SqlSessionFactoryBuilder
- SqlSessionfactory
- SqlSession
SqlSessionFactoryBuilder ----> SqlSessionfactory ----> SqlSession
// 获取 SqlSessionFactoryBuilder 对象
SqlSessionFactoryBuilder sqlSessionFactoryBuilder = new SqlSessionFactoryBuilder();

// 获取 SqlSessionFactory 对象
InputStream is = Resources.getResourceAsStream("mybatis-config.xml");    // Resources.getResourceAsStream 默认从类的根路径下查找资源
SqlSessionFactory sqlSessionFactory = sqlSessionFactoryBuilder.build(is);    // 一般情况下都是一个数据库对应一个 SqlSessionFactory 对象

// 获取 SqlSession 对象
SqlSession sqlSession = sqlSessionFactory.openSession();

// 执行 SQL 语句
int count = sqlSession.insert("insertCar");

// 手动提交
sqlSession.commit();

System.out.println("插入了几条记录:" + count);
2.3 mybatis 中有两个主要的配置文件
-
mybatis-config.xml
这是核心配置文件,主要配置连接数据库的信息等。(一个)
-
XxxMapper.xml
这是专门用来编写 SQL 语句的配置文件。(一个表一个)
t_user 表,一般会对应 UserMapper.xml
t_student 表,一般会对应 StudentMapper.xml
2.4 关于 mybatis 的事务管理机制(深度剖析)
- 在 mybatis-config.xml 文件中,可以通过以下的配置进行 mybatis 的事务管理
<transactionManager type="JDBC"/>
type 属性值有两个:
- JDBC
- MANAGED
-
在 mybatis 中提供了两种管理机制:
- JDBC 事务管理器
- MANAGED 事务管理器
-
JDBC 事务管理器
mybatis 框架自己管理事务,采用原生的 JDBC 代码去管理事务:
conn.setAutoCommit(false); 开启事务。
… 业务处理 …
conn.commit(); 手动提交事务
如果没有在 JDBC 代码中执行 conn.setAutoCommit(false); 的话,默认的 autoCommit 是 true。
使用 JDBC 事务管理器的话,底层创建的事务管理器对象:JdbcTransaction 对象
SqlSession sqlSession = sqlSessionFactory.openSession(true); /** 表示没有开启事务,因为这种方式不会执行:conn.setAutoCommit(false); 在 JDBC 事务中,没有执行 conn.setAutoCommit(false); 那么 autoCommit 默认就是 true 如果 autoCommit 是 true,就表示没有开启事务,只要执行任意一条 DML 语句就提交一次 */ -
MANAGED 事务管理器
mybatis 不再负责事务的管理了。事务管理交给其他容器来负责。例如:spring。
对于我们当前的单纯只有 mybatis 的情况下,如果配置为:MANAGED
那么事务这块是没人管的。没有人管理事务表示事务不会开启。
-
重点
只要 autoCommit 是 true。就表示没有开启事务。
只有 autoCommit 是 false。表示开启了事务。
2.5 Junit
测试类名的规范:以 test 结尾,假设测试的类是 MathService,这个测试类名:MathServiceTest
测试方法名的规范:以 test 开始,假设测试的方法是 sum,这个测试方法名:testSum
单元测试中有两个重要的概念
- 实际值(被测试的业务方法的真正执行结果)
- 期望值(执行力这个业务方法之后,你期望的执行结果是多少)
2.6 关于 mybatis 集成日志组件
mybatis 常见的集成日志组件
- SLF4J (沙拉风)
- LOG4J
- LOG4J2
- STDOUT_LOGGING
- …
其中 STDOUT_LOGGING 是标准日志,mybatis 已经实现了这种标准日志。只要开启即可
<!--
	这种实现可以看到一些信息,比如:连接对象什么时候创建,什么时候关闭,sql 语句是怎样的
	但是没有详细的日期,线程名字,等。如果想用更加丰富的配置,可以集成第三方的 log 组件。
-->
<settings>
	<setting name="logImpl" value="STDOUT_LOGGING"/>
</settings>
集成 logback 日志框架。
logback 日志框架实现了 SLF4J 标准。
-
第一步:引入 logback 的依赖
<dependency> <groupId>ch.qos.logback</groupId> <artifactId>logback-classic</artifactId> <version>1.2.11</version> </dependency> -
第二步:引入 logback 所需要的 xml 配置文件
这个配置文件的名字必须叫做:logback.xml 或者 logback-test.xml,不能是其他的名字。
这个配置文件必须放到类的根路径下,不能是其他位置。
<?xml version="1.0" encoding="UTF-8"?>

<!-- 配置文件修改时重新加载,默认true -->
<configuration debug="false">

    <!-- 控制台输出 -->
    <appender name="STDOUT" class="ch.qos.logback.core.ConsoleAppender">
        <encoder class="ch.qos.logback.classic.encoder.PatternLayoutEncoder" charset="UTF-8">
            <!-- 输出日志记录格式 -->
            <pattern>[%thread] %-5level %logger{50} - %msg%n</pattern>
        </encoder>
    </appender>

<!--    mybatis log configure-->
    <logger name="com.apache.ibatis" level="TRACE"/>
    <logger name="java.sql.Connection" level="DEBUG"/>
    <logger name="java.sql.Statement" level="DEBUG"/>
    <logger name="java.sql.PreparedStatement" level="DEBUG"/>


    <!-- 日志输出级别,LOGBACK日志级别包括五个:TRACE < DEBUG < INFO < WARN < ERROR-->
    <root level="DEBUG">
        <appender-ref ref="STDOUT"/>
        <appender-ref ref="FILE"/>
    </root>
</configuration>
三、使用 Mybatis 完成 CRUD
3.1 Insert
Java 程序中使用 POJO 类给 SQL 语句的占位符传值
Car car = new Car();
car.setCarNum("3333");
car.setBrand("比亚迪秦");
car.setGuidePrice(30.0);
car.setProduceTime("2020-11-11");
car.setCarType("新能源");
注意:占位符 #{},大括号里面写 POJO 类的属性名
<insert id="insertCar">
	insert into t_car(id, car_num, brand, guide_price, produce_time, car_type)
	values (null, #{carNum}, #{brand}, #{guidePrice}, #{produceTime}, #{carType})
</insert>
严格意义来说:如果使用 POJO 对象传递值的话,#{} 这个大括号中写的是 get 方法的方法名去掉 get,然后将剩下的单词首字母小写,然后放进去。
列如:getUsername() --> #{username}
例如:getEmail() --> #{email}
…
mapper 文件中填写的 #{carType}),MyBatis 会通过反射机制查找 getCarType() 方法得到值
3.2 Delete
需求:根据 id 删除数据
将 id = 13 的数据删除
实现:
int count = sqlSession.delete("deleteById", 13);
<delete id="deleteById">
	delete from t_car where id = #{id}
</delete>
注意:如果占位符只有一个,那么 #{} 的大括号里可以随意。但最好见名知意
3.3 Update
需求:根据 id 修改数据
修改 id = 8 的数据
实现:
public void testUpdateById() {
    SqlSession sqlSession = SqlSessionUtil.openSession();
    Car car = new Car();
    car.setId(8L);
    car.setCarNum("9999");
    car.setBrand("凯美瑞");
    car.setGuidePrice(30.3);
    car.setProduceTime("1999-11-10");
    car.setCarType("燃油车");
    int count = sqlSession.update("updateById", car);
    System.out.println(count);
    sqlSession.commit();
    sqlSession.close();
}
<update id="updateById">
    update t_car set
        car_num = #{carNum},
        brand = #{brand},
        guide_price = #{guidePrice},
        produce_time = #{produceTime},
        car_type = #{carType}
    where id = #{id}
</update>
3.4 Select
3.4.1 selectOne (查一个)
需求:根据 id 查询
实现:
<select id="selectById" resultType="com.guokui.mybatis.pojo.Car">
	select * from t_car where id = #{id}
</select>
Object car = sqlSession.selectOne("selectById", 1);
注意:select 标签中 resultType 属性,这个属性用来告诉 mybatis 查询结果集封装成什么类型的 java 对象。
resultType 通常写的是:全限定类名。
结果:
Car{id=1, carNum=‘null’, brand=‘宝马 520Li’, guidePrice=null, produceTime=‘null’, carType=‘null’}
id 和 brand 属性有值,其他属性为 null。
数据库查询结果:
SELECT * FROM t_car WHERE id = 1
±—±--------±-------------±------------±-------------±----------+
| id | car_num | brand | guide_price | produce_time | car_type |
±—±--------±-------------±------------±-------------±----------+
| 1 | 1001 | 宝马 520Li | 10.00 | 2020-10-11 | 燃油车 |
±—±--------±-------------±------------±-------------±----------+
car_num、guide_price、produce_time、car_type 这是查询结果的类名。
这些列名和 Car 类中的属性名对不上。
Car 类的属性名:
carNum、guidePrice、produceTime、carType
修改 SQL 语句(用 as 关键字起别名)
<select id="selectById" resultType="com.guokui.mybatis.pojo.Car">
	select
		id, car_num as carNum, brand,
		guide_price as guidePrice,
		produce_time as produceTime,
		car_type as carType
	from t_car
	where id = #{id}
</select>
起别名后:
±—±-------±-------------±-----------±------------±----------+
| id | carNum | brand | guidePrice | produceTime | carType |
±—±-------±-------------±-----------±------------±----------+
| 1 | 1001 | 宝马 520Li | 10.00 | 2020-10-11 | 燃油车 |
±—±-------±-------------±-----------±------------±----------+
Car{id=1, carNum=‘1001’, brand=‘宝马 520Li’, guidePrice=10.0, produceTime=‘2020-10-11’, carType=‘燃油车’}
3.4.2 selectList (查所有)
需求:查询 t_car 表中所有记录
实现:
<select id="selectAll" resultType="com.guokui.mybatis.pojo.Car">
	select
		id, car_num as carNum, brand,
		guide_price as guidePrice,
		produce_time as produceTime,
		car_type as carType
	from t_car
</select>
List<Object> cars = sqlSession.selectList("selectAll");
注意:resultType 还是指定要封装的结果集的类型。不是 List 类型,是指定 List 集合中元素的类型。
selectList 方法:mybatis 通过这个方法就可以得知需要一个 List 集合,会自动返回一个 List 集合。
3.5 Mapper 文件的 namespace
在 sql mapper.xml 文件当中有一个 namespace,这个属性是用来指定命名空间的。用来防止 id 重复。
<mapper namespace="aaa">
    <!-- 使用insert, update, delete, select 标签写sql -->
    <select id="selectAll" resultType="com.guokui.mybatis.pojo.Car">
        select
            id, car_num as carNum, brand,
            guide_price as guidePrice,
            produce_time as produceTime,
            car_type as carType
        from t_car
    </select>
</mapper>
List<Object> cars = sqlSession.selectList("aaa.selectAll");
本质上 mybatis 中的 sql id 这样写才是严谨、完整的。
四、Mybatis 核心配置文件详解
4.1 environment标签
一个 environment 对应一个 SqlSessionFactory
一个 SqlSessionFactory 对应一个数据库
多环境下,配置文件这样写(两个 environment)
<!--  default="默认环境"  -->
<environments default="mybatisDB">

    <environment id="powernodeDB">
        <transactionManager type="JDBC"/>
        <dataSource type="POOLED">
            <property name="driver" value="com.mysql.cj.jdbc.Driver"/>
            <property name="url" value="jdbc:mysql://localhost:3306/powernode"/>
            <property name="username" value="root"/>
            <property name="password" value="root"/>
        </dataSource>
    </environment>

    <environment id="mybatisDB">
        <transactionManager type="JDBC"/>
        <dataSource type="POOLED">
            <property name="driver" value="com.mysql.cj.jdbc.Driver"/>
            <property name="url" value="jdbc:mysql://localhost:3306/mybatis"/>
            <property name="username" value="root"/>
            <property name="password" value="root"/>
        </dataSource>
    </environment>

</environments>
4.2 transactionManager 标签
在 mybatis-config.xml 配置文件中,有 transactionManager 子标签,表示设置 MyBatis 的事务管理器
<transactionManager type="JDBC"/>
type 有两个值:
- JDBC:使用原生的 JDBC 代码来管理事务
- MANAGED:mybatis 不再负责事务的管理,将事务管理交给其他的 JEE(JavaEE)容器来管理。例如:spring
MyBatis 底层有一个 Transaction 接口,实现两个事务
如果 type=“JDBC”,那么底层会实例化 JdbcTransaciton对象
如果 type=“MANAGED”,那么底层会实例化 ManagedTransaciton
4.3 dataSource 标签
<dataSource type="POOLED">
	.......
</dataSource>
问:这个标签有啥用
答:dataSource 表示数据源,用来获取 Connection 对象
它的 type 属性可以填写三个值:
UNPOOLED:不使用数据库连接池,每次获取 Connection 都要创建一个新对象
POOLED:使用 MyBatis 自带的连接池
JNDI:集成其他第三方的数据源(如果自己手写框架也可以用这个)
JNDI 是一套规范(java 命名目录接口),Tomcat 服务器实现了这个规范。
UNPOOLED 和 POOLED 区别
- unpooled 表示不使用连接池,每次请求过来都会创建一个 Connection
- pooled 表示使用 MyBatis 自带的连接池:请求过来会先从连接池获取C onnection对象
使用连接池的好处:
- 池内的 Connection 数量是固定的,比如池子大小是5,如果5个连接都被占用,第6个要获取连接就先等待,数量固定
- 假如有人一直F5刷新,没有用连接池的话,就会一直创建Connection对象,如果实例化对象过多,可能会导致服务器宕机,数量固定
- 有新请求,第一反应去池中查找,可以增加效率
配置具体的数据库连接池参数
<!--连接池最大连接数,默认:10-->
<property name="poolMaximumActiveConnections " value="10"/>
<!--可以同时存在的最大空闲连接数,空闲太多则真正关闭一些Connection-->
<property name="poolMaximumIdleConnections " value="5"/>
<!--超时强制关闭时间,默认20000-->
<property name="poolMaximumCheckoutTime " value="20000"/>
<!--如果连接花费时间很长,连接池会隔断时间尝试重新连接并打印日志-->
<property name="poolTimeToWait " value="2000"/>
4.4 properties 标签
在 configuration 标签下有一个 properties 子标签,是用来设置变量的
两种写法:
-
文件内
<properties> <property name="jdbc.driver" value="com.mysql.cj.jdbc.Driver"/> <property name="jdbc.url" value="jdbc:mysql://localhost:3306/mybatis"/> <property name="jdbc.username" value="root"/> <property name="jdbc.password" value="root"/> </properties> -
外部文件(相对路径)
<properties resource="jdbc.properties" /># jdbc.properties 文件 jdbc.driver=com.mysql.cj.jdbc.Driver jdbc.url=jdbc:mysql://localhost:3306/mybatis jdbc.username=root jdbc.password=root -
外部文件(绝对路径,不推荐)
<properties url="file:///D://jdbc.properties"/>
五、 在 WEB 中应用 MyBatis (使用 MVC 架构模式)
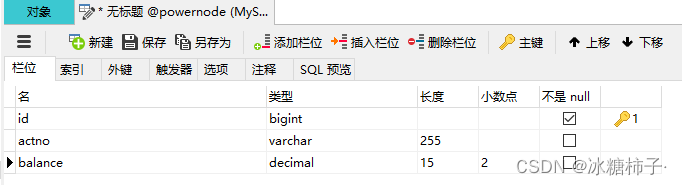
5.1 数据库表的设计和准备数据
表名:t_act
列名:id、actno、balance

5.2 环境搭建
5.2.1 添加依赖
<dependencies>
    <!--  mybatis 依赖  -->
    <dependency>
        <groupId>org.mybatis</groupId>
        <artifactId>mybatis</artifactId>
        <version>3.5.9</version>
    </dependency>
    <!--  mysql 依赖  -->
    <dependency>
        <groupId>mysql</groupId>
        <artifactId>mysql-connector-java</artifactId>
        <version>8.0.28</version>
    </dependency>
    <!--  logback 依赖  -->
    <dependency>
        <groupId>ch.qos.logback</groupId>
        <artifactId>logback-core</artifactId>
        <version>1.2.11</version>
    </dependency>
    <!--  servlet 依赖  -->
    <dependency>
        <groupId>javax.servlet</groupId>
        <artifactId>javax.servlet-api</artifactId>
        <version>4.0.1</version>
    </dependency>
</dependencies>
5.2.2 修改 web.xml 配置文件
<?xml version="1.0" encoding="UTF-8"?>
<web-app xmlns="http://xmlns.jcp.org/xml/ns/javaee"
         xmlns:xsi="http://www.w3.org/2001/XMLSchema-instance"
         xsi:schemaLocation="http://xmlns.jcp.org/xml/ns/javaee
                      http://xmlns.jcp.org/xml/ns/javaee/web-app_4_0.xsd"
         version="4.0"
         metadata-complete="false">
</web-app>
5.2.3 编写 mybatis-config.xml 配置文件
<?xml version="1.0" encoding="UTF-8" ?>
<!DOCTYPE configuration
        PUBLIC "-//mybatis.org//DTD Config 3.0//EN"
        "http://mybatis.org/dtd/mybatis-3-config.dtd">
<configuration>
    <properties resource="jdbc.properties" />

    <environments default="powernodeDB">
        <environment id="powernodeDB">
            <transactionManager type="JDBC"/>
            <dataSource type="POOLED">
                <property name="driver" value="${jdbc.driver}"/>
                <property name="url" value="${jdbc.url}"/>
                <property name="username" value="${jdbc.username}"/>
                <property name="password" value="${jdbc.password}"/>
            </dataSource>
        </environment>
    </environments>

    <mappers>
        <!--    resource 属性自动从类的根路径下开始查找资源    -->
        <mapper resource="AccountMapper.xml"/>
    </mappers>
</configuration>
5.2.4 在 resources 目录下新建、编辑 jdbc.properties 文件
jdbc.driver=com.mysql.cj.jdbc.Driver
jdbc.url=jdbc:mysql://localhost:3306/powernode
jdbc.username=root
jdbc.password=root
5.2.5 在 resources 目录下新建、编写 Mapper 文件
<?xml version="1.0" encoding="UTF-8" ?>
<!DOCTYPE mapper
        PUBLIC "-//mybatis.org//DTD Mapper 3.0//EN"
        "http://mybatis.org/dtd/mybatis-3-mapper.dtd">
<mapper namespace="account">
	<insert id="insertAct">
        insert into t_act(id,name,balance)
        values (null,#{name},#{balance})
    </insert>
</mapper>
5.2.6 在 resources 目录下新建、编写 logback.xml 配置文件
<?xml version="1.0" encoding="UTF-8"?>

<!-- 配置文件修改时重新加载,默认true -->
<configuration debug="false">

    <!-- 控制台输出 -->
    <appender name="STDOUT" class="ch.qos.logback.core.ConsoleAppender">
        <encoder class="ch.qos.logback.classic.encoder.PatternLayoutEncoder" charset="UTF-8">
            <!-- 输出日志记录格式 -->
            <pattern>[%thread] %-5level %logger{50} - %msg%n</pattern>
        </encoder>
    </appender>

    <!--    mybatis log configure-->
    <logger name="com.apache.ibatis" level="TRACE"/>
    <logger name="java.sql.Connection" level="DEBUG"/>
    <logger name="java.sql.Statement" level="DEBUG"/>
    <logger name="java.sql.PreparedStatement" level="DEBUG"/>


    <!-- 日志输出级别,LOGBACK日志级别包括五个:TRACE < DEBUG < INFO < WARN < ERROR-->
    <root level="DEBUG">
        <appender-ref ref="STDOUT"/>
        <appender-ref ref="FILE"/>
    </root>
</configuration>
5.2.7 新建dao, servce, web, pojo, utils
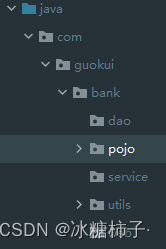
5.2.8 新建 pojo 类
package com.guokui.bank.pojo;

/**
 * 账户类,封装账户数据。
 * @author 锅盔
 * @version 1.0
 * @since 1.0
 */
public class Account {

    private Long id;
    private String actno;
    private Double balance;

    public Account() {
    }

    public Account(Long id, String actno, Double balance) {
        this.id = id;
        this.actno = actno;
        this.balance = balance;
    }

    public Long getId() {
        return id;
    }

    public void setId(Long id) {
        this.id = id;
    }

    public String getActno() {
        return actno;
    }

    public void setActno(String actno) {
        this.actno = actno;
    }

    public Double getBalance() {
        return balance;
    }

    public void setBalance(Double balance) {
        this.balance = balance;
    }

    @Override
    public String toString() {
        return "Account{" +
                "id=" + id +
                ", actno='" + actno + '\'' +
                ", balance=" + balance +
                '}';
    }
}
5.2.9 新建 SqlSessionUtil 类
package com.guokui.bank.utils;

import org.apache.ibatis.io.Resources;
import org.apache.ibatis.session.SqlSession;
import org.apache.ibatis.session.SqlSessionFactory;
import org.apache.ibatis.session.SqlSessionFactoryBuilder;

import java.io.IOException;
import java.io.InputStream;

public class SqlSessionUtil {

    private SqlSessionUtil(){}

    private static SqlSessionFactory sqlSessionFactory;

    // 类加载时执行
    static {
        try {
            SqlSessionFactoryBuilder sqlSessionFactoryBuilder = new SqlSessionFactoryBuilder();
            InputStream is = Resources.getResourceAsStream("mybatis-config.xml");
            sqlSessionFactory = sqlSessionFactoryBuilder.build(is);
        } catch (IOException e) {
            e.printStackTrace();
        }
    }

    public static SqlSession openSession() {
        SqlSession sqlSession = sqlSessionFactory.openSession();
        return sqlSession;
    }
}
5.2.10 在 webapp 中新建 index.html、error1.html、ereror2.html、success.html
<!DOCTYPE html>
<html lang="en">
<head>
    <meta charset="UTF-8">
    <title>银行账户转账</title>
</head>
<body>
    <form action="/bank/transfer" method="post">
        转出账号:<input type="text" name="fromActno"><br>
        转入账号:<input type="text" name="toActno"><br>
        转账金额:<input type="text" name="money"><br>
        <input type="submit" name="转账">
    </form>
</body>
</html>
<!DOCTYPE html>
<html lang="en">
<head>
    <meta charset="UTF-8">
    <title>转账报告</title>
</head>
<body>
    <h1>余额不足!!!</h1>
</body>
</html>
<!DOCTYPE html>
<html lang="en">
<head>
  <meta charset="UTF-8">
  <title>转账报告</title>
</head>
<body>
  <h1>转账失败:未知原因!!!</h1>
</body>
</html>
<!DOCTYPE html>
<html lang="en">
<head>
    <meta charset="UTF-8">
    <title>转账报告</title>
</head>
<body>
    <h1>转账成功!</h1>
</body>
</html>
5.3 后端代码实现
5.3.1 完善 DAO 层,接口、实现类
package com.guokui.bank.dao;

import com.guokui.bank.pojo.Account;

/**
 * 账户的 DAO 对象,负责 t_act 表中的 CRUD
 * @author 锅盔
 * @version 1.0
 * @since 1.0
 */
public interface AccountDao {

    /**
     * 根据账号查询账户信息
     * @param actno 账号
     * @return 账户信息
     */
    Account selectByActno(String actno);

    /**
     * 更新账户信息
     * @param act 被更新的账户对象
     * @return 1 表示更新成功,其他值表示失败
     */
    int updateByActnoo(Account act);
}
package com.guokui.bank.dao.impl;

import com.guokui.bank.dao.AccountDao;
import com.guokui.bank.pojo.Account;
import com.guokui.bank.utils.SqlSessionUtil;
import org.apache.ibatis.session.SqlSession;

public class AccountDaoImpl implements AccountDao {
    public Account selectByActno(String actno) {
        SqlSession sqlSession = SqlSessionUtil.openSession();
        Account account = sqlSession.selectOne("account.selectByActno", actno);
        sqlSession.close();
        return account;
    }

    public int updateByActnoo(Account act) {
        SqlSession sqlSession = SqlSessionUtil.openSession();
        int count = sqlSession.update("account.updateByActnoo", act);
        sqlSession.commit();
        sqlSession.close();
        return count;
    }
}
5.3.2 完善业务层 AccountService 接口、实现类
package com.guokui.bank.service;

import com.guokui.bank.exceptions.MoneyNotEnoughException;
import com.guokui.bank.exceptions.TransferException;

/**
 * 账户业务类
 * @author 锅盔
 * @version 1.0
 * @since 1.0
 */

public interface AccountService {

    /**
     * 账户转账业务
     * @param fromActno 转出账号
     * @param toActno 转入账号
     * @param money 转账金额
     */
    void transfer(String fromActno, String toActno, double money)
        throws MoneyNotEnoughException, TransferException;
}
package com.guokui.bank.service.impl;

import com.guokui.bank.dao.AccountDao;
import com.guokui.bank.dao.impl.AccountDaoImpl;
import com.guokui.bank.exceptions.MoneyNotEnoughException;
import com.guokui.bank.exceptions.TransferException;
import com.guokui.bank.pojo.Account;
import com.guokui.bank.service.AccountService;
import com.guokui.bank.utils.SqlSessionUtil;
import org.apache.ibatis.session.SqlSession;

public class AccountServiceImpl implements AccountService {

    private AccountDao accountDao = new AccountDaoImpl();

    public void transfer(String fromActno, String toActno, double money)
    		throws MoneyNotEnoughException, TransferException {
        Account fromAct = accountDao.selectByActno(fromActno);
        if (fromAct.getBalance() < money) {
            throw new MoneyNotEnoughException("对不起,余额不足!");
        }
        Account toAct = accountDao.selectByActno(toActno);
        fromAct.setBalance(fromAct.getBalance() - money);
        toAct.setBalance(toAct.getBalance() + money);
        int count = accountDao.updateByActnoo(fromAct);
        count += accountDao.updateByActnoo(toAct);
        if (count != 2) {
            throw new TransferException("转账异常:未知原因");
        }
    }

}
5.3.3 新建、完善AccountServlet(接口与实现类)
package com.guokui.bank.web;

import com.guokui.bank.exceptions.MoneyNotEnoughException;
import com.guokui.bank.exceptions.TransferException;
import com.guokui.bank.service.AccountService;
import com.guokui.bank.service.impl.AccountServiceImpl;

import javax.servlet.ServletException;
import javax.servlet.annotation.WebServlet;
import javax.servlet.http.HttpServlet;
import javax.servlet.http.HttpServletRequest;
import javax.servlet.http.HttpServletResponse;
import java.io.IOException;

@WebServlet("/transfer")
public class AccoutServlet extends HttpServlet {

    private AccountService accountService = new AccountServiceImpl();

    @Override
    protected void doPost(HttpServletRequest request, HttpServletResponse response)
            throws ServletException, IOException {
        //接收前端传来的参数
        String fromActno = request.getParameter("fromActno");
        String toActno = request.getParameter("toActno");
        Double money = Double.parseDouble(request.getParameter("money"));
        try {
            // 调用 业务层
            accountService.transfer(fromActno, toActno, money);
            // 调用 View 完成显示结果
            response.sendRedirect(request.getContextPath() + "/success.html");
        } catch (MoneyNotEnoughException e) {
            response.sendRedirect(request.getContextPath() + "/error1.html");
        } catch (TransferException e) {
            response.sendRedirect(request.getContextPath() + "/error2.html");
        }
    }
}
5.3.4 完善两个异常类
package com.guokui.bank.exceptions;

/**
 * 余额不足异常
 */
public class MoneyNotEnoughException extends Exception{
    public MoneyNotEnoughException(){}

    public MoneyNotEnoughException(String msg) {
        super(msg);
    }
}
package com.guokui.bank.exceptions;

/**
 * 转账异常
 */
public class TransferException extends Exception{

    public TransferException() {}

    public TransferException(String msg) {super(msg);}

}
5.4 完善事务处理
目前为止项目里存在一个问题,没有事务处理机制
如果在更新完账户1之后出现异常,就会出现少钱的现象
5.4.1 加入线程池
package com.guokui.bank.utils;

import org.apache.ibatis.io.Resources;
import org.apache.ibatis.session.SqlSession;
import org.apache.ibatis.session.SqlSessionFactory;
import org.apache.ibatis.session.SqlSessionFactoryBuilder;

import java.io.IOException;
import java.io.InputStream;

public class SqlSessionUtil {

    private SqlSessionUtil(){}

    private static SqlSessionFactory sqlSessionFactory;

    // 类加载时执行
    static {
        try {
            SqlSessionFactoryBuilder sqlSessionFactoryBuilder = new SqlSessionFactoryBuilder();
            InputStream is = Resources.getResourceAsStream("mybatis-config.xml");
            sqlSessionFactory = sqlSessionFactoryBuilder.build(is);
        } catch (IOException e) {
            e.printStackTrace();
        }
    }

    private static ThreadLocal<SqlSession> local = new ThreadLocal<>();

    public static SqlSession openSession() {
        SqlSession sqlSession = local.get();
        if (sqlSession == null) {
            sqlSession  = sqlSessionFactory.openSession();
            // 将 sqlSession 对象绑定到当前线程上
            local.set(sqlSession);
        }
        return sqlSession;
    }

    public static void close(SqlSession sqlSession) {
        if (sqlSession != null) {
            sqlSession.close();
            local.remove();
        }
    }
}
5.4.2 在业务层控制事务处理
package com.guokui.bank.service.impl;

import com.guokui.bank.dao.AccountDao;
import com.guokui.bank.dao.impl.AccountDaoImpl;
import com.guokui.bank.exceptions.MoneyNotEnoughException;
import com.guokui.bank.exceptions.TransferException;
import com.guokui.bank.pojo.Account;
import com.guokui.bank.service.AccountService;
import com.guokui.bank.utils.SqlSessionUtil;
import org.apache.ibatis.session.SqlSession;

public class AccountServiceImpl implements AccountService {

    private AccountDao accountDao = new AccountDaoImpl();

    public void transfer(String fromActno, String toActno, double money) throws MoneyNotEnoughException, TransferException {
        SqlSession sqlSession = SqlSessionUtil.openSession();

        Account fromAct = accountDao.selectByActno(fromActno);
        if (fromAct.getBalance() < money) {
            throw new MoneyNotEnoughException("对不起,余额不足!");
        }
        Account toAct = accountDao.selectByActno(toActno);
        fromAct.setBalance(fromAct.getBalance() - money);
        toAct.setBalance(toAct.getBalance() + money);
        int count = accountDao.updateByActnoo(fromAct);

        // 模拟异常
        String s = null;
        s.toString();

        count += accountDao.updateByActnoo(toAct);
        if (count != 2) {
            throw new TransferException("转账异常:未知原因");
        }

        sqlSession.commit();
        SqlSessionUtil.close(sqlSession);
    }

}
6.4.3 修改 DAO 层代码
package com.guokui.bank.dao.impl;

import com.guokui.bank.dao.AccountDao;
import com.guokui.bank.pojo.Account;
import com.guokui.bank.utils.SqlSessionUtil;
import org.apache.ibatis.session.SqlSession;

public class AccountDaoImpl implements AccountDao {
    public Account selectByActno(String actno) {
        SqlSession sqlSession = SqlSessionUtil.openSession();
        Account account = sqlSession.selectOne("account.selectByActno", actno);
        return account;
    }

    public int updateByActnoo(Account act) {
        SqlSession sqlSession = SqlSessionUtil.openSession();
        int count = sqlSession.update("account.updateByActnoo", act);
        return count;
    }
}
5.5 MyBatis 作用域(Scope)和生命周期
| 名称 | 生命周期 | 作用域 |
|---|---|---|
| SqlSessionFactoryBuilder | 用于创建 SqlSessionFactory ,一旦创建 SqlSessionFactory 后,便可丢弃 | 方法作用域 |
| SqlSessionFactory | 一个数据库对应一个 SqlSessionFactory,被创建后就应该在应用的运行期间一直存在 | 应用作用域 |
| SqlSession | 一个线程对应一个 SqlSession 实例 | 请求或方法 |
官方文档
SqlSessionFactoryBuilder
这个类可以被实例化、使用和丢弃,一旦创建了 SqlSessionFactory,就不再需要它了。因此 SqlSessionFactoryBuilder 实例的最佳作用域是方法作用域(也就是局部方法变量)。你可以重用 SqlSessionFactoryBuilder 来创建多个 SqlSessionFactory 实例,但最好还是不要一直保留着它,以保证所有的 XML 解析资源可以被释放给更重要的事情。
SqlSessionFactory
SqlSessionFactory 一旦被创建就应该在应用的运行期间一直存在,没有任何理由丢弃它或重新创建另一个实例。使用 SqlSessionFactory 的最佳实践是在应用运行期间不要重复创建多次,多次重建SqlSessionFactory 被视为一种代码“坏习惯”。因此 SqlSessionFactory 的最佳作用域是应用作用域。有很多方法可以做到,最简单的就是使用单例模式或者静态单例模式。
SqlSession
每个线程都应该有它自己的 SqlSession 实例。SqlSession的实例不是线程安全的,因此是不能被共享的,所以它的最佳的作用域是请求或方法作用域。绝对不能将 SqlSession 实例的引用放在一个类的静态域,甚至一个类的实例变量也不行。也绝不能将 SqlSession 实例的引用放在任何类型的托管作用域中,比如 Servlet 框架中的 HttpSession。如果你现在正在使用一种 Web 框架,考虑将 SqlSession 放在一个和 HTTP 请求相似的作用域中。换句话说,每次收到 HTTP 请求,就可以打开一个 SqlSession,返回一个响应后,就关闭它。这个关闭操作很重要,为了确保每次都能执行关闭操作,你应该把这个关闭操作放到 finally 块中。下面的示例就是一个确保 SqlSession 关闭的标准模式:
try (SqlSession session = sqlSessionFactory.openSession()) {
  // 你的应用逻辑代码
}
在所有代码中都遵循这种使用模式,可以保证所有数据库资源都能被正确地关闭。
5.6 面向接口的方式进行 CRUD
5.6.1 添加 maven 依赖
<?xml version="1.0" encoding="UTF-8"?>

<project xmlns="http://maven.apache.org/POM/4.0.0" xmlns:xsi="http://www.w3.org/2001/XMLSchema-instance"
  xsi:schemaLocation="http://maven.apache.org/POM/4.0.0 http://maven.apache.org/xsd/maven-4.0.0.xsd">
  <modelVersion>4.0.0</modelVersion>

  <groupId>org.example</groupId>
  <artifactId>mybatis-005-crud2</artifactId>
  <version>1.0-SNAPSHOT</version>
  <packaging>jar</packaging>

  <name>mybatis-005-crud2</name>
  <!-- FIXME change it to the project's website -->
  <url>http://www.example.com</url>

  <properties>
    <project.build.sourceEncoding>UTF-8</project.build.sourceEncoding>
    <maven.compiler.source>1.7</maven.compiler.source>
    <maven.compiler.target>1.7</maven.compiler.target>
  </properties>

  <dependencies>
    <!--  mybatis 依赖  -->
    <dependency>
      <groupId>org.mybatis</groupId>
      <artifactId>mybatis</artifactId>
      <version>3.5.9</version>
    </dependency>
    <!--  mysql 依赖  -->
    <dependency>
      <groupId>mysql</groupId>
      <artifactId>mysql-connector-java</artifactId>
      <version>8.0.28</version>
    </dependency>
    <!--  logback 依赖  -->
    <dependency>
      <groupId>ch.qos.logback</groupId>
      <artifactId>logback-core</artifactId>
      <version>1.2.11</version>
    </dependency>
    <!--  servlet 依赖  -->
    <dependency>
      <groupId>javax.servlet</groupId>
      <artifactId>javax.servlet-api</artifactId>
      <version>4.0.1</version>
    </dependency>
    <!--  junit 依赖  -->
    <dependency>
      <groupId>junit</groupId>
      <artifactId>junit</artifactId>
      <version>4.11</version>
      <scope>test</scope>
    </dependency>
  </dependencies>

  <build>
    <pluginManagement><!-- lock down plugins versions to avoid using Maven defaults (may be moved to parent pom) -->
      <plugins>
        <!-- clean lifecycle, see https://maven.apache.org/ref/current/maven-core/lifecycles.html#clean_Lifecycle -->
        <plugin>
          <artifactId>maven-clean-plugin</artifactId>
          <version>3.1.0</version>
        </plugin>
        <!-- default lifecycle, jar packaging: see https://maven.apache.org/ref/current/maven-core/default-bindings.html#Plugin_bindings_for_jar_packaging -->
        <plugin>
          <artifactId>maven-resources-plugin</artifactId>
          <version>3.0.2</version>
        </plugin>
        <plugin>
          <artifactId>maven-compiler-plugin</artifactId>
          <version>3.8.0</version>
        </plugin>
        <plugin>
          <artifactId>maven-surefire-plugin</artifactId>
          <version>2.22.1</version>
        </plugin>
        <plugin>
          <artifactId>maven-jar-plugin</artifactId>
          <version>3.0.2</version>
        </plugin>
        <plugin>
          <artifactId>maven-install-plugin</artifactId>
          <version>2.5.2</version>
        </plugin>
        <plugin>
          <artifactId>maven-deploy-plugin</artifactId>
          <version>2.8.2</version>
        </plugin>
        <!-- site lifecycle, see https://maven.apache.org/ref/current/maven-core/lifecycles.html#site_Lifecycle -->
        <plugin>
          <artifactId>maven-site-plugin</artifactId>
          <version>3.7.1</version>
        </plugin>
        <plugin>
          <artifactId>maven-project-info-reports-plugin</artifactId>
          <version>3.0.0</version>
        </plugin>
      </plugins>
    </pluginManagement>
    <plugins>
      <plugin>
        <groupId>org.apache.maven.plugins</groupId>
        <artifactId>maven-compiler-plugin</artifactId>
        <configuration>
          <source>8</source>
          <target>8</target>
        </configuration>
      </plugin>
    </plugins>
  </build>
</project>
5.6.2 编写 mapper 类
package org.example.mybatis.mapper;

import org.example.mybatis.pojo.Car;

import java.util.List;

public interface CarMapper {

    int insert(Car car);

    int deleteById(Long id);

    int update(Car car);

    Car selectById(Long id);

    List<Car> selectAll();

}
5.6.3 编写 CarMapper.xml 配置文件
<?xml version="1.0" encoding="UTF-8" ?>
<!DOCTYPE mapper
        PUBLIC "-//mybatis.org//DTD Mapper 3.0//EN"
        "http://mybatis.org/dtd/mybatis-3-mapper.dtd">
<mapper namespace="org.example.mybatis.mapper.CarMapper">
    <insert id="insert">
        insert into t_car (id, car_num, brand, guide_price, produce_time, car_type)
        values (null, #{carNum}, #{brand}, #{guidePrice}, #{produceTime}, #{carType})
    </insert>

    <delete id="deleteById">
        delete from t_car where id = #{id}
    </delete>

    <update id="update">
        update t_car set
             car_num = #{carNum},
             brand = #{brand},
             guide_price = #{guidePrice},
             produce_time = #{produceTime},
             car_type = #{carType}
        where id = #{id}
    </update>

    <select id="selectById" resultType="org.example.mybatis.pojo.Car">
        select
            id, car_num as carNum, brand,
            guide_price as guidePrice,
            produce_time as produceTime,
            car_type as carType
        from t_car
        where id = #{id}
    </select>

    <select id="selectAll" resultType="org.example.mybatis.pojo.Car">
        select
            id, car_num as carNum, brand,
            guide_price as guidePrice,
            produce_time as produceTime,
            car_type as carType
        from t_car
    </select>
</mapper>
5.6.4 编写工具类,SqlSessionUtil
package org.example.mybatis.utils;

import org.apache.ibatis.io.Resources;
import org.apache.ibatis.session.SqlSession;
import org.apache.ibatis.session.SqlSessionFactory;
import org.apache.ibatis.session.SqlSessionFactoryBuilder;

import java.io.IOException;
import java.io.InputStream;

public class SqlSessionUtil {

    private SqlSessionUtil(){}

    private static SqlSessionFactory sqlSessionFactory;

    // 类加载时执行
    static {
        try {
            SqlSessionFactoryBuilder sqlSessionFactoryBuilder = new SqlSessionFactoryBuilder();
            InputStream is = Resources.getResourceAsStream("mybatis-config.xml");
            sqlSessionFactory = sqlSessionFactoryBuilder.build(is);
        } catch (IOException e) {
            e.printStackTrace();
        }
    }

    public static SqlSession openSession() {
        SqlSession sqlSession = sqlSessionFactory.openSession();
        return sqlSession;
    }
}
5.6.5 编写测试用例
package org.example.mybatis.test;


import org.apache.ibatis.session.SqlSession;
import org.example.mybatis.mapper.CarMapper;
import org.example.mybatis.pojo.Car;
import org.example.mybatis.utils.SqlSessionUtil;
import org.junit.Test;

import java.util.List;

public class CarMapperTest {

    @Test
    public void testInsert() {
        SqlSession sqlSession = SqlSessionUtil.openSession();
        CarMapper mapper = sqlSession.getMapper(CarMapper.class);
        Car car = new Car(null, "8654", "凯美瑞", 3.0, "2020-10-10", "新能源");
        int count = mapper.insert(car);
        System.out.println(count);
        sqlSession.commit();
    }

    @Test
    public void testDeleteById() {
        SqlSession sqlSession = SqlSessionUtil.openSession();
        CarMapper mapper = sqlSession.getMapper(CarMapper.class);
        final int count = mapper.deleteById(11L);
        System.out.println(count);
        sqlSession.commit();
    }

    @Test
    public void testUpdate() {
        SqlSession sqlSession = SqlSessionUtil.openSession();
        CarMapper mapper = sqlSession.getMapper(CarMapper.class);
        Car car = new Car(14L, "2222", "凯美瑞", 3.0, "2020-10-10", "新能源");
        int count = mapper.update(car);
        System.out.println(count);
        sqlSession.commit();
    }

    @Test
    public void testSelectById() {
        SqlSession sqlSession = SqlSessionUtil.openSession();
        CarMapper mapper = sqlSession.getMapper(CarMapper.class);
        final Car car = mapper.selectById(1L);
        System.out.println(car);
    }

    @Test
    public void testSelectAll() {
        SqlSession sqlSession = SqlSessionUtil.openSession();
        CarMapper mapper = sqlSession.getMapper(CarMapper.class);
        List<Car>  cars = mapper.selectAll();
        cars.forEach(car -> {
            System.out.println(car);
        });
    }

}
六、 MyBatis小技巧
6.1 #{} 和 ${} 的区别
<select id="selectByCarType" resultType="com.guokui.mybatis.pojo.Car">
    select
        id, car_num as carNum, brand,
        guide_price as guidePrice,
        produce_time as produceTime,
        car_type as carType
    from t_car
    where car_type = #{carType}
</select>
#{}的执行结果:
Preparing:
select
id, car_num as carNum, brand, guide_price as guidePrice,
produce_time as produceTime, car_type as carType
from t_car where car_type = ?
[main] DEBUG c.guokui.mybatis.mapper.CarMapper.selectByCarType - > Parameters: 新能源(String)
[main] DEBUG c.guokui.mybatis.mapper.CarMapper.selectByCarType - < Total: 4
${}的执行结果
Preparing:
select
id, car_num as carNum, brand, guide_price as guidePrice,
produce_time as produceTime, car_type as carType
from t_car where car_type = 新能源
[main] DEBUG c.guokui.mybatis.mapper.CarMapper.selectByCarType - ==> Parameters:
org.apache.ibatis.exceptions.PersistenceException:
###Error querying database. Cause: java.sql.SQLSyntaxErrorException: Unknown column ‘新能源’ in ‘where clause’
###SQL: select id, car_num as carNum, brand, guide_price as guidePrice, produce_time as produceTime, ###car_type as carType from t_car where car_type = 新能源
###Cause: java.sql.SQLSyntaxErrorException: Unknown column ‘新能源’ in ‘where clause’
区别:
#{}:底层使用 PreparedStatment,特点:先进行 SQL语句的编译,然后给 SQL 语句的占位符 ? 传值。可避免 SQL 注入的风险
${}:底层使用 Statement,特点:先进行 SQL语句的拼接,然后再对 SQL 语句进行编译。存在 SQL 注入的风险。
优先使用 #{},这是原则,避免 SQL 注入的风险。
6.2 什么时候使用 ${}
6.2.1 SQL 语句拼接关键字
当需要 SQL 语句的关键字放到 SQL 语句中,只能使用 ${},因为 #{} 是以值的形式放到 SQL 语句当中的。
<select id="selectAllByAscOrDesc" resultType="com.guokui.mybatis.pojo.Car">
    select
        id, car_num as carNum, brand,
        guide_price as guidePrice,
        produce_time as produceTime,
        car_type as carType
    from t_car
    order by produce_time ${ascOrDesc}
</select>
6.2.2 SQL 语句拼接表名
现实业务当中,可能会存在分表存储数据的情况。因为一张表存的话,数据量太大。查询效率低。、
日志表:专门存储日志信息的。如果 t_log 只有一张表,这张表每一天都会产生很多 log。慢慢的这个表中数据就会很多。
怎么解决问题:
可以每天生成一个新表。每张表以当天日期作为名称。例如:
t_log_20230101
t_log_20230102
…
当需要某一天的日志信息
假设今天是20230101,那么直接查:t_log_20230101 的表即可。
-
POJO 类
package com.guokui.mybatis.pojo; public class Log { private Integer id; private String log; private String time; public Log() { } public Log(Integer id, String log, String time) { this.id = id; this.log = log; this.time = time; } public Integer getId() { return id; } public void setId(Integer id) { this.id = id; } public String getLog() { return log; } public void setLog(String log) { this.log = log; } public String getTime() { return time; } public void setTime(String time) { this.time = time; } @Override public String toString() { return "Log{" + "id=" + id + ", log='" + log + '\'' + ", time='" + time + '\'' + '}'; } } -
Mapper 类
package com.guokui.mybatis.mapper; import com.guokui.mybatis.pojo.Log; import java.util.List; public interface LogMapper { /** * 根据日期查询不同的表,获取表中所有的日志 * @param date * @return */ List<Log> selectAllByTable(String date); } -
Mapper 映射文件
<?xml version="1.0" encoding="UTF-8" ?> <!DOCTYPE mapper PUBLIC "-//mybatis.org//DTD Mapper 3.0//EN" "http://mybatis.org/dtd/mybatis-3-mapper.dtd"> <mapper namespace="com.guokui.mybatis.mapper.LogMapper"> <!-- 使用insert, update, delete, select 标签写sql --> <select id="selectAllByTable" resultType="com.guokui.mybatis.pojo.Log"> select * from t_log_${date} </select> </mapper> -
测试用例
package com.guokui.mybatis.test;

import com.guokui.mybatis.mapper.CarMapper;
import com.guokui.mybatis.mapper.LogMapper;
import com.guokui.mybatis.pojo.Log;
import com.guokui.mybatis.utils.SqlSessionUtil;
import org.apache.ibatis.session.SqlSession;
import org.junit.Test;

import java.util.List;

public class LogMapperTest {

    @Test
    public void testSelectAllByTable(){
        SqlSession sqlSession = SqlSessionUtil.openSession();
        LogMapper mapper = sqlSession.getMapper(LogMapper.class);
        List<Log> logs = mapper.selectAllByTable("20230101");
        logs.forEach(log -> System.out.println(log));
        sqlSession.close();
    }
}
6.2.3 SQL 语句批量删除
批量删除的 SQL 语句有两种写法:
- or:delect from t_car where id = 1 or id = 2 or id = 3;
- int:delect from t_car where id in (1, 2, 3);
<delete id="deleteBatch">
    delete from t_car where id in (${ids})
</delete>
6.2.4 SQL 语句模糊查询
需求:根据汽车品牌进行模糊查询
select * from t_car where brand like '%奔驰%';
select * from t_car where brand like '%丰田%';
实现:
<!-- 第一种方案:'%${}%'-->
<select id="selectAllByBrandLike" resultType="com.guokui.mybatis.pojo.Car">
    select
        id, car_num as carNum, brand,
        guide_price as guidePrice,
        produce_time as produceTime,
        car_type as carType
    from t_car
    where brand like ('%${brand}%')
</select>
<!-- 结果: select * from t_car where brand like ('%奔驰%') -->
<!-- 第二种方案:concat 函数。这个是 mysql 数据库中的一个函数,专门进行字符串拼接-->
<!-- concat('%', #{brand}, '%') -->
<select id="selectAllByBrandLike" resultType="com.guokui.mybatis.pojo.Car">
    select
        id, car_num as carNum, brand,
        guide_price as guidePrice,
        produce_time as produceTime,
        car_type as carType
    from t_car
    where brand like concat('%', #{brank}, '%')
</select>
<!-- 第三种方案:concat 函数。这个是 mysql 数据库中的一个函数,专门进行字符串拼接-->
<!-- concat('%', '${brand}', '%') -->
<select id="selectAllByBrandLike" resultType="com.guokui.mybatis.pojo.Car">
    select
        id, car_num as carNum, brand,
        guide_price as guidePrice,
        produce_time as produceTime,
        car_type as carType
    from t_car
    where brand like concat('%', '${brank}', '%')
</select>
<!-- 第四种方案 -->
<!-- 用双引号把通配符引出去,让#{}在外面好被 jdbc 检测到(常用) -->
<select id="selectAllByBrandLike" resultType="com.guokui.mybatis.pojo.Car">
    select
        id, car_num as carNum, brand,
        guide_price as guidePrice,
        produce_time as produceTime,
        car_type as carType
    from t_car
    where brand like "%"#{brand}"%"
</select>
6.3 别名机制
所有别名不区分大小写
namespace 不能使用别名
<typeAliases>
    <!--
		type: 指定给哪个类起别名
		alias:指定别名
		注意:别名不区分大小写
	-->
    <typeAlias type="com.powernode.mybatis.pojo.Car" alias="car"/>
    <!-- 省略alias,默认就是类简名,比如:car,不区分大小写 -->
    <typeAlias type="com.powernode.mybatis.pojo.Log"/>
    <!--包下所有类自动起别名,不区分大小写-->
    <package name="com.powernode.mybatis.pojo"/>
</typeAliases>
<!-- namespace 不可使用别名 -->
<mapper namespace="com.guokui.mybatis.mapper.LogMapper">
    <!-- resultType 可使用别名 -->
    <select id="selectAllByTable" resultType="log">
        select * from t_log_${date}
    </select>
</mapper>
6.4 mapper 的配置
mybatis-config.xml 文件中的 mappers 标签
- mapper resource=“”
- mapper url=“”
- mapper class=“”
<mappers>
<!-- 1. 从根路径下查找CarMapper.xml文件 -->
<mapper resource="CarMapper.xml"/>
<!-- 2. 绝对路径查找,移植性差 -->
<mapper url="file://d:/CarMapper.xml"/>
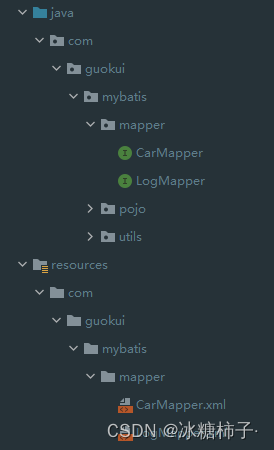
<!--
3. 查找映射接口同级目录下的Mapper.xml文件
需要两个文件
java.com.guokui.mybatis.mapper.CarMapper(这是 mapper 接口)
resources/com/guokui/mybatis/mapper/CarMapper.xml(这是 mapper 映射文件)
注意:必须和 CarMapper 接口放在一起
XML 文件的名字必须和接口名一致
-->
<mapper class="com.guokui.mybatis.mapper.CarMapper"/>
<!--
4. 最常用:路径下自动查找接口对应名字xml文件
前提:XML 文件必须和接口放在一起,并且名字一致。
-->
<package name="com.guokui.mybatis.mapper"/>
</mappers>
注意:
在 IDEA 的 resources 目录下新建多重目录的话,必须这样创建:
com/guokui/mybatis/mapper
不能这样:
com.guokui.mybatis.mapper
6.5 获取自动生成的主键值
<!--
	useGeneratedKeys="true" 使用自动生成的主键值。
	keyProperty="id" 指定主键值赋值给对象的哪个属性。这个就表示将主键值赋值给 Car 对象的 id 属性。
-->
<insert id="insertCarUseGeneratedKeys" useGeneratedKeys="true" keyProperty="id">
    insert into t_car(id, car_num, brand, guide_price, produce_time, car_type)
    values (null, #{carNum}, #{brand}, #{guidePrice}, #{produceTime}, #{carType})
</insert>
编写测试用例
@Test
public void testInsertCarUseGeneratedKeys() {
    SqlSession sqlSession = SqlSessionUtil.openSession();
    CarMapper mapper = sqlSession.getMapper(CarMapper.class);
    Car car = new Car();
    car.setCarNum("3333");
    car.setBrand("比亚迪秦");
    car.setGuidePrice(30.0);
    car.setProduceTime("2020-11-11");
    car.setCarType("新能源");
    mapper.insertCarUseGeneratedKeys(car);
    System.out.println(car);
    sqlSession.commit();
    sqlSession.close();
}
// 结果:
//Car{id=18, carNum='3333', brand='比亚迪秦', guidePrice=30.0, produceTime='2020-11-11', carType='新能源'}
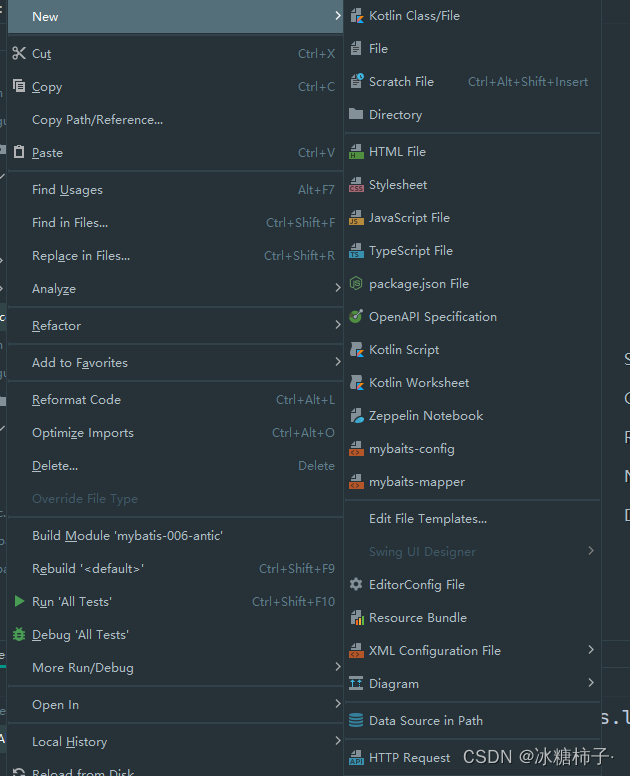
6.6 IDEA 配置模板文件
配置 mybatis-config.xml 模板文件
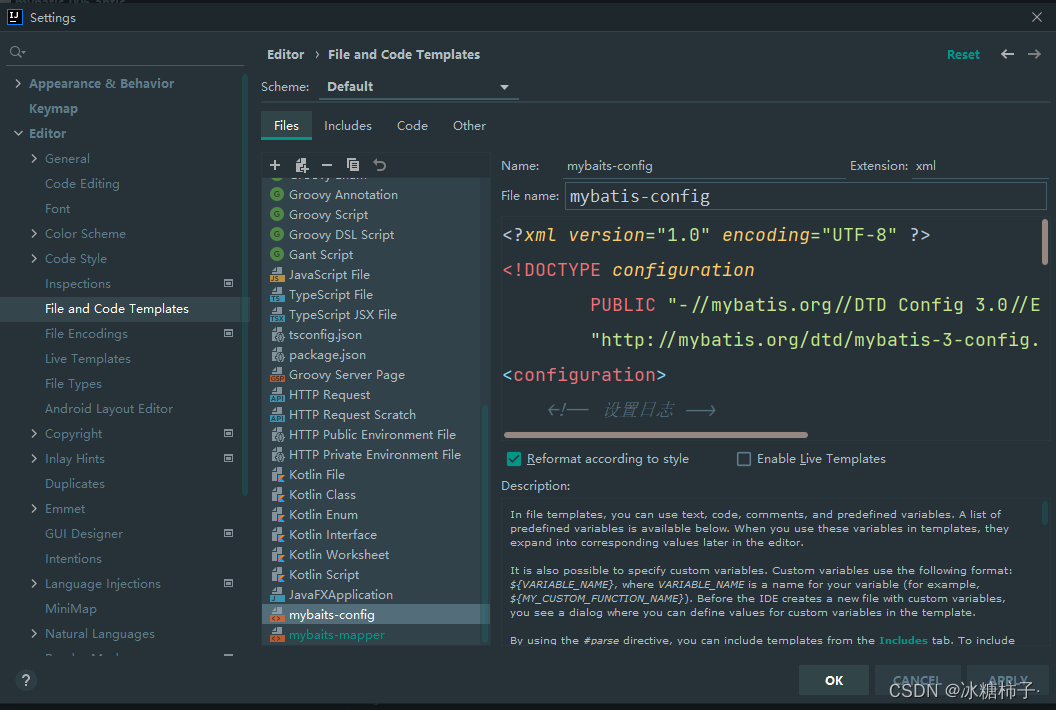
配置 mybatis-mapper.xml 模板文件
![[外链图片转存失败,源站可能有防盗链机制,建议将图片保存下来直接上传(img-QNPI6rNn-1675771363222)(C:\Users\28247\AppData\Roaming\Typora\typora-user-images\image-20230104110810228.png)]](https://img-blog.csdnimg.cn/4d72abb6dfaf400baaa5206b47439239.png)
配置完成
七、 Mybatis 参数处理
7.1 单个简单类型参数
简单类型包括:
- byte short int long float double char
- Byte Short Integer Long Float Double Character
- String
- java.util.Date
- java.sql.Date
需求:根据 id 查、根据 name 查、根据 birth 查、根据 sex 查
package com.guokui.mybatis.mapper;

import com.guokui.mybatis.pojo.Student;

import java.util.Date;
import java.util.List;

public interface StudentMapper {

    /**
     * 需求:根据 id 查、根据 name 查、根据 birth 查、根据 sex 查
     */
    Student selectById(Long id);

    List<Student> selectByName(String name);

    List<Student> selectByBirth(Date birth);

    List<Student> selectBySex(Character sex);
}
<?xml version="1.0" encoding="UTF-8" ?>
<!DOCTYPE mapper
        PUBLIC "-//mybatis.org//DTD Mapper 3.0//EN"
        "http://mybatis.org/dtd/mybatis-3-mapper.dtd">
<mapper namespace="com.guokui.mybatis.mapper.StudentMapper">
    <!-- 使用insert, update, delete, select 标签写sql -->
    <!--
        parameterType 属性的作用:
            告诉 mybatis 框架,这个方法的参数类型是什么类型。
            mybatis 框架自身带有类型自动推断机制,所以大部分情况下 parameterType 属性可以忽略不写。

            最终的 SQL 语句:
                select * from t_student where id = ?;
            JDBC 代码要给 ? 传值。 ps.setXxx(第几个 ? ,传什么值)
                ps.setLong(1, 1L)
                ps.setString(1, "zhangsan")
                ps.setDate(1, new Date())
                ps.setInt(1, 100)
                ...

            mybatis底层到底调用 setXxx的哪个方法,取决于 parameterType 属性的值

        注意:mybatis 框架实际上内置了很多别名,可以参考开发手册。
    -->
    <select id="selectById" resultType="student" parameterType="long">
        select * from t_student where id = #{id};
    </select>

    <select id="selectByName" resultType="student">
        select * from t_student where name = #{name, javaType=String, jdbcType=VARCHAR};
    </select>

    <select id="selectByBirth" resultType="student">
        select * from t_student where birth = #{birth};
    </select>

    <select id="selectBySex" resultType="student">
        select * from t_student where sex= #{sex};
    </select>
</mapper>
package com.guokui.mybatis.test;

import com.guokui.mybatis.mapper.StudentMapper;
import com.guokui.mybatis.pojo.Student;
import com.guokui.mybatis.utils.SqlSessionUtil;
import org.apache.ibatis.session.SqlSession;
import org.junit.Test;

import java.text.ParseException;
import java.text.SimpleDateFormat;
import java.util.Date;
import java.util.List;

public class StudentMapperTest {

    @Test
    public void testSelectById() {
        SqlSession sqlSession = SqlSessionUtil.openSession();
        StudentMapper mapper = sqlSession.getMapper(StudentMapper.class);
        Student student = mapper.selectById(1L);
        System.out.println(student);
        sqlSession.close();
    }

    @Test
    public void testSelectByName() {
        SqlSession sqlSession = SqlSessionUtil.openSession();
        StudentMapper mapper = sqlSession.getMapper(StudentMapper.class);
        List<Student> students = mapper.selectByName("李四");
        students.forEach(student -> System.out.println(student));
        sqlSession.close();
    }

    @Test
    public void testSelectByBirth() throws ParseException {
        SqlSession sqlSession = SqlSessionUtil.openSession();
        StudentMapper mapper = sqlSession.getMapper(StudentMapper.class);

        SimpleDateFormat sdf = new SimpleDateFormat("yyyy-MM-dd");
        Date birth = sdf.parse("2000-01-01");

        List<Student> students = mapper.selectByBirth(birth);
        students.forEach(student -> System.out.println(student));
        sqlSession.close();
    }

    @Test
    public void testSelectBySex() {
        SqlSession sqlSession = SqlSessionUtil.openSession();
        StudentMapper mapper = sqlSession.getMapper(StudentMapper.class);

        Character sex = Character.valueOf('男');
        List<Student> students = mapper.selectBySex(sex);

        students.forEach(student -> System.out.println(student));
        sqlSession.close();
    }
}
注意:
mybatis 框架自身带有类型自动推断机制,所以大部分情况下 parameterType 属性可以忽略不写。
mybatis 框架实际上内置了很多别名,可以参考开发手册。
[外链图片转存失败,源站可能有防盗链机制,建议将图片保存下来直接上传(img-dWiqirKy-1675771363225)(C:\Users\28247\AppData\Roaming\Typora\typora-user-images\image-20230104125034170.png)]
7.2 Map 参数
<!-- #{map的key} -->
<insert id="insertStudentByMap" parameterType="map">
    insert into t_student values (null, #{姓名}, #{年龄}, #{身高}, #{生日}, #{性别})
</insert>
@Test
public void testInsertStudentByMap() {
    SqlSession sqlSession = SqlSessionUtil.openSession();
    StudentMapper mapper = sqlSession.getMapper(StudentMapper.class);

    Map<String, Object> map = new HashMap<>();
    map.put("姓名", "王五");
    map.put("年龄", 18);
    map.put("身高", 1.81);
    map.put("生日", new Date());
    map.put("性别", '男');

    int count = mapper.insertStudentByMap(map);
    System.out.println(count);
    sqlSession.commit();
    sqlSession.close();
}
7.3 实体类参数
<!-- pojo 的属性 -->
<insert id="insertStudentByPOJO">
    insert into t_student
    values (null, #{name}, #{age}, #{height}, #{birth}, #{sex})
</insert>
@Test
public void testInsertStudentByPOJO() {
    SqlSession sqlSession = SqlSessionUtil.openSession();
    StudentMapper mapper = sqlSession.getMapper(StudentMapper.class);

    Student student = new Student(null, "赵六", 20, 1.65, new Date(), '女');
    int count = mapper.insertStudentByPOJO(student);

    sqlSession.commit();
    sqlSession.close();
}
7.4 多参数
/**
     * 这是多参数
     * 根据 name 和 sex 查询 Student 信息
     * 如果是多个参数的话
     *     mybatis 框架会自动创建一个 Map 集合,并且 Map 集合是以以下方式存储参数的。
     *         map.put("arg0", name)
     *         map.put("arg1", sex)
     *         map.put("param1", name)
     *         map.put("param2", sex)
     *
     * @param name
     * @param sex
     * @return
     */
List<Student> selectByNameAndSex(String name, Character sex);
<!--
	注意:
		低版本的 mybatis 中,使用的是:#{0}, #{1}
		高版本的 mybatis 中,使用的是:#{arg1}, #{arg2} 或者 #{param1}, #{param2}
-->
<select id="selectByNameAndSex" resultType="student">
    <!--select * from t_student where name = #{arg0} and sex = #{agr1}-->
    <!--select * from t_student where name = #{arg0} and sex = #{param2}-->
    select * from t_student where name = #{param1} and sex = #{param2}
</select>
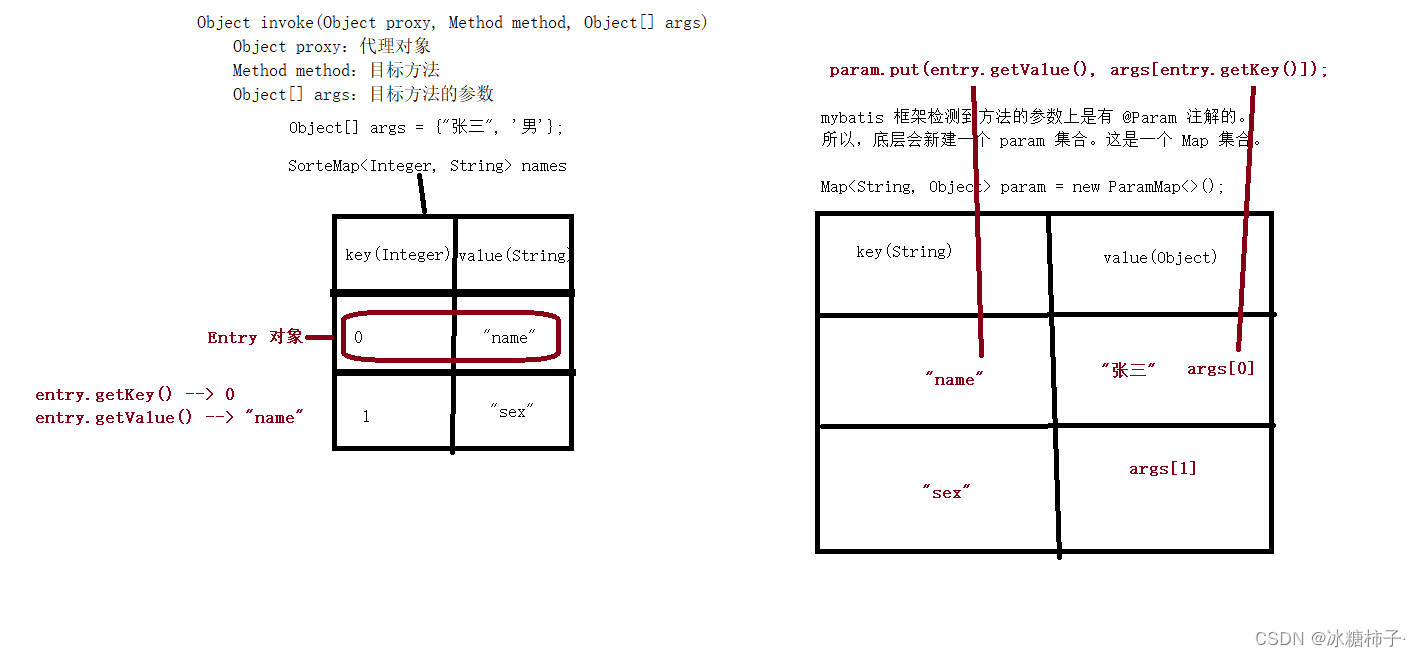
7.5 @Param 注解(命名参数)
/**
  * Param 注解
  *
  * mybatis 框架底层实现原理:
  *     map.put("name", name);
  *     map.put("sex", sex);
  *	    map.put("param1", name)
  *     map.put("param2", sex)
  *
  * @param name
  * @param sex
  * @return
  */
List<Student> selectByNameAndSex2(@Param("name") String name,
                                  @Param("sex") Character sex);
<select id="selectByNameAndSex2" resultType="student">
    <!--使用了 @Param 注解, arg0 和 arg1 失效-->
    <!--select * from t_student where name = #{arg0} and sex = #{agr1}-->
    <!--使用了 @Param 注解, param1 和 param2 还有效-->
    <!--select * from t_student where name = #{param1} and sex = #{param2}-->
    select * from t_student where name = #{name} and sex = #{sex}
</select>
7.6 @Param 源码分析
八、 Mybatis 查询专题
8.1 返回 pojo 对象
Car selectById(Long id);
<select id="selectById" resultType="car">
    select
        id, car_num as carNum, brand,
        guide_price as guidePrice,
        produce_time as produceTime,
        car_type as carType
    from t_car
    where id = #{id}
</select>
@Test
public void testSelectById() {
    SqlSession sqlSession = SqlSessionUtil.openSession();
    CarMapper mapper = sqlSession.getMapper(CarMapper.class);

    Car car = mapper.selectById(1L);

    System.out.println(car);

    sqlSession.close();
}
/**
结果:
Car{id=1, carNum='1001', brand='宝马 520Li', guidePrice=10.0, produceTime='2020-10-11', carType='燃油车'}
*/
8.2 返回多个 pojo 对象
// 用 List<> 来接收
List<Car> selectAll();
<select id="selectAll" resultType="car">
    select
        id, car_num as carNum, brand,
        guide_price as guidePrice,
        produce_time as produceTime,
        car_type as carType
    from t_car
</select>
@Test
public void testSelectAll() {
    SqlSession sqlSession = SqlSessionUtil.openSession();
    CarMapper mapper = sqlSession.getMapper(CarMapper.class);
    List<Car> cars = mapper.selectAll();
    System.out.println(cars);
    sqlSession.close();
}
/**
结果:
[Car{id=1, carNum='1001', brand='宝马 520Li', guidePrice=10.0, produceTime='2020-10-11', carType='燃油车'}, Car{id=2, carNum='1002', brand='奔驰E 300L', guidePrice=55.0, produceTime='2020-11-11', carType='新能源'}, Car{id=3, carNum='1003', brand='丰田霸道', guidePrice=30.0, produceTime='2000-10-11', carType='燃油车'}, Car{id=4, carNum='1003', brand='丰田霸道', guidePrice=30.0, produceTime='2000-10-11', carType='燃油车'}, Car{id=5, carNum='1003', brand='丰田霸道', guidePrice=30.0, produceTime='2000-10-11', carType='燃油车'}, Car{id=6, carNum='1003', brand='丰田霸道', guidePrice=30.0, produceTime='2000-10-11', carType='燃油车'}, Car{id=18, carNum='3333', brand='比亚迪秦', guidePrice=30.0, produceTime='2020-11-11', carType='新能源'}]
*/
8.3 返回 Map 集合
// 用 Map<String, Object> 来接受
Map<String, Object> selectByIdRetMap(Long id);
<!-- resultType="map" -->
<select id="selectByIdRetMap" resultType="map">
    select
        id, car_num as carNum, brand,
        guide_price as guidePrice,
        produce_time as produceTime,
        car_type as carType
    from t_car
    where id = #{id}
</select>
@Test
public void testSelectByIdRetMap() {
    SqlSession sqlSession = SqlSessionUtil.openSession();
    CarMapper mapper = sqlSession.getMapper(CarMapper.class);
    Map<String, Object> map = mapper.selectByIdRetMap(1L);
    System.out.println(map);
    sqlSession.close();
}
// 结果:{carType=燃油车, carNum=1001, guidePrice=10.00, produceTime=2020-10-11, id=1, brand=宝马 520Li}
8.4 返回多个 Map 集合
// // 用 List<Map<String, Object>> 来接收
List<Map<String, Object>> selectAllByRetListMap();
<!-- resultType="map" -->
<select id="selectAllByRetListMap" resultType="map">
	select
        id, car_num as carNum, brand,
        guide_price as guidePrice,
        produce_time as produceTime,
    	car_type as carType
	from t_car
</select>
@Test
public void testSelectAllByRetListMap() {
    SqlSession sqlSession = SqlSessionUtil.openSession();
    CarMapper mapper = sqlSession.getMapper(CarMapper.class);
    List<Map<String, Object>> list = mapper.selectAllByRetListMap();
    System.out.println(list);
    sqlSession.close();
}
/**
[{carType=燃油车, carNum=1001, guidePrice=10.00, produceTime=2020-10-11, id=1, brand=宝马 520Li}, {carType=新能源, carNum=1002, guidePrice=55.00, produceTime=2020-11-11, id=2, brand=奔驰E 300L},
{carType=燃油车, carNum=1003, guidePrice=30.00, produceTime=2000-10-11, id=3, brand=丰田霸道},
{carType=燃油车, carNum=1003, guidePrice=30.00, produceTime=2000-10-11, id=4, brand=丰田霸道},
{carType=燃油车, carNum=1003, guidePrice=30.00, produceTime=2000-10-11, id=5, brand=丰田霸道},
{carType=燃油车, carNum=1003, guidePrice=30.00, produceTime=2000-10-11, id=6, brand=丰田霸道},
{carType=新能源, carNum=3333, guidePrice=30.00, produceTime=2020-11-11, id=18, brand=比亚迪秦}]
*/
8.5 返回大 Map 集合
/**
  * 查询所有的 Car,返回一个大 Map 集合。
  * Map 集合的 key 是每条记录的主键值
  * Map 集合的 value 是每条记录
  * @return
  */
@MapKey("id") // 将查询结果的 id 作为整个大 Map 集合的 key。
Map<Long, Map<String, Object>> selectAllRetMap();
<select id="selectAllRetMap" resultType="map">
    select
        id, car_num as carNum, brand,
        guide_price as guidePrice,
        produce_time as produceTime,
        car_type as carType
    from t_car
</select>
@Test
public void testSelectAllByRetMap() {
    SqlSession sqlSession = SqlSessionUtil.openSession();
    CarMapper mapper = sqlSession.getMapper(CarMapper.class);
    Map<Long, Map<String, Object>> map = mapper.selectAllRetMap();
    System.out.println(map);
    sqlSession.close();
}
/**
{1={carType=燃油车, carNum=1001, guidePrice=10.00, produceTime=2020-10-11, id=1, brand=宝马 520Li},
2={carType=新能源, carNum=1002, guidePrice=55.00, produceTime=2020-11-11, id=2, brand=奔驰E 300L},
18={carType=新能源, carNum=3333, guidePrice=30.00, produceTime=2020-11-11, id=18, brand=比亚迪秦},
3={carType=燃油车, carNum=1003, guidePrice=30.00, produceTime=2000-10-11, id=3, brand=丰田霸道},
4={carType=燃油车, carNum=1003, guidePrice=30.00, produceTime=2000-10-11, id=4, brand=丰田霸道},
5={carType=燃油车, carNum=1003, guidePrice=30.00, produceTime=2000-10-11, id=5, brand=丰田霸道},
6={carType=燃油车, carNum=1003, guidePrice=30.00, produceTime=2000-10-11, id=6, brand=丰田霸道}}
*/
8.6 resultMap 结果映射
查询结果的列名和 java 对象的属性名对应不上怎么办?
- 第一种方式:as 给列起别名
- 第二种方式:使用 resultMap 进行结果映射
- 第三种方式:是否开启驼峰命名自动映射(配置 settings)
8.6.1 使用 resultMap 进行结果映射
// 使用 resultMap 进行结果映射
List<Car> selectAllByResultMap();
<!--
	1.专门定义一个结果映射,在这个结果映射当中指定数据库表的字段名和 java 类的属性名的对应关系。
	2.id 属性:指定 resultMap 的唯一标识。这个 id 将来要在 select 标签中使用。
	3.type 属性:用来指定 POJO 类的类名。
-->
<resultMap id="carResultMap" type="car">
    <!-- 如果有主键,建议配置 id 标签,非必须。但可提高 mybatis 效率。 -->
    <id property="id" column="id"/>
    <!-- property:POJO 类的属性名 -->
    <!-- column:数据库表的字段名 -->
    <result property="carNum" column="car_num" />
    <!-- 如果 property 和 column 是一样的,这个可以省略 -->
    <!-- <result property="brand" column="brand" /> -->
    <result property="guidePrice" column="guide_price" />
    <result property="produceTime" column="produce_time" />
    <result property="carType" column="car_type" />
</resultMap>

<!-- select 标签的 resultMap 属性,用来指定使用哪个结果映射,resultMap 后面的值是 resultMap 的 id -->
<select id="selectAllByResultMap" resultMap="carResultMap">
    select * from t_car
</select>
@Test
public void testSelectAllByResultMap() {
    SqlSession sqlSession = SqlSessionUtil.openSession();
    CarMapper mapper = sqlSession.getMapper(CarMapper.class);
    List<Car> cars = mapper.selectAllByResultMap();
    System.out.println(cars);
    sqlSession.close();
}
/**
结果:
[
Car{id=1, carNum='1001', brand='宝马 520Li', guidePrice=10.0, produceTime='2020-10-11', carType='燃油车'}, Car{id=2, carNum='1002', brand='奔驰E 300L', guidePrice=55.0, produceTime='2020-11-11', carType='新能源'}, Car{id=3, carNum='1003', brand='丰田霸道', guidePrice=30.0, produceTime='2000-10-11', carType='燃油车'}, Car{id=4, carNum='1003', brand='丰田霸道', guidePrice=30.0, produceTime='2000-10-11', carType='燃油车'}, Car{id=5, carNum='1003', brand='丰田霸道', guidePrice=30.0, produceTime='2000-10-11', carType='燃油车'}, Car{id=6, carNum='1003', brand='丰田霸道', guidePrice=30.0, produceTime='2000-10-11', carType='燃油车'}, Car{id=18, carNum='3333', brand='比亚迪秦', guidePrice=30.0, produceTime='2020-11-11', carType='新能源'}
]
*/
8.6.2 驼峰命名自动映射
前提:
属性名遵循 java 的命名规范,数据库的列名遵循 SQL 的命名规范。
- Java 命名规范:首字母小写,后面每个单词首字母大写,遵循驼峰命名方式
- SQL 明明规范:单词之间采用下划线分割
| 实体类中的属性名 | 数据库表的列名 |
|---|---|
| carNum | car_num |
| carType | car_type |
| produceTime | produce_time |
mapUnderscoreToCamelCase:
是否开启驼峰命名自动映射,即从经典数据库列名 A_COLUMN 映射到经典 Java 属性名 aColumn。
<settings>
        <setting name="mapUnderscoreToCamelCase" value="true"/>
    </settings>
List<Car> selectAllByMapUnderscoreToCamelCase();
<select id="selectAllByMapUnderscoreToCamelCase" resultType="car">
    select * from t_car
</select>
@Test
public void testSelectAllByMapUnderscoreToCamelCase() {
    SqlSession sqlSession = SqlSessionUtil.openSession();
    CarMapper mapper = sqlSession.getMapper(CarMapper.class);
    List<Car> cars = mapper.selectAllByMapUnderscoreToCamelCase();
    System.out.println(cars);
    sqlSession.close();
}
/**
[
Car{id=1, carNum='1001', brand='宝马 520Li', guidePrice=10.0, produceTime='2020-10-11', carType='燃油车'}, Car{id=2, carNum='1002', brand='奔驰E 300L', guidePrice=55.0, produceTime='2020-11-11', carType='新能源'}, Car{id=3, carNum='1003', brand='丰田霸道', guidePrice=30.0, produceTime='2000-10-11', carType='燃油车'}, Car{id=4, carNum='1003', brand='丰田霸道', guidePrice=30.0, produceTime='2000-10-11', carType='燃油车'}, Car{id=5, carNum='1003', brand='丰田霸道', guidePrice=30.0, produceTime='2000-10-11', carType='燃油车'}, Car{id=6, carNum='1003', brand='丰田霸道', guidePrice=30.0, produceTime='2000-10-11', carType='燃油车'}, Car{id=18, carNum='3333', brand='比亚迪秦', guidePrice=30.0, produceTime='2020-11-11', carType='新能源'}
]
*/
8.7 查询总记录条数
Long selectTotal();
<select id="selectTotal" resultType="long">
    select count(*) from t_car
</select>
@Test
public void testSelectTotal() {
    SqlSession sqlSession = SqlSessionUtil.openSession();
    CarMapper mapper = sqlSession.getMapper(CarMapper.class);
    Long count = mapper.selectTotal();
    System.out.println(count);
    sqlSession.close();
}
九、 动态 SQL
业务场景:
-
批量删除
uri?id=1&id=2&id=3&id=4 前端以表单的方式提交
String[] ids = request.getParameterValues(“id”);
String[] ids = [1, 2, 3, 4]
delete from t_car where id in (1, 2, 3, 4, 5, 6,… 这里的值是动态的,根据用户选择的 id 不同,值是不同的);
-
多条件查询
不提供条件:select * from t_product
选择了一个条件:select * from t_product where brand = #{brand}
选择了多个条件:select * from t_product where 条件1 = … and 条件2 = … and 条件3 = …
9.1 if 标签
需求:多条件查询
条件包括:品牌(brand)、指导价格(guide_price)、汽车类型(car_type)
/**
  * 多条件查询
  * @param brand 品牌
  * @param guidePrice 指导价
  * @param carType 汽车类型
  * @return
  */
List<Car> selectByMultiCondition(@Param("brand") String brand,
                                 @Param("guidePrice") Double guidePrice,
                                 @Param("carType") String carType);
<select id="selectByMultiCondition" resultType="car">
    select * from t_car where 1=1
    <!--
        1. if 标签中 test 属性是必须的。
        2. if 标签中 test 属性的值是 false 或 true。
        3. 如果 test 是 true,则 if 标签中的 sql 语句就会拼接。反之,则不会拼接。
        4. test 属性中可以使用的是:
            当使用了 @Param注解,那么 test 中要出现的是 @Param 注解指定的参数名,@Param("brand"),那么这
            里只能使用 brand。
            当没有使用 @Param 注解,那么 test 中要出现的是:param1 param2 param3 arg0 arg1 arg2....
        5. 在 mybatis 的动态 SQL 中,不能使用 &&,只能使用 and
    -->
    <if test="brand != null and brand != ''">
        and brand like "%"#{brand}"%"
    </if>
    <if test="guidePrice != null and guidePrice != ''">
        and guide_price > #{guidePrice}
    </if>
    <if test="carType != null and carType != ''">
        and car_type = #{carType}
    </if>
</select>
@Test
public void testSelectByMultiCondition() {
    SqlSession sqlSession = SqlSessionUtil.openSession();
    CarMapper mapper = sqlSession.getMapper(CarMapper.class);
    // 假设三个条件不为空
    // List<Car> cars = mapper.selectByMultiCondition("比亚迪", 2.0, "新能源");

    // 假设三个条件都为空
    // List<Car> cars = mapper.selectByMultiCondition(null, null, null);

    // 假设后两个条件不为空,第一个条件为空
    // List<Car> cars = mapper.selectByMultiCondition(null, 2.0, "新能源");

    // 假设第一个条件不为空,后两个条件为空
    List<Car> cars = mapper.selectByMultiCondition("比亚迪", null, null);

    cars.forEach(car -> System.out.println(car));
    sqlSession.close();
}
9.2 where 标签
where 标签的作用:让 where 子句更加动态智能
- 所有条件都为空时,where 标签保证不会生成 where 子句。
- 自动去除某些条件 前面 多余的 and 或 or。
继续使用 if 标签中的需求
List<Car> selectByMultiConditionWithWhere(@Param("brand") String brand,
                                     @Param("guidePrice") Double guidePrice,
                                     @Param("carType") String carType);
<select id="selectByMultiConditionWithWhere" resultType="car">
    select * from t_car
    <!-- where 标签是专门负责 where 子句动态生成的-->
    <where>
        <if test="brand != null and brand != ''">
            brand like "%"#{brand}"%"
        </if>
        <if test="guidePrice != null and guidePrice != ''">
            and guide_price > #{guidePrice}
        </if>
        <if test="carType != null and carType != ''">
            and car_type = #{carType}
        </if>
    </where>
</select>
@Test
public void testSelectByMultiConditionWithWhere() {
    SqlSession sqlSession = SqlSessionUtil.openSession();
    CarMapper mapper = sqlSession.getMapper(CarMapper.class);
    // 假设三个条件不为空
    // List<Car> cars = mapper.selectByMultiConditionWithWhere("比亚迪", 2.0, "新能源");

    // 假设三个条件都为空
    // List<Car> cars = mapper.selectByMultiConditionWithWhere("", null, "");

    // 假设后两个条件不为空,第一个条件为空
    // List<Car> cars = mapper.selectByMultiConditionWithWhere("", 2.0, "新能源");

    // 假设第一个条件不为空,后两个条件为空
    List<Car> cars = mapper.selectByMultiConditionWithWhere("比亚迪", null, "");

    cars.forEach(car -> System.out.println(car));
    sqlSession.close();
}
9.3 trim 标签
trim 标签的属性:
- prefix:在 trim 标签中的语句前 添加 内容。
- suffix:在 trim 标签中的语句后 添加 内容。
- prefixOverrides:前缀 覆盖掉(去掉)
- suffixOverrides:后缀 覆盖掉(去掉)
List<Car> selectByMultiConditionWithTrim(@Param("brand") String brand,
                                              @Param("guidePrice") Double guidePrice,
                                              @Param("carType") String carType);
<select id="selectByMultiConditionWithTrim" resultType="car">
    select * from t_car
    <!--
        prefix: 加前缀
        suffix: 加后缀
        prefixOverrides: 删除前缀
        suffixOverrides: 删除后缀
    -->
    <!-- prefix="where" 是在 trim 标签所有内容的前面加 where -->
    <!-- suffixOverrides="and | or"  在 trim 标签中内容的后缀 and 或 or 去掉-->
    <trim prefix="where" suffixOverrides="and | or">
        <if test="brand != null and brand != ''">
            brand like "%"#{brand}"%" and
        </if>
        <if test="guidePrice != null and guidePrice != ''">
            guide_price > #{guidePrice} and
        </if>
        <if test="carType != null and carType != ''">
            car_type = #{carType}
        </if>
    </trim>
</select>
@Test
public void testSelectByMultiConditionWithTrim() {
    SqlSession sqlSession = SqlSessionUtil.openSession();
    CarMapper mapper = sqlSession.getMapper(CarMapper.class);
    List<Car> cars = mapper.selectByMultiConditionWithTrim("", null, "");
    cars.forEach(car -> System.out.println(car));
    sqlSession.close();
}
9.4 set 标签
set 标签
主要使用在 update 语句当中,用来生成 set 关键字,同时去掉最后多余的 “,”
比如我们只更新提交的不为空的字段,如果提交的数据是空或者"",那么这个字段将不更新。
/**
  * 更新 Car
  * @param car
  * @return
  */
int updateBySet(Car car);
<update id="updateBySet">
    update t_car
    <set>
        <if test="carNum != null and carNum != ''">car_num = #{carNum},</if>
        <if test="brand != null and brand != ''">brand = #{brand},</if>
        <if test="guidePrice != null and guidePrice != ''">guide_price = #{guidePrice},</if>
        <if test="produceTime != null and produceTime != ''">produce_time = #{produceTime},</if>
        <if test="carType != null and carType != ''">car_type = #{carType},</if>
    </set>
    where
    id = #{id}
</update>
@Test
public void testUpdateBySet() {
    SqlSession sqlSession = SqlSessionUtil.openSession();
    CarMapper mapper = sqlSession.getMapper(CarMapper.class);
    Car car = new Car(6L, null, "比亚迪汉", null, null, "新能源");
    mapper.updateBySet(car);
    sqlSession.commit();
    sqlSession.close();
}
/**
结果:
	update t_car SET brand = ?, car_type = ? where id = ?
	Parameters: 比亚迪汉(String), 新能源(String), 6(Long)
*/
9.5 choose when otherwise
这三个标签是在一起使用的
语法格式:
<choose>
    <when></when>
    <when></when>
    <when></when>
    <otherwise></otherwise>
</choose>
等同于:
if(){

} else if() {

} else if() {

} else if() {

} else{

}
List<Car> selectByChoose(@Param("brand") String brand,
                             @Param("guidePrice") Double guidePrice,
                             @Param("carType") String carType);
<select id="selectByChoose" resultType="car">
    select * from t_car
    <where>
        <choose>
            <when test="brand != null and brand != ''">
                brand like "%"#{brand}"%"
            </when>
            <when test="guidePrice != null and guidePrice != ''">
                guide_price > #{guidePrice}
            </when>
            <otherwise>
                car_type = #{carType}
            </otherwise>
        </choose>
    </where>
</select>
@Test
public void testSelectByChoose() {
    SqlSession sqlSession = SqlSessionUtil.openSession();
    CarMapper mapper = sqlSession.getMapper(CarMapper.class);

    // 三个条件都不为空
    List<Car> cars = mapper.selectByChoose("丰田霸道", 1.0, "新能源");
    /**
    	结果:
    	Preparing: select * from t_car WHERE brand like "%"?"%"
    	Parameters: 丰田霸道(String)
    */

    // 假设后两个条件不为空,第一个条件为空
    List<Car> cars = mapper.selectByChoose(null, 1.0, "新能源");
    /**
    	结果:
    	Preparing: select * from t_car WHERE guide_price > ?
    	Parameters: 1.0(Double)
    */

    // 假设前两个条件都为空,最后一个条件不为空
    List<Car> cars = mapper.selectByChoose(null, null, "新能源");
    /**
    	结果:
    	// 假设前两个条件都为空,最后一个条件不为空
        Preparing: select * from t_car WHERE car_type = ?
        Parameters: 新能源(String)
    */

    // 全部为空
    List<Car> cars = mapper.selectByChoose("", null, "");
    /**
    	结果:
    	// 假设前两个条件都为空,最后一个条件不为空
        Preparing: select * from t_car WHERE car_type = ?
        Parameters: (String)
    */

    cars.forEach(car -> System.out.println(car));
    sqlSession.close();
}
注意:至少执行一个分支,如果 when 分支条件都不满足,则执行 otherwise 分支
9.6 foreach 标签
9.6.1 批量删除
uri?id=1&id=2&id=3&id=4 前端以表单的方式提交
String[] ids = request.getParameterValues(“id”);
String[] ids = [1, 2, 3, 4]
delete from t_car where id in (1, 2, 3, 4, 5, 6,… 这里的值是动态的,根据用户选择的 id 不同,值是不同的);
/**
  * 批量删除:foreach 标签
  * @param ids
  * @return
  */
int deleteByIds(@Param("ids") Long[] ids);

/**
  * 根据 id 批量删除 使用 or 关键字
  * @param ids
  * @return
  */
int deleteByIds2(@Param("ids") Long[] ids);
<!--
    foreach 标签的属性
    	collection : 指定数组或者集合
    	item : 数组或集合中的元素
    	separator : 循环之间的分隔符
    	open : foreach 循环拼接的所有 sql 语句的最前面以什么开始。
    	close : foreach 循环拼接的所有 sql 语句的最后面以什么结束。
-->
<delete id="deleteByIds">
    delete from t_car where id in
    <foreach collection="ids" item="id" separator="," open = "(" close=")">
        #{id}
    </foreach>
</delete>

<!--
	因为使用 or 关键字
	所以 sql 语句应该如下:
		delete from t_car where id = 1 or id = 2 or id = 3
	所以 foreach 的 separator = "or"
-->
<delete id="deleteByIds2">
    delete from t_car where
    <foreach collection="ids" item="id" separator="or">
        id = #{id}
    </foreach>
</delete>
@Test
public void testDeleteByIds() {
    SqlSession sqlSession = SqlSessionUtil.openSession();
    CarMapper mapper = sqlSession.getMapper(CarMapper.class);
    Long[] ids = {3L, 4L, 18L};
    int count = mapper.deleteByIds(ids);
    System.out.println(count);
    sqlSession.commit();
    sqlSession.close();
}
/**
	结果:
		Preparing: delete from t_car where id in ( ? , ? , ? );
		Parameters: 3(Long), 4(Long), 18(Long)
*/

@Test
public void testDeleteByIds2() {
    SqlSession sqlSession = SqlSessionUtil.openSession();
    CarMapper mapper = sqlSession.getMapper(CarMapper.class);
    Long[] ids = {2L, 5L, 6L};
    int count = mapper.deleteByIds2(ids);
    System.out.println(count);
    sqlSession.commit();
    sqlSession.close();
}
/**
	结果:
		Preparing: delete from t_car where id = ? or id = ? or id = ?
		Parameters: 2(Long), 5(Long), 6(Long)
*/
9.6.2 批量插入
批量插入
一次向数据库表当中插入多条记录。
insert into t_user (id, name, age) values
(1, ‘zs’, 20)
(2, ‘zs’, 20)
(3, ‘zs’, 20)
(4, ‘zs’, 20)
List users;
/**
  * 批量插入,一次插入多条信息
  * @param cars
  * @return
  */
int insertBatch(@Param("cars") List<Car> cars);
<insert id="insertBatch">
    insert into t_car values
    <foreach collection="cars" item="car" separator=",">
        (null, #{car.carNum}, #{car.brand}, #{car.guidePrice}, #{car.produceTime}, #{car.carType})
    </foreach>
</insert>
@Test
public void testInsertBatch() {
    SqlSession sqlSession = SqlSessionUtil.openSession();
    CarMapper mapper = sqlSession.getMapper(CarMapper.class);
    List<Car> cars = new ArrayList<>();
    Car car1 = new Car(null, "1200", "帕沙特1", 30.0, "2020-11-11", "燃油车");
    Car car2 = new Car(null, "1201", "帕沙特2", 30.0, "2020-11-11", "燃油车");
    Car car3 = new Car(null, "1202", "帕沙特3", 30.0, "2020-11-11", "燃油车");
    cars.add(car1);
    cars.add(car2);
    cars.add(car3);
    int count = mapper.insertBatch(cars);
    System.out.println(count);
    sqlSession.commit();
    sqlSession.close();
}
/**
结果:
Preparing: insert into t_car values (null, ?, ?, ?, ?, ?) , (null, ?, ?, ?, ?, ?) , (null, ?, ?, ?, ?, ?)
Parameters: 1200(String), 帕沙特1(String), 30.0(Double), 2020-11-11(String), 燃油车(String), 1201(String), 帕沙特2(String), 30.0(Double), 2020-11-11(String), 燃油车(String), 1202(String), 帕沙特3(String), 30.0(Double), 2020-11-11(String), 燃油车(String)
*/
9.7 sql 标签与 include 标签
好处:代码可复用,易维护
<!-- 原先代码 -->
<select id="selectAllRetMap" resultType="map">
    select
        id, car_num as carNum, brand,
        guide_price as guidePrice,
        produce_time as produceTime,
        car_type as carType
    from t_car
</select>

<!-- 使用 <sql> 修改后的代码-->
<sql id="carCols">
    id, car_num as carNum, brand,
    guide_price as guidePrice,
    produce_time as produceTime,
    car_type as carType
</sql>

<select id="selectAllRetMap" resultType="map">
    select <include refid="carCols"></include> from t_car
</select>
十、 MyBatis 的高级映射及延迟加载
数据库表:班级表:t_clazz、 学生表:t_stu 一对多的关系
模块名:mybatis-010-advanced-mappping
打包方式:jar
依赖:mybatis 依赖、 mysql 依赖、 junit 依赖、 logback 依赖
配置文件:mybatis-config.xml、 logback.xml、 jdbc.properties
pojo 类:Student、 Clazz
utils类:SqlSessionUtil
mapper 接口类:StudentMapper.java、 ClazzMapper.java
mapper 映射类:StudentMapper.xml、ClazzMapper.xml
测试类:StudentMapperTest、 ClazzMapperTest
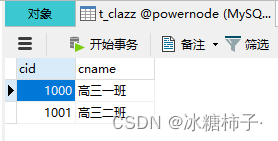
![[外链图片转存失败,源站可能有防盗链机制,建议将图片保存下来直接上传(img-6cYePqR0-1675771363227)(C:\Users\28247\AppData\Roaming\Typora\typora-user-images\image-20230111091148526.png)]](https://img-blog.csdnimg.cn/6cab27477920498ab641801883435875.png)
10.1 多对一
多种方式,常见的包括三种:
- 第一种方式:一条 SQL 语句,级联属性映射。
- 第二种方式:一条 SQL 语句,association。
- 第三种方式:两条 SQL 语句,分步查询。 (常用,优点一:可复用。优点二:支持懒加载。)
![[外链图片转存失败,源站可能有防盗链机制,建议将图片保存下来直接上传(img-pwznH3fI-1675771363228)(C:\Users\28247\AppData\Roaming\Typora\typora-user-images\image-20230111150302743.png)]](https://img-blog.csdnimg.cn/7e5f91087d874e6c95ad1d7deec02795.png)
在 Student 类中添加 Clazz clazz 属性
// Student
public class Student {
    private Integer sid;
    private String sname;
    private Clazz clazz;
}
10.1.1 级联属性映射
/**
  * 根据 id 获取学生信息。同时获取学生关联的班级信息
  * @param sid 学生的 id
  * @return 学生对象,学生对象当中包含有班级对象
  */
Student selectById(@Param("sid") Integer sid);
<!-- 多对一映射的第一种方式:一条 SQL 语句,级联属性映射。 -->
<resultMap id="studentResultMap" type="Student">
    <id property="sid" column="sid"></id>
    <result property="sname" column="sname"/>
    <result property="clazz.cid" column="cid"/>
    <result property="clazz.cname" column="cname"/>
</resultMap>

<select id="selectById" resultMap="studentResultMap">
    select
        s.sid, s.sname, c.cid, c.cname
    from
        t_stu s left join t_clazz c
    on
        s.cid = c.cid
    where
        s.sid = #{sid}
</select>
@Test
public void testSelectById() {
    SqlSession sqlSession = SqlSessionUtil.openSession();
    StudentMapper mapper = sqlSession.getMapper(StudentMapper.class);
    Student student = mapper.selectById(1);
    System.out.println(student.getSid());
    System.out.println(student.getSname());
    System.out.println(student.getClazz().getCid());
    System.out.println(student.getClazz().getCname());
    System.out.println(student);
    sqlSession.close();
}
/**
  * 结果:
  * 1
  * 张三
  * 1000
  * 高三一班
  * Student{sid=1, sname='张三', clazz=Clazz{cid=1000, cname='高三一班'}}
  */
10.1.2 association
/**
  * 一条 SQL 语句,association
  * @param id
  * @return
  */
Student selectByIdAssociation(@Param("sid") Integer sid);
<!-- 一条 SQL 语句,association -->
<resultMap id="studentResultMapAssociation" type="Student">
    <id property="sid" column="sid"/>
    <result property="sname" column="sname"/>
    <!--
		association:翻译为关联,一个 Student 对象关联一个 Clazz 对象
		property:提供要映射的 POJO 类的属性名。
		javaType:用来指定要映射的 java 类型。
     -->
    <association property="clazz" javaType="Clazz">
        <id property="cid" column="cid"/>
        <result property="cname" column="cname"/>
    </association>
</resultMap>

<select id="selectByIdAssociation" resultMap="studentResultMapAssociation">
    select
        s.sid, s.sname, c.cid, c.cname
    from
        t_stu s left join t_clazz c
    on
        s.cid = c.cid
    where
        s.sid = #{sid}
</select>
@Test
public void testSelectByIdAssociation() {
    SqlSession sqlSession = SqlSessionUtil.openSession();
    StudentMapper mapper = sqlSession.getMapper(StudentMapper.class);
    Student student = mapper.selectByIdAssociation(3);
    System.out.println(student.getSid());
    System.out.println(student.getSname());
    System.out.println(student.getClazz().getCid());
    System.out.println(student.getClazz().getCname());
    System.out.println(student);
    sqlSession.close();
    /**
      * 结果:
      * 3
      * 王五
      * 1000
      * 高三一班
      * Student{sid=3, sname='王五', clazz=Clazz{cid=1000, cname='高三一班'}}
      */
}
10.1.3 分步查询
分布查询的优点
- 第一:复用性强,可以重复使用。
- 第二:可以充分利用延迟加载(懒加载)机制
延迟加载(懒加载):
- 核心原理:用的时候再执行语句,不用的时候不查询
- 作用:提高性能。
如何开启延迟加载?
局部设置:在 association 标签中添加 fetchType=“lazy”
<resultMap id="studentResultMapByStep" type="Student"> <id property="sid" column="sid"/> <result property="sname" column="sname"/> <association property="clazz" select="com.guokui.mybatis.mapper.ClazzMapper.selectByIdStep2" column="cid" <!-- 局部设置延迟加载 --> fetchType="lazy"/> </resultMap> 全局设置:在 mybatis-config.xml 中添加全局配置
<settings> <!-- 延迟加载的全局开关。默认值 false 不开启 --> <!-- value="true":只要 mapper.xml 带分步操作,都采用延迟加载 --> <setting name="lazyLoadingEnabled" value="true"/> </settings> 注意:
1.默认情况下是没有开启延迟加载的。需要设置:fetchType=“lazy”
2.局部设置只对当前的 association 关联的 sql 语句起作用。
3.全局设置对项目中所有的 association 关联的 sql 语句起作用。
// StudentMapper.java
/**
  * 分步查询第一步:先根据学生的 sid 查询学生的信息。
  * @param sid
  * @return
  */
Student selectByIdStep1(@Param("sid") Integer sid);
// ClazzMapper.java
/**
  * 分布查询第二步:根据 cid 获取班级信息
  * @param cid
  * @return
  */
Clazz selectByIdStep2(@Param("cid") Integer cid);
<!-- StudentMapper.xml -->
<!-- 两条 SQL 语句,完成多对一的分步查询。 -->
<!-- 第一步:根据学生的 id 查询学生的所有信息。这些信息当中含有班级 id(cid) -->
<resultMap id="studentResultMapByStep" type="Student">
    <id property="sid" column="sid"/>
    <result property="sname" column="sname"/>
    <association property="clazz"
                 select="com.guokui.mybatis.mapper.ClazzMapper.selectByIdStep2"
                 column="cid"
                 fetchType="lazy"/>
</resultMap>

<select id="selectByIdStep1" resultMap="studentResultMapByStep">
    select
        sid, sname, cid
    from t_stu
    where sid = #{sid}
</select>
<!-- ClazzMapper.xml -->
<!-- 分步查询第二步:根据 cid 获取班级信息。 -->
<sql id="selectClazz">
    cid, cname
</sql>

<select id="selectByIdStep2" resultType="Clazz">
    select <include refid="selectClazz"/> from t_clazz where cid = #{cid}
</select>
@Test
public void testSelectByIdStep() {
    SqlSession sqlSession = SqlSessionUtil.openSession();
    StudentMapper mapper = sqlSession.getMapper(StudentMapper.class);
    Student student = mapper.selectByIdStep1(5);
    System.out.println(student.getSname());
    System.out.println(student.getClazz().getCname());
    sqlSession.close();
    /**
      * 结果
      * ==>  Preparing: select sid, sname, cid from t_stu where sid = ?
      * ==> Parameters: 5(Integer)
      * <==    Columns: sid, sname, cid
      * <==        Row: 5, 钱七, 1001
      * <==      Total: 1
      * 钱七
      * ==>  Preparing: select cid, cname from t_clazz where cid = ?
      * ==> Parameters: 1001(Integer)
      * <==    Columns: cid, cname
      * <==        Row: 1001, 高三二班
      * <==      Total: 1
      * 高三二班
      */
}
10.2 一对多
一对多的实现,通常是在一的一方中有 List 集合属性。
一对多的实现通常包括两种实现方式:
- 第一种:collection
- 第二种:分步查询
![[外链图片转存失败,源站可能有防盗链机制,建议将图片保存下来直接上传(img-4UKU4B2Z-1675771363229)(C:\Users\28247\AppData\Roaming\Typora\typora-user-images\image-20230111185500927.png)]](https://img-blog.csdnimg.cn/0dbd335e9dc043ea8454fb5f5ced15ed.png)
在 Clazz 类中添加 List stus 属性。
public class Clazz {
    private Integer cid;
    private String cname;
    private List<Student> stus;
}
10.2.1 collection
/**
  * 根据班级 id 查询班级信息
  * @param cid 班级 id
  * @return
  */
Clazz selectByCollection(@Param("cid") Integer cid);
<resultMap id="clazzResultMap" type="Clazz">
    <id property="cid" column="cid"/>
    <result property="cname" column="cname"/>
    <collection property="stus" ofType="Student">
        <id property="sid" column="sid"/>
        <result property="sname" column="sname"/>
    </collection>
</resultMap>

<select id="selectByCollection" resultMap="clazzResultMap">
    select
    	c.cid, c.cname, s.sid, s.sname
    from
    	t_clazz as c left join t_stu as s
    on
    	c.cid = s.cid
    where
    	c.cid = #{cid}
</select>
@Test
public void testSelectByCollection() {
    SqlSession sqlSession = SqlSessionUtil.openSession();
    ClazzMapper mapper = sqlSession.getMapper(ClazzMapper.class);
    Clazz clazz = mapper.selectByCollection(1000);
    System.out.println(clazz);
    sqlSession.close();
}
/**
  * Clazz{cid=1000,
  *       cname='高三一班',
  *       stus=[Student{sid=1, sname='张三', clazz=null},
  *             Student{sid=2, sname='李四', clazz=null},
  *             Student{sid=3, sname='王五', clazz=null}]}
  */
10.2.2 分步查询
// ClazzMapper.java
Clazz selectByStep1(@Param("cid") Integer cid);
// StudentMapper.java
List<Student> selectByCidStep2(@Param("cid") Integer cid);
<!-- ClazzMapper.xml -->
<resultMap id="clazzResultMapStep" type="Clazz">
    <id property="cid" column="cid"/>
    <result property="cname" column="cname"/>
    <collection property="stus"
                ofType="Student"
                select="com.guokui.mybatis.mapper.StudentMapper.selectByCidStep2"
                column="cid"/>
</resultMap>

<select id="selectByStep1" resultMap="clazzResultMapStep">
    select cid, cname from t_clazz where cid = #{cid}
</select>
<!-- StudentMapper.xml -->
<select id="selectByCidStep2" resultType="Student">
	select sid, sname from t_stu where cid = #{cid}
</select>
@Test
public void testSelectByStep1() {
    SqlSession sqlSession = SqlSessionUtil.openSession();
    ClazzMapper mapper = sqlSession.getMapper(ClazzMapper.class);
    Clazz clazz = mapper.selectByStep1(1000);
    System.out.println(clazz.getCname());
    for (Student stus : clazz.getStus()) {
        System.out.println(stus.getSname());
    }
    sqlSession.close();
    /**
      * 结果:
      * ==>  Preparing: select cid, cname from t_clazz where cid = ?
      * ==> Parameters: 1000(Integer)
      * <==    Columns: cid, cname
      * <==        Row: 1000, 高三一班
      * <==      Total: 1
      * 高三一班
      * ==>  Preparing: select sid, sname from t_stu where cid = ?
      * ==> Parameters: 1000(Integer)
      * <==    Columns: sid, sname
      * <==        Row: 1, 张三
      * <==        Row: 2, 李四
      * <==        Row: 3, 王五
      * <==      Total: 3
      * 张三
      * 李四
      * 王五
      */
}
十一、 Mybatis 的缓存
缓存:cache
缓存的作用:通过减少 IO 的方式,来提高程序的执行效率。
mybatis 的缓存:将 select 语句的查询结果放到缓存(内存)当中,下一次还是这条 select 语句的话,直接从缓存中取,不再查数据库,一方面是减少了 IO,另一方面不再执行繁琐的查找算法。效率大大提升。
mybatis 缓存包括:
- 一级缓存:将查询到的数据存储到 SqlSession 中。
- 二级缓存:将查询到的数据存储到 SqlSessionFactory 中。
- 或者集成其他第三方的缓存:比如 EhCache【Java语言开发的】、Memcache【C语言开发的】等。
缓存只针对 DQL 语句,也就是说缓存机制只对应 select 语句。
![[外链图片转存失败,源站可能有防盗链机制,建议将图片保存下来直接上传(img-7XiOvh4W-1675771363229)(C:\Users\28247\AppData\Roaming\Typora\typora-user-images\image-20230111210856221.png)]](https://img-blog.csdnimg.cn/f2219cfc9d5246d29162c33edc248cff.png)
11.1 一级缓存
一级缓存默认是开启的,不需要做任何配置。
原理:只要使用同一个 SqlSession 对象执行同一条 SQL 语句,就会走缓存。
模块名:mybatis-011-cache
Car selectById(@Param("id") long id);
<select id="selectById" resultType="Car">
    select * from t_car where id = #{id}
</select>
@Test
public void testSelectById() throws IOException {
    SqlSessionFactory sqlSessionFactory = new         SqlSessionFactoryBuilder().build(Resources.getResourceAsStream("mybatis-config.xml"));

    SqlSession sqlSession1 = sqlSessionFactory.openSession();
    SqlSession sqlSession2 = sqlSessionFactory.openSession();

    CarMapper mapper1 = sqlSession1.getMapper(CarMapper.class);
    CarMapper mapper2 = sqlSession2.getMapper(CarMapper.class);

    Car car1 = mapper1.selectById(1L);
    System.out.println("car1 ---->" + car1);

    Car car2 = mapper1.selectById(1L);
    System.out.println("car2 ---->" + car2);

    Car car3 = mapper2.selectById(1L);
    System.out.println("car3 ---->" + car3);

    sqlSession1.close();
    sqlSession2.close();
}
/**
结果:
==>  Preparing: select * from t_car where id = ?
==> Parameters: 1(Long)
<==      Total: 1
car1 ---->Car{id=1, carNum='1001', brand='宝马 520Li', guidePrice=10.0, produceTime='2020-10-11', carType='燃油车'}
car2 ---->Car{id=1, carNum='1001', brand='宝马 520Li', guidePrice=10.0, produceTime='2020-10-11', carType='燃油车'}
==>  Preparing: select * from t_car where id = ?
==> Parameters: 1(Long)
<==      Total: 1
car3 ---->Car{id=1, carNum='1001', brand='宝马 520Li', guidePrice=10.0, produceTime='2020-10-11', carType='燃油车'}

结果解读:
因为 MyBatis是默认开启一级缓存的,所以使用同一个 SqlSession 对象执行同一条 SQL 语句,就会走缓存。
测试代码中 car1, car2 都是使用 SqlSession1 所以 car1 查询完就会将结果保存到缓存,car2 不再查数据库,直接从缓存中取结果。car3 使用的是 SqlSession2 不再是 SqlSession1,所以缓存中没有 car1 的查询结果,所以 car3 要往数据库查询数据。
*/
什么情况下不走缓存?
- 不同的 SqlSession 对象
- 查询条件变化了。
一级缓存失效情况包括两种:
- 执行了 sqlSession 的 clearCache() 方法,这是手动清空缓存
- 执行了 INSERT 或 DELETE 或 UPDATE 语句。不管操作哪张表,都会清空一级缓存。
1.手动清空一级缓存
// 1.手动清空一级缓存
@Test
public void testSelectById2() throws IOException {
    SqlSessionFactory sqlSessionFactory = new     SqlSessionFactoryBuilder().build(Resources.getResourceAsStream("mybatis-config.xml"));
    SqlSession sqlSession = sqlSessionFactory.openSession();
    CarMapper mapper = sqlSession.getMapper(CarMapper.class);

    Car car1 = mapper.selectById(1L);
    System.out.println("car1 ---->" + car1);

    // 手动清空缓存
    sqlSession.clearCache();

    Car car2 = mapper.selectById(1L);
    System.out.println("car2 ---->" + car2);

    sqlSession.close();
    /**
      * 结果:
      * ==>  Preparing: select * from t_car where id = ?
      * ==> Parameters: 1(Long)
      * <==      Total: 1
      * car1 ---->Car{id=1, carNum='1001', brand='宝马 520Li', guidePrice=10.0, produceTime='2020-10-11', carType='燃油车'}
      * ==>  Preparing: select * from t_car where id = ?
      * => Parameters: 1(Long)
      * <==      Total: 1
      * car2 ---->Car{id=1, carNum='1001', brand='宝马 520Li', guidePrice=10.0, produceTime='2020-10-11', carType='燃油车'}
      */
}
2.执行 INSERT 或 DELETE 或 UPDATE 语句
// 添加 POJO 类,Clazz.java
package com.guokui.mybatis.pojo;

public class Clazz {

    private Integer cid;
    private String cname;

    public Clazz() {
    }

    public Clazz(Integer cid, String cname) {
        this.cid = cid;
        this.cname = cname;
    }

    public Integer getCid() {
        return cid;
    }

    public void setCid(Integer cid) {
        this.cid = cid;
    }

    public String getCname() {
        return cname;
    }

    public void setCname(String cname) {
        this.cname = cname;
    }

    @Override
    public String toString() {
        return "Clazz{" +
                "cid=" + cid +
                ", cname='" + cname + '\'' +
                '}';
    }
}
// 添加 ClazzMapper.java 接口类
public interface ClazzMapper {

    int insertClazz(Clazz clazz);

    Clazz selectByCid(@Param("cid") Integer cid);
}
<!-- 添加 ClassMapper.xml 映射类 -->
<?xml version="1.0" encoding="UTF-8" ?>
<!DOCTYPE mapper
        PUBLIC "-//mybatis.org//DTD Mapper 3.0//EN"
        "http://mybatis.org/dtd/mybatis-3-mapper.dtd">
<mapper namespace="com.guokui.mybatis.mapper.ClazzMapper">
    <!-- 使用insert, update, delete, select 标签写sql -->
    <insert id="insertClazz">
        insert into t_clazz values (#{cid}, #{cname})
    </insert>

    <select id="selectByCid" resultType="Clazz">
        select * from t_clazz where cid = #{cid}
    </select>
</mapper>
// 还是在 CarMapperTest 测试类中接着写测试方法
// 2.执行 INSERT 或 DELETE 或 UPDATE 语句
@Test
public void testSelectById3() throws IOException{
    SqlSessionFactory sqlSessionFactory = new SqlSessionFactoryBuilder().build(Resources.getResourceAsStream("mybatis-config.xml"));
    SqlSession sqlSession = sqlSessionFactory.openSession();

    CarMapper Carmapper = sqlSession.getMapper(CarMapper.class);
    ClazzMapper Clazzmapper = sqlSession.getMapper(ClazzMapper.class);

    Car car1 = Carmapper.selectById(1L);
    System.out.println("car1 ---->" + car1);

    // 对不同表执行 SELECT 语句
    Clazz clazz = Clazzmapper.selectByCid(1000);
    System.out.println(clazz);

    Car car2 = Carmapper.selectById(1L);
    System.out.println("car2 ---->" + car2);

    // 对不同表执行 INSERT 或 DELETE 或 UPDATE 语句
    Clazzmapper.insertClazz(new Clazz(1003, "高三三班"));

    Car car3 = Carmapper.selectById(1L);
    System.out.println("car3 ---->" + car3);

    sqlSession.commit();
    sqlSession.close();
}
/**
  * ==>  Preparing: select * from t_car where id = ?
  *  ==> Parameters: 1(Long)
  * <==      Total: 1
  * car1 ---->Car{id=1, carNum='1001', brand='宝马 520Li', guidePrice=10.0, produceTime='2020-10-11', carType='燃油车'}
  * ==>  Preparing: select * from t_clazz where cid = ?
  * ==> Parameters: 1000(Integer)
  * <==      Total: 1
  * Clazz{cid=1000, cname='高三一班'}
  * car2 ---->Car{id=1, carNum='1001', brand='宝马 520Li', guidePrice=10.0, produceTime='2020-10-11', carType='燃油车'}
  * ==>  Preparing: insert into t_clazz values (?, ?)
  * ==> Parameters: 1003(Integer), 高三三班(String)
  * <==    Updates: 1
  * ==>  Preparing: select * from t_car where id = ?
  * ==> Parameters: 1(Long)
  * <==      Total: 1
  * car3 ---->Car{id=1, carNum='1001', brand='宝马 520Li', guidePrice=10.0, produceTime='2020-10-11', carType='燃油车'}
  */

/**
结果解读:
    car1 的结果是跟数据库进行交互获得的结果
    Clazz 的结果也是跟数据库进行交互获得的结果
    car2 没有跟数据库进行交互,直接从 SqlSession 的缓存中获得
    在 car3 之前 对 t_clazz 表进行了 INSERT 操作。因为此操作所以导致 SqlSession 的缓存被清空。
    car3 的结果因为 SqlSession 的缓存被清空,所以要跟数据库进行交互获得。
*/
11.2 二级缓存
二级缓存的范围是 SqlSessionFactory
使用二级缓存需要具备以下几个条件:
<!-- mybatis-config.xml -->
<!-- 全局性地开启或关闭所有映射配置文件中已配置的任何缓存。默认就是 true, 所以无需设置 -->
<select name="cacheEnabled" value="true">
<!-- CarMapper.xml --> <!-- 在需要使用二级缓存的 SqlMapper.xml 文件中添加配置:<cache/> --> <cache/>// 使用二级缓存的实体类对象必须是可序列化的,也就是必须实现 java.io.Serializable 接口。 public class Car implements Serializable { // .... }SqlSession 对象关闭或提交之后,一级缓存中的数据才会被写入到二级缓存当中,此时二级缓存才可用。
测试二级缓存
<!-- CarMapper.xml -->
<!--
	默认情况下,二级缓存是开启的
 	只需要再对应的 SqlMapper.xml 文件中添加以下标签,用来表示使用二级缓存
-->
<cache/>
// Car.java
public class Car implements Serializable {
    // ....
}
@Test
public void testSelectById4() throws IOException{
    // 这里有一个 SqlSessionFactory 对象,二级缓存对应的是 SqlSessionFactory
    SqlSessionFactory sqlSessionFactory = new SqlSessionFactoryBuilder().build(Resources.getResourceAsStream("mybatis-config.xml"));
    SqlSession sqlSession1 = sqlSessionFactory.openSession();
    SqlSession sqlSession2 = sqlSessionFactory.openSession();

    CarMapper mapper1 = sqlSession1.getMapper(CarMapper.class);
    CarMapper mapper2 = sqlSession2.getMapper(CarMapper.class);

    // 这行代码执行结束之后,实际上数据是缓存到一级缓存当中了。(sqlSession1 是一级缓存。)
    Car car1 = mapper1.selectById(1L);
    System.out.println(car1);

    // 这行代码执行结束之后,sqlSession1 的一级缓存中的数据就会写入到二级缓存当中。
    sqlSession1.close();

    // car2 先从 sqlSession2 的一级缓存中找数据,找不到。再从二级缓存中找数据,找到了。
    // 所以 car2 不需要跟数据库做交互
    Car car2 = mapper2.selectById(1L);
    System.out.println(car2);

    // 这行代码执行结束之后,sqlSession2 的一级缓存中的数据就会写入到二级缓存当中。
    sqlSession2.close();

    /**
      * 结果:
      * Cache Hit Ratio [com.guokui.mybatis.mapper.CarMapper]: 0.0
      * ==>  Preparing: select * from t_car where id = ?
      * ==> Parameters: 1(Long)
      * <==      Total: 1
      * Car{id=1, carNum='1001', brand='宝马 520Li', guidePrice=10.0, produceTime='2020-10-11', carType='燃油车'}
      * Cache Hit Ratio [com.guokui.mybatis.mapper.CarMapper]: 0.5
      * Car{id=1, carNum='1001', brand='宝马 520Li', guidePrice=10.0, produceTime='2020-10-11', carType='燃油车'}
      */
}
二级缓存的失效:只要两次查询之间出现了增删改操作,二级缓存就会失效。【一级缓存也会失效】
十二、 MyBatis 集成 EhCache
集成 EhCache 是为了代替 mybatis 自带的二级缓存,一级缓存是无法替代的。
mybatis 对外提供了接口,也可以集成第三方的缓存组件。比如:EhCache、Memcache 等。
集成 EhCache 步骤:
-
第一步:引入 mybatis 整合 ehcache 的依赖
<!-- mybatis 集成 ehcache 的组件--> <dependency> <groupId>org.mybatis.caches</groupId> <artifactId>mybatis-ehcache</artifactId> <version>1.2.2</version> </dependency> -
第二步:在类的根路径下新建 ehcache.xml 文件,并提供以下配置信息。
<?xml version="1.0" encoding="UTF-8" ?> <ehcache xmlns:xsi="http://www.w3.org/2001/XMLSchema-instance" xsi:noNamespaceSchemaLocation="http://ehcache.org/ehcache.xsd" updateCheck="false"> <diskStore path="e:/ehcache"/> <defaultCache eternal="false" maxElementsInMemory="1000" overflowToDisk="false" diskPersistent="false" timeToIdleSeconds="0" timeToLiveSeconds="600" memoryStoreEvictionPolicy="LRU" /> </ehcache> -
第三步:修改 SqlMapper.xml 文件中的 标签,添加 type 属性。
<!-- 集成 Ehcache 组件 -->
<cache type="org.mybatis.caches.ehcache.EhcacheCache"/>


 64
64


 被折叠的 条评论
为什么被折叠?
被折叠的 条评论
为什么被折叠?
 到【灌水乐园】发言


