


目录
最近了解了Zephyr这个RTOS,在这里记录下学习以及将它在立创梁山派天空星开发板跑起来的过程。
1 环境搭建
我使用的是Windows,参考官方文档的步骤总结如下:
1.1 安装Chocolatey
在powershell管理员下执行:
Set-ExecutionPolicy Bypass -Scope Process -Force; [System.Net.ServicePointManager]::SecurityProtocol = [System.Net.ServicePointManager]::SecurityProtocol -bor 3072; iex ((New-Object System.Net.WebClient).DownloadString('https://community.chocolatey.org/install.ps1'))1.2 安装依赖
powershell管理员执行:
choco feature enable -n allowGlobalConfirmation
choco install cmake --installargs 'ADD_CMAKE_TO_PATH=System'
choco install ninja gperf python311 git dtc-msys2 wget 7zip
获取west:
pip install west1.3 获取zephyr源码和安装python依赖
新建一个文件夹zephyrproject,执行以下操作:
cd zephyrproject

# 这里用gitclone加速下载, 下载时间较长
west init -m https://gitclone.com/github.com/zephyrproject-rtos/zephyr

# 进入zephyr目录git checkout到新版本

# update前可以用watt toolkit加速github
west update

west zephyr-export

pip3 install -r zephyrproject\zephyr\scripts\requirements.txt
1.4 安装Zephyr SDK
这一步如果自己有编译工具链的话可以省去,这里记录下过程
Zephyr SDK:https://github.com/zephyrproject-rtos/sdk-ng/releases/tag/v0.16.8
下载好后找位置解压,解压完运行里面的 setup.cmd
安裝 openocd
1.5 编译测试
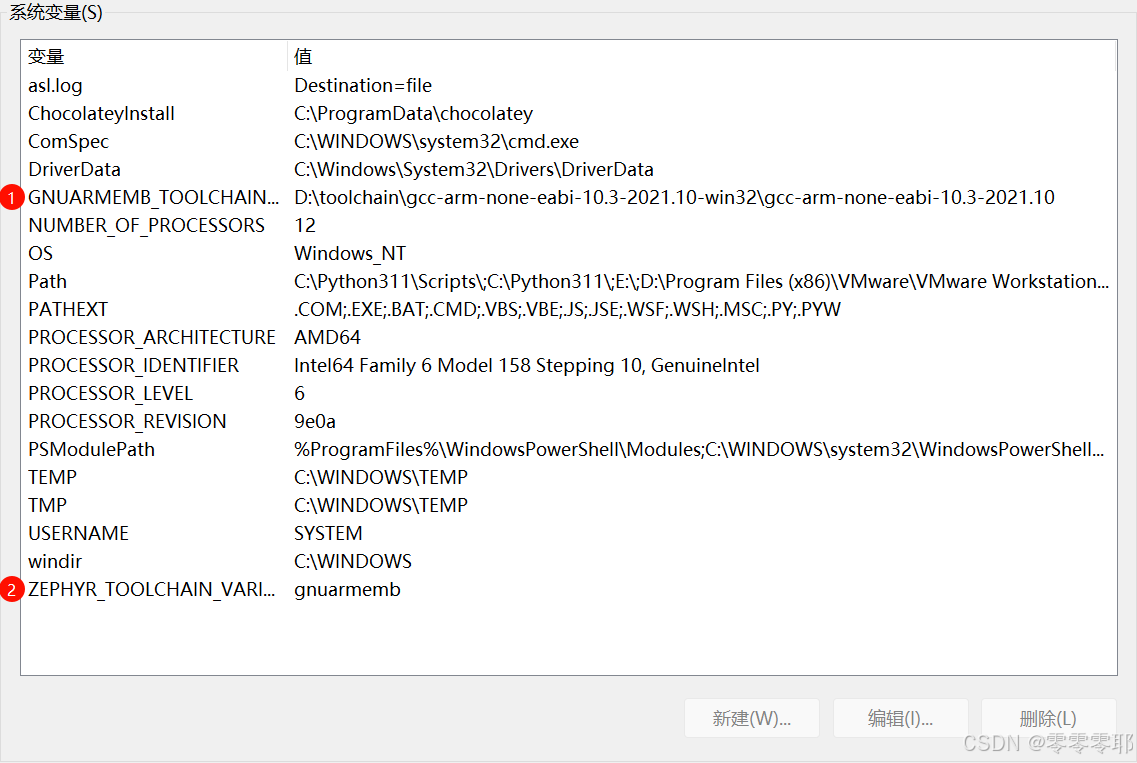
因为我用的是STM32,相关的工具链我自己已经安装好了,所以这里不再赘述安装过程。编译前需要添加两个系统变量:
ZEPHYR_TOOLCHAIN_VARIANT = gnuarmemb
GNUARMEMB_TOOLCHAIN_PATH = (你工具链的位置)
然后可以编译官方的板子测试下编译是否OK
cd zephyrproject\zephyr
west build -p always -b <your-board-name> samples\basic\blinky
2 在天空星上点亮LED
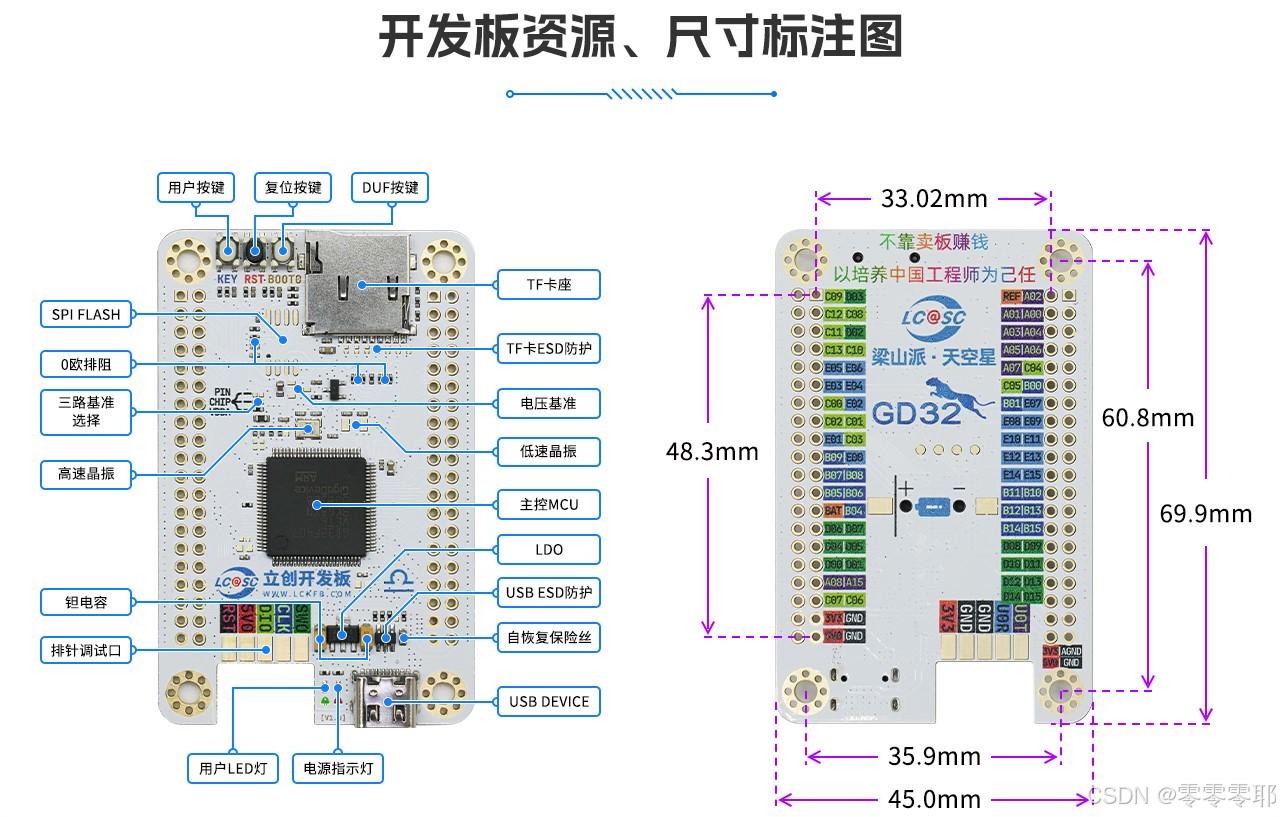
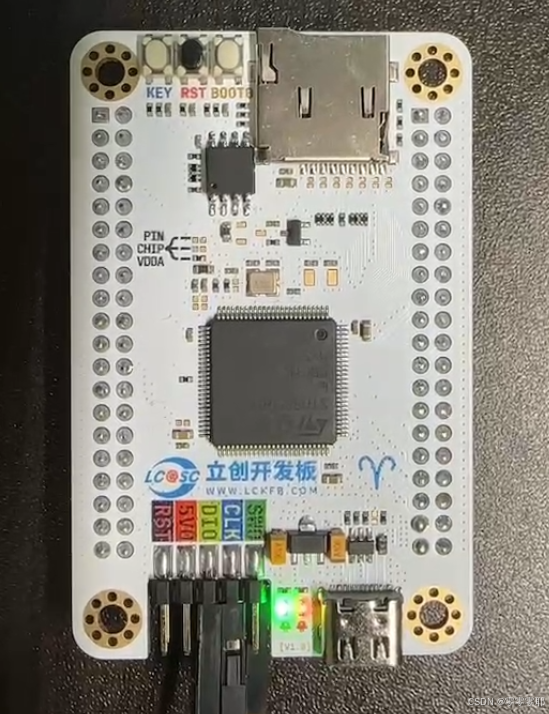
我用的是立创天空星开发板,搭载STM32F407VET6
 接下来在vscode中打开zephyrproject,开始简单的移植
2.1 新建boards相关文件
我们需要在zephyr/boards/arm/ 下新建一个我们的开发版的文件夹,因为官方支持的开发版里没有和我的板子主控相同的,所以找个相近的复制一下,这里我复制的是stm32f411e_disco
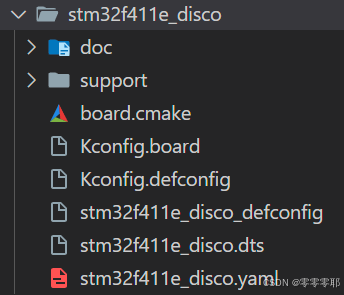
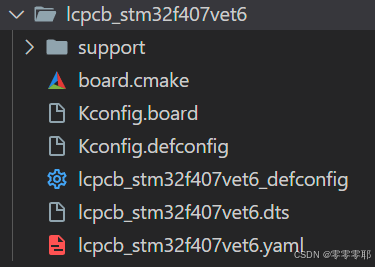
然后改一下名字:
修改Kconfig.board:
# LCPCB_STM32F407VET6 board configuration

# Copyright (c) 2016 Linaro Limited.
# SPDX-License-Identifier: Apache-2.0

config BOARD_LCPCB_STM32F407VET6
	bool "LCPCB LiangShan Pi stm32f407"
	depends on SOC_STM32F407XE
修改Kconfig.defconfig:
# LCPCB_STM32F407VET6 board configuration

# Copyright (c) 2016 Linaro Limited.
# SPDX-License-Identifier: Apache-2.0

if BOARD_LCPCB_STM32F407VET6

config BOARD
	default "lcpcb_stm32f407vet6"

endif # BOARD_LCPCB_STM32F407VET6
修改defconfig,尤其注意时钟树的几个CONFIG:
# SPDX-License-Identifier: Apache-2.0

CONFIG_SOC_SERIES_STM32F4X=y
CONFIG_SOC_STM32F407XE=y
# 168MHz system clock
CONFIG_SYS_CLOCK_HW_CYCLES_PER_SEC=168000000

# Enable MPU
CONFIG_ARM_MPU=n

# Enable HW stack protection
CONFIG_HW_STACK_PROTECTION=y

CONFIG_SERIAL=y

# console
CONFIG_CONSOLE=y
CONFIG_UART_CONSOLE=y

# enable pinmux
CONFIG_PINMUX=y

# enable GPIO
CONFIG_GPIO=y

# clock configuration
CONFIG_CLOCK_CONTROL=y

# Clock configuration for Cube Clock control driver
CONFIG_CLOCK_STM32_HSE_CLOCK=8000000
CONFIG_CLOCK_STM32_SYSCLK_SRC_PLL=y
# use HSE as PLL input
CONFIG_CLOCK_STM32_PLL_SRC_HSE=y
# produce 168MHz clock at PLL output
CONFIG_CLOCK_STM32_PLL_M_DIVISOR=4
CONFIG_CLOCK_STM32_PLL_N_MULTIPLIER=168
CONFIG_CLOCK_STM32_PLL_P_DIVISOR=2
CONFIG_CLOCK_STM32_PLL_Q_DIVISOR=4
CONFIG_CLOCK_STM32_AHB_PRESCALER=1
CONFIG_CLOCK_STM32_APB1_PRESCALER=4
CONFIG_CLOCK_STM32_APB2_PRESCALER=2
CONFIG_CLOCK_STM32_HSE_CLOCK=8000000 代表使用的是8MHz的外部晶振,下面是PLL的设置
修改dts:
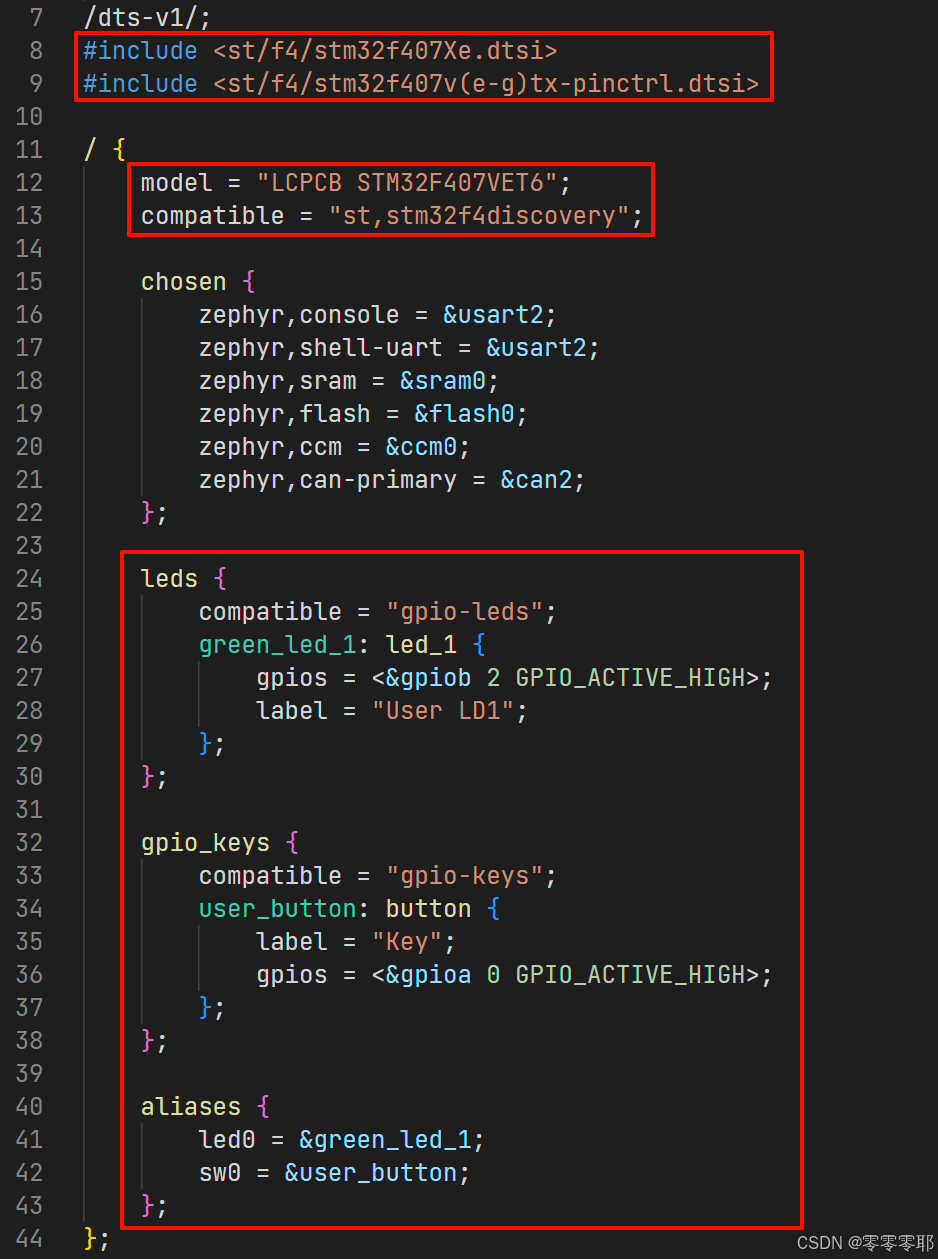
dts中没用的节点我们可以先把status设成disabled来关闭他们。
2.2 编译测试
PS E:\zephyrproject\zephyr> west boards | grep lcpcb
lcpcb_stm32f407vet6
PS E:\zephyrproject\zephyr> west build -p always -b lcpcb_stm32f407vet6 samples\basic\blinky
...省略编译过程
[129/129] Linking C executable zephyr\zephyr.elf
Memory region         Used Size  Region Size  %age Used
           FLASH:       14000 B       512 KB      2.67%
             CCM:          0 GB        64 KB      0.00%
            SRAM:        4488 B       128 KB      3.42%
        IDT_LIST:          0 GB         2 KB      0.00%
2.3 修改烧录相关文件
在support文件夹下新增一个lcpcb_stm32f407vet6.cfg,里面内容如下:
# SPDX-License-Identifier: GPL-2.0-or-later

source [find interface/cmsis-dap.cfg]

transport select swd

# increase working area to 64KB
# set WORKAREASIZE 0x10000

source [find target/stm32f4x.cfg]

reset_config none
这里我用的是DAP-Link,如果用ST Link稍微改下即可。
修改openocd.cfg:
source [find lcpcb_stm32f407vet6.cfg]

$_TARGETNAME configure -event gdb-attach {
	echo "Debugger attaching: halting execution"
	reset halt
	gdb_breakpoint_override hard
}

$_TARGETNAME configure -event gdb-detach {
	echo "Debugger detaching: resuming execution"
	resume
}
修改board.cmake,把jlink相关给注释掉
# SPDX-License-Identifier: Apache-2.0

board_runner_args(openocd)
# board_runner_args(jlink "--device=STM32F407VG" "--speed=4000")

include(${ZEPHYR_BASE}/boards/common/openocd.board.cmake)
# include(${ZEPHYR_BASE}/boards/common/jlink.board.cmake)
2.4 烧录
连接好daplink后执行 `west flash` 即可
PS E:\zephyrproject\zephyr> west flash
-- west flash: rebuilding
[1/2] Linking C executable zephyr\zephyr.elf
Memory region         Used Size  Region Size  %age Used
           FLASH:       14000 B       512 KB      2.67%
             CCM:          0 GB        64 KB      0.00%
            SRAM:        4488 B       128 KB      3.42%
        IDT_LIST:          0 GB         2 KB      0.00%

[1/2] C:\WINDOWS\system32\cmd.exe /C "cd /D E:\zephyrproje...\flash && "D:\Program Files\CMake\bin\cmake.exe" -E echo "

-- west flash: using runner openocd
-- runners.openocd: Flashing file: E:/zephyrproject/zephyr/build/zephyr/zephyr.hex
Open On-Chip Debugger 0.12.0 (2023-01-14-23:37)
Licensed under GNU GPL v2
For bug reports, read
        http://openocd.org/doc/doxygen/bugs.html
Info : Using CMSIS-DAPv2 interface with VID:PID=0x0d28:0x0204, serial=000000800671ff525154887767033308a5a5a5a597969908
Info : CMSIS-DAP: SWD supported
Info : CMSIS-DAP: Atomic commands supported
Info : CMSIS-DAP: FW Version = 2.2.2R
Info : CMSIS-DAP: Serial# = 396608E4C284
Info : CMSIS-DAP: Interface Initialised (SWD)
Info : SWCLK/TCK = 1 SWDIO/TMS = 1 TDI = 0 TDO = 0 nTRST = 0 nRESET = 1
Info : CMSIS-DAP: Interface ready
Info : clock speed 2000 kHz
Info : SWD DPIDR 0x2ba01477
Info : [stm32f4x.cpu] Cortex-M4 r0p1 processor detected
Info : [stm32f4x.cpu] target has 6 breakpoints, 4 watchpoints
Info : starting gdb server for stm32f4x.cpu on 3333
Info : Listening on port 3333 for gdb connections
    TargetName         Type       Endian TapName            State
--  ------------------ ---------- ------ ------------------ ------------
 0* stm32f4x.cpu       cortex_m   little stm32f4x.cpu       running

[stm32f4x.cpu] halted due to debug-request, current mode: Thread
xPSR: 0x01000000 pc: 0x08001418 msp: 0x20000848
Info : device id = 0x101f6413
Info : flash size = 512 KiB
auto erase enabled
wrote 16384 bytes from file E:/zephyrproject/zephyr/build/zephyr/zephyr.hex in 0.843051s (18.979 KiB/s)

[stm32f4x.cpu] halted due to debug-request, current mode: Thread
xPSR: 0x01000000 pc: 0x08001418 msp: 0x20000848
verified 14000 bytes in 0.148283s (92.201 KiB/s)

shutdown command invoked
烧录好后我们可以看到板子上的LED在闪烁了:


 548
548

 被折叠的 条评论
为什么被折叠?
被折叠的 条评论
为什么被折叠?
 到【灌水乐园】发言


