


目录
前言:
笔者在浏览中偶然注意到可以直接利用vue组件来直接操作数据库的组件:vue-neo4j,但是使用下来比较坑,特写下本文,希望对大家有帮助:
参考文章:
(244条消息) 使用Vue-neo4j绘制三国人物图谱关系_K歌、之王的博客-CSDN博客_neo4j vue
首先是网址介绍:
我是直接下的文件夹

直接放到项目中就好,
接下来需要下载补充依赖:

idea会自动提示的
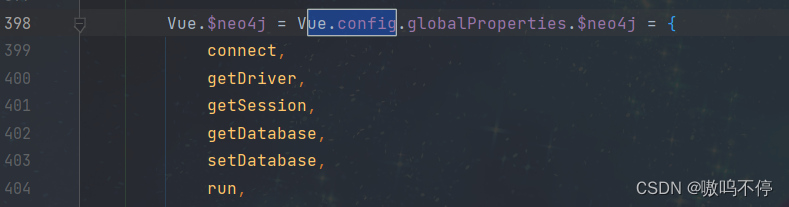
检查vue版本:

如果版本高的话会报错
需要在index.js进行以下修改:
修改后:
接下来需要运行,这里讲一下登录是怎么实现的
首先cmd打开命令窗口,输入neo4j.bat console运行neo4j:
![]()
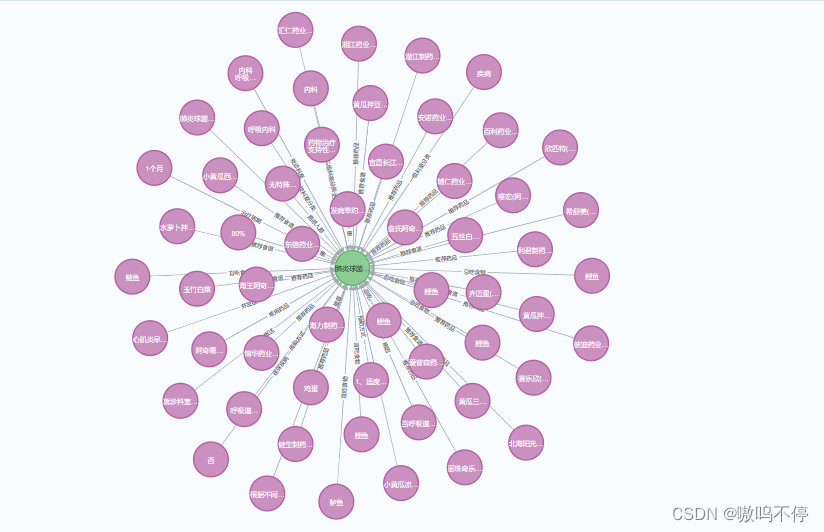
运行成功后的结果:
在浏览器中输入
http://localhost:7474/browser/运行可视化界面
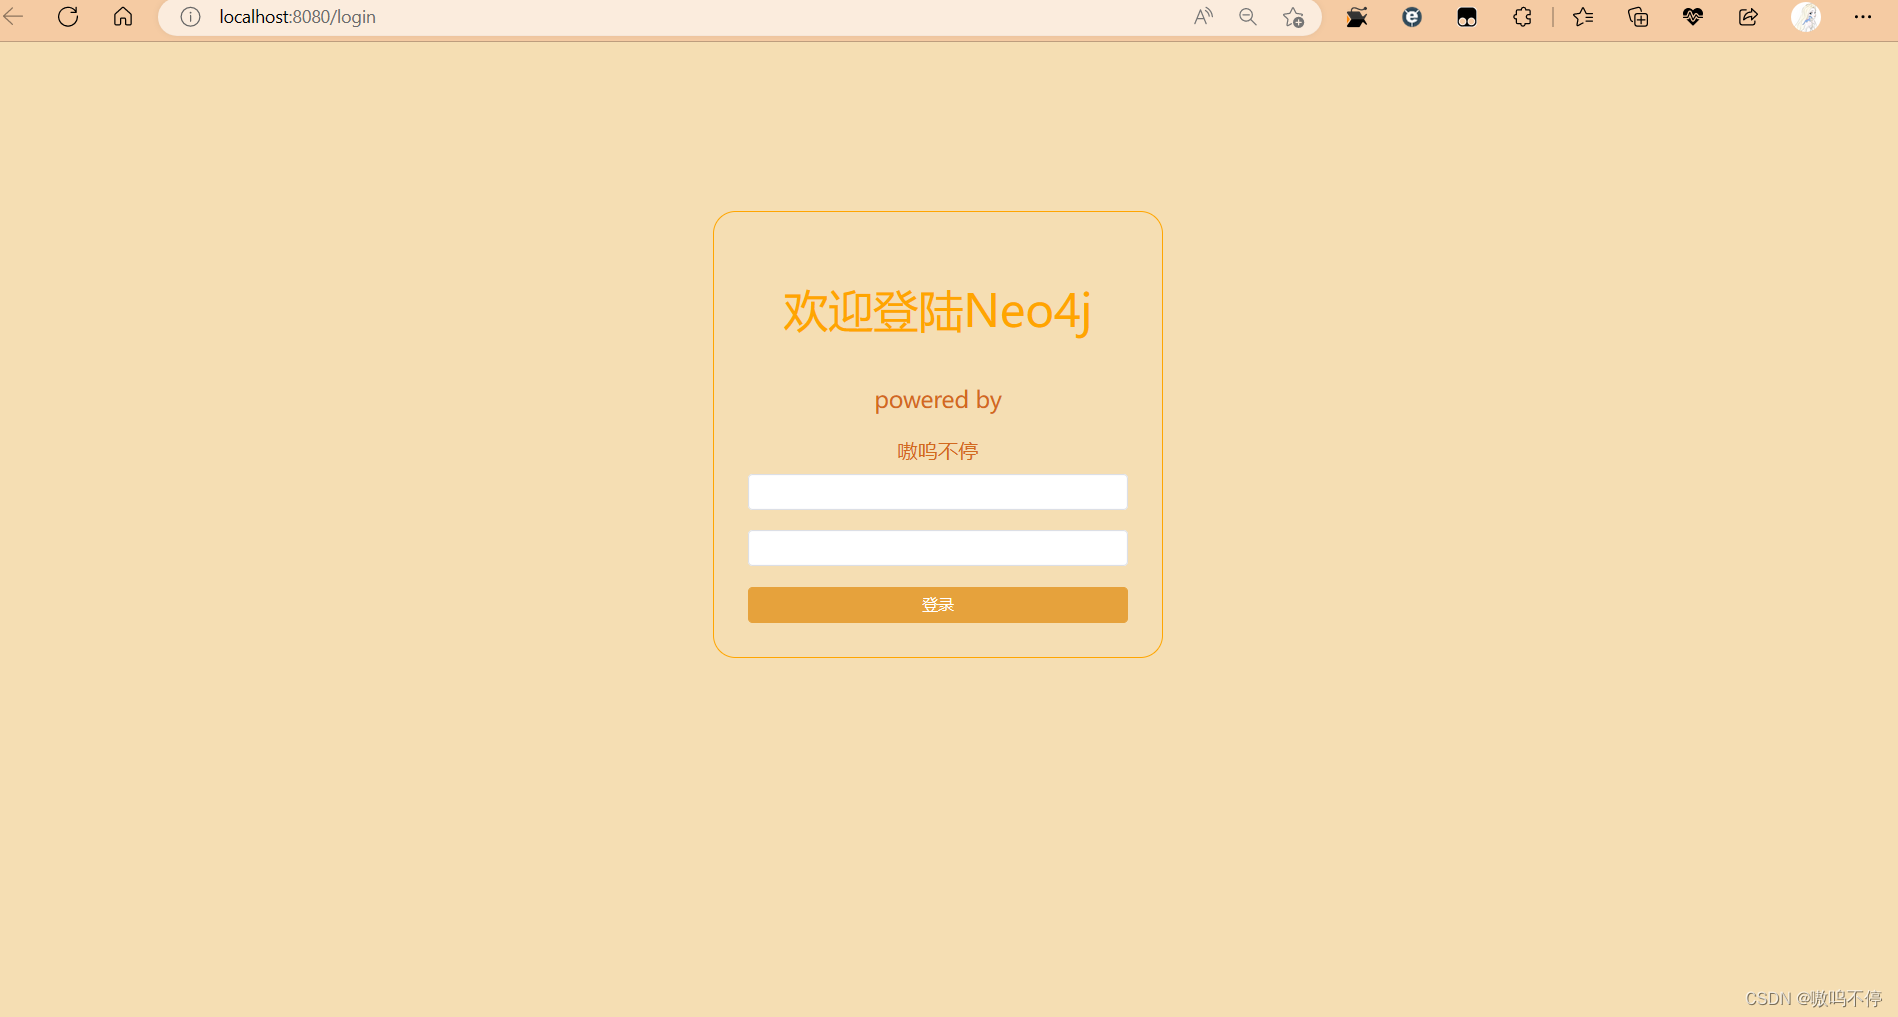
为了让项目更加完整,我做了登陆界面:
登录:
<template>
    <div style="width: 100%; height: 100vh  ; background-color: wheat; overflow: hidden" >
     <div style="width: 400px; margin:150px auto ; border: orange solid 1px; padding: 30px; border-radius:20px">
       <div style="color: orange;font-size: 40px;text-align: center; padding: 30px 0" >欢迎登陆Neo4j</div>
       <div style="color: chocolate;font-size:20px; text-align: center; padding: 10px 0">powered by</div>
       <div style="color:chocolate;font-size:18px; text-align: center; padding: 10px 0">
       嗷呜不停 </div>
       <el-form>
         <el-form-item >
           <el-input v-model="username" />
         </el-form-item>
         <el-form-item >
           <el-input v-model="password" show-password/>
         </el-form-item>
          <el-button style="width: 100%" type="warning" @click="connect()">登录</el-button>

       </el-form>
     </div>
    </div>
</template>

<script>

export default {
  name: 'Login',
  data() {
    return{
      protocol: 'bolt',
      host: 'localhost',
      port: 7687,
      password:'',
      username:'',
    }
  },
  methods:{
    connect() {
      return this.$neo4j.connect(this.protocol, this.host, this.port, this.username, this.password)
          .then(driver => {
            this.testQuery();
          }).catch((error)=>{
            console.log('error: ' + error)
          })
    },
    testQuery() {
      // Get a session from the driver
      const session = this.$neo4j.getSession()
      const that=this;
        session.run('MATCH (n) RETURN n LIMIT 100')
            .then(res => {
              console.log('connection successful!')
              console.log(res)
              this.$message({
                type: 'success',
                message: '登陆成功'
              })
              sessionStorage.setItem("username",this.username);
              sessionStorage.setItem("password",this.password);
              that.$router.push("/home")
            }).catch(err => {
          console.log("catch: ", err);
          alert('连接失败,检查用户名和密码!')
        })
            .then(() => {
              session.close()
            })


    },
    checkData(){
      console.log('userName:'+this.username+'\n password'+this.password)
    }
  },
  components: {

  }
}
// const session = this.$neo4j.getSession()


// Or you can just call this.$neo4j.run(cypher, params)
// session.run('MATCH (n) RETURN n LIMIT 10000')
//     .then(res => {
//       console.log(res)//,res.records[0].get('count')
//     })
//     .then(() => {
//       session.close()
//     })
</script>
接下来给大家讲解一下怎样利用vue-neo4j来实现增删改查
查询数据:
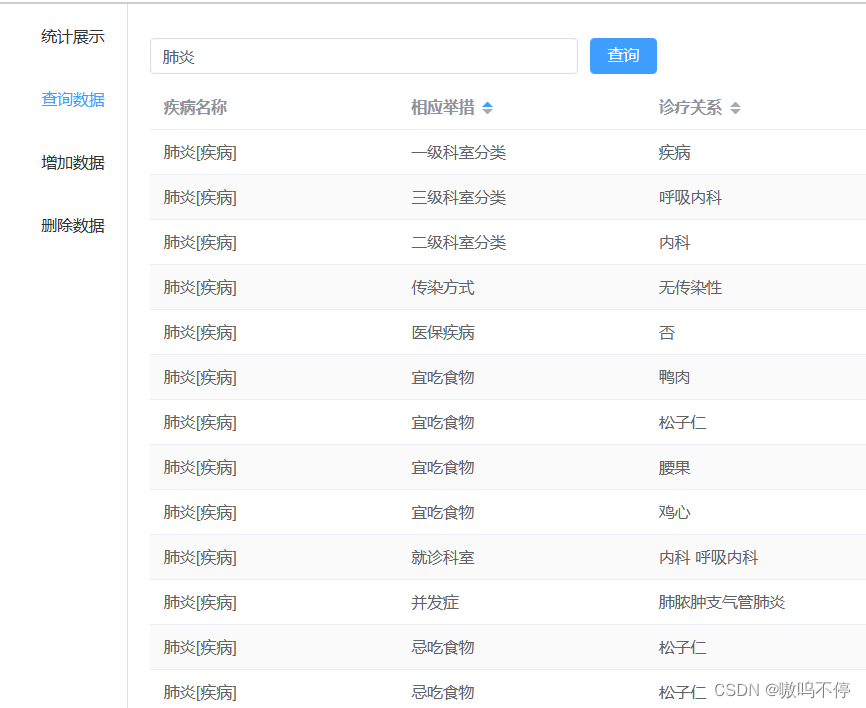
这里利用了element-plus组件,代码如下:
<template>
<!--<div>-->
<!--  <h2>查询</h2>-->
<!--  <br>-->
<!--</div>-->

  <div style="padding: 20px">
    <div style="margin: 10px 0">
      <el-input v-model="search" placeholder="输入关键字 " style="width: 25%"></el-input>
      <el-button type="primary" style="margin-left: 10px" @click="Query()">查询</el-button>
    </div>
    <el-table :data="listData" stripe style="width: 100%">
      <el-table-column prop="jbmc" label="疾病名称" width="220" />
      <el-table-column prop="gx" label="相应举措" sortable width="220" />
      <el-table-column prop="ywmc" label="诊疗关系"  sortable width="620" />

    </el-table>
  </div>
</template>

<script>

export default {
  name: "QueryView",
  data(){
    return{
      search:'',
      listData:[],
      list:[],

      tableData : [
        {
          jbmc: '2016-05-03',
          ywmc: 'Tom',
          gx: 'No. 189, Grove St, Los Angeles',
        },
        {
          jbmc: '2016-05-02',
          ywmc: 'Tom',
          gx: 'No. 189, Grove St, Los Angeles',
        },

      ]
    }
  },
  methods:{
    connect() {
      return this.$neo4j.connect('bolt', 'localhost', 7687, sessionStorage.getItem('username'), sessionStorage.getItem('password'))
          .then(driver => {
            // this.testQuery();
          }).catch((error)=>{
            console.log('error: ' + error)
          })
    },
    Query(){
      let dateBegin = new Date();
      this.connect()
      const session = this.$neo4j.getSession();//'${this.formInline.startNode}'
      let cypher = `match p=(n:yaowu)-[]->(m:jibing{jbmc:'${this.search}[疾病]'}) return p limit 100`;
      session.run(cypher).then(res => {
        const length = res.records.length;
        console.log(res);
//比如想把另外一个数组中编列出来的值加入到这个数组中
        for (let index = 0; index < length; index++) {
          this.listData.push({ jbmc: "", ywmc:"",gx: ""});
          this.listData[index].jbmc= res.records[index]._fields[0].end.properties.jbmc;
          this.listData[index].gx= res.records[index]._fields[0].segments[0].relationship.properties.gx;
          this.listData[index].ywmc= res.records[index]._fields[0].start.properties.ymmc;
        }
        let dateEnd = new Date();
        let dateDiff = dateEnd.getTime() - dateBegin.getTime();
        console.log('花费时间:'+dateDiff)
        console.log(this.listData)
        this.$message({
          type: 'success',
          message: '查询花费'+dateDiff+'ms'
        })
      })
    }

  },

}

</script>

<style scoped>

</style>
在 <template> 标签中,定义了一个带有输入框和按钮的表单,输入框用于输入查询关键字,按钮用于点击后执行查询。
在 data 选项中,定义了search、listData、list、tableData等变量。
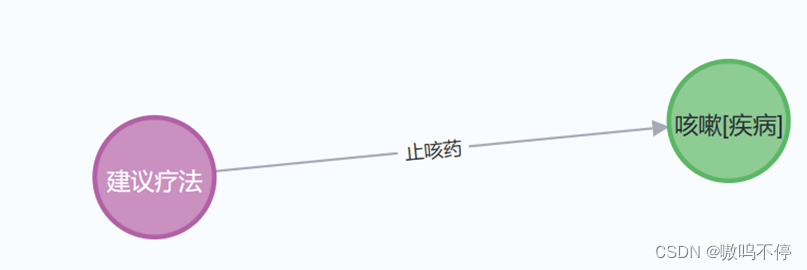
在 methods 选项中,定义了 connect() 和 Query() 两个函数。connect() 函数会使用 this.$neo4j.connect() 函数来连接 Neo4j 数据库,并使用sessionStorage.getItem('username')和sessionStorage.getItem('password')获取用户名和密码登录。Query()函数会先连接Neo4j数据库,然后使用 this.$neo4j.getSession() 函数来获取一个 Neo4j 会话,然后使用 Cypher 查询语句来查询数据,并将查询结果存储到 listData 中,Cypher语句包含了一个参数 this.search,它是在用户在输入框中输入的查询关键字。
在查询的过程中,使用了 for 循环来遍历查询结果,并将结果存储到 listData 中。
最后,使用 this.$message 函数来显示查询成功的消息,并在控制台中输出查询花费的时间。
在 <el-table> 中,定义了一个表格,用来显示查询结果。
总的来说,这段代码实现了一个能够查询 Neo4j 数据库并显示结果的组件。
<template>
<!--<div>-->
<!--  <h1>增加数据</h1>-->
<!--</div>-->
<div style="padding: 30px">
  <el-form
            label-width="100px"

            style="max-width: 460px;padding: 20px">
    <el-form-item label="疾病名称">
      <el-input v-model="diseaseName" placeholder="disease name" />
    </el-form-item>
    <el-form-item label="相应举措">
      <el-input v-model="needToDo" placeholder="Corresponding measures" />
    </el-form-item>
    <el-form-item label="诊疗关系">
      <el-input v-model="howToDealWith" placeholder="Diagnostic and therapeutic relationships"/>
    </el-form-item>
<!--    <el-form-item label="Activity form">-->
<!--      <el-input v-model="name" />-->
<!--    </el-form-item>-->
    <el-form-item>
      <el-button type="primary" @click="OnSubmit()" style="width: 100%">增加数据</el-button>
    </el-form-item>
  </el-form>
</div>


</template>

<script>
export default {
  name: "changeDataView",

  data(){
    return{
      listData:[],
      diseaseName:'',
      needToDo:'',
      howToDealWith:'',
    }

  },
  methods: {
    connect() {
      return this.$neo4j.connect('bolt', 'localhost', 7687, sessionStorage.getItem('username'), sessionStorage.getItem('password'))
          .then(driver => {
            // this.testQuery();
          }).catch((error)=>{
            console.log('error: ' + error)
          })
    },
    OnSubmit(){
      let dateBegin = new Date();
      this.connect();
      const session = this.$neo4j.getSession();//'${this.formInline.startNode}'
      //match p=(n:yaowu)-[]->(m:jibing{jbmc:'${this.search}[疾病]'}) return p limit 100
      let cypher = `create(yaowu1:yaowu{ymmc:'${this.howToDealWith}'})-[gx1:rel{gx:'${this.needToDo}'}]->(jibing1:jibing{jbmc:'${this.diseaseName}[疾病]'})
return gx1`;
      session.run(cypher).then(res => {
          console.log(res)
        let dateEnd = new Date();
        let dateDiff = dateEnd.getTime() - dateBegin.getTime();
        console.log('花费时间:'+dateDiff)
        console.log(this.listData)
        this.$message({
          type: 'success',
          message: '增加数据花费'+dateDiff+'ms'
        })
      })
    }
  }

}
</script>

<style scoped>

</style>
本段代码使用了 vue-neo4j 这个库来连接并操作 Neo4j 图数据库。
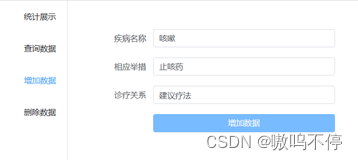
组件中定义了一些 data,例如:diseaseName、needToDo、howToDealWith,这些数据是用来存储页面上用户输入的疾病名称,应该采取的举措和该如何处理。
在 methods 中定义了一个 connect() 方法和 OnSubmit() 方法。 connect() 方法用来连接 Neo4j 数据库,OnSubmit() 方法用来在数据库中创建一条关于疾病的数据,并在操作完成后给出提示。
OnSubmit() 方法中使用了 cypher 查询语句来创建节点和关系,并返回新建关系。
最后,在代码的最后,使用了 $message 组件来提示用户操作成功,并显示花费时间。
上述代码实现了增加数据的功能
删除数据:

<script>
export default {
  name: "DeleteDataView",
  data(){
    return{
      listData:[],
      deleteDataOfItem:''
    }
  },
  methods:{
    connect() {
      return this.$neo4j.connect('bolt', 'localhost', 7687, sessionStorage.getItem('username'), sessionStorage.getItem('password'))
          .then(driver => {
            // this.testQuery();
          }).catch((error)=>{
            console.log('error: ' + error)
          })
    },
    QueryData(){
      let dateBegin = new Date();
      this.connect()
      const session = this.$neo4j.getSession();//'${this.formInline.startNode}'
      let cypher = `match p=(n:yaowu)-[]->(m:jibing{jbmc:'${this.deleteDataOfItem}[疾病]'}) return p `;
      session.run(cypher).then(res => {
        const length = res.records.length;
        console.log(length)
        if (length!==0){
          this.listData.push({ jbmc: "", jbsm:"",gx: ""});
          this.listData[0].jbmc=this.deleteDataOfItem;
          this.listData[0].jbsm=length;
        }

      }
      )
    },

    onDelete() {
      this.connect();
      this.listData[0].jbsm=0;
      const session = this.$neo4j.getSession();
      let cypher = `match(n:jibing{jbmc:'${this.deleteDataOfItem}[疾病]'}) DETACH DELETE (n) `;
      session.run(cypher);
      alert("删除成功!")
      // cypher = `MATCH (n:Person) delete n`;
      // session.run(cypher).then(() => {
      //   session.close()
      // });
      //this.QueryData();
    },
  }
}

</script>

<style scoped>

</style>
本段代码实现了一个名为"DeleteDataView"的页面。它包含了三个函数,分别是connect,QueryData和onDelete。
connect函数是用来连接Neo4j数据库的,它首先使用$neo4j.connect()方法连接数据库,连接参数分别是协议、主机、端口、用户名和密码。如果连接成功,则会返回一个驱动器。如果连接失败,则会抛出一个错误。
QueryData函数是用来查询数据的。首先,它调用connect函数连接数据库,然后使用$neo4j.getSession()方法获取一个会话。它使用cypher语句来查询数据,并将查询结果保存在listData数组中。
onDelete函数是用来删除数据的。它首先使用connect函数连接数据库,然后使用$neo4j.getSession()方法获取一个会话。然后使用cypher语句来删除数据,最后提示删除成功。
后续:
以上就是利用vue-neo4j来直接连接neo4j数据库的参考方案,希望对大家有帮助,但是我必须要提醒大家:没有后端进行校验就运行前端直接连接数据库是十分危险的!!!


 6664
6664


 被折叠的 条评论
为什么被折叠?
被折叠的 条评论
为什么被折叠?
 到【灌水乐园】发言


