


Mybatis
Mybatis中文文档[mybatis中文文档 - MyBatis中文官网]
狂神随堂笔记[(98条消息) 狂神说mybatis笔记_大写的zgc的博客-CSDN博客_狂神说mybatis笔记]
环境配置
java: jdk1.8
MySQL: 5.7
Maven: 3.8.4
MyBatis :3.5.6
第一个Mybatis项目
项目中要用到很多来自Maven仓库的jar包,所以要创建Maven项目
创建思路:搭建环境–>导入Mybatis–>编写代码–>测试
1.搭建环境
- 创建测试专用数据库
- 新建Maven项目
-
新建项目后删除src目录
-
导入项目所需依赖
 <dependencies>
     <!--mysql驱动-->
     <dependency>
         <groupId>mysql</groupId>
         <artifactId>mysql-connector-java</artifactId>
         <version>5.1.47</version>
     </dependency>
     <!--mybatis-->
     <!-- https://mvnrepository.com/artifact/org.mybatis/mybatis -->
     <dependency>
         <groupId>org.mybatis</groupId>
         <artifactId>mybatis</artifactId>
         <version>3.5.6</version>
     </dependency>
     <!--junit-->
     <dependency>
         <groupId>junit</groupId>
         <artifactId>junit</artifactId>
         <version>4.12</version>
     </dependency>
 </dependencies>
//用来过滤文件的build标签1
  <build>
        <resources>
            <resource>
                <directory>src/main/resources</directory>
                <includes>
                    <include>**/*.properties</include>
                    <include>**/*.xml</include>
                </includes>
                <filtering>true</filtering>
            </resource>

            <resource>
                <directory>src/main/java</directory>
                <includes>
                    <include>**/*.properties</include>
                    <include>**/*.xml</include>
                </includes>
                <filtering>true</filtering>
            </resource>
        </resources>
    </build>
- 创建一个Maven模块
1.编写mybatis的核心配置文件(mybatis-config.xml)
放在resource目录下,一般xml文件都放在该文件夹下方便运行时能够被找到
也可以在pom.xml里加入标签
<?xml version="1.0" encoding="UTF-8" ?>
<!DOCTYPE configuration
PUBLIC "-//mybatis.org//DTD Config 3.0//EN"
"http://mybatis.org/dtd/mybatis-3-config.dtd">
<!--configuration核心配置文件-->
<configuration><environments default="development">
<environment id="development">
<transactionManager type="JDBC"/>
<dataSource type="POOLED">
<property name="driver" value="com.mysql.jdbc.Driver"/>//sql驱动
<property name="url" value="jdbc:mysql://localhost:3306/mybatis?useSSL=true&useUnicode=true&characterEncoding=UTF-8"/>
<property name="username" value="root"/>
<property name="password" value="123456"/>
</dataSource>
</environment>
</environments>
</configuration>
2.编写mybatis工具类
//sqlSessionFactory --> sqlSession
public class MybatisUtils {
private static SqlSessionFactory sqlSessionFactory;

static{
    try {
        //使用Mybatis第一步:获取sqlSessionFactory对象
        String resource = "mybatis-config.xml";
        InputStream inputStream = Resources.getResourceAsStream(resource);
        sqlSessionFactory = new SqlSessionFactoryBuilder().build(inputStream);
    } catch (IOException e) {
        e.printStackTrace();
    }

}

//既然有了 SqlSessionFactory,顾名思义,我们就可以从中获得 SqlSession 的实例了。
// SqlSession 完全包含了面向数据库执行 SQL 命令所需的所有方法。
public static SqlSession  getSqlSession(){
    return sqlSessionFactory.openSession();
}
}
2.在模块内写实体类
实体类内的属性名要与数据库表内的属性命名完全一致
package com.kuang.pojo;

//实体类
public class User {
    private int id;
    private String name;
    private String pwd;
public User() {
}

public User(int id, String name, String pwd) {
    this.id = id;
    this.name = name;
    this.pwd = pwd;
}

public int getId() {
    return id;
}

public void setId(int id) {
    this.id = id;
}

public String getName() {
    return name;
}

public void setName(String name) {
    this.name = name;
}

public String getPwd() {
    return pwd;
}

public void setPwd(String pwd) {
    this.pwd = pwd;
}

@Override
public String toString() {
    return "User{" +
            "id=" + id +
            ", name='" + name + '\'' +
            ", pwd='" + pwd + '\'' +
            '}';
}
}
3.Mapper接口
<?xml version="1.0" encoding="UTF-8" ?>
<!DOCTYPE mapper
        PUBLIC "-//mybatis.org//DTD Mapper 3.0//EN"
        "http://mybatis.org/dtd/mybatis-3-mapper.dtd">

<mapper namespace="com.Study.Dao.UserMapper">
    <select id="getUserList" resultType="com.Study.pojo.User">
        select * from mybatis.user
    </select>
    <select id="getUserById" resultType="com.Study.pojo.User">
        select * from mybatis.user where id=#{id};
    </select>
    <insert id="InsertUser" parameterType="com.Study.pojo.User">
        insert into mybatis.user(id,name,pwd) values(#{id},#{name},#{pwd})
    </insert>
    <update id="UpdateUser" parameterType="com.Study.pojo.User">
        update mybatis.user set name=#{name},pwd=#{pwd} where id=#{id};
    </update>
    <delete id="DeleteUser" parameterType="com.Study.pojo.User">
        delete from mybatis.User where id=#{id}
    </delete>
    <insert id="addUser" parameterType="map">
        insert into mybatis.user(id,name,pwd) values(#{userid},#{username},#{userpwd})
    </insert>
    <select id="getUserLike" resultType="com.Study.pojo.User" parameterType="String">
        select * from mybatis.user where name like #{value}
    </select>
</mapper>
不同标签内只能进行不同的操作,各行其是,不能乱
id:mapper接口内要调用的方法名
namespace:接口文件所在路径
resultType:返回值类型
parameterType:参数值类型
value值指定形式:#{value}
通配符Like:在确定参数时加%,如:%value%
所有要填写内容的名字必须保持完全一致,否则就会出错
4.测试类
@Test
public void UpdateTest(){
    SqlSession sqlSession=MybatisUtils.getSqlSession();//获取工具类内写好的sqlSession
    UserMapper userMapper=sqlSession.getMapper(UserMapper.class);//获取mapper接口
   int res= userMapper.UpdateUser(new User(1,"霉霉","123456"));//调用mapper内的函数
   if(res>0){
       System.out.println("更新成功");//判断是否成功执行命令
   }
    sqlSession.commit();//提交更新数据
    sqlSession.close();//释放资源
}
测试类使用Junit内的注解@Test,在main同级目录的test中构建与main相同的目录结构进行测试(方便对应查找)
[外链图片转存失败,源站可能有防盗链机制,建议将图片保存下来直接上传(img-baD92lPi-1679993381544)(C:\Users\呆预言家\AppData\Roaming\Typora\typora-user-images\image-20220421233420388.png)]
对于需要对数据库内数据进行修改的,要加sqlSession.commit()提交信息,才能完成数据更新
Map键值对赋值
Map实现插入指定字段:在mapper.xml文件中将参数类型改为map类型,把已经插入数据的map作为参数传给实现函数。
@Test
public void MapTest() {
    SqlSession sqlSession=MybatisUtils.getSqlSession();
    UserMapper userMapper=sqlSession.getMapper(UserMapper.class);
    Map<String,Object>map =new HashMap<String,Object>();
    map.put("username","张二");
    map.put("userpwd","123456");
    userMapper.addUser(map);

    sqlSession.commit();
    sqlSession.close();
}
<insert id="addUser" parameterType="map">
    insert into mybatis.user(name,pwd) values(#{username},#{userpwd})
</insert>
引用别名
类型别名可为 Java 类型设置一个缩写名字,仅用于 XML 配置,降低冗余的全限定类名书写
但别名表签必须放在mybatis-config.xml文件的指定顺序位置
[外链图片转存失败,源站可能有防盗链机制,建议将图片保存下来直接上传(img-8nYOUkHq-1679993381545)(C:/Users/呆预言家/AppData/Roaming/Typora/typora-user-images/image-20220422162518911.png)]
使用语法(两个不能同时使用,一般使用第一种)
//对指定实体类修改报名
<typeAliases>
    <typeAlias type="com.Study.pojo.User" alias="User"/>
</typeAliases>
//对实体类所在包创建别名标签,实现引用包内所有实体类
 <typeAliases>
         <package name="com.Study.pojo"/>
 </typeAliases>
在实体类内通过注解@Alias添加别名
[外链图片转存失败,源站可能有防盗链机制,建议将图片保存下来直接上传(img-cPk642sg-1679993381546)(C:/Users/呆预言家/AppData/Roaming/Typora/typora-user-images/image-20220422172251469.png)]
ResultMap结果集
如果实体类内属性名与数据库内列字段名不一致,可以使用resultMap使其一一对应
[外链图片转存失败,源站可能有防盗链机制,建议将图片保存下来直接上传(img-QHlTk8za-1679993381546)(C:/Users/呆预言家/AppData/Roaming/Typora/typora-user-images/image-20220424144309058.png)]
[外链图片转存失败,源站可能有防盗链机制,建议将图片保存下来直接上传(img-l8QYY8Nr-1679993381547)(C:/Users/呆预言家/AppData/Roaming/Typora/typora-user-images/image-20220424144344962.png)]
log4j日志
配置文件
log4j.rootLogger=DEBUG, console,file //日志输出位置
log4j.additivity.org.apache=true
# 控制台(console)
log4j.appender.console=org.apache.log4j.ConsoleAppender
log4j.appender.console.Threshold=DEBUG
log4j.appender.console.ImmediateFlush=true
log4j.appender.console.Target=System.err
log4j.appender.console.layout=org.apache.log4j.PatternLayout
log4j.appender.console.layout.ConversionPattern=[%-5p] %d(%r) --> [%t] %l: %m %x %n

# 日志文件(logFile)
log4j.appender.logFile=org.apache.log4j.RollingCalendar
log4j.appender.logFile.Threshold=DEBUG
log4j.appender.logFile.ImmediateFlush=true
log4j.appender.logFile.Append=true
log4j.appender.logFile.File=./com/Study/log/TestLog.log    //输出到当前文件内
log4j.appender.logFile.layout=org.apache.log4j.PatternLayout
log4j.appender.logFile.layout.ConversionPattern=[%-5p] %d(%r) --> [%t] %l: %m %x %n

#日志输出级别
log4j.logger.org.mybatis=DEBUG
log4j.logger.java.sql=DEBUG
log4j.logger.java.sql.Statement=DEBUG
log4j.logger.java.sql.ResultSet=DEBUG
log4j.logger.java.sql.PreparedStatement=DEBUG
## 回滚文件(rollingFile)
#log4j.appender.rollingFile=org.apache.log4j.RollingFileAppender
#log4j.appender.rollingFile.Threshold=DEBUG
#log4j.appender.rollingFile.ImmediateFlush=true
#log4j.appender.rollingFile.Append=true
#log4j.appender.rollingFile.File=D:/logs/log.log4j
#log4j.appender.rollingFile.MaxFileSize=200KB
#log4j.appender.rollingFile.MaxBackupIndex=50
#log4j.appender.rollingFile.layout=org.apache.log4j.PatternLayout
#log4j.appender.rollingFile.layout.ConversionPattern=[%-5p] %d(%r) --> [%t] %l: %m %x %n
## 定期回滚日志文件(dailyFile)
#log4j.appender.dailyFile=org.apache.log4j.DailyRollingFileAppender
#log4j.appender.dailyFile.Threshold=DEBUG
#log4j.appender.dailyFile.ImmediateFlush=true
#log4j.appender.dailyFile.Append=true
#log4j.appender.dailyFile.File=D:/logs/log.log4j
#log4j.appender.dailyFile.DatePattern='.'yyyy-MM-dd
#log4j.appender.dailyFile.layout=org.apache.log4j.PatternLayout
#log4j.appender.dailyFile.layout.ConversionPattern=[%-5p] %d(%r) --> [%t] %l: %m %x %n
## 应用于Socket
#log4j.appender.socket=org.apache.log4j.RollingFileAppender
#log4j.appender.socket.RemoteHost=localhost
#log4j.appender.socket.Port=5001
#log4j.appender.socket.LocationInfo=true
## Set up for Log Factor 5
#log4j.appender.socket.layout=org.apache.log4j.PatternLayout
#log4j.appender.socket.layout.ConversionPattern=[%-5p] %d(%r) --> [%t] %l: %m %x %n
## Log Factor 5 Appender
#log4j.appender.LF5_APPENDER=org.apache.log4j.lf5.LF5Appender
#log4j.appender.LF5_APPENDER.MaxNumberOfRecords=2000
## 发送日志到指定邮件
#log4j.appender.mail=org.apache.log4j.net.SMTPAppender
#log4j.appender.mail.Threshold=FATAL
#log4j.appender.mail.BufferSize=10
#log4j.appender.mail.From = xxx@mail.com
#log4j.appender.mail.SMTPHost=mail.com
#log4j.appender.mail.Subject=Log4J Message
#log4j.appender.mail.To= xxx@mail.com
#log4j.appender.mail.layout=org.apache.log4j.PatternLayout
#log4j.appender.mail.layout.ConversionPattern=[%-5p] %d(%r) --> [%t] %l: %m %x %n
## 应用于数据库
#log4j.appender.database=org.apache.log4j.jdbc.JDBCAppender
#log4j.appender.database.URL=jdbc:mysql://localhost:3306/test
#log4j.appender.database.driver=com.mysql.jdbc.Driver
#log4j.appender.database.user=root
#log4j.appender.database.password=123456
#log4j.appender.database.sql=INSERT INTO LOG4J (Message) VALUES('=[%-5p] %d(%r) --> [%t] %l: %m %x %n')
#log4j.appender.database.layout=org.apache.log4j.PatternLayout
#log4j.appender.database.layout.ConversionPattern=[%-5p] %d(%r) --> [%t] %l: %m %x %n

## 自定义Appender
#log4j.appender.im = net.cybercorlin.util.logger.appender.IMAppender
#log4j.appender.im.host = mail.cybercorlin.net
#log4j.appender.im.username = username
#log4j.appender.im.password = password
#log4j.appender.im.recipient = corlin@cybercorlin.net
#log4j.appender.im.layout=org.apache.log4j.PatternLayout
#log4j.appender.im.layout.ConversionPattern=[%-5p] %d(%r) --> [%t] %l: %m %x %n
日志输出级别:DEBUG < INFO < WARN < ERROR < FATAL
Log4j有一个规则:只输出级别不低于设定级别的日志信息,假设Loggers级别设定为INFO,则INFO、WARN、ERROR和FATAL级别的日志信息都会输出,而级别比INFO低的DEBUG则不会输出。
setting设置日志实现
<settings>
   <setting name="logImpl" value="LOG4J"/>
</settings>
pom内导包
<dependency>
   <groupId>log4j</groupId>
   <artifactId>log4j</artifactId>
   <version>1.2.17</version>
</dependency>
Limit分页
语法
SELECT * FROM table LIMIT stratIndex,pageSize
SELECT * FROM table LIMIT 5,10; // 检索记录行 6-15
#为了检索从某一个偏移量到记录集的结束所有的记录行,可以指定第二个参数为 -1:
SELECT * FROM table LIMIT 95,-1; // 检索记录行 96-last.
#如果只给定一个参数,它表示返回最大的记录行数目:
SELECT * FROM table LIMIT 5; //检索前 5 个记录行
#换句话说,LIMIT n 等价于 LIMIT 0,n。
注解CRUD
使用注解主要是编写sql一些简单的crud代码,不再写Mapper,.xml文件用以简化,对于复杂的SQL还是使用xml文件实现
1.使用注解在Mapper接口中直接编写SQL语句
@Select("select id,name,pwd password from user")
public List<User> getAllUser();
2.在mybatis-config.xml文件对Mapper修改
<mappers>
   <mapper class="com.Study.mapper.UserMapper"/>
</mappers>
3.@Test测试代码没有变化
@Test
public void testGetAllUser() {
   SqlSession session = MybatisUtils.getSession();
   //本质上利用了jvm的动态代理机制
   UserMapper mapper = session.getMapper(UserMapper.class);

   List<User> users = mapper.getAllUser();
   for (User user : users){
       System.out.println(user);
  }

   session.close();
}
@Param注解用于给方法参数起一个名字。以下是总结的使用原则:
- 在方法只接受一个参数的情况下,可以不使用@Param。
- 在方法接受多个参数的情况下,建议一定要使用@Param注解给参数命名。
- 如果参数是 JavaBean , 则不能使用@Param。
- 不使用@Param注解时,参数只能有一个,并且是Javabean。
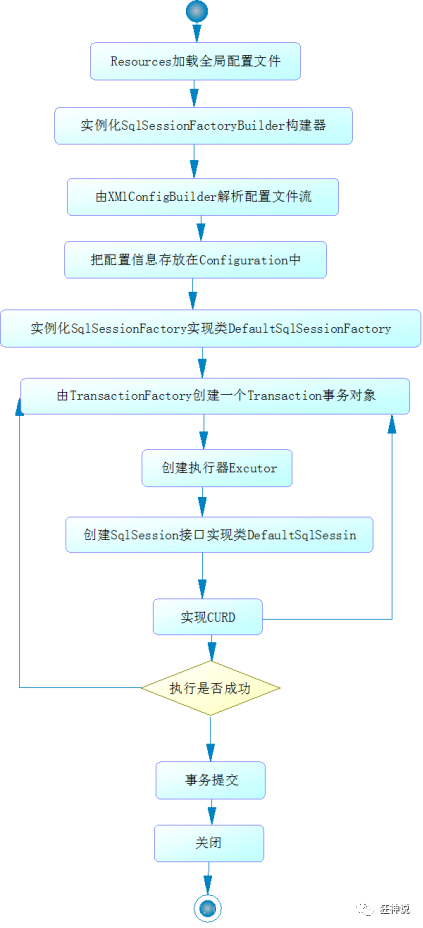
Mybatis详细的执行流程
一对多与多对一
多个学生对应一个老师
按照查询进行嵌套处理就像SQL中的子查询
按照结果进行嵌套处理就像SQL中的联表查询
<?xml version="1.0" encoding="UTF-8" ?>
<!DOCTYPE mapper
       PUBLIC "-//mybatis.org//DTD Mapper 3.0//EN"
       "http://mybatis.org/dtd/mybatis-3-mapper.dtd">
<mapper namespace="com.kuang.mapper.StudentMapper">

   <!--
   需求:获取所有学生及对应老师的信息
   思路:
       1. 获取所有学生的信息
       2. 根据获取的学生信息的老师ID->获取该老师的信息
       3. 思考问题,这样学生的结果集中应该包含老师,该如何处理呢,数据库中我们一般使用关联查询?
           1. 做一个结果集映射:StudentTeacher
           2. StudentTeacher结果集的类型为 Student
           3. 学生中老师的属性为teacher,对应数据库中为tid。
              多个 [1,...)学生关联一个老师=> 一对一,一对多
           4. 查看官网找到:association – 一个复杂类型的关联;使用它来处理关联查询
   -->
   <select id="getStudents" resultMap="StudentTeacher">
    select * from student
   </select>
   <resultMap id="StudentTeacher" type="Student">
       <!--association关联属性 property属性名 javaType属性类型 column在多的一方的表中的列名-->
       <association property="teacher"  column="tid" javaType="Teacher" select="getTeacher"/>
   </resultMap>
   <!--
   这里传递过来的id,只有一个属性的时候,下面可以写任何值
   association中column多参数配置:
       column="{key=value,key=value}"
       其实就是键值对的形式,key是传给下个sql的取值名称,value是片段一中sql查询的字段名。
   -->
   <select id="getTeacher" resultType="teacher">
      select * from teacher where id = #{id}
   </select>

</mapper>
<!--
按查询结果嵌套处理
思路:
   1. 直接查询出结果,进行结果集的映射
-->
<select id="getStudents2" resultMap="StudentTeacher2" >
  select s.id sid, s.name sname , t.name tname
  from student s,teacher t
  where s.tid = t.id
</select>

<resultMap id="StudentTeacher2" type="Student">
   <id property="id" column="sid"/>
   <result property="name" column="sname"/>
   <!--关联对象property 关联对象在Student实体类中的属性-->
   <association property="teacher" javaType="Teacher">
       <result property="name" column="tname"/>
   </association>
</resultMap>
一个老师对应多个学生
按结果查询
<mapper namespace="com.kuang.mapper.TeacherMapper">

   <!--
   思路:
       1. 从学生表和老师表中查出学生id,学生姓名,老师姓名
       2. 对查询出来的操作做结果集映射
           1. 集合的话,使用collection!
               JavaType和ofType都是用来指定对象类型的
               JavaType是用来指定pojo中属性的类型
               ofType指定的是映射到list集合属性中pojo的类型。
   -->
   <select id="getTeacher" resultMap="TeacherStudent">
      select s.id sid, s.name sname , t.name tname, t.id tid
      from student s,teacher t
      where s.tid = t.id and t.id=#{id}
   </select>

   <resultMap id="TeacherStudent" type="Teacher">
       <result  property="name" column="tname"/>
       <collection property="students" ofType="Student">
           <result property="id" column="sid" />
           <result property="name" column="sname" />
           <result property="tid" column="tid" />
       </collection>
   </resultMap>
</mapper>
按子嵌套查询
<select id="getTeacher2" resultMap="TeacherStudent2">
select * from teacher where id = #{id}
</select>
<resultMap id="TeacherStudent2" type="Teacher">
   <!--column是一对多的外键 , 写的是一的主键的列名-->
   <collection property="students" javaType="ArrayList" ofType="Student" column="id" select="getStudentByTeacherId"/>
</resultMap>
<select id="getStudentByTeacherId" resultType="Student">
  select * from student where tid = #{id}
</select>
- 关联-association
- 集合-collection
- 所以association是用于一对一和多对一,而collection是用于一对多的关系
- JavaType和ofType都是用来指定对象类型的
- JavaType是用来指定pojo中属性的类型
- ofType指定的是映射到list集合属性中pojo的类型。
动态SQL
动态SQL指的是根据不同的查询条件 , 生成不同的Sql语句,减少SQL语句拼接
mybatis核心配置文件,下划线驼峰自动转换
<settings>
   <setting name="mapUnderscoreToCamelCase" value="true"/>
   <setting name="logImpl" value="STDOUT_LOGGING"/>
</settings>
IF
(如果属性存在就执行,否则就不执行)
<select id="queryBlogIf" parameterType="map" resultType="blog">
  select * from blog where
   <if test="title != null">
      title = #{title}
   </if>
   <if test="author != null">
      and author = #{author}
   </if>
</select>
Where
(上述如果只有author,and开头,SQL语句语法错误,where标签中有哪个执行那个,开头会自动去除and)
<select id="queryBlogIf" parameterType="map" resultType="blog">
  select * from blog
   <where>
       <if test="title != null">
          title = #{title}
       </if>
       <if test="author != null">
          and author = #{author}
       </if>
   </where>
</select>
Choose
(任意一个满足条件就执行,执行后就停止,类似swicth语句)
<select id="queryBlogChoose" parameterType="map" resultType="blog">
  select * from blog
   <where>
       <choose>
           <when test="title != null">
                title = #{title}
           </when>
           <when test="author != null">
              and author = #{author}
           </when>
           <otherwise>
              and views = #{views}
           </otherwise>
       </choose>
   </where>
</select>
Foreach
<select id="queryBlogForeach" parameterType="map" resultType="blog">
  select * from blog
   <where>
       <!--
       collection:指定输入对象中的集合属性
       item:每次遍历生成的对象
       open:开始遍历时的拼接字符串
       close:结束时拼接的字符串
       separator:遍历对象之间需要拼接的字符串
       select * from blog where 1=1 and (id=1 or id=2 or id=3)
     -->
       <foreach collection="ids"  item="id" open="and (" close=")" separator="or">
          id=#{id}
       </foreach>
   </where>
</select>
SQL片段
对于一个指定表(防止字段名重复)常用的SQL语句,可以引用SQL片段简写代码
提取SQL
<sql id="if-title-author">
   <if test="title != null">
      title = #{title}
   </if>
   <if test="author != null">
      and author = #{author}
   </if>
</sql>
引用SQL
<select id="queryBlogIf" parameterType="map" resultType="blog">
  select * from blog
   <where>
       <!-- 引用 sql 片段,如果refid 指定的不在本文件中,那么需要在前面加上 namespace -->
       <include refid="if-title-author"></include>
       <!-- 在这里还可以引用其他的 sql 片段 -->
   </where>
</select>
Mybatis缓存
MyBatis包含一个非常强大的查询缓存特性,它可以非常方便地定制和配置缓存。缓存可以极大的提升查询效率。
MyBatis系统中默认定义了两级缓存:一级缓存和二级缓存
一级缓存
默认情况下,只有一级缓存开启。(SqlSession级别的缓存,也称为本地缓存),与数据库同一次会话期间查询到的数据会放在本地缓存中,以后如果需要获取相同的数据,直接从缓存中拿,没必须再去查询数据库.
-
一级缓存是SqlSession级别的缓存,是一直开启的,我们关闭不了它;
-
每个sqlSession中的缓存相互独立
-
因为增删改操作可能会对当前数据产生影响
二级缓存
二级缓存需要手动开启和配置,他是基于namespace级别的缓存,为了提高扩展性,MyBatis定义了缓存接口Cache。我们可以通过实现Cache接口来自定义二级缓存
二级缓存也叫全局缓存,一级缓存作用域太低了,所以诞生了二级缓存
基于namespace级别的缓存,一个名称空间,对应一个二级缓存;
工作机制:
1、一个会话查询一条数据,这个数据就会被放在当前会话的一级缓存中;
2、如果当前会话关闭了,这个会话对应的一级缓存就没了;但是我们想要的是,会话关闭了,一级缓存中的数据被保存到二级缓存中;
3、新的会话查询信息,就可以从二级缓存中获取内容;
4、不同的mapper查出的数据会放在自己对应的缓存(map)中;


 344
344


 被折叠的 条评论
为什么被折叠?
被折叠的 条评论
为什么被折叠?
 到【灌水乐园】发言


