


接着上一节更新的内容,这一章主要讲讲vue3的生命周期
先复习一下vue2的生命周期
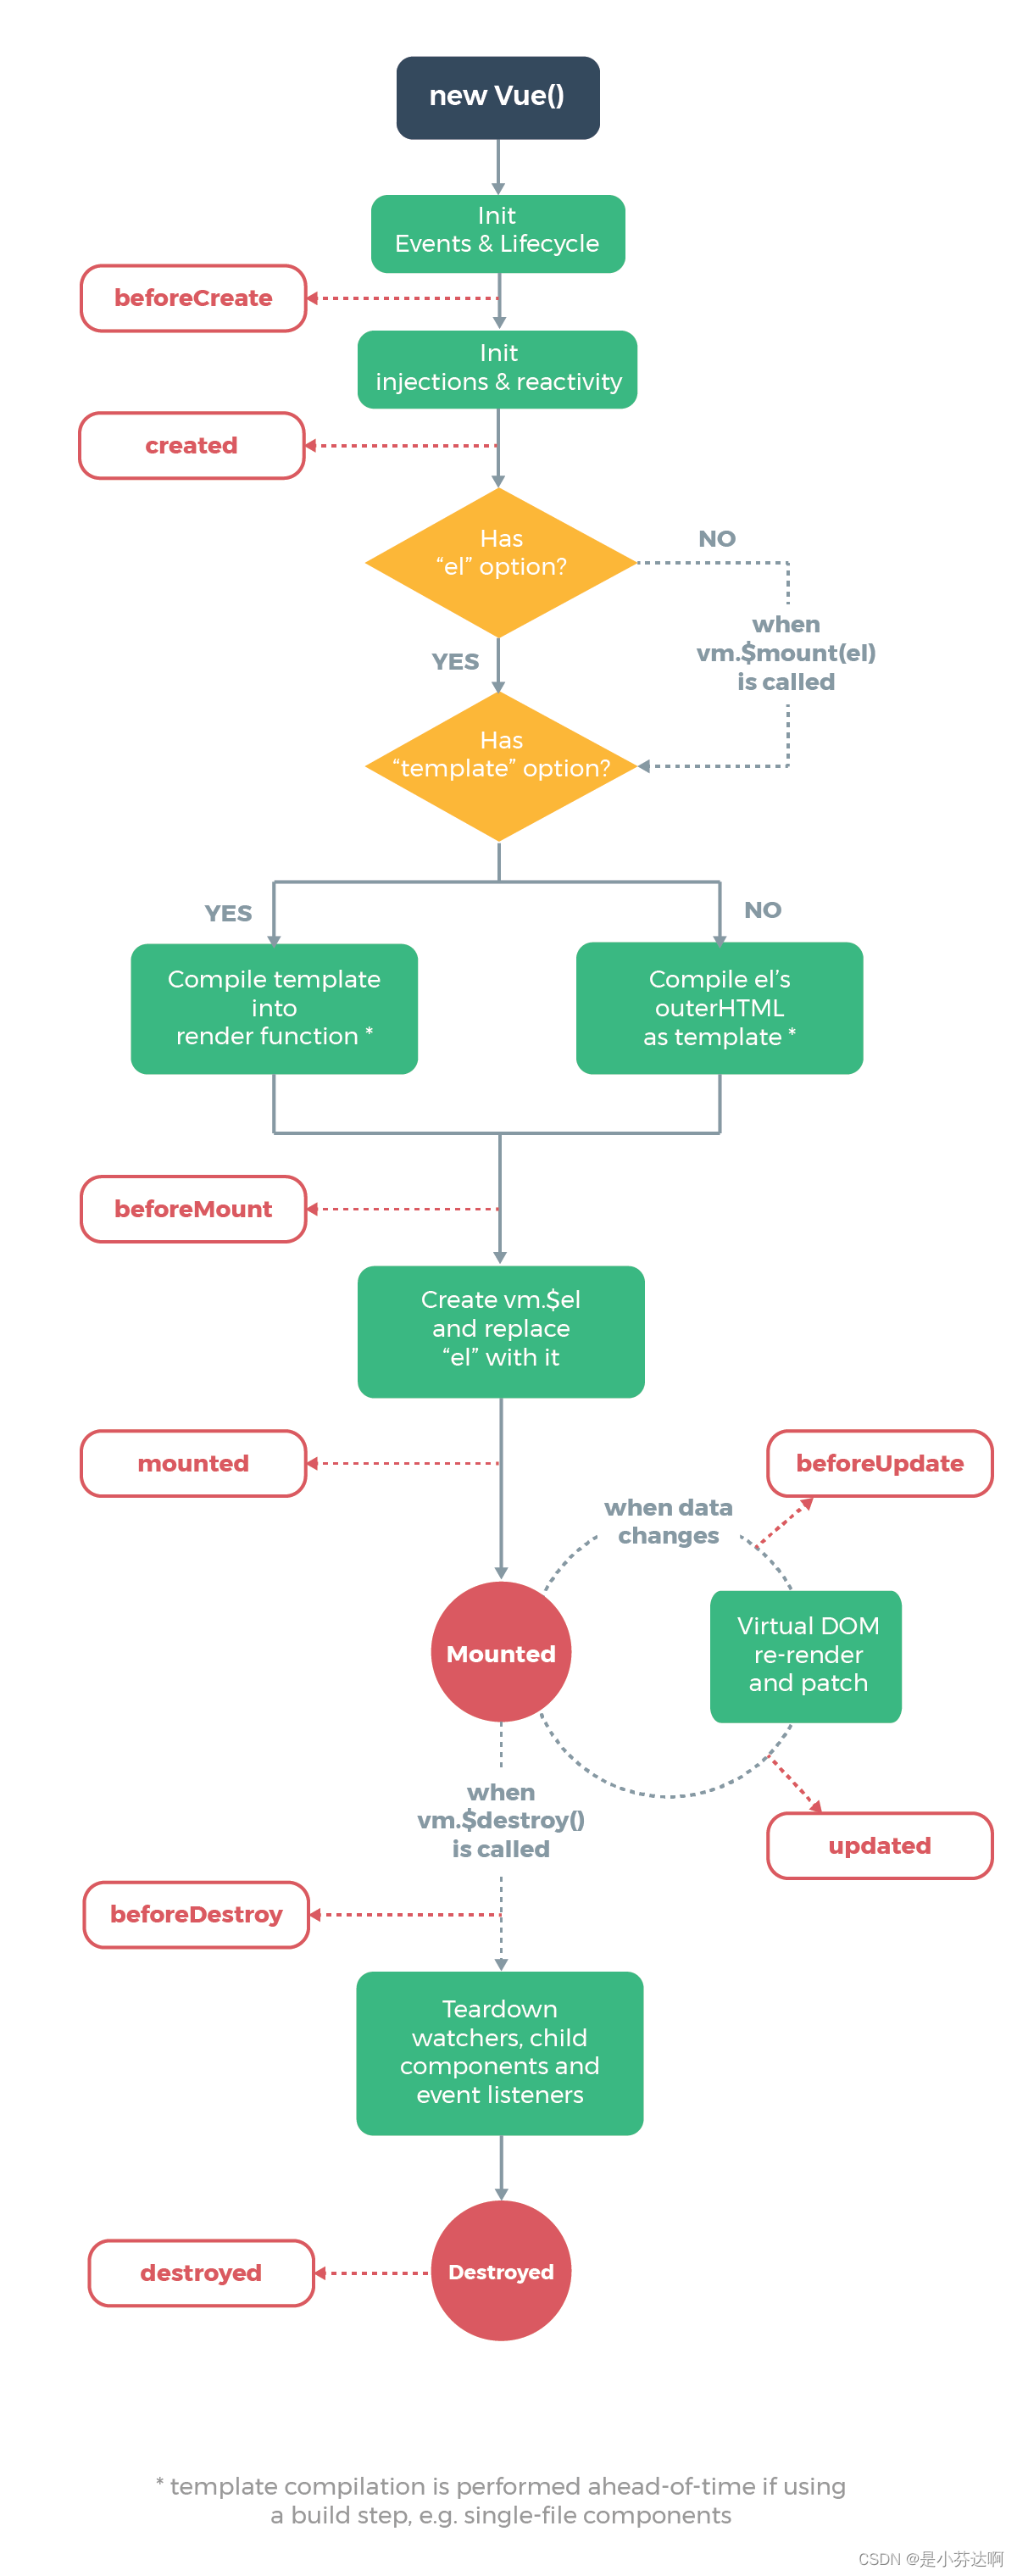
beforeCreate():实例在内存中被创建出来,还没有初始化好data和methods属性。

create():实例已经在内存中创建,已经初始化好data和method,此时还没有开始编译模板。

beforeMount():已经完成了模板的编译,还没有挂载到页面中。

mounted():将编译好的模板挂载到页面指定的容器中显示。

beforeUpdate():状态更新之前执行函数,此时data中的状态值是最新的,但是界面上显示的数据还是旧的,因为还没有开始重新渲染DOM节点。

updated():此时data中的状态值和界面上显示的数据都已经完成了跟新,界面已经被重新渲染好了!

beforeDestroy():实例被销毁之前。

destroyed():实例销毁后调用,Vue实例指示的所有东西都会解绑,所有的事件监听器都会被移除,所有的子实例也都会被销毁。组件已经被完全销毁,此时组建中所有data、methods、以及过滤器,指令等,都已经不可用了。
还有个比较特殊的钩子函数nextTick(),数据更新后的dom操作,写在该函数里面
vue3的生命周期

Vue2--------------vue3
beforeCreate  -> setup()
created       -> setup()
beforeMount   -> onBeforeMount
mounted       -> onMounted
beforeUpdate  -> onBeforeUpdate
updated       -> onUpdated
beforeDestroy -> onBeforeUnmount
destroyed     -> onUnmounted
activated     -> onActivated
deactivated   -> onDeactivated
errorCaptured -> onErrorCaptured
实际使用
//view/home.vue
<script setup>
import Child from "@/components/Child.vue";
import { ref } from "vue";
const isShow = ref(true);
</script>

<template>
  欢迎来到首页
  <hr />
  <h2>父级组件</h2>
  <button @click="isShow = !isShow">切换显示</button>
  <hr />
  <child v-if="isShow" />
  <router-link to="/user">去个人中心</router-link>
</template>

<style></style>
//components/Child.vue
<script setup>
import {
  ref,
  onBeforeMount,
  onMounted,
  onBeforeUpdate,
  onUpdated,
  onBeforeUnmount,
  onUnmounted,
} from "vue";

const msg = ref("abc");
// 按钮点击事件的回调
const update = () => {
  msg.value += "!";
};
console.log("3.x 中的 setup");

onBeforeMount(() => {
  console.log("3.x 中的 onBeforeMount");
});
onMounted(() => {
  console.log("3.x 中的 onMounted");
});
onBeforeUpdate(() => {
  console.log("3.x 中的 onBeforeUpdate");
});
onUpdated(() => {
  console.log("3.x 中的 onUpdated");
});
onBeforeUnmount(() => {
  console.log("3.x 中的 onBeforeUnmount");
});
onUnmounted(() => {
  console.log("3.x 中的 onUnmounted");
});
</script>

<template>
  <div>子级组件</div>
  <h4>msg:{{ msg }}</h4>
  <button @click="update">更新数据</button>
  <hr />
</template>

<style></style>
初始页面

切换显示

更新数据

完结


 3015
3015


 被折叠的 条评论
为什么被折叠?
被折叠的 条评论
为什么被折叠?
 到【灌水乐园】发言


