


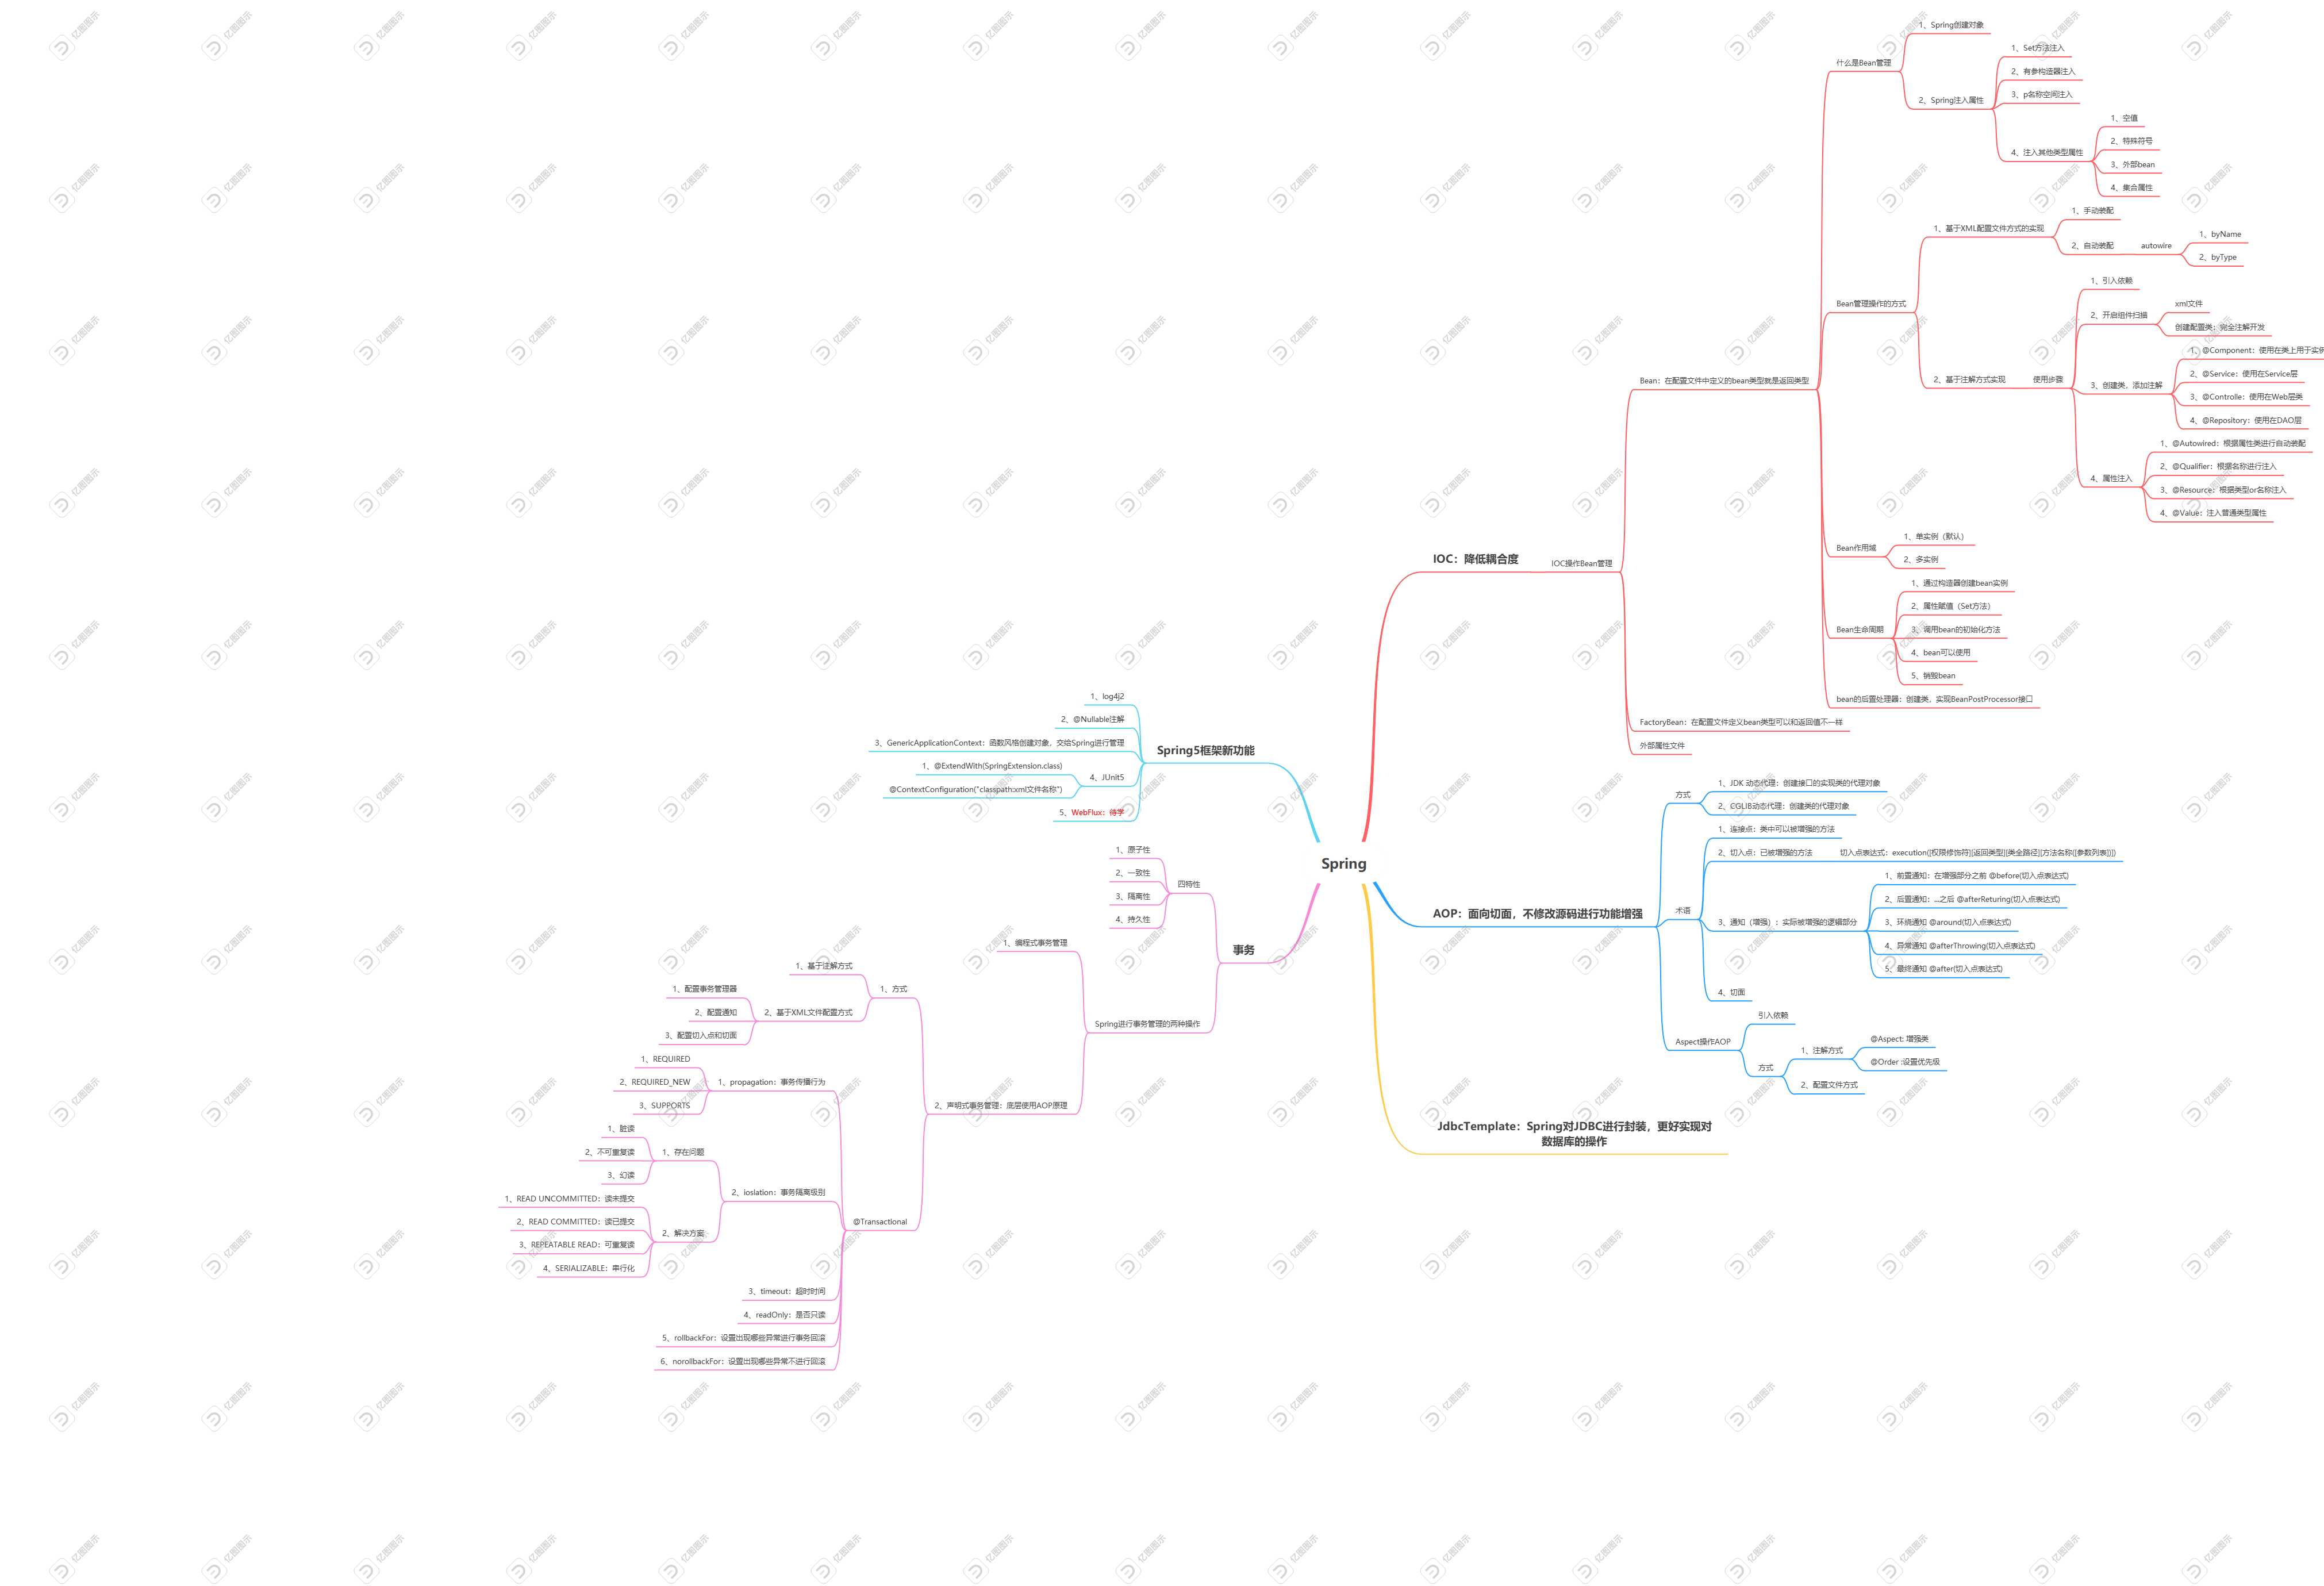
一、IOC:
控制反转(Inversion of Control,缩写为IoC),是面向对象编程中的一种设计原则,可以用来减低计算机代码之间的耦合度。其中最常见的方式叫做依赖注入(Dependency Injection,简称DI),还有一种方式叫“依赖查找”(Dependency Lookup)。通过控制反转,对象在被创建的时候,由一个调控系统内所有对象的外界实体将其所依赖的对象的引用传递给它。也可以说,依赖被注入到对象中。
通俗讲就是把创建对象以及对象间的调用交给Spring进行管理,降低耦合度。
二、AOP:
在软件业,AOP为Aspect Oriented Programming的缩写,意为:面向切面编程,通过预编译方式和运行期间动态代理实现程序功能的统一维护的一种技术。AOP是OOP的延续,是软件开发中的一个热点,也是Spring框架中的一个重要内容,是函数式编程的一种衍生范型。利用AOP可以对业务逻辑的各个部分进行隔离,从而使得业务逻辑各部分之间的耦合度降低,提高程序的可重用性,同时提高了开发的效率。
通俗讲就是不修改源码就可在添加新功能
1、JDK动态代理
创建接口实现类的代理对象,如图
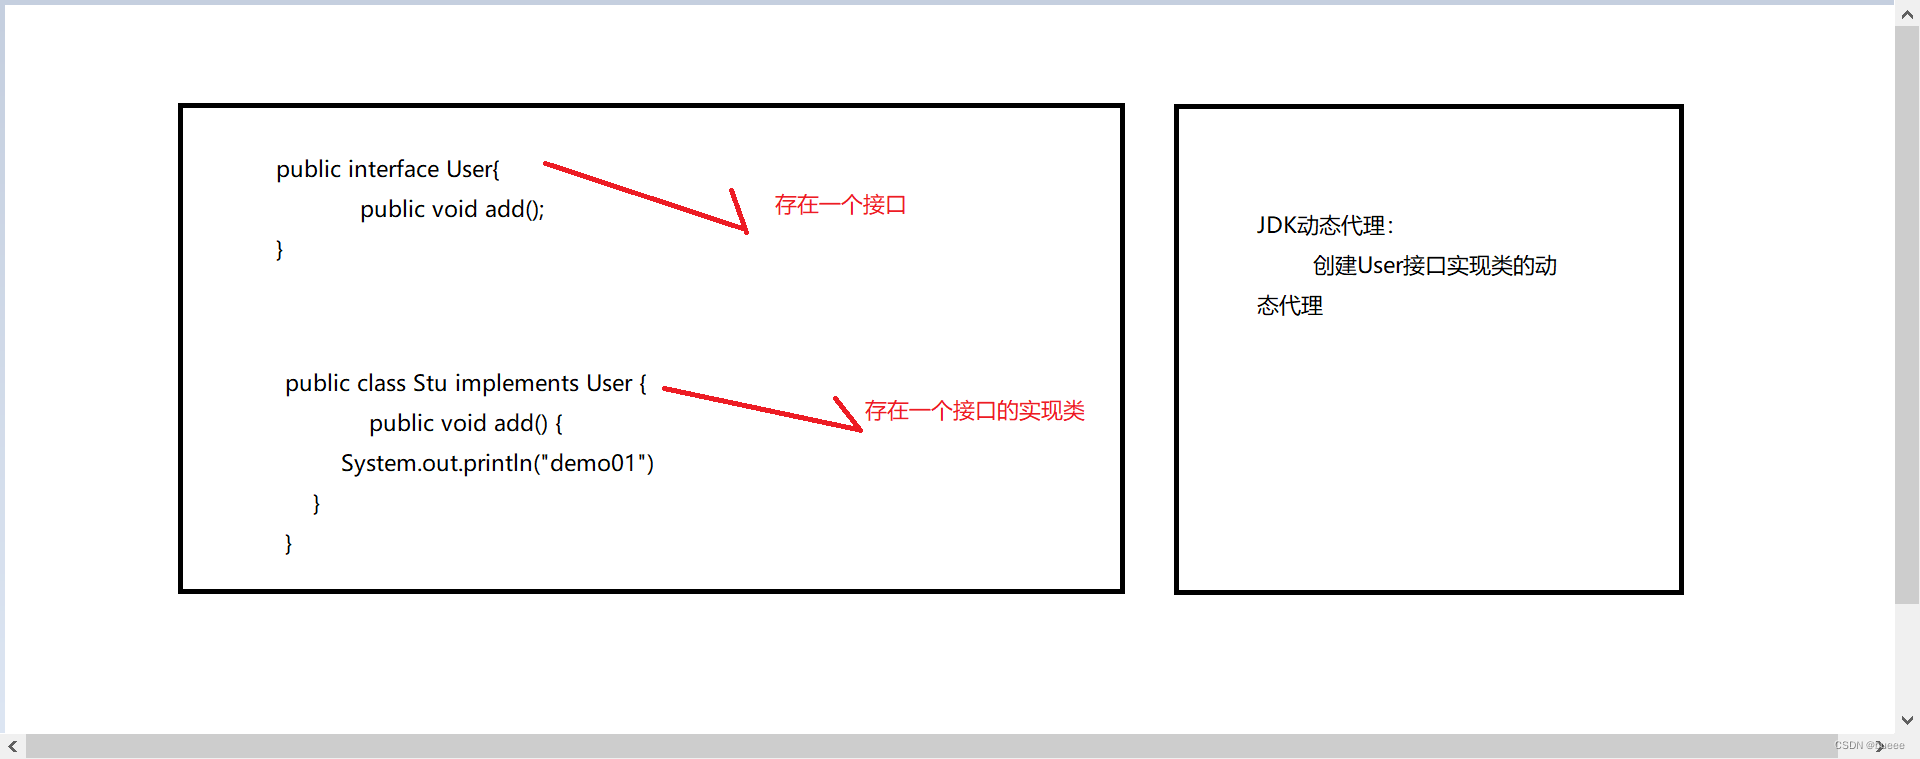
创建一个接口
public interface UserDAO {
    public int add(int a, int b);
    public String update(String id);
}
创建这个接口的实现类
@Repository(value = "userDAOImpl") //前面学了IOC 所以这里采用注解的方式注入
public class UserDAOImpl implements UserDAO{
    @Override
    public int add(int a, int b) {
        return a + b;
    }

    @Override
    public String update(String id) {
        return id;
    }
}
创建一个实现java.lang.reflect.InvocationHandler接口的类
public class UserDAOProxy implements InvocationHandler {
    //这里创建的是UserDAO的代理对象 讲UserDAO对象通过有参构造器传递过来

    private Object obj;

    public UserDAOProxy(Object obj) {
        this.obj = obj;
    }


     /**
     * proxy 被代理的对象
     * method 被调用的方法
     * args传入的参数
     **/
    @Override
    public Object invoke(Object proxy, Method method, Object[] args) throws Throwable {
        //方法之前
        System.out.println("方法执行之前..方法名为:" + method.getName() + "    传递的参数为" + Arrays.toString(args));
        //被增强的方法执行
        Object res;
        if (method.getName().equals("add")) { //如果调用的是add方法  则将结果转换为 100 + 100
            res = method.invoke(obj, 100, 100);
        } else { //调用的是update方法则按args的值返回
            res = method.invoke(obj, args);
        }
        //方法执行之后
        System.out.println("方法执行之后..." + obj);
        return res;
    }
}
创建一个测试类
public class JDKProxy {
	//属性注入
    @Autowired
    @Qualifier(value = "userDAOImpl")
    public static void main(String[] args) {
        ApplicationContext context = new AnnotationConfigApplicationContext(SpringConfig.class);
        UserDAOImpl userDAO = context.getBean("userDAOImpl", UserDAOImpl.class);


        //创建接口实现类代理对象
        Class[] interfaces = {UserDAO.class};
        UserDAO dao = (UserDAO) Proxy.newProxyInstance(JDKProxy.class.getClassLoader(), interfaces, new UserDAOProxy(userDAO));
        System.out.println(dao.add(1, 2));
    }
}
存在一个未解决的问题 为什么在测试中实现java.lang.reflect.InvocationHandler接口的类UserDAOProxy中的invoke()方法会被自动调用。有大佬文章jdk动态代理invoke方法自动运行原因
2、Aspect操作AOP(基于注解方式)
创建一个普通类
@Component //通过注解创建对象
public class User {
    //连接点
    public void add() {
        int i = 10 / 0; //自定义一个异常 验证后面的异常通知
        System.out.println("现在输出原方法add");
    }
}
创建一个增强类
@Component //通过注解创建对象
@Aspect //
public class UserProxy {

    //提取相同切入点
    @Pointcut(value = "execution(* com.xx.spring5.aopanno.User.add(..))")
    public void pointDemo() {

    }

    //@Before注解 表示前置通知
    @Before(value = "execution(* com.xx.spring5.aopanno.User.add(..))")
    public void before() {
        System.out.println("前置通知已发出");
    }

    //后置通知
    @AfterReturning(value = "execution(* com.xx.spring5.aopanno.User.add(..))")
    public void afterReturning() {
        System.out.println("后置通知已发出");
    }

    //后置通知
    @AfterThrowing(value = "execution(* com.xx.spring5.aopanno.User.add(..))")
    public void afterThrowing() {
        System.out.println("afterThrowing....");
    }

    //环绕通知
    @Around(value = "execution(* com.xx.spring5.aopanno.User.add(..))")
    public void Around(ProceedingJoinPoint proceedingJoinPoint) throws Throwable {
        System.out.println("环绕通知前");
        //被增强的方法执行
        proceedingJoinPoint.proceed();
        System.out.println("环绕通知后");
    }

    //最终通知
    @After(value = "execution(* com.xx.spring5.aopanno.User.add(..))")
    public void after() {
        System.out.println("最终通知已发出");
    }
}
创建一个配置类(实现完全注解开发的方式)
@Configuration //配置类
@ComponentScan(basePackages = {"com.xx"}) //开启注解扫描com.xx包下的所有类
@EnableAspectJAutoProxy(proxyTargetClass = true) //开启Aspect生成代理对象
public class SpringConfig {
}
创建一个测试类
public class TestAOP {
@Test
public void testAOPAnno() {
ApplicationContext context = new AnnotationConfigApplicationContext(SpringConfig.class);
User user = context.getBean("user", User.class);
user.add(); //以为add方法添加了前置通知 故输出add..前会先输出before...
}
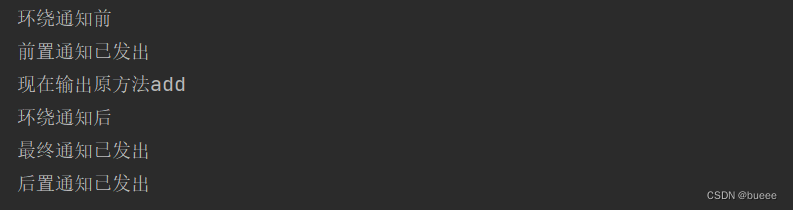
}
输出结果
@Order(number): 设置优先级,解决多个增强类增强 同一个普通类 的同一个方法时 先后顺序的问题。 number值越小 优先级越高
2、Aspect操作AOP(基于配置文件方式 了解)
<?xml version="1.0" encoding="UTF-8"?>
<beans xmlns="http://www.springframework.org/schema/beans"
       xmlns:xsi="http://www.w3.org/2001/XMLSchema-instance"
       xmlns:aop="http://www.springframework.org/schema/aop"
       xsi:schemaLocation="http://www.springframework.org/schema/beans http://www.springframework.org/schema/beans/spring-beans.xsd
                           http://www.springframework.org/schema/aop http://www.springframework.org/schema/aop/spring-aop.xsd">

<!--    创建对象-->
    <bean id="stu" class="com.xx.spring5.aopxml.Stu"></bean>
    <bean id="stuProxy" class="com.xx.spring5.aopxml.StuProxy"></bean>

<!--    配置aop增强-->
    <aop:config>
<!--        切入点-->
        <aop:pointcut id="pc" expression="execution(* com.xx.spring5.aopxml.Stu.getScore(..))"/>
<!--        配置切面-->
        <aop:aspect ref="stuProxy">
<!--            实际增强内容-->
            <aop:before method="before" pointcut-ref="pc"></aop:before>
        </aop:aspect>
    </aop:config>
</beans>
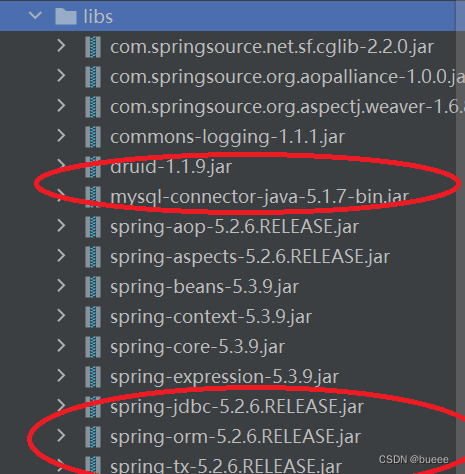
三、JdbcTemplate
1、引入jar包
2、实现对数据库的增删改查
查!
返回某个值:

返回某个对象:
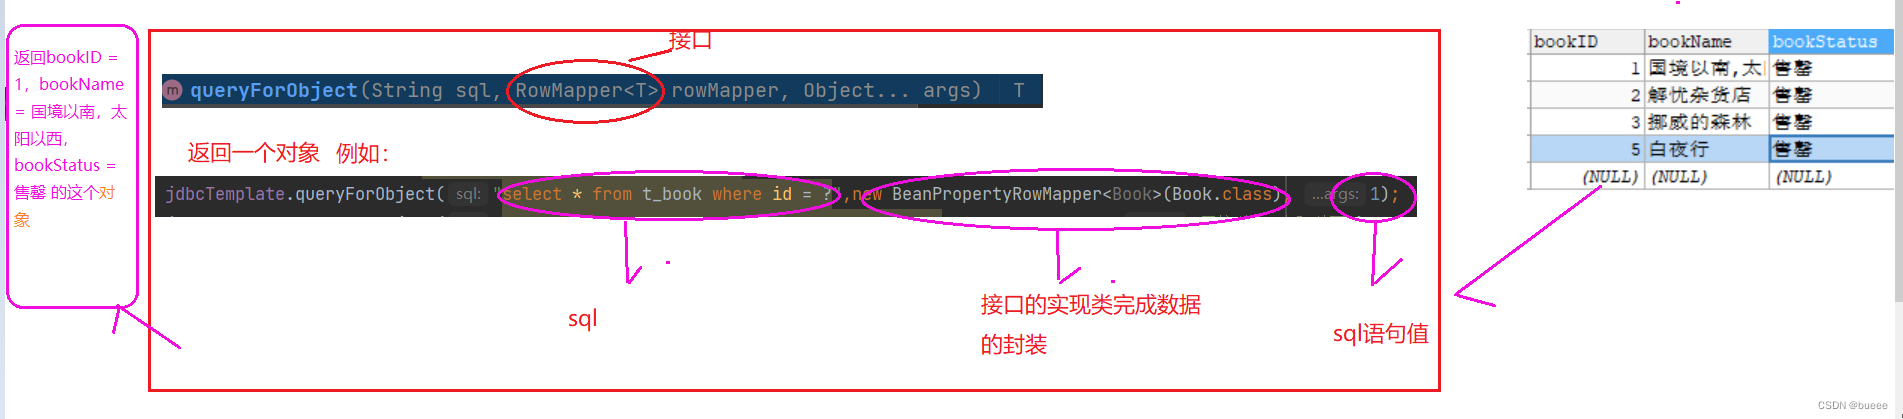
返回集合

增删改!

批量操作: 简单而言 通过将数据保存到集合中同时添加或删除多条数据

四、事务
1、propagation:事务传播行为
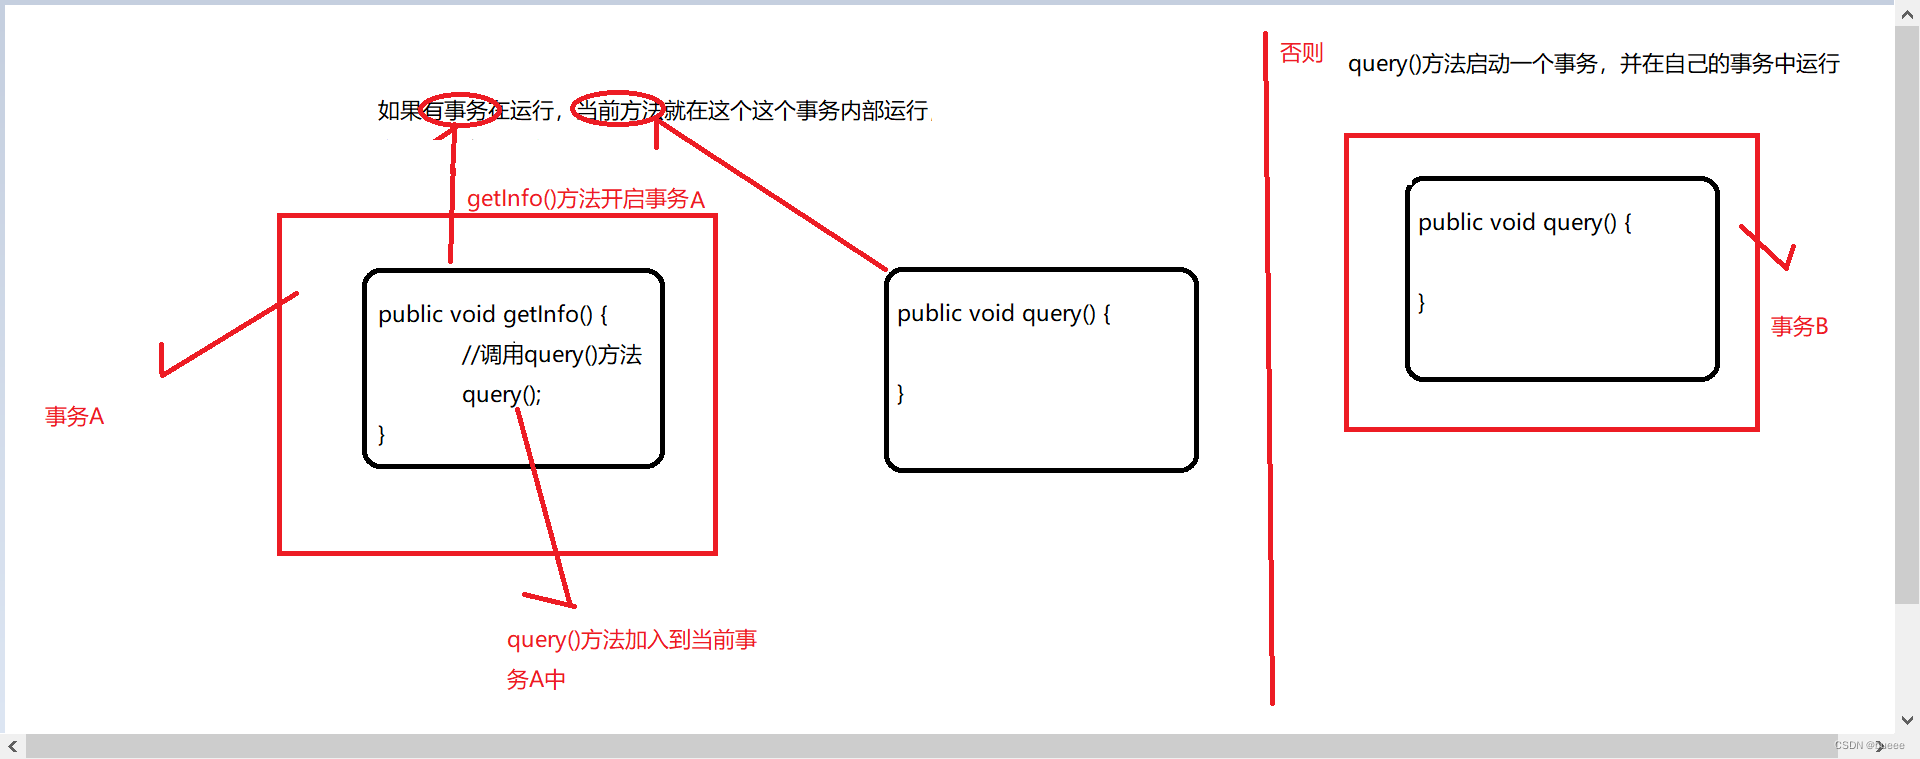
①REQUIRED:
如果有事务在运行,当前方法就在这个这个事务内部运行,否则就启动一个新的事务,并在自己的事务内运行。
②SUPPORTS:
如果有事务在运行,当前方法就在这个事务内运行,否则它可以不运行在事务中。

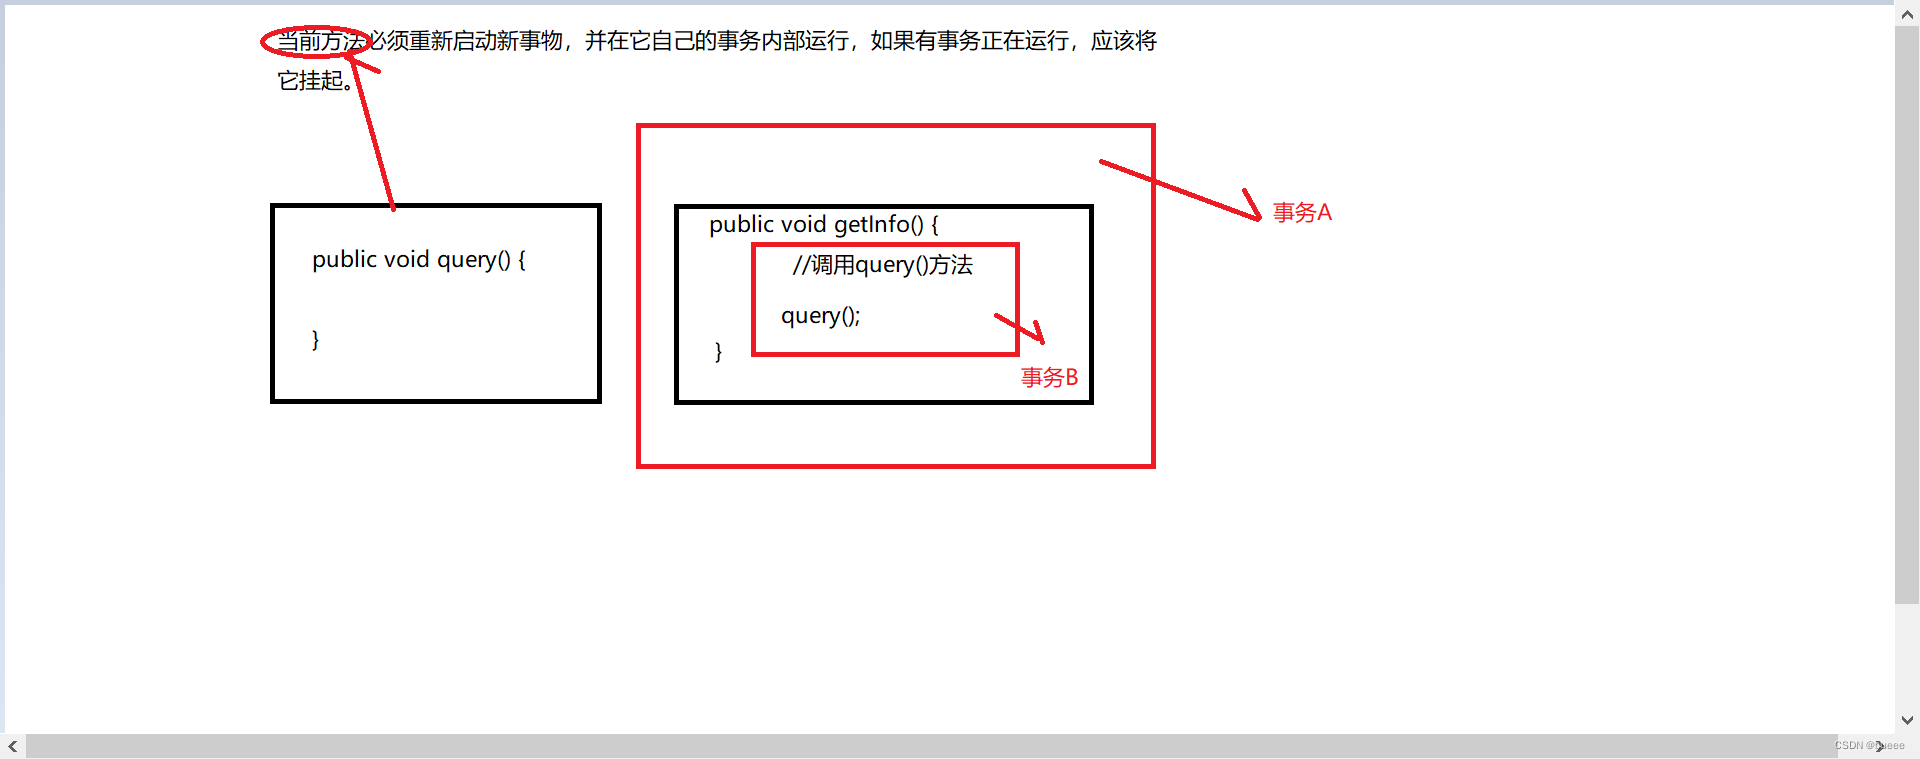
③REQUIRED_NEW:
当前方法必须重新启动新事物,并在它自己的事务内部运行,如果有事务正在运行,应该将它挂起。
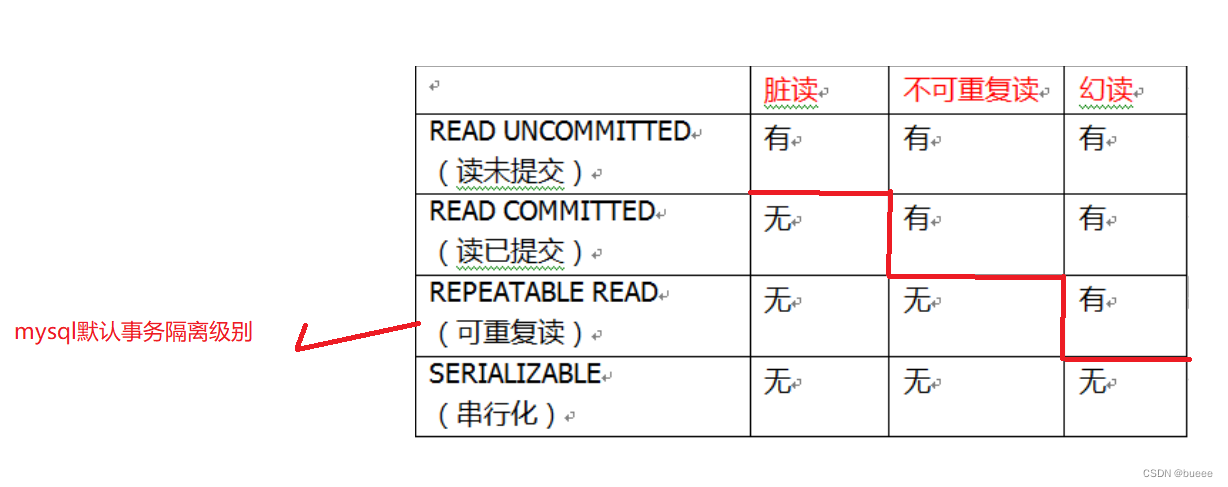
2、ioslation:事务隔离级别
存在的问题:
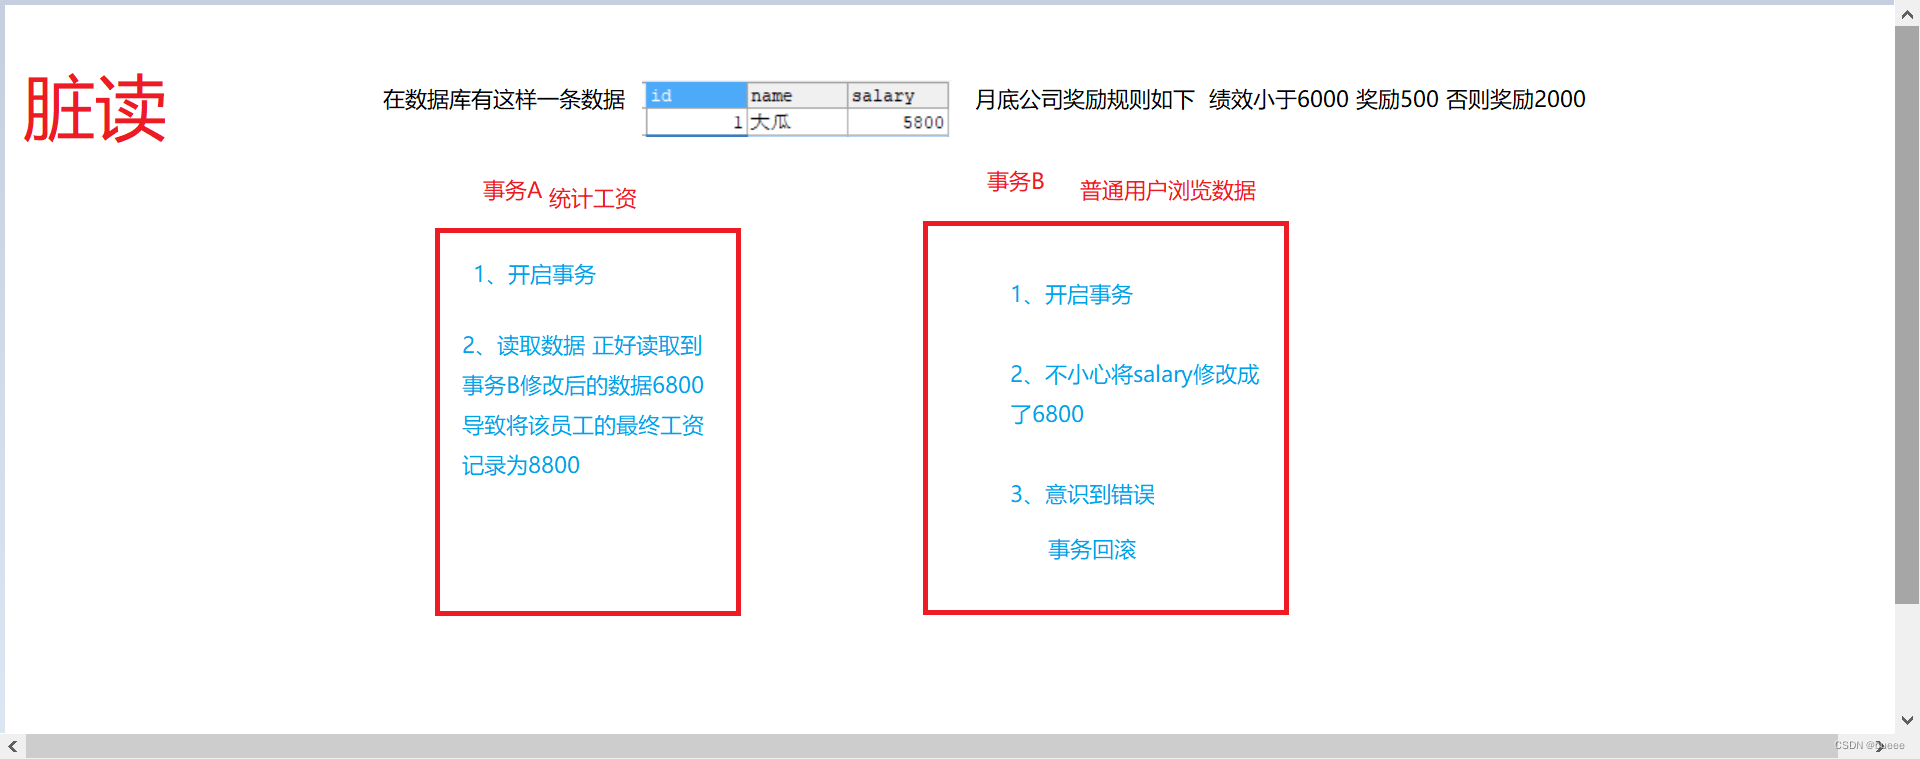
①脏读:
一个未提交的事务 读取到另一个 未提交的事务 的数据
②不可重复读:
一个未提交事务 读取到另一个已提交事务 修改的数据

③幻读:
一个未提交事务 读取到另一个已提交事务 添加的数据
解决方案:
3、XML声明事务管理
准备工作
<!--引入名称空间 -->
<beans xmlns="http://www.springframework.org/schema/beans"
       xmlns:xsi="http://www.w3.org/2001/XMLSchema-instance"
       xmlns:context="http://www.springframework.org/schema/context"
       xmlns:tx="http://www.springframework.org/schema/tx"
       xmlns:aop="http://www.springframework.org/schema/aop"
       xsi:schemaLocation="http://www.springframework.org/schema/beans http://www.springframework.org/schema/beans/spring-beans.xsd
                           http://www.springframework.org/schema/context http://www.springframework.org/schema/context/spring-context.xsd
                           http://www.springframework.org/schema/tx http://www.springframework.org/schema/tx/spring-tx.xsd
                           http://www.springframework.org/schema/aop http://www.springframework.org/schema/aop/spring-aop.xsd">
 </beans>
<!--    开启注解扫描-->
    <context:component-scan base-package="com.xx"></context:component-scan>
 <!-- 数据库连接池 -->
    <bean id="dataSource" class="com.alibaba.druid.pool.DruidDataSource"
          destroy-method="close">
        <property name="url" value="jdbc:mysql:///user_db"/>
        <property name="username" value="root" />
        <property name="password" value="123456" />
        <property name="driverClassName" value="com.mysql.jdbc.Driver" />
    </bean>
<!--    JdbcTemplate对象-->
    <bean id="jdbcTemplate" class="org.springframework.jdbc.core.JdbcTemplate">
<!--        注入dataSource-->
        <property name="dataSource" ref="dataSource"></property>
    </bean>
Go
<!--    1、创建事务管理器-->
    <bean id="transactionManager" class="org.springframework.jdbc.datasource.DataSourceTransactionManager">
        <property name="dataSource" ref="dataSource"></property>
    </bean>

<!--    2、配置通知-->
    <tx:advice id="txadvice">
<!--        配置事务参数 传播性 隔离性 回滚...-->
        <tx:attributes>
            <tx:method name="transferMoney" propagation="REQUIRED"/> <!-- transferMoney方法的传播性设置为REQUIRED-->
        </tx:attributes>
    </tx:advice>

<!--    3、配置切入点和切面-->
    <aop:config>
<!--        配置切入点-->
        <aop:pointcut id="pt" expression="execution(* com.xx.spring5.service.UserService.*(..))"/>
<!--        配置切面-->
        <aop:advisor advice-ref="txadvice" pointcut-ref="pt"></aop:advisor>
    </aop:config>
测试一下
实体类
public class User {
    private  String name;
    private int balance;

    public User(String name) {
        this.name = name;

    }

    public String getName() {
        return name;
    }

    public void setName(String name) {
        this.name = name;
    }

    public int getBalance() {
        return balance;
    }

    public void setBalance(int balance) {
        this.balance = balance;
    }
}
dao层
@Repository
public class UserDAOImpl implements UserDAO {

    @Autowired
    private JdbcTemplate jdbcTemplate;


    @Override
    public void transfer(User user) {
        jdbcTemplate.update("update card set balance = balance -  ? where name = ?", 100, user.getName());
    }

    @Override
    public void collect(User user) {
        jdbcTemplate.update("update card set balance = balance +  ? where name = ?", 100, user.getName());
    }
}
service层
@Service
public class UserService {
@Autowired
private UserDAO userDAO;
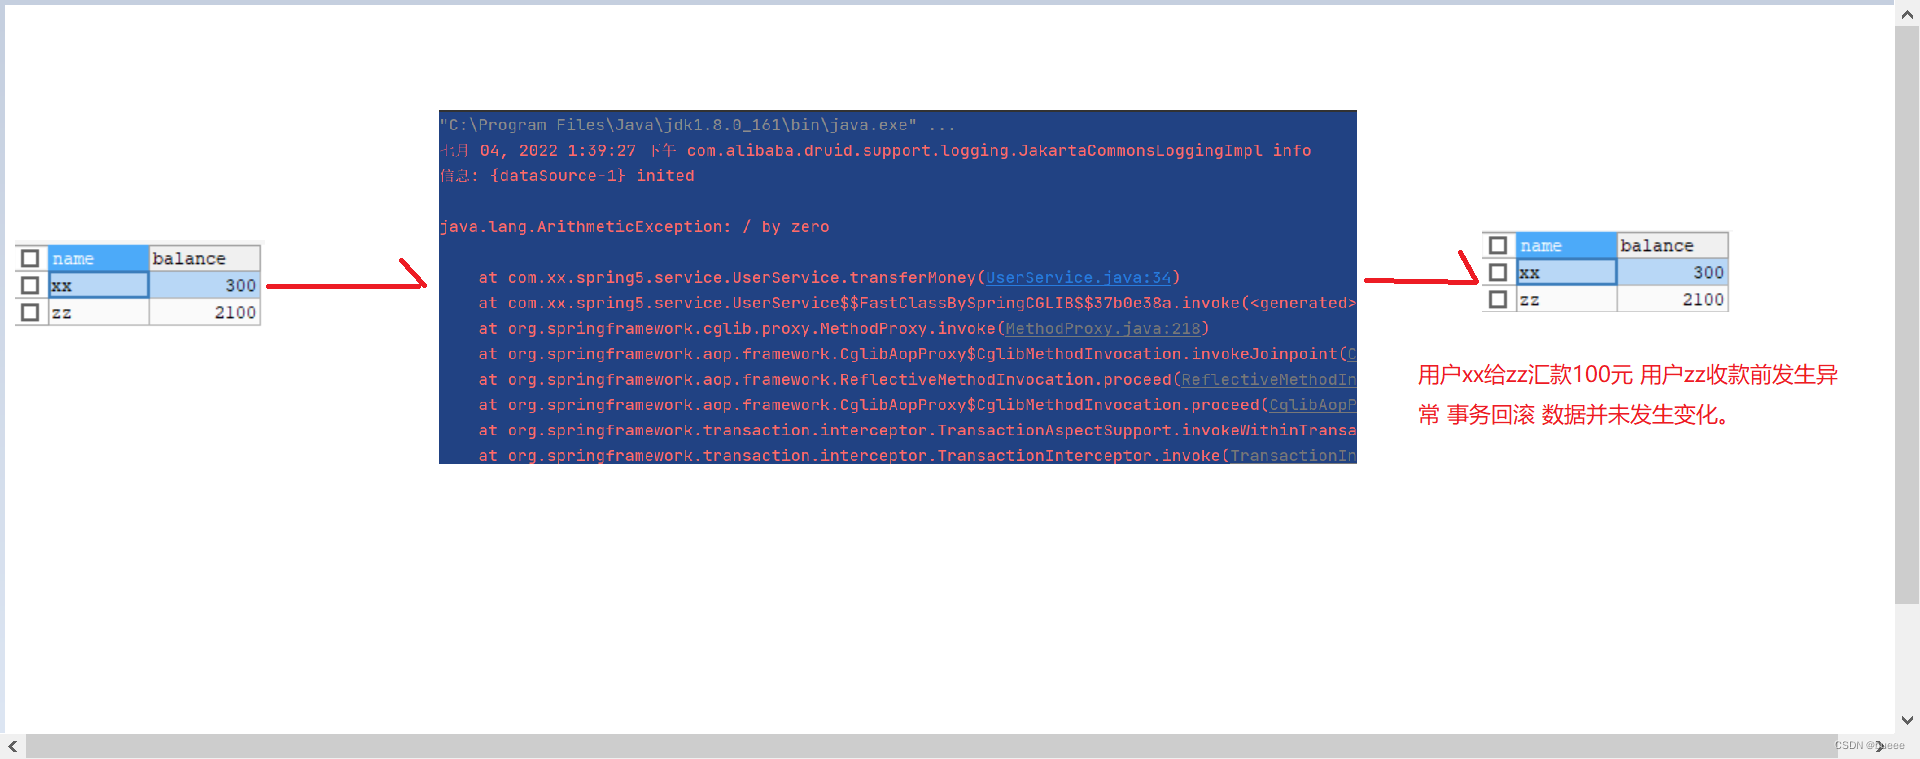
//转账
public void transferMoney(User user01, User user02) {
// //2.进行业务操作
userDAO.transfer(user01);
//模拟异常
int i = 10 / 0;//转账已提交 而收钱发生异常 无法入账 整体操作异常
userDAO.collect(user02);
}
}
Test类
public class TestDemo {

    @Test
    public  void test02() {
        ApplicationContext context = new ClassPathXmlApplicationContext("bean02.xml");
        UserService userService = context.getBean("userService", UserService.class);
        userService.transferMoney(user01, user02);
    }
}
4、注解声明事务管理
Config配置类
@Configuration //配置类
@ComponentScan(basePackages = "com.xx") //开启注解组件扫描
@EnableTransactionManagement //开启事务
public class TxConfig {
    //创建数据库连接池
    @Bean
    public DruidDataSource getDruidDataSource() {
        DruidDataSource dataSource = new DruidDataSource();
        dataSource.setDriverClassName("com.mysql.jdbc.Driver");
        dataSource.setUrl("jdbc:mysql:///user_db");
        dataSource.setUsername("root");
        dataSource.setPassword("123456");
        return dataSource;
    }

    //创建JdbcTemplate对象
    @Bean
    public JdbcTemplate getJdbcTemplate(DataSource dataSource) {
        //到ioc容器中根据类型找到dataSource
        JdbcTemplate jdbcTemplate = new JdbcTemplate();
        //注入dataSource
        jdbcTemplate.setDataSource(dataSource);
        return jdbcTemplate;
    }

    //创建事务管理器
    @Bean
    public DataSourceTransactionManager getDataSourceTransactionManager(DataSource dataSource) {
        DataSourceTransactionManager dataSourceTransactionManager = new DataSourceTransactionManager();
        dataSourceTransactionManager.setDataSource(dataSource);
        return dataSourceTransactionManager;
    }
}
service层
UserService类前添加注解@Transactionnal即可 dao层 实体类保持一致
@Service
//@Transactional(timeout = -1, propagation = Propagation.REQUIRED, isolation = Isolation.REPEATABLE_READ) //添加到类上 表明 这个类的所有方法均添加事务
// 传播行为为:Required           隔离级别:可重复读 解决了脏读和不可重复读的问题
public class UserService {
    @Autowired
    private UserDAO userDAO;

  //转账
    public void transferMoney(User user01, User user02) {
//            //2.进行业务操作
            userDAO.transfer(user01);

            //模拟异常
            int i = 10 / 0;//转账已提交 而收钱发生异常 无法入账   整体操作异常

            userDAO.collect(user02);
    }
}
Test类
public class TestDemo{
    @Test
    public void test03() {
        ApplicationContext context = new AnnotationConfigApplicationContext(TxConfig.class);
        UserService userService = context.getBean("userService", UserService.class);
        userService.transferMoney(user01, user02);
    }

}
点火 Go


 577
577


 被折叠的 条评论
为什么被折叠?
被折叠的 条评论
为什么被折叠?
 到【灌水乐园】发言


