


文章目录
前言
SpringCloud的配置中心——config,是一个分布式配置中心,为微服务架构中的微服务提供集中化的外部配置支持。配置服务器为各个不同的微服务应用的所有环境提供一个中心化的外部配置。
一、概述
SpringCloud提供了ConfigServer来为微服务提供一套集中式的,动态的配置管理设施。
服务端也称为分布式配置中心,它是一个独立的微服务应用,用来连接配置服务器并为客户端提供获取配置信息,加密/解密信息等访问接口。
客户端则是通过指定的配置中心来管理应用资源,以及与业务相关的配置内容,并在启动的时候总配置中心获取和加载配置信息配置服务器默认采用git来存储配置信息,这样有助于对环境配置进行版本管理。
二、服务端的配置
1.在github上创建一个仓库

2.将本地文件推送到github的远程仓库
3.创建config模块(cloud-config-center3344)

4.引入依赖
<dependencies>
    <!-- config Server -->
    <dependency>
        <groupId>org.springframework.cloud</groupId>
        <artifactId>spring-cloud-config-server</artifactId>
    </dependency>

    <!--eureka-client config Server也要注册进服务中心-->
    <dependency>
        <groupId>org.springframework.cloud</groupId>
        <artifactId>spring-cloud-starter-netflix-eureka-client</artifactId>
    </dependency>
    <dependency>
        <groupId>org.springframework.boot</groupId>
        <artifactId>spring-boot-devtools</artifactId>
        <scope>runtime</scope>
        <optional>true</optional>
    </dependency>
    <dependency>
        <groupId>org.projectlombok</groupId>
        <artifactId>lombok</artifactId>
        <optional>true</optional>
    </dependency>
    <dependency>
        <groupId>org.springframework.boot</groupId>
        <artifactId>spring-boot-starter-test</artifactId>
        <scope>test</scope>
    </dependency>
    <dependency><!-- 引入自己定义的api通用包,可以使用Payment支付Entity -->
        <groupId>com.krisswen.cloud</groupId>
        <artifactId>cloud-api-commons</artifactId>
        <version>${project.version}</version>
    </dependency>
</dependencies>
5.编写配置文件
server:
  port: 3344
spring:
  application:
    name: cloud-config-center  # 注册进eureka Server 的微服务名
  cloud:
    config:
      server:
        git:
          uri: https://github.com/krisswen-aomo/springcloud-config.git # github 仓库位置
          ## 搜索目录 远程仓库的名称
          search-paths:
            - springcloud-config
          # 读取的分支
          label: master
eureka:
  client:
    service-url:
      defaultZone: http://eureka7001.com:7001/eureka/,http://eureka7002.com:7002/eureka/
6.编写启动类
@SpringBootApplication
@EnableConfigServer   //关键注解
public class ConfigCenterMain3344 {
    public static void main(String[] args) {
        SpringApplication.run(ConfigCenterMain3344.class,args);
    }
}
7.添加模拟映射
在C:\Windows\System32\drivers\etc\hosts文件中添加127.0.0.1 config-3344.com
8.启动微服务进行测试
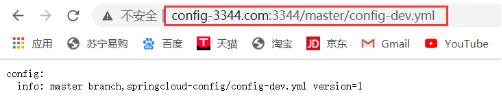
访问http://config-3344.com:3344/master/config-dev.yml 文件(前提:在github仓库中提前上传该文件)
三、客户端的配置
1.新建模块

2.引入依赖
<dependencies>
    <!-- config Client 和 服务端的依赖不一样 -->
    <dependency>
        <groupId>org.springframework.cloud</groupId>
        <artifactId>spring-cloud-starter-config</artifactId>
    </dependency>

    <!--eureka-client config Server也要注册进服务中心-->
    <dependency>
        <groupId>org.springframework.cloud</groupId>
        <artifactId>spring-cloud-starter-netflix-eureka-client</artifactId>
    </dependency>
    <dependency>
        <groupId>org.springframework.boot</groupId>
        <artifactId>spring-boot-starter-web</artifactId>
    </dependency>
    <dependency>
        <groupId>org.springframework.boot</groupId>
        <artifactId>spring-boot-starter-actuator</artifactId>
    </dependency>
    <dependency>
        <groupId>org.springframework.boot</groupId>
        <artifactId>spring-boot-devtools</artifactId>
        <scope>runtime</scope>
        <optional>true</optional>
    </dependency>
    <dependency>
        <groupId>org.projectlombok</groupId>
        <artifactId>lombok</artifactId>
        <optional>true</optional>
    </dependency>
    <dependency>
        <groupId>org.springframework.boot</groupId>
        <artifactId>spring-boot-starter-test</artifactId>
        <scope>test</scope>
    </dependency>
    <dependency><!-- 引入自己定义的api通用包,可以使用Payment支付Entity -->
        <groupId>com.krisswen.cloud</groupId>
        <artifactId>cloud-api-commons</artifactId>
        <version>${project.version}</version>
    </dependency>
</dependencies>
3.定义配置文件
server:
  port: 3355

spring:
  application:
    name: config-client
  cloud:
    # config 客户端配置
    config:
      label: master # 分支名称
      name: config # 配置文件名称,文件也可以是client-config-dev.yml这种格式的,这里就写 client-config
      profile: dev # 使用配置环境
      uri: http://config-3344.com:3344  # config Server 地址
      # 综合上面四个 即读取配置文件地址为: http://config-3344.com:3344/master/config-dev.yml

eureka:
  client:
    service-url:
      defaultZone: http://eureka7001.com:7001/eureka/,http://eureka7002.com:7002/eureka/
4.定义启动类
@SpringBootApplication
@EnableEurekaClient
public class ConfigClientMain3355 {
    public static void main(String[] args) {
        SpringApplication.run(ConfigClientMain3355.class, args);
    }
}
5.定义controller
@RestController
public class ConfigClientController {
    @Value("${config.info}")
    private String configInfo;

    @GetMapping("/configInfo")
    public String getConfigInfo(){
        return configInfo;
    }
    // localhost:3355/configInfo
}
6.启动测试

四、动态刷新
上述两个模块的配置,在每次运维修改配置文件,客户端都需要重启(在Linux运维修改GitHub上的配置文件内容做调整时,刷新3344,发现ConfigServer配置中心立刻响应,但是刷新3355,发现ConfigClient客户端没有任何响应,除非重启或重新加载3355。)
如何解决?
(1)在client端添加依赖
<dependency>
    <groupId>org.springframework.boot</groupId>
    <artifactId>spring-boot-starter-actuator</artifactId>
</dependency>
(2)在client端添加配置
# 暴露监控端点
management:
  endpoints:
    web:
      exposure:
        include: "*"
(3)在controller 层添加注解@RefreshScope:即时刷新;
(4)向 client 端发送一个 POST 请求
http://localhost:3355/actuator/refresh
(5)在gethub上修改一下数据version方便测试
然后分别访问3344 3355两个服务,发现version一致


 287
287


 被折叠的 条评论
为什么被折叠?
被折叠的 条评论
为什么被折叠?
 到【灌水乐园】发言


