


1.Rabbitmq入门概念
1.rabbitmq架构图

-
broker:用于接收和分发消息的应用
-
virtual host:出于多租户和安全因素考虑,把AQMP的基本组件划分到一个虚拟的分组中,类似于网络中namespace概念。当多个不同用户使用同一个rabbitmq sever提供服务时,可以划分出多个vhost,每个用户在自已的vhost创建exchange/queue等。
-
connection:publisher/consumer和broker之间的tcp连接
-
Channel:如果每一次访问rabbitmq都建立一个connection,在消息量大的时候建立tcp connection的开销将时巨大的,效率也较低。channel时connection内部建议的逻辑连接,如果应用程序支持多线程,通常每个thread创建单独的channel进行通讯,amqp method包含了channel id 帮助客户端和message broker识别channel,所以channel之间是完全隔离的。channel作为轻量级的Connection极大减少了操作系统建立TCP connection的开销
-
exchange:message到达broker的第一站,根据分发规则,匹配查询表中的routing key,分发消息到queue中去。常用的类型有direct,topic,fanout
-
queue:消息最终被送到这里等到消费者取走
-
binding:exchange和queue之间的虚拟连接,binding中可以包含routing key,bingding信息被保存到echange中的查询表,用户message的分发依据
2.安装
docker pull rabbitmq:3.9.3-management

docker run -di  --restart always --name rabbitmq  -p 5672:5672  -p 15672:15672  -v /home/rabbitmq/lib:/var/rabbitmq/lib rabbitmq:3.9.3-management
# 登陆页面
localhost:15672 root:guest password:guest
3.整合springboot
<dependency>
    <groupId>org.springframework.boot</groupId>
    <artifactId>spring-boot-starter-amqp</artifactId>
</dependency>
spring:
  rabbitmq:
    host: localhost
    port: 5672
    virtual-host: /
    username: guest
    password: guest
    # 开启发送端确认
    publisher-confirm-type: simple
    # 开启发送端消息抵达队列的确认
    publisher-returns: true
    # 只要抵达队列,以异步发送优先回调我们这个 returnConfirm
    template:
      mandatory: true
    # 手动ack消息
    listener:
      simple:
        acknowledge-mode: manual
@RestController
@RequestMapping("/rabbitmq")
public class RabbitMqProducer {

    @Autowired
    private AmqpTemplate amqpTemplate;

    @RequestMapping("/hello")
    public void send(String msg){
        amqpTemplate.convertAndSend("hello",msg);
    }
}
@Component
public class RabbitMqConsumer {

    @RabbitHandler
    @RabbitListener(queues = "hello")
    public void process(String message) {
        System.out.println("Receiver  : " + message);
    }
}
@EnableRabbit
@SpringBootApplication
public class RabbitmqApplication {
    public static void main(String[] args) {
        SpringApplication.run(RabbitmqApplication.class, args);
    }
}
2.work queue
1.消息应答
-
为了保证消息在发送的过程中不丢失,rabbitmq引入了消息应答机制,消息应答就是:消费者在接收消息并处理该消息之后,告诉它rabbitmq它已经处理了,rabbitmq可以把该消息删除了。
-
自动应答
- 消息发送后立即被认为已经传送成功,这种模式需要在高吞吐量与数据传输安全性之间做权衡,(1)因为如果消息在接收之前,消费者的channel或者连接关闭,那么消息就丢失了。(2)这种模式没有对传递的消息做限制,消费者如果接收了太多来不及处理的消息,导致这些消息的挤压使得内存耗尽,最终导致消费者线程被操作系统杀死。这种模式适合消费者能高效并以某种速率处理这些消息的情况下使用。
-
手动应答
- 消费者成功接收到消息并处理完成后,向rabbitmq发送ack确认消费标识
-
spring:
  rabbitmq:
    host: localhost
    port: 5672
    virtual-host: /
    username: guest
    password: guest
    # 开启发送端确认
    publisher-confirm-type: correlated
    # 开启发送端消息抵达队列的确认
    publisher-returns: true
    # 只要抵达队列,以异步发送优先回调我们这个 returnConfirm
    template:
      mandatory: true
    # 手动ack消息
    listener:
      direct:
        default-requeue-rejected: true
        acknowledge-mode: manual

server:
  port: 8080
@Configuration
@Slf4j
public class RabbitConfig {
	@Bean("listenerContainerFactory")
    public SimpleRabbitListenerContainerFactory listenerContainerFactory(ConnectionFactory connectionFactory) {
        SimpleRabbitListenerContainerFactory factory = new SimpleRabbitListenerContainerFactory();
        factory.setConnectionFactory(connectionFactory);
        // 如果需要批量确认消息,则做以下设置
        // 设置批量
        // factory.setBatchListener(true);
        // 设置BatchMessageListener生效
        // factory.setConsumerBatchEnabled(true);
        // 设置批量确认数量
        // factory.setBatchSize(10);

        //设置消息为手动确认
        factory.setAcknowledgeMode(AcknowledgeMode.MANUAL);

        return factory;
    }
}
   @RabbitListener(queues = "hello",containerFactory = "listenerContainerFactory")
    public void queueAck(String msg, Channel channel, Message message) {
        try {
            long deliveryTag = message.getMessageProperties().getDeliveryTag();
            channel.basicAck(deliveryTag, false);
            System.out.println("手动确认机制,tag:" + deliveryTag + ",接收到消息:" + msg);
        } catch (Exception e) {
            e.printStackTrace();
        }
    }
3.发布确认
-
生产者将信道设置成confirm模式,一旦信道进入confirm模式,所有在该信道上发布的消息都将会被指派一个唯一的ID
-
设置队列为持久化
-
设置队列中的消息持久化
-
发布确认
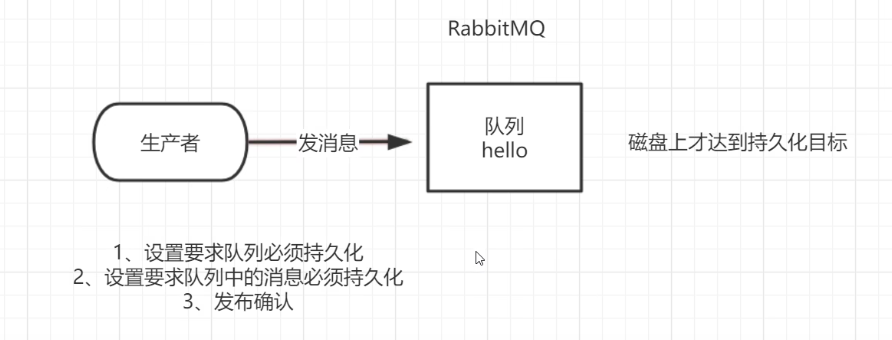
-
4.交换机
- 生产者将消息发送给交换机(exchanges)交换机工作内容非常简单,一方面接收来自生产者的消息,另一方面将它们推入队列,交换机必须确切知道如何处理接收的消息,是应该把消息放到特定的队列还是丢弃它们,这就由交换机来决定。
- 直接类型(direct)
- 主题(topic)
- 标题(headers)
- 扇出(fanout)

1.fanout(广播模式)
    @RequestMapping("/fanout")
    public void fanout() {
        rabbitTemplate.convertAndSend("abc", "", "fanout");
    }
   @RabbitListener(bindings = {
            @QueueBinding(
                    value = @Queue,
                    exchange = @Exchange(value = "abc",type = "fanout")
            )
    })
    public void fanout(String msg) {
        System.out.println(msg);
    }
2.direct(路由模式)
    @RequestMapping("/direct")
    public void direct() {
        rabbitTemplate.convertAndSend("directs", "error", "direct");
    }
   @RabbitListener(bindings = {
            @QueueBinding(
                    value = @Queue(value = "rabbitmq"),
                    exchange = @Exchange(value = "directs", type = "direct"),
                    key = {"error"}
            )
    })
    public void direct2(String msg) {
        System.out.println(msg);
    }
3.topic(主题模式)
    @RequestMapping("/topic")
    public void topic() {
        rabbitTemplate.convertAndSend("topics", "order.save", "topic");
    }
    @RabbitListener(bindings = {
            @QueueBinding(
                    value = @Queue,
                    exchange = @Exchange(type = "topic", value = "topics"),
                    key = {"order.#", "user.*"}
            )
    })
    public void receive2(String message) {
        System.out.println("message2=" + message);
    }
5.死信队列
-
生产者将消息投递到broker中,消费者从broker中取出消息消费时由于特定的原因导致某些消费无法被消费,这样的消息没有后续的处理就变成了死信消息加入到死信队列中
-
消息TTL过期
-
队列达到最大长度
-
消息被拒绝并且requeue=false
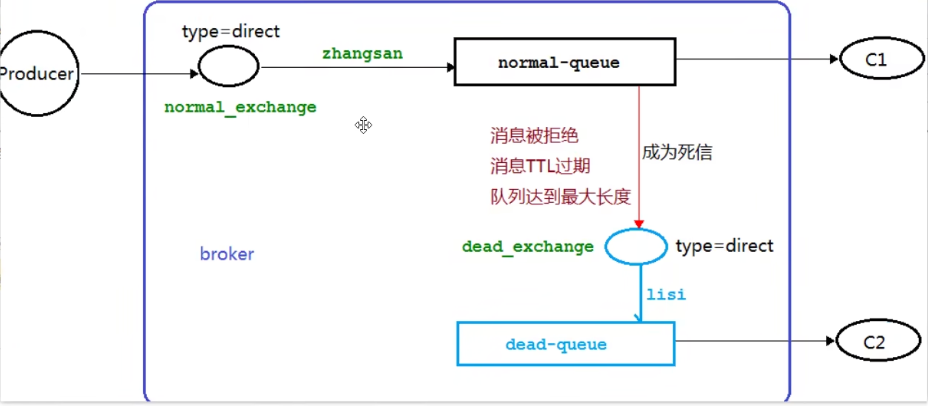
-
    @RequestMapping("/dead")
    public void dl() {
        String message = "Hello World!";

        rabbitTemplate.convertAndSend("normal_exchange", "normal_key", message);
    }
// 这里我只演示了TTL过期

@RabbitListener(bindings = {@QueueBinding(
            value = @Queue(value = "normal_queue", declare = "true"//指定一下队列名,默认持久队列,不指定则为临时队列
                    , arguments = {
                    @Argument(name = "x-dead-letter-exchange", value = "dlx_exchange"), //指定一下死信交换机
                    @Argument(name = "x-dead-letter-routing-key", value = "dead_key"),  //指定死信交换机的路由key
                    @Argument(name = "x-message-ttl", value = "10000", type = "java.lang.Long") //指定队列的过期时间,type需要指定为Long,否则会抛异常
                    //,@Argument(name = "x-max-length",value = "3") //指定队列最大长度,超过会被投入死信,至于type是否需要指定为Long,本人没试过
            }
            ),
            exchange = @Exchange(value = "normal_exchange", type = ExchangeTypes.DIRECT, durable = "true"),//Exchang的默认类型就是direct,所以type可以不写
            key = "normal_key"
    )
    })
    public void normal(Message message) throws InterruptedException {
        Thread.sleep(20000);
        log.info(" [ 消费者@A号 ] 消费了消息 ==> '" + new String(message.getBody()));
    }

    // 监听死信队列
    @RabbitListener(bindings = {@QueueBinding(
            value = @Queue(value = "dlx_queue"),
            exchange = @Exchange(value = "dlx_exchange"),//Exchang的默认类型就是direct,所以type可以不写
            key = "dead_key"
    )
    })
    public void dl(Message message) {
        log.info(" [ 消费者@死信号 ] 接收到消息 ==> '" + new String(message.getBody()));
    }
6.延迟队列
-
安装插件
- 因为队列是先进先出的,当一条消息延迟20s,第二条消息延迟2s,第二条消息并不会被先消费,而是会等到20s之后消费第一条后才会继续消费第二条。
https://blog.csdn.net/m0_67402774/article/details/124169540

-
配置类代码
@Configuration public class DelayedQueueConfig { public static final String DELAYED_QUEUE_NAME = "delayed.queue"; public static final String DELAYED_EXCHANGE_NAME = "delayed.exchange"; public static final String DELAYED_ROUTING_KEY = "delayed.routingKey"; @Bean("delayedQueue") public Queue delayedQueue(){ return new Queue(DELAYED_QUEUE_NAME); } /** * 自定义交换机 定义一个延迟交换机 * 不需要死信交换机和死信队列,支持消息延迟投递,消息投递之后没有到达投递时间,是不会投递给队列 * 而是存储在一个分布式表,当投递时间到达,才会投递到目标队列 * @return */ @Bean("delayedExchange") public CustomExchange delayedExchange(){ Map<String, Object> args = new HashMap<>(1); // 自定义交换机的类型 args.put("x-delayed-type", "direct"); return new CustomExchange(DELAYED_EXCHANGE_NAME, "x-delayed-message", true, false, args); } @Bean public Binding bindingDelayedQueue(@Qualifier("delayedQueue") Queue delayedQueue, @Qualifier("delayedExchange") CustomExchange delayedExchange){ return BindingBuilder.bind(delayedQueue).to(delayedExchange).with(DELAYED_ROUTING_KEY).noargs(); } } -
生产者
@Slf4j @RestController @RequestMapping("/ttl") public class SendMsgController { @Autowired private RabbitTemplate rabbitTemplate; public static final String DELAYED_EXCHANGE_NAME = "delayed.exchange"; public static final String DELAYED_ROUTING_KEY = "delayed.routingKey"; @GetMapping("/sendDelayMsg/{message}/{delayTime}") public String sendMsg(@PathVariable String message, @PathVariable Integer delayTime){ rabbitTemplate.convertAndSend(DELAYED_EXCHANGE_NAME, DELAYED_ROUTING_KEY, message, messagePostProcessor ->{ messagePostProcessor.getMessageProperties().setDelay(delayTime); return messagePostProcessor; }); log.info("当前时间:{},发送一条延迟{}毫秒的信息给队列delay.queue:{}", new Date(), delayTime, message); return "发送成功"; } } -
消费者
@Slf4j
@Component
public class DeadLetterConsumer {

    public static final String DELAYED_QUEUE_NAME = "delayed.queue";

    @RabbitListener(queues = DELAYED_QUEUE_NAME)
    public void receiveDelayedQueue(Message message){
        String msg = new String(message.getBody());
        log.info("当前时间:{},收到延时队列的消息:{}", new Date(), msg);
    }
}
7.发布确认(高级)
-
当生产者发送消息给交换机 交换机或者队列因为网络问题未收到消息的解决方案。
-
配置类
@Configuration public class ConfirmConfig { //交换机 public static final String CONFIRM_EXCHANGE_NAME = "confirm_exchange"; //队列 public static final String CONFIRM_QUEUE_NAME = "confirm_queue"; //RountingKey public static final String CONFIRM_ROUNTING_KEY = "key1"; //声明交换机 @Bean("confirmExchange") public DirectExchange confirmExchange(){ return new DirectExchange(CONFIRM_EXCHANGE_NAME); } //声明队列 @Bean("confirmQueue") public Queue confirmQueue(){ return QueueBuilder.durable(CONFIRM_QUEUE_NAME).build(); } //绑定 @Bean public Binding queueBindingExchange(@Qualifier("confirmQueue") Queue confirmQueue, @Qualifier("confirmExchange") DirectExchange confirmExchange){ return BindingBuilder.bind(confirmQueue).to(confirmExchange).with(CONFIRM_ROUNTING_KEY); } } -
yml配置
# 开启发送端确认 publisher-confirm-type: correlated # 开启发送端消息抵达队列的确认 publisher-returns: true -
生产者
@GetMapping("/sendMessage/{message}") public void sendMessage(@PathVariable String message){ CorrelationData correlationData = new CorrelationData("1"); rabbitTemplate.convertAndSend(ConfirmConfig.CONFIRM_EXCHANGE_NAME, ConfirmConfig.CONFIRM_ROUNTING_KEY,message,correlationData); log.info("发送消息内容为:{}",message); CorrelationData correlationData2 = new CorrelationData("2"); rabbitTemplate.convertAndSend(ConfirmConfig.CONFIRM_EXCHANGE_NAME, ConfirmConfig.CONFIRM_ROUNTING_KEY+"2",message,correlationData2); log.info("发送消息内容为:{}",message); } -
消费者
@RabbitListener(queues = ConfirmConfig.CONFIRM_QUEUE_NAME) public void receiveConfirmMessage(Message message) { String msg = new String(message.getBody()); log.info("接收到的队列confirm.queue消息:{}", msg); } -
回调接口
package com.liubo.rabbitmq.config;

import lombok.extern.slf4j.Slf4j;
import org.springframework.amqp.core.Message;
import org.springframework.amqp.rabbit.connection.CorrelationData;
import org.springframework.amqp.rabbit.core.RabbitTemplate;
import org.springframework.beans.factory.annotation.Autowired;
import org.springframework.stereotype.Component;

import javax.annotation.PostConstruct;

@Slf4j
@Component
public class MyCallBack implements RabbitTemplate.ConfirmCallback,RabbitTemplate.ReturnCallback{

    @Autowired
    private RabbitTemplate rabbitTemplate;

    @PostConstruct
    public void init() {
        rabbitTemplate.setConfirmCallback(this);
        rabbitTemplate.setReturnCallback(this);
    }


    @Override
    public void confirm(CorrelationData correlationData, boolean ack, String cause) {
        String id = correlationData != null ? correlationData.getId() : "";
        if (ack) {
            log.info("交换机已经收到ID为:{}的消息", id);
        } else {
            log.info("交换机还未收到ID为:{}的消息,由于原因:{}", id, ack);
        }
    }

    @Override
    public void returnedMessage(Message message, int replyCode, String replyText, String exchange, String routingKey) {
        log.error("消息{},被交换机{}退回,退回原因:{},路由key:{}",
                new String(message.getBody()),exchange,replyText,routingKey);
    }
}
8.队列优先级
-
配置类
@Slf4j @Component public class PriorityConfig { public static final String EXCHANGE = "priority-exchange"; public static final String QUEUE = "priority-queue"; public static final String ROUTING_KEY = "priority_key"; /** * 定义优先级队列 */ @Bean Queue queue() { Map<String, Object> args = new HashMap<>(); args.put("x-max-priority", 10); //设置优先级,范围0-255,此处设为10,则允许优先级的范围为0-10 return new Queue(QUEUE, false, false, false, args); } /** * 定义交换器 */ @Bean DirectExchange exchange() { return new DirectExchange(EXCHANGE); } @Bean Binding binding(Queue queue, DirectExchange exchange) { return BindingBuilder.bind(queue).to(exchange).with(ROUTING_KEY); } } -
生产者
    @GetMapping("/sendPriorityMessage")
    public void sendPriorityMessage(){
        String message = "";
        for (int i = 0; i < 10;i++){
            message = "info" + i;
            if (i == 5){ // i= 5 设置优先级为10 ,优先级也可以作为形参接受
                rabbitTemplate.convertAndSend(PriorityConfig.EXCHANGE,PriorityConfig.ROUTING_KEY,message, msg -> {
                    msg.getMessageProperties().setPriority(10);
                    return msg;
                });
            }else {
                rabbitTemplate.convertAndSend(PriorityConfig.EXCHANGE,PriorityConfig.ROUTING_KEY,message,msg -> {
                    msg.getMessageProperties().setPriority(5);
                    return msg;
                });
            }
        }

        log.info("发出消息success");
    }
9.惰性队列
-
RabbitMQ 从 3.6.0 版本开始引入了惰性队列的概念。惰性队列会尽可能的将消息存入磁盘中,而在消费者消费到相应的消息时才会被加载到内存中,它的一个重要的设计目标是能够支持更长的队列,即支持更多的消息存储。当消费者由于各种各样的原因(比如消费者下线、宕机亦或者是由于维护而关闭等)而致使长时间内不能消费消息造成堆积时,惰性队列就很有必要了。
默认情况下,当生产者将消息发送到 RabbitMQ 的时候,队列中的消息会尽可能的存储在内存之中,这样可以更加快速的将消息发送给消费者。即使是持久化的消息,在被写入磁盘的同时也会在内存中驻留一份备份。当 RabbitMQ 需要释放内存的时候,会将内存中的消息换页至磁盘中,这个操作会耗费较长的时间,也会阻塞队列的操作,进而无法接收新的消息。虽然 RabbitMQ 的开发者们一直在升级相关的算法,但是效果始终不太理想,尤其是在消息量特别大的时候
-
两种模式
队列具备两种模式: default 和 lazy。默认的为 default 模式,在 3.6.0 之前的版本无需做任何变更。 lazy 模式即为惰性队列的模式,可以通过调用 channel.queueDeclare 方法的时候在参数中设置,也可以通过 Policy 的方式设置,如果一个队列同时使用这两种方式设置的话,那么 Policy 的方式具备更高的优先级。如果要通过声明的方式改变已有队列的模式的话,那么只能先删除队列,然后再重新声明一个新的
Map<String, Object> args = new HashMap<String, Object>();
args.put("x-queue-mode", "lazy");
channel.queueDeclare("myqueue", false, false, false, args);


 838
838


 被折叠的 条评论
为什么被折叠?
被折叠的 条评论
为什么被折叠?
 到【灌水乐园】发言


