数字图像处理作业-医学图像浏览器

     使用Qt框架编写的一个支持课程提供的.raw格式16位灰度图操作的图像处理器,自定义Image类型,封装几何变换、灰度映射、图像增强等功能,可以多步撤回及多图切换,附加一个比较简单的伪彩色图生成。

        感谢C提供的按行读取图像方法;感谢L提供的完美的拉普拉斯滤波。


一、交互界面设计


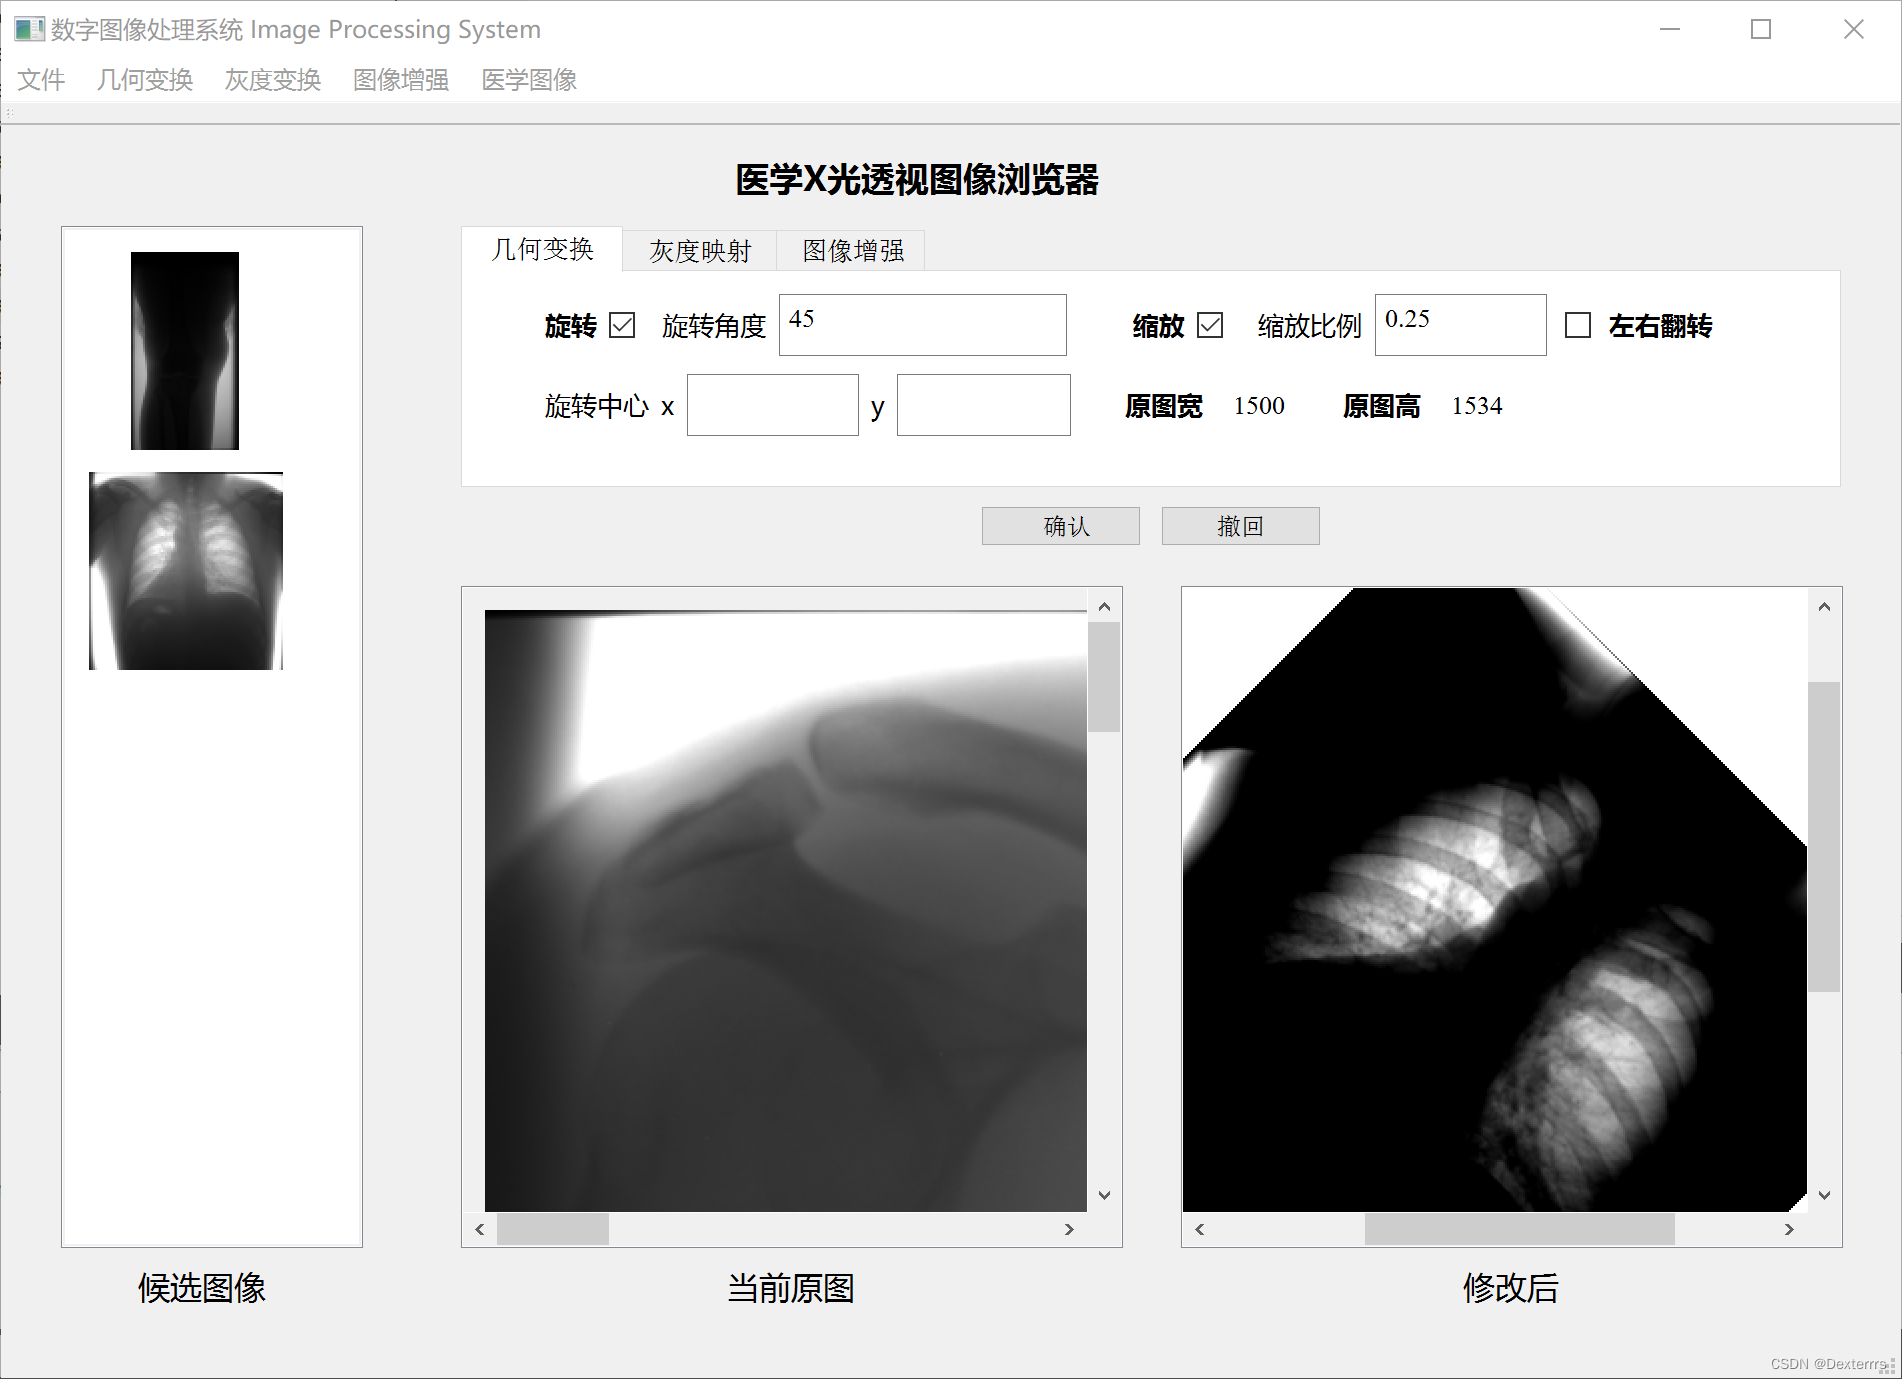
(……具体ui设计待编辑ing,左边是一个缩略图栏,listwidget+Qicon,切换式功能栏借鉴室友刘某,但是给自己挖了大坑orz,比较多逻辑没有考虑清楚的……

1.取消撤回没有实现……

2.右键icon删除没做……

3.双击放大没做,现在的label太小了,即使有scroll也很不友好) 
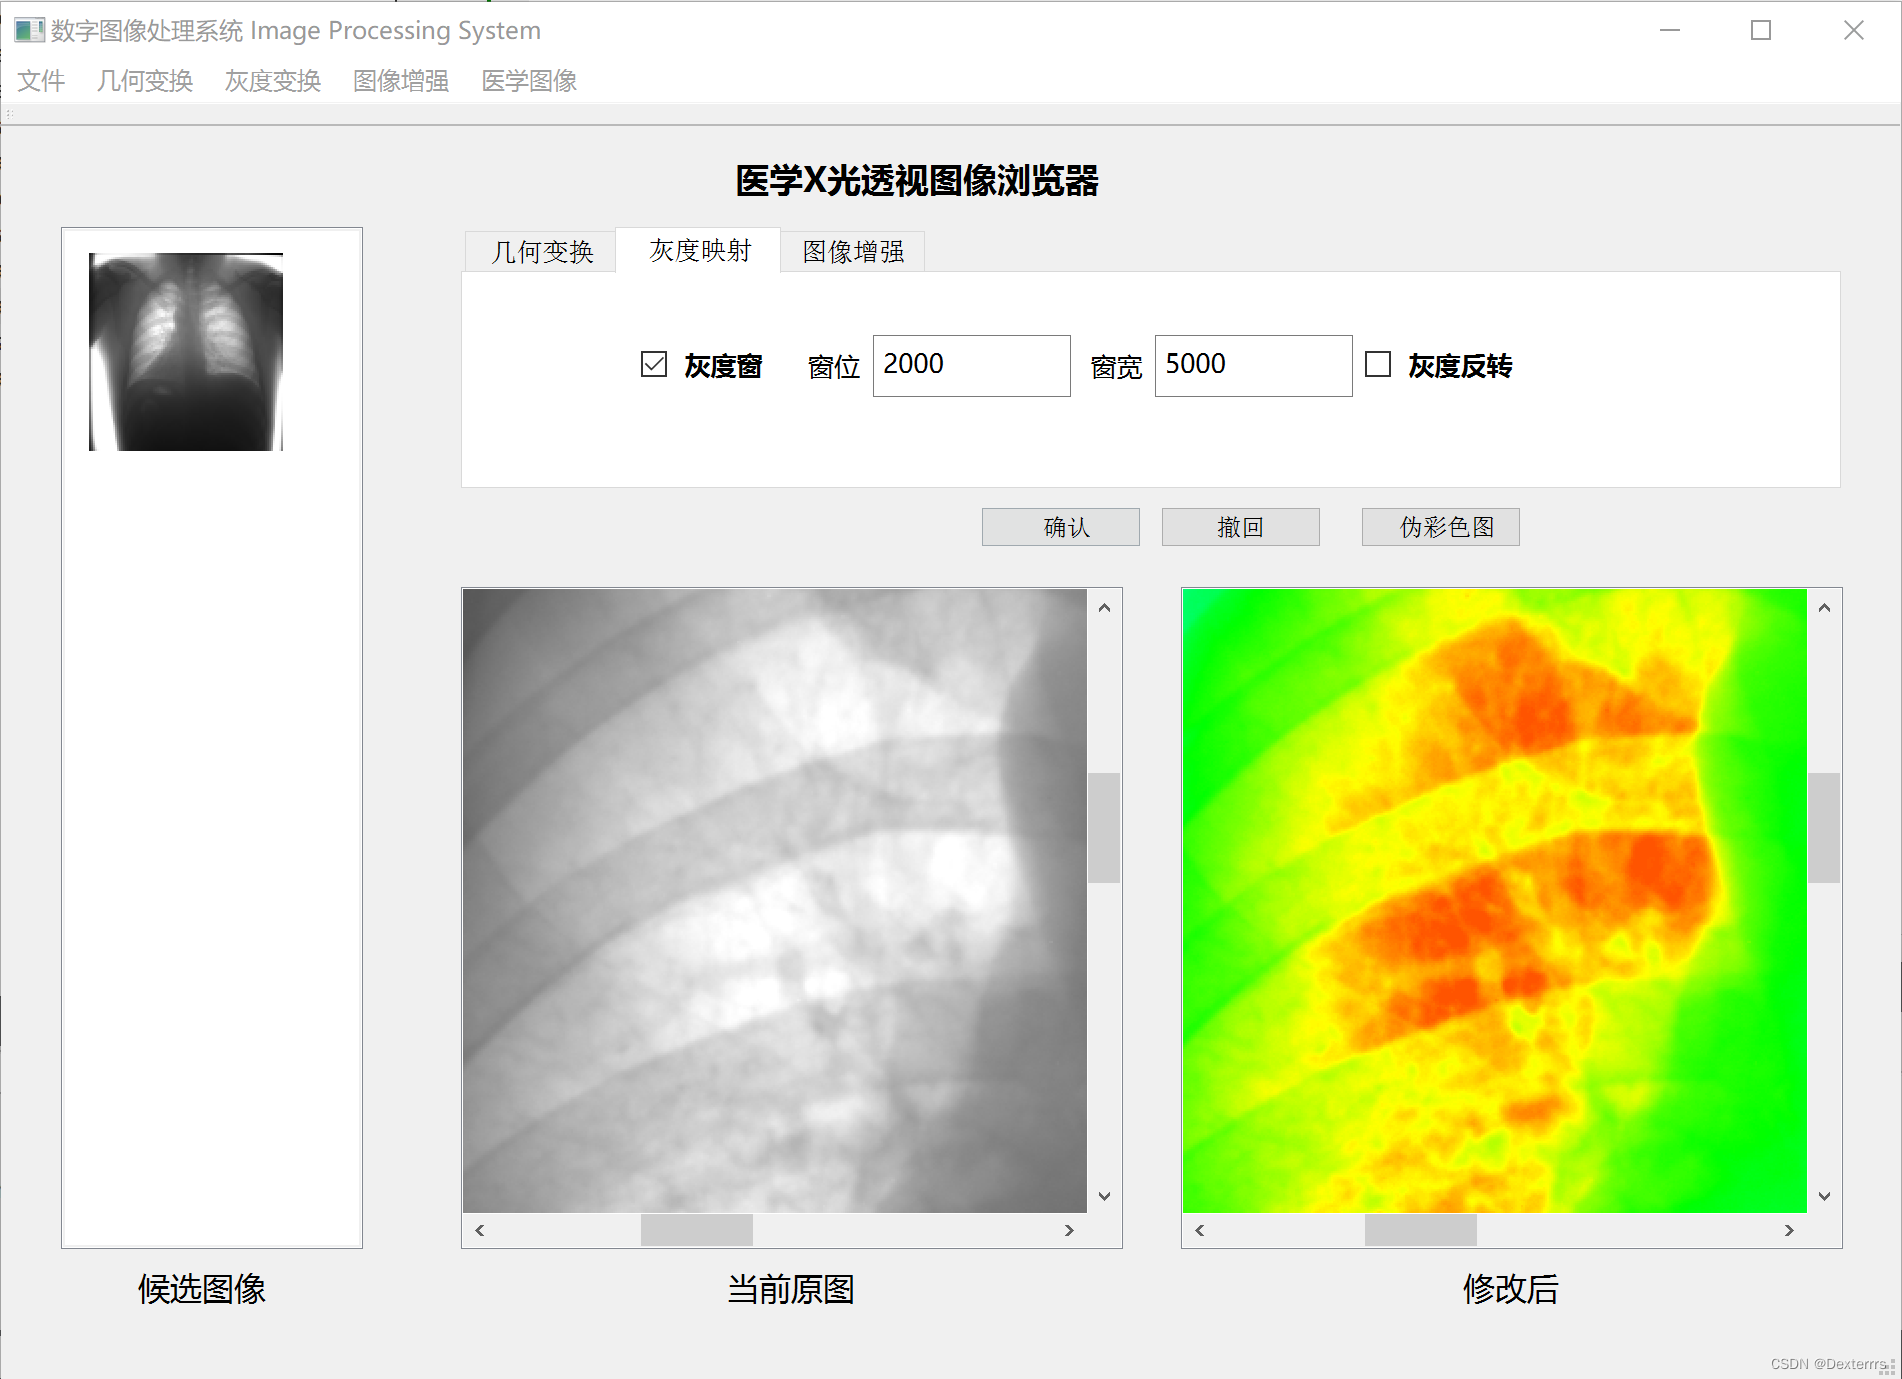
2022.11.19更新:

增加了伪彩色图生成。


 二、自定义图像类型Image

类成员模仿QImage。

#ifndef IMAGE_H
#define IMAGE_H
#include<QImage>
#include<QPixmap>
#include<QLabel>
#include<complex>
#include <QtMath>
#include<QtGlobal>


class Image:public QImage
{
public:
    enum format{
        GRAY8,
        GRAY16,
        RGB32
    };
    Image();
    ~Image();
    Image(const Image &image);//拷贝构造
    Image(QString);//Qimage转换
    Image(unsigned char* data,int width,int height,enum format fmt);
    Image(unsigned short* data,int width,int height,enum format fmt);

    Image* OpenFile_Gray16(QString FileName);//自定义文件格式读取
    void SaveFile(QString FileName);//自选文件格式保存
    QImage* convert(Image*);

    Image* Rotate();//旋转
    Image* Scaling();//缩放
    Image* Flip();//左右翻转
    Image* Grayscale();//灰度映射
    Image* GrayFlip();//灰度反转
    Image* Enhance();//图像增强


    QString getFileName();
    int getWidth();
    int getHeight();
    double getScale();
    void setFileName(QString fn);
    void convertmatrix();
    void convertpixel(uchar**);

    void setRotationAngle(double);
    void setRotationCenterX(int);
    void setRotationCenterY(int);
    void setScale(double);

    void setWinCenter(int);
    void setWinWidth(int);

    uchar getmyPixel8(int x,int y);
    ushort getmyPixel16(int x,int y);
    format getmyformat();


protected:
    /*基本参数*/
    QString FileName;//文件名
    int height=0;//图像高
    int width=0;//图像宽
    enum format myformat;//图像格式
    uchar* pixels=nullptr;//8位图像数据指针
    ushort* pixels16=nullptr;//16位图像数据指针
    int ByteCount;// 一个像素所需的字节数
    int BytesPerLine;//一行字节数

    /*几何变换参数*/
    double RotationAngle=0;//旋转角度,默认正向转0度
    int RoCX=0;
    int RoCY=0;//旋转中心
    double Scale=1.0;//缩放比例,默认等比例

    /*灰度映射*/
    int WinCenter=0;//窗位
    int WinWidth=255;//窗宽


};

#endif // IMAGE_H

反思:

1.没有使用模板,每个类自带一个8位uchar数组,一个16位ushort数组,代码比较冗余,涉及大量8位和16位转换的问题,功能基本上都是用的if else判断format……

2.图像灰度值对数据类型及范围非常敏感(因为int、ushort、uchar出了无数次乌龙……反思……)

3.浪费很多内存……嗯……Qrz,比如各种int和double

4.继承了QImage主要是为了在图像保存的时候偷懒……

三、具体功能

(一)文件读取

特化的文件读取,目前的逻辑是检测到文件名最后四个是‘.raw’就调用这种读取方式,不然就直接拿QImage的标准格式读取(…)再转换成Image

Image* Image::OpenFile_Gray16(QString fn)
{
    fn=QDir::toNativeSeparators(fn);//绝对路径‘/’与‘\’转化
    char*  ch;
    QByteArray ba = fn.toLatin1();
    ch=ba.data();//文件名格式转化
    ifstream is(ch, ifstream::binary);//文件流

   ulong w,h,bytesperline;
   enum format fmt=format::GRAY16;

   is.seekg(0);
   is.read((char*)&w, 4);//读4字节宽度
   is.seekg(4);
   is.read((char*)&h,4);//读4字节长度
   is.seekg(8);


   bytesperline= (w*8 +31)/32*4;
   ushort* data=new ushort[h*bytesperline];

   //按字节读取
   /*int k=0;
    for(int y=0;y<h;y++)
       for(int x=0;x<w;x++)
           {
              is.seekg(8+k);
              is.read((char*)&data[y*bytesperline+x],2);

              k=k+2;
       }*/   //一个数据两个字节

    //改进:按行读取
    //QT的QDataStream:适用于二进制流的文件读取/写入操作
   for(int y=0;y<h;y++)
    {
       is.read(reinterpret_cast<char*>(data+y*bytesperline),sizeof(ushort)*w);
   }


   Image* Gray16Image=new Image(data,w,h,fmt);
   Gray16Image->setFileName(fn);

   is.close();
   delete[] data;
   return Gray16Image;
}

(二)几何变换

其实可以统一成仿射变换……16位的else if就不放了

Image* Image::Rotate()
{
    //负数代表逆时针转,正数代表顺时针转

    double theta = RotationAngle *  M_PI/ 180;
    double Cos=cos(theta);
    double Sin=sin(theta);

    double Cos2=qAbs(Cos);
    double Sin2=qAbs(Sin);

    int OpHeight = round(width * Sin2 + Cos2 * height);
    int OpWidth =  round(width * Cos2 + Sin2 * height);
    int OpBytesPerLine=(OpWidth*ByteCount +31)/32*4;

    double temp1, temp2;
    temp1 = -0.5 * OpWidth * Cos - 0.5 * OpHeight * Sin + 0.5 * width;
    temp2 = 0.5 * OpWidth * Sin - 0.5 * OpHeight * Cos + 0.5 * height;

    if(myformat==format::GRAY8)
    {
        uchar* Oppixels=new uchar[OpHeight*OpBytesPerLine];

    for (int y0 = 0; y0 < OpHeight; y0++)
     {
       for (int x0 = 0; x0 < OpWidth; x0++)
            {
               Oppixels[y0*OpBytesPerLine+x0] = 255;
           }

    }
    Image* OpImage= new Image(Oppixels,OpWidth,OpHeight,myformat);

    double SrcX, SrcY;//旋转后坐标位置
    for (int y0 = 0; y0 < OpHeight; y0++)
     {
       for (int x0 = 0; x0 < OpWidth; x0++)
            {
                SrcX = RoCX+(x0-RoCX) * Cos + (y0-RoCY) * Sin + temp1;
                SrcY = RoCY-(x0-RoCX) * Sin + (y0-RoCY) * Cos + temp2;
                //SrcX = x0 * Cos + y0* Sin + temp1;
                //SrcY = -x0* Sin + y0* Cos + temp2;

                //双线性插值
                if (SrcX >= 0 && SrcX <= width - 1 && SrcY >= 0 && SrcY <= height - 1)
                    //在原画布大小区域内
                {
                    int X1 = round(SrcX-0.5);
                    int X2 =round(SrcX+0.5);
                    int Y2 =round(SrcY+0.5);
                    int Y1 =round(SrcY-0.5);

                    //相邻四个点以不同权值确定新图(x0,y0)出灰度值
                    OpImage->pixels[y0*OpBytesPerLine+x0] =
                   (Y2-SrcY)*((X2-SrcX)* pixels[Y1*BytesPerLine+X1]
                            + (SrcX - X1)*pixels[Y1*BytesPerLine+X2])
                      +(SrcY-Y1)*((X2-SrcX)* pixels[Y2*BytesPerLine+X1]
                            + (SrcX-X1)*pixels[Y2*BytesPerLine+X2]);

                    if (OpImage->pixels[y0*OpBytesPerLine+x0]> 255)
                    {
                        OpImage->pixels[y0*OpBytesPerLine+x0]= 255;
                    }

                }
                else
                {

                    OpImage->pixels[y0*OpBytesPerLine+x0] = 255;//白色填充
                }
            }
        }

    delete[] Oppixels;
    return OpImage;
    }

}
Image* Image::Scaling()
{

    int OpHeight =round(height * Scale);
    int OpWidth = round(width *Scale);
    int OpBytesPerLine=(OpWidth*ByteCount +31)/32*4;

    if(myformat== format::GRAY8)
    {
        uchar* Oppixels=new uchar[OpHeight*OpBytesPerLine];
        for (int y0 = 0; y0 < OpHeight; y0++)
         {
           for (int x0 = 0; x0 < OpWidth; x0++)
                {
                   Oppixels[y0*OpBytesPerLine+x0] = 255;
               }
            }

        Image* OpImage= new Image(Oppixels,OpWidth,OpHeight,myformat);

        double SrcX, SrcY;//缩放后坐标位置

        for (int y0 = 0; y0 < OpHeight; y0++)
         {
           for (int x0 = 0; x0 < OpWidth; x0++)
                {
                     SrcX=(x0+0.5)/Scale -0.5;
                     SrcY=(y0+0.5)/Scale -0.5;
                     //正好落在采样点上,(SrcX、SrcY)为整数,否则双线性插值计算

                    if (SrcX >= 0 && SrcX <= width-1  && SrcY >= 0 && SrcY <= height - 1)
                        //在原画布大小区域内
                    {
                        int X1 =round(SrcX-0.5);
                        int X2 =round(SrcX+0.5);
                        int Y2 =round(SrcY+0.5);
                        int Y1 =round(SrcY-0.5);

                        //相邻四个点以不同权值确定新图(x0,y0)灰度值
                        OpImage->pixels[y0*OpBytesPerLine+x0] =
                       (Y2-SrcY)*((X2-SrcX)* pixels[Y1*BytesPerLine+X1]
                                + (SrcX - X1)*pixels[Y1*BytesPerLine+X2])
                      +(SrcY-Y1)*((X2-SrcX)* pixels[Y2*BytesPerLine+X1]
                                + (SrcX-X1)*pixels[Y2*BytesPerLine+X2]);

                        if (OpImage->pixels[y0*OpBytesPerLine+x0]> 255)
                        {
                            OpImage->pixels[y0*OpBytesPerLine+x0]= 255;
                        }

                    }
                    else
                    {

                        OpImage->pixels[y0*OpBytesPerLine+x0] = 255;//白色填充
                    }
                }
            }
        delete[] Oppixels;
        return OpImage;

    }

(三)灰度映射(2022.11.19)

医学图像不适用直方图均衡算法,会丢失灰度,采用分段线性灰度映射。

Image* Image::Grayscale()
{
    int L=4096;
    int WinMax=WinCenter+(WinWidth/2);
    int WinMin=WinCenter-(WinWidth/2);
    int n=height*width;//像素数
    int i,j,y0,x0=0;

    uchar *S=new uchar[L];//[WinMin,WinMax]->[0,255]映射

    int OpBytesPerLine= (width*8 +31)/32*4;
    uchar* Oppixels=new uchar[height*OpBytesPerLine];
    enum format opfmt=format::GRAY8;

    /*线性灰度映射*/

    double k=(double)255/WinWidth;
    double b=(double)(-255)*WinMin/WinWidth;

    for(i=0;i<L;i++)
    {
        if(i<WinMax&&i>WinMin){

            S[i]=(uchar)(k*i+b);
        }
        else if(i>=0&&i<=WinMin)
        {
            S[i]=0;

        }
       else if(i>=WinMax&&i<L)
        {
            S[i]=255;
        }
    }
    for(y0=0;y0<height;y0++)
    {

        for(x0=0;x0<width;x0++)
        {

            ushort r2=pixels16[y0*BytesPerLine+x0];
            Oppixels[y0*OpBytesPerLine+x0]=S[r2];
        }
    }

    Image* OpImage=new Image(Oppixels,width,height,opfmt);

    delete[] S;
    delete[] Oppixels;

    return OpImage;
}

(四)拓展:伪彩色图生成(2022.11.19)

用了一个比较简单的分四级灰度计算LUT(色彩查找表),且偷懒用了QImage的RGB格式,没有直接更新Image类,于是把跟彩色图有关的操作全部扔在了MainWindow里。

void MainWindow::generateLUT()
{
    int R,G,B;
    int L=255;
    for(int i=0;i<=L;i++)
    {
        if (i<=L/4)
           {   R=0;
               G=4*i;
               B=L;}
        else if (i>L/4&&i<=L/2)
            {  R=0;
               G=L;
               B=-4*i+2*L; }
       else if (i>L/2&&i<=3*L/4)
          {   R=4*i-2*L;
              G=L;
              B=0;}
       else
          { R=L;
            G=-4*i+4*L;
            B=0;}
        R=qBound(0,R,255);
        B=qBound(0,B,255);
        G=qBound(0,G,255);
        QRgb rgb=qRgba(R,G,B,1);
        LUT[i]=rgb;

    }
}

QImage应该是可以生成索引图,赶ddl交了作业没有仔细想,用了简单粗暴的循环赋值。

不支持16位灰度的查表,必须先进行灰度窗。

void MainWindow::on_pushButton_color_clicked()
{
    OpImage=CurImage;
    /*灰度映射*/
    if(ui->checkBox_Gray1->isChecked()&&!ui->checkBox_Gray2->isChecked())
   {
        int WWidth=ui->textEdit_WinWidth->toPlainText().toInt();
        int WCenter=ui->textEdit_WinCenter->toPlainText().toInt();

        OpImage->setWinWidth(WWidth);
        OpImage->setWinCenter(WCenter);
        OpImage=OpImage->Grayscale();
        LastOp=CurOp;
        CurOp=Operation::GRAYSCALE;
    }
    if(ui->GrayFlipcheckBox->isChecked())
    {
        OpImage=OpImage->GrayFlip();
        LastOp=CurOp;
        CurOp=Operation::GRAYFLIP;
    }

    CoImage=QImage(OpImage->getWidth(),OpImage->getHeight(),QImage::Format_RGB32);
    CoImage.fill(QColor(Qt::black));

     if(OpImage->getmyformat()==Image::format::GRAY8)
    {
         Color=true;
         for (int y0=0;y0<CoImage.height();y0++) {
           for (int x0=0;x0<CoImage.width();x0++) {
            CoImage.setPixel(x0,y0,LUT[OpImage->getmyPixel8(x0,y0)]);
            }
         }
     }

    ShowCoImage(CoImage);

}

(待更新)

  • 1
    点赞
  • 2
    收藏
    觉得还不错? 一键收藏
  • 5
    评论
评论 5
添加红包

请填写红包祝福语或标题

红包个数最小为10个

红包金额最低5元

当前余额3.43前往充值 >
需支付:10.00
成就一亿技术人!
领取后你会自动成为博主和红包主的粉丝 规则
hope_wisdom
发出的红包
实付
使用余额支付
点击重新获取
扫码支付
钱包余额 0

抵扣说明:

1.余额是钱包充值的虚拟货币,按照1:1的比例进行支付金额的抵扣。
2.余额无法直接购买下载,可以购买VIP、付费专栏及课程。

余额充值