


Android作业二Recyclerview+adapter+StaggeredGridLayoutManager展示联系人
准备工作
在gradle中导入依赖
implementation ‘androidx.appcompat:appcompat:1.2.0’
implementation 'androidx.recyclerview:recyclerview:1.2.0’
尽量与appcompat的版本相同
一.编写要放入contactpeople的内部layout
<?xml version="1.0" encoding="utf-8"?>
<LinearLayout xmlns:android="http://schemas.android.com/apk/res/android"
    xmlns:app="http://schemas.android.com/apk/res-auto"
    xmlns:tools="http://schemas.android.com/tools"
    android:layout_width="match_parent"
    android:layout_height="wrap_content"
    android:layout_margin="8dp"
    android:orientation="vertical">


    <ImageView
        android:id="@+id/peoimg"
        android:layout_width="wrap_content"
        android:layout_height="wrap_content" />

    <LinearLayout
        android:layout_width="match_parent"
        android:layout_height="match_parent"
        android:orientation="horizontal">

        <LinearLayout
            android:layout_width="match_parent"
            android:layout_height="match_parent"
            android:layout_weight="1"
            android:orientation="vertical">

            <TextView
                android:id="@+id/contactname"
                android:layout_width="wrap_content"
                android:layout_height="wrap_content"
                android:layout_margin="8dp"

                tools:text="1" />
        </LinearLayout>

        <LinearLayout
            android:layout_width="match_parent"
            android:layout_height="match_parent"
            android:layout_weight="1"
            android:orientation="vertical">

            <TextView
                android:id="@+id/contactnumber"
                android:layout_width="wrap_content"
                android:layout_height="wrap_content"
                android:layout_margin="8dp"

                tools:text="price" />
        </LinearLayout>

        <LinearLayout
            android:layout_width="match_parent"
            android:layout_height="match_parent"
            android:layout_weight="1"
            android:orientation="vertical">

            <TextView
                android:id="@+id/contacttype"
                android:layout_width="wrap_content"
                android:layout_height="wrap_content"
                android:layout_margin="8dp"

                tools:text="男" />
        </LinearLayout>

    </LinearLayout>

</LinearLayout>
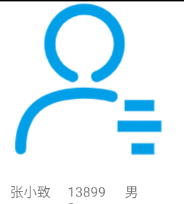
展示效果为
一.修改上次的contactpeople页面
添加recyclerview,adapter,上下文context,和要添加的数据data
 private RecyclerView recyclerView;
    private myadapter myadapter;
    private Context context;
    private ArrayList<HashMap<String,Object>> data=new ArrayList<HashMap<String,Object>>();
然后在oncreateview函数中为新增的变量赋值
context=inflate.getContext();
        recyclerView=inflate.findViewById(R.id.recycleview);
        HashMap<String, Object> stringObjectHashMap = new HashMap<>();
        stringObjectHashMap.put("name","张小致");
        stringObjectHashMap.put("number",138999);
        stringObjectHashMap.put("type","男");
        HashMap<String, Object> stringObjectHashMap1 = new HashMap<>();
        stringObjectHashMap1.put("name","朱小兵");
        stringObjectHashMap1.put("number",138999);
        stringObjectHashMap1.put("type","男");
        HashMap<String, Object> stringObjectHashMap2 = new HashMap<>();
        stringObjectHashMap2.put("name","左小萌");
        stringObjectHashMap2.put("number",138999);
        stringObjectHashMap2.put("type","女");


        //System.out.println(data.size());
        data.add(stringObjectHashMap);
        data.add(stringObjectHashMap1);
        data.add(stringObjectHashMap2);
        myadapter=new myadapter(context,data);
三.编写adapter
继承自RecyclerView.adapter,注意泛型需要添加继承自RecyclerView.ViewHolder的子类
上代码
public class myadapter extends RecyclerView.Adapter <myadapter.myviewholder>{
    private ArrayList<HashMap<String,Object>> data;
    private Context context;
    private View inflater;
    public myadapter(Context context,ArrayList<HashMap<String,Object>> data) {
        this.context=context;
        this.data=data;
    }

    @NonNull
    @Override
    public myviewholder onCreateViewHolder(@NonNull ViewGroup parent, int viewType) {
         inflater = LayoutInflater.from(context).inflate(R.layout.contactlist, parent, false);
        myviewholder myholder = new myviewholder(inflater);
        return myholder;
    }

    @Override
    public void onBindViewHolder(@NonNull myviewholder holder, int position) {
        HashMap<String, Object> stringObjectHashMap = data.get(position);
        holder.m.setImageResource(R.drawable.contact);
       // String[] strings = stringObjectHashMap.keySet().toArray(new String[0]);
//        System.out.println(strings.toString());
//        System.out.println(strings[0]);
        holder.name.setText(stringObjectHashMap.get("name").toString());
        holder.number.setText(stringObjectHashMap.get("number").toString());
        holder.type.setText(stringObjectHashMap.get("type").toString());

    }

    @Override
    public int getItemViewType(int position) {
        return super.getItemViewType(position);
    }

    @Override
    public int getItemCount() {
        return data.size();
    }
    public class myviewholder extends RecyclerView.ViewHolder {
        ImageView m;
        TextView name,number,type;
        public myviewholder(@NonNull View itemView) {
            super(itemView);
            m=itemView.findViewById(R.id.peoimg);
            name=itemView.findViewById(R.id.contactname);
            number=itemView.findViewById(R.id.contactnumber);
            type=itemView.findViewById(R.id.contacttype);
        }
    }
}
在myviewhoder中绑定view,在onBindViewHolder中设置数据
四.回到contactpeople中写剩下的部分(重点代码)
 StaggeredGridLayoutManager manager = new StaggeredGridLayoutManager(2, StaggeredGridLayoutManager.VERTICAL);
        recyclerView.setLayoutManager(manager);
        recyclerView.setAdapter(myadapter);
注意这里的manager可以任选,有LinearLayout,grid之类的,可以实现不同样式.这里以staggeredgrid来举例子,第一个参数是指分多少列
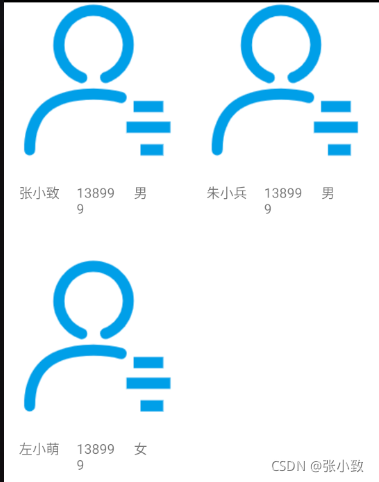
最后展示总体效果
最后附上gitee链接
gitee安卓作业二


 1585
1585


 被折叠的 条评论
为什么被折叠?
被折叠的 条评论
为什么被折叠?
 到【灌水乐园】发言


