


一、底层原理
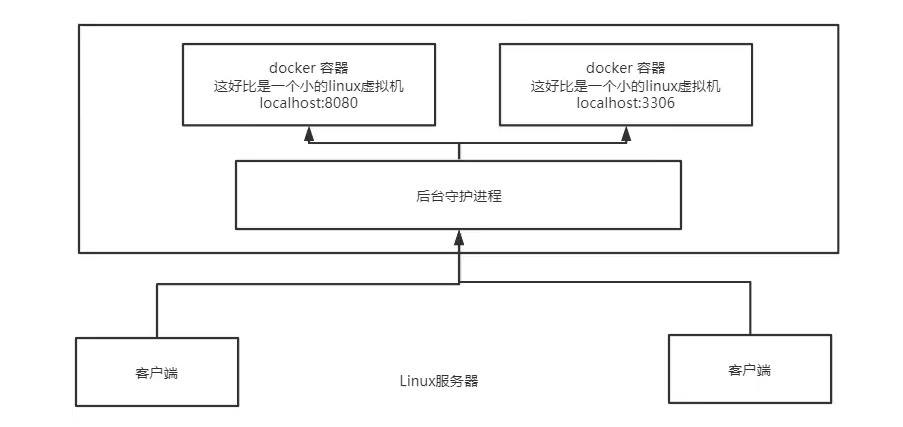
1、Docker是怎么工作的?
Docker是一个Client-Server结构的系统,Docker的守护进程运行在主机上。通过Docket客户端访问!DockerServer接收到Docker-Client的指令,就会执行这个命令!
2、Docker的优势
1、Docker有着比虚拟机更少的抽象层
2、docker利用的时宿主机的内核,vm需要的是Guest OS。
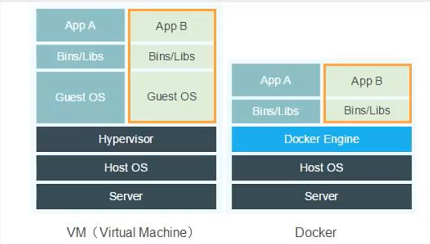
所以说,新建一个容器的时候,docker不需要向虚拟机一样重新加载一个操作系统内核,避免引导。虚拟机是加载Guest OS,分钟级别的,而docker是利用宿主机的操作系统吗,省略了这个复杂的过程,秒级!
二、Docker的常用命令
1、帮助命令
docker version		  #显示docker的版本信息
docker info			  #显示docker的系统信息,包括镜像和容器的数量
docker命令--help		 #帮助命令
帮助文档的地址: https://docs.docker.com/engine/reference/commandline/
2、镜像命令
1 docker images #查看所有本地主机的镜像
[root@localhost ~]#docker images
REPOSITORY		TAG			IMAGE ID		CREATED			SIZE
he11o-world		latest		bf756fb1ae65	4 months ago	13.3kB
#解释
REPOSITORY		镜像的仓库源

TAG				镜像的标签
IMAGE ID		镜像的id
CREATED			镜像的创建时间
SIZE			镜像的大小

#可选项
-a, --all		#列出所有镜像
-q,	--quiet		#只显示镜像的id
3 docker pull #下载镜像
下载镜像命令格式:
docker pull 镜像名[:tag]
[root@localhost ~] # docker pull mysql
Using default tag: latest				#如果不指定tag,默认是latest(最新版本)
latest: Pulling from library/mysql
#分层下载,docker image的核心,联合文件系统
a076a628af6f: Pull complete
f6c208f3f991: Pull complete
88a9455a9165: Pull complete
406c9b8427c6: Pull complete
7c88599c0b25: Pull complete
25b5c6debdaf: Pull complete
43a5816f1617: Pull complete
1a8c919e89bf: Pull complete
9f3cf4bd1a07: Pull complete
80539cea118d: Pull complete
201b3cad54ce: Pull complete
944ba37e1c06: Pull complete
Digest: sha256:feada149cb8ff54eade1336da7c1d080c4a1c7ed82b5e320efb5beebed85ae8c	#签名
Status: Downloaded newer image for mysql:latest
docker.io/library/mysql:latest		#真实地址

#docker pull mysql 等价于 docker pull docker.io/library/mysql:latest
[root@localhost ~] # docker pull mysql:5.7
5.7: Pulling from library/mysql
a076a628af6f: Already exists
f6c208f3f991: Already exists
88a9455a9165: Already exists
406c9b8427c6: Already exists
7c88599c0b25: Already exists
25b5c6debdaf: Already exists
43a5816f1617: Already exists
1831ac1245f4: Pull complete
37677b8c1f79: Pull complete
27e4ac3b0f6e: Pull complete
7227baa8c445: Pull complete
Digest: sha256:b3d1eff023f698cd433695c9506171f0d08a8f92a0c8063c1a4d9db9a55808df
Status: Downloaded newer image for mysql:5.7
docker.io/library/mysql:5.7
[root@localhost ~] # docker images
REPOSITORY    TAG       IMAGE ID       CREATED         SIZE
mysql         5.7       a70d36bc331a   2 months ago    449MB
mysql         latest    c8562eaf9d81   2 months ago    546MB
hello-world   latest    bf756fb1ae65   14 months ago   13.3kB

[root@localhost ~] # docker rmi -f a70d36bc331a
Untagged: mysql:5.7		#这里只删除mysql5.7版本独有的镜像文件,和mysql最新版的相同文件没有删除,这里就是前面说的 联合文件系统
Untagged: mysql@sha256:b3d1eff023f698cd433695c9506171f0d08a8f92a0c8063c1a4d9db9a55808df
Deleted: sha256:a70d36bc331a13d297f882d3d63137d24b804f29fa67158c40ad91d5050c39c5
Deleted: sha256:50c77bf7bcddd1f1d97789d80ac2404eec22c860c104e858620d2a2e321f0ef7
Deleted: sha256:14244329b83dfc8982398ee4104a548385652d2bffb957798ff86a419013efd6
Deleted: sha256:6d990477f90af28473eb601a9bca22253f6381e053c5a8edda0a4f027e124a3c
Deleted: sha256:ee0449796df204071589162fc16f8d65586312a40c68d1ba156c93c56f5e5ce8

[root@localhost ~] # docker images
REPOSITORY    TAG       IMAGE ID       CREATED         SIZE
mysql         latest    c8562eaf9d81   2 months ago    546MB
hello-world   latest    bf756fb1ae65   14 months ago   13.3kB
#参数说明
--name="Name"		#容器名字,用来区分容器
-d					#后台方式运行
-it					#使用交互方式进行,进入容器查看内容
-p					#指定容器的端口
	1、-p ip:主机端口:容器端口
	2、-p 主机端口:容器端口(常用)
	3、-p 容器端口
	4、容器端口
-P					#随机指定端口
2 列出所有的运行容器
docker ps 命令
docker ps 空格 	#列出当前正在运行的容器
		  -a	 #列出当前正在运行的容器+带出历史运行过的容器
		  -n=?	 #显示最近创建的容器,?表示显示几条信息,-n=1表示只显示最近创建的一个容器
		  -q	 #只显示容器的编号
[root@localhost ~] # docker ps
CONTAINER ID   IMAGE     COMMAND       CREATED          STATUS          PORTS     NAMES
e86417a66570   centos    "/bin/bash"   57 seconds ago   Up 57 seconds             recursing_elbakyan

[root@localhost ~] # docker ps -a
CONTAINER ID   IMAGE         COMMAND       CREATED          STATUS                      PORTS     NAMES
533b50918b01   centos        "/bin/bash"   27 minutes ago   Exited (0) 37 seconds ago             stoic_benz
22382b298e19   hello-world   "/hello"      12 hours ago     Exited (0) 12 hours ago               happy_visvesvaraya
128d2cf7e35c   hello-world   "/hello"      14 hours ago     Exited (0) 14 hours ago               quizzical_kirch

[root@localhost ~] # docker ps -n=2
CONTAINER ID   IMAGE         COMMAND       CREATED          STATUS                      PORTS     NAMES
533b50918b01   centos        "/bin/bash"   27 minutes ago   Exited (0) 55 seconds ago             stoic_benz
22382b298e19   hello-world   "/hello"      12 hours ago     Exited (0) 12 hours ago               happy_visvesvaraya

[root@localhost ~] # docker ps -aq
533b50918b01
22382b298e19
128d2cf7e35c
4 删除容器
docker rm 容器id					#删除指定的容器,不能删除正在运行的容器,如果要强制删除要加-f
docker rm -f $(docker ps -aq)	 #删除所有的容器
docker ps -aq | xargs docker rm  #删除所有的容器
5 启动和停止容器的操作
docker start 容器id		#启动容器
docker restart 容器id		#重启容器
docker stop 容器id		#停止当前正在运行的容器
docker kill 容器id		#强制停止当前容器
[root@localhost ~] # docker stop a7c83b47f5b2
a7c83b47f5b2
[root@localhost ~] # docker ps
CONTAINER ID   IMAGE     COMMAND   CREATED   STATUS    PORTS     NAMES
[root@localhost ~] # docker start a7c83b47f5b2
a7c83b47f5b2
[root@localhost ~] # docker ps
CONTAINER ID   IMAGE     COMMAND       CREATED         STATUS         PORTS     NAMES
a7c83b47f5b2   centos    "/bin/bash"   2 minutes ago   Up 2 seconds             affectionate_jemison
[root@localhost /etc/docker] # docker run -d centos
c3793ed5b6a0ce85fe7f7311c7e91e32d857537eb043e8fd6a3138d48de283b5

#问题
docker ps 发现centos停止了
#常见的坑,docker容器使用后台运行,就必须要有一个前台的进程,docker发现没有应用,就会自动停止
#比如安装nginx服务,容器启动后,发现自己没有提供服务,就会立刻停止,也就是谁没有程序了。
若是新建的容器没有日志,可以自己写一个shell脚本,来尝试查看
docker run -d centos /bin/bash -c "while true;do echo mxx;sleep 1;done"		#一直输入mxx

[root@localhost /etc/docker] # docker run -d centos /bin/bash -c "while true;do echo mxx;sleep 1;done"
d4a2d085333b56480e3f8ef92ca1dfca765b84bdf947afcf54a847f622a3a6c4

[root@localhost /etc/docker] # docker ps
CONTAINER ID   IMAGE     COMMAND                  CREATED          STATUS          PORTS     NAMES
d4a2d085333b   centos    "/bin/bash -c 'while…"   19 seconds ago   Up 18 seconds             quirky_tharp
73e9ef1e057c   centos    "/bin/bash"              2 minutes ago    Up 2 minutes              elated_robinson

[root@localhost /etc/docker] # docker logs -tf --tail 10 d4a2d085333b
2021-03-22T07:07:48.546239079Z mxx
2021-03-22T07:07:49.549686630Z mxx
2021-03-22T07:07:50.551859961Z mxx
2021-03-22T07:07:51.558737827Z mxx
2021-03-22T07:07:52.561124212Z mxx
2021-03-22T07:07:53.564247660Z mxx
2021-03-22T07:07:54.567197971Z mxx
2021-03-22T07:07:55.570299179Z mxx
2021-03-22T07:07:56.573367987Z mxx
2021-03-22T07:07:57.576551959Z mxx
2021-03-22T07:07:58.579282573Z mxx
2021-03-22T07:07:59.582745826Z mxx
^C
[root@localhost /etc/docker] #
[root@localhost /etc/docker] # docker top 73e9ef1e057c
UID                 PID                 PPID                C                   STIME               TTY                 TIME                CMD
root                3178                3158                0                   15:04               pts/0               00:00:00            /bin/bash
#查看当前主机目录的内容
[root@localhost /opt] # ls
containerd                     mha4mysql-node-0.57         redis-5.0.7.tar.gz  sarg-2.3.7.tar.gz
mha4mysql-manager-0.57         mha4mysql-node-0.57.tar.gz  rh                  squid-3.5.28
mha4mysql-manager-0.57.tar.gz  redis-5.0.7                 sarg-2.3.7          squid-3.5.28.tar.gz
[root@localhost /opt] #

#进入docker容器内部
[root@localhost /opt] # docker attach 7d14a187ad43
[root@7d14a187ad43 opt]# ls

#创建test目录
[root@7d14a187ad43 opt]# touch test
[root@7d14a187ad43 opt]# ls
test
[root@7d14a187ad43 opt]#

#把容器内的文件复制到目的主机指定目录内
[root@localhost /opt] # docker cp 7d14a187ad43:/opt/test /opt

#查看,已经有了test目录
[root@localhost /opt] # ls
containerd                     mha4mysql-node-0.57.tar.gz  sarg-2.3.7           test
mha4mysql-manager-0.57         redis-5.0.7                 sarg-2.3.7.tar.gz
mha4mysql-manager-0.57.tar.gz  redis-5.0.7.tar.gz          squid-3.5.28
mha4mysql-node-0.57            rh                          squid-3.5.28.tar.gz


 1004
1004


 被折叠的 条评论
为什么被折叠?
被折叠的 条评论
为什么被折叠?
 到【灌水乐园】发言


