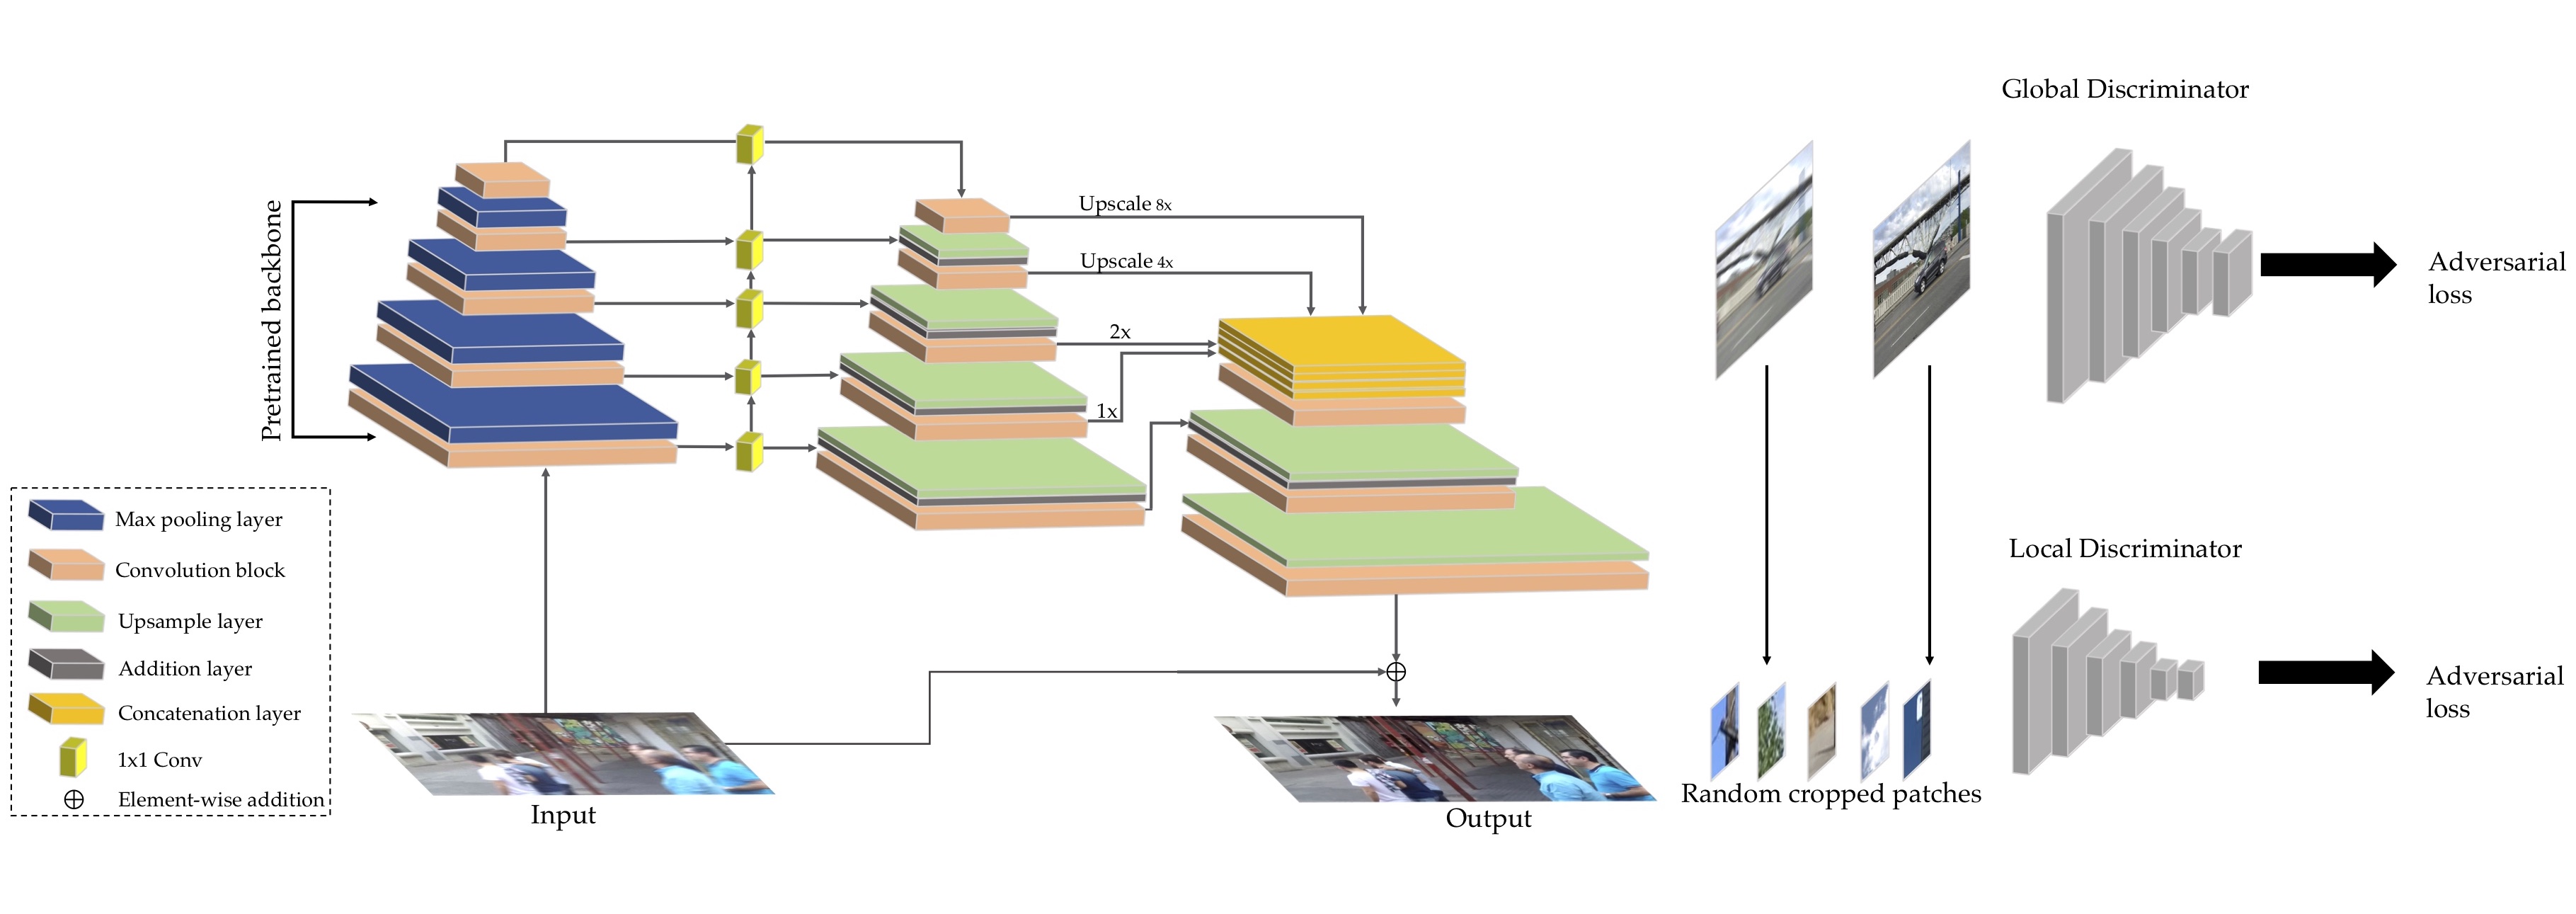
DeblurGAN-v2 是一种图像去模糊的深度学习模型,可用于将模糊图像转换为清晰图像。在该模型中,使用了超像素技术来提高去模糊的效果。下面是利用超像素优化DeblurGAN-v2的PyTorch代码:
首先,需要安装以下依赖库:
```
pip install opencv-python
pip install scikit-image
pip install numpy
pip install torch
pip install torchvision
pip install pydensecrf
```
然后,加载DeblurGAN-v2模型和测试图像,并生成超像素:
```python
import cv2
import torch
import numpy as np
from skimage.segmentation import slic
from skimage.segmentation import mark_boundaries
from skimage.color import rgb2gray
from models.networks import define_G
from options.test_options import TestOptions
from util import util
from pydensecrf.densecrf import DenseCRF2D
# 加载模型
opt = TestOptions().parse()
opt.nThreads = 1
opt.batchSize = 1
opt.serial_batches = True
opt.no_flip = True
model = define_G(opt)
util.load_checkpoint(model, opt.pretrained)
# 加载测试图像
img_path = 'path/to/test/image'
img = cv2.imread(img_path)
img = cv2.cvtColor(img, cv2.COLOR_BGR2RGB)
h, w, c = img.shape
# 生成超像素
segments = slic(img, n_segments=100, sigma=5, compactness=10)
```
接下来,将每个超像素作为输入,运行DeblurGAN-v2模型进行去模糊:
```python
# 对每个超像素进行去模糊
result = np.zeros((h, w, c), dtype=np.float32)
for i in np.unique(segments):
mask = (segments == i).astype(np.uint8)
masked_img = cv2.bitwise_and(img, img, mask=mask)
if np.sum(mask) > 0:
masked_img = masked_img[np.newaxis, :, :, :]
masked_img = torch.from_numpy(masked_img.transpose((0, 3, 1, 2))).float()
with torch.no_grad():
output = model(masked_img)
output = output.cpu().numpy()
output = output.transpose((0, 2, 3, 1))
output = np.squeeze(output)
result += output * mask[:, :, np.newaxis]
# 对结果进行后处理
result /= 255.0
result = np.clip(result, 0, 1)
result = (result * 255).astype(np.uint8)
```
最后,使用密集条件随机场(DenseCRF)算法对结果进行后处理,以进一步提高去模糊的效果:
```python
# 使用DenseCRF算法进行后处理
d = DenseCRF2D(w, h, 2)
result_softmax = np.stack([result, 255 - result], axis=0)
result_softmax = result_softmax.astype(np.float32) / 255.0
unary = -np.log(result_softmax)
unary = unary.reshape((2, -1))
d.setUnaryEnergy(unary)
d.addPairwiseGaussian(sxy=5, compat=3)
d.addPairwiseBilateral(sxy=20, srgb=3, rgbim=img, compat=10)
q = d.inference(5)
q = np.argmax(np.array(q), axis=0).reshape((h, w))
result = q * 255
```
完整代码如下:
```python
import cv2
import torch
import numpy as np
from skimage.segmentation import slic
from skimage.segmentation import mark_boundaries
from skimage.color import rgb2gray
from models.networks import define_G
from options.test_options import TestOptions
from util import util
from pydensecrf.densecrf import DenseCRF2D
# 加载模型
opt = TestOptions().parse()
opt.nThreads = 1
opt.batchSize = 1
opt.serial_batches = True
opt.no_flip = True
model = define_G(opt)
util.load_checkpoint(model, opt.pretrained)
# 加载测试图像
img_path = 'path/to/test/image'
img = cv2.imread(img_path)
img = cv2.cvtColor(img, cv2.COLOR_BGR2RGB)
h, w, c = img.shape
# 生成超像素
segments = slic(img, n_segments=100, sigma=5, compactness=10)
# 对每个超像素进行去模糊
result = np.zeros((h, w, c), dtype=np.float32)
for i in np.unique(segments):
mask = (segments == i).astype(np.uint8)
masked_img = cv2.bitwise_and(img, img, mask=mask)
if np.sum(mask) > 0:
masked_img = masked_img[np.newaxis, :, :, :]
masked_img = torch.from_numpy(masked_img.transpose((0, 3, 1, 2))).float()
with torch.no_grad():
output = model(masked_img)
output = output.cpu().numpy()
output = output.transpose((0, 2, 3, 1))
output = np.squeeze(output)
result += output * mask[:, :, np.newaxis]
# 对结果进行后处理
result /= 255.0
result = np.clip(result, 0, 1)
result = (result * 255).astype(np.uint8)
# 使用DenseCRF算法进行后处理
d = DenseCRF2D(w, h, 2)
result_softmax = np.stack([result, 255 - result], axis=0)
result_softmax = result_softmax.astype(np.float32) / 255.0
unary = -np.log(result_softmax)
unary = unary.reshape((2, -1))
d.setUnaryEnergy(unary)
d.addPairwiseGaussian(sxy=5, compat=3)
d.addPairwiseBilateral(sxy=20, srgb=3, rgbim=img, compat=10)
q = d.inference(5)
q = np.argmax(np.array(q), axis=0).reshape((h, w))
result = q * 255
# 显示结果
result = cv2.cvtColor(result, cv2.COLOR_RGB2BGR)
cv2.imshow('result', result)
cv2.waitKey(0)
cv2.destroyAllWindows()
```


 1万+
1万+


 被折叠的 条评论
为什么被折叠?


