


目录
视频链接
B站:【7天学会Vue!用实战项目入门Vue,每个知识点都是以大厂项目做为应用】 https://www.bilibili.com/video/BV1Eh411e7jt/?p=52&share_source=copy_web&vd_source=6292da9153a51dadfb0d3a4117a4b357
1.简介与入门
1.1.运行理论:MVVM
MVVM:M——Model 模型(数据);V——View 视图(结构);
VM——ViewModel 控制
1.2Vue实例
<div id="app"></div>
	<script>
		const vm = new Vue({
			el:"#app",
			data:{
				name:'kaivon',
				age:18,
				wechart:'haokeruyi'
			},
			methods:{
				add(){
					this.age++;
				}
			}
		});

		console.log(
			vm.constructor === Vue,	//vm的老子是Vue
			vm instanceof Vue,		//Vue的儿子是vm
		);

		console.log(vm);
		console.log(vm.$el);
		console.log(vm.$data); //用$的方式,获取vm实例的属性
		console.log(vm.name);  //可以直接取data中的值

		vm.add();
	</script>
1.3元素与数据
<div id="app">
		{{name}}
		<h2>{{age}}</h2>
		<h2>{{wechart}}</h2>
</div>
<script>
    const vm=new Vue({
	el:document.querySelector('#app'),
	/* data:{
		name:'kaivon',
		age:18,
	} */
	data(){
		return {
			name:'kaivon',
			age:18,
			wechart:'',
		}
	}
    });

    console.log(vm.$data);
</script>视图部分用{{}}插值的方法,获取数据值
2.基础语法
2.1插值
<div id="app">
		<h1>Hi, {{name}}</h1>
		{{tag}}
		<p></p>
		<div class="title" v-html="tag"></div>
		<div>{{height+10}}</div>  //插值可以运算
		<div>{{height.toString().split('').join('-')}}</div>
		<h2>
			Hi, {{name}}
			<span v-pre>180</span>
			<!-- v-pre:1、跳过其所在节点的编译过程;
			2.可利用它跳过:没有使用指令语法、没有使用插值语法的节点,会加快编译 -->
		</h2>
	</div>
	<script>
		const vm=new Vue({
			el:'#app',
			data:{
				name:"kaivon",
				tag:'<h2>陈学辉</h2>',
				height:180
			}
		});
		document.querySelector('p').innerText='<span>辉哥,你真帅!</span>'
	</script>
2.2指令
<div id="app">
	<a v-bind:href="blog">个人博客</a>
	<input type="text" :value="name" :[attr]="name">
	<p :id="true?'yes':'no'" v-on:click.once="cl">这个id为yes</p>
</div>

<script>
	/*
		指令:带有v-前缀的特殊属性
		v-for v-if
		并不是所有的指令都能添加参数,能添加参数的只有三个指令:v-bind v-on v-slot
		只有三条指令可以缩写:v-bind(:) v-on(@) v-slot(#)
		可以添加修饰符的指令有:v-bind v-on v-model

		*/
	new Vue({
		el: "#app",
		data: {
			name: '陈学辉',
			age: 18,
			blog: 'http://www.chenxuehui.com',
			attr:'class',	//要绑定的属性是什么
		},
		methods:{
			cl(){
				console.log('只会打印一次')
			}
		}
	})
</script>
2.3事件
<head>
	<meta charset="UTF-8">
	<title></title>
	<script src="js/vue.js"></script>
	<style>
		.div{
			width: 200px;
			height: 200px;
			background: green;
			margin-top: 20px;
		}
		.p{
			width: 100px;
			height: 100px;
			background: grey;
		}
	</style>
</head>

<body>
	<div id="app">
		<input type="text" :value="age">
		<button v-on:click="add('kaivon',$event)">加一岁</button>
		<button @click="sub">减一岁</button>

		<div class="div" @click="divClick">
			<p class="p" @click.stop="pClick"></p>  //.stop指示符停止冒泡
		</div>

		<div class="div" @click="divClick">
			<a href="http://www.chenxuehui.com" @click.prevent.stop="aClick">个人博客</a> //.prevent指示符阻止默认行为
		</div>
	</div>

	<script>
		new Vue({
			el:'#app',
			data:{
				age:18,
			},
			methods:{
				add(msg, ev){
					this.age++;

					console.log(ev);
					console.log(msg);
				},
				sub(){
					this.age--;
				},
				divClick(){
					console.log('div点击了');
				},
				pClick(){
					console.log('p点击了');
				},
				aClick(){
					console.log('a点击了');
				}
			}
		});
	</script>
</body>
2.4条件渲染
<head>
	<meta charset="UTF-8">
	<title></title>
	<script src="js/vue.js"></script>
	<style>
		.div{
			width: 100px;
			height: 100px;
			background: green;
		}
	</style>
</head>

<body>
<div id="app">
	<h2 v-if="hot">文章</h2>
	<!-- <h2>姚笛</h2> -->
	<h2 v-else>马伊琍</h2>

	<template v-if="hot">
		<ul>
			<li>王宝强与马蓉</li>
			<li>林丹与谢杏芳</li>
			<li>陈羽凡与白百何</li>
			<li>潘粤明与董洁</li>
			<li>谢霆锋与张柏芝</li>
		</ul>
	</template>

	<template v-if="loginType">
		<label for="">用户名:</label>
		<input type="text" placeholder="请输入您的用户名">
	</template>
	<template v-else>
		<label for="">邮箱:</label>
		<input type="text" placeholder="请输入您的邮箱">
	</template>
	<button @click="changeLogin">切换登录方式</button>

	<br>
	<br>
	<button @click="toggle">显示隐藏</button>
	<div class="div" v-show="show"></div>
</div>

<script>
	new Vue({
		el:'#app',
		data:{
			hot:true,
			loginType:true,
			show:true,
		},
		methods:{
			changeLogin(){
				this.loginType=!this.loginType;
			},
			toggle(){
				this.show=!this.show;
			}
		},
	})

	/*
		v-if与v-show的区别
			1、对template的支持
				v-show不支持,v-if支持
			2、元素隐藏的区别
				v-if不会渲染元素,v-show会渲染
		如何选择
			1、如果从渲染的角度来说,v-if要比v-show性能好,如果条件很少变化就要用v-if
			2、如果从显示与隐藏的角度来说,v-show要比v-if性能好。如果要频繁的切换条件,就要使用v-show
		*/
</script>
</body>
2.5列表渲染
<div id="app">
	<ul>
		<li v-for="color in colors">{{color}}</li>
		<hr>
		//列表为数组,数组中存对象
		<li v-for="(wang, index) in wangs">{{wang.name}}的年龄是:{{wang.age}},索引值为:{{index}}</li>
		<hr>
		//列表为对象
		<li v-for="(value, key, index) in kaivon">属性值为:{{value}},属性名为:{{key}},索引值为:{{index}}</li>
		<hr>
		//n从1开始
		<li v-for="n in 10">{{n}}</li>
		<hr>

		<!-- <li v-for="wang in adult" v-if="wang.age>=18">{{wang.name}}成人了</li> -->
		<li v-for="wang in adult">{{wang.name}}成人了</li>
	</ul>
</div>
<script>
	const arr = ['html', 'css', 'js'];
	console.log(arr);

	const vm = new Vue({
		el: '#app',
		data: {
			colors: ['red', 'green', 'blue'],
			wangs: [
				{ name: '老王', age: 40 },
				{ name: '大王', age: 30 },
				{ name: '小王', age: 16 },
			],
			//adult:[],
			kaivon:{
				name:'陈学辉',
				age:18,
				height:'180CM',
				trait:"帅",
			}
		},
		computed:{  //计算属性
			adult(){
				return this.wangs.filter(item => item.age>=18);
			}
		}
	});
</script>
2.6就地更新策略
<div id="app">
	<ul>
		<li v-for="(wang, index) in wangs" :key="wang.name">
			{{wang.name}}
			<input type="text">
			<button @click="move(index)">下移</button>
		</li>
	</ul>
</div>
<script>
	const vm = new Vue({
		el: '#app',
		data: {
			wangs: [
				{ name: '老王', age: 40 },
				{ name: '大王', age: 30 },
				{ name: '小王', age: 16 },
				{ name: '小小王', age: 6 },
			],
		},
		methods:{
			move(i){
				// console.log(i);
				const deleteData=this.wangs.splice(i, 1);	//截取数组里的一个数据
				//console.log(deleteData); //deleteData是一个对象
				this.wangs.splice(i+1, 0, ...deleteData);	//在数组里插入一条数据 ...ES6扩展运算符,取到deleteData的数据
			}
		}
	});
</script>
v-for指令与key属性一起配置,让整个元素一起下移。
2.7数据更新方法
this.$set与this.$delete
<div id="app">
	<ul>
		<li v-for="(wang, index) in wangs" :key="wang.name">
			{{wang.name}}
			<button @click="move(index)">修改</button>
		</li>
	</ul>
	<p>{{kaivon.name}}<button @click="change">修改删除</button></p>
</div>
<script>
	const vm = new Vue({
		el: '#app',
		data: {
			wangs: [
				{ name: '老王', age: 40 },
				{ name: '大王', age: 30 },
				{ name: '小王', age: 16 },
				{ name: '小小王', age: 6 },
			],
			kaivon:{
				name:'陈学辉'
			}
		},
		methods:{
			move(i){
				// this.wangs[i]={name: '王中王', age: 20};
				// this.wangs[i].name='王中王';
				// this.wangs[this.wangs.length]={name: '王中王', age: 20};

				// this.wangs.push({name: '王中王', age: 20}); //一般操作数组
				this.$set(this.wangs, this.wangs.length, {name: '王中王', age: 20}); //(操作的数组,索引,修改为的数据)--在数组中添加元素
				this.$delete(this.wangs, i);//(操作的数组,索引)
			},
			change(){
				this.$set(this.kaivon, 'name', '课如一');  //$set、$delete一般操作对象  //(操作的对象,key值,修改为的数据)
				this.$delete(this.kaivon, 'name'); //(操作的对象,key值)
			}
		}
	});
</script>
2.8操作样式
<head>
	<meta charset="UTF-8">
	<title></title>
	<script src="js/vue.js"></script>
	<style>
		.green {
			color: green;
		}

		.red {
			color: red;
		}

		.active {
			background: pink;
			color: #fff;
		}

		.align {
			text-align: right;
		}

		.div {
			width: 100px;
			height: 100px;
			background: green;
		}

		.fontStyle {
			font-size: 50px;
			color: #00f;
		}

		.borderStyle {
			border: 5px solid #000;
		}
	</style>
</head>

<body>
<div id="app">
	<h2 class="title" :class="cl" @click="cl='red'">普通class绑定,原生的方法与vue的方法添加的class是可以共存的</h2>

	<h2 :class="{active:ac, align:al}" @click="ac=!ac">对象语法绑定class,对象里的key是class,value决定这个class能否加上</h2>

	<h2 :class="classObject" @click="ac=!ac">对象语法绑定class,值为对象名,对象里面放的就是class</h2>

	<button @click="dv=!dv">切换div</button>
	<div :class="{div:dv}"></div>

	<h2 :class="classObj2">对象语法绑定class,值放在计算属性里</h2>

	<h2 :class="[fs,bs]">数组语法绑定class,数组里放的是key,key的value是class名字</h2>
	<h2 :class="[ac?fs:bs]">数组语法绑定class,数组里放的是key,key的value是class名字</h2>
	<h2 :class="[{active:al},bs]">数组语法绑定class,数组里放的是key,key的value是class名字</h2>

	<div :style="{color:color,fontSize:font}">学vue讲究的是说学逗唱</div>
	<div :style="styleObj">学vue讲究的是说学逗唱</div>
</div>
<script>
	const vm = new Vue({
		el: '#app',
		data: {
			cl: 'green',
			ac: false,
			al: true,
			classObject: {
				active: true,
				align: false
			},
			dv: true,
			fs: 'fontStyle',
			bs: 'borderStyle',
			color:'green',
			font:'70px',
			styleObj:{
				color:'red',
				fontSize:'40px'
			}
		},
		computed: {
			classObj2() {
				return {
					active: !this.ac,
					align: this.al || false
				}
			}
		}
	});
</script>
</body>
2.9案例-类目筛选功能
<head>
	<meta charset="UTF-8">
	<title></title>
	<script src="js/vue.js"></script>
	<style>
		body {
			background: #b5abb3;
		}

		dl,
		dd,
		h3,
		p {
			margin: 0;
		}

		ul {
			margin: 0;
			padding: 0;
			list-style: none;
		}

		#app {
			width: 850px;
			background: rgba(255, 255, 255, 0.8);
			box-shadow: 0 0 10px #494242;
			margin: 50px auto;
		}

		#app dl {
			height: 50px;
			line-height: 50px;
			border-bottom: 1px dashed #fad8e6;
			display: flex;
			margin: 0 20px;
		}

		#app dt {
			color: #8a8a8a;
		}

		#app dd {
			color: #252525;
			margin: 0 10px;
			font-size: 14px;
			cursor: pointer;
		}

		#app dd.active {
			color: #c4284d;
		}

		.select {
			height: 50px;
			padding: 0 20px;
			background: #ebe4e4;
			display: flex;
			align-items: center;
		}

		.select h3 {
			font-weight: normal;
			color: #8a8a8a;
			font-size: 16px;
		}

		.select p {
			color: #ababaa;
			font-size: 14px;
		}

		.select ul {
			display: flex;
		}

		.select li {
			border: 1px solid #c4284d;
			padding: 0 2px 0 10px;
			margin: 0 10px;
		}

		.select li span {
			width: 20px;
			height: 20px;
			display: inline-block;
			text-align: center;
			line-height: 20px;
			background: #c4284d;
			color: #fff;
			margin-left: 10px;
			cursor: pointer;
		}
	</style>
</head>

<body>
	<div id="app">
		<dl v-for="(good, goodIndex) in goodsList" :key="good.id">
			<dt>{{good.title}}:</dt>
			<dd v-for="(list, listIndex) in good.list" :key="list" @click="select(list,listIndex,good,goodIndex)"
				:class="{active:listIndex===good.cn}">
				{{list}}
			</dd>
		</dl>
		<div class="select">
			<h3>已选条件:</h3>
			<p v-if="!Object.keys(selectGoods).length">没有选择的条件</p>
			<ul>
				<li v-for="(value,key) in selectGoods">{{value}}<span @click="deleteSelect(key)">x</span></li>
			</ul>
		</div>
	</div>
	<script>
		const vm = new Vue({
			el: '#app',
			data: {
				selectGoods: {
					/*
						这个对象里放的就是选中的数据,它是一个对象,目的是为了每行数据只能选中一个
					 */
					/* "0":'惠普',
					"1":'3000-3999',
					"2":'11英寸', */
				},
				goodsList: [
					{
						title: '品牌',
						list: ['惠普', '联想', '戴尔', '三星', '宏基', '苹果', '神舟', '华硕', '方正'],
						id: 1,
					},
					{
						title: '价格',
						list: ['3000-3999', '4000-4999', '5000-5999', '6000-6999', '7000-7999', '8000-8999', '9000-9999', '10000以上'],
						id: 2,
					},
					{
						title: '尺寸',
						list: ['8.9英寸以及以下', '11英寸', '12英寸', '13英寸', '14英寸', '15英寸', '16英寸'],
						id: 3,
					},
					{
						title: '显卡',
						list: ['独立显卡', '集成显卡', '核芯显卡'],
						id: 4,
					},
				],
			},
			methods: {
				select(list, listIndex, good, goodIndex) {
					/*
						list		品牌、价格。。。
						listIndex	品牌的索引。。。
						good		一行的分类数据
						goodIndex	每一行数据的索引
					 */
					good.cn = listIndex;	//点击的时候给每一行数据添加一个cn,它的值对应的就是点击的那个元素的索引,为了添加class

					//console.log(list);
					console.log(list, listIndex, goodIndex);

					this.$set(this.selectGoods, goodIndex, list);
				},
				deleteSelect(key){
					this.$delete(this.selectGoods, key);

					this.goodsList[key].cn='';	//把当前选中的一行数据身上的cn的值设置为空,它与listIndex就不等了,class的表达式结果就为false,那class就取消了
				}
			}
		});

		var obj={name:'kaivon'};
		console.log(Object.keys(obj));	//["name"]
	</script>
</body>
3.响应式数据
3.1数据双向绑定
v-model的使用
   <div id="app">
		<!-- <input type="text" :value='message' @input="update($event)"> -->
		<input type="text" v-model="message">
		<p>{{message}}</p>
	</div>
	<script>
		const vm=new Vue({
			el:'#app',
			data:{
				message:'这是初始值'
			},
			methods:{
				update(ev){
					this.message=ev.target.value;
					console.log(this.message);
				}
			}
		});
	</script>
3.2不同类型表单的数据双向绑定
<body>
	<div id="app">
		<input type="checkbox" v-model="checked">
		<label for="">{{checked}}</label>
		<hr>
		<br>

		<p>
			<input type="checkbox" id="high" value="高" v-model='checkedNames'>
			<label for="high">高</label>
			<input type="checkbox" id="rich" value="富" v-model='checkedNames'>
			<label for="rich">富</label>
			<input type="checkbox" id="handsome" value="帅" v-model='checkedNames'>
			<label for="handsome">帅</label>
		<p>选中的有:{{checkedNames}}</p>
		</p>
		<hr>
		<br>

		<p>
			<input type="radio" value="男" id="man" v-model="sex">
			<label for="man">男</label>
			<input type="radio" value="女" id="woman" v-model="sex">
			<label for="woman">女</label>
			<span>性别:{{sex}}</span>
		</p>
		<hr>
		<br>

		<select name="" id="" v-model="city" multiple>
        <!--multiple 属性:允许在下拉列表中进行多选-->
			<option>北京</option>
			<option>上海</option>
			<option>广州</option>
		</select>
		<span>选中的城市有:{{city}}</span>
		<hr>
		<br>

		<input type="text" v-model.lazy.trim="msg">
		<!-- .lazy修饰符:双向绑定的数据不同步了,相当于在input输入框输入数据时,v-model绑定的值不会发生变化,
			但是当我们停止输入,输入框失去焦点或者按下回车时,v-model绑定的值才会发生变化
			.trim修饰符:自动过滤用户输入的首尾空白字符。-->
		<p>{{msg}}</p>
		<input type="number" v-model.number="age">
		<!-- .number修饰符:自动将用户的输入值转为数值类型。 -->
		<p>{{age}}</p>
	</div>
	<script>
		const vm = new Vue({
			el: '#app',
			data: {
				checked: false,
				checkedNames: [],
				sex: '男',
				city: [],
				msg: null,
				age: 0
			},
		});
	</script>
</body>
.lazy修饰符:双向绑定的数据不同步了,相当于在input输入框输入数据时,v-model绑定的值不会发生变化,但是当我们停止输入,输入框失去焦点或者按下回车时,v-model绑定的值才会发生变化
.trim修饰符:自动过滤用户输入的首尾空白字符。
.number修饰符:自动将用户的输入值转为数值类型。
3.3v-model应用
<body>
	<div id="app">
		<input type="number" v-model.number.lazy="num1">
		<select name="" id="" v-model="type">
			<option>+</option>
			<option>-</option>
			<option>*</option>
			<option>/</option>
		</select>
		<input type="number" v-model.number.lazy="num2">
		<button @click="computed">=</button>
		<span>{{result}}</span>
	</div>
	<script>
		const vm = new Vue({
			el: '#app',
			data: {
				num1: 0,
				num2: 0,
				type: '+',
				result: 0,
			},
			methods: {
				computed() {
					switch (this.type) {
						case "+":
							this.result = this.num1 + this.num2;
							break;
						case "-":
							this.result = this.num1 - this.num2;
							break;
						case "*":
							this.result = this.num1 * this.num2;
							break;
						case "/":
							this.result = this.num1 / this.num2;
							break;
					}
				}
			}
		});
	</script>
</body>
3.4计算属性
<div id="app">
		<p>模板语法:{{height.toString().split('').reverse().join('-')}}</p>
		<p>方法:{{reverse()}}</p>
		<p>方法:{{reverse()}}</p>
		<p>计算属性:{{reverseMsg}}</p>
		<p>计算属性:{{reverseMsg}}</p>
		<p>
			{{num}}
			<button @click="num++">加一下</button>
		</p>
		<p>{{show()}}</p>
	</div>
	<script>
		const vm = new Vue({
			el: '#app',
			data: {
				height:180,
				num:10,
			},
			methods:{
				reverse(){
					console.log('方法');
					return this.height.toString().split('').reverse().join('-');
				},
				show(){
					console.log('这是另一个方法,只调用了一次,但是诡异的是data里的数据变化了,这个方法也会被调用')
				}
			},
			computed:{
				reverseMsg(){
					console.log('计算属性');
					return this.height.toString().split('').reverse().join('-')+this.num;
				}
			}
		});

		/*
			 1、方法调用的时候需要加括号,计算属性不需要
			 2、方法的结果不会被缓存,计算属性的结果会被缓存
			 3、调用几次方法,就执行几次,data的数据发生变化,所有方法都执行;调用几次计算属性,也执行一次
		 */
	</script>
完整的计算属性computed的写法是:
computed:{
	propName::{
		get(){
			//getter
		},
		set(){
			//setter
		}
	}
}
1.计算属性本质是包含getter和setter的方法。
2.当获取计算属性时,实际上是在调用getter方法。vue会收集计算属性的依赖,并缓存计算属性返回的结果。只有当依赖变化的时候才会重新进行计算。
3.方法没有缓存,每次调用方法都会导致重新执行。
4.计算属性的getter和setter参数固定:getter没有参数,setter只有一个参数。而方法的参数不限。
5.最重要的区别是含义上面的区别:计算属性也是一个数据,可以读取也可以赋值。而方法含义上是一个操作用于处理一些事情。
3.5计算属性的setter
<div id="app">
		<p>{{getName()}}</p>
		<p>{{fullName}}</p>
		<!-- fuck oriented object -->
	</div>
	<script>
		const vm = new Vue({
			el: '#app',
			data: {
				firstName:'foo',
				lastName:'bar'
			},
			methods:{
				getName(){
					return this.firstName+' '+this.lastName;
				}
			},
			computed:{
				/* fullName(){
					return this.firstName+' '+this.lastName;
				} */

				fullName:{
					get(){	//对应getter
						return this.firstName+' '+this.lastName;
					},
					set(newValue){	//对应setter
						// console.log(123);
						this.firstName=newValue[0];
						this.lastName=newValue.substr(1);
					}
				}
			}
		});

		//vm.fullName='张三';

		var obj={
			age:12,
			name:'kaivon'
		}

		/*
			属性描述对象
				setter	存值函数
				getter	取值函数
		 */
	</script>
substring()方法:返回一个索引和另一个索引之间的字符串(不取后索引)
var str = 'abcdefghij';
console.log('(1, 2): '   + str.substring(1, 2));   // '(1, 2): b'
console.log('(1, 1): '   + str.substring(1, 1));   // '(1, 1): '
console.log('(-3, 2): '  + str.substring(-3, 2));  // '(-3, 2): ab'
console.log('(-3): '     + str.substring(-3));     // '(-3): abcdefghij'
console.log('(1): '      + str.substring(1));      // '(1): bcdefghij'
console.log('(-20, 2): ' + str.substring(-20, 2)); // '(-20, 2): ab'
console.log('(2, 20): '  + str.substring(2, 20));  // '(2, 20): cdefghij'
console.log('(20, 2): ' + str.substring(20, 2)); // '(20, 2): cdefghijsubstr()方法:返回从指定位置开始的字符串中指定字符数的字符
var str = 'abcdefghij';
console.log('(1, 2): '   + str.substr(1, 2));   // '(1, 2): bc'
console.log('(-3, 2): '  + str.substr(-3, 2));  // '(-3, 2): hi'
console.log('(-3): '     + str.substr(-3));     // '(-3): hij'
console.log('(1): '      + str.substr(1));      // '(1): bcdefghij'
console.log('(-20, 2): ' + str.substr(-20, 2)); // '(-20, 2): ab'
console.log('(20, 2): '  + str.substr(20, 2));  // '(20, 2):
substring()与substr()的主要区别:substring()方法的参数表示起始和结束索引,substr()方法的参数表示起始索引和要包含在生成的字符串中的字符的长度
var text = 'Mozilla';
console.log(text.substring(2,5)); // => "zil"
console.log(text.substr(2,3)); // => "zil"slice()方法返回一个索引和另一个索引之间的字符串(不取后索引),不会改变元素数组,而是将截取到的元素封装到一个新数组
var str = 'abcdefghij';
console.log('(1, 2): '   + str.slice(1, 2));   // '(1, 2): b'
console.log('(-3, 2): '  + str.slice(-3, 2));  // '(-3, 2): '
console.log('(-3, 9): '  + str.slice(-3, 9));  // '(-3, 9): hi'
console.log('(-3): '     + str.slice(-3));     // '(-3): hij'
console.log('(-3,-1): ' + str.slice(-3,-1));     // '(-3,-1): hi'
console.log('(0,-1): '  + str.slice(0,-1));     // '(0,-1): abcdefghi'
console.log('(1): '      + str.slice(1));      // '(1): bcdefghij'
console.log('(-20, 2): ' + str.slice(-20, 2)); // '(-20, 2): ab'
console.log('(20): '     + str.slice(20));  // '(20): '
console.log('(20, 2): '  + str.slice(20, 2));  // '(20, 2): '
3.6侦听器
<div id="app">
		{{firstName}} + {{lastName}}
		{{author}}
		<button @click="change">变</button>
	</div>
	<script>
		const vm = new Vue({
			el: '#app',
			data: {
				firstName: 'foo',
				lastName: 'bar',
				author: {
					name: 'kaivon',
					age: 18,
					technology: {
						sing: '一般',
						drive: '老司机',
					}
				}
			},
			methods: {
				change() {
					this.firstName = 'kaivon';

					// this.author={name:'陈学辉', age:20};
					//this.author.name='陈学辉';

					this.author.technology.drive = '出神入化';
				},
				firstNameChange(newVal, oldVal) {
					console.log('新值为:' + newVal);
					console.log('旧值为:' + oldVal);
				}
			},
			watch: {
                /*侦听器写法一*/
				/* firstName(newVal, oldVal) {
					//console.log('firstName变化了');
					console.log('新值为:' + newVal);
					console.log('旧值为:' + oldVal);
				} */
                /*侦听器写法二*/

				//firstName:'firstNameChange',
                /*侦听器写法三*/
				firstName: {
					handler(newVal, oldVal) {
						console.log('新值为:' + newVal);
						console.log('旧值为:' + oldVal);
					}
				},
				/* author:{
					handler(newVal, oldVal){
						console.log('author的值发生变化了');
					},  //只侦听到整个对象,侦听不到对象中每个属性的改变
					deep:true,	//开启深度侦听,侦听到整个对象与对象中每个属性的改变,但非常消耗性能
					immediate:true, //侦听函数立马执行一次
				}, */
				//侦听某一条数据
				/* 'author.technology.drive':function(newVal, oldVal){
					console.log('新值为:' + newVal);
					console.log('旧值为:' + oldVal);
				} */
			}
		});
         /*侦听器写法四*/
		const unWatch=vm.$watch('author.technology.drive', function (newVal, oldVal) {
			console.log('新值为:' + newVal);
			console.log('旧值为:' + oldVal);

			if(newVal=='出神入化'){
				unWatch();  //关闭侦听器
				return;
			}
		}, {
			deep: true,	//开启深度侦听
			immediate: true,
		});
	</script>
3.7计算属性与侦听器的区别
<div id="app">
		{{fullName}}<br>
		{{fullName1}}<br>
		亲家:{{getQingjia}}<br>
		全名:{{allName}}
	</div>
	<script>
		const vm = new Vue({
			el: '#app',
			data: {
				firstName: '尼古拉斯',
				lastName: '赵四',
				fullName1: '尼古拉斯 赵四',
				qingjia: '刘能',
				allName: ''
			},
			computed: {
				fullName() {
					return this.firstName + ' ' + this.lastName;
				},
				getQingjia() {
					var name = '';
					setTimeout(() => {
						console.log(1);
						name = '莱昂纳多';
					}, 1000);

					return name + this.qingjia;
				}
			},
			watch: {
				firstName() {
					this.fullName1 = this.firstName + ' ' + this.lastName;
				},
				lastName() {
					this.fullName1 = this.firstName + ' ' + this.lastName;
				},
				qingjia() {
					var name = '';
					setTimeout(() => {
						name = '莱昂纳多';
						this.allName = name + this.qingjia;
					}, 1000);
				}
			}
		});
计算属性与侦听器的区别:
一、侦听模式上的区别
1、计算属性是多对一(购物车结算)
2、侦听器是一对多(搜索引擎搜索框)
二、异步操作上的区别
1、计算属性不支持异步操作(计时器是异步操作)
2、侦听器支持异步操作
3.8侦听器例子
<head>
	<meta charset="UTF-8">
	<title></title>
	<script src="js/vue.js"></script>
	<script src="js/jquery-3.6.0.min.js"></script>
	<style>
		ul {
			margin: 0;
			padding: 0;
			list-style: none;
		}

		#app {
			font-size: 0;
			position: relative;
		}

		input {
			width: 512px;
			height: 45px;
			padding: 0 16px;
			outline: none;
			border-radius: 10px 0 0 10px;
			border: 2px solid #c4c7ce;
			border-right: none;
			background: #fff;
			color: #222;
			vertical-align: middle;
			box-sizing: border-box;
		}

		button {
			cursor: pointer;
			width: 108px;
			height: 45px;
			background-color: #4e6ef2;
			border-radius: 0 10px 10px 0;
			font-size: 17px;
			color: #fff;
			font-weight: bold;
			border: none;
			outline: none;
			vertical-align: middle;
		}

		#app ul {
			width: 514px;
			border-radius: 0 0 10px 10px;
			border: 2px solid #4e71f2;
			box-sizing: border-box;
			padding: 0 10px 10px;

		}

		#app li {
			font-size: 16px;
			line-height: 30px;
			color: #626675;
		}
	</style>
</head>

<body>
	<div id="app">
		<input type="text" v-model="inputValue" @blur="ulDis=false" @focus="ulDis=searchResult.length">
		<button>百度一度</button>
		<ul v-show="ulDis">
			<li v-for="result in searchResult" :key="result.q">{{result.q}}</li>
		</ul>
	</div>
	<script>
		//https://www.baidu.com/sugrec?prod=pc&wd=w
		const vm = new Vue({
			el: '#app',
			data: {
				inputValue:'',
				searchResult:[],
				ulDis:false,
			},
			watch:{
				inputValue(){
					$.ajax({
						url:'https://www.baidu.com/sugrec',
						dataType:'jsonp',
						data:{
							prod:'pc',
							wd:this.inputValue,
						},
						success(res){
							vm.searchResult=res.g || [];	//有时候取联想不到数据,结果就是一个undefined,遍历就会出错,所以这里做了容错处理
							console.log(vm.searchResult);
							//console.log(res.g);

							vm.ulDis=vm.searchResult.length;
						}
					});
				}
			}
		});
	</script>
</body>
3.9-案例-待办事项
<head>
	<meta charset="UTF-8">
	<title></title>
	<script src="js/vue.js"></script>
	<style>
		h2 {
			margin: 0;
		}

		ul {
			margin: 0;
			padding: 0;
			list-style: none;
		}

		input,
		button {
			padding: 0;
			box-sizing: border-box;
			vertical-align: middle;
			outline: none;
		}

		#todoList {
			width: 500px;
			padding: 30px;
			box-sizing: border-box;
			border-radius: 5px;
			border: 1px solid #a3a3a3;
			box-shadow: 0 0 10px #575757;
			margin: 100px auto 0 auto;
		}

		#todoList h2 {
			text-align: center;
			font-size: 26px;
			margin: 20px 0;
		}

		.done {
			margin-bottom: 30px;
			display: flex;
			justify-content: space-between;
		}

		.done input,
		.done button,
		#todoList li {
			height: 50px;
			font-size: 20px;
			border: 1px solid #999;
		}

		.done input {
			width: 80%;
			color: #757575;
			padding-left: 10px;
		}

		.done button {
			padding: 0 15px;
			cursor: pointer;
		}

		#todoList li {
			border: none;
			border-bottom: 1px solid #F5F5F5;
		}

		#todoList li input[type="checkbox"] {
			width: 18px;
			height: 18px;
		}

		#todoList li button {
			cursor: pointer;
			float: right;
			width: 26px;
			height: 26px;
			color: #fff;
			background: #ccc;
			font-size: 20px;
			border: 1px solid #ccc;
			text-align: center;
			border-radius: 50%;
			position: relative;
			top: 15px;
		}

		#todoList li button:hover {
			color: #f00;
			background: #fff;
			border-color: #f00;
		}

		.control {
			height: 50px;
			line-height: 50px;
			display: flex;
			justify-content: space-between;
		}

		.control span:nth-child(1),
		.control span:nth-child(3) {
			color: #df2c0e;
			cursor: pointer;
		}

		.control span:nth-child(2) {
			color: #65ad50;
		}
	</style>
</head>

<body>
	<div id="todoList" @click="closeInput">
		<h2>待办事项</h2>
		<div class="done">
			<input type="text" v-model="thing" placeholder="请输入待办事项..." />
			<button @click='add'>添加</button>
		</div>
		<ul>
			<li v-for="(item, index) in arr" :key="item.des">
				<input type="checkbox" :value="item.des" v-model="checkedThings" />
				<span @click.stop="edit(index)" v-show="!item.edit">{{item.des}}</span>
				<input type="text" v-show="item.edit" v-model="item.des" @click.stop />
				<button @click='del(index)'>x</button>
			</li>
		</ul>
		<div class="control">
			<span><input type="checkbox" :checked='checkedThings.length && checkedThings.length==arr.length' @click="selAll($event)" />全选</span>
			<span>共{{arr.length}}项,选中{{checkedThings.length}}项</span>
			<span @click="delAll">批量删除</span>
		</div>
	</div>
	<script>
		const vm = new Vue({
			el: '#todoList',
			data: {
				arr: [
					{ des: '吃饭', edit: false },
					{ des: '睡觉', edit: false },
					{ des: '打豆豆', edit: false },
				],
				thing: '',	//用户输入框里的内容
				checkedThings: [],	//用户选择的事项
			},
			methods: {
				add() {
					if (!this.thing) {
						alert('请输入内容');
						return;
					}
					this.arr.push({ des: this.thing, edit: false });
					this.thing = '';
				},
				edit(i) {
					this.arr[i].edit = true;
				},
				closeInput() {
					this.arr.forEach(item => {
						item.edit = false;
					});
				},
				selAll(ev) {
					// console.log(this.checkedThings);
					const checkAll = [];	//所有的数据
					this.arr.forEach(item => {
						checkAll.push(item.des);
					});
					// console.log(checkAll);

					this.checkedThings = ev.target.checked ? checkAll : []
				},
				del(i) {
					if(this.checkedThings.includes(this.arr[i].des)){
						//这个条件成立说明要删除的选项是选中的
						this.checkedThings.splice(i, 1);
					}
					this.arr.splice(i, 1);
				},
				delAll(){
					this.arr=this.arr.filter(item=>{
						return !this.checkedThings.includes(item.des);
					});
					this.checkedThings=[];
				}
			}
		});

	</script>
</body>
4.组件
4.1全局组件
<head>
	<meta charset="UTF-8">
	<title></title>
	<script src="js/vue.js"></script>
</head>

<body>
	<div id="app">
		<!-- <my-component></my-component> -->
	</div>

	<div id="box">
		<my-component></my-component>
	</div>

	<template id="btn">
		<button @click="add">你点了{{count}}次</button>
	</template>

	<script>
		//组件是Vue实例,除el外,其他的配置参数都可使用
		Vue.component('MyComponent', {  //两种命名方式:短横杠(my-component)和大驼峰(方放推荐)(MyComponent),在HTML两种方式调用时,都用短横杠(<my-component></my-component>)
			// 组件的data避免使用对象的方式,否则使用同个组件时,会导致data同时变化
			data(){
				return {
					count:0,
				}
			},
			//template:'<button @click="add">你点了{{count}}次</button>',
			template:'#btn',
			methods: {
				add(){
					this.count++;
				}
			},
			computed: {

			}
		});
		//Vue.component('MyComponent', {});

		new Vue({
			el: '#app',
			data: {
				count:0,
			},
			methods: {

			},
			computed: {

			},
			// template中组件三种调用方式
			template:'<MyComponent></MyComponent>',
			template:'<my-component></my-component>',
			template:'<MyComponent />',  //脚手架常用
		});

		new Vue({
			el:'#box',
		});
	</script>
</body>
4.2局部组件
<body>
	<div id="app">
		<counter></counter>
		<color></color>
	</div>

	<div id="box">
		<!-- <counter></counter> -->
	</div>

	<template id="count">
		<div>
			<button @click="add">你点了{{count}}次</button>
			<span>kaivon</span>
		</div>
	</template>

	<script>
		new Vue({
			el: '#app',
			components: {
				Counter: {
					data() {
						return {
							count: 0
						}
					},
					template: '#count',
					methods:{
						add(){
							this.count++;
						}
					}
				},
				Color: {
					data(){
						return {
							str:'red',
						}
					},
					template:'<h1>{{str}}</h1>'
				},
				Name: {
				}
			},
			//template:'<Counter />'
		});

		new Vue({
			el:'#box'
		});
	</script>
</body>
4.3组件案例
<head>
	<meta charset="UTF-8">
	<title></title>
	<script src="js/vue.js"></script>
	<style>
		body {
			background: #e2e2e2;
		}

		h3,
		h4,
		p {
			margin: 0;
		}

		.box {
			width: 500px;
			background: #fff;
			padding: 10px 20px 20px;
			margin: 50px;
		}

		.box h3 {
			color: #2cbd53;
			border-bottom: 1px solid #E8ECEE;
			margin-bottom: 20px;
			padding-bottom: 10px;
		}

		.box div {
			overflow: hidden;
		}

		.box div img {
			float: left;
			margin-right: 15px;
		}

		.box div h4 {
			color: #333;
			font-size: 20px;
			line-height: 20px;
			padding: 10px 0 20px 0;
		}

		.box div p {
			color: #8b8b8b;
			font-size: 14px;
			line-height: 22px;
		}
	</style>
</head>

<body>
	<div id="app">
		<article-list></article-list>
		<article-list></article-list>
	</div>

	<template id="box">
		<div class="box">
			<h3>{{boxTitle}}</h3>
			<div>
				<img :src="imgSrc" alt="" />
				<div>
					<h4>{{articleTitle}}</h4>
					<p>{{articleContent}}</p>
				</div>
			</div>
		</div>
	</template>

	<script>
		new Vue({
			el: '#app',
			components: {
				ArticleList: {
					data() {
						return {
							boxTitle: '饮食健康',
							imgSrc: 'images/img_01.jpg',
							articleTitle: '你的暴饮暴食,是因为饿了吗?',
							articleContent: '在一项调查中发现,有近40%的成人选择以暴饮暴食或吃垃圾食品的方式,来缓解前一个月的压力。而在这些人之中,有近一半的人每周都是如此。'
						}
					},
					template: '#box',
				},
			},
			//template:'<ArticleList />'
		});
	</script>
</body>
4.4props
<head>
	<meta charset="UTF-8">
	<title></title>
	<script src="js/vue.js"></script>
	<style>
		body {
			background: #e2e2e2;
		}

		h3,
		h4,
		p {
			margin: 0;
		}

		.box {
			width: 500px;
			background: #fff;
			padding: 10px 20px 20px;
			margin: 50px;
		}

		.box h3 {
			color: #2cbd53;
			border-bottom: 1px solid #E8ECEE;
			margin-bottom: 20px;
			padding-bottom: 10px;
		}

		.box div {
			overflow: hidden;
		}

		.box div img {
			float: left;
			margin-right: 15px;
		}

		.box div h4 {
			color: #333;
			font-size: 20px;
			line-height: 20px;
			padding: 10px 0 20px 0;
		}

		.box div p {
			color: #8b8b8b;
			font-size: 14px;
			line-height: 22px;
		}
	</style>
</head>

<body>

	<div id="app">
		<article-list
			box-title="饮食健康"
			img-src="images/img_01.jpg"
			article-title="你的暴饮暴食,是因为饿了吗?"
			article-content="在一项调查中发现,有近40%的成人选择以暴饮暴食或吃垃圾食品的方式,来缓解前一个月的压力。而在这些人之中,有近一半的人每周都是如此。"
		></article-list>

		<!-- :box-title="title" 实现动态数据绑定,父组件给子组件传递数据,下面为实参 -->
		<article-list
			:box-title="title"
			img-src="images/img_02.jpg"
			article-title="表扬孩子聪明是害了他吗?"
			article-content="大人对小孩儿说话时常常并不会想太多,尤其是在表扬孩子时,总是顺口就赞美孩子说:“你好漂亮、好可爱啊!”“你真聪明!”殊不知对于不懂事的小孩儿来说"
		></article-list>
	</div>

	<template id="box">
		<div class="box">
			<h3>{{boxTitle}}</h3>
			<div>
				<img :src="imgSrc" alt="" />
				<div>
					<h4>{{articleTitle}}</h4>
					<p>{{articleContent}}</p>
				</div>
			</div>
		</div>
	</template>

	<script>
		new Vue({
			el: '#app',
			data(){
				return {
					title:'陈学辉',
				}
			},
			components: {
				ArticleList: {
					/* data() {
						return {
							boxTitle: '饮食健康',
							imgSrc: 'images/img_01.jpg',
							articleTitle: '你的暴饮暴食,是因为饿了吗?',
							articleContent: '在一项调查中发现,有近40%的成人选择以暴饮暴食或吃垃圾食品的方式,来缓解前一个月的压力。而在这些人之中,有近一半的人每周都是如此。'
						}
					}, */
					// props:组件中传递数据,数据为形参,可以实现父组件给子组件传递数据
					props: ['boxTitle', 'imgSrc', 'articleTitle', 'articleContent'],
					template: '#box',
				},
			},
			//template:'<ArticleList />'
		});

		// 原生js实现
		/* function renderDom(boxTitle,imgSrc,articleTitle,articleContent){
			// ES6模板字符串用法``
			var str=`<div class="box">
				<h3>${boxTitle}</h3>
				<div>
					<img src="${imgSrc}" alt="" />
					<div>
						<h4>${articleTitle}</h4>
						<p>${articleContent}</p>
					</div>
				</div>
			</div>`
		}
		renderDom('饮食健康','images/img_01.jpg');
		renderDom('子女教育','images/img_02.jpg'); */
	</script>
</body>
子组件不能使用父组件的data,需要使用props传递数据。
4.5props高级配置
<body>
	<div id="app">
		<my-color :data="colors"></my-color>
		<!-- :age="'18岁'"中,'18岁'为一个变量,动态绑定可为变量或表达式 -->
		<!-- sing='false'中的'false'是字符串,:sing动态绑定可为变量或表达式 -->
		<!-- :weight='10'中,10为变量,形参为数字类型一般用动态绑定;形参为字符串类型不用动态绑定-->
		<kaivon name="陈学辉" :age="'18岁'" :sing='false' height="190CM" :weight='10'></kaivon>
	</div>
	<script>
		new Vue({
			el: '#app',
			data() {
				return {
					colors: ['red', 'green', 'blue'],
					/* colors: function () {
					} */
				}
			},
			components: {
				MyColor: {
					props: {
						data: {
							type: Array
						}
					},
					template: `
						<ul>
							<li v-for="color in data" :key="color">{{color}}</li>
						</ul>
					`
				},
				Kaivon: {
					props: {
						name: {
							type: String,
							required: true,  //必填项
						},
						sing: {
							type: Boolean
						},
						age: [Number, String],
						height: {
							type: [Number, String],
							default: '180CM',  //默认值
						},
						interest: {
							type: Array,
							// default: ['下棋', '遛鸟', '广场舞'],
							default: () => ['下棋', '遛鸟', '广场舞'],
							//如果你的数据是一个对象或者数组,你就不能直接给default,而是要当作一个函数的返回值赋给它
						},
						weight: {
							type: Number,
							validator: val => val > 0  //验证
						}
					},
					template: `
						<div>
							<h2>{{name}}</h2>
							<p>唱歌:{{sing?'会唱':'不会唱'}}</p>
							<p>年龄:{{age}}</p>
							<p>身高:{{height}}</p>
							<p>爱好:{{interest}}</p>
							<p>体重:{{weight}}</p>
						</div>`
				}

			}
		});
	</script>
</body>
4.6插槽
slot :插槽,用于分发内容(是Vue的内部组件)
语法:template里定义:<slot></slot>
组件标签对里使用(标签对里的标签能被解析)
注意:插槽只能写一个,写多个会报错
如果想显示在默认的插槽上还可以显式的给一个default的值,给template的#default
<template #default>
<h3>居家生活</h3>
</template>
具名插槽:给slot添加name属性后就叫具名插槽
语法: template里定义:<slot name="属性名"></slot>
组件标签对里使用:<template #属性名><p></p></template>
插槽与props的对比:插槽让组件使用起来更加像真正的HTML标签了,数据不需要通过属性传播,直接通过里面的标签进行传播
例子如下:
<head>
		<meta charset="UTF-8">
		<title></title>
		<script src="js/vue.js"></script>
		<style>
			body{
				margin: 0;
				font-size: 14px;
			}
			h3{
				margin: 0;
			}
			.title{
				width: 1000px;
				padding: 0 20px;
				height: 50px;
				line-height: 50px;
				margin: 20px auto;
				background: #f4f0ea;
			}
			.title h3{
				float: left;
				font-size: 28px;
				margin-right: 20px;
			}
			.subtitle{
				float: left;
			}
			.more{
				float: right;
				margin-left: 30px;
			}
			.title a{
				color: #333;
				text-decoration: none;
			}
			.title a:hover,.title a.active{
				color: #b4a078;
				border-bottom: 2px solid #b4a078;;
			}
			.tab{
				float: left;
			}
			.subnav{
				float: right;
			}
		</style>
	</head>
	<body>
		<div id="app">
			<section-head>
				<!-- <h3>新品首发 - 这是通过插槽添加的内容</h3>
				<h3>人气推荐 - 再来一个,也会显示</h3> -->
				<template v-slot:title>
					<h3>新品首发</h3>
				</template>
				<template #subtitle>
					<span class="subtitle">为你寻觅世间好物</span>
				</template>
				<template #more>
					<div class="more">
						<a href="#">更多新品></a>
					</div>
				</template>
			</section-head>


			<section-head>
				<!-- 即使这里的顺序变了也没关系,它只会按定义插槽地方的顺序解析 -->
				<template #more>
					<div class="more">
						<a href="#">更多推荐></a>
					</div>
				</template>

				<template #title>
					<h3>人气推荐</h3>
				</template>
				<template #tab>
					<div class="tab">
						<a href="#" class="active">编辑推荐</a>
						<a href="#">热销总榜</a>
					</div>
				</template>
			</section-head>


			<section-head>
				<template #title>
					<h3>福利社</h3>
				</template>
				<template #more class="more">
					<div class="more">
						<a href="#">查看全部福利></a>
					</div>
				</template>
			</section-head>


			<section-head>
				<template #title>
					<h3>居家生活</h3>
				</template>
				<template #more class="more">
					<div class="more">
						<a href="#">查看更多></a>
					</div>
				</template>
				<template #subnav>
					<div class="subnav">
						<a href="#">好物精选</a> / <a href="#">秋冬焕新</a> / <a href="#">疫情防控</a> / <a href="#">收纳好物</a> / <a href="#">北欧原木</a> / <a href="#">餐厨爆款清单</a> / <a href="#">厨房电器</a>
					</div>
				</template>
			</section-head>
		</div>

		<template id="head">
			<div class="title">
				<!-- <slot></slot> -->
				<slot name='title'></slot>
				<slot name='subtitle'></slot>
				<slot name='tab'></slot>
				<slot name='more'></slot>
				<slot name='subnav'></slot>
				<slot></slot>
			</div>
		</template>


		<script>
			new Vue({
				el:'#app',
				components:{
					SectionHead:{
						template:'#head',
					}
				}
			});
        </script>
4.7组件嵌套
<head>
	<meta charset="UTF-8">
	<title></title>
	<script src="js/vue.js"></script>
	<style>
		body {
			margin: 0;
			font-size: 14px;
		}

		h3 {
			margin: 0;
		}

		.title {
			width: 1000px;
			padding: 0 20px;
			height: 50px;
			line-height: 50px;
			margin: 20px auto;
			background: #f4f0ea;
		}

		.title h3 {
			float: left;
			font-size: 28px;
			margin-right: 20px;
		}

		.subtitle {
			float: left;
		}

		.more {
			float: right;
			margin-left: 30px;
		}

		.title a {
			color: #333;
			text-decoration: none;
		}

		.title a:hover,
		.title a.active {
			color: #b4a078;
			border-bottom: 2px solid #b4a078;
			;
		}

		.tab {
			float: left;
		}

		.subnav {
			float: right;
		}
	</style>
</head>

<body>
	<div id="app">
		<section-head>
			<template #title>
				<h3>人气推荐</h3>
			</template>

			<template #more>
				<div class="more">
					<a href="#">更多推荐></a>
				</div>
			</template>
		</section-head>


	</div>

	<!-- 父组件模板 -->
	<template id="head">
		<div class="title">
			<slot name='title'></slot>
			<slot name='subtitle'></slot>

			<!-- 子组件只能在父组件里面使用,这里直接调用就行了,不需要插槽 -->
			<tab>
				<template #tab1>
					<a href="#" class="active">编辑推荐1</a>
				</template>
				<template #tab2>
					<a href="#">热销总榜2</a>
				</template>
			</tab>

			<slot name='more'></slot>
			<slot name='subnav'></slot>
			<slot></slot>
		</div>
	</template>

	<!-- 子组件的模板 -->
	<template id="tab">
		<div class="tab">
			<slot name='tab1'></slot>
			<slot name='tab2'></slot>
		</div>
	</template>

	<script>
		new Vue({
			el: '#app',
			components: {
				SectionHead: {
					template: '#head',
					components: {
						Tab: {
							template: '#tab'
						}
					}
				}
			}
		});
	</script>
</body>
4.8单向数据流
父级传递数据给子级,子级和父级改变传递的数据后,不传递给对方。
<body>
	<div id="app">
		<lao-wang></lao-wang>
	</div>

	<template id="laowang">
		<div>
			老王年龄为:{{age}}
			<button @click="addAge">增加老王的年龄</button>
			<xiao-wang :father-age="age"></xiao-wang>
		</div>
	</template>

	<template id="xiaowang">
		<div>
			小王接收到的年龄:{{newAge}}
			<button @click="addAge">增加老王的年龄</button>
		</div>
	</template>
	<script>
		new Vue({
			el: '#app',
			components: {
				LaoWang:{
					data(){
						return {
							age:40
						}
					},
					template:'#laowang',
					methods:{
						addAge(){
							this.age++;
						}
					},
					components:{
						XiaoWang:{
							data(){
								return {
									newAge:this.fatherAge,
								}
							},
							props:{
								'fatherAge':Number
							},
							template:'#xiaowang',
							methods:{
								addAge(){
									//this.fatherAge++;
									this.newAge++;
								}
							}
						}
					}
				}
			}
		});
	</script>
</body>
4.9自定义事件
子组件给父组件传递数据。
<body>
	<div id="app">
		<news></news>
	</div>

	<template id="news">
		<div :style='{fontSize:fontSize+"px"}'>
			<h3>新闻列表</h3>
			<!-- 方法一 -->
			<!-- $event事件对象,接收3 -->
			<sleep :articles="articleList" @add="fontSize+=$event"></sleep>

			<!-- 方法二,change方法在news组件中定义 -->
			<!-- <sleep :articles="articleList" @add="change"></sleep> -->
		</div>
	</template>

	<template id="sleep">
		<ul>
			<li v-for="article in articles" :key="article.id">
				<h3>{{article.title}}</h3>
				<!-- 方法一 -->
				<!-- $emit(事件,参数):触发事件 -->
				<button @click="$emit('add',3)">放大字号</button>

				<!-- 方法二,add方法在sleep组件中定义 -->
				<!-- <button @click="add">放大字号</button> -->
				<div>{{article.content}}</div>
			</li>
		</ul>
	</template>

	<script>
		new Vue({
			el: '#app',
			components: {
				News: {
					data() {
						return {
							articleList: [
								{ title: '论睡觉的重要性', content: '孔子曰:“中午不睡,下午崩溃”;老子曰:“孔子说的对!”', id: 0 },
								{ title: '论早起的严重性', content: '早起五分钟,蒙逼两小时”', id: 1 },
								{ title: '论手机与睡觉的关联性', content: '睡觉前的最后一件事是放手机,早上起床的第一件事是摸手机', id: 2 },
							],
							fontSize:16,	//字体大小
						}
					},
					template:'#news',
					components:{
						Sleep:{
							props:{
								articles:Array,
							},
							template:'#sleep',
							methods:{
								add(){
									this.$emit('add',3); //触发事件
								}
							}
						}
					},
					methods:{
						change(step){
							console.log(step)
							this.fontSize+=step;
						}
					}
				}
			}
		});
	</script>
</body>
4.10动态组件
核心语句:<component :is="currentTab"></component> (显示的组件由is决定)
<keep-alive>:包裹动态组件时,缓存不活动的组件实例,不销毁它们
<head>
	<meta charset="UTF-8">
	<title></title>
	<script src="js/vue.js"></script>
	<style>
		button {
			width: 100px;
			height: 50px;
			margin: 0 10px;
			outline: none;
		}

		.content {
			width: 340px;
			height: 300px;
			margin-left: 10px;
			border: 1px solid #000;
			font-size: 40px;
			box-sizing: border-box;
			padding: 20px;
		}

		.active {
			background: green;
			color: #fff;
			border: none;
		}
	</style>
</head>

<body>
	<div id="app">
		<button v-for="tab in tabs" :key="tab.id" @click="currentTab=tab.component"
			:class="{active: currentTab==tab.component}">{{tab.name}}</button>
		<div class="content">
			<!-- <keep-alive>包裹动态组件时,缓存不活动的组件实例,不销毁它们 -->
			<keep-alive>
				<!-- 显示的组件由is决定 -->
				<component :is="currentTab"></component>
			</keep-alive>

		</div>
	</div>

	<script>
		new Vue({
			el: '#app',
			data() {
				return {
					currentTab: 'Html',
					tabs: [
						{ name: 'html', component: 'Html', id: 0 },
						{ name: 'css', component: 'Css', id: 1 },
						{ name: 'js', component: 'Javascript', id: 2 },
					]
				}
			},
			components: {
				Html: {
					template: '<div>html</div>'
				},
				Css: {
					template: '<div>css</div>'
				},
				Javascript: {
					template: '<div>js</div>',
					data() {
						return {
							currentTab: 'Vue',
							children: [
								{ name: 'vue', component: 'Vue', id: 3 },
								{ name: 'react', component: 'React', id: 4 },
							]
						}
					},
					components: {
						Vue: {
							template: '<div>vue</div>'
						},
						React: {
							template: '<div>react</div>'
						},
					},
					template: `
						<div>
							<button v-for="child in children" :key="child.id" @click="currentTab=child.component"
								:class="{active: currentTab==child.component}">{{child.name}}</button>
							<div class="childContent">
								<keep-alive>
									<component :is="currentTab"></component>
								</keep-alive>
							</div>
						</div>`
				},
			}
		});
	</script>
</body>
4.11案例-购物车
this.$set( target, key, value ):作用添加一个属性
target:要更改的数据源(可以是对象或者数组)
key:要更改的具体数据(索引或对象的key)
value :重新赋的值
<head>
	<meta charset="UTF-8">
	<title></title>
	<link rel="stylesheet" href="css/shopping.css">
	<script src="js/vue.js"></script>
</head>

<body>
	<div id="cart">
		<!-- <table class="product">
			<tbody>
				<tr>
					<td>
						<img src="images/img_01-1.png" />
					</td>
					<td>
						<p>打不翻的吸盘碗</p>
						<div class="color"><span class="">粉色</span><span class="">蓝色</span><span class="">黄色</span><span
								class="active">绿色</span></div>
					</td>
					<td>21.00元</td>
					<td><span>-</span> <strong>3</strong> <span>+</span></td>
					<td><button>加入购物车</button></td>
				</tr>
			</tbody>
		</table>

		<table class="selected">
			<thead>
				<tr>
					<th colspan="6">已选中商品</th>
				</tr>
			</thead>
			<tbody>
				<tr>
					<td><img src="images/img_01-4.png"></td>
					<td>
						<p>打不翻的吸盘碗</p>
					</td>
					<td>绿色</td>
					<td>63.00元</td>
					<td>x3</td>
					<td><button>删除</button></td>
				</tr>
			</tbody>
		</table> -->

		<shop-all :all='all' @addlist="changeList"></shop-all>
		<shop-select :select='select' @del="select.splice($event,1)"></shop-select>
		<div>总价:{{allPrice}}元</div>
	</div>

	<template id="shopAll">
		<table class="product">
			<tbody>
				<tr v-for="(shop, shopIndex) in all" :key="shop.id">
					<td>
						<img :src="shop.img" />
					</td>
					<td>
						<p>{{shop.name}}</p>
						<div class="color">
							<span v-for="(color, colorIndex) in shop.colors" :key="color"
								@click="selectColor(shop,shopIndex,color,colorIndex)"
								:class="{active:shop.cn==colorIndex}">{{color}}</span>
						</div>
					</td>
					<td>{{shop.price}}.00元</td>
					<td>
						<span @click="changeNum(shop, -1)">-</span>
						<strong>{{shop.selectNum}}</strong>
						<span @click="changeNum(shop, 1)">+</span>
					</td>
					<td><button @click="addShop(shop)">加入购物车</button></td>
				</tr>
			</tbody>
		</table>
	</template>

	<template id="shopSelect">
		<table class="selected">
			<thead>
				<tr>
					<th colspan="6">已选中商品</th>
				</tr>
			</thead>
			<tbody>
				<tr v-for="(shop,index) in select" :key="shop.id">
					<td><img :src="shop.img"></td>
					<td>
						<p>{{shop.name}}</p>
					</td>
					<td>{{shop.selectColor}}</td>
					<td>{{shop.totalPrice}}.00元</td>
					<td>x{{shop.selectNum}}</td>
					<td><button @click="$emit('del',index)">删除</button></td>
				</tr>
			</tbody>
		</table>
	</template>

	<script>
		const vm = new Vue({
			el: '#cart',
			methods: {
				changeList(selectData) {
					this.select = selectData;	//把添加的数据直接赋值给select
				}
			},
			computed: {
				allPrice() {
					let total = 0;
					this.select.forEach(item => {
						total += item.totalPrice;
					});

					return total;
				}
			},
			data() {
				return {
					all: [
						{
							id: 0,
							name: '打不翻的吸盘碗',
							price: 21,
							img: 'images/img_01-1.png',
							colors: ['粉色', '蓝色', '黄色', '绿色'],
						},
						{
							id: 1,
							name: '韩式帆布电脑双肩包',
							price: 227,
							img: 'images/img_02-1.png',
							colors: ['黑色', '青色', '蓝色'],
						},
						{
							id: 2,
							name: 'Carat钻石汤锅24cm',
							price: 78,
							img: 'images/img_03-1.png',
							colors: ['绿色', '黄色', '银色'],
						},
						{
							id: 3,
							name: '中筒皮毛一体雪地靴',
							price: 359,
							img: 'images/img_04-1.png',
							colors: ['栗色', '蓝色', '紫色', '红色'],
						},
					],
					select: [
						/* {
							id: 0,
							name: '打不翻的吸盘碗',
							price: 21,
							img: 'images/img_01-1.png',
							selectNum: 0,
							selectColor: '粉色',
							totalPrice: 0,
						} */
					],
				}
			},
			components: {
				ShopAll: {
					template: '#shopAll',
					props: {
						all: Array,
					},
					data() {
						return {
							select: [],	//点击加入购物车的数据
						}
					},
					methods: {
						selectColor(shop, shopIndex, color, colorIndex) {
							// console.log(shop);
							//shop.cn = colorIndex;
							this.$set(shop, 'cn', colorIndex);
							// this.$set( target, key, value ):作用添加一个属性
							// target:要更改的数据源(可以是对象或者数组)
							// key:要更改的具体数据
							// value :重新赋的值
							shop.img = `images/img_0${shopIndex + 1}-${colorIndex + 1}.png`;	//改图片的地址

							shop.selectColor = color;

							console.log(shop);

							//console.log(shop);
						},
						changeNum(shop, num) {
							let selectNum = shop.selectNum + num;
							if (selectNum <= 0) {
								selectNum = 0;
							}

							shop.selectNum = selectNum;

							//更新当前商品的总价
							shop.totalPrice = selectNum * shop.price;

							//console.log(shop);

							//如果减到0了,需要把数据从已选商品列表里删除
							let n = this.select.findIndex(item => item.selectNum == 0);
							if (n != -1) {
								//这个条件成立说明数据找到了,就是0
								this.select.splice(n, 1);
							}
						},
						addShop(shop) {
							if (!shop.selectNum) {
								alert('请选择数量');
								return;
							}

							let data = this.select.find(item => item.id == shop.id);

							data ? shop : this.select.push(shop);	//传过来的数据在select里找到了,就替换掉。没找到的话再push

							this.$emit('addlist', this.select);
						}
					},
				},
				ShopSelect: {
					template: '#shopSelect',
					props: {
						select: Array,
					}
				}
			}
		});

		vm.$data.all.map(item => {
			vm.$set(item, 'selectNum', 0);
			vm.$set(item, 'selectColor', item.colors[0]);
			vm.$set(item, 'totalPrice', 0);
		});

		//console.log(vm.$data);
	</script>
</body>
5.脚手架
5.1脚手架的安装
1进入vue-cli页面

2.安装node.js,网站:nodejs.org
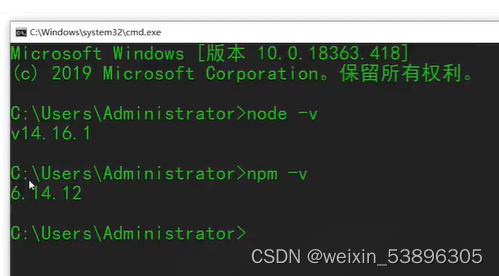
3.按下win+r,输入cmd,进入命令提示符,输入node -v,显示出node.js的版本号(至少用14的版本),输入npm -v,显示出npm的版本
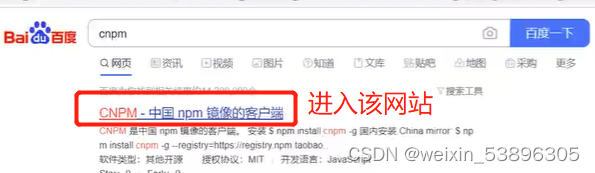
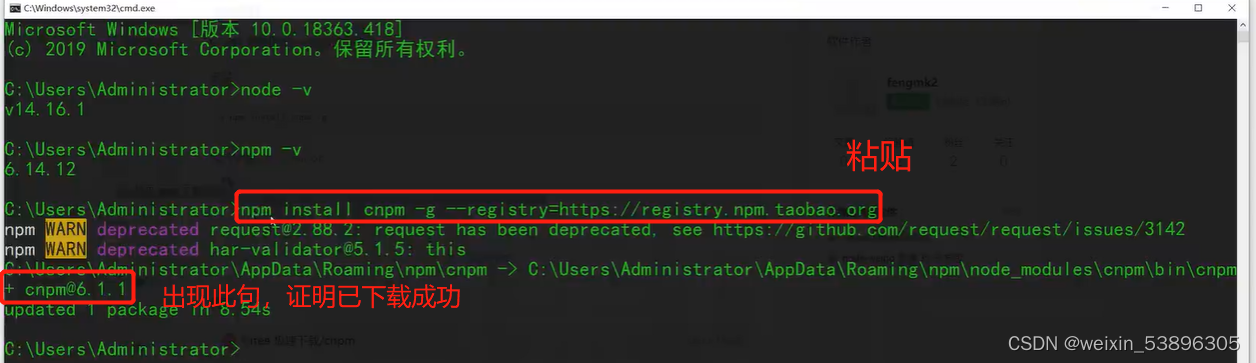
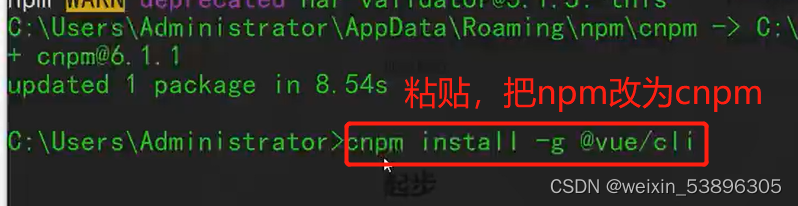
4.安装cnpm:

5.回到vue-cli页面,安装vue-cil
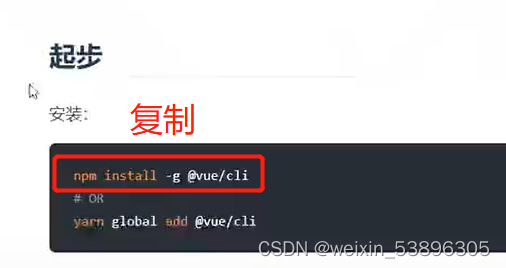

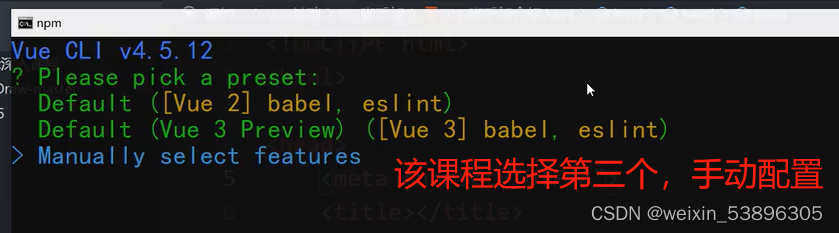
6.在项目路径下创建项目。
一、切换到项目路径

二、输入项目创建语句

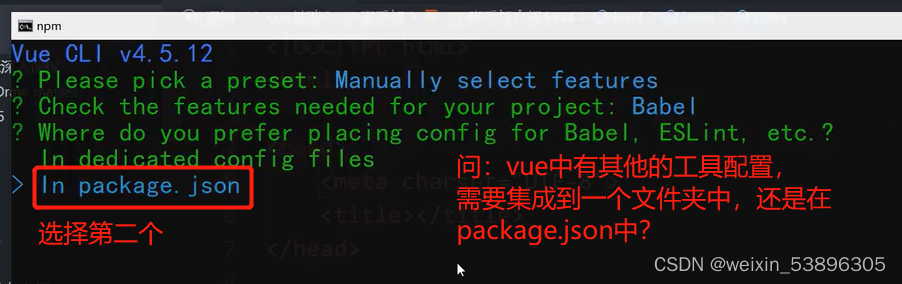
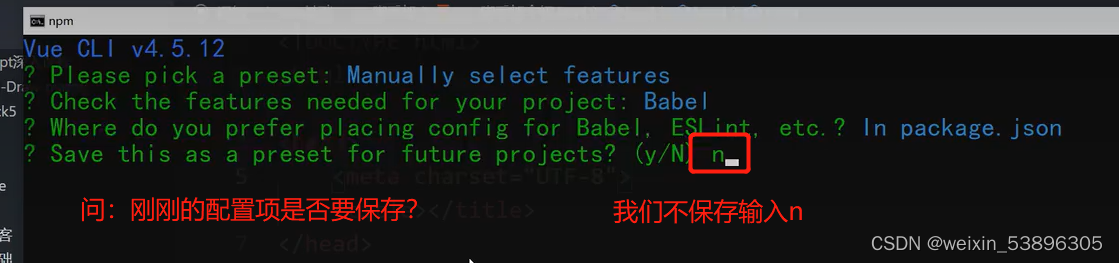
三、选择配置
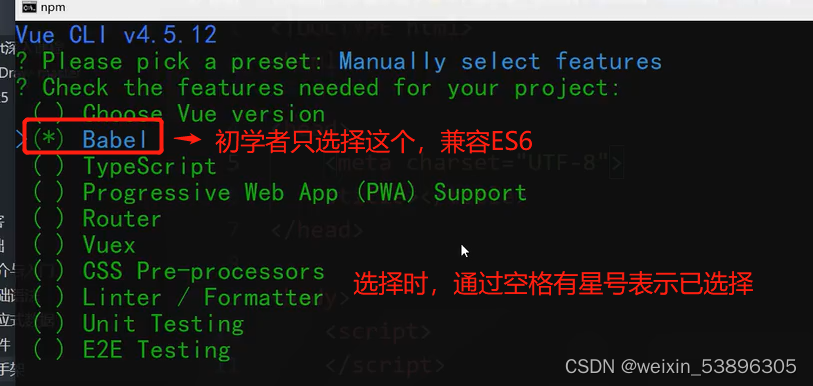
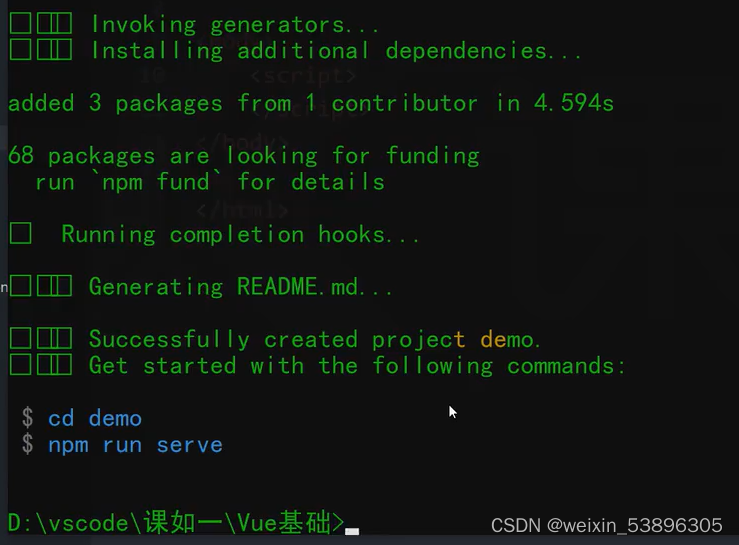
四、安装成功界面。
5.2项目目录介绍
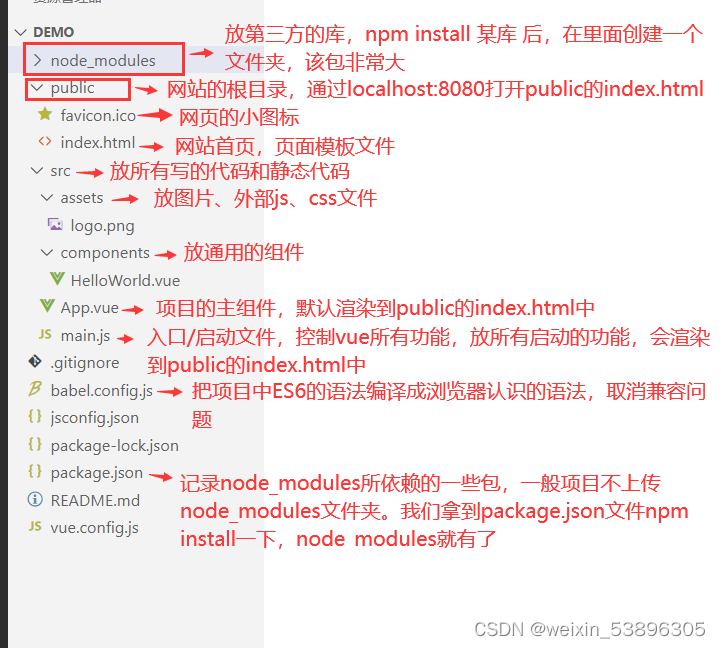
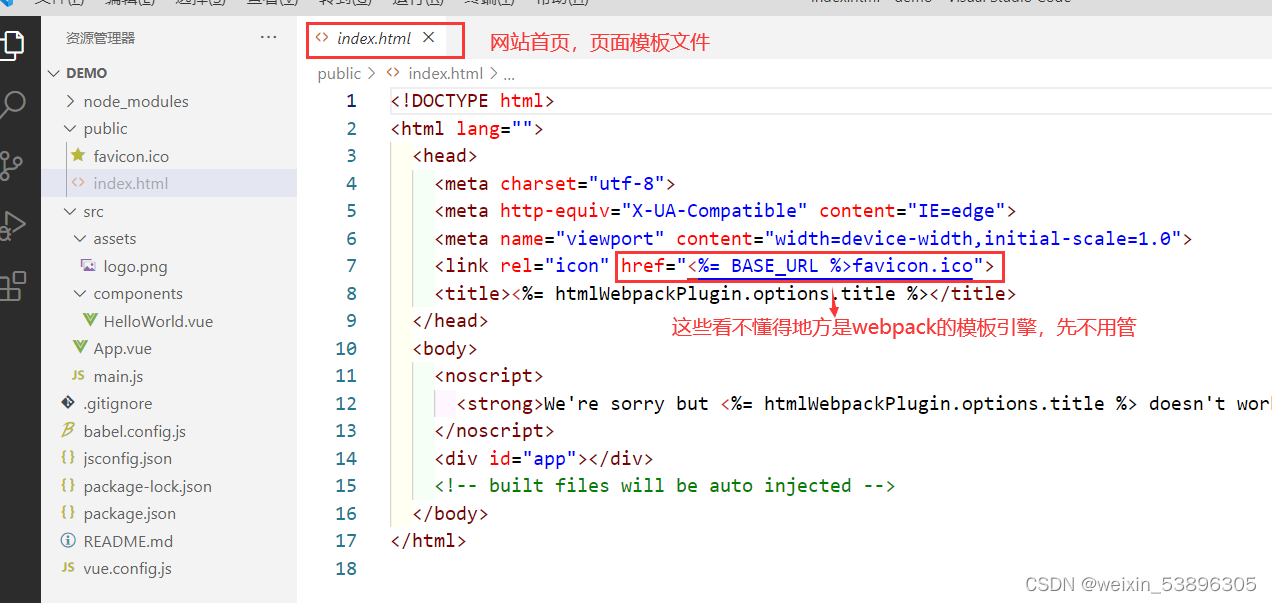
public中的index.html文件:
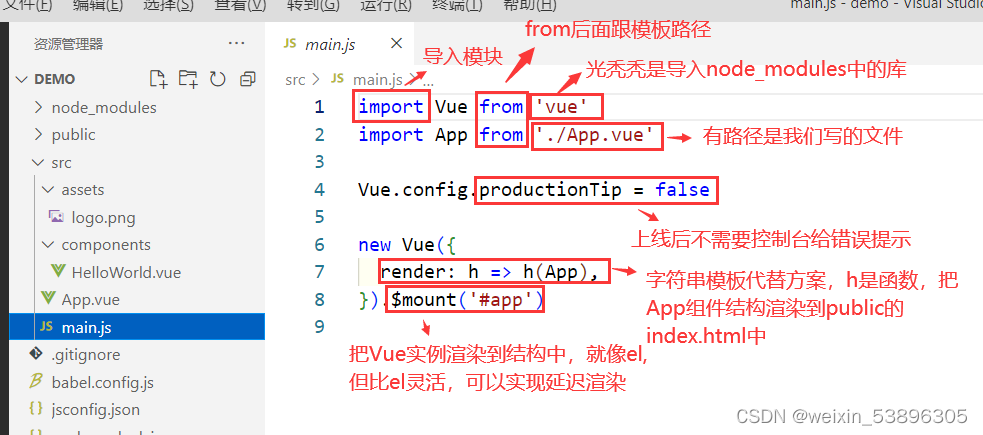
main.js文件:
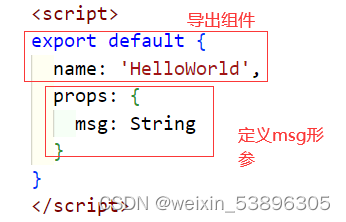
HelloWorld.vue中:
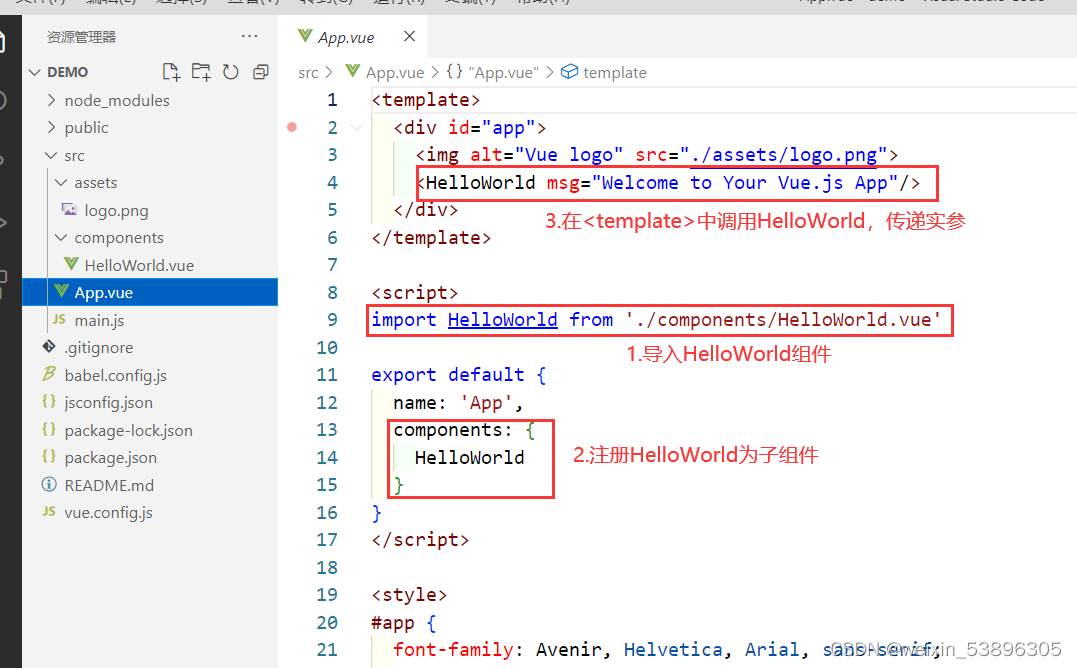
App.vue中:

使用HelloWorld组件的过程:
其他:
1.vue文件命名都是用大驼峰的方式;装Vetur插件,.vue文件代码才有颜色
2..vue:单文件组件,一个文件就是一个组件,每个文件都是一个独立完整的功能
3.启动项目:
一、使用命令cd demo,移到项目目录当中
二、使用命令npm run serve:启动项目,然后出现本地和网络地址
4.编译(打包)命令:写完项目,编译成浏览器认识的语言,使用npm run build命令,编译后上传到服务器
5.3ES6模块化

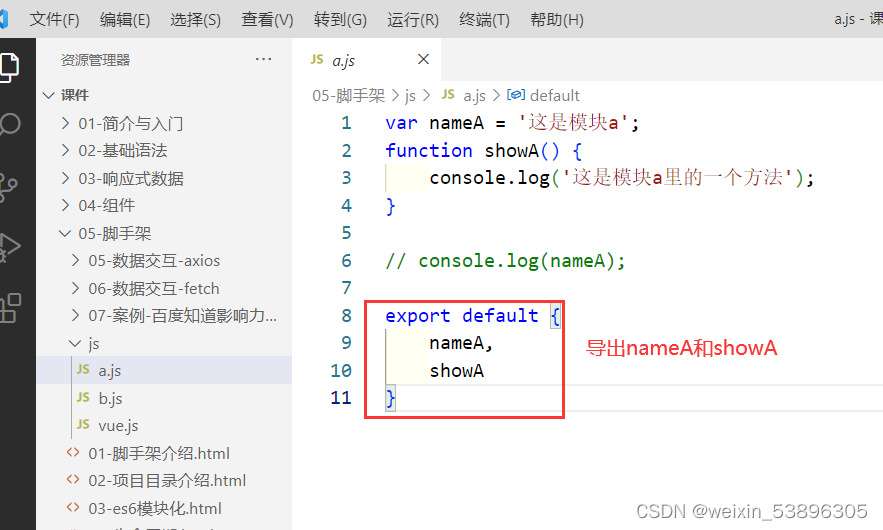
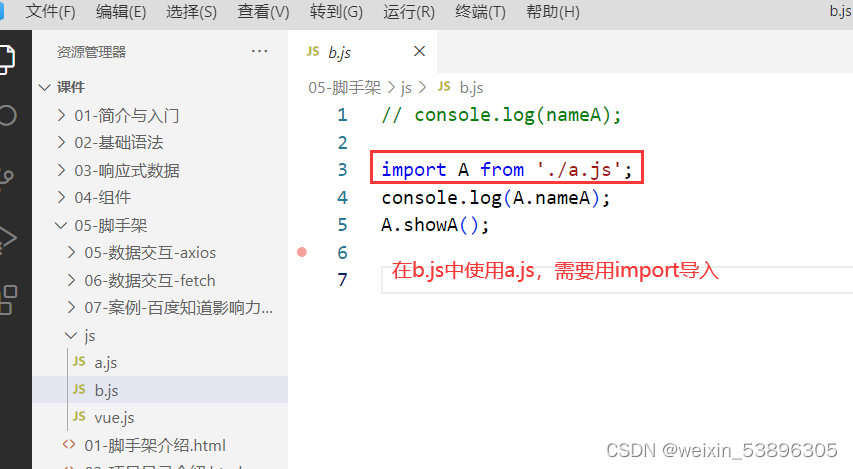
总结:export default(导出)和import(导入)搭配使用。
5.4生命周期
共4个阶段,每个阶段各两个钩子函数,共8个钩子函数。
1、beforeCreate 实例创建之前触发
2、created 实例创建后触发
3、beforeMount 实例挂载DOM前触发
4、mounted 实例挂载DOM后触发
5、beforeUpdate 数据更新前触发
6、updated 数据更改后触发
7、beforeDestroy 实例销毁前触发
8、destroyed 实例销毁后触发
<div id="app"></div>
<script>
new Vue({
data() {
return {
name: '陈学辉',
}
},
template: `
<div>
<h2 @click="change">{{this.name}}</h2>
<button @click="del">销毁实例</button>
</div>
`,
methods: {
change() {
this.name = 'kaivon';
},
del() {
this.$destroy();
}
},
//阶段一:创建
beforeCreate() {
alert('这个时候实例还没有被创建');
console.log('beforeCreate', this.name, this.change, this); //beforeCreate undefined undefined
},
created() { //常在此阶段请求数据,并把数据存在data中
alert('这个时候实例已经创建了,属性也有了,但是并没有渲染到页面中');
console.log('created', this.name, this.change);
},
//阶段二:挂载
beforeMount() {
alert('这个时候模板 已经编译完成了,准备往页面里挂载');
},
mounted() { //也可在此阶段请求数据,但数据不用存起来
alert('此时真正的DOM已经挂载到页面上了,页面里已经有内容了,数据,事件都有了');
},
//阶段三:更新
beforeUpdate() {
alert('数据马上要更新了')
},
updated() {
alert('数据已经更新了')
},
//阶段四:销毁,需要调用$destroy方法(主动删除)
// 销毁后页面功能被删除,但页面还在,可以在下面两个钩子函数中删除定时器,节约性能
beforeDestroy() {
alert('实例要销毁了')
},
destroyed() {
alert('实例已经销毁了')
}
}).$mount('#app');
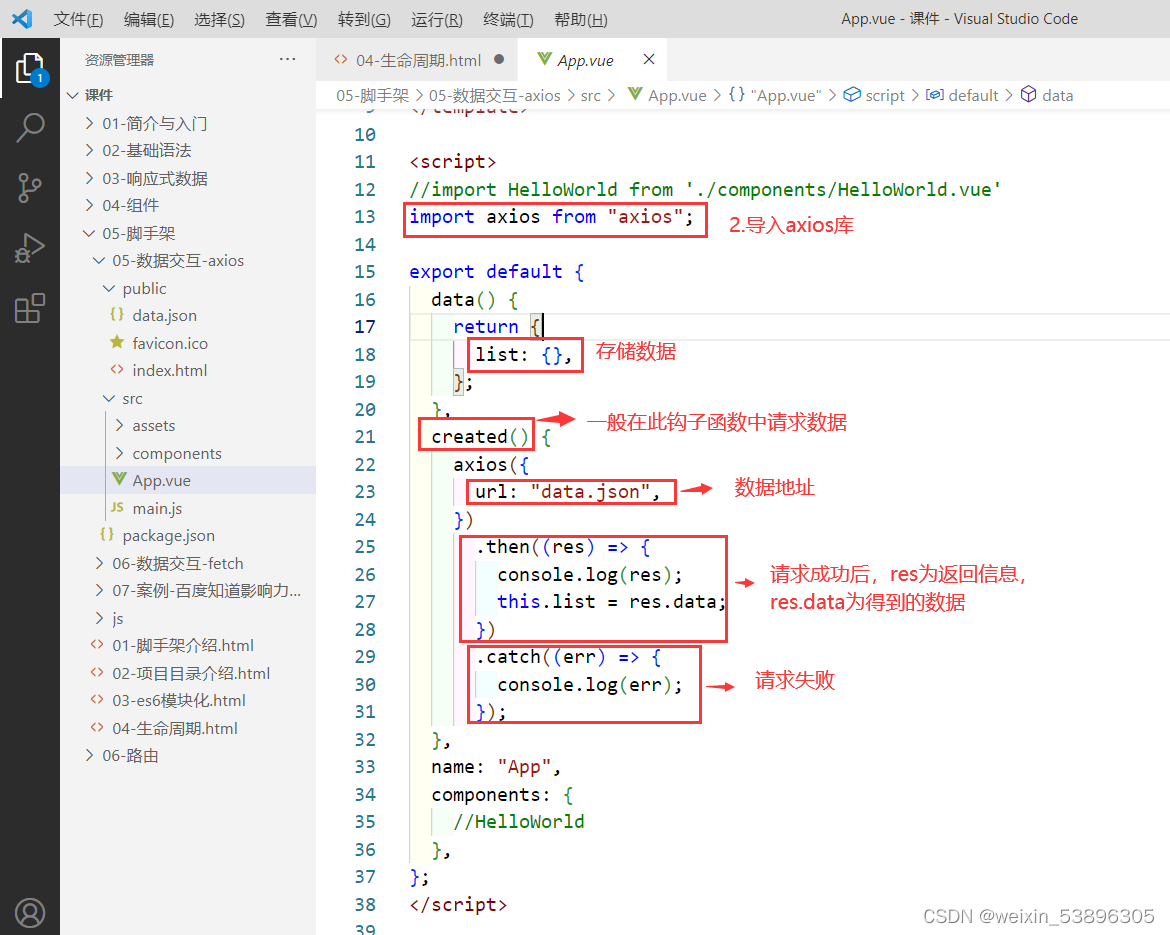
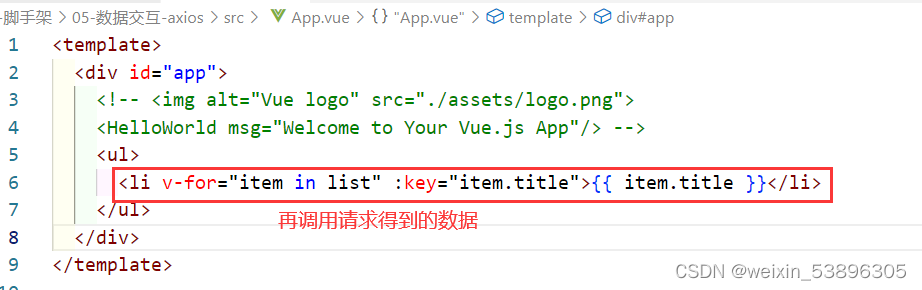
</script>5.5数据交互-axios(异步)
1.安装axios库,命令:npm install axios
5.5数据交互-fetch(异步)
兼容性不好,ES7,IE浏览器、部分移动端不支持;但脚手架有babel,可以编译成浏览器认识的语法,取消兼容问题。
fetch基于promis封装的,异步操作。
export default {
  data() {
    return {
      list: {},
    };
  },
  created() {
        //fetch('data.json?name=kaivon&age=18');  //get请求方式
	      var data={"name":"kaivon","age":"18"}
	      /* fetch('data.json',{
		  method:'post',
		  headers:{
			  //'Content-Type':'application/json',  //数据格式一
			  'Content-Type':'application/x-www-form-urlencoded',  //数据格式二
		  },
		  //body:JSON.stringify(data) //数据格式一
		  body:'name=kaivon&age=18'   //数据格式二
	  }); */


	   /* const result=fetch('data.json')
	   .then(res=>{  //操作成功状态
		   console.log(res);
	   })
	   .catch(err=>{  //操作失败状态
		   console.log(err);
	   }); */


         //运用箭头函数解决this问题
		(async () => {     //ES7 async异步
			// try{
			// 	const res = await fetch('data.json');
			// 	const result = await res.json();
			// 	console.log(result);
			// } catch(err){
			// 	console.log(err);
			// }   //try、catch捕捉错误
			const res = await fetch('data.json');
           //await:不知道什么时候得到数据,就等待到得到数据
			const result = await res.json();
			// console.log(result);

			console.log(this);

			this.list=result;
		})();
}
  name: "App",
}
获取数据方法(都是异步方法)
text():把数据解析成文本字符串
blob():把数据解析成二进制对象(如:上传)
json() :把数据解析成json格式的对象(常用)
6.路由
6.1路由介绍
SPA 单页面:点击一遍进入页面后,再重新进入该页面,不再重新加载资源
优点
1、交互体验非常良好
2、减轻服务器的压力
3、更容易实现响应式
缺点
1、SEO难度大
2、初次加载时间长
6.2使用路由
1.安装路由:

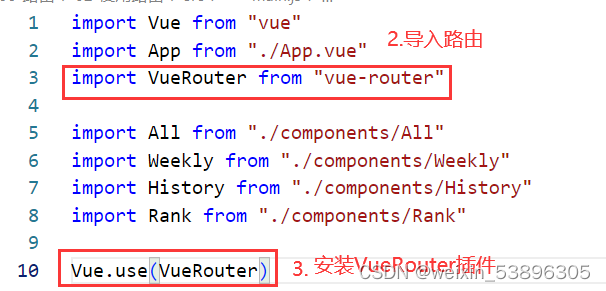
开始路由的配置步骤:
1、定义路由组件
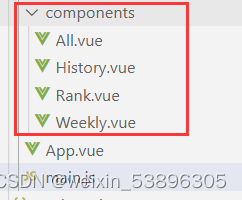
2、引入路由组件
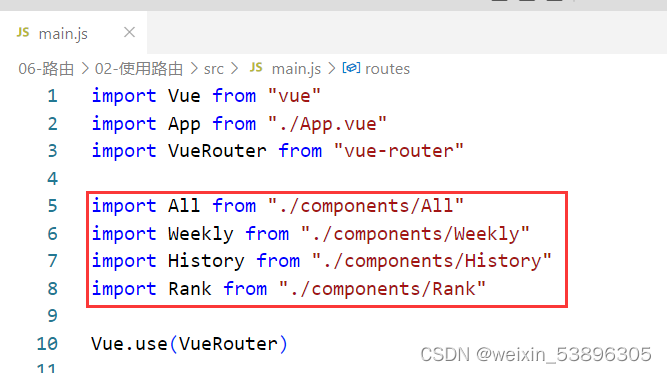
3、配置路由(routes)

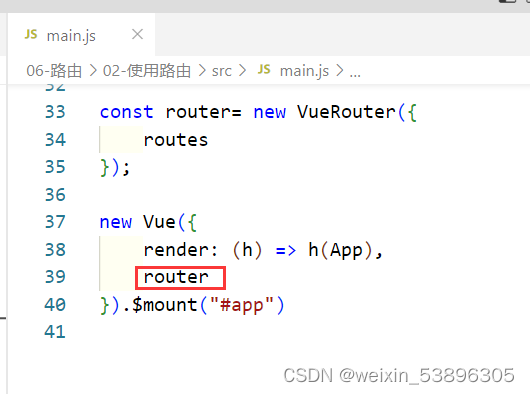
4、实例化路由(router)

5、把路由挂载到vue实例上(new Vue())
6、使用<router-linik>组件给标签添加导航
7、使用<router-view>组件给路由定义出口
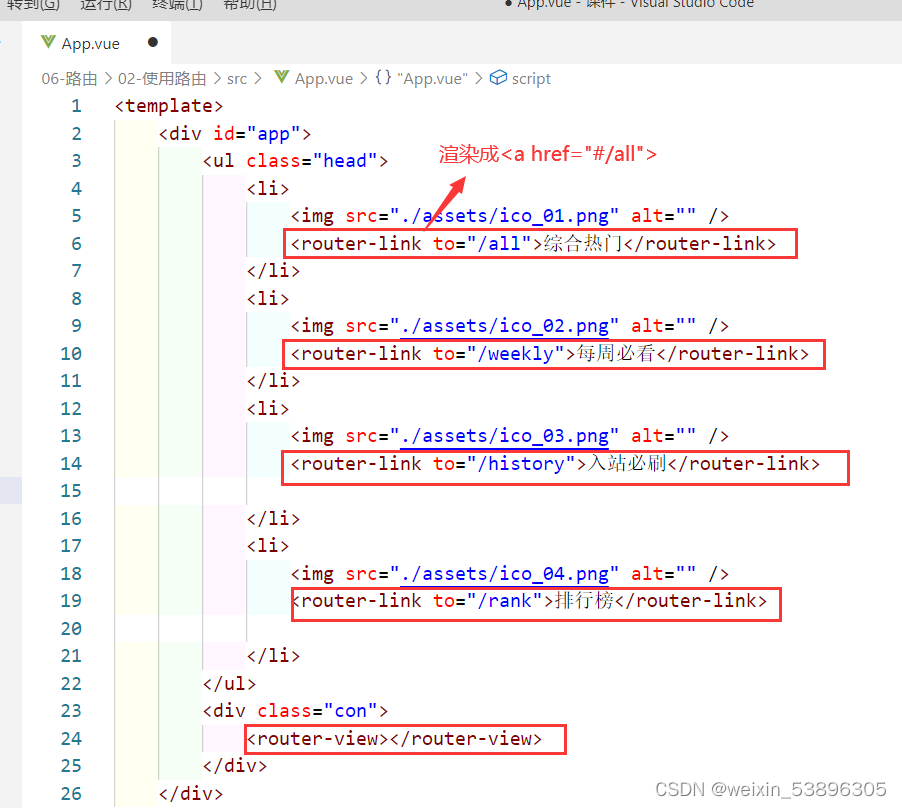
6.3-router-link组件
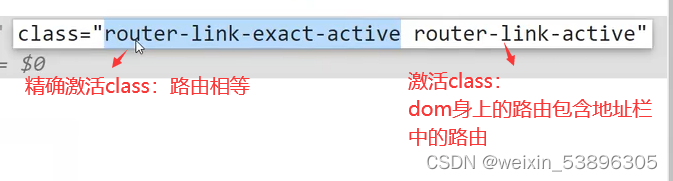
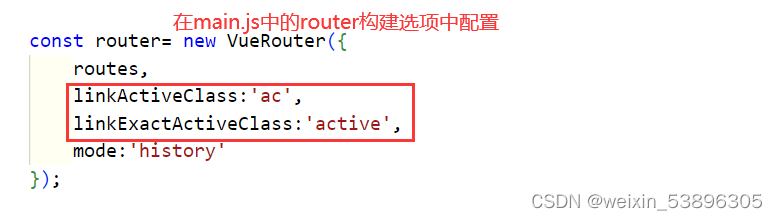
1.精确激活class和激活class:

2.v-slot:暴露底层的定制能力,让<router-link>功能暴露到外面去用

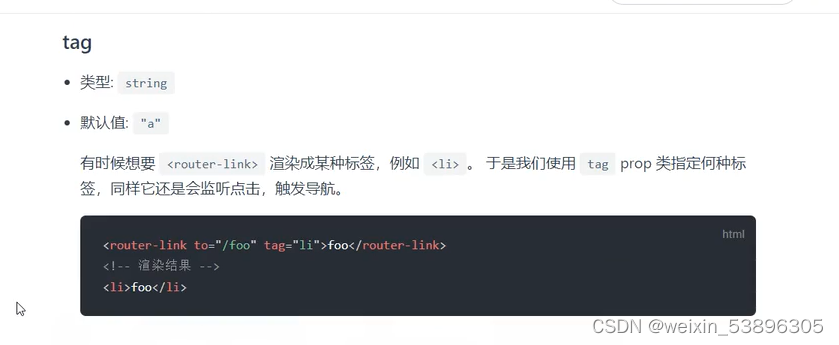
3.tag属性:渲染成想要的标签
4.mode
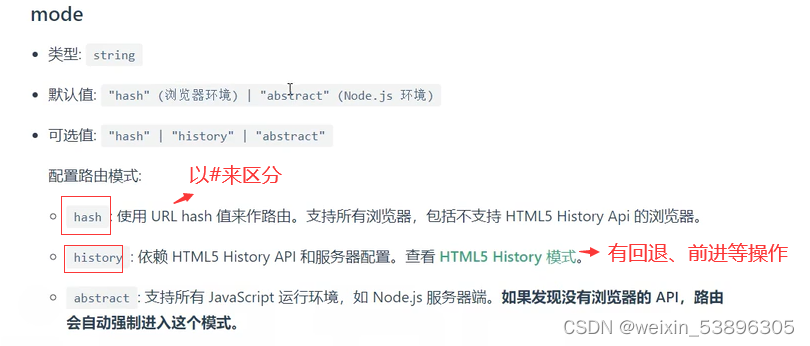
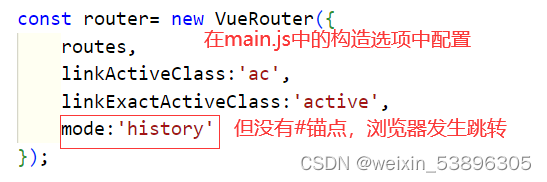
解决mode:'history'时,浏览器发生跳转不符合单页面的问题:

6.4路由懒加载
把在main.js中路由的代码独立到一个js文件中,步骤如下:
1.在main.js的同级下新建router.js文件,并把路由相关代码剪切到router.js文件,router.js中代码如下:

实现懒加载:component:()=> import('./views/All'),
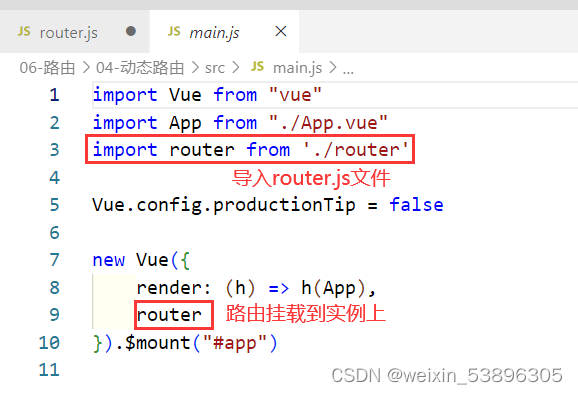
2.main.js中导入路由,main.js代码如下:
6.5嵌套路由
1.创建嵌套的组件
2.在main.js路由配置中配置子组件
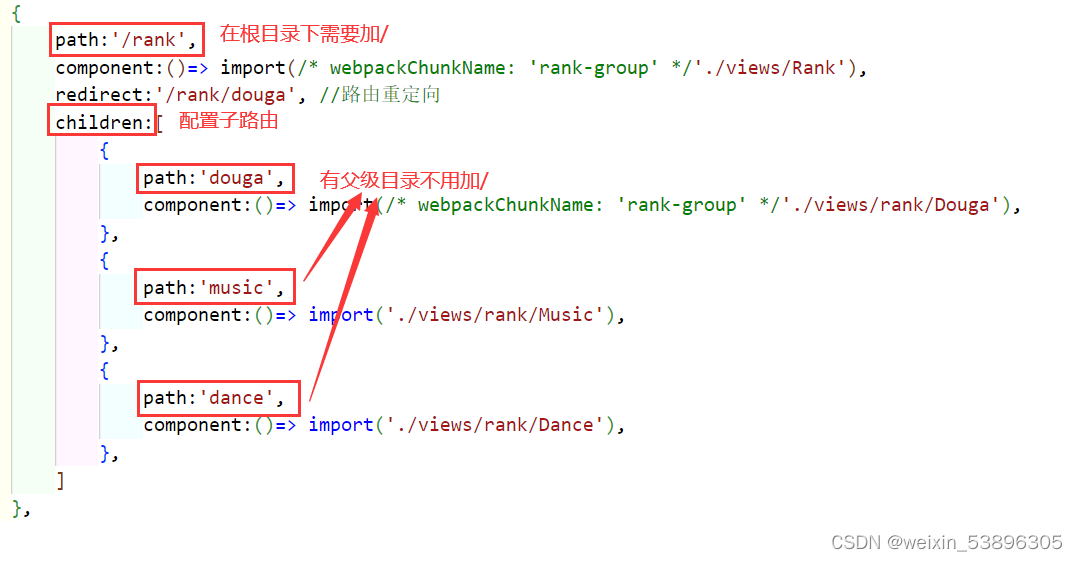
3.在父组件中使用<router-linik>和<router-view>

注意:子路由的path和to不一样
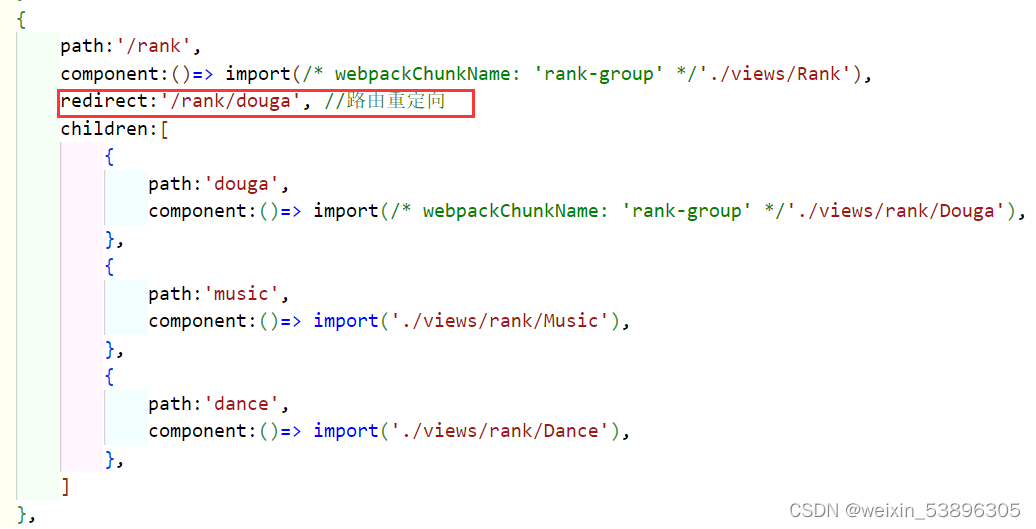
4.使用路由重定向解决,点击父组件直接进入子组件
5.在App.vue中实现子组件选中后,父组件也有选中样式

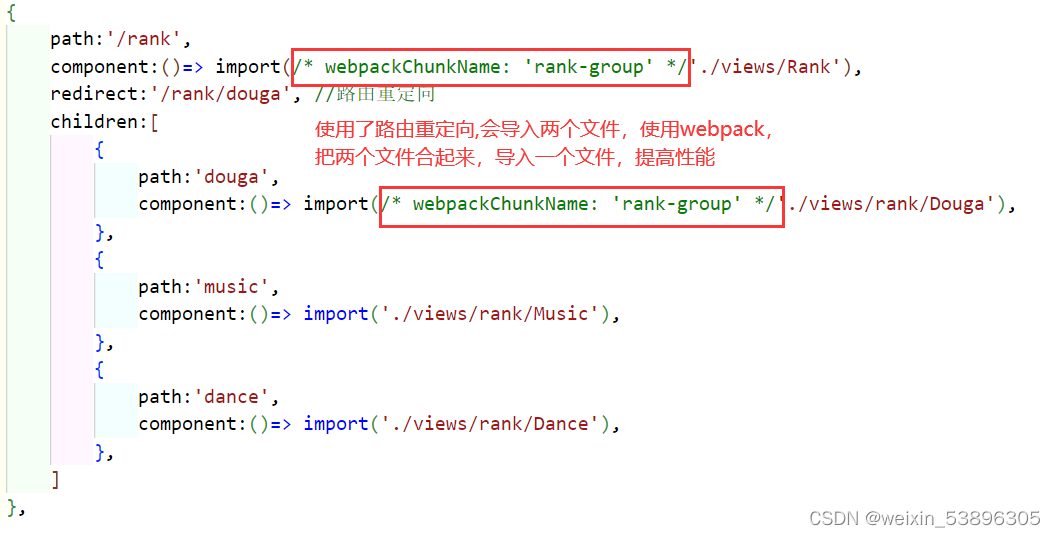
5.使用Webpack,导入两个文件合成一个文件,提高性能
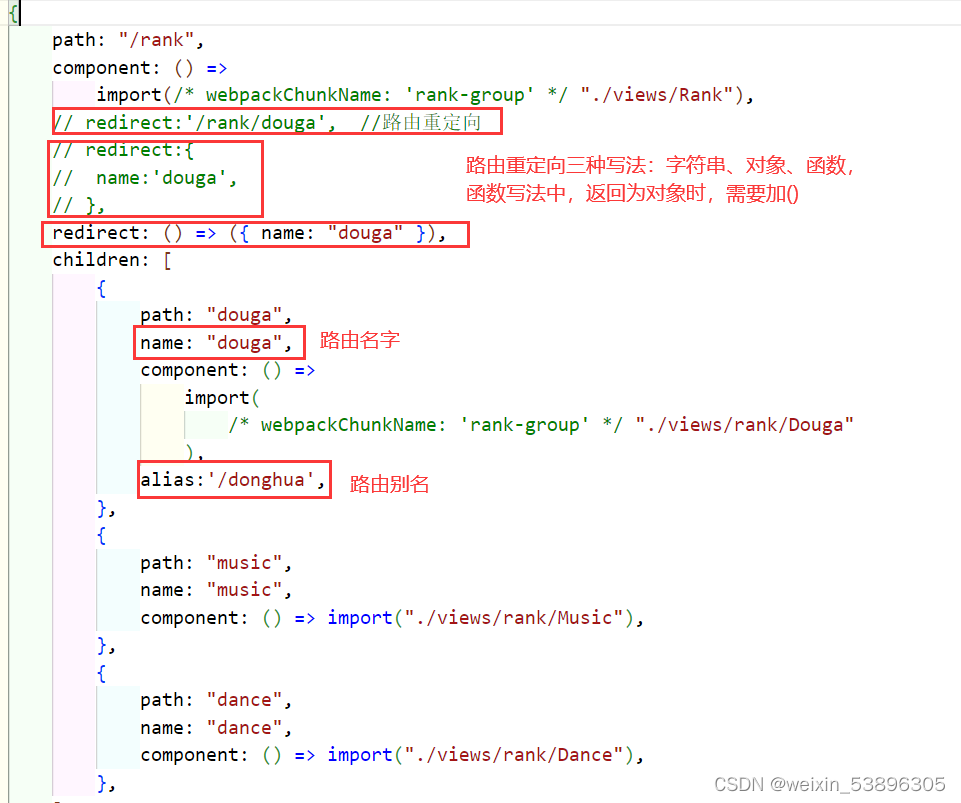
6.6路由名字与别名
名字:浏览器的地址还是原来的(name)
别名:浏览器的地址发生变化(alias)
在router.js中:
父组件中:
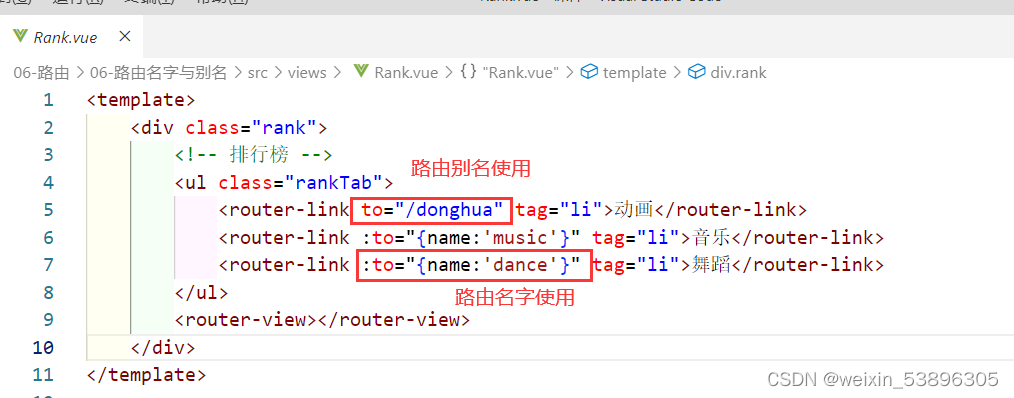
App.vue中父组件代码:

6.7编程式导航
路由对象($route):一个点击就有一个路由对象,包含当前路由的路径($route.path)等信息。
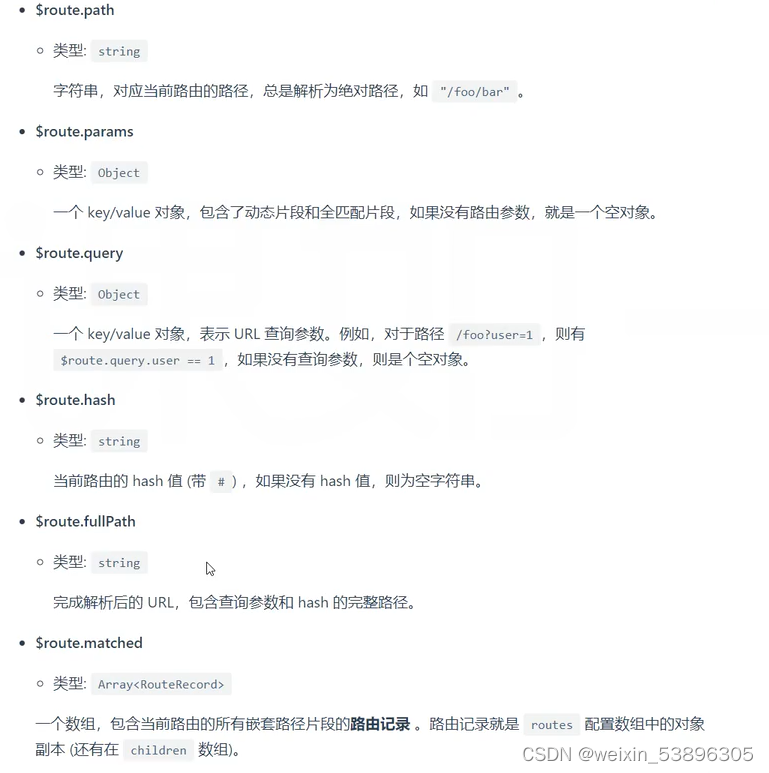
路由实例($router):整个项目的路由,在main.js中挂载到vue实例上。
1.父级组件修改为编程式导航,App.vue中:
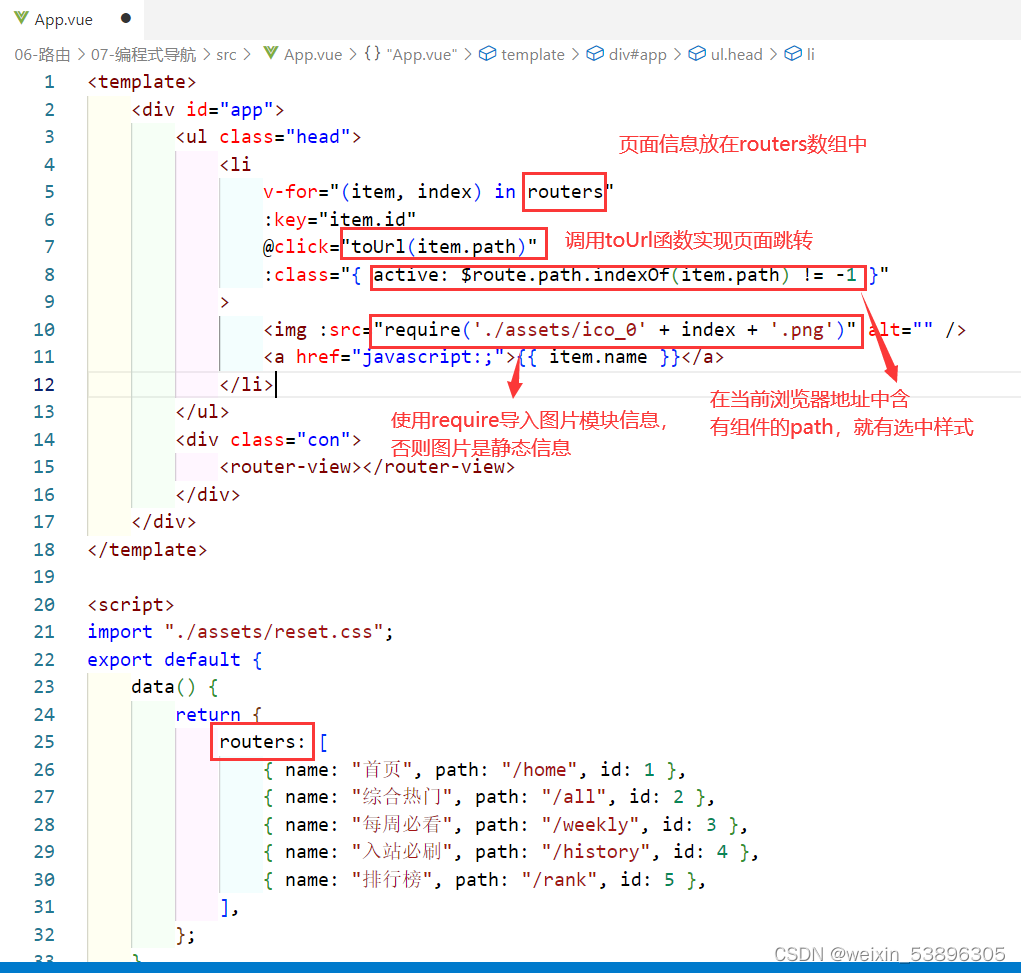

this.$router.push(url)与 this.$router.replace(url):
url与<router-link>的to属性值相同(需要父级组件地址或路由别名);
['a','b','c','home'] push方法,能正常后退页面记
['a','b','home'] replace方法,替换前一个页面记录,只能后退到前前一个页面。
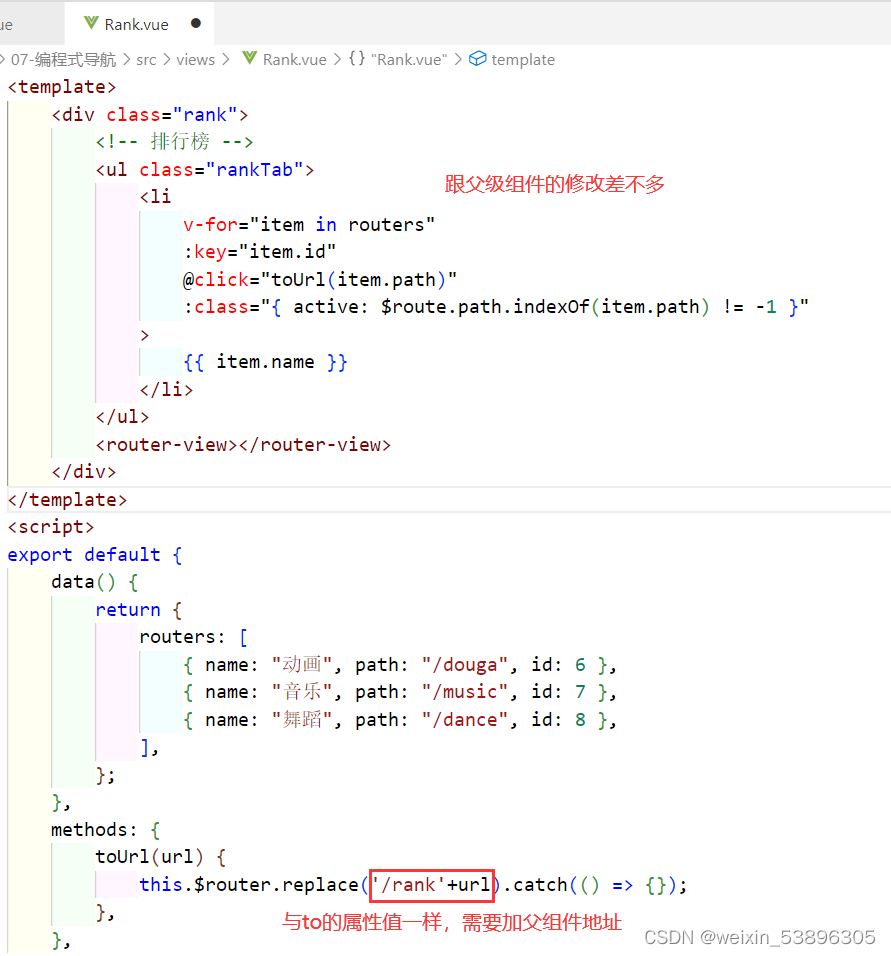
2.子组件修改为编程式导航,Rank.vue中:
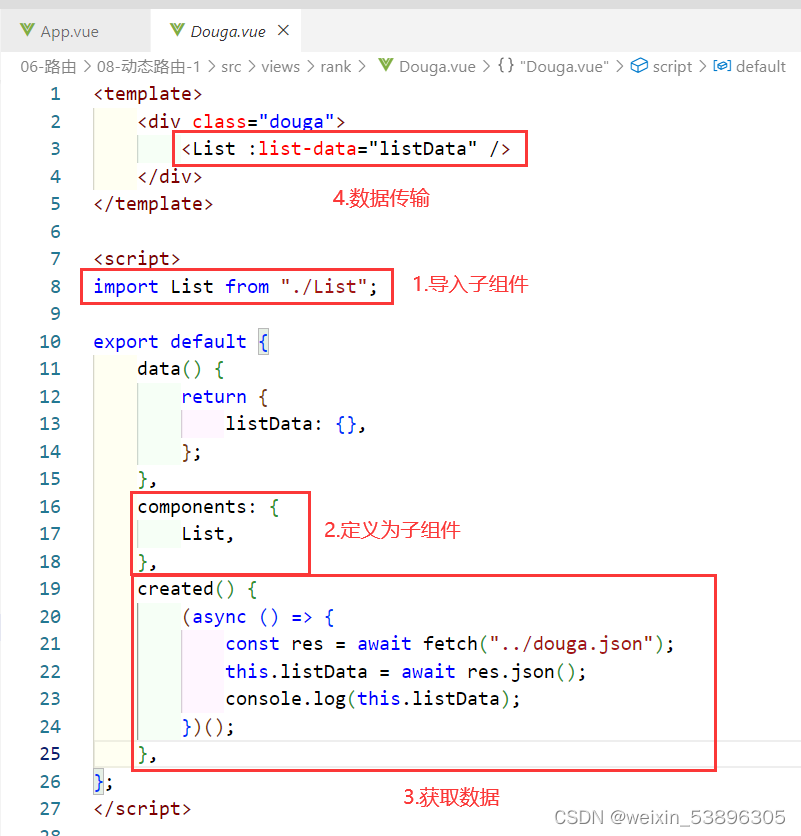
6.8动态路由-1
在Douga.vue中:
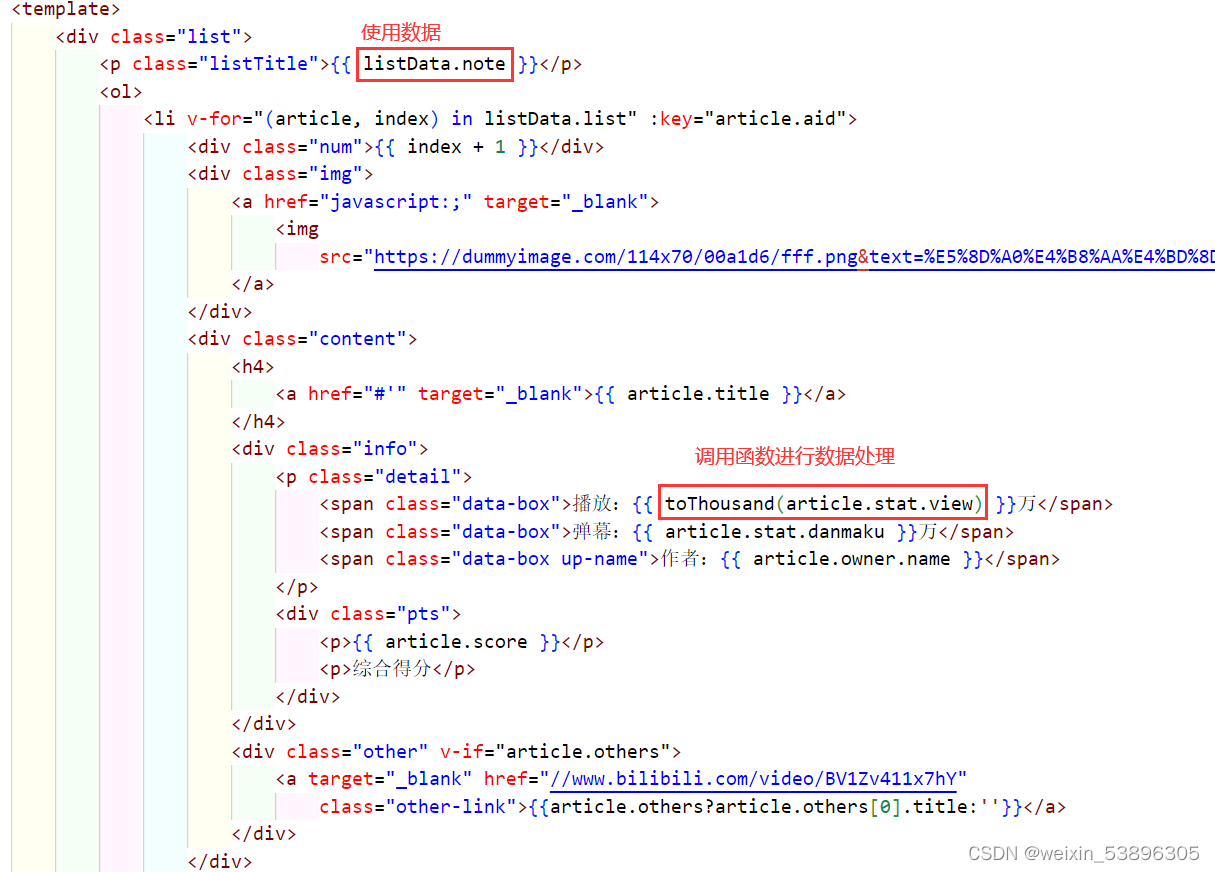
在List.vue中:

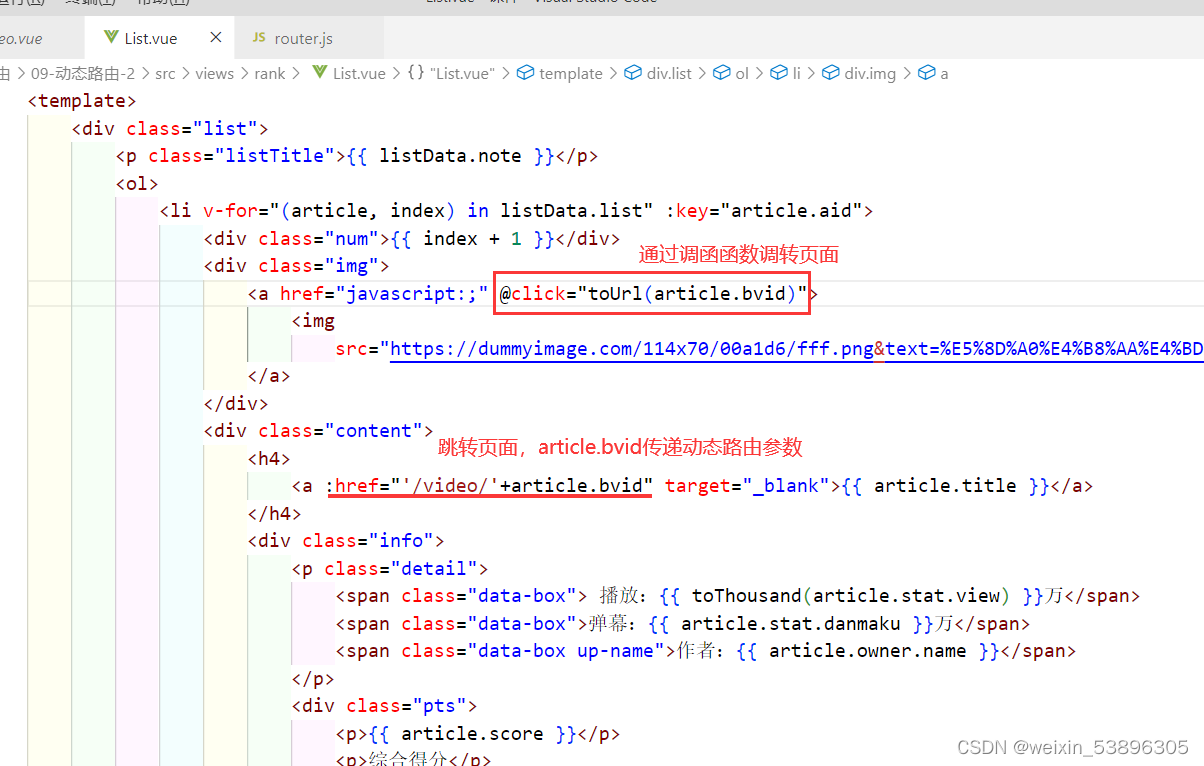
6.9动态路由-2
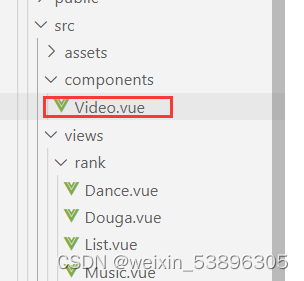
1.在components文件夹中创建Video组件。
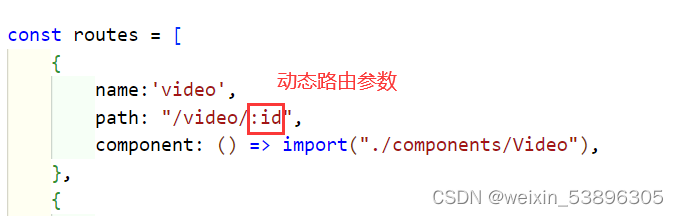
2.在router.js中配置video组件。
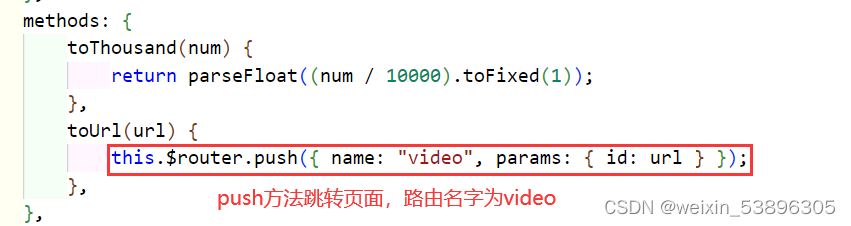
3.在List.vue跳转页面。
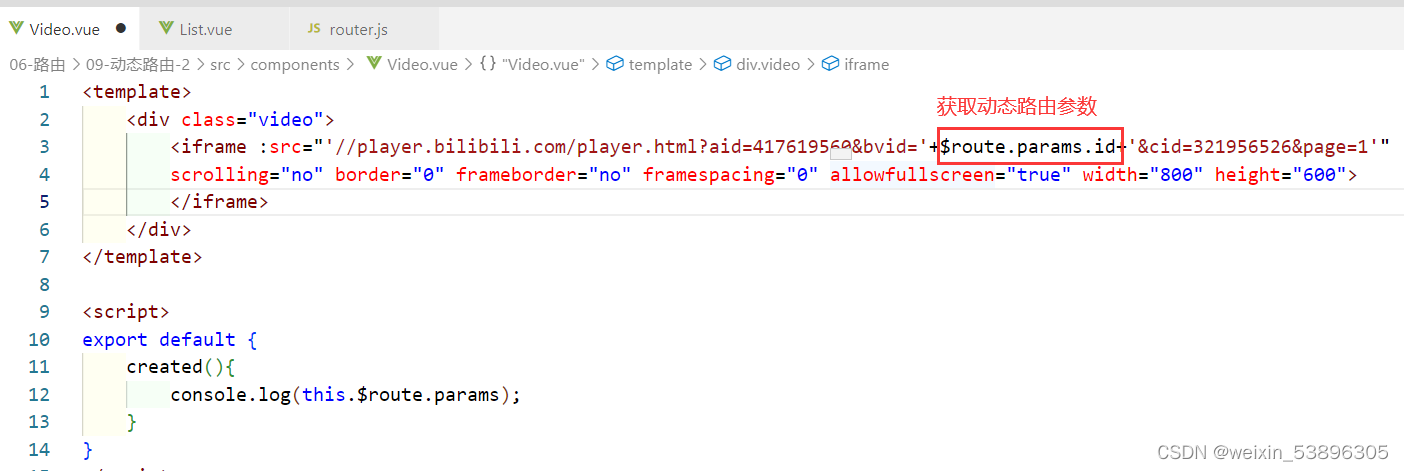
在Video.vue显示视频:
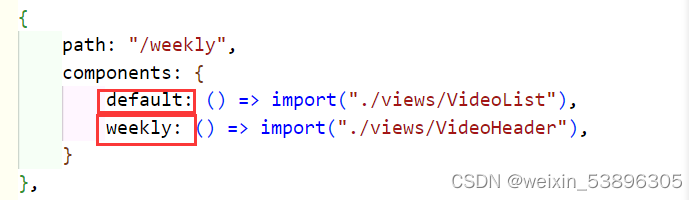
6.10命名视图
命名视图:一个路由中显示多个组件。
在App.vue中:

在router.js中:
6.11-导航守卫
一、全局守卫的三个钩子函数,在router.js定义
//第一种守卫:全局守卫的三个钩子函数,在router.js定义
router.beforeEach((to,from,next)=>{
    console.log('beforeEach');  //跳转路由前触发
    // console.log(to);  //到哪里去(要进入的路由)
    // console.log(from);  //从哪里来(离开的路由)
    // next(false);

    // to.path=='/all'?next({name: 'music'}):next()

    // next(new Error('你不能走'))
    next() //进行路由跳转
})
router.beforeResolve((to,from,next)=>{
    console.log('beforeResolve') //跳转路由前触发(它前面还有别的环节)
    next()
})
router.afterEach((to,from)=>{
    console.log('afterEach') //跳转路由后触发
})
二、路由独享守卫,在router.js配置路由(routes)中定义
const routes=[
{
    path:'/rank',
    //第二种守卫:路由独享守卫
    beforeEnter:(to, from, next)=>{  //进入路由前触发
        console.log('beforeEnter');
        next();
    },
    component:()=>import(/*webpackChunkName: 'rank-group' */'./views/Rank'),
}]
三、组件内路由,在组件的vue文件中定义
export default {
  //第三种守卫:组件内的守卫
  beforeRouteEnter:(to, from, next)=>{
    console.log('beforeRouteEnter');  //进入组件前触发
    //console.log(this); //路由跳转前触发,还未进入组件,没有实例对象--undefined

    //使用this的方法
    next(vm=>{
      console.log(vm);
    })
  },

  beforeRouteUpdate:(to, from, next)=>{  //更新组件前触发
    console.log('beforeRouteUpdate');
    next();
  },

  beforeRouteLeave:(to, from, next)=>{  //离开组件前触发
    console.log('beforeRouteLeave');
    const answer=confirm('页面内容没有保存。你确定要离开吗?');
    if(answer){
      next();
    }else{
      next(false);
    }
  },
}
导航守卫总结
一、全局守卫
1.beforeEach 跳转路由前
2.beforeResolve 跳转路由前(它前面还有别的环节)
3.afterEach 跳转路由后
二、路由独享守卫
1.beforeEnter 进入路由前
三、组件内路由
1.beforeRouteEnter 进入组件前
2.beforeRouteUpdate 更新组件前
3.beforeRouteLeave 离开组件前
执行顺序:
beforeRouteLeave -> beforeEach -> beforeRouteUpdate -> beforeEnter -> beforeRouteEnter -> beforeResolve -> afterEach
6.12-案例-登录验证
1.导入Cookie.js到assets文件夹中(正常是通过后端接口)
2.在router.js中导入Cookie文件,下面是在router.js中的操作:
2.1在配置路由中,需要跳转登录的页面添加meta属性,代码如下:
{
    path:'/history',
    component:()=>import('./views/VideoList'),
    meta:{
        requireLogin: true
    }
},
{
    path:'/rank',
    meta:{
        requireLogin: true
    },
}
2.2设置全局守卫,代码如下:
router.beforeEach((to, from, next)=>{
    // console.log(to);
    //matched即:找父级和子级,本句意思为:如果父级和子级中,有meta.requireLogin的值为true,则isRequire为true
    const isRequire = to.matched.some(item=>item.meta.requireLogin);
    // console.log(isRequire);
    if(isRequire){ //如果条件成立,则需要登录
        if(Cookie.get('login')=='true'){
            //这个条件成立说明已经登录了
            next();
        }else {
            next({name:'login', params:{curpage:to.path}});
        }
    }else{
        next();
    }
})
3.在views文件夹中新建Login.vue文件(登录页面),并导入Cookie文件
Login.vue代码如下:
<template>
    <ul class="login">
        <li><input type="text" placeholder="用户名为login"></li>
        <li><input type="password" placeholder="密码为true"></li>
        <li><button @click="login">登录</button></li>
    </ul>
</template>

<script>
import { log } from 'console'
import Cookie from '../assets/cookie'
export default {
    methods:{
        login(){
            Cookie.set('login', 'true', 24 * 60 * 60) //设置一个Cookie
            // console.log(this.$route);
            this.$router.replace(this.$route.params.curpage)
            //便于登录后页面正确的跳转
        }
    }
}
</script>

<style scoped>
.login input{
    width: 300px;
    height: 34px;
    line-height: 40px;
    border: 1px solid #ccc;
}
.login button{
    width: 80px;
    height: 34px;
}
.login li{
    margin: 10px;
}
</style>


 655
655


 被折叠的 条评论
为什么被折叠?
被折叠的 条评论
为什么被折叠?
 到【灌水乐园】发言


