


文章目录
nginx
1.安装
Centos7安装nginx
配置源
# rpm -Uvh http://nginx.org/packages/centos/7/noarch/RPMS/nginx -release-centos-7-0.el7.ngx.noarch.rpm
安装
# yum install -y nginx
启动
# systemctl start nginx
注意:
注意:在centos 7中,用systemctl启动nginx可能出现如下错误,
nginx: [emerg] bind() to 0.0.0.0:8000 failed (13: Permission denied)
这是由于selinux的安全策略引起的。解决方法如下:
- setenforce 0 (临时)
- 修改/etc/selinux/config,设置SELINUX=disabled (永久有效,需重启)
2.nginx常用命令及配置文件
nginx

#立即停止
nginx -s stop

#执行完当前请求再停止
nginx -s quit

#重新加载配置文件,相当于restart
nginx -s reload

#将日志写入一个新的文件
nginx -s reopen

#测试配置文件
nginx -t
日志文件位置/var/log/nginx/
配置文件位于 /etc/nginx/nginx.conf , 下列命令会引用/etc/nginx/conf.d目录下所有的.conf文件,这可以编写多个配置文件,方便区分。
include /etc/nginx/conf.d/*.conf;
默认配置/etc/nginx/conf.d/default.conf
server {
    listen       80; #监听端口
    server_name  localhost;

    location / {
        root   /usr/share/nginx/html; #根目录
        index  index.html index.htm; #首页
    }

    error_page   500 502 503 504  /50x.html;
    location = /50x.html {
        root   /usr/share/nginx/html;
    }
}
3.配置静态网页
在/etc/nginx/conf.d目录下编写配置文件,配置静态页面
server {
    listen 8080;
    server_name demo;

    location / {
        root /html/static;
        index login.html reg.html;
    }
}
虚拟主机server通过listen和server_name进行区分,如果有多个server配置,listen + server_name 不能重复。
通过访问主机IP+8080端口就能访问到静态资源。
listen
监听可以配置成IP或端口或IP+端口
listen 127.0.0.1:8000;
listen 127.0.0.1;( 端口不写,默认80 )
listen 8000;
listen *:8000;
listen localhost:8000;
server_name
server_name主要用于区分,可以随便起。
也可以使用变量$hostname配置成主机名。
或者配置成域名:example.org www.example.org *.example.org
如果多个server的端口重复,那么根据域名或者主机名去匹配 server_name 进行选择。
下面的例子中:
curl http://localhost:80`会访问`/usr/share/nginx/html
curl http://nginx-dev:80`会访问`/home/AdminLTE-3.2.0
# curl http://localhost:80 会访问这个
server {
    listen       80;
    server_name  localhost;

    #access_log  /var/log/nginx/host.access.log  main;

    location / {
        root   /usr/share/nginx/html;
        index  index.html index.htm;
    }

 # curl http://nginx-dev:80 会访问这个
server{
    listen 80;
    server_name nginx-dev;#主机名

    location / {
        root /home/AdminLTE-3.2.0;
        index index.html index2.html index3.html;
    }

}
location
/请求指向 root 目录
location 总是从/目录开始匹配,如果有子目录,例如/css,他会指向/static/css
location /css {
  root /static;
}
4. HTTP 反向代理
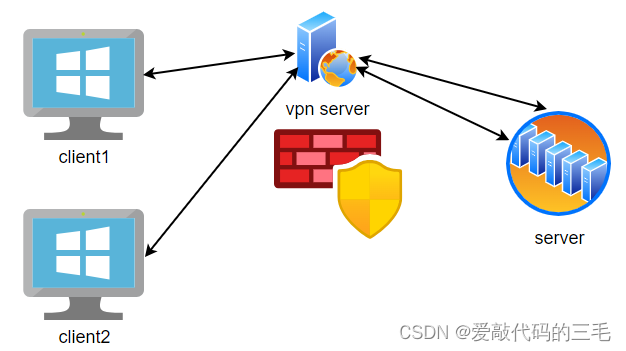
正向代理
正向代理就是在服务器的角度隐藏客户端,比如说常见的VPN就是正向代理。VNP就是一个代理服务器,他代理的就是客户端。
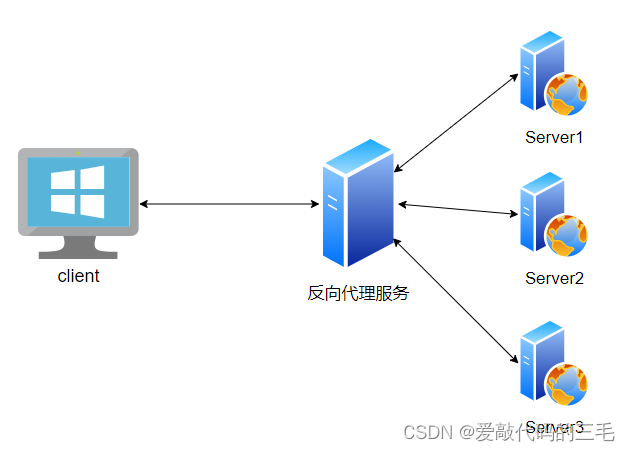
反向代理
同理反向代理和正向代理相反,是站在客户端的角度把服务器给隐藏起来,比如说我们通过www.baidu.com的域名来访问百度,而其背后是是有很多服务器的,当我们一般只能通过这个域名来进行访问,然后我们的请求会被代理服务转发到后面的服务器上,也就是后面进行服务的真实服务器的IP以及端口信息都被隐藏了
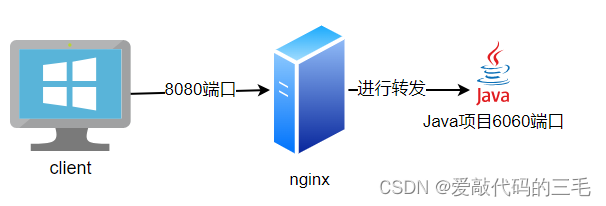
配置反向代理
当客户端访问服务器的8080端口就会将请求转发到http://localhost:6060/login.html上
server {
    listen 8080;
    server_name oj_java;

    location / {
        proxy_pass http://localhost:6060/login.html;
    }
}
proxy_pass配置说明
server {
    listen 8080;
    server_name oj_java;

    location / {
        proxy_pass http://localhost:6060/;
    }
}
将8080端口的请求转发到6060端口
设置代理请求headers
用户可以重新定义或追加header信息传递给后端服务器。可以包含文本、变量及其组合。默认情况下,仅重定义两个字段:
proxy_set_header Host       $proxy_host;
proxy_set_header Connection close;
由于使用反向代理之后,后端服务无法获取用户的真实IP,所以,一般反向代理都会设置以下header信息。
location /some/path/ {
    #nginx的主机地址
    proxy_set_header Host $http_host;
    #用户端真实的IP,即客户端IP
    proxy_set_header X-Real-IP $remote_addr;
    proxy_set_header X-Forwarded-For $proxy_add_x_forwarded_for;

    proxy_pass http://localhost:8088;
}
常用变量的值:
$host:nginx主机IP,例如192.168.56.105
$http_host:nginx主机IP和端口,192.168.56.105:8001
$proxy_host:localhost:8088,proxy_pass里配置的主机名和端口
$remote_addr:用户的真实IP,即客户端IP。
5.负载均衡
负载均衡将前端请求分发到多个服务器上,有以下好处。
-
提高系统性能:通过将请求分发到多个服务器上,负载均衡可以减轻单个服务器的负载,从而提高系统的响应速度和吞吐量。
-
提高系统可靠性:如果某个服务器发生故障或不可用,负载均衡器可以自动将请求转发到其他可用的服务器上,从而确保系统的连续性和可用性。
-
实现可扩展性:通过添加更多的服务器,负载均衡可以实现系统的水平扩展,从而应对不断增长的流量和用户需求。
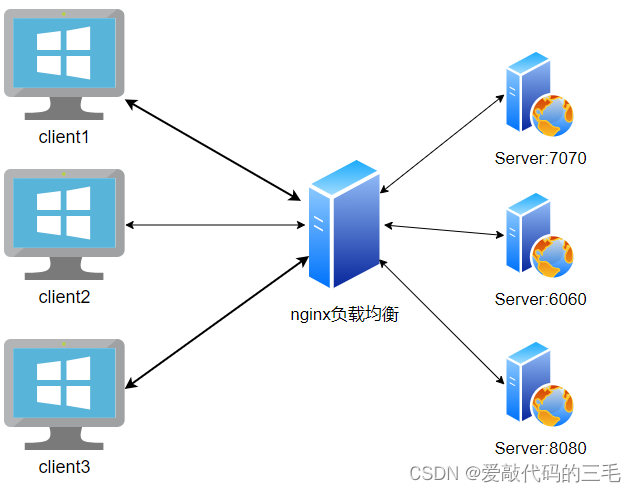
配置负载均衡,一下配置了一个轮询的负载均衡,当访问8080端口时,请求会被轮询转发到6060端口和7070端口的服务。
upstream java_oj {
    #不写,采用轮循机制
    server localhost:6060;
    server localhost:7777;

}

server {
    listen 8080;
    server_name oj_java;
    #nginx的主机地址
    proxy_set_header Host $http_host;
    #用户端真实的IP,即客户端IP
    proxy_set_header X-Real-IP $remote_addr;
    proxy_set_header X-Forwarded-For $proxy_add_x_forwarded_for;
    location / {
        proxy_pass http://java_oj;
    }
}
负载均衡策略
这里只是简单学习几个简单的策略
1.轮循机制(round-robin)
默认机制,以轮循机制方式分发。
2.最小连接(least-connected)
将下一个请求分配给活动连接数最少的服务器(较为空闲的服务器)。
upstream backend {
    least_conn;
    server backend1.example.com;
    server backend2.example.com;
}
3.ip-hash
客户端的 IP 地址将用作哈希键,来自同一个ip的请求会被转发到相同的服务器。此方法可确保来自同一客户端的请求将始终定向到同一服务器,除非此服务器不可用。
upstream backend {
    ip_hash;
    server backend1.example.com;
    server backend2.example.com;
}


 2577
2577


 被折叠的 条评论
为什么被折叠?
被折叠的 条评论
为什么被折叠?
 到【灌水乐园】发言


