


1、微信登录流程
微信登录:https://developers.weixin.qq.com/miniprogram/dev/OpenApiDoc/user-login/code2Session.html
流程图:
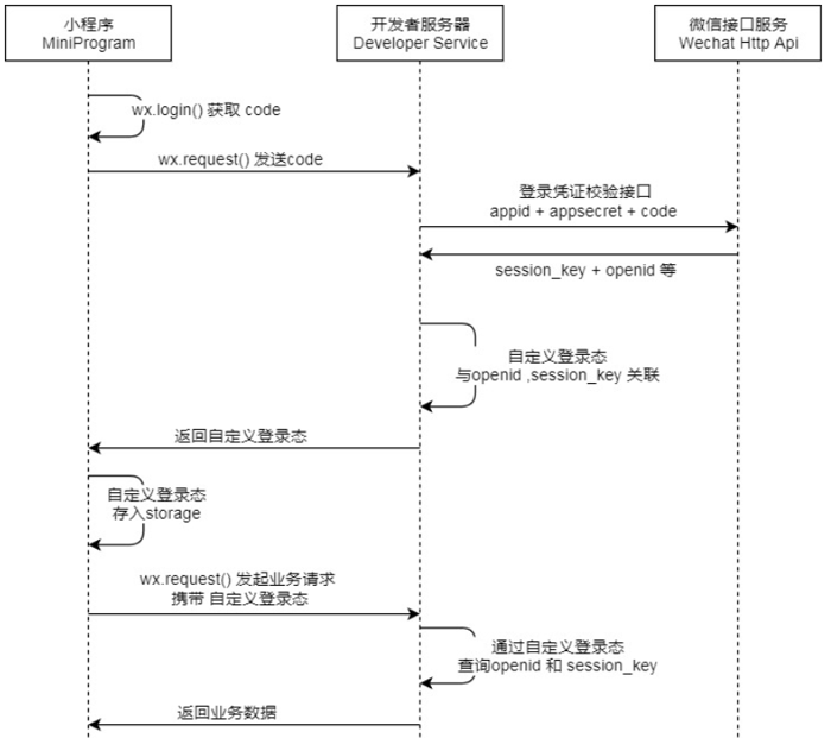
步骤分析:
- 小程序端,调用wx.login()获取code,就是授权码。
- 小程序端,调用wx.request()发送请求并携带code,请求开发者服务器(自己编写的后端服务)。
- 开发者服务端,通过HttpClient向微信接口服务发送请求,并携带appId+appsecret+code三个参数。
- 开发者服务端,接收微信接口服务返回的数据,session_key+opendId等。opendId是微信用户的唯一标识。
- 开发者服务端,自定义登录态,生成令牌(token)和openid等数据返回给小程序端,方便后绪请求身份校验。
- 小程序端,收到自定义登录态,存储storage。
- 小程序端,后绪通过wx.request()发起业务请求时,携带token。
- 开发者服务端,收到请求后,通过携带的token,解析当前登录用户的id。
- 开发者服务端,身份校验通过后,继续相关的业务逻辑处理,最终返回业务数据。
说明:
- 调用 wx.login() 获取 临时登录凭证code ,并回传到开发者服务器。
- 调用 auth.code2Session 接口,换取 用户唯一标识 OpenID 、 用户在微信开放平台帐号下的唯一标识UnionID(若当前小程序已绑定到微信开放平台帐号) 和 会话密钥 session_key。
之后开发者服务器可以根据用户标识来生成自定义登录态,用于后续业务逻辑中前后端交互时识别用户身份。
2、代码实现
通过微信登录的流程,如果要完成微信登录的话,最终就要获得微信用户的openid。在小程序端获取授权码后,向后端服务发送请求,并携带授权码,这样后端服务在收到授权码后,就可以去请求微信接口服务。最终,后端向小程序返回openid和token等数据。
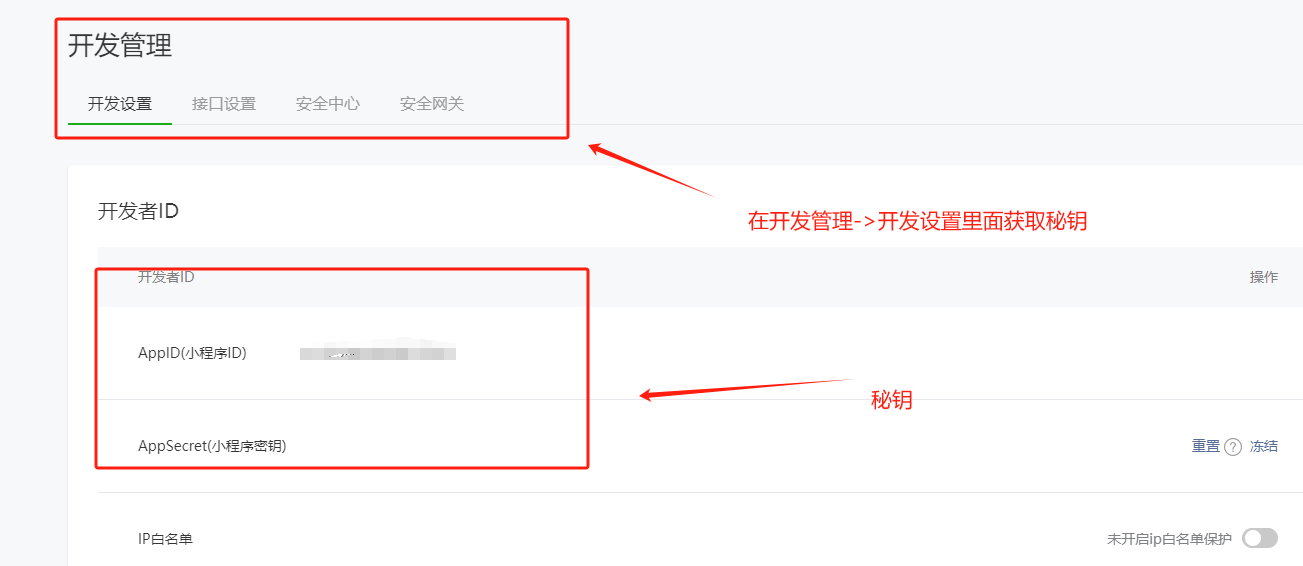
配置微信登录
application-dev.yml
wechat:
  appid: 你的id
  secret: 你的秘钥
application.yml
wechat:
  appid: ${sky.wechat.appid}
  secret: ${sky.wechat.secret}
配置为微信用户生成jwt令牌时使用的配置项:
application.yml
jwt:
	user-secret-key: 小林
    user-ttl: 7200000
    user-token-name: authentication
配置dao类
/**
 * C端用户登录
 */
@Data
public class UserLoginDTO implements Serializable {

    private String code;

}
返回数据vo类
@Data
@Builder
@NoArgsConstructor
@AllArgsConstructor
public class UserLoginVO implements Serializable {

    private Long id;
    private String openid;
    private String token;

}
创建UserController的login方法
@RestController
@RequestMapping("/user/user")
@Api(tags = "C端用户相关接口")
@Slf4j
public class UserController {

    @Autowired
    private UserService userService;
    @Autowired
    private JwtProperties jwtProperties;

    /**
     * 微信登录
     * @param userLoginDTO
     * @return
     */
    @PostMapping("/login")
    @ApiOperation("微信登录")
    public Result<UserLoginVO> login(@RequestBody UserLoginDTO userLoginDTO){
        log.info("微信用户登录:{}",userLoginDTO.getCode());

        //微信登录
        User user = userService.wxLogin(userLoginDTO);//后绪步骤实现

        //为微信用户生成jwt令牌
        Map<String, Object> claims = new HashMap<>();
        claims.put(JwtClaimsConstant.USER_ID,user.getId());
        String token = JwtUtil.createJWT(jwtProperties.getUserSecretKey(), jwtProperties.getUserTtl(), claims);

        UserLoginVO userLoginVO = UserLoginVO.builder()
                .id(user.getId())
                .openid(user.getOpenid())
                .token(token)
                .build();
        return Result.success(userLoginVO);
    }
}
其中,JwtClaimsConstant.USER_ID常量已定义,值为userId
创建UserService接口
public interface UserService {

    /**
     * 微信登录
     * @param userLoginDTO
     * @return
     */
    User wxLogin(UserLoginDTO userLoginDTO);
}
创建UserServiceImpl实现类
实现获取微信用户的openid和微信登录功能
@Service
@Slf4j
public class UserServiceImpl implements UserService {

    //微信服务接口地址
    public static final String WX_LOGIN = "https://api.weixin.qq.com/sns/jscode2session";

    @Autowired
    private WeChatProperties weChatProperties;
    @Autowired
    private UserMapper userMapper;

    /**
     * 微信登录
     * @param userLoginDTO
     * @return
     */
    public User wxLogin(UserLoginDTO userLoginDTO) {
        String openid = getOpenid(userLoginDTO.getCode());

        //判断openid是否为空,如果为空表示登录失败,抛出业务异常
        if(openid == null){
            throw new LoginFailedException(MessageConstant.LOGIN_FAILED);
        }

        //判断当前用户是否为新用户
        User user = userMapper.getByOpenid(openid);

        //如果是新用户,自动完成注册
        if(user == null){
            user = User.builder()
                    .openid(openid)
                    .createTime(LocalDateTime.now())
                    .build();
            userMapper.insert(user);//后绪步骤实现
        }

        //返回这个用户对象
        return user;
    }

    /**
     * 调用微信接口服务,获取微信用户的openid
     * @param code
     * @return
     */
    private String getOpenid(String code){
        //调用微信接口服务,获得当前微信用户的openid
        Map<String, String> map = new HashMap<>();
        map.put("appid",weChatProperties.getAppid());
        map.put("secret",weChatProperties.getSecret());
        map.put("js_code",code);
        map.put("grant_type","authorization_code");
        String json = HttpClientUtil.doGet(WX_LOGIN, map);

        JSONObject jsonObject = JSON.parseObject(json);
        String openid = jsonObject.getString("openid");
        return openid;
    }
}
创建UserMapper接口
@Mapper
public interface UserMapper {
    /**
     * 根据openid获取用户
     * @param openId
     * @return
     */
    @Select("select * from user where openid = #{openId}")
    User getByOpenId(String openId);

    /**
     * 添加用户
     * @param user
     */
    @Insert("insert into user values (null,#{openid}," +
            "#{name},#{phone},#{sex},#{idNumber}" +
            ",#{avatar},#{createTime})")
    @Options(useGeneratedKeys = true,keyProperty = "id")
    void saveUser(User user);
}
编写拦截器JwtTokenUserInterceptor
@Component
@Slf4j
public class JwtTokenUserInterceptor implements HandlerInterceptor {

    @Autowired
    private JwtProperties jwtProperties;

    /**
     * 校验jwt
     *
     * @param request
     * @param response
     * @param handler
     * @return
     * @throws Exception
     */
    public boolean preHandle(HttpServletRequest request, HttpServletResponse response, Object handler) throws Exception {
        //判断当前拦截到的是Controller的方法还是其他资源
        if (!(handler instanceof HandlerMethod)) {
            //当前拦截到的不是动态方法,直接放行
            return true;
        }

        //1、从请求头中获取令牌
        String token = request.getHeader(jwtProperties.getUserTokenName());

        //2、校验令牌
        try {
            log.info("jwt校验:{}", token);
            Claims claims = JwtUtil.parseJWT(jwtProperties.getUserSecretKey(), token);
            Long userId = Long.valueOf(claims.get(JwtClaimsConstant.USER_ID).toString());
            log.info("当前用户的id:", userId);
            BaseContext.setCurrentId(userId);
            //3、通过,放行
            return true;
        } catch (Exception ex) {
            //4、不通过,响应401状态码
            response.setStatus(401);
            return false;
        }
    }
}
在WebMvcConfiguration配置类中注册拦截器
	@Autowired
    private JwtTokenUserInterceptor jwtTokenUserInterceptor;
	/**
     * 注册自定义拦截器
     * @param registry
     */
    protected void addInterceptors(InterceptorRegistry registry) {
        log.info("开始注册自定义拦截器...");
        //.........

        registry.addInterceptor(jwtTokenUserInterceptor)
                .addPathPatterns("/user/**")
                .excludePathPatterns("/user/user/login")
                .excludePathPatterns("/user/shop/status");
    }


 1718
1718


 被折叠的 条评论
为什么被折叠?
被折叠的 条评论
为什么被折叠?
 到【灌水乐园】发言


