


目录
spring cloud Eureka 概述
Spirng Cloud Eureka使用Netflix Eureka来实现服务注册与发现。它既包含了服务端组件,也包含了客户端组件,并且服务端与客户端均采用java编写,所以Eureka主要适用于通过java实现的分布式系统,或是JVM兼容语言构建的系统。Eureka的服务端提供了较为完善的REST API,所以Eureka也支持将非java语言实现的服务纳入到Eureka服务治理体系中来,只需要其他语言平台自己实现Eureka的客户端程序。目前.Net平台的Steeltoe、Node.js的eureka-js-client等都已经实现了各自平台的Ereka客户端组件。
Eureka服务治理体系
1:服务治理
Spring Cloud 封装了 Netflix 公司开发的 Eureka 模块来实现服务治理
在传统的rpc远程调用框架中,管理每个服务与服务之间依赖关系比较复杂,管理比较复杂,所以需要使用服务治理,管理服务于服务之间依赖关系,可以实现服务调用、负载均衡、容错等,实现服务发现与注册。
2:服务注册:
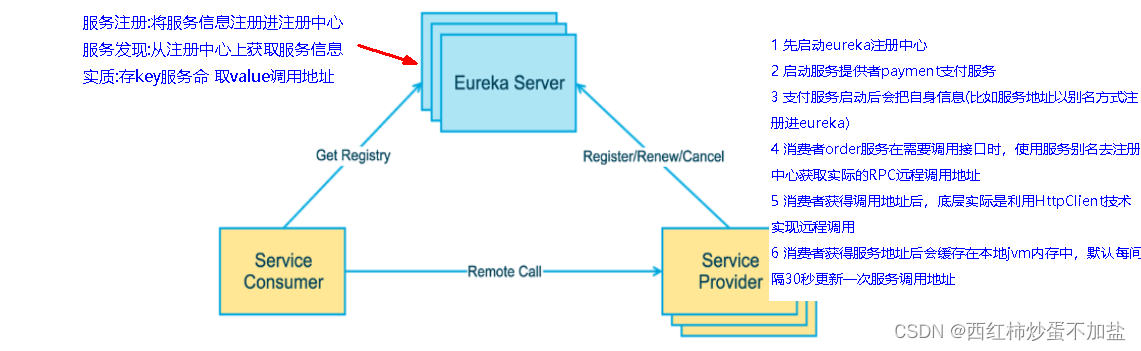
Eureka采用了CS的设计架构,Eureka Server 作为服务注册功能的服务器,它是服务注册中心。而系统中的其他微服务,使用 Eureka的客户端连接到 Eureka Server并维持心跳连接。这样系统的维护人员就可以通过 Eureka Server 来监控系统中各个微服务是否正常运行。
在服务注册与发现中,有一个注册中心。当服务器启动的时候,会把当前自己服务器的信息 比如 服务地址通讯地址等以别名方式注册到注册中心上。另一方(消费者|服务提供者),以该别名的方式去注册中心上获取到实际的服务通讯地址,然后再实现本地RPC调用RPC远程调用框架核心设计思想:在于注册中心,因为使用注册中心管理每个服务与服务之间的一个依赖关系(服务治理概念)。在任何rpc远程框架中,都会有一个注册中心(存放服务地址相关信息(接口地址))
3: 服务发现
由于在服务治理框架下运作,服务间的调用不再通过指定具体的实例地址来实现,而是通过向服务名发起请求调用实现。所以,服务调用方在调用服务提供方接口的时候,并不知道具体的服务实例位置,因此,调用方需要向服务注册中心咨询服务,并获取所有服务的实例清单,以实现对具体服务实例的访问。
Netflix Eureka
1:Eureka server 服务端
各个微服务节点通过配置启动后,会在EurekaServer中进行注册,这样EurekaServer中的服务注册表中将会存储所有可用服务节点的信息,服务节点的信息可以在界面中直观看到
2:Eureka client 客户端
是一个Java客户端,用于简化Eureka Server的交互,客户端同时也具备一个内置的、使用轮询(round-robin)负载算法的负载均衡器。在应用启动后,将会向Eureka Server发送心跳(默认周期为30秒)。如果Eureka Server在多个心跳周期内没有接收到某个节点的心跳,EurekaServer将会从服务注册表中把这个服务节点移除(默认90秒)
单机Eureka构建步骤
搭建服务注册中心
首先我们搭建一个springboot项目,项目名为cloud-eureka-server7001
,然后第一步先在pom文件中导入依赖
<parent>
    <groupId>org.springframework.boot</groupId>
    <artifactId>spring-boot-starter-parent</artifactId>
    <version>1.3.7.RELEASE</version>
    <relativePath/>
</parent>

<dependencies>
    <dependency>
        <groupId>org.springframework.cloud</groupId>
        <artifactId>spring-cloud-starter-eureka-server</artifactId>
    </dependency>
</dependencies>

<dependencyManagement>
    <dependencies>
        <dependency>
            <groupId>org.springframework.cloud</groupId>
            <artifactId>spring-cloud-dependencies</artifactId>
            <version>Brixton.SR5</version>
            <type>pom</type>
            <scope>import</scope>
        </dependency>
    </dependencies>
</dependencyManagement>
然后第二步,写yml配置文件
server:
  port: 7001

eureka:
  instance:
    hostname: eureka7001.com  #eureka服务端的实例名称
  client:
    register-with-eureka: false #false表示不向注册中心注册自己。
    fetch-registry: false #false表示自己端就是注册中心,我的职责就是维护服务实例,并不需要去检索服务
    service-url:
      defaultZone: http://eureka7001.com:7001/eureka/
第三部,启动类上加上@EnableEurekaServer 注解
import org.springframework.boot.SpringApplication;
        import org.springframework.boot.autoconfigure.SpringBootApplication;
        import org.springframework.cloud.netflix.eureka.server.EnableEurekaServer;

@SpringBootApplication
@EnableEurekaServer
public class CloudEurekaServer7001Application {

    public static void main(String[] args) {
        SpringApplication.run(CloudEurekaServer7001Application.class, args);
    }

}
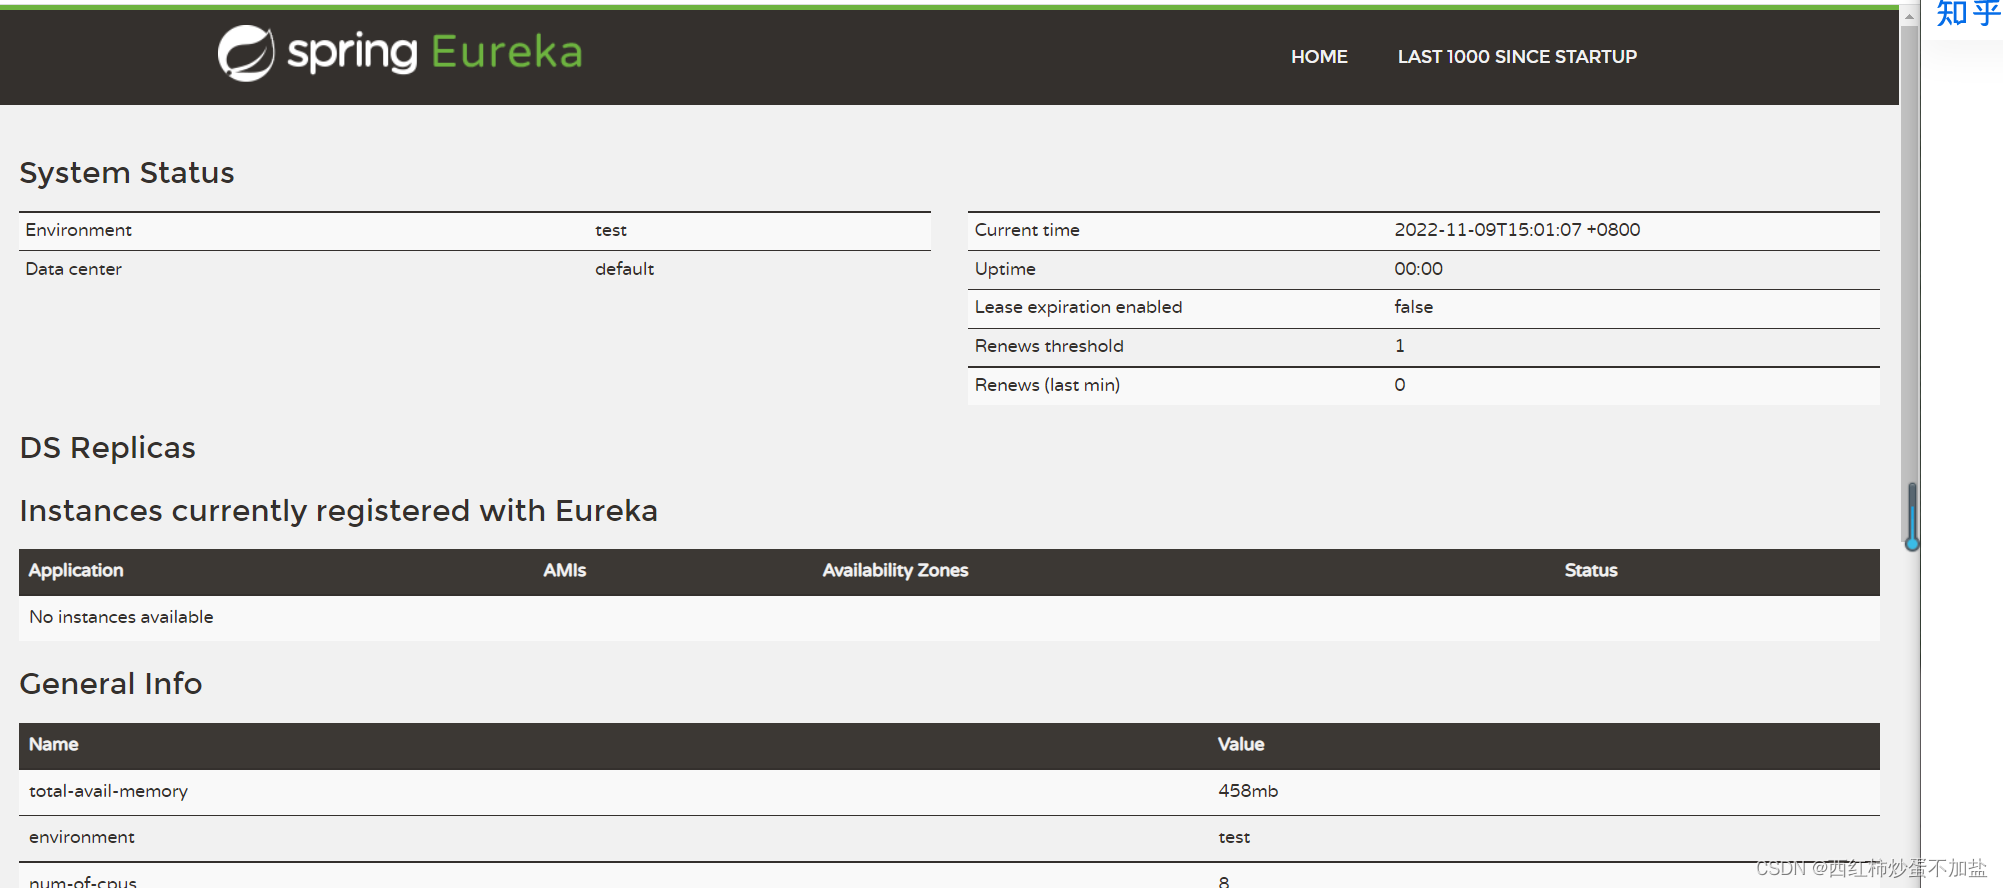
完成上面的配置后,启动应用并访问 http://localhost:7001/。可以看到如下图所示的 Eureka 信息面板,其中 Instances currently registered with Eureka 栏是空的,说明该注册中心还没有注册任何服务。
注册服务提供者
在完成了服务注册中心的搭建之后,接下来我们尝试将一个既有的 Spring Boot 应用加入 Eureka 的服务治理中去。这里我们创建一个新的 Spring Boot 项目,命名为cloud-provider-payment8001,首先修改 pom.xml,增加 Spring Cloud Eureka 模块的依赖,具体代码如下所示:
<dependencies>
    <dependency>
        <groupId>org.springframework.boot</groupId>
        <artifactId>spring-boot-starter-web</artifactId>
    </dependency>

    <dependency>
        <groupId>org.springframework.boot</groupId>
        <artifactId>spring-boot-starter-test</artifactId>
        <scope>test</scope>
    </dependency>

    <dependency>
        <groupId>org.springframework.cloud</groupId>
        <artifactId>spring-cloud-starter-eureka</artifactId>
    </dependency>
</dependencies>

<dependencyManagement>
    <dependencies>
        <dependency>
            <groupId>org.springframework.cloud</groupId>
            <artifactId>spring-cloud-dependencies</artifactId>
            <version>Brixton.SR5</version>
            <type>pom</type>
            <scope>import</scope>
        </dependency>
    </dependencies>
</dependencyManagement>
我们需要在 application.yml配置文件中,通过 spring.application.name 属性来为服务命名,再通过 eureka.client.serviceUrl.defaultZone 属性指定服务注册中心的地址,这里我们指定之前构建的服务注册中心地址,完整配置如下所示:
server:
  port: 8001

spring:
  application:
    name: cloud-payment-service
ureka:
  client:
    #表示是否将自己注册进EurekaServer默认为true
    fetch-registry: true
    service-url:
      # 集群版
      defaultZone: http://localhost:7001/eureka
  instance:
    instance-id: payment8001
    prefer-ip-address: true #访问路径可以显示IP地址
第三步在启动类上加上@EnableDiscoveryClient 注解,激活 Eureka 中的 DiscoveryClient 实现,才能实现上述 Controller 中对服务信息的输出。
import org.springframework.boot.SpringApplication;
import org.springframework.boot.autoconfigure.SpringBootApplication;
import org.springframework.cloud.client.discovery.EnableDiscoveryClient;
import org.springframework.cloud.netflix.eureka.EnableEurekaClient;

@EnableEurekaClient
@SpringBootApplication
@EnableDiscoveryClient
public class CloudProviderPayment8001Application {

    public static void main(String[] args) {
        SpringApplication.run(CloudProviderPayment8001Application.class, args);
    }

}
最后在创建一个controller包,来写我们的业务类,PaymentController
实现/payment 请求处理接口,通过注入 org.springframework.cloud.client.discovery.DiscoveryClient 对象,在日志中打印出服务的相关内容。
@RestController
@RequestMapping("/payment")
@Slf4j
public class PaymentController {

	private final Logger logger = Logger.getLogger(getClass());

    @Autowired
    private DiscoveryClient client;

    @GetMapping
     public String payment() {
        ServiceInstance instance = client.getLocalServiceInstance();
        logger.info("/payment, host:" + instance.getHost() + ", service_id:" + instance.getServiceId());

        return "payment";
    }
  }
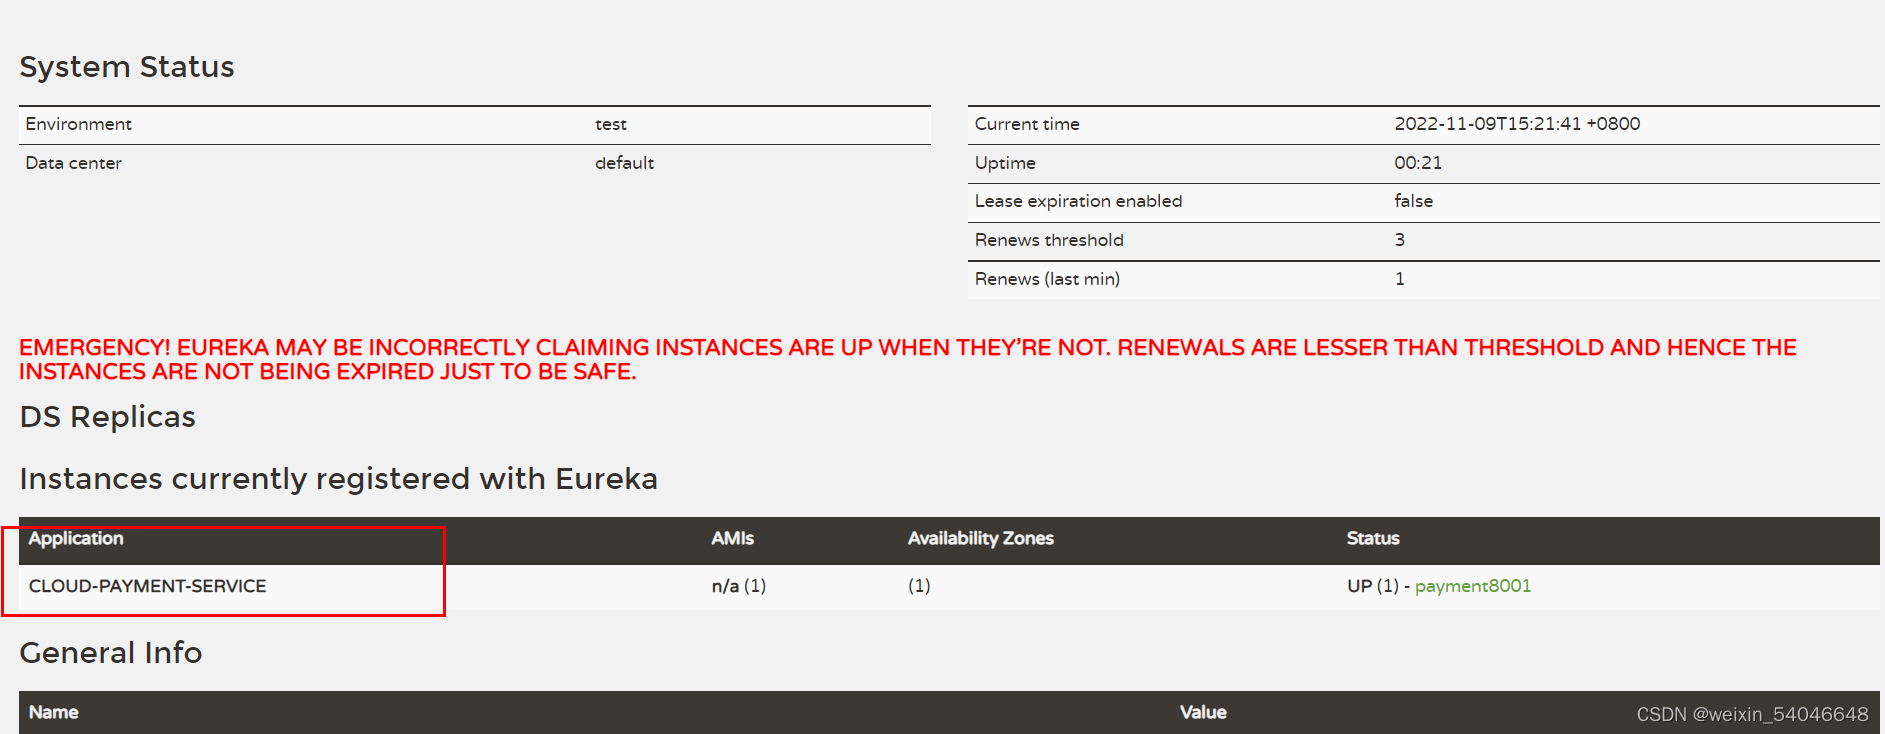
下面我们分别启动服务注册中心和 cloud-provider-payment8001服务。在 cloud-provider-payment8001 服务控制台中,Tomcat 启动后,com.netflix.discovery.DiscoveryClient 对象打印了该服务的注册信息,表示服务注册成功。
最后,我们可以通过访问 Eureka 的信息面板,在 Instances currently registered with Eureka 一栏中看到服务的注册信息。
注册服务消费者
创建项目cloud-consumer-order80 E,urekaClient 端 cloud-consumer-order80 将注册进 EurekaServer 成为服务消费者 consumer,
1:改pom
<dependencies>
    <dependency>
        <groupId>org.springframework.boot</groupId>
        <artifactId>spring-boot-starter-web</artifactId>
    </dependency>

    <dependency>
        <groupId>org.springframework.boot</groupId>
        <artifactId>spring-boot-starter-test</artifactId>
        <scope>test</scope>
    </dependency>

    <dependency>
        <groupId>org.springframework.cloud</groupId>
        <artifactId>spring-cloud-starter-eureka</artifactId>
    </dependency>
</dependencies>

<dependencyManagement>
    <dependencies>
        <dependency>
            <groupId>org.springframework.cloud</groupId>
            <artifactId>spring-cloud-dependencies</artifactId>
            <version>Brixton.SR5</version>
            <type>pom</type>
            <scope>import</scope>
        </dependency>
    </dependencies>
</dependencyManagement>
(2)写YML配置文件
server:
  port: 80

spring:
  application:
    name: cloud-order-service

eureka:
  client:
    #表示是否将自己注册进EurekaServer默认为true。
    register-with-eureka: true
    #是否从EurekaServer抓取已有的注册信息,默认为true。单节点无所谓,集群必须设置为true才能配合ribbon使用负载均衡
    fetchRegistry: true
    service-url:
      defaultZone: http://localhost:7001/eureka
(3)主启动类
import com.angel.myrule.MySelfRule;
import org.springframework.boot.SpringApplication;
import org.springframework.boot.autoconfigure.SpringBootApplication;
import org.springframework.boot.autoconfigure.jdbc.DataSourceAutoConfiguration;
import org.springframework.cloud.netflix.eureka.EnableEurekaClient;
import org.springframework.cloud.netflix.ribbon.RibbonClient;

@SpringBootApplication()
@EnableEurekaClient
public class CloudConsumerOrder80Application {

    public static void main(String[] args) {
        SpringApplication.run(CloudConsumerOrder80Application.class, args);
    }

}
(4)config配置类
ApplicationContextConfig
@Configuration
public class ApplicationContextConfig {

    @Bean
    public RestTemplate restTemplate() {
        return new RestTemplate();
    }
}
(5)RestTemplate
是什么:
RestTemplate提供了多种便捷访问远程Http服务的方法, 是一种简单便捷的访问restful服务模板类,是Spring提供的用于访问Rest服务的客户端模板工具集
使用:
使用restTemplate访问restful接口非常的简单粗暴无脑
url:REST请求地址
requestMap:请求参数
ResponseBean.class:HTTP响应转换被转换成的对象类型
(6)controller
@RestController
@Slf4j
@RequestMapping("/consumer")
public class OrderController {

    public static final String PaymentSrv_URL = "http://CLOUD-PAYMENT-SERVICE";

    @Resource
    private RestTemplate restTemplate;

    @GetMapping("/payment")
    public String payment() {
        return restTemplate.getForObject(PaymentSrv_URL + "/payment", String.class);
    }
}
(4)测试
先要启动EurekaServer——7001服务,再要启动服务提供者provider——8001服务

访问路径:http://localhost/consumer/payment
高可用注册中心
在上面的演示中,我们一直都是用单节点的服务注册中心,这在生产环境中显然并不合适,我们需要构建高可用的服务注册中心以增强系统的可用性,Eureka Server 的设计一开始就考虑了高可用问题,在 Eureka 的服务治理设计中,所有节点即是服务的提供方,也是服务的消费方,服务注册中心也不例外。是否还记得在单点的配置中,我们设置过下面这两个参数,让服务注册中心不注册自己:
# 注册中心,禁止向注册中心注册自己
eureka.client.register-with-eureka=false
# 注册中心的职责就是维护服务实例,并不需要去检索服务
eureka.client.fetch-registry=false
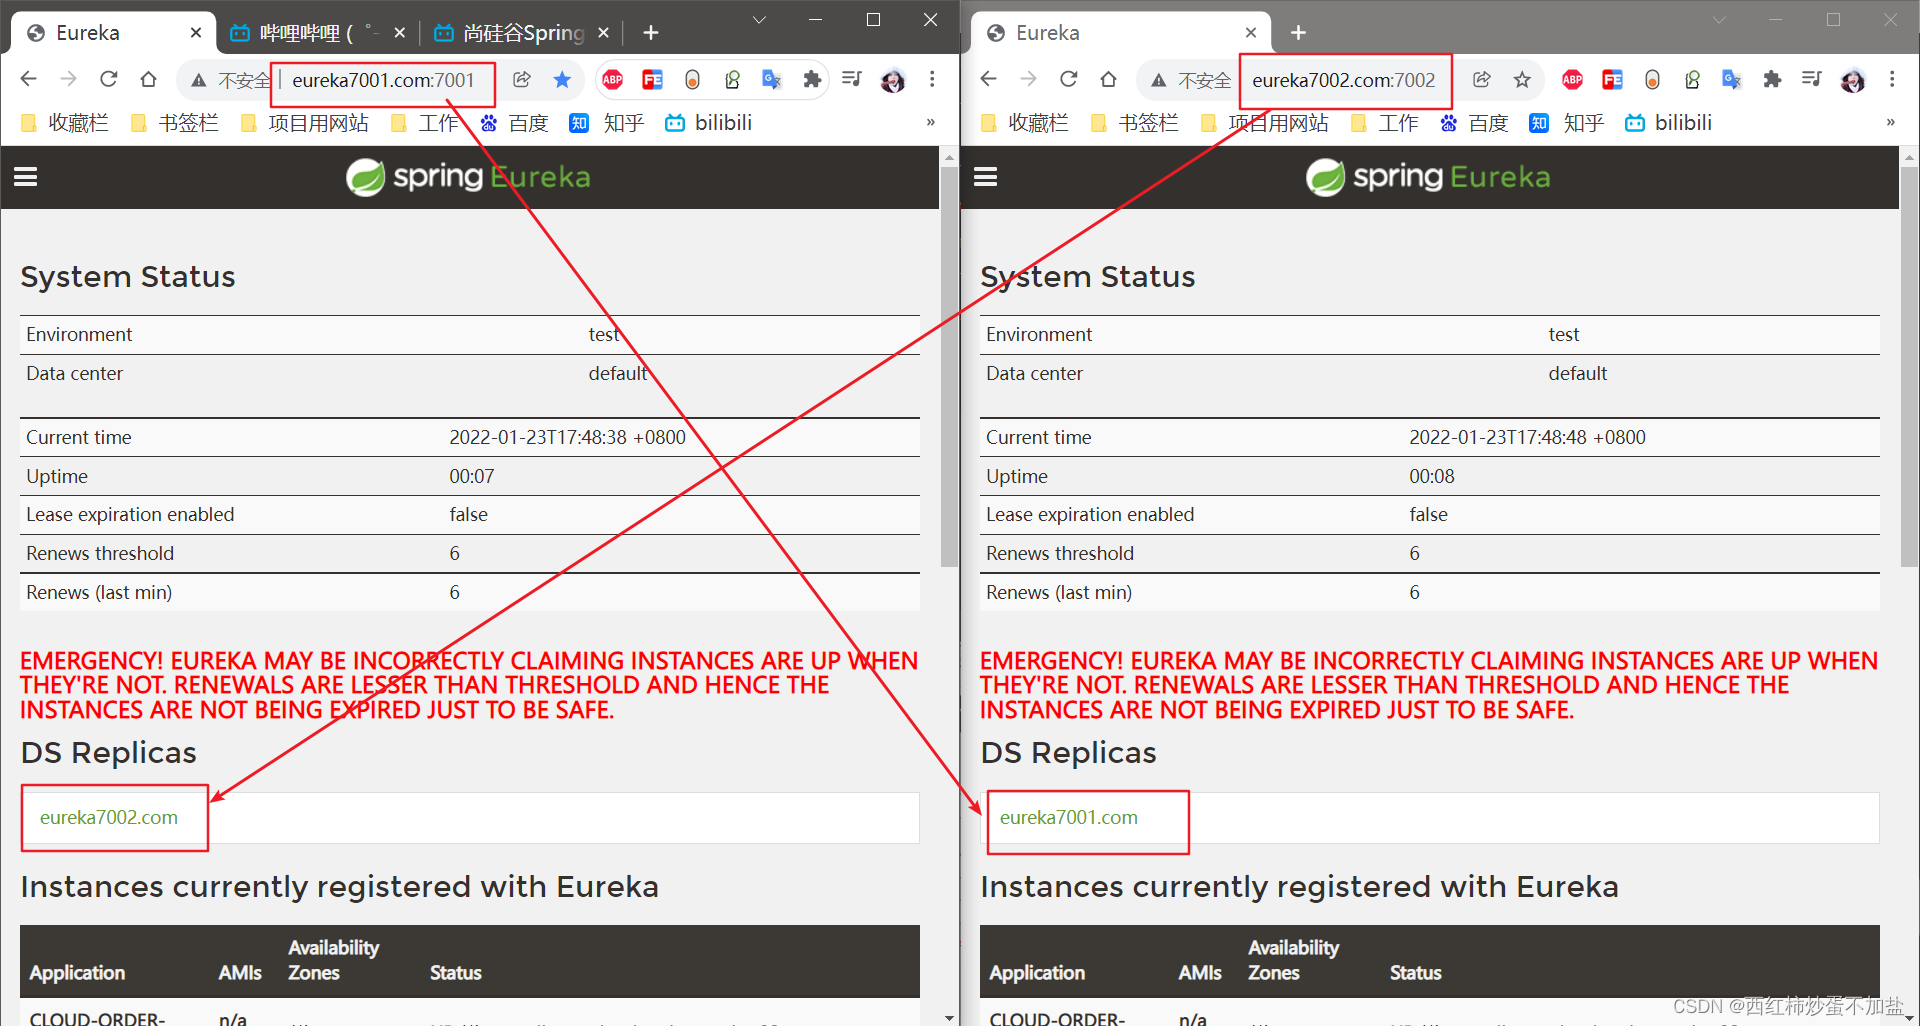
Eureka Server 的高可用实际上就是将自己作为服务向其他服务注册中心注册自己,这样就可以形成一组互相注册的服务注册中心,以实现服务清单的互相同步,达到高可用的效果。下面我们根据 eureka-server 进行扩展,构建一个双节点的服务注册中心集群。
EurekaServer集群环境构建步骤
(1)新建cloud-eureka-server7002
参考cloud-eureka-server7001,新建cloud-eureka-server7002
(2)写YML
7001:
server:
  port: 7001

eureka:
  instance:
    hostname: eureka7001.com  #eureka服务端的实例名称
  client:
    register-with-eureka: false #false表示不向注册中心注册自己。
    fetch-registry: false #false表示自己端就是注册中心,我的职责就是维护服务实例,并不需要去检索服务
    service-url:
      defaultZone: http://localhost:7002/eureka/
7002:
server:
  port: 7002

eureka:
  instance:
    hostname: eureka7002.com  #eureka服务端的实例名称
  client:
    register-with-eureka: false #false表示不向注册中心注册自己。
    fetch-registry: false #false表示自己端就是注册中心,我的职责就是维护服务实例,并不需要去检索服务
    service-url:
      defaultZone: http://localhost.com:7001/eureka/
3:启动类,添加@EnableEurekaServer 注解
package com.atguigu.springcloud;

@SpringBootApplication
@EnableEurekaServer
public class EurekaMain7002 {
    public static void main(String[] args) {
        SpringApplication.run(EurekaMain7002.class, args);
    }
}
4:测试
5: 注册服务提供者,8001发布到2台Eureka集群
(1)修改yml
# 集群版
defaultZone: http://localhost:7001/eureka,http://localhost:7002/eureka
server:
  port: 8001

spring:
  application:
    name: cloud-payment-service

eureka:
  client:
    #表示是否将自己注册进EurekaServer默认为true。
    register-with-eureka: true
    #是否从EurekaServer抓取已有的注册信息,默认为true。单节点无所谓,集群必须设置为true才能配合ribbon使用负载均衡
    fetchRegistry: true
    service-url:
      #defaultZone: http://localhost:7001/eureka
      defaultZone: http://localhost:7001/eureka,http://localhost:7002/eureka  # 集群版
(6) 注册服务消费者、80发布到2台Eureka集群
```java
defaultZone: http://localhost:7001/eureka,http://localhost:7002/eureka  # 集群版
server:
  port: 80

spring:
  application:
    name: cloud-order-service

eureka:
  client:
    #表示是否将自己注册进EurekaServer默认为true。
    register-with-eureka: true
    #是否从EurekaServer抓取已有的注册信息,默认为true。单节点无所谓,集群必须设置为true才能配合ribbon使用负载均衡
    fetchRegistry: true
    service-url:
      #defaultZone: http://localhost:7001/eureka
      defaultZone: http://localhost:7001/eureka,http://localhost:7002/eureka  # 集群版
7:测试
先要启动EurekaServer,7001/7002服务,再要启动服务提供者provide——8001,最后再启动消费者——80
http://localhost/consumer
8:支付服务提供者8001集群环境构建
(1)新建cloud-provider-payment8002
参考cloud-provider-payment8001
pom.xml
<dependencies>
    <dependency>
        <groupId>org.springframework.boot</groupId>
        <artifactId>spring-boot-starter-web</artifactId>
    </dependency>

    <dependency>
        <groupId>org.springframework.boot</groupId>
        <artifactId>spring-boot-starter-test</artifactId>
        <scope>test</scope>
    </dependency>

    <dependency>
        <groupId>org.springframework.cloud</groupId>
        <artifactId>spring-cloud-starter-eureka</artifactId>
    </dependency>
</dependencies>

<dependencyManagement>
    <dependencies>
        <dependency>
            <groupId>org.springframework.cloud</groupId>
            <artifactId>spring-cloud-dependencies</artifactId>
            <version>Brixton.SR5</version>
            <type>pom</type>
            <scope>import</scope>
        </dependency>
    </dependencies>
</dependencyManagement>
我们需要在 application.yml配置文件中,通过 spring.application.name 属性来为服务命名,再通过 eureka.client.serviceUrl.defaultZone 属性指定服务注册中心的地址,这里我们指定之前构建的服务注册中心地址,完整配置如下所示:

```java
server:
  port: 8002

spring:
  application:
    name: cloud-payment-service

eureka:
  client:
    #表示是否将自己注册进EurekaServer默认为true。
    register-with-eureka: true
    #是否从EurekaServer抓取已有的注册信息,默认为true。单节点无所谓,集群必须设置为true才能配合ribbon使用负载均衡
    fetchRegistry: true
    service-url:
      #defaultZone: http://localhost:7001/eureka
      defaultZone: http://localhost:7001/eureka,http://localhost:7002/eureka  # 集群版
第三步在启动类上加上@EnableDiscoveryClient 注解,激活 Eureka 中的 DiscoveryClient 实现,才能实现上述 Controller 中对服务信息的输出。
import org.springframework.boot.SpringApplication;
import org.springframework.boot.autoconfigure.SpringBootApplication;
import org.springframework.cloud.client.discovery.EnableDiscoveryClient;
import org.springframework.cloud.netflix.eureka.EnableEurekaClient;

@EnableEurekaClient
@SpringBootApplication
@EnableDiscoveryClient
public class CloudProviderPayment8002Application {

    public static void main(String[] args) {
        SpringApplication.run(CloudProviderPayment8001Application.class, args);
    }

}
最后在创建一个controller包,来写我们的业务类,PaymentController
实现/payment 请求处理接口,通过注入 org.springframework.cloud.client.discovery.DiscoveryClient 对象,在日志中打印出服务的相关内容。
@RestController
@RequestMapping("/payment")
@Slf4j
public class PaymentController {

	private final Logger logger = Logger.getLogger(getClass());

    @Autowired
    private DiscoveryClient client;

    @GetMapping
     public String payment() {
        ServiceInstance instance = client.getLocalServiceInstance();
        logger.info("/payment, host:" + instance.getHost() + ", service_id:" + instance.getServiceId());

        return "payment";
    }
  }
http://localhost/consumer/payment
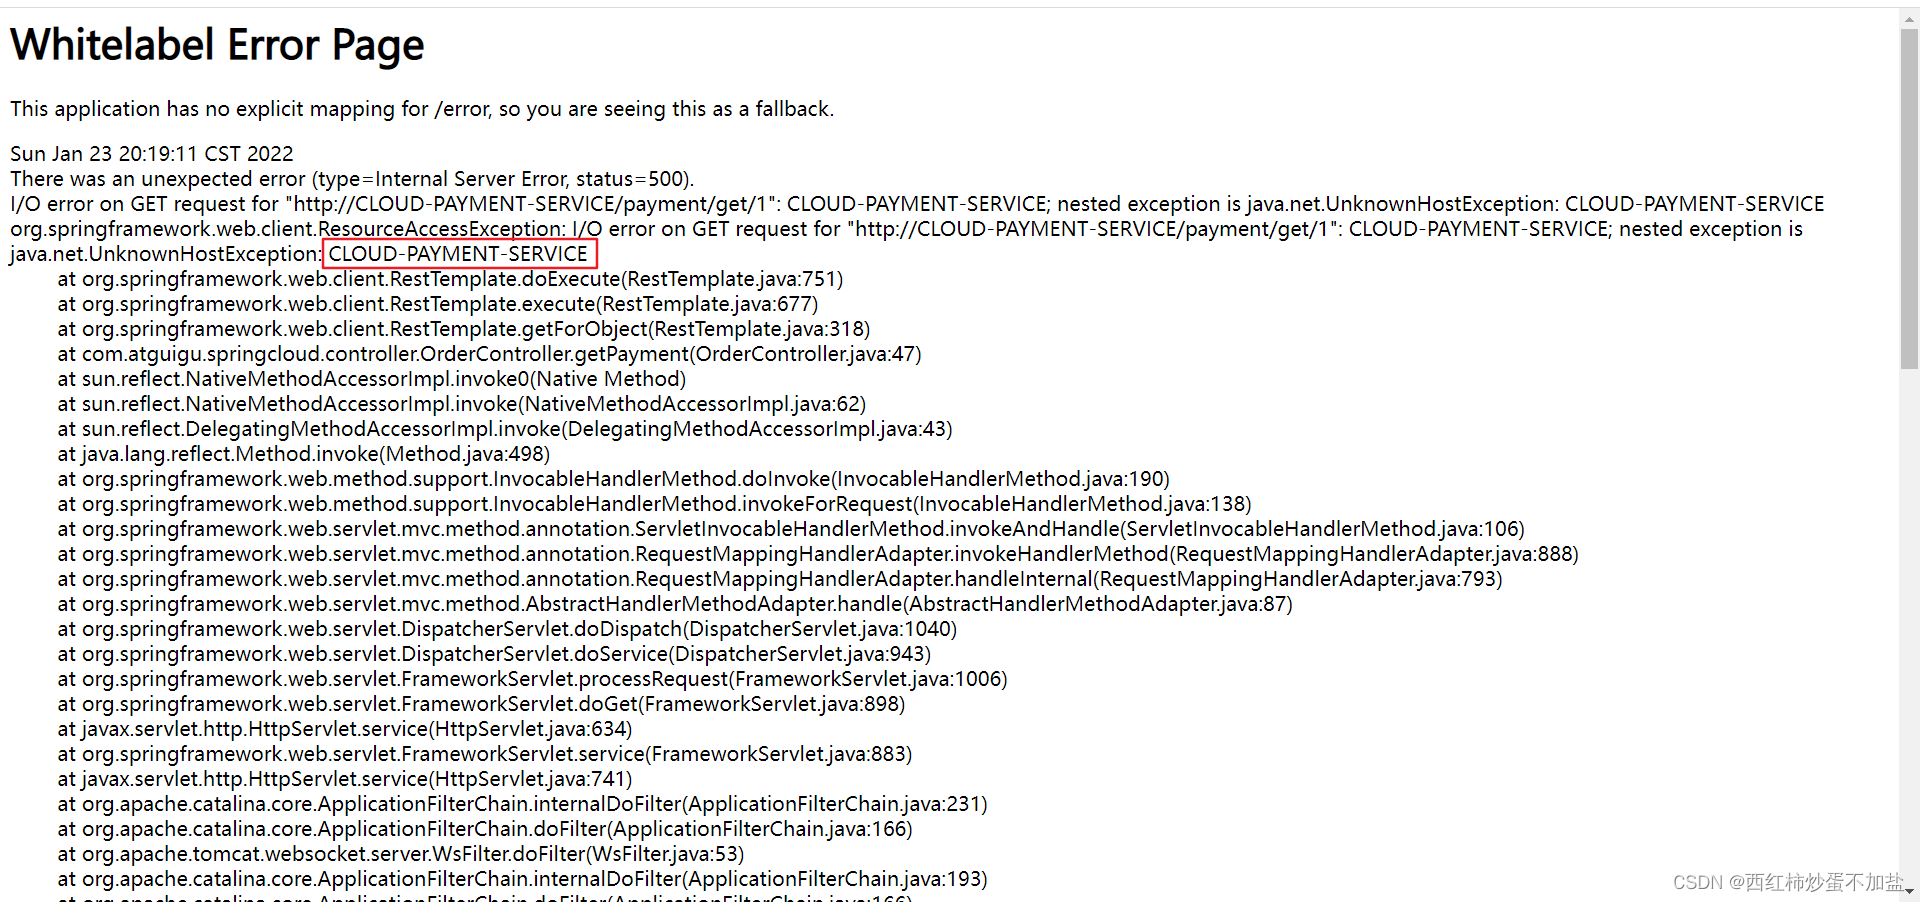
这又是什么情况?
现在注册中心不再是暴露出具体的端口号,而是微服务名称 CLOUD-PAYMENT-SERVICE,但是这个微服务名称代表的集群中有很多个,比如8001、8002…用哪个,它并不知道
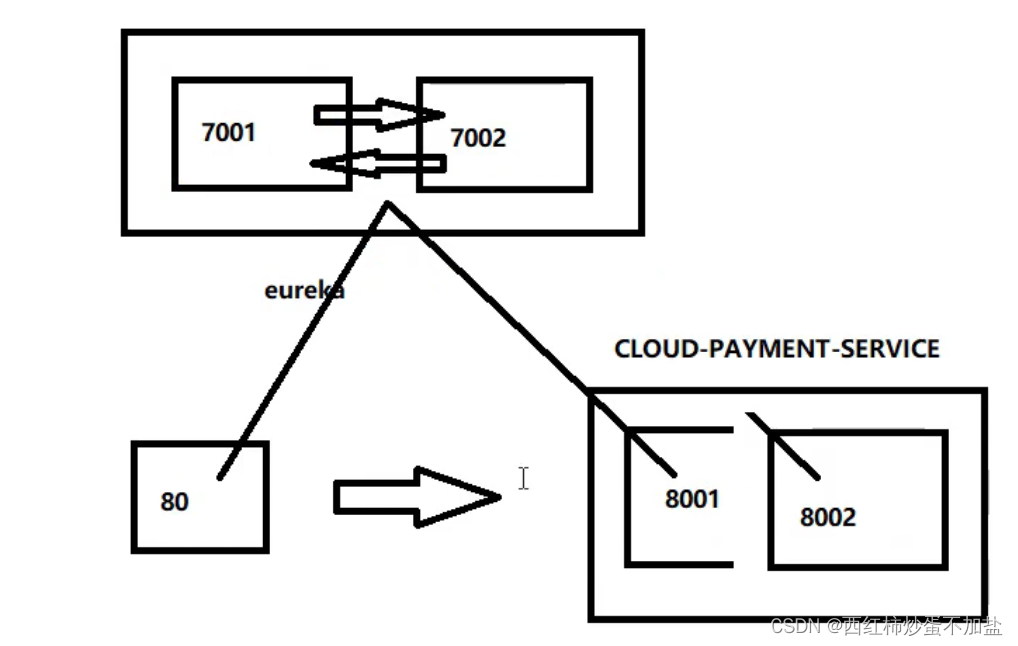
我们需要再配置一下负载均衡
7、负载均衡
(1)@LoadBalanced
使用 @LoadBalanced 注解赋予 RestTemplate 负载均衡的能力
cloud-consumer-order80
ApplicationContextConfig
@LoadBalanced //使用@LoadBalanced注解赋予RestTemplate负载均衡的能力
@Configuration
public class ApplicationContextConfig {

    @Bean
    @LoadBalanced //使用@LoadBalanced注解赋予RestTemplate负载均衡的能力
    public RestTemplate restTemplate() {
        return new RestTemplate();
    }
}
补充:
服务发现的任务由 Eureka 的客户端完成,而服务消费者的任务由 Ribbon 完成。Ribbon 是一个基于 HTTP 和 TCP 的客户端负载均衡器,它可以在通过客户端中配置的 RibbonServerList 服务端列表去轮询访问达到均衡负载的作用。当 Ribbon 与 Eureka 联合使用时,Ribbon 的服务实例清单 RibbonServerList 会被 DiscoveryEnabledNIWSServerList 重写, 扩展成从 Eureka 注册中心获取服务端列表。同时它也会用 NIWSDiscoveryPing 来取代 IPing,它将职责委托给 Eureka 来确定服务端是否已经启动。


 1343
1343


 被折叠的 条评论
为什么被折叠?
被折叠的 条评论
为什么被折叠?
 到【灌水乐园】发言


