


1.自己创建一个群聊
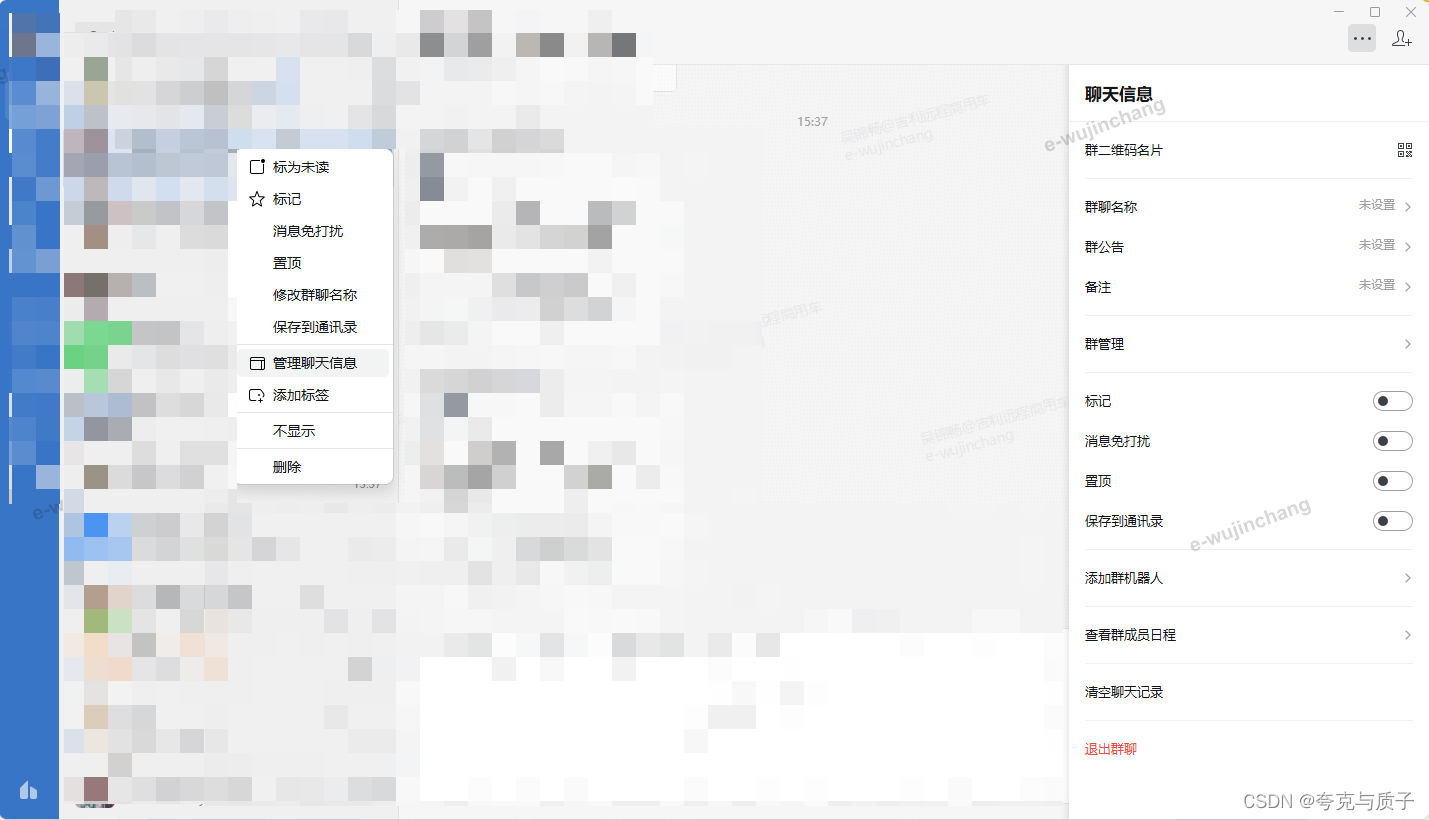
2.通过右键群聊创建机器人
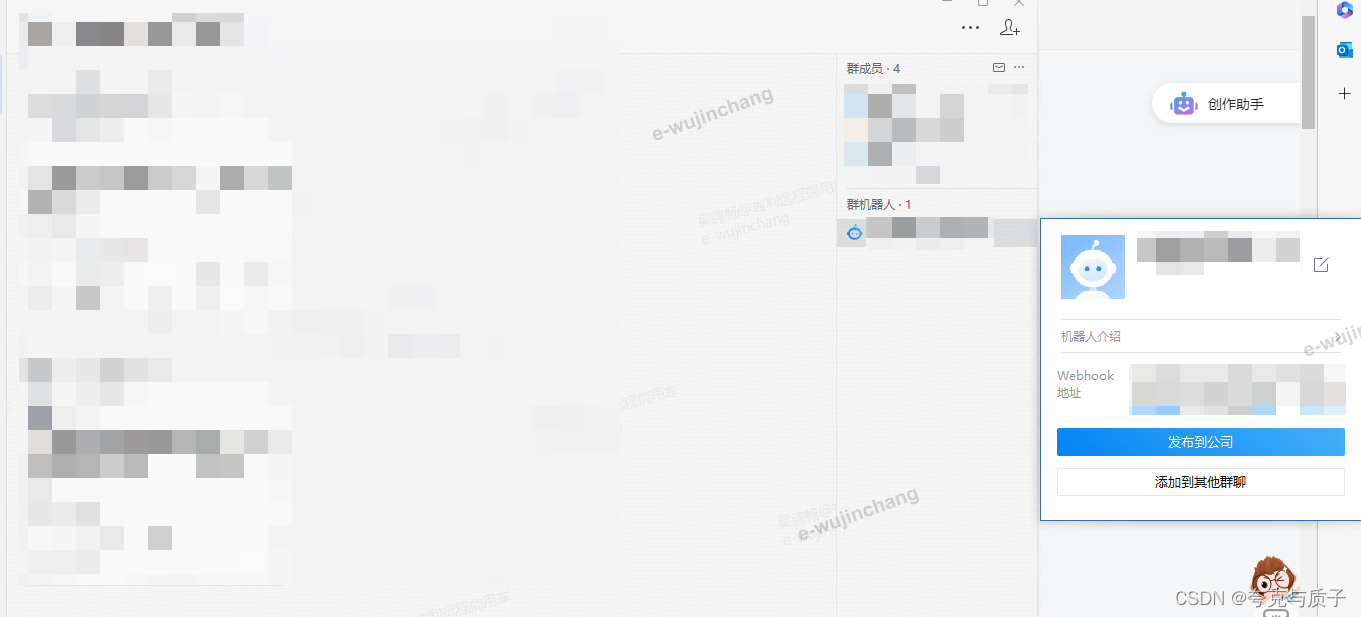
3.获取机器人webhook地址
4.查看企业微信的接口文档
由于我使用的是卡片模式,所以以下是基于卡片模式的编写,如选择其他可点击下方按钮进行查询群机器人配置说明 - 文档 - 企业微信开发者中心 (qq.com)
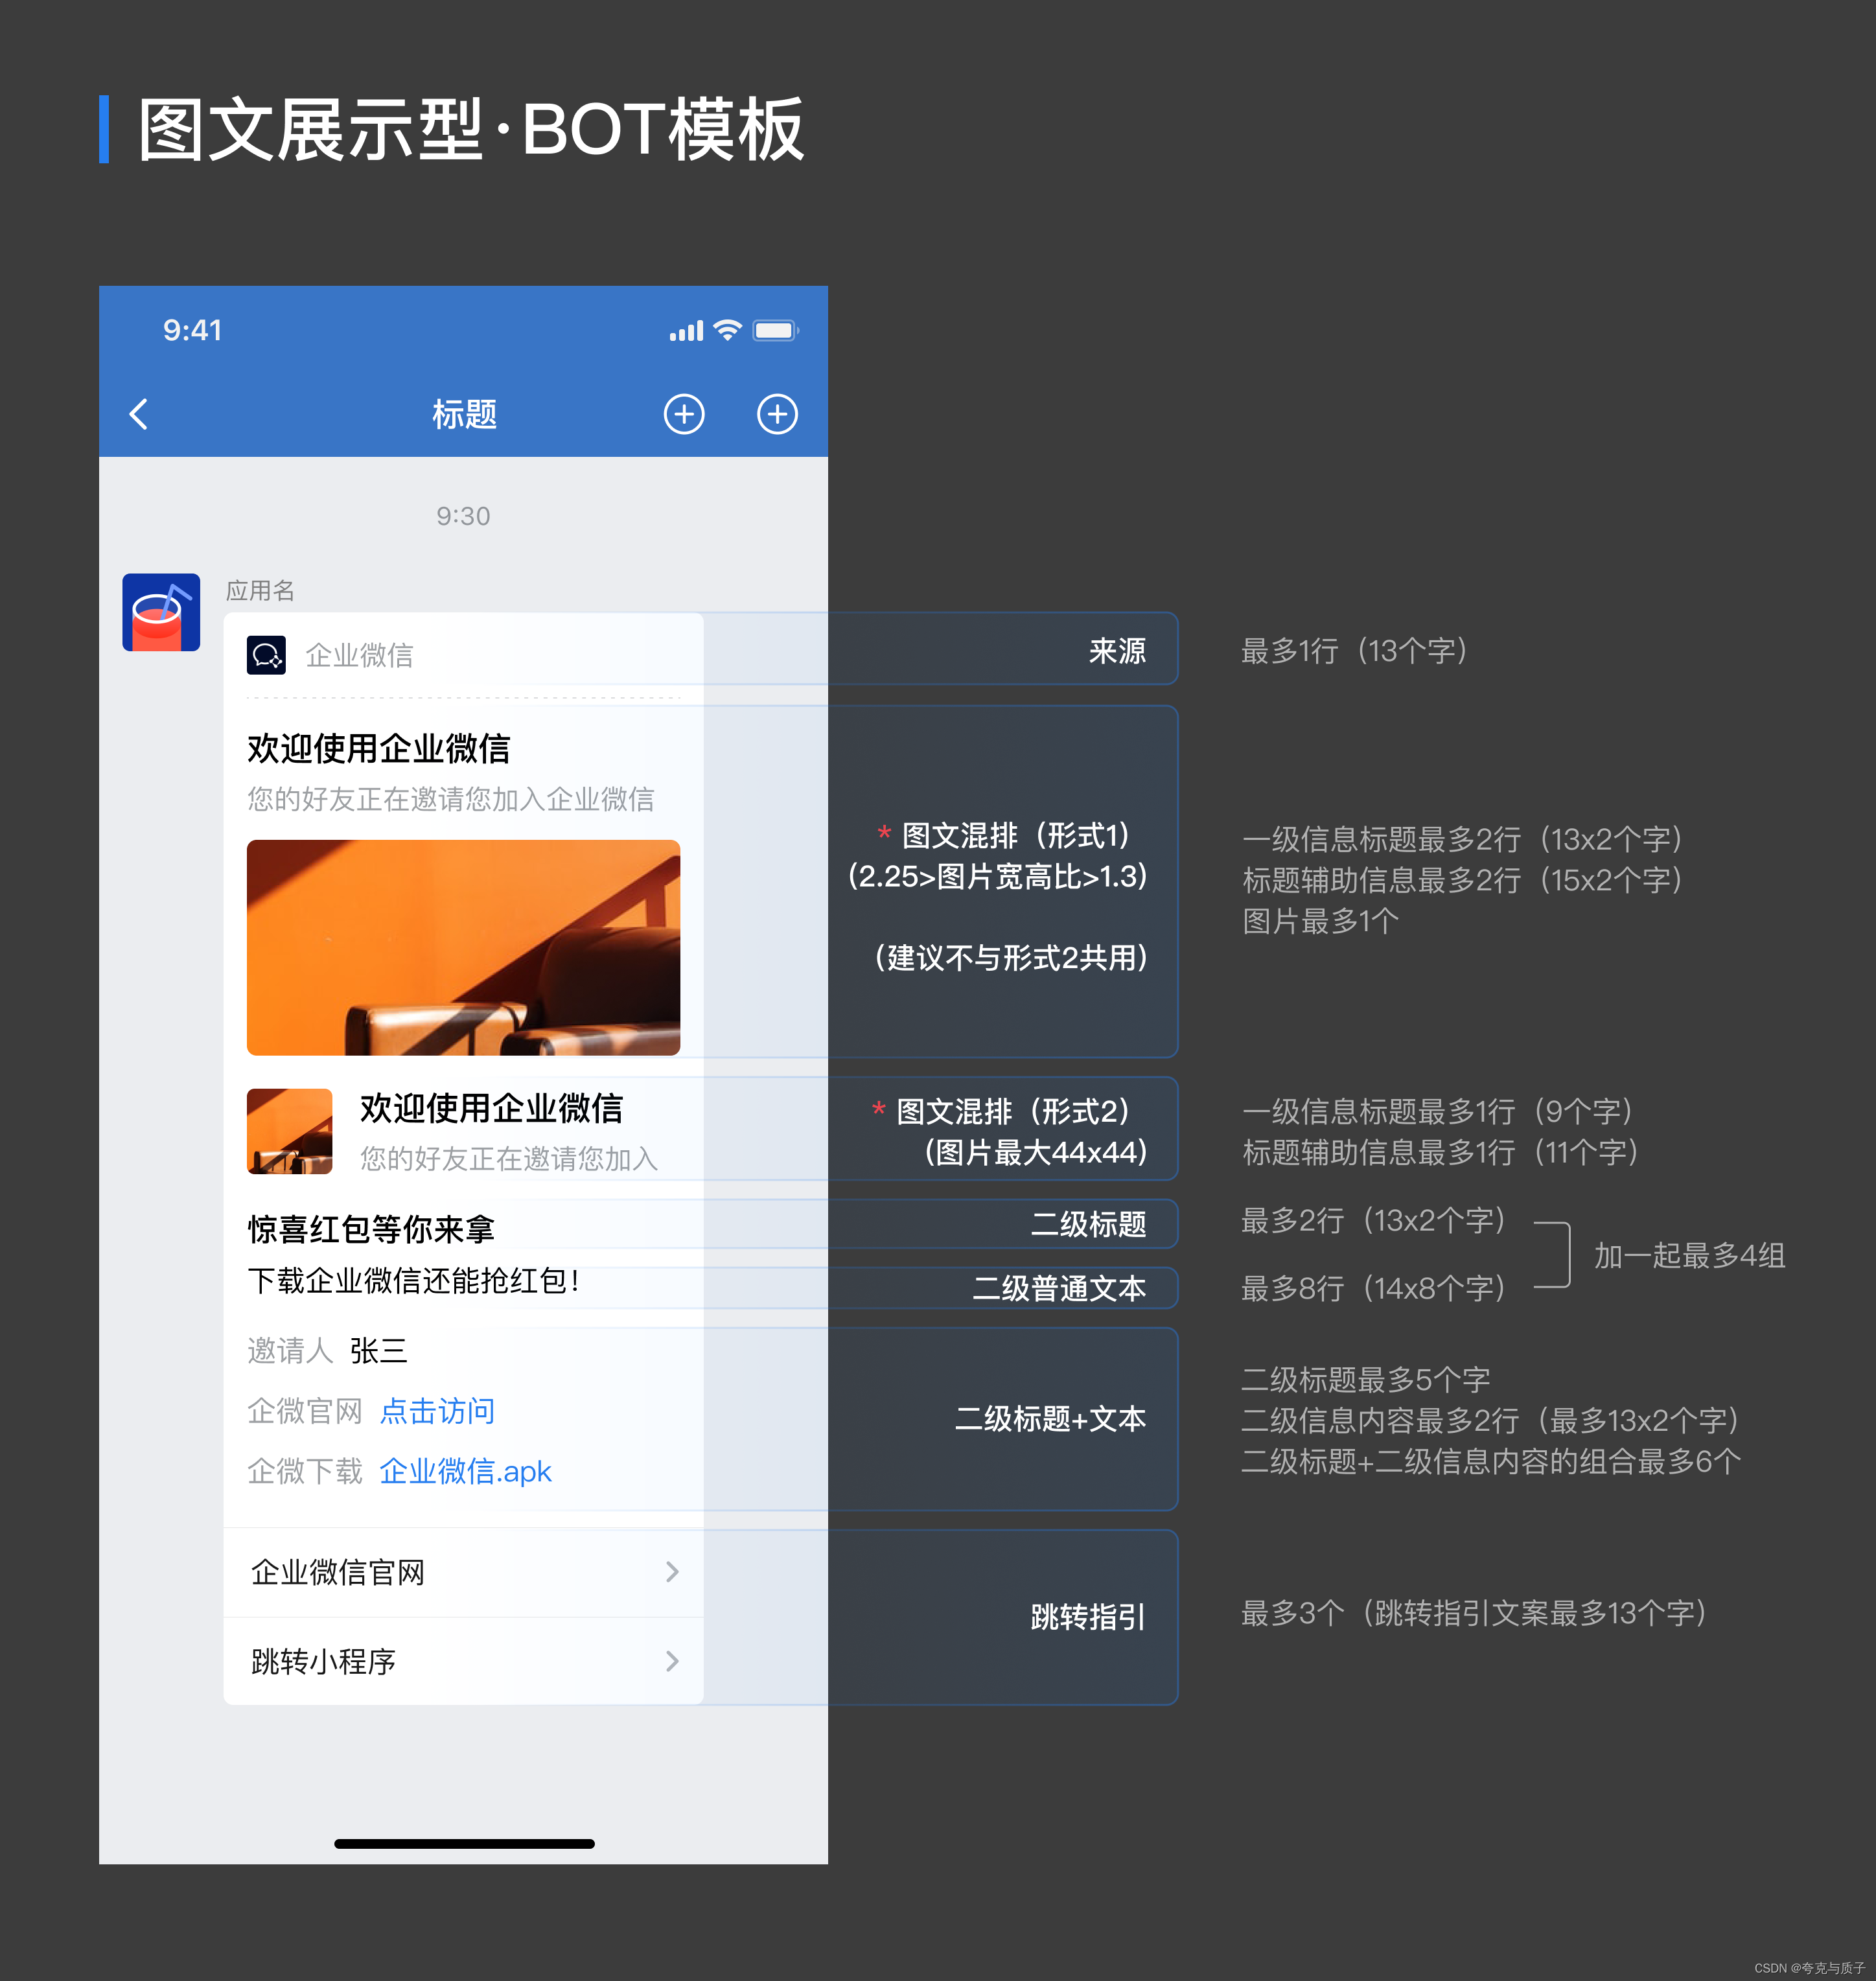
{
    "msgtype":"template_card",
    "template_card":{
        "card_type":"news_notice",
        "source":{
            "icon_url":"https://wework.qpic.cn/wwpic/252813_jOfDHtcISzuodLa_1629280209/0",
            "desc":"企业微信",
            "desc_color":0
        },
        "main_title":{
            "title":"欢迎使用企业微信",
            "desc":"您的好友正在邀请您加入企业微信"
        },
        "card_image":{
            "url":"https://wework.qpic.cn/wwpic/354393_4zpkKXd7SrGMvfg_1629280616/0",
            "aspect_ratio":2.25
        },
        "image_text_area":{
            "type":1,
            "url":"https://work.weixin.qq.com",
            "title":"欢迎使用企业微信",
            "desc":"您的好友正在邀请您加入企业微信",
            "image_url":"https://wework.qpic.cn/wwpic/354393_4zpkKXd7SrGMvfg_1629280616/0"
        },
        "quote_area":{
            "type":1,
            "url":"https://work.weixin.qq.com/?from=openApi",
            "appid":"APPID",
            "pagepath":"PAGEPATH",
            "title":"引用文本标题",
            "quote_text":"Jack:企业微信真的很好用~\nBalian:超级好的一款软件!"
        },
        "vertical_content_list":[
            {
                "title":"惊喜红包等你来拿",
                "desc":"下载企业微信还能抢红包!"
            }
        ],
        "horizontal_content_list":[
            {
                "keyname":"邀请人",
                "value":"张三"
            },
            {
                "keyname":"企微官网",
                "value":"点击访问",
                "type":1,
                "url":"https://work.weixin.qq.com/?from=openApi"
            },
            {
                "keyname":"企微下载",
                "value":"企业微信.apk",
                "type":2,
                "media_id":"MEDIAID"
            }
        ],
        "jump_list":[
            {
                "type":1,
                "url":"https://work.weixin.qq.com/?from=openApi",
                "title":"企业微信官网"
            },
            {
                "type":2,
                "appid":"APPID",
                "pagepath":"PAGEPATH",
                "title":"跳转小程序"
            }
        ],
        "card_action":{
            "type":1,
            "url":"https://work.weixin.qq.com/?from=openApi",
            "appid":"APPID",
            "pagepath":"PAGEPATH"
        }
    }
}
5.根据提供的请求体编写实体类
有些写死的配置可以直接写死,灵活的配置可以抽取成配置yaml里
import lombok.Data;

import java.util.List;
import java.util.Map;

@Data
public class TemplateCard {

    private String card_type;

    private Source source;

    private MainTitle main_title;

    private List<Map<String, Object>> horizontal_content_list;

    private CardAction card_action;
    @Data
    public static class CardAction{
        private Integer type;

        private String url;
    }

    @Data
    public static class MainTitle{
        private String title;

        private String desc;
    }

    @Data
    public static class Source{
        private String icon_url="https://wework.qpic.cn/wwpic/252813_jOfDHtcISzuodLa_1629280209/0";

        private String desc="企业微信";

        private Integer desc_color=0;
    }
}
import lombok.Data;

@Data
public class MsgE {

    private TemplateCard template_card;

    private String msgtype;

}
6.编写配置类
qw:
  config:

    enabled:     //是否开启通知
      true
    cardtype:    文本通知模版卡片下默认值
      text_notice
    title:       //标题

    url:        //点击卡片跳转地址

    msgtype:    //文本通知模版卡片类型
      template_card
    robotWebhook: //机器人的webhook
import lombok.Data;
import org.springframework.boot.context.properties.ConfigurationProperties;
import org.springframework.stereotype.Component;
@Data
@Component
@ConfigurationProperties(prefix = "qw.config")
public class QWProperties {
private Boolean enabled;
private String cardtype;
private String title;
private String url;
private String msgtype;
private String robotWebhook;
}
7.编写工具类
用的json工具类选择hutool就行,没有特别之处
import cn.hutool.http.HttpRequest;
import cn.hutool.http.HttpResponse;
import cn.hutool.http.HttpUtil;
import com.geelycv.ni.common.config.QWProperties;
import com.geelycv.ni.common.utils.JsonUtils;
import lombok.extern.slf4j.Slf4j;
import org.springframework.beans.factory.annotation.Autowired;
import org.springframework.stereotype.Component;

import java.util.ArrayList;
import java.util.HashMap;
import java.util.Map;

@Component
@Slf4j
public class CompanyWxUtil {

    @Autowired
    private QWProperties qwProperties;


    public  void sendMsg(String orderId,String phone,String count){
        if (!qwProperties.getEnabled()){
            return;
        }
        HttpRequest request = HttpUtil.createPost(qwProperties.getRobotWebhook());
        TemplateCard textCard = new TemplateCard();

        textCard.setCard_type(qwProperties.getCardtype());
        textCard.setSource(new TemplateCard.Source());

        TemplateCard.MainTitle mainTitle = new TemplateCard.MainTitle();
        mainTitle.setTitle(qwProperties.getTitle());
        textCard.setMain_title(mainTitle);

        ArrayList<Map<String,Object>> maps = new ArrayList<>();
        addHorizontalContentList("单号",orderId,maps);
        addHorizontalContentList("下单人手机号",phone,maps);
        addHorizontalContentList("金额",count,maps);
        textCard.setHorizontal_content_list(maps);

        TemplateCard.CardAction cardAction = new TemplateCard.CardAction();
        cardAction.setType(1);
        cardAction.setUrl(qwProperties.getUrl());
        textCard.setCard_action(cardAction);

        MsgE msgE = new MsgE();
        msgE.setTemplate_card(textCard);
        msgE.setMsgtype(qwProperties.getMsgtype());

        log.info("请求的json为{}",JsonUtils.toJsonString(msgE));
        request.body(JsonUtils.toJsonString(msgE));
        HttpResponse execute = request.execute();
        Integer errcode = (Integer) JsonUtils.parseMap(execute.body()).get("errcode");
        if (errcode==0){
            log.info("企业微信消息发送成功");
        }else {
            log.info("企业微信消息发送失败,返回信息为{}",execute.body());
        }
    }

    private void addHorizontalContentList(String keyname,String value,ArrayList<Map<String,Object>> maps){
        HashMap<String, Object> map = new HashMap<>();
        map.put("keyname",keyname);
        map.put("value",value);
        maps.add(map);
    }
}


 1857
1857

 被折叠的 条评论
为什么被折叠?
被折叠的 条评论
为什么被折叠?
 到【灌水乐园】发言


