


 本文介绍了React的基础概念,包括组件的使用、状态和props管理、生命周期方法、受控与非受控组件的区别以及表单的实现。通过实例演示了如何构建和维护简单的React应用。
react 基础

Q: what is react?
A:React 是一个用于构建用户界面的 JavaScript 库。它通过使用组件来构建用户界面,使开发人员能够更轻松地创建和维护复杂的前端应用程序。React 可以让您声明式地定义您的 UI,并且提供了强大的工具来管理状态和渲染,从而使您能够构建快速、响应式的应用程序。
- react 是组件化开发的鼻祖,仍然是目前使用最广泛的前端框架。
- react 的社区相当完善。
- react 的后台相当硬。
- react 的主要编写在 JavaScript。
脚手架
安装:
npm i -g create-react-app

我们可以看到下载了三个文件:
- react
- react-dom
- react-scripts
基础的目录:

使用yarn start执行
结果:

运行成功的界面就是这样。
目录
index.js
这是整个 react 项目的开始。
import React from 'react'
import ReactDOM from 'react-dom/client'
import './index.css'
import App from './App'
import reportWebVitals from './reportWebVitals'
const namefn = function (p) {
return p
}
const root = ReactDOM.createRoot(document.getElementById('root'))
root.render(
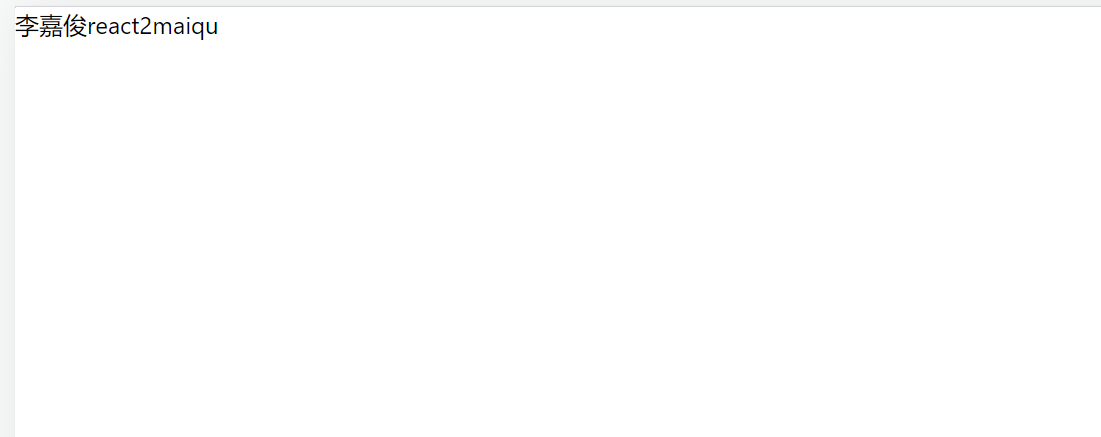
<h>
李嘉俊{'react'}
{1 + 1}
{namefn('maiqu')}
</h>
)
reportWebVitals()
使用的是 jsx 语法,其实就是 JavaScript + xml
简单来说就是可以在 js 中直接编写 html 代码,并且可以直接渲染出来。
效果:
元素渲染
元素是构成 react 应用的最小对象
比如 const ele = <h1>李嘉俊</h1> 就是一个元素
而 react 只更新它需要变化的元素
比如下面的这个例子:
import React from 'react'
import ReactDOM from 'react-dom/client'
import './index.css'
import App from './App'
import reportWebVitals from './reportWebVitals'

const namefn = function (p) {
    return p
}
let ele = 0
const changefn = function () {
    ele++
}
setInterval(() => {
    changefn()
    console.log(ele)
}, 1000)
const root = ReactDOM.createRoot(document.getElementById('root'))
root.render(
    <div>
        <h1>
            李嘉俊{'react'}
            {1 + 1}
            {namefn('maiqu')}
        </h1>
        <h2>{ele}</h2>
    </div>
)
reportWebVitals()
像上面这样写是不会有效果的。
实现循环与过滤
循环
使用 map 函数
const arr = [1, 2, 3]
root.render(
    <ul>
        {arr.map((el, index) => {
            return <li key={index}>{el}</li>
        })}
    </ul>
)
需要给每一个 li独一无二 的key不然会报错。
过滤
使用 map 函数 和三元运算符
const obj = [
    {
        id: 1,
        price: 60,
        name: '小米1',
    },
    {
        id: 2,
        price: 70,
        name: '小米2',
    },
    {
        id: 3,
        price: 90,
        name: '小米3',
    },
    {
        id: 4,
        price: 100,
        name: '小米4',
    },
]
root.render(
    <ul>
        {obj.map((el, index) => {
            return el.price >= 90 ? <li key={index}>{el.name}</li> : null
        })}
    </ul>
)
效果:

创建组件
当我们的项目体量很大时,我们不太可能将很大量的代码直接塞到 render 中。
所以 react 推出了 组件化
函数式声明
本质就是一个函数
// 组件名称首字母一定大写
// 一定要有返回值
function Hello(props) {
    return <h1>李嘉俊{props}</h1>
}
root.render(<Hello name="react"></Hello>)
效果:

类声明
class Hello extends React.Component {
constructor(props){
super(props)
}
// 必须使用 render 函数 -> 将虚拟的 dom 渲染为真实的 dom
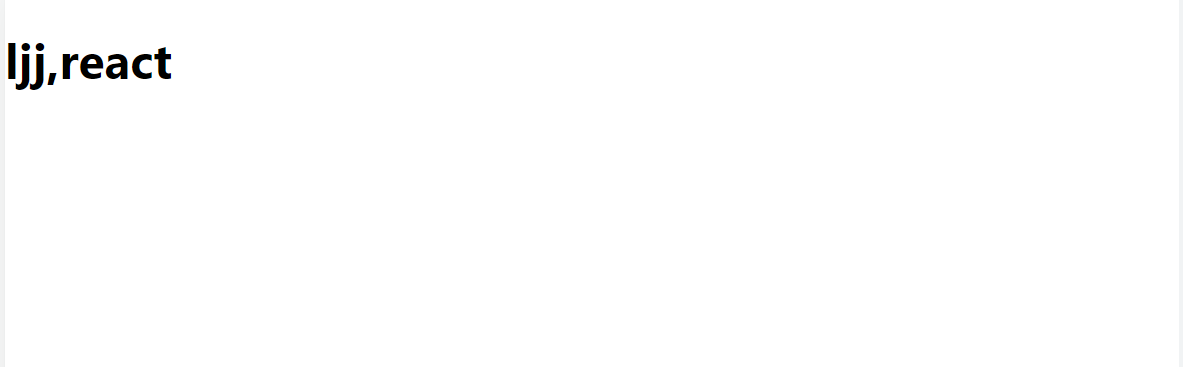
render() {
return <h1>ljj,{this.props.name}</h1>
}
}
root.render(<Hello name="react" />)
效果:
注意:
-
React.Component 是一个
基类使用 类声明的组件必须继承基类 -
必须要有 render
-
在 render 中一定需要 return 一个元素
-
和函数式声明一样,组件的开头一定需要大写
-
实际开发中我们一般使用
类声明
插件

然后使用 r 开头的一系列快捷键进行快速开发:

复用组件
复用组件的目的就是为了组件化开发。
什么样的组件需要复用?
- 需要调用多次的组件
- 结构比较复杂的时候需要拆分
- 组件之间存在明显的父子关系
比如下面的例子,按键就是可以重复使用的:
App.js
import logo from './logo.svg'
import './App.css'
import Button from './button'

function App() {
    return (
        <div className="App">
            <Button name="按键1"></Button>
            <Button name="按键2"></Button>
            <Button name="按键3"></Button>
        </div>
    )
}

export default App
import React, { Component } from 'react'

export default class Button extends Component {
    render() {
        return <button>{this.props.name}</button>
    }
}
效果:

如何提取组件
react 遵循单向数据流

父子组件通信
子组件向父组件传值:
方法:在子组件中定义方法调用父组件中的方法
案例:
import logo from './logo.svg'
import './App.css'
import Button from './button'
import React, { Component } from 'react'

export default class App extends Component {
    constructor(props) {
        super(props)
        this.user = {
            name: 'ljj',
            age: 21,
        }
    }

    change(p) {
        alert(p)
    }

    render() {
        return (
            <div className="App">
                <Button name="按键1"></Button>
                <Button name="按键2"></Button>
                <Button name="按键3" fn={this.change}></Button>
                <h1>{this.user.name}</h1>
            </div>
        )
    }
}
import React, { Component } from 'react'

export default class Button extends Component {
    change = () => {
        this.props.fn(123)
    }
    render() {
        return <button onClick={this.change}>{this.props.name}</button>
    }
}
结果:

状态的改变和this的指向处理
修改状态的唯一方法是 修改setState
import logo from './logo.svg'
import './App.css'
import Button from './button'
import React, { Component } from 'react'

export default class App extends Component {
    constructor(props) {
        super(props)
        this.user = {
            name: 'ljj',
            age: 21,
        }
        this.state = {
            count: 0,
        }
    }

    change = (p) => {
        alert(p)
    }

    add = () => {
        this.setState({
            count: this.state.count + 1,
        })
    }

    render() {
        return (
            <div className="App">
                <Button name="按键1"></Button>
                <Button name="按键2"></Button>
                <Button name="按键3" fn={this.change}></Button>
                <h1>{this.user.name}</h1>
                <h1>{this.state.count}</h1>
                <button onClick={this.add}>+1</button>
            </div>
        )
    }
}
改变 this 指向的四种方法:
-
使用箭头函数
-
constructor(props) { super(props) this.user = { name: 'ljj', age: 21, } this.state = { count: 0, } this.add = this.add.bind(this) } -
<button onClick={this.add.bind(this)}>+1</button> -
<button onClick={(e) => this.add(e)}>+1</button>
效果:

setState 方法
注意 : 注意使用类声明的组件才能使用
state
setState 对象形式是一个异步的操作!
有的时候我们需要使用回调函数的形式
请看:
setState({
    count:this.state.count+1
})
console.log(this.state.count) // 此处无法拿到正确的值
因此我们需要使用函数的形式
this.setState((prevState,prevProps) => ({
    count:this.state.count+1
}),()=> {
    console.log(this.state.count)
})
react 生命周期

- Mounting(挂载):已插入真实 DOM
- Updating(更新):正在被重新渲染
- Unmounting(卸载):已移出真实 DOM
挂载
当组件实例被创建并插入 DOM 中时,其生命周期调用顺序如下:
constructor(): 在 React 组件挂载之前,会调用它的构造函数。getDerivedStateFromProps(): 在调用 render 方法之前调用,并且在初始挂载及后续更新时都会被调用。render(): render() 方法是 class 组件中唯一必须实现的方法。componentDidMount(): 在组件挂载后(插入 DOM 树中)立即调用。
render() 方法是 class 组件中唯一必须实现的方法,其他方法可以根据自己的需要来实现。
更新
每当组件的 state 或 props 发生变化时,组件就会更新。
当组件的 props 或 state 发生变化时会触发更新。组件更新的生命周期调用顺序如下:
getDerivedStateFromProps(): 在调用 render 方法之前调用,并且在初始挂载及后续更新时都会被调用。根据 shouldComponentUpdate() 的返回值,判断 React 组件的输出是否受当前 state 或 props 更改的影响。shouldComponentUpdate():当 props 或 state 发生变化时,shouldComponentUpdate() 会在渲染执行之前被调用。render(): render() 方法是 class 组件中唯一必须实现的方法。getSnapshotBeforeUpdate(): 在最近一次渲染输出(提交到 DOM 节点)之前调用。componentDidUpdate(): 在更新后会被立即调用。
render() 方法是 class 组件中唯一必须实现的方法,其他方法可以根据自己的需要来实现。
卸载
当组件从 DOM 中移除时会调用如下方法:
componentWillUnmount(): 在组件卸载及销毁之前直接调用。
案例
import React, { Component } from 'react'

export default class Life extends Component {
    static defaultProps = {
        name: 'ljj',
        age: 21,
    }
    constructor(props) {
        super(props)
        console.log('1初始化状态')
        this.state = {
            count: 0,
        }
    }
    componentWillMount() {
        console.log('2父组件即将被挂载')
    }
    componentDidMount() {
        console.log('4父组件挂载完成')
    }
    shouldComponentUpdate(nextProps, nextState) {
        // 性能优化点
        console.log('组件是需要更新')
        return true
    }
    componentWillUpdate() {
        console.log('组件将要更新')
    }
    componentDidUpdate() {
        console.log('组件更新完成')
    }
    change = () => {
        this.setState(
            (prevState, prevProps) => ({
                count: this.state.count + 1,
            }),
            () => {}
        )
    }
    render() {
        console.log('3执行render')
        return (
            <div>
                <div>{this.state.count}</div>
                <button onClick={this.change}>+1</button>
            </div>
        )
    }
}
结果:

受控组件
react 中是没有双向数据绑定的!
所谓受控组件就是受状态控制的组件
import React, { Component } from 'react'

export default class Control extends Component {
    constructor(props) {
        super(props)
        this.state = {
            val: '123',
        }
    }
    change = (e) => {
        let val = e.target.value
        this.setState({
            val: val,
        })
    }
    render() {
        return (
            <div>
                <input
                    type="text"
                    value={this.state.val}
                    onChange={this.change}
                />
            </div>
        )
    }
}
结果:

非受控组件
即不受状态的控制

表单的使用
import React, { Component } from 'react'

export default class Form extends Component {
    constructor(props) {
        super(props)
        this.state = {
            username: '',
            password: '',
        }
    }
    handleU = (e) => {
        this.setState({
            username: e.target.value,
        })
    }
    handleP = (e) => {
        this.setState({
            password: e.target.value,
        })
    }
    handleS = (e) => {
        e.preventDefault()
        if (this.state.password && this.state.username) {
            console.log('发送请求')
        }
    }
    render() {
        return (
            <div>
                <form action="username" onSubmit={this.handleS}>
                    <p className="username">
                        <label htmlFor="name">用户名: </label>
                        <input
                            type="text"
                            value={this.state.username}
                            onChange={this.handleU}
                            id="name"
                        ></input>
                    </p>
                    <p className="password">
                        <label htmlFor="name">密码: </label>
                        <input
                            type="password"
                            value={this.state.password}
                            onChange={this.handleP}
                            id="pwd"
                        ></input>
                    </p>
                </form>
                {/* 提交按钮 */}
                <button onClick={this.handleS}>登录</button>
            </div>
        )
    }
}
效果:


 2044
2044

 被折叠的 条评论
为什么被折叠?
被折叠的 条评论
为什么被折叠?
 到【灌水乐园】发言


