


目录
多线程概念

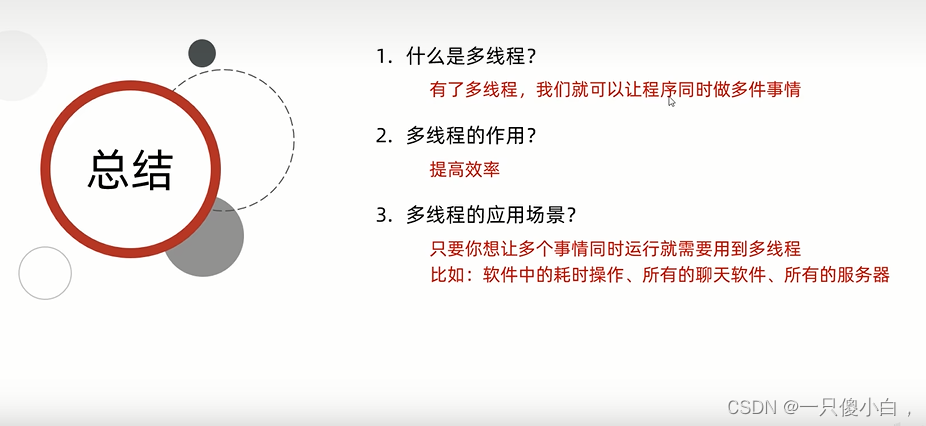
并发与并行


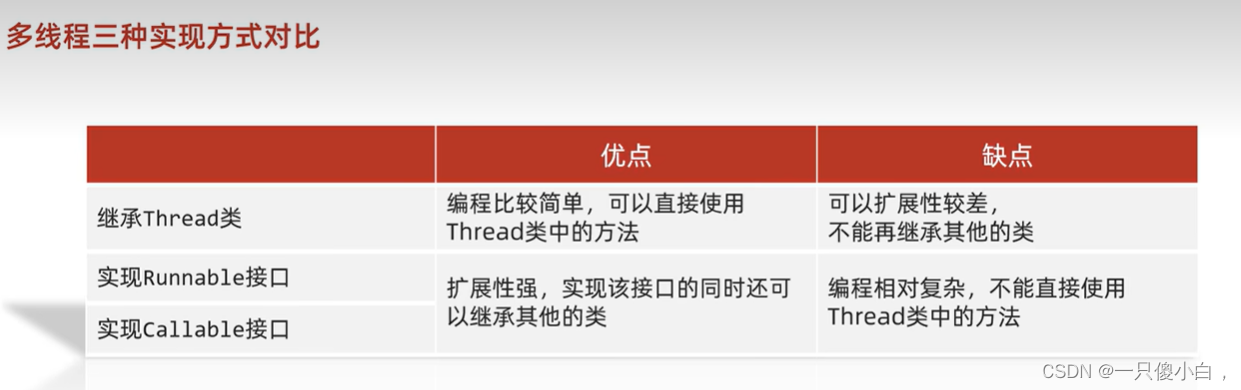
多线程的实现方式
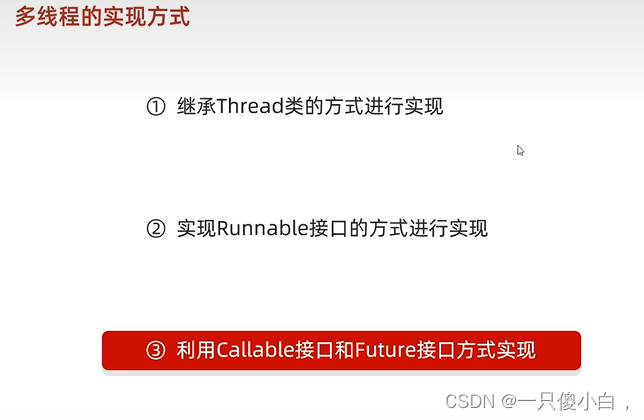
继承Thread类
public class Thread01 extends Thread {
    @Override
    public void run() {
//        重写run方法,书写要执行的逻辑
        for (int i = 0; i < 100; i++) {
            System.out.println(getName() + "helloWorld");

        }
    }
}
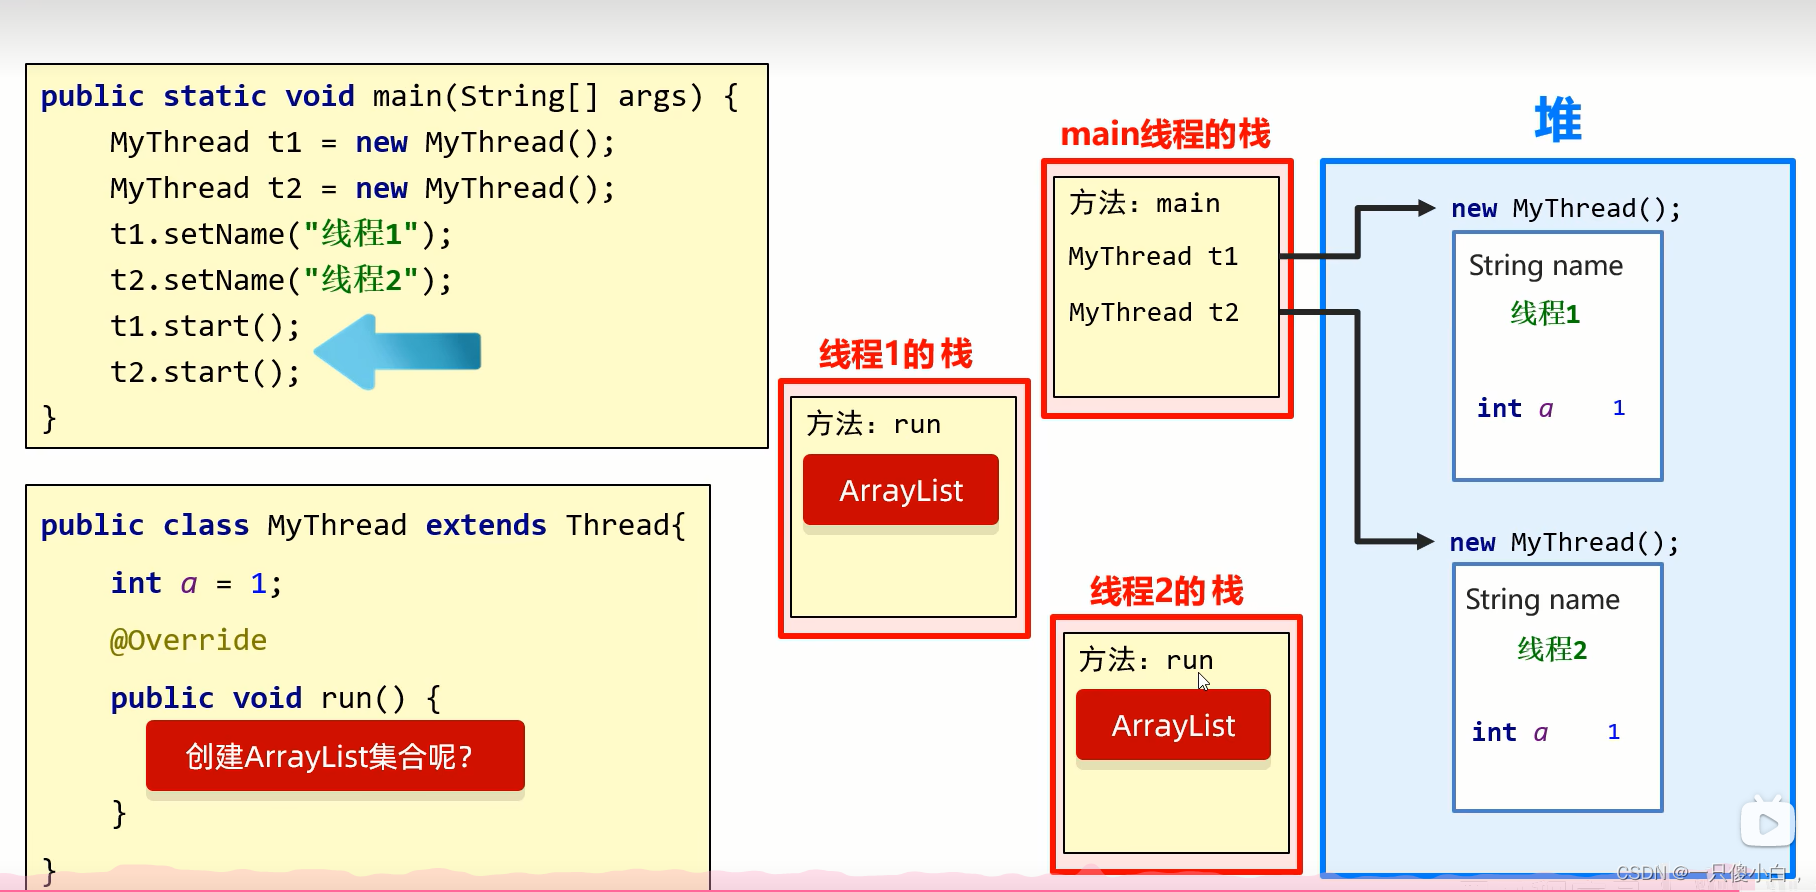
public class ThreadDemo {
    public static void main(String[] args) {
        Thread01 thread01 = new Thread01();
        Thread01 thread02 = new Thread01();
//设置线程名字
        thread01.setName("线程1");
        thread02.setName("线程2");
//开启线程
        thread01.start();
        thread02.start();
    }
}
实现Runnable接口
public class MyRun implements Runnable{
    @Override
    public void run() {
        for (int i = 0; i < 100; i++) {
//            获取当前线程的对象
            System.out.println(Thread.currentThread().getName()+"HelloWORLD");

        }
    }
}
public class ThreadDemo2 {
    public static void main(String[] args) {
        MyRun myRun = new MyRun();

//        创建线程对象
        Thread thread1 = new Thread(myRun);
        Thread thread2 = new Thread(myRun);

//        给线程设置名字
        thread1.setName("线程1");
        thread2.setName("线程2");

//        开启线程
        thread1.start();
        thread2.start();
    }
}
实现Callable接口
public class MyCallable implements Callable<Integer> {
    @Override
    public Integer call() throws Exception {
//        求1-100的和
        int sum = 0;
        for (int i = 0; i < 100; i++) {
            sum=sum+i;
        }
        return sum;
    }
}
public class ThreadDemo {
public static void main(String[] args) throws ExecutionException, InterruptedException {
MyCallable myCallable = new MyCallable();
FutureTask<Integer> integerFutureTask = new FutureTask<Integer>(myCallable);
Thread thread = new Thread(integerFutureTask);
thread.start();
Integer i = integerFutureTask.get();
System.out.println(i);
}
}
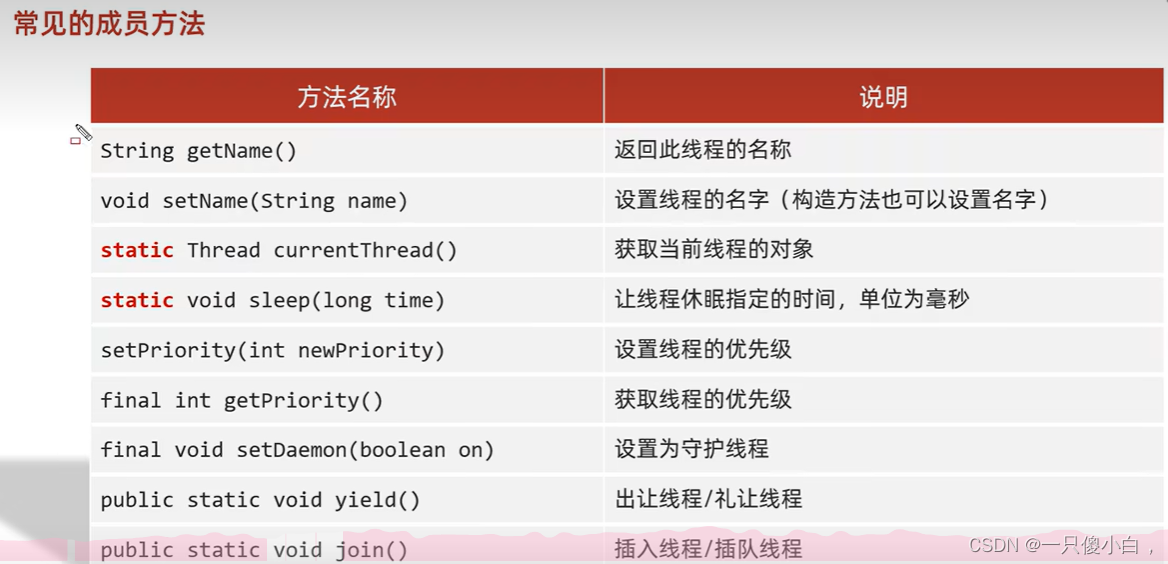
常见的成员方法
public class MyThread1 extends Thread {
    public MyThread1() {
    }

    public MyThread1(String name) {
        super(name);
    }

    //    父类的run方法没有抛出异常,子类就不能抛出异常
    @Override
    public void run() {
        for (int i = 0; i < 100; i++) {
            try {
                Thread.sleep(1000);
            } catch (InterruptedException e) {
                throw new RuntimeException(e);
            }
            System.out.println(getName() + "@" + i);

        }
    }
}
public class ThreadDemo1 {
    public static void main(String[] args) {
        MyThread1 myThread1 = new MyThread1("飞机");
        MyThread1 myThread2 = new MyThread1("坦克");
//        有默认的名字
//        myThread1.start();
//        myThread2.start();

//        main线程
//        Thread thread = Thread.currentThread();
//        System.out.println(thread.getName());


    }
}
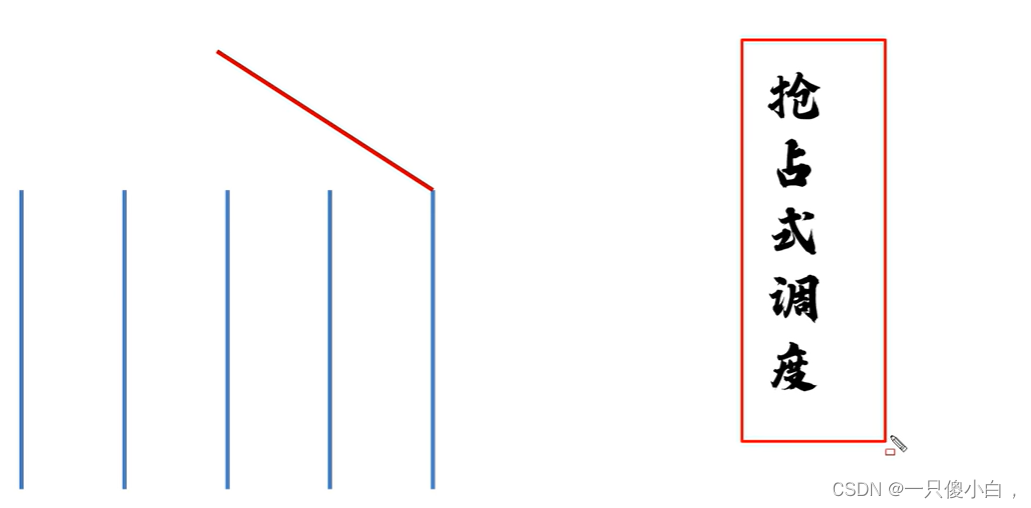

优先级是从1-10,默认是5。优先级高的抢占cpu概率高,但不是绝对的。
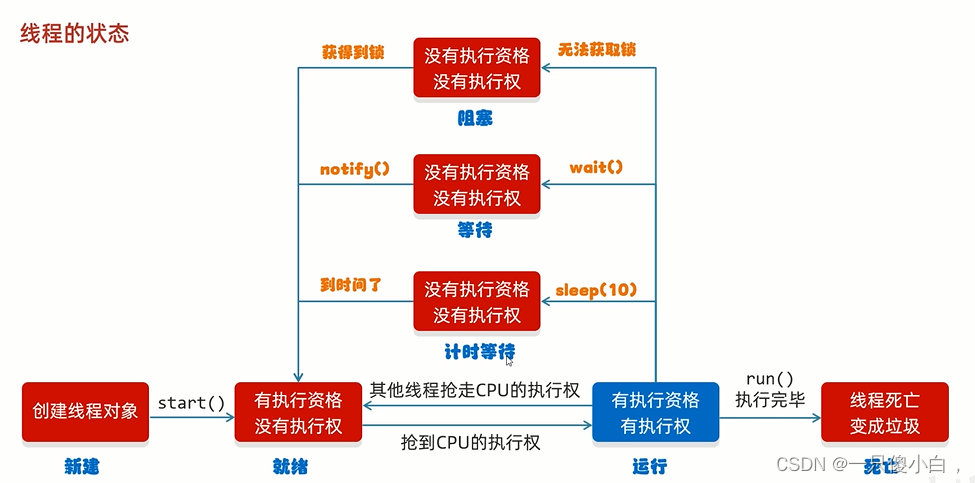
线程的生命周期.


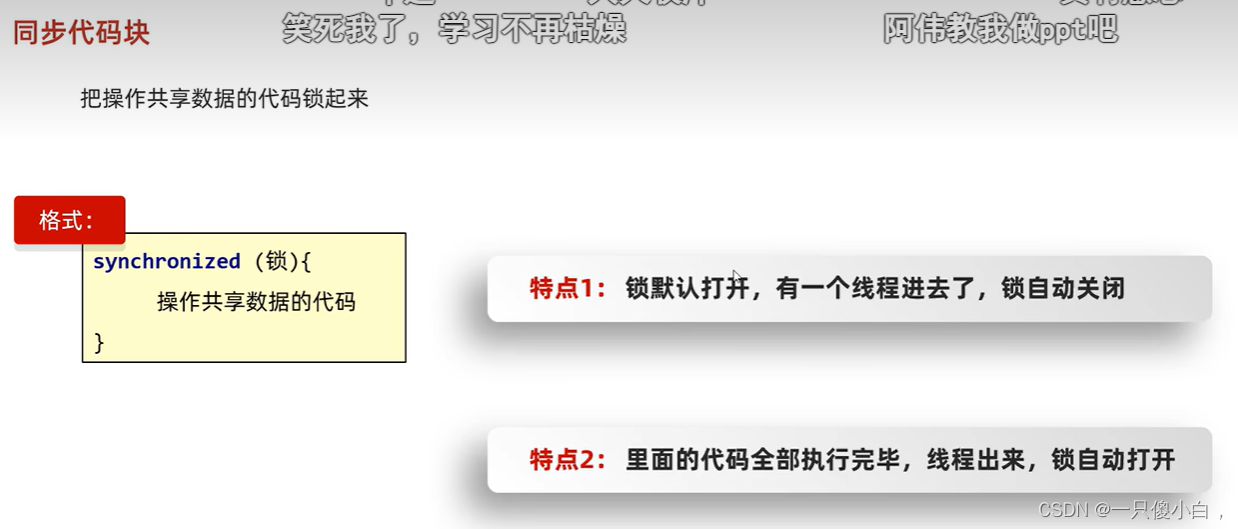
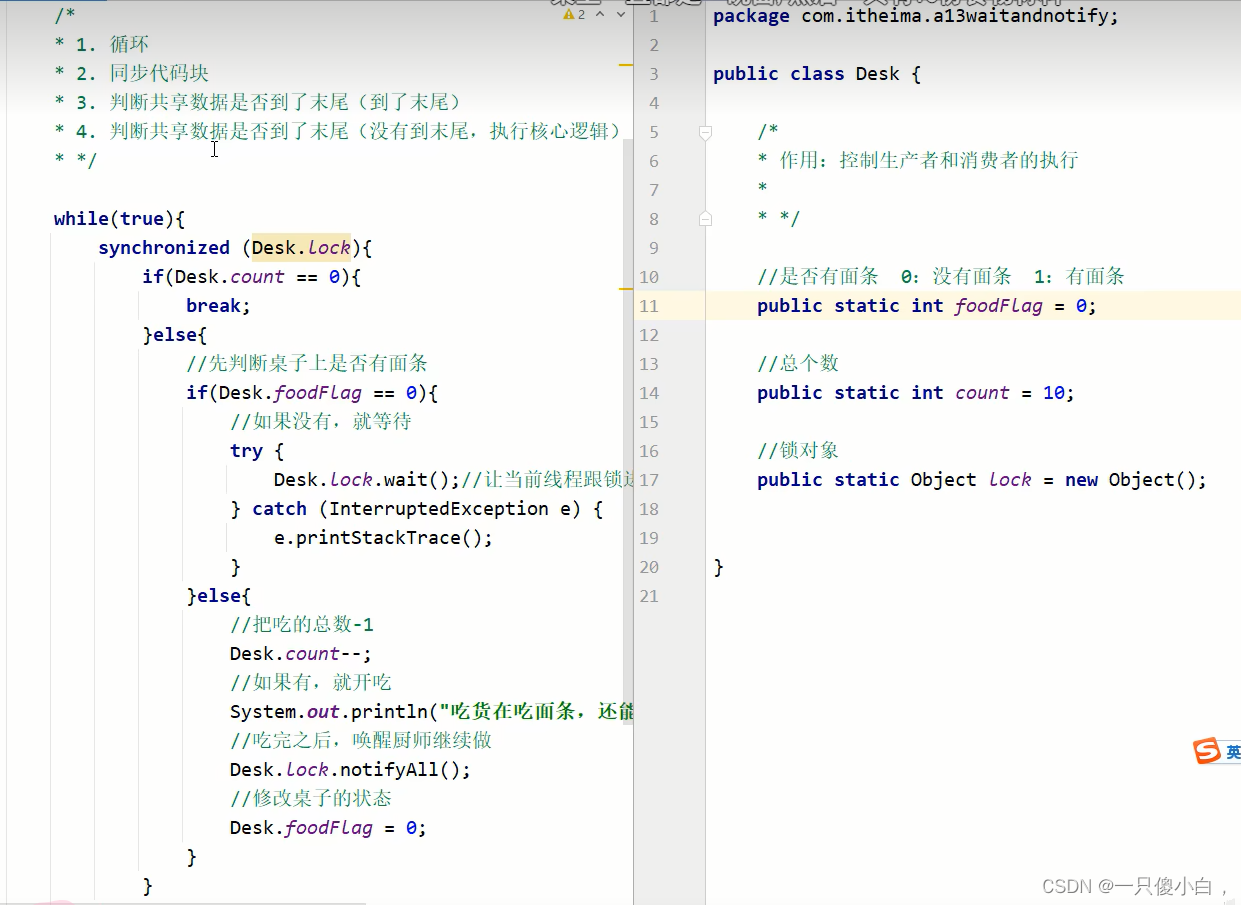
同步代码块
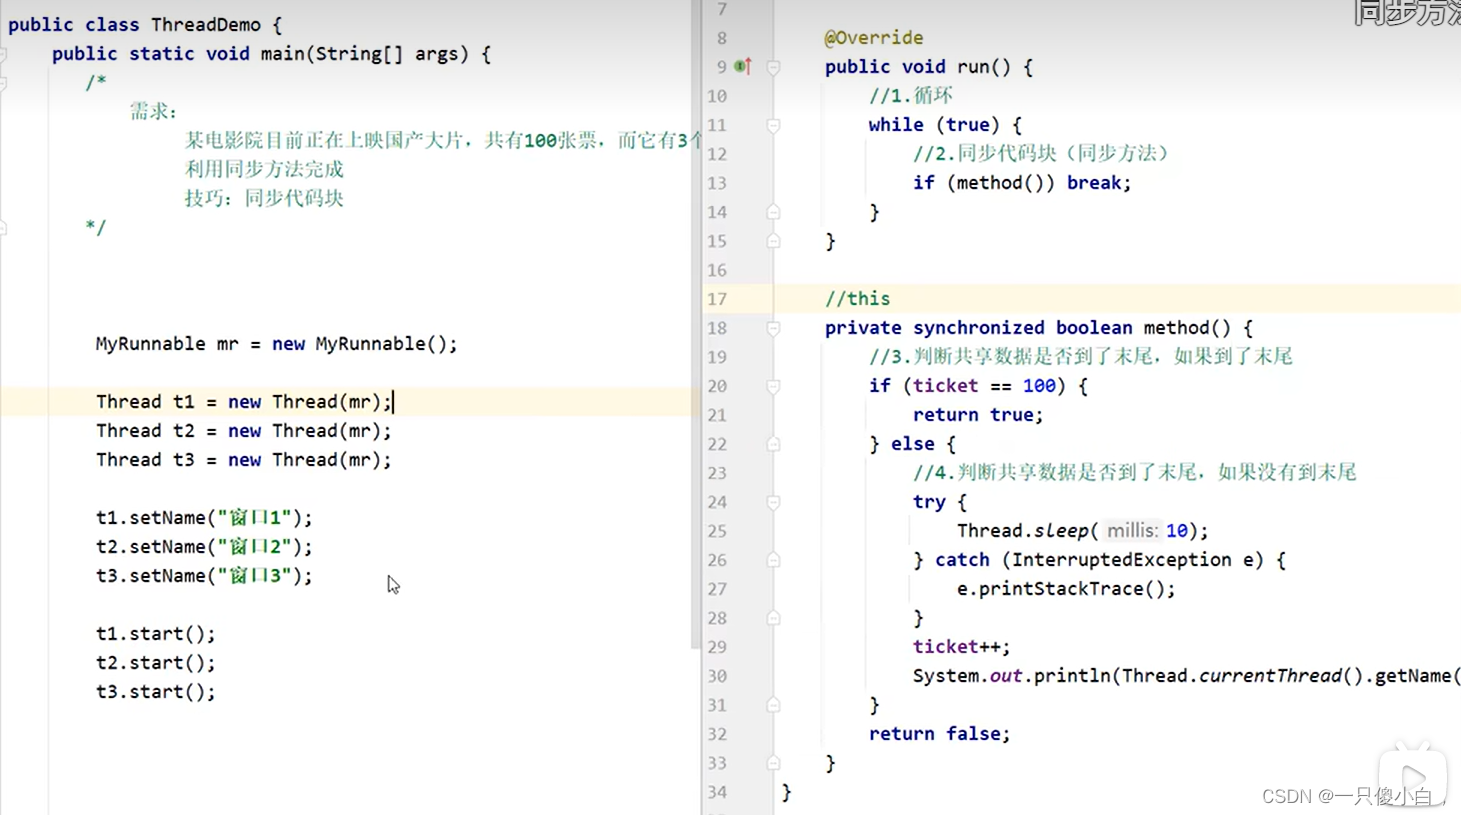
public class testTicketDemo {
    public static void main(String[] args) {
        ticketThread ticketThread1 = new ticketThread();
        ticketThread ticketThread2 = new ticketThread();
        ticketThread ticketThread3 = new ticketThread();
        ticketThread1.setName("窗口1");
        ticketThread2.setName("窗口2");
        ticketThread3.setName("窗口3");

        ticketThread1.start();
        ticketThread2.start();
        ticketThread3.start();
    }
}
public class ticketThread extends Thread{
//    类共享票
    static int ticket = 0;

//    锁对象,一定要是唯一的
    static Object object = new Object();

    @Override
    public void run() {
        while (true){
            synchronized (object){
                if(ticket<100){
                    try {
                        Thread.sleep(100);
                    } catch (InterruptedException e) {
                        throw new RuntimeException(e);
                    }
                    ticket++;
                    System.out.println(getName()+"正在卖第"+ticket+"张票");
                }else {
                    break;
                }
            }
        }
    }
}
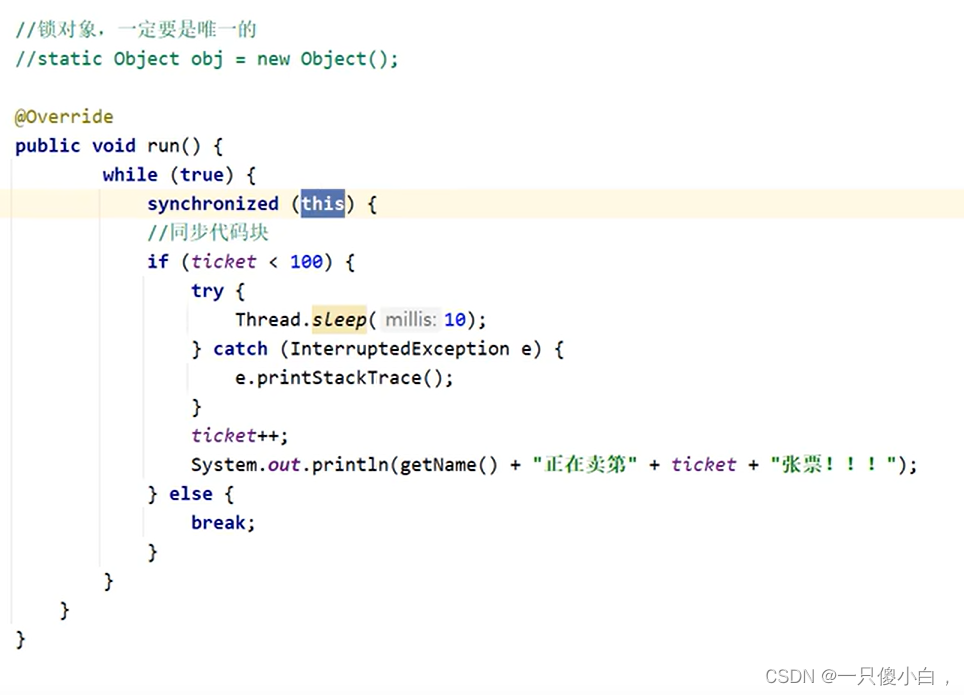
如果改成这样那,每个获取的锁就是线程对象锁,锁就不唯一了。

字节码对象是唯一的
同步方法
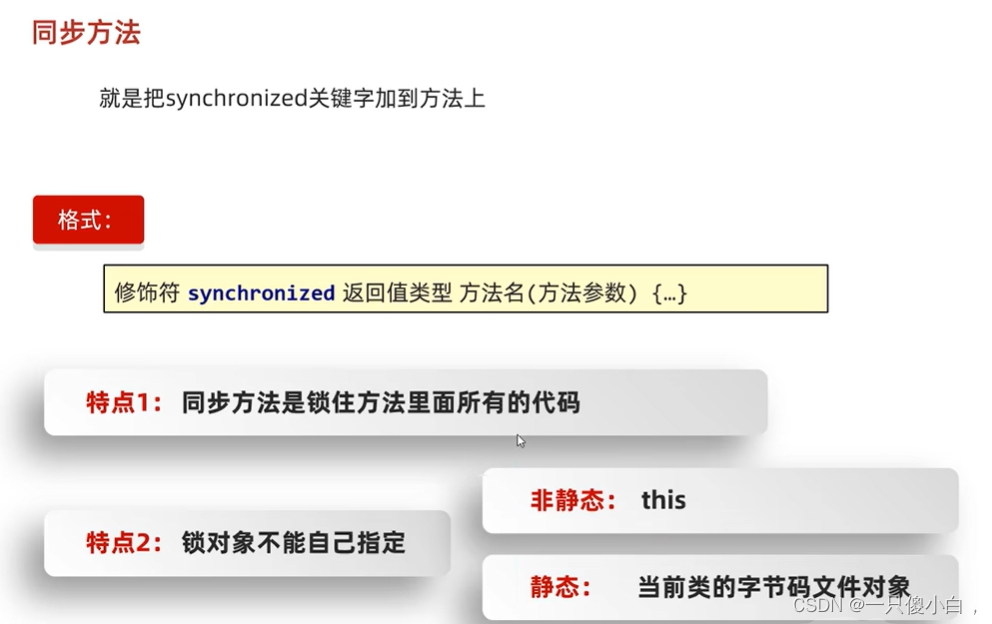
因为是同一个Runnable对象,实现创建三个线程,这个时候this表示的就是唯一的,不用加static关键字。
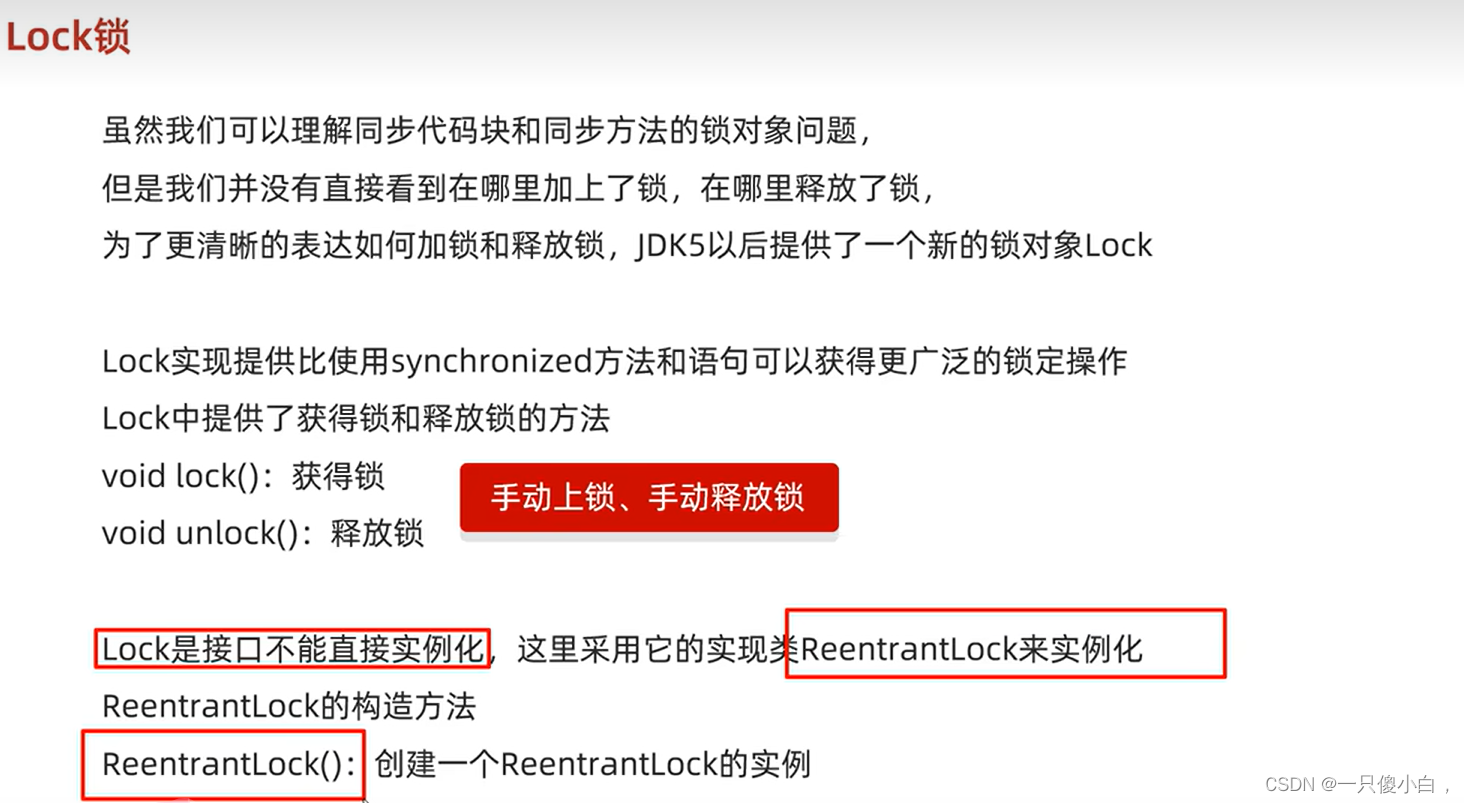
public class RentlockThread extends Thread {
    static int ticket = 0;
    static Lock lock = new ReentrantLock();

    @Override
    public void run() {

        while (true) {
            lock.lock();
            try {
                if (ticket == 100) {
                    break;
                } else {
                    Thread.sleep(100);
                    ticket++;
                    System.out.println(getName() + "在卖第" + ticket + "张票");
                }
            } catch (InterruptedException e) {
                throw new RuntimeException(e);
            } finally {
//                最终执行代码,避免程序获取不到解锁,不能正常停止
                lock.unlock();
            }

        }
    }

}
public class testRententrLOCK {
public static void main(String[] args) {
RentlockThread rentlockThread1= new RentlockThread();
RentlockThread rentlockThread2= new RentlockThread();
RentlockThread rentlockThread3 = new RentlockThread();
rentlockThread1.setName("窗口1");
rentlockThread2.setName("窗口2");
rentlockThread3.setName("窗口3");
rentlockThread1.start();
rentlockThread2.start();
rentlockThread3.start();
}
}
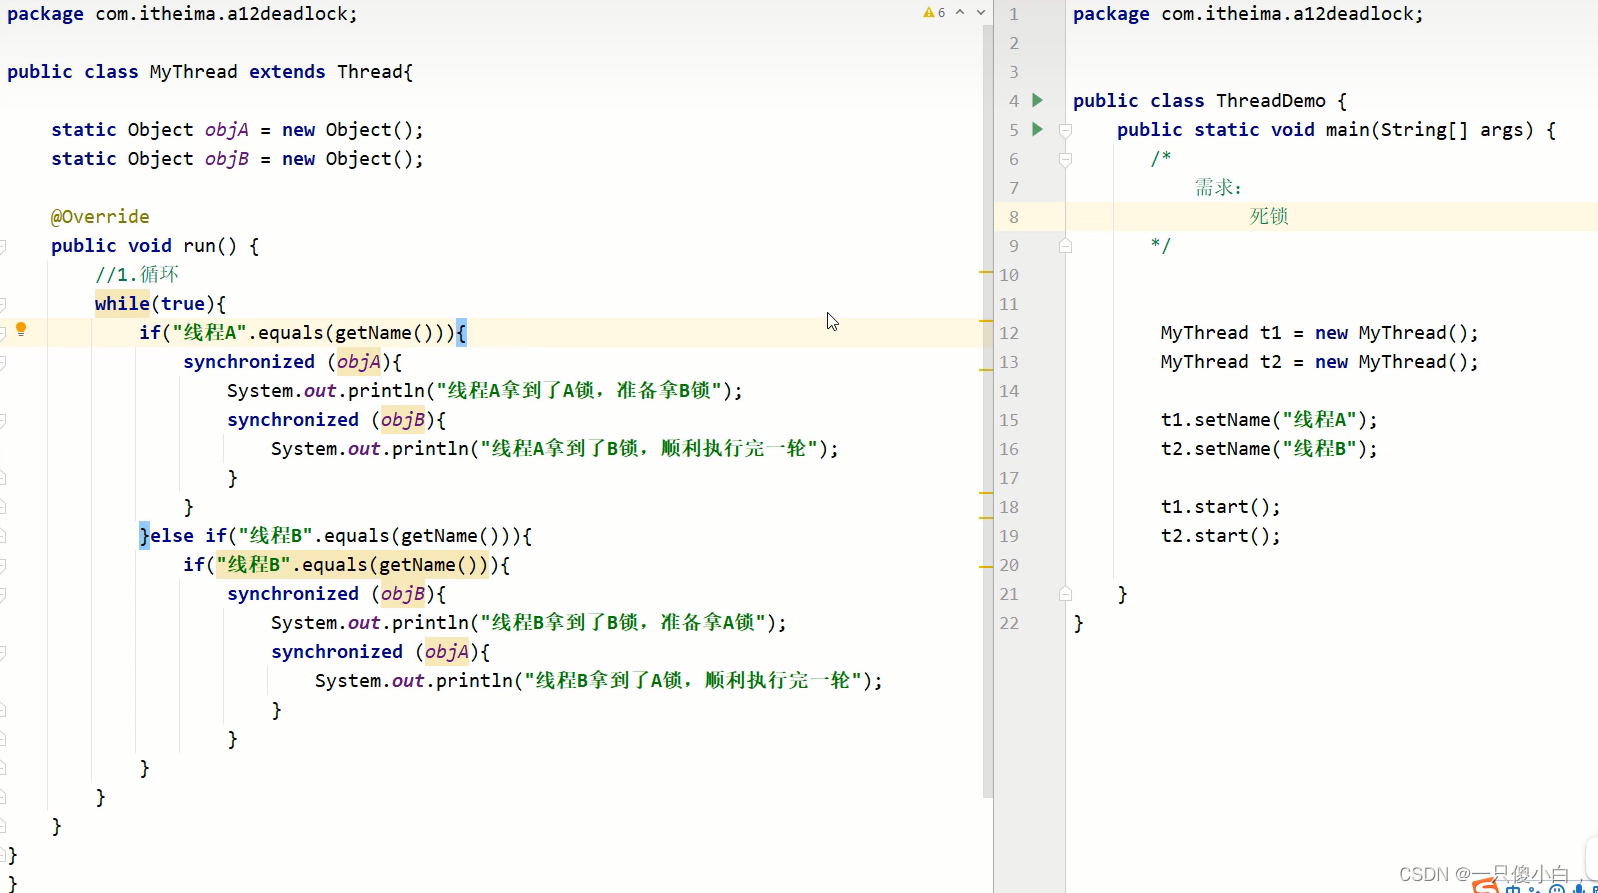
死锁
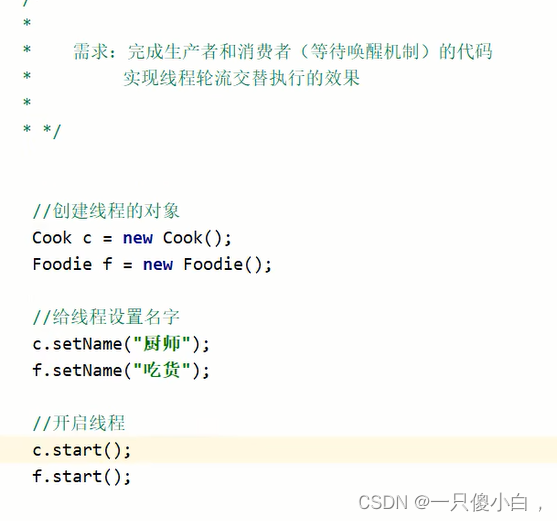
等待与唤醒

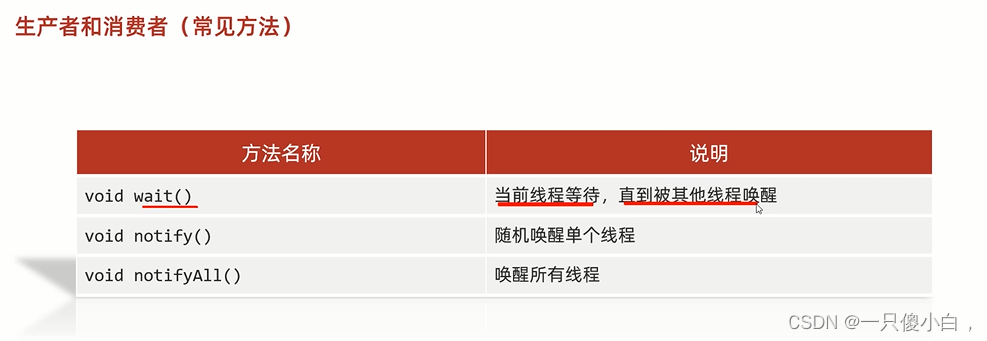
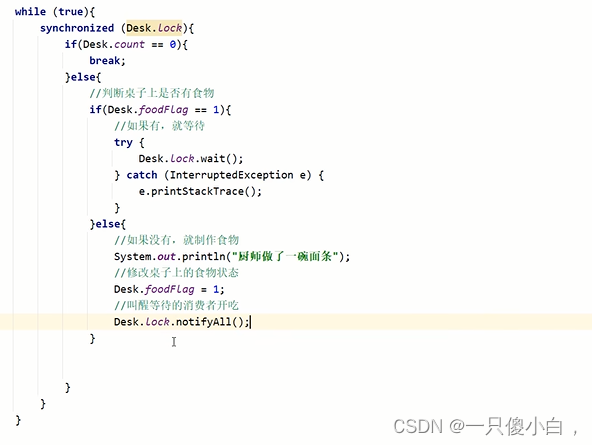
在Java中,当一个线程调用了某个对象的 wait() 方法时,它会释放该对象的锁(即监视器锁),并进入等待状态。这个行为允许其他线程获取该对象的锁,并可能执行一些操作,最终通过调用 notify() 或 notifyAll() 方法来唤醒等待的线程。
以下是 wait() 方法的一些关键点:
-
释放锁:当线程调用
wait()时,它会释放当前持有的对象锁,并等待该对象的notify()或notifyAll()被调用。 -
进入等待集:释放锁后,线程进入该对象的等待集(也称为等待池)。
-
响应通知:当其他线程调用了对象的
notify()(唤醒一个等待的线程)或notifyAll()(唤醒所有等待的线程)时,被通知的线程会从等待集中移除,并尝试重新获取对象的锁。 -
按顺序获取锁:一旦线程从
wait()返回,它需要重新竞争获取对象的锁。这通常发生在同步块或同步方法的末尾,因为线程需要再次拥有锁才能继续执行。 -
超时和中断:
wait()方法还可以带有一个超时参数,允许线程在指定的时间后醒来,即使没有收到通知。此外,如果线程在wait()期间被中断,它会抛出InterruptedException,并清除中断状态。 -
与
sleep()的区别:与sleep()不同,wait()会释放锁,而sleep()不会。 -
条件等待:
wait()通常与条件变量一起使用,以实现线程间的协调。线程在等待某个条件为真时调用wait(),当条件变为真时,其他线程会通知等待的线程。
,当一个线程调用了某个对象的 wait() 方法后,它会释放锁并等待,直到另一个线程调用同一个对象的 notify() 或 notifyAll() 方法来唤醒它。以下是线程被唤醒后执行逻辑的步骤:
-
唤醒通知:
- 当
notify()被调用时,它会随机选择等待集(等待在这个对象锁上的线程集合)中的一个线程,并将其从等待状态唤醒。 - 当
notifyAll()被调用时,它会唤醒等待集中的所有线程。
- 当
-
等待锁的重新获取:
- 被唤醒的线程从
wait()方法返回,但这并不意味着它立即就能执行。首先,它需要重新竞争获取该对象的锁。
- 被唤醒的线程从
-
重新进入同步块:
- 一旦线程获取了锁,它将从
wait()方法之后的代码点继续执行。这是因为线程在进入wait()方法之前已经持有了锁,并且在wait()方法调用过程中释放了锁。
- 一旦线程获取了锁,它将从
-
执行后续代码:
- 线程继续执行同步块或同步方法中的其余代码。
-
条件检查:
- 通常,线程会在
wait()方法调用之前检查某个条件。当它被唤醒并从wait()返回后,它通常会再次检查这个条件,以确定是否继续执行或再次等待。
- 通常,线程会在
-
处理中断:
- 如果线程在
wait()调用期间被中断,wait()方法会抛出InterruptedException。线程需要捕获并处理这个异常,通常的做法是重新设置中断状态(Thread.currentThread().interrupt()),并根据需要处理中断。
- 如果线程在
注意事项:
- 唤醒操作(
notify()或notifyAll())不会自动使线程跳过同步块或同步方法中的代码。线程必须在获取锁后重新检查条件。 - 使用
wait()、notify()和notifyAll()时,一定要在同步块或同步方法中。 - 避免在同步块中使用
while循环来检查条件,这可能导致错过唤醒通知(称为 "spurious wakeup")。正确的做法是使用while循环,即使在被唤醒后也要检查条件。
阻塞队列

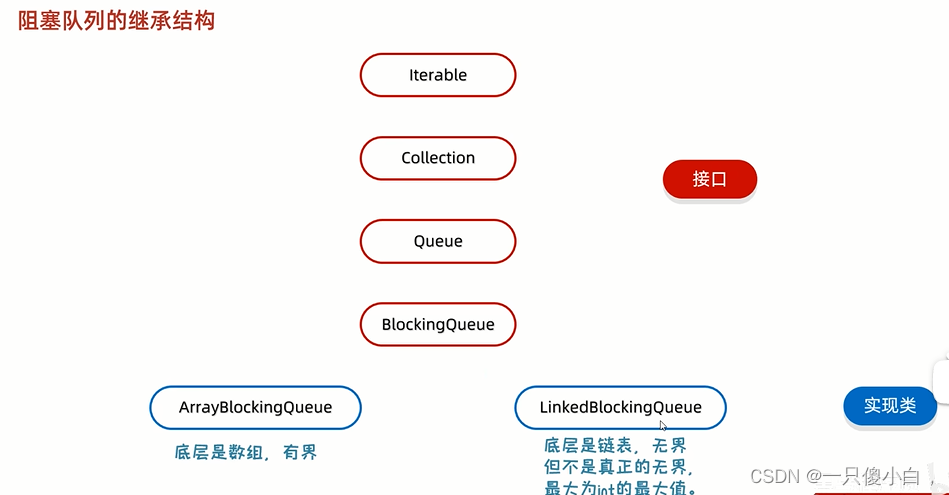
public class Cook extends Thread{
    ArrayBlockingQueue<String> queue;

    public Cook(ArrayBlockingQueue<String> arrayBlockingQueue) {
        this.queue = arrayBlockingQueue;
    }

    @Override
    public void run() {
       while (true){
//           不断把面条放到阻塞队列当中
           try {
//               不用加锁 底层是reentrantlcok锁实现的
               queue.put("面条");
               System.out.println("厨师放了一碗面条");
           } catch (Exception e) {
              e.printStackTrace();
           }
       }
    }
}
public class Foodie extends Thread{
    ArrayBlockingQueue<String> queue;

    public Foodie(ArrayBlockingQueue<String> arrayBlockingQueue) {
        this.queue = arrayBlockingQueue;
    }

    @Override
    public void run() {
        while (true){
//           不断把面条放到阻塞队列当中
            try {
//               不用加锁 底层是reentrantlcok锁实现的
                String take = queue.take();
                System.out.println(take);
            } catch (Exception e) {
                e.printStackTrace();
            }
        }
    }
}
public class BLOCKdemo {
    public static void main(String[] args) {
//    1.创建阻塞队列的对象
        ArrayBlockingQueue<String> arrayBlockingQueue = new ArrayBlockingQueue<>(1);

        Cook cook = new Cook(arrayBlockingQueue);
        Foodie foodie = new Foodie(arrayBlockingQueue);

        cook.start();
        foodie.start();

    }
}
线程状态
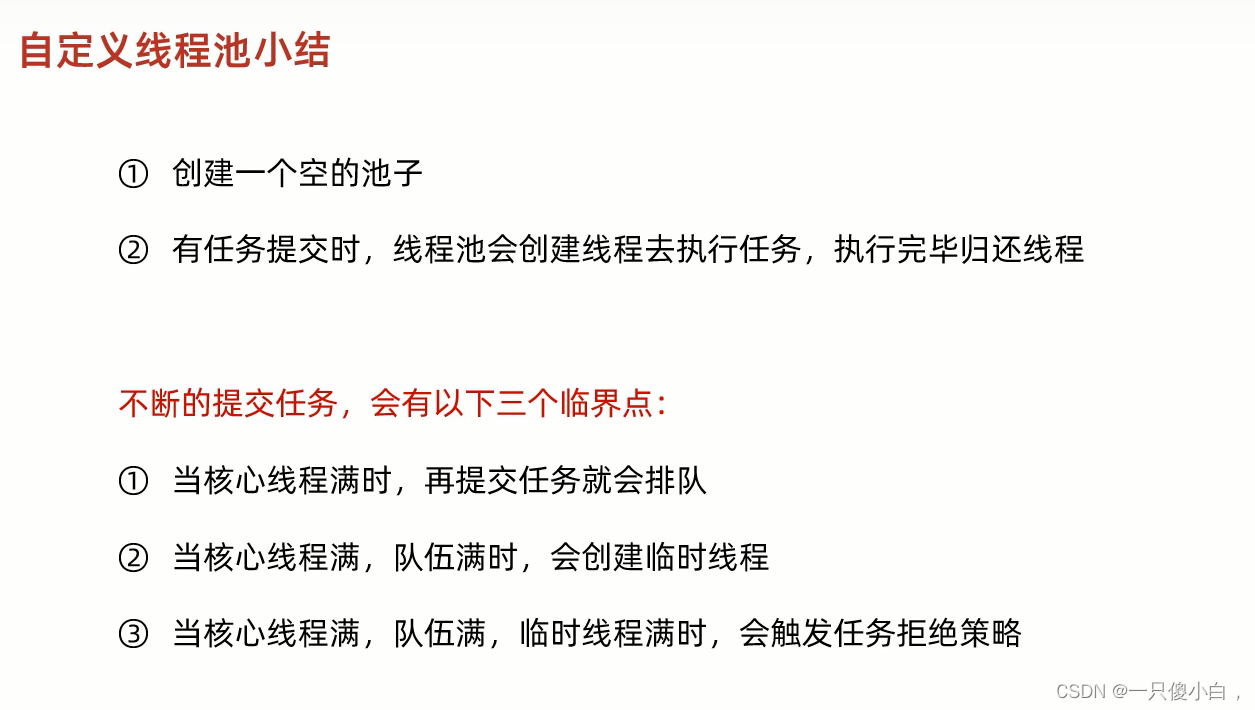
线程池


public class MyRunnable implements Runnable{
    @Override
    public void run() {
        for (int i = 0; i < 10; i++) {
            System.out.println(Thread.currentThread().getName()+"-----"+i);
        }
    }
}
public class MyThreadPool {
    public static void main(String[] args) {
//        获取线程池对象
        ExecutorService executorService = Executors.newFixedThreadPool(5);
//        提交任务
        executorService.submit(new MyRunnable());
        executorService.submit(new MyRunnable());
        executorService.submit(new MyRunnable());

//      销毁线程池  真实开发中线程池一般不会关闭
        executorService.shutdown();
    }
}
自定义线程池
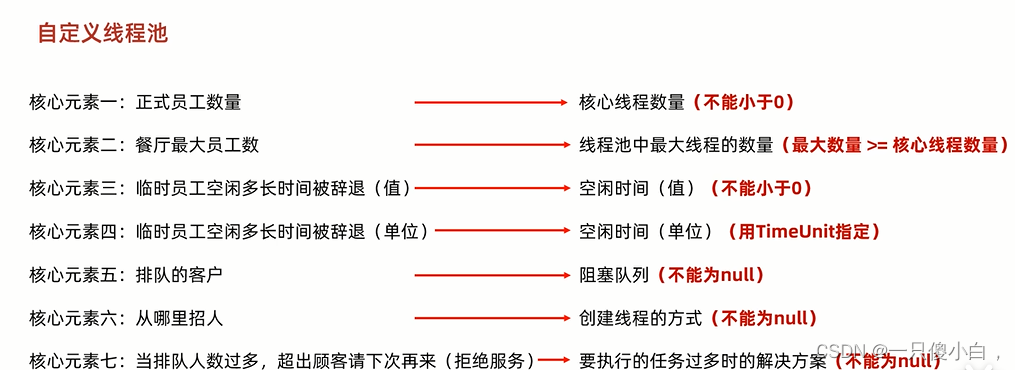

public class ZiDingYiPool {
public static void main(String[] args) {
ThreadPoolExecutor threadPoolExecutor = new ThreadPoolExecutor(3,
6,
60,
TimeUnit.SECONDS,
new ArrayBlockingQueue<>(3),
Executors.defaultThreadFactory(),
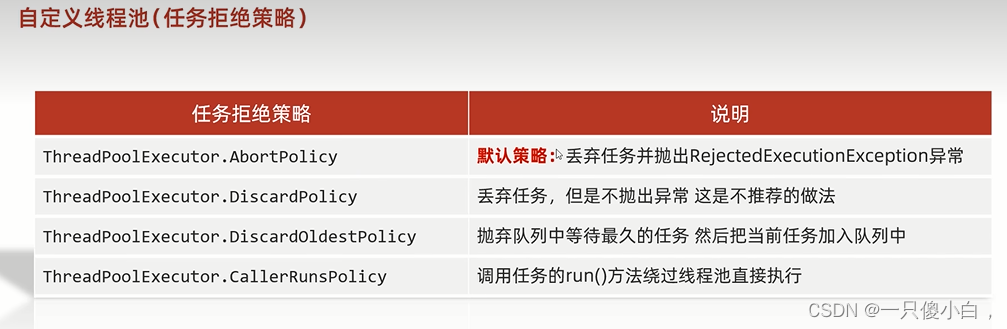
new ThreadPoolExecutor.AbortPolicy());
threadPoolExecutor.submit(new MyRunnable());
}
}
查看电脑可用的线程数
方法一:
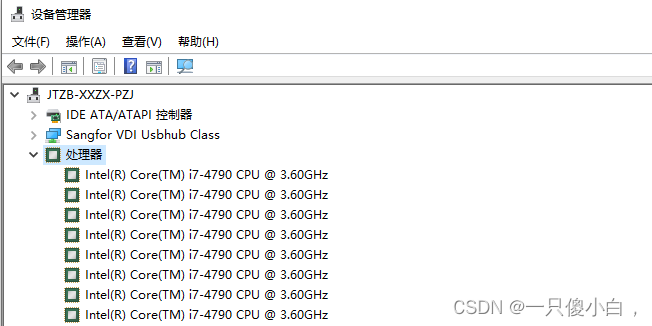
方法二:
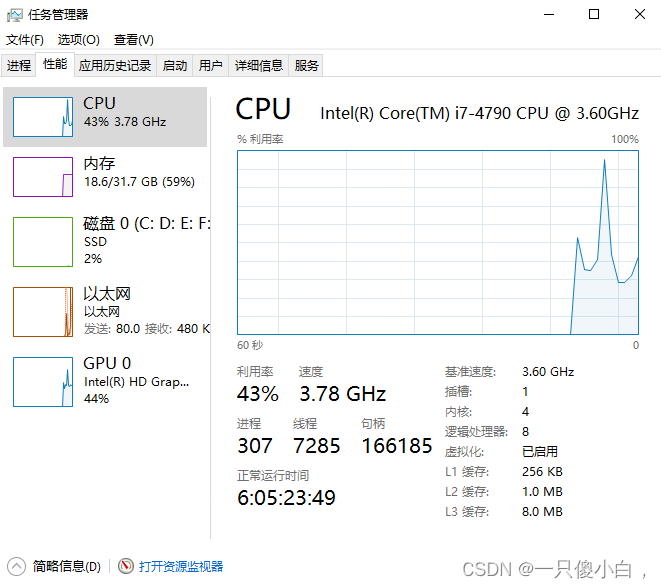
方法三:
public class availableProcess {
    public static void main(String[] args) {
        int i = Runtime.getRuntime().availableProcessors();
        System.out.println(i);
    }
}
线程池大小的选择


 450
450


 被折叠的 条评论
为什么被折叠?
被折叠的 条评论
为什么被折叠?
 到【灌水乐园】发言


