


git——一个开源的分布式版本控制系统,可以有效、高速地处理从很小到非常大的项目版本管理,帮助我们更好的组织项目、控制项目,并且帮助我们进行更高效的团队开发。接下来,让我们走进git,掌握git的正确使用姿势。
邂逅Git:
git的初始化:
使用指令创建一个git仓库
➜ github mkdir git-study
目录: E:\github
Mode LastWriteTime Length Name
---- ------------- ------ ----
d----- 2022/5/25 14:48 git-study
➜ github cd .\git-study\
➜ git-study ls
➜ git-study git init
Initialized empty Git repository in E:/github/git-study/.git/
➜ git-study git:(master)
查看刚刚创建的仓库目录:
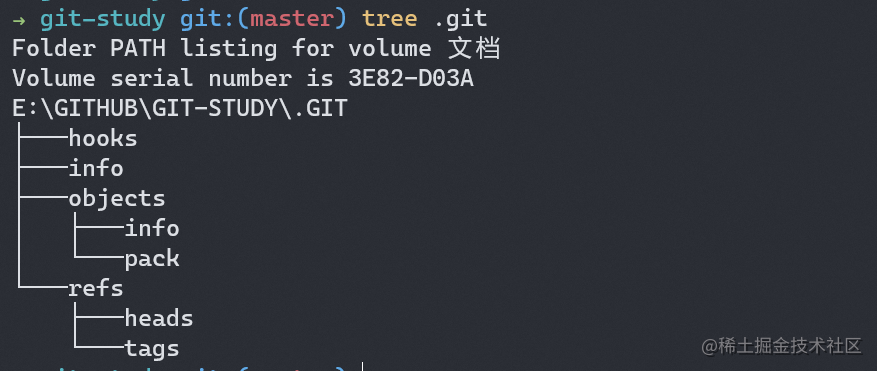
git的使用过程中主要有三个区域—工作区、暂存区和远程仓库,当我们在修改代码时,是在工作区进行代码的编写(Working Directory),当我们完成代码编写后会将代码添加到暂存区(Staging Area),最后将提交到远程仓库(Repository),后续我们会对这个过程进行详细解读。
git的配置:
三种级别配置:
git主要有三种不同级别的配置,每个级别的配置可能重复,但是低级别的配置会覆盖高级别的配置。
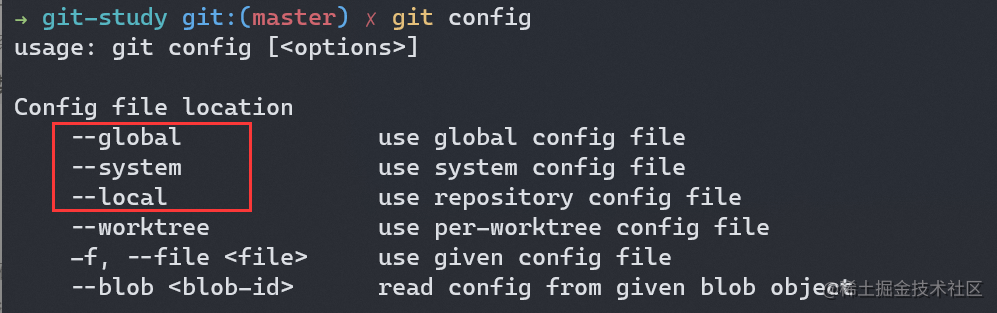
global:全局配置
system:系统配置
local:本地配置
常见git配置:
用户名配置:
➜ git-study git:(master) ✗ git config --global user.name "你的仓库用户名"
➜ git-study git:(master) ✗ git config --global user.email 仓库邮箱
注意:用户名的配置关系到你能否正确连接到你的远程仓库
instead of 配置:
➜ git-study git:(master) ✗ git config --global url.git@github.com:.insteadOf <https://github.com/>
将url “git@github.com” 替换为 “https://github.com/”
也可以进行ssh替换为http的协议替换。
Git命令别名配置:
➜ git-study git:(master) ✗ git config --global alias.cin "commit --amend --no-edit"
配置后:cin = commit —amend —no-edit
Git Remote配置:(配置源,用来拉取代码和push代码)
- 添加ssh和http两种协议的remote:
➜ git-study git:(master) git remote add origin_ssh git@github.com:git/git.git
➜ git-study git:(master) git remote add origin_http <https://github.com/git/git.git>
➜ git-study git:(master) git remote -v
origin_http     <https://github.com/git/git.git> (fetch)
origin_http     <https://github.com/git/git.git> (push)
origin_ssh      git@github.com:git/git.git (fetch)
origin_ssh      git@github.com:git/git.git (push)
查看remote内容的指令:git remote -v
查看现在的config配置,会发现多了两个关于remote的配置,分别记录了两个remote的url和fetch
➜ git-study git:(master) cat .git/config
[core]
        repositoryformatversion = 0
        filemode = false
        bare = false
        logallrefupdates = true
        ignorecase = true
[remote "origin_ssh"]
        url = git@github.com:git/git.git
        fetch = +refs/heads/*:refs/remotes/origin_ssh/*
[remote "origin_http"]
        url = <https://github.com/git/git.git>
        fetch = +refs/heads/*:refs/remotes/origin_http/*
- 对同一个Origin设置不同的Push和Fetch URL,可以实现拉取开源库然后push到自己的仓库里:
➜ git-study git:(master) git remote add origin git@github.com:git/git.git
➜ git-study git:(master) git remote set-url --add --push origin git@github.com:my_repo/git.git
// 查看一下remote发现新添加的remote的push和fetch不是一个源
➜ git-study git:(master) git remote -v
origin  git@github.com:git/git.git (fetch)
origin  git@github.com:my_repo/git.git (push)
origin_http     <https://github.com/git/git.git> (fetch)
origin_http     <https://github.com/git/git.git> (push)
origin_ssh      git@github.com:git/git.git (fetch)
origin_ssh      git@github.com:git/git.git (push)
- HTTP Remote与SSH Remote
一般我们都建议使用SSH连接远程仓库,也就是使用公私钥机制,SSH通过公私钥的机制,将生成的公钥存放在服务端,从而实现免密访问。HTTP相对来说不够安全,而且连接的机制也不方便。
SSH连接过程:
- 生成自己的公钥
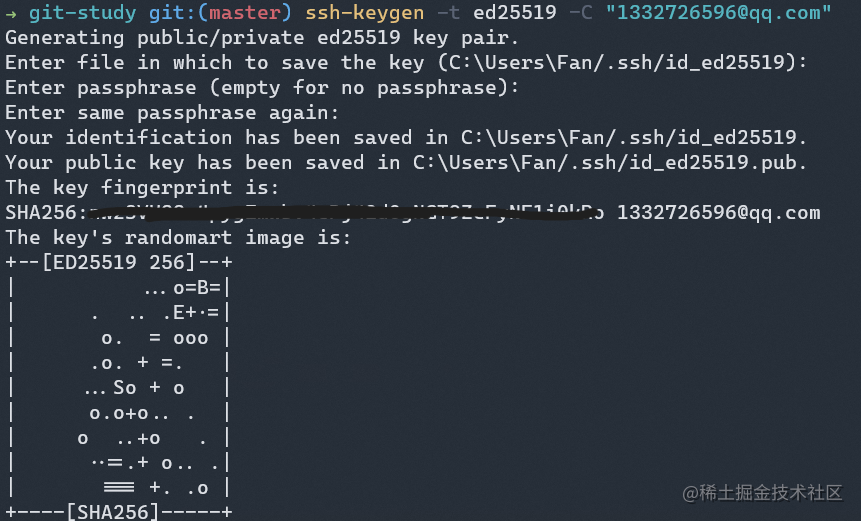
然后通过打开公钥存储的文件,得到公钥。
- 然后保存到github上即可
 最低0.47元/天 解锁文章


 320
320


 被折叠的 条评论
为什么被折叠?
被折叠的 条评论
为什么被折叠?
 到【灌水乐园】发言


