


一、查看系统上安装的所有模块
ansible-doc -l
查看ping模块帮助文档
ansible-doc ping
ansible模块
文件模块:
copy:将本地文件复制到受控主机
file:设置文件的权限和其他属性
lineinfile:确保特定行是否在文件中,也就是说修改文件内容
synchronize:使用rsync同步内容
软件包模块
package:使用操作系统本机的自动检测软件包管理器管理软件包
yum:使用yum软件包管理器管理软件包
apt:使用apt软件包管理器管理软件包
dnf:使用dnf软件包管理器管理软件包
gem:管理Ruby gem
pip:从PyPI管理Python软件包
系统模块
firewalld:使用firewalld管理任意端口和服务
reboot:重新启动计算机
service:管理服务
user:添加、删除和管理用户账户
Net Tools模块
get_url:通过http、https或者ftp下载文件
nmcli:管理网络
uri:与WEB服务交互
语法:
ansible bgx -m command -a 'df -h'
命令 主机名称 指定模块 模块名称 模块动作 具体命令
执行的状态返回信息:
绿色:执行成功并且不需要做改变的动作
黄色:执行成功并且对目标主机做变更
红色:执行失败
常用模块
案例1:user

临时命令使用user模块来确保newbie用户存在于node1.example.com上,并且其UID为4000
[galaxy@server ~]$ ansible server1 -m user -a 'name=newbie uid=4000 state=present'
创建用户并指定密码,如果该用户存在,仍然修改密码
[galaxy@server ~]$ openssl passwd -1 linux
$1$bChlQ4jX$97x50MlATs0PA6UsObqN1.
[galaxy@server ~]$ ansible all -m user -a 'name=chenyu state=present password="$1$bChlQ4jX$97x50MlATs0PA6UsObqN1." update_password=always'
创建用户并指定密码,但是如果改用户存在,则不修改密码
[galaxy@server ~]$ openssl passwd -1 redhat
$1$zcVeWQiB$dIsAdkcv91mTjrCaayN3F/
[galaxy@server ~]$ ansible all -m user -a 'name=chenyu12 state=present password="$1$zcVeWQiB$dIsAdkcv91mTjrCaayN3F/" update_password=on_create'
案例2:shell
临时命令使用shell模块来删除node1.example.com节点中的用户newbie
ansible server1 -m shell -a ‘userdel -r newbie’
案例3:copy
ansible webserver -m copy -a ‘src=/etc/fstab dest=/var/tmp/fstab’
ansible webserver -m copy -a ‘src=/etc/fstab dest=/var/tmp/fstab group=chenyu owner=chenyu’

案例4:template模块---template模块用法和copy模块用法基本一致,它主要用于复制配置文件
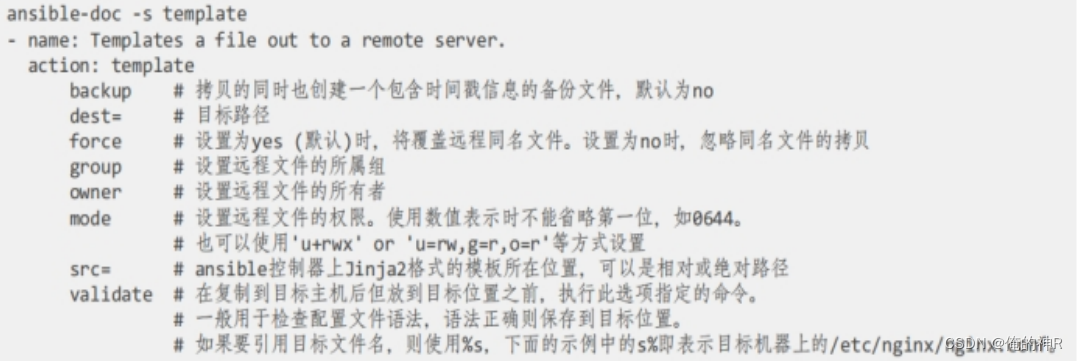
ansible all -m template -a 'src=/usr/share/doc/httpd/httpd-vhosts.conf dest=/etc/httpd/conf.d/httpd-vhosts.conf group=root owner=root mode=0644 '
案例5:file
修改文件的权限属性和context值
ansible webserver -m file -a 'path=/var/tmp/fstab mode=g+w mode=o+w group=galaxy owner=galaxy setype=samba_share_t'
mode:设置权限可以是mode=g+w 也可以是mode=666
group:设置文件的所属组
owner:设置文件的所有者
setype:修改文件的context值
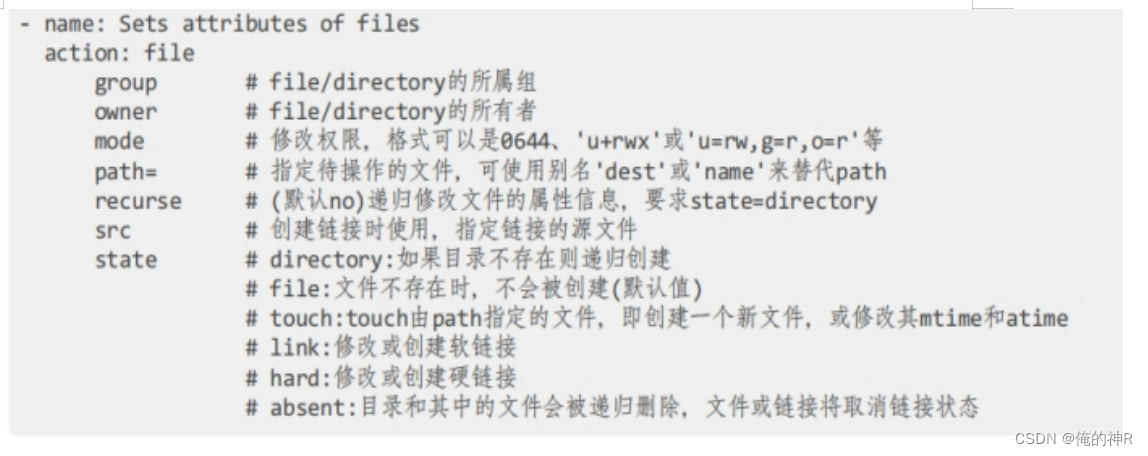
新建文件
ansible webserver -m file -a 'path=/var/tmp/bbb state=touch'
新建目录
ansible webserver -m file -a 'path=/var/tmp/cc state=directory'
删除文件或者目录
ansible webserver -m file -a 'path=/var/tmp/cc state=absent'
创建软链接
ansible webserver -m file -a 'dest=/var/tmp/chenyu src=/var/tmp/bbb state=link'
创建硬链接
ansible webserver -m file -a 'dest=/var/tmp/chenyu1 src=/var/tmp/aaa state=hard'
案例6:lineinfile
把abc开头的一行换成 bbbbb
ansible webserver -m lineinfile -a 'dest=/tmp/cy regexp=abc line=bbbbb'
在某一行前面插入一行新数据---insertbefore
ansible webserver -m lineinfile -a 'dest=/tmp/cy insertbefore="aa(.*)" line=chenyu'
在某一行后面插入一行新数据---insertafter
ansible webserver -m lineinfile -a 'dest=/tmp/cy insertafter="aaaa(.*)" line=bbbb'
删除某一行
ansible webserver -m lineinfile -a 'dest=/tmp/cy regexp="aaa(.*)" state=absent'
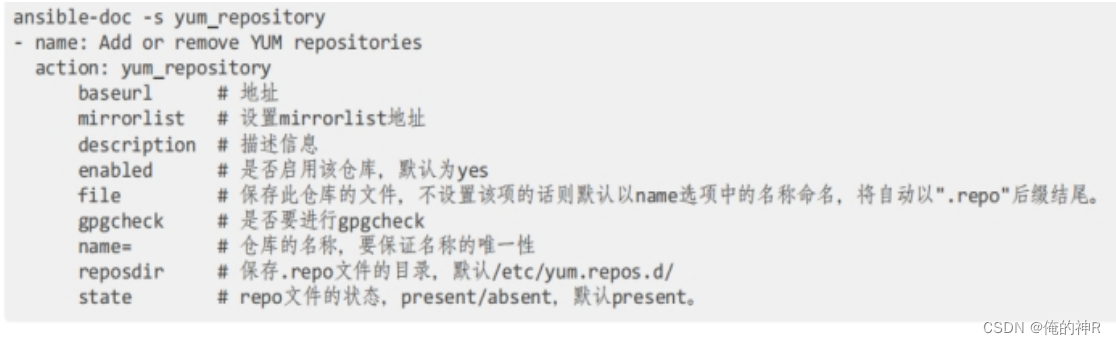
案例7:yum_repository模块-----配置yum仓库
ansible webserver -m yum_repository -a 'file=server name=baseos description=rhel8 baseurl=file:///mnt/BaseOS enabled=yes gpgcheck=no'
ansible webserver -m yum_repository -a 'file=server name=appstream description=RHEL8 baseurl=file:///mnt/AppStream enabled=yes gpgcheck=no'
案例8:yum模块----yum安装与卸载
state:present、installed、latest安装
absent、removed卸载
ansible all -m yum -a 'name=httpd state=installed' ----------------安装
ansible all -m yum -a 'name=httpd state=removed' ----------------卸载

案例9:service模块

重启httpd服务并设置下次启动生效
ansible all -m service -a 'name=httpd state=started enabled=yes'
案例10:fetch—拉取文件模块
和copy工作方式类似,只不过是从远程主机将文件拉取到本地端,存储时使用主机名作为目录树,且只能拉取文件,不能拉取目录

将远程主机的/etc/fstab文件拉取到本地来,存储的名字为/tmp/node1(node2)/etc/fstab
ansible all -m fetch -a 'src=/etc/fstab dest=/tmp'
将某台远程主机的/etc/fstab文件拉取到本地来,存储的名字为/tmp/fstab
ansible node1 -m fetch -a 'src=/etc/fstab dest=/tmp/ flat=yes'
将远程主机的/etc/fstab文件拉取到本地来,存储的名字为/tmp/fstab-node1(node2)
ansible all -m fetch -a 'src=/etc/fstab dest=/tmp/fstab-{{inventory_hostname}} flat=yes'
案例11:firewalld模块
允许http流量的传入
ansible all -m firewalld -a 'service=http permanent=yes state=enabled immediate=yes'
富规则 允许172.16.30.0/24主机http流量的传入
ansible all -m firewalld -a ‘zone=public rich_rule="rule family=ipv4 source address=172.16.30.0/24 service name=http accept" permanent=yes state=enabled immediate=yes'
案例12:replace模块
replace模块可以根据我们指定的正则表达式替换文件中的字符串,文件中所有被匹配的字符串都会被替换
参数:
path参数:2.3版本之前只能用dest、destfile、name指定操作文件,2.4版本中仍然可以用这些参数名,也可以用path
regexp参数:必须参数,指定一个python正则表达式,文件中与正则匹配的字符串将会被替换
replace参数:指定最终要替换成的字符串
backup参数:是否在修改文件之前对文件进行备份,最好设置为yes。
将/tmp/cy文件中的“abc”替换成“yyy”
ansible all -m replace -a 'path=/tmp/cy regexp="abc" replace="yyy"'
将/tmp/cy文件中的“yyy”替换成“iii”,且把替换前的/tmp/cy文件备份
ansible all -m replace -a 'path=/tmp/cy regexp="yyy" replace="iii" backup=yes'
案例13:parted模块
新建扩展分区
ansible node1 -m parted -a 'device=/dev/sda number=4 part_type=extended part_start=46GiB part_end=49.8GiB state=present'
新建逻辑分区ansible node1 -m parted -a 'device=/dev/sda number=5 part_type=logical part_start=46.1GiB part_end=48.2GiB state=present'
案例14:filesystem—文件系统
ansible node1 -m filesystem -a 'fstype=xfs dev=/dev/sda5'
案例15:mount---挂载
新建挂载点/common
ansible node1 -m file -a 'path=/common state=directory'
查看/dev/sda5的UUID
ansible node1 -m shell -a 'blkid /dev/sda5'
将分区/dev/sda5挂载到/common目录
ansible node1 -m mount -a 'path=/common src="UUID=d162b8b9-2326-4ee4-a559-80861461c4f0" fstype=xfs state=mounted'
卸载
ansible node1 -m mount -a 'path=/common src="UUID=d162b8b9-2326-4ee4-a559-80861461c4f0" fstype=xfs state=absent'
案例16:lvg—新建卷组
ansible node1 -m lvg -a 'vg=vg0 pesize=16M pvs=/dev/sda5'
案例17:lvol—新建逻辑卷
ansible node1 -m lvol -a 'lv=lv0 size=1000M vg=vg0'
在线扩容逻辑卷
ansible node1 -m lvol -a 'lv=lv0 size=1600M vg=vg0 resizefs=yes'
案例18:sefcontext---修改context值
ansible node1 -m file -a 'path=/share state=directory'
修改context值
ansible node1 -m sefcontext -a 'target="/share(/.*)?" setype=samba_share_t state=present'
应用新的selinux 文件的context值
ansible node1 -m command -a 'restorecon -irv /share'
案例19:debug
用户输出自定义的信息,类似于echo、print等输出命令。ansible中的debug主要用于输出变量值、表达式值,以及用于when条件判断时。使用方式非常简单

案例20:cron---计划任务模块

ansible node1 -m cron -a 'name="shuchu" job="/bin/echo I AM RHCE" user=root minute=0 hour=14 state=present'
案例21:get_url

注意:dest为目录时或者force=yes时,总是会下载文件到临时存放的目录中,只不过不一定会替换旧文件。只有force=no(默认)且dest是一个文件时,在文件已存在时才不会下载文件
语法:ansible node1 -m get_url -a 'url=需要下载的文件 dest=存放的位置'


 1086
1086


 被折叠的 条评论
为什么被折叠?
被折叠的 条评论
为什么被折叠?
 到【灌水乐园】发言


