1、进入阿里云官网
https://www.aliyun.com/
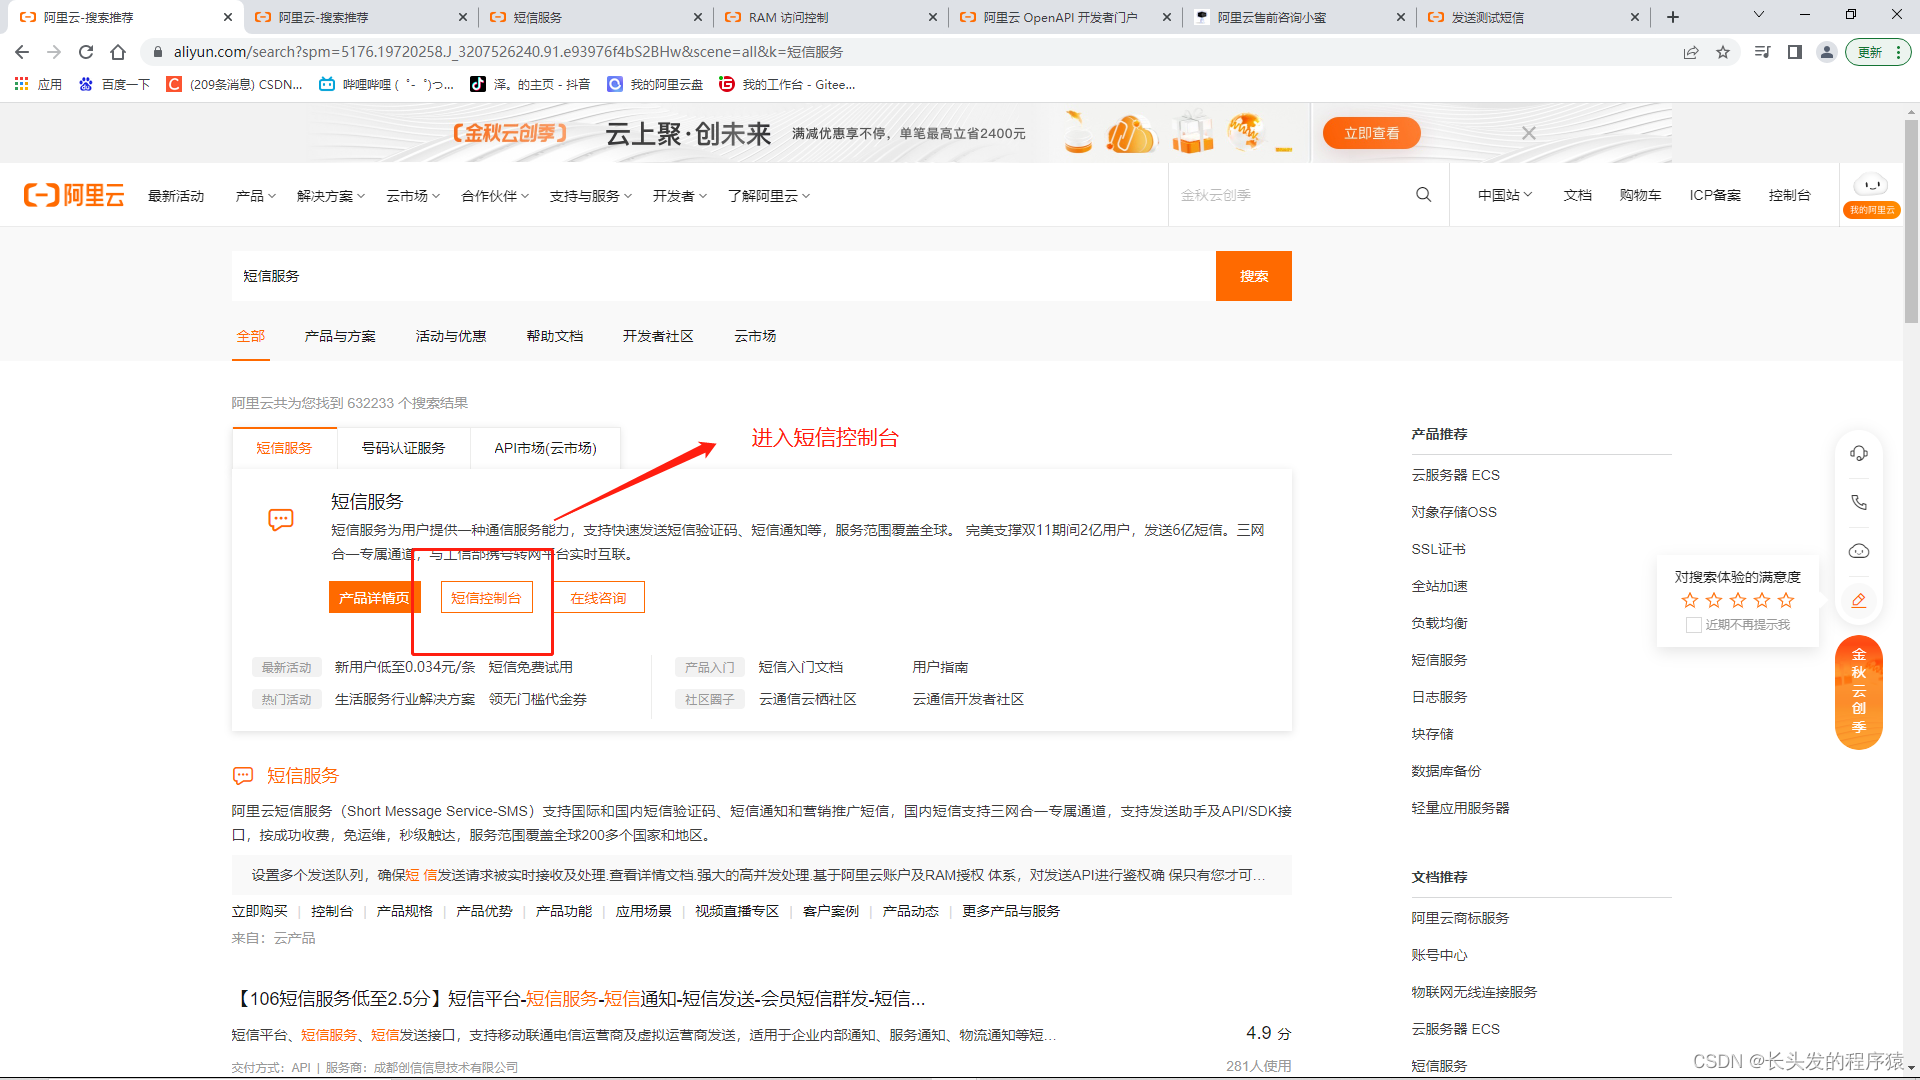
2、搜索短信服务

3、进入短信控制台
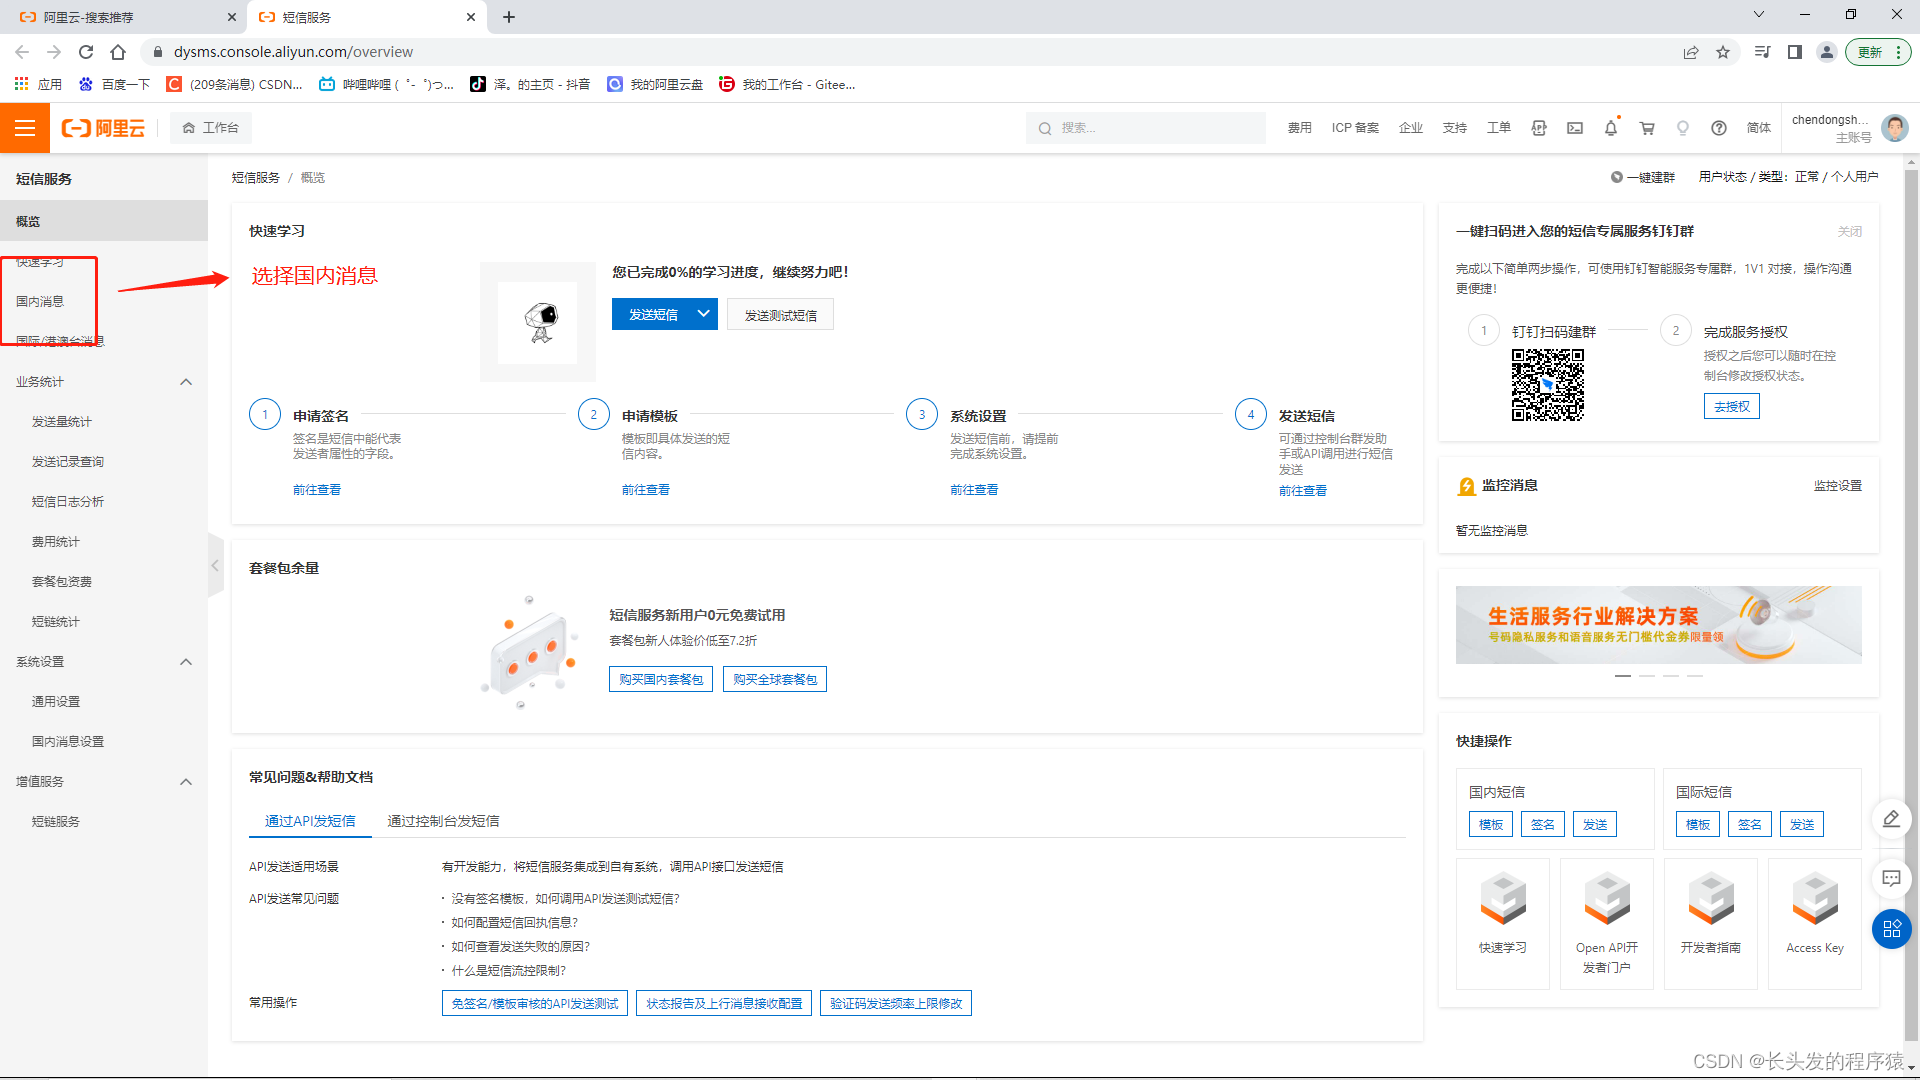
4、选择国内消息
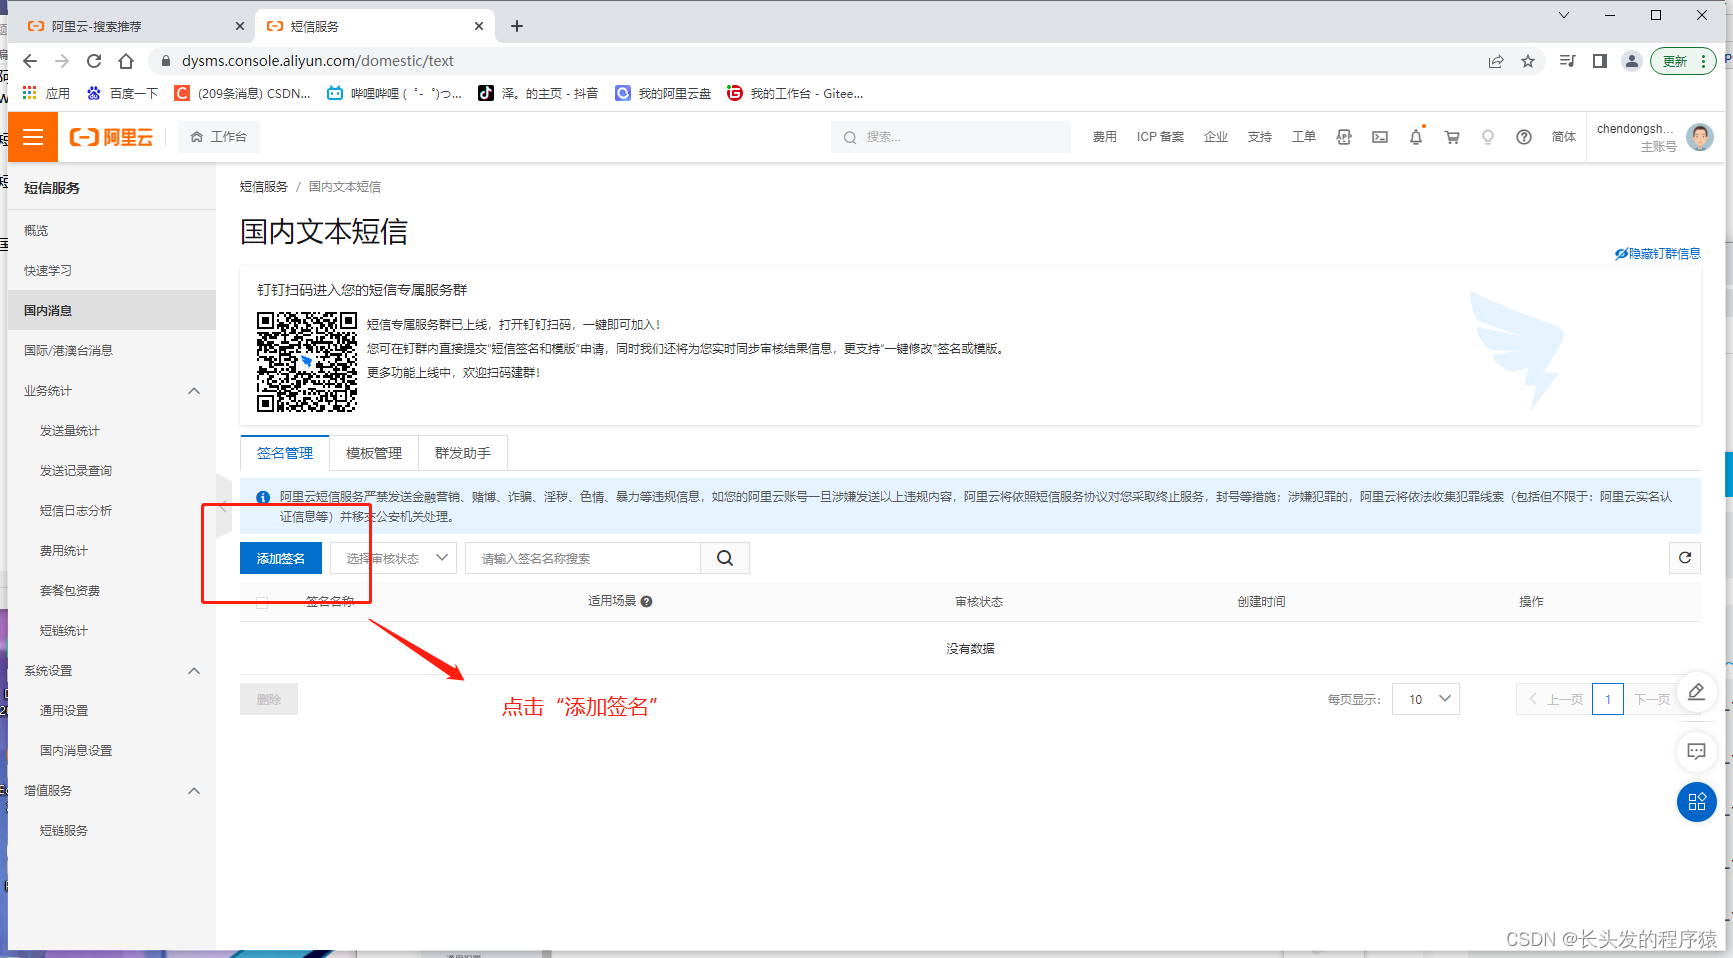
5、点击添加签名
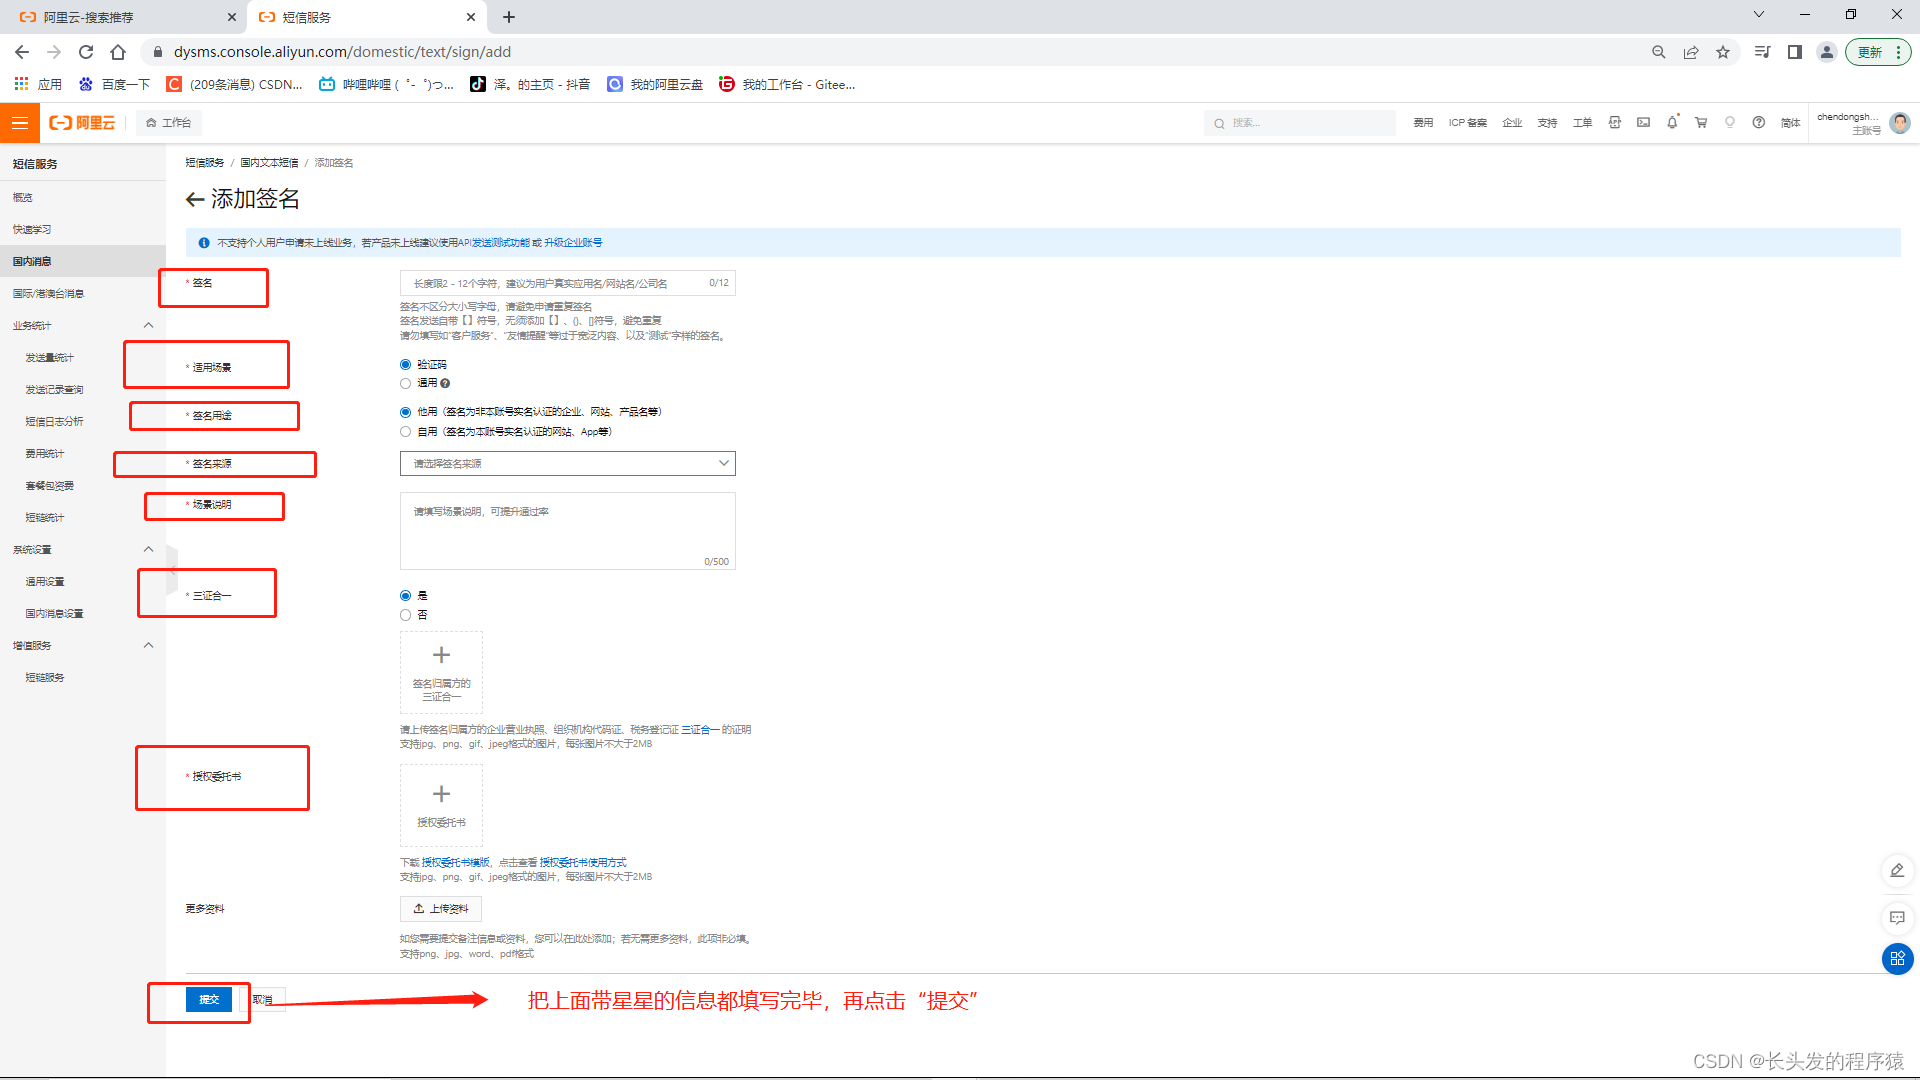
6、输入相关信息,点击提交

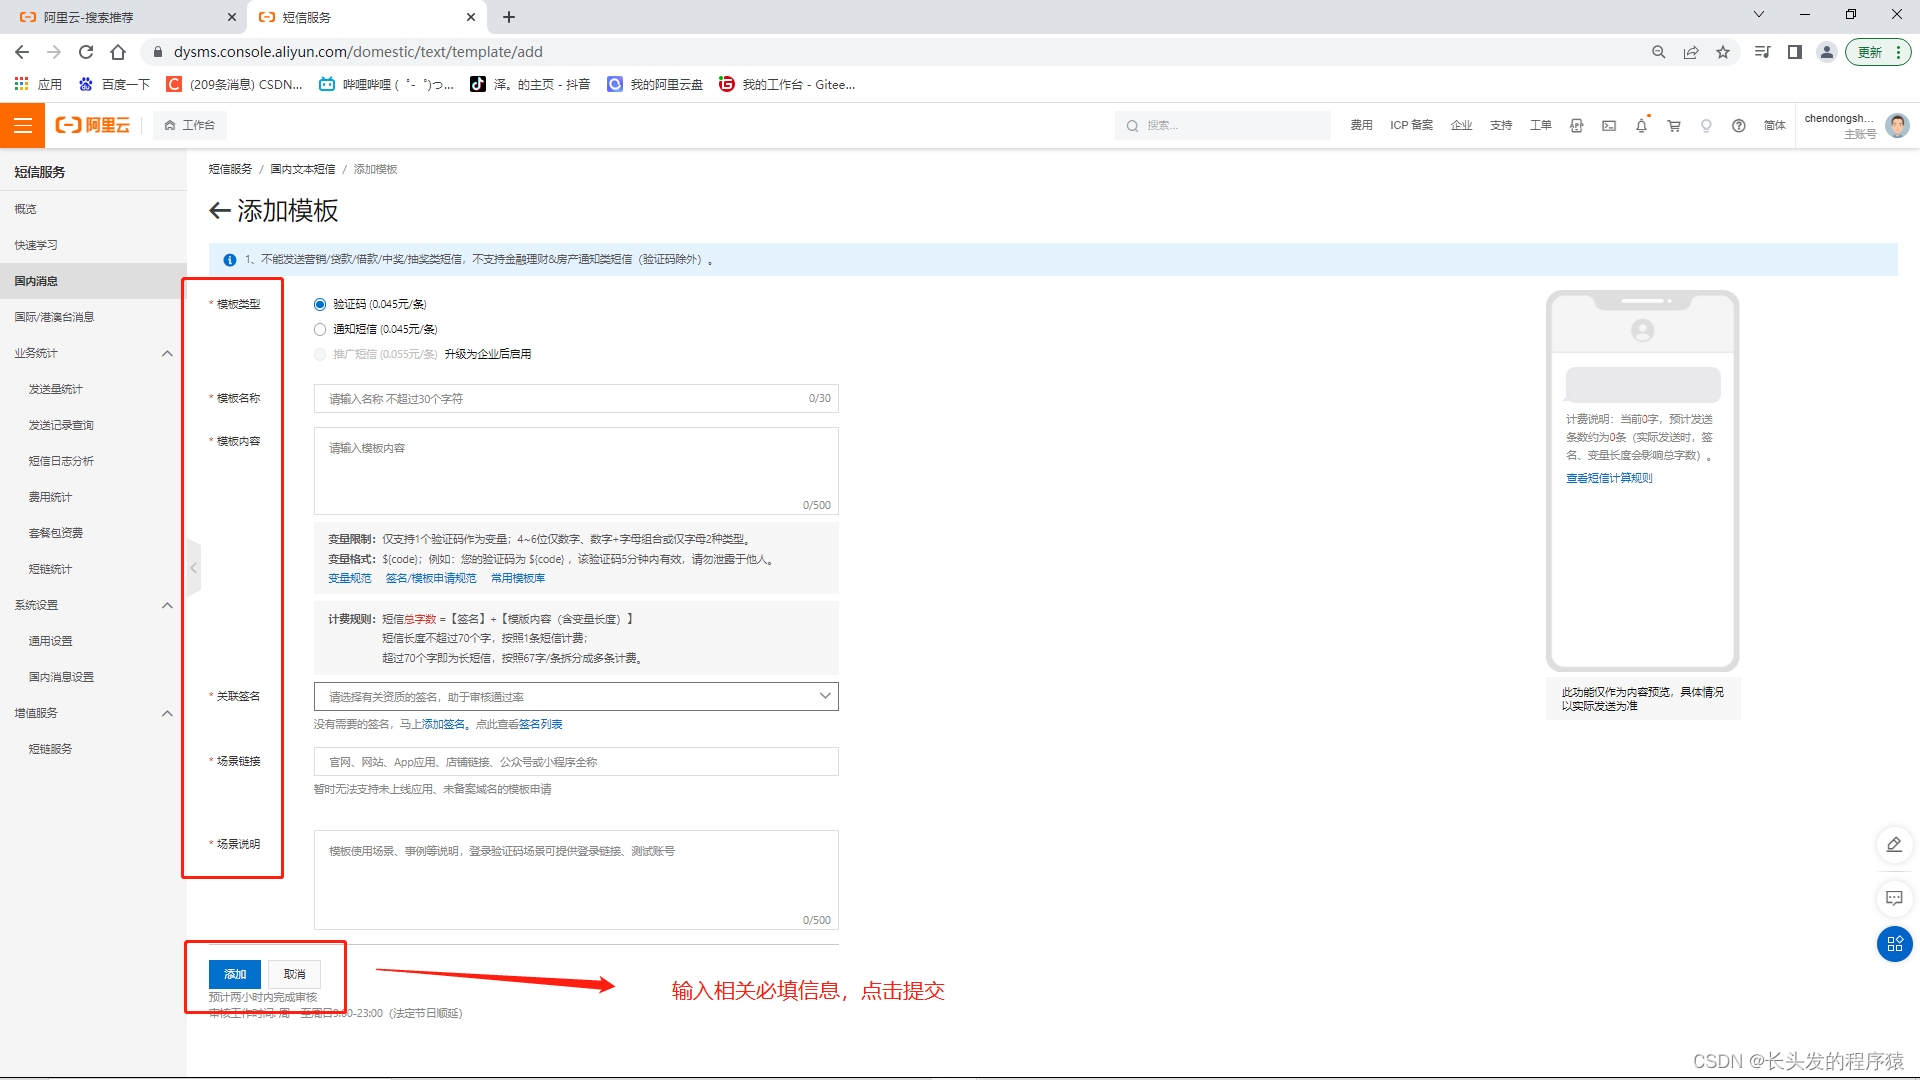
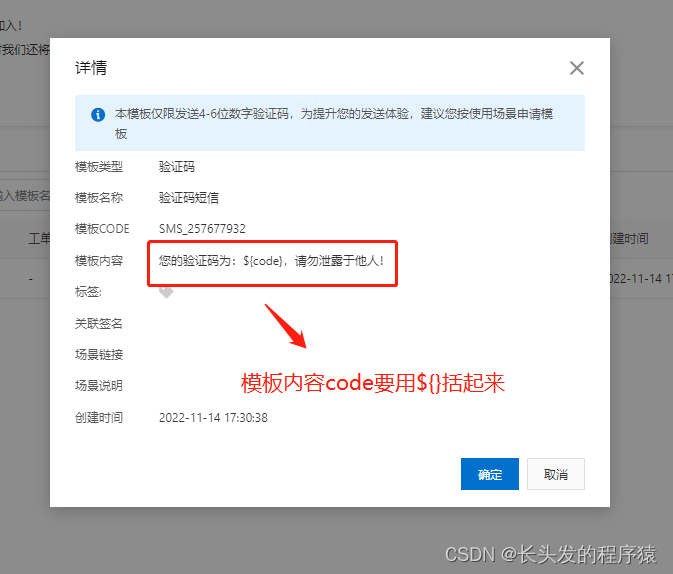
7、点击模块管理,选择添加模块
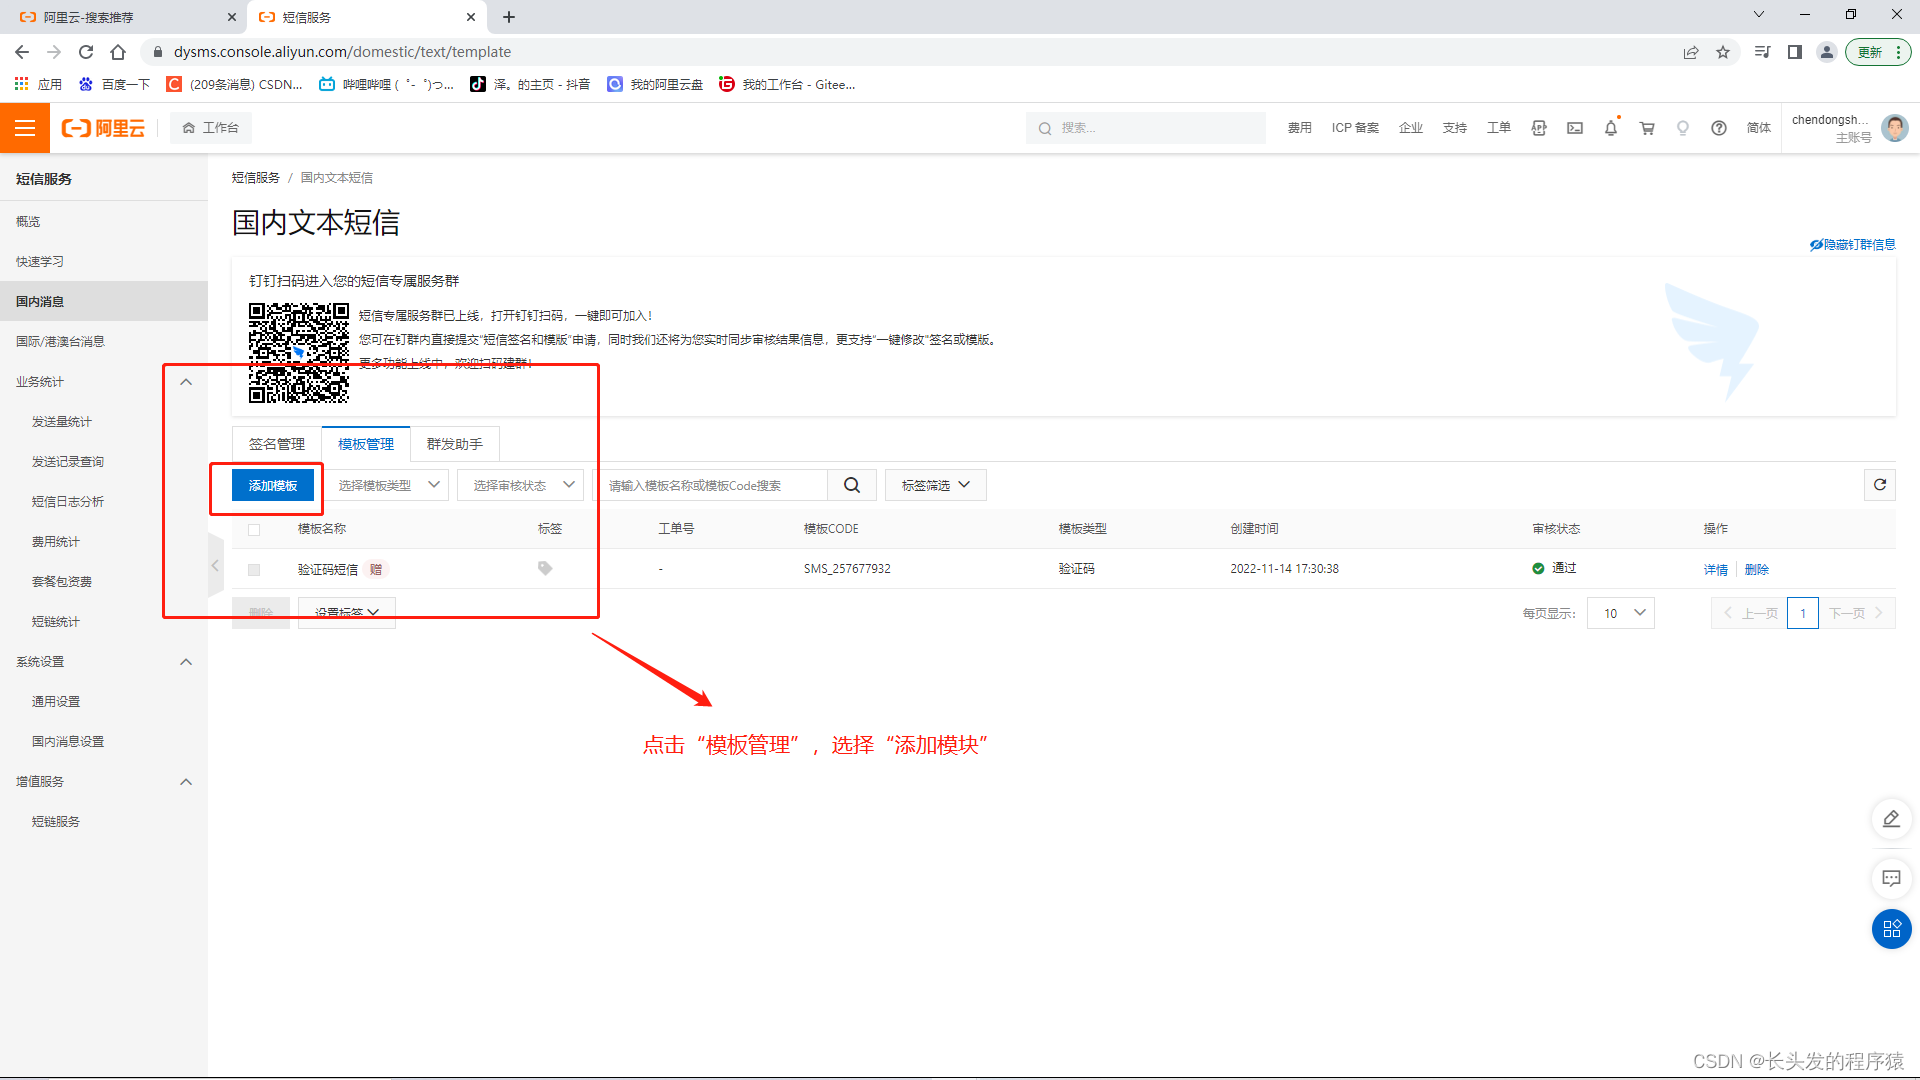
8、输入相关信息,点击提交
9、鼠标放在头像上,点击下拉框中的AccessKey管理

10、点击创建AccessKey
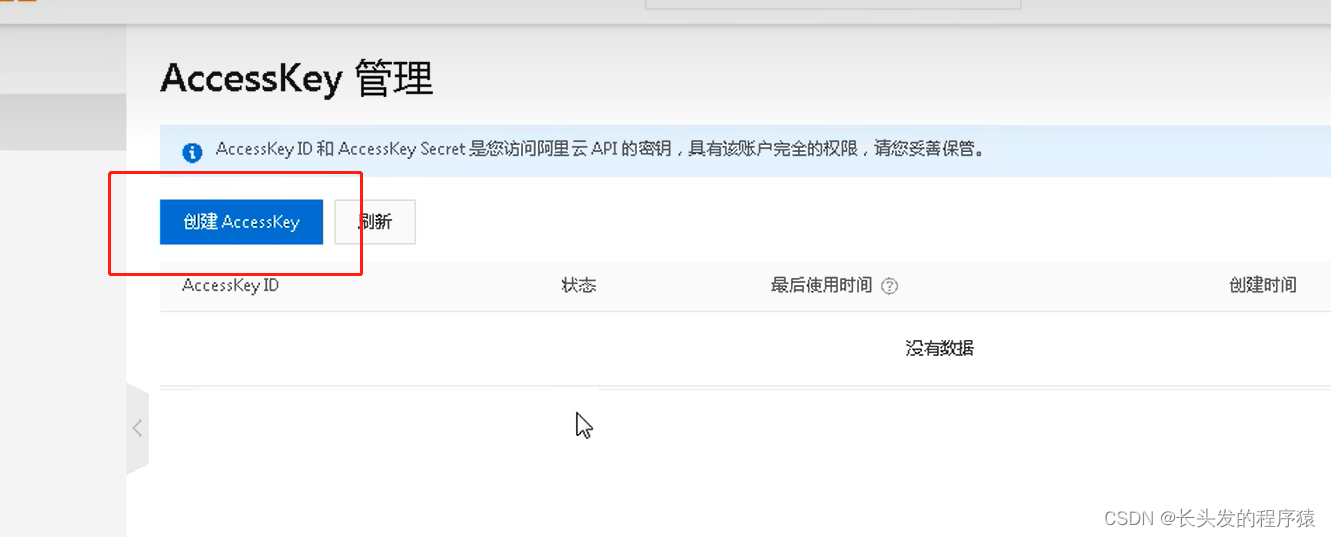
11、输入验证码
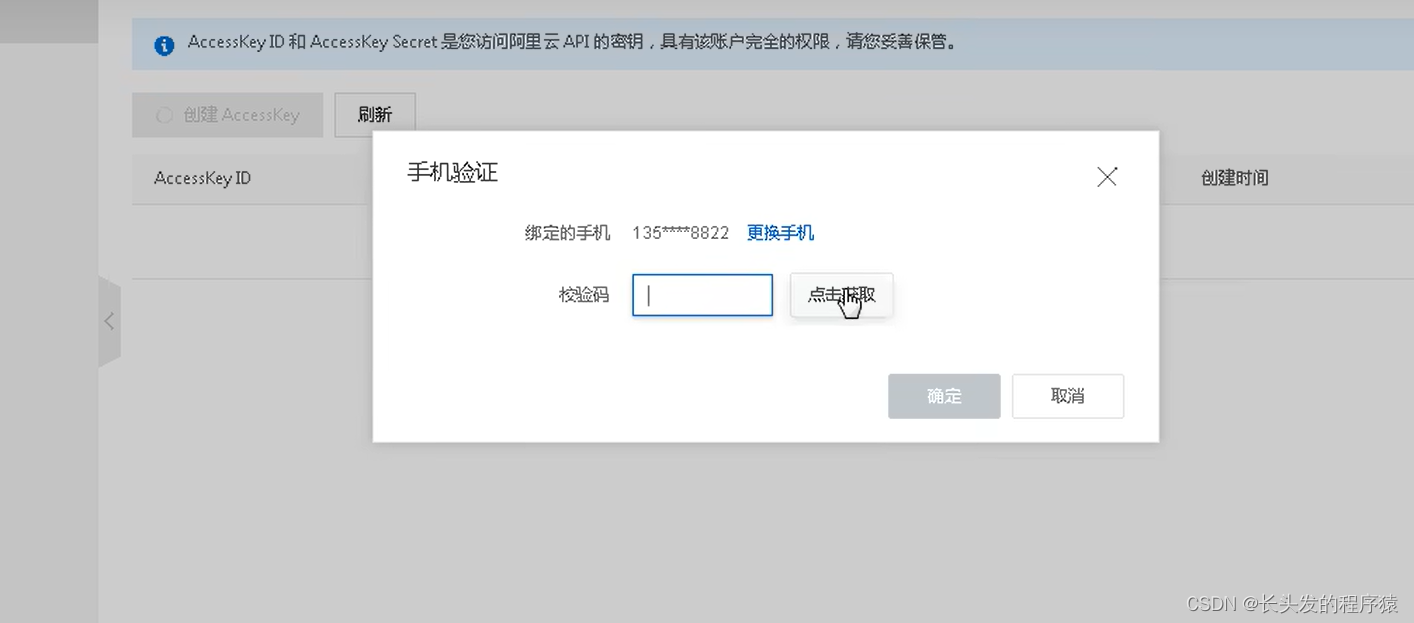
12、创建成功,两串字符串复制一下

13、pom.xml中引入阿里云相关依赖,还有redis的依赖
<dependency>
    <groupId>com.aliyun</groupId>
    <artifactId>aliyun-java-sdk-core</artifactId>
    <version>4.5.16</version>
</dependency>

<dependency>
    <groupId>org.springframework.boot</groupId>
    <artifactId>spring-boot-starter-data-redis</artifactId>
</dependency>
14、配置application.properties(不是微服务项目就不要加nacos了)
# 服务端口
server.port=8204
# 服务名
spring.application.name=service-msm

#返回json的全局时间格式
spring.jackson.date-format=yyyy-MM-dd HH:mm:ss
spring.jackson.time-zone=GMT+8

# redis配置
spring.redis.host=192.168.44.165
spring.redis.port=6379
spring.redis.database= 0
spring.redis.timeout=1800000
spring.redis.lettuce.pool.max-active=20
spring.redis.lettuce.pool.max-wait=-1
# 最大阻塞等待时间(负数表示没限制)
spring.redis.lettuce.pool.max-idle=5
spring.redis.lettuce.pool.min-idle=0

# nacos服务地址
spring.cloud.nacos.discovery.server-addr=127.0.0.1:8848

aliyun.sms.regionId=default
# 第12步复制的两串字符串
aliyun.sms.accessKeyId=LT6I0Y5633pX89qC
aliyun.sms.secret=jX8D04Dm12I3gGKj345FYSzu0fq8mT

15、添加启动类
//取消数据源自动配置,因为application.properties配置文件中没有配置数据库
//如果application.properties配置文件中配置了数据库,“(exclude = DataSourceAutoConfiguration.class)”就不用加了
@SpringBootApplication(exclude = DataSourceAutoConfiguration.class)
@EnableDiscoveryClient
public class ServiceMsmApplication {
   public static void main(String[] args) {
      SpringApplication.run(ServiceMsmApplication.class, args);
   }
}
16、配置网关(不是微服务项目就不用写这一步)
spring.cloud.gateway.routes[3].id=service-msm
#设置路由的uri
spring.cloud.gateway.routes[3].uri=lb://service-msm
#设置路由断言,代理servicerId为auth-service的/auth/路径
spring.cloud.gateway.routes[3].predicates= Path=/*/msm/**
17、添加阿里云短信服务配置类
import org.springframework.beans.factory.InitializingBean;
import org.springframework.beans.factory.annotation.Value;
import org.springframework.stereotype.Component;

@Component
public class ConstantPropertiesUtils implements InitializingBean {

    //对应application.properties配置文件中的aliyun.sms.regionId=default
    @Value("${aliyun.sms.regionId}")
    private String regionId;

    //对应application.properties配置文件中的aliyun.sms.accessKeyId=LT6I0Y5633pX89qC
    @Value("${aliyun.sms.accessKeyId}")
    private String accessKeyId;

    //对应application.properties配置文件中的aliyun.sms.secret=jX8D04Dm12I3gGKj345FYSzu0fq8mT
    @Value("${aliyun.sms.secret}")
    private String secret;

    public static String REGION_Id;
    public static String ACCESS_KEY_ID;
    public static String SECRECT;

    @Override
    public void afterPropertiesSet() throws Exception {
        REGION_Id=regionId;
        ACCESS_KEY_ID=accessKeyId;
        SECRECT=secret;
    }
}
18、添加redis配置类(如果项目中redis已经有配置类了,就不用再添加了)
import com.fasterxml.jackson.annotation.JsonAutoDetect;
import com.fasterxml.jackson.annotation.PropertyAccessor;
import com.fasterxml.jackson.databind.ObjectMapper;
import org.springframework.cache.CacheManager;
import org.springframework.cache.annotation.EnableCaching;
import org.springframework.cache.interceptor.KeyGenerator;
import org.springframework.context.annotation.Bean;
import org.springframework.context.annotation.Configuration;
import org.springframework.data.redis.cache.RedisCacheConfiguration;
import org.springframework.data.redis.cache.RedisCacheManager;
import org.springframework.data.redis.connection.RedisConnectionFactory;
import org.springframework.data.redis.core.RedisTemplate;
import org.springframework.data.redis.serializer.Jackson2JsonRedisSerializer;
import org.springframework.data.redis.serializer.RedisSerializationContext;
import org.springframework.data.redis.serializer.RedisSerializer;
import org.springframework.data.redis.serializer.StringRedisSerializer;

import java.lang.reflect.Method;
import java.time.Duration;

@Configuration
@EnableCaching
public class RedisConfig {

    /**
     * 自定义key规则
     * @return
     */
    @Bean
    public KeyGenerator keyGenerator() {
        return new KeyGenerator() {
            @Override
            public Object generate(Object target, Method method, Object... params) {
                StringBuilder sb = new StringBuilder();
                sb.append(target.getClass().getName());
                sb.append(method.getName());
                for (Object obj : params) {
                    sb.append(obj.toString());
                }
                return sb.toString();
            }
        };
    }

    /**
     * 设置RedisTemplate规则
     * @param redisConnectionFactory
     * @return
     */
    @Bean
    public RedisTemplate<Object, Object> redisTemplate(RedisConnectionFactory redisConnectionFactory) {
        RedisTemplate<Object, Object> redisTemplate = new RedisTemplate<>();
        redisTemplate.setConnectionFactory(redisConnectionFactory);
        Jackson2JsonRedisSerializer jackson2JsonRedisSerializer = new Jackson2JsonRedisSerializer(Object.class);

        //解决查询缓存转换异常的问题
        ObjectMapper om = new ObjectMapper();
        // 指定要序列化的域,field,get和set,以及修饰符范围,ANY是都有包括private和public
        om.setVisibility(PropertyAccessor.ALL, JsonAutoDetect.Visibility.ANY);
        // 指定序列化输入的类型,类必须是非final修饰的,final修饰的类,比如String,Integer等会跑出异常
        om.enableDefaultTyping(ObjectMapper.DefaultTyping.NON_FINAL);
        jackson2JsonRedisSerializer.setObjectMapper(om);

        //序列号key value
        redisTemplate.setKeySerializer(new StringRedisSerializer());
        redisTemplate.setValueSerializer(jackson2JsonRedisSerializer);
        redisTemplate.setHashKeySerializer(new StringRedisSerializer());
        redisTemplate.setHashValueSerializer(jackson2JsonRedisSerializer);

        redisTemplate.afterPropertiesSet();
        return redisTemplate;
    }

    /**
     * 设置CacheManager缓存规则
     * @param factory
     * @return
     */
    @Bean
    public CacheManager cacheManager(RedisConnectionFactory factory) {
        RedisSerializer<String> redisSerializer = new StringRedisSerializer();
        Jackson2JsonRedisSerializer jackson2JsonRedisSerializer = new Jackson2JsonRedisSerializer(Object.class);

        //解决查询缓存转换异常的问题
        ObjectMapper om = new ObjectMapper();
        om.setVisibility(PropertyAccessor.ALL, JsonAutoDetect.Visibility.ANY);
        om.enableDefaultTyping(ObjectMapper.DefaultTyping.NON_FINAL);
        jackson2JsonRedisSerializer.setObjectMapper(om);

        // 配置序列化(解决乱码的问题),过期时间600秒
        RedisCacheConfiguration config = RedisCacheConfiguration.defaultCacheConfig()
                .entryTtl(Duration.ofSeconds(600))
                .serializeKeysWith(RedisSerializationContext.SerializationPair.fromSerializer(redisSerializer))
                .serializeValuesWith(RedisSerializationContext.SerializationPair.fromSerializer(jackson2JsonRedisSerializer))
                .disableCachingNullValues();

        RedisCacheManager cacheManager = RedisCacheManager.builder(factory)
                .cacheDefaults(config)
                .build();
        return cacheManager;
    }
}
19、添加验证码自动生成工具类
import java.text.DecimalFormat;
import java.util.ArrayList;
import java.util.HashMap;
import java.util.List;
import java.util.Random;

public class RandomUtil {

    private static final Random random = new Random();

    private static final DecimalFormat fourdf = new DecimalFormat("0000");

    private static final DecimalFormat sixdf = new DecimalFormat("000000");

    public static String getFourBitRandom() {
        return fourdf.format(random.nextInt(10000));
    }

    public static String getSixBitRandom() {
        return sixdf.format(random.nextInt(1000000));
    }

    /**
     * 给定数组,抽取n个数据
     * @param list
     * @param n
     * @return
     */
    public static ArrayList getRandom(List list, int n) {

        Random random = new Random();

        HashMap<Object, Object> hashMap = new HashMap<Object, Object>();

        // 生成随机数字并存入HashMap
        for (int i = 0; i < list.size(); i++) {

            int number = random.nextInt(100) + 1;

            hashMap.put(number, i);
        }

        // 从HashMap导入数组
        Object[] robjs = hashMap.values().toArray();

        ArrayList r = new ArrayList();

        // 遍历数组并打印数据
        for (int i = 0; i < n; i++) {
            r.add(list.get((int) robjs[i]));
            System.out.print(list.get((int) robjs[i]) + "\t");
        }
        System.out.print("\n");
        return r;
    }
}
20、开发阿里云发送短信接口
20.1、Controller层:
import com.hospital.common.result.Result;
import com.hospital.msm.service.MsmService;
import com.hospital.msm.utils.RandomUtil;
import org.apache.commons.lang.StringUtils;
import org.springframework.beans.factory.annotation.Autowired;
import org.springframework.data.redis.core.RedisTemplate;
import org.springframework.web.bind.annotation.GetMapping;
import org.springframework.web.bind.annotation.PathVariable;
import org.springframework.web.bind.annotation.RequestMapping;
import org.springframework.web.bind.annotation.RestController;

import java.util.concurrent.TimeUnit;

@RestController
@RequestMapping("/api/msm")
public class MsmApiController {

    @Autowired
    private MsmService msmService;

    @Autowired
    private RedisTemplate<String,String> redisTemplate;

    /**
     * 发送手机验证码
     * @param phone
     * @return
     */
    @GetMapping("/send/{phone}")
    public Result sendCode(@PathVariable String phone){
        //从redis中获取验证码,如果获取到,返回ok
        //key:手机号,value:验证码
        String code = redisTemplate.opsForValue().get(phone);
        if (!StringUtils.isEmpty(code)){
            return Result.ok();
        }

        //如果从redis中获取不到,就自己生成验证码
        code = RandomUtil.getSixBitRandom();

        //通过调用service方法,整合阿里云短信服务进行发送
        boolean isSend = msmService.send(phone,code);

        //如果阿里云短信服务发送成功就给isSend返回为true
        //然后把生成的验证码放到redis里面,并设置过期时间
        if(isSend){
            //超过两分钟,验证码就失效了
            redisTemplate.opsForValue().set(phone,code,2, TimeUnit.MINUTES);
            return Result.ok();
        }else {
            return Result.fail().message("发送短信失败!!!");
        }
    }
}
20.2、Service层:
public interface MsmService {
    //阿里云短信服务发送手机验证码
    boolean send(String phone, String code);
}
20.3、Service实现层:
import com.alibaba.fastjson.JSONObject;
import com.aliyuncs.CommonRequest;
import com.aliyuncs.CommonResponse;
import com.aliyuncs.DefaultAcsClient;
import com.aliyuncs.IAcsClient;
import com.aliyuncs.exceptions.ClientException;
import com.aliyuncs.exceptions.ServerException;
import com.aliyuncs.http.MethodType;
import com.aliyuncs.profile.DefaultProfile;
import com.hospital.msm.service.MsmService;
import com.hospital.msm.utils.ConstantPropertiesUtils;
import org.apache.commons.lang.StringUtils;
import org.springframework.stereotype.Service;

import java.util.HashMap;
import java.util.Map;

@Service
public class MsmServiceImpl implements MsmService {

    /**
     * 阿里云短信服务发送手机验证码
     * @param phone
     * @param code
     * @return
     */
    @Override
    public boolean send(String phone, String code) {
        //判断手机号是否为空
        if (StringUtils.isEmpty(phone)){
            return false;
        }

        //传入ConstantPropertiesUtils配置类中从application.properties配置文件中获取的三个值
        DefaultProfile profile = DefaultProfile.
                getProfile(ConstantPropertiesUtils.REGION_Id,
                        ConstantPropertiesUtils.ACCESS_KEY_ID,
                        ConstantPropertiesUtils.SECRECT);
        IAcsClient client = new DefaultAcsClient(profile);
        CommonRequest request = new CommonRequest();
        //request.setProtocol(ProtocolType.HTTPS);  //发送的协议如果是https就不注释
        request.setMethod(MethodType.POST); //这一行是固定的
        request.setDomain("dysmsapi.aliyuncs.com"); //这一行是固定的
        request.setVersion("2017-05-25");   //这一行是固定的
        request.setAction("SendSms");   //这一行是固定的

        //手机号
        request.putQueryParameter("PhoneNumbers", phone);
        //签名名称
        request.putQueryParameter("SignName", "我的谷粒在线教育网站");
        //模板code
        request.putQueryParameter("TemplateCode", "SMS_257677932");
        //验证码  使用json格式   {"code":"123456"}
        Map<String,Object> param = new HashMap();
        param.put("code",code);
        request.putQueryParameter("TemplateParam", JSONObject.toJSONString(param));

        //调用方法进行短信发送
        try {
            CommonResponse response = client.getCommonResponse(request);
            System.out.println(response.getData());
            return response.getHttpResponse().isSuccess();
        } catch (ServerException e) {
            e.printStackTrace();
        } catch (ClientException e) {
            e.printStackTrace();
        }

        //失败就返回false
        return false;
    }
}
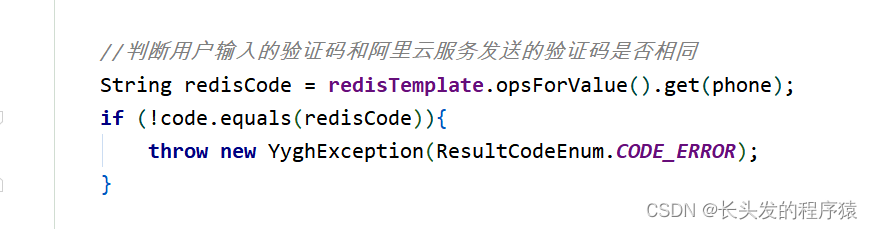
21、登录接口判断用户输入的验证码和阿里云服务发送的验证码是否相同


 309
309


 被折叠的 条评论
为什么被折叠?
被折叠的 条评论
为什么被折叠?
 到【灌水乐园】发言


