


1.简单demo:
在项目中有的时候通常会使用多线程的方式来达到异步执行的效果,而Spring提供了一个使用注解的方式来达到多线程异步执行方法的效果,下面给出使用案例:
首先需要在配置类上加上@EnableAsync注解,表示开启异步:
@ComponentScan("com.atlx")
@Configuration
@EnableAsync
public class AppConfig {

}
其次在方法上加上@Async注解即可达到该方法异步执行的效果:
@Component
public class PcsService {
    @Async
    public void test(){
        System.out.println("test pcs ~~");
    }
}
2.原理分析:
首先从开启异步注解@EnableAsync分析,进入这个注解的内部实现,发现它通过@Import注解导入了一个类:AsyncConfigurationSelector:
@Target(ElementType.TYPE)
@Retention(RetentionPolicy.RUNTIME)
@Documented
@Import(AsyncConfigurationSelector.class)
public @interface EnableAsync {

}
跟进这个类:
public class AsyncConfigurationSelector extends AdviceModeImportSelector<EnableAsync> {

	private static final String ASYNC_EXECUTION_ASPECT_CONFIGURATION_CLASS_NAME =
			"org.springframework.scheduling.aspectj.AspectJAsyncConfiguration";


	/**
	 * Returns {@link ProxyAsyncConfiguration} or {@code AspectJAsyncConfiguration}
	 * for {@code PROXY} and {@code ASPECTJ} values of {@link EnableAsync#mode()},
	 * respectively.
	 */
	@Override
	@Nullable
	public String[] selectImports(AdviceMode adviceMode) {
		switch (adviceMode) {
			case PROXY:
				return new String[] {ProxyAsyncConfiguration.class.getName()};
			case ASPECTJ:
				return new String[] {ASYNC_EXECUTION_ASPECT_CONFIGURATION_CLASS_NAME};
			default:
				return null;
		}
	}

}
发先它是AdviceModeImportSelector的一个子类,而它的父类也就是AdviceModeImportSelector实现了ImportSelector并且重写了selectImports()方法,这里我就不详细解释了,我直接告诉大家这里他会直接进入switch()的第一个case 也就是PROXY,而在第一个case中,它return了一个类为:ProxyAsyncConfiguration(这个类也会被当作配置类来解析,这是Spring的知识点)。
下面直接进入这个类,看看具体的实现:
@Configuration(proxyBeanMethods = false)
@Role(BeanDefinition.ROLE_INFRASTRUCTURE)
public class ProxyAsyncConfiguration extends AbstractAsyncConfiguration {

	@Bean(name = TaskManagementConfigUtils.ASYNC_ANNOTATION_PROCESSOR_BEAN_NAME)
	@Role(BeanDefinition.ROLE_INFRASTRUCTURE)
	public AsyncAnnotationBeanPostProcessor asyncAdvisor() {
		Assert.notNull(this.enableAsync, "@EnableAsync annotation metadata was not injected");
		AsyncAnnotationBeanPostProcessor bpp = new AsyncAnnotationBeanPostProcessor();
		bpp.configure(this.executor, this.exceptionHandler);
		Class<? extends Annotation> customAsyncAnnotation = this.enableAsync.getClass("annotation");
		if (customAsyncAnnotation != AnnotationUtils.getDefaultValue(EnableAsync.class, "annotation")) {
			bpp.setAsyncAnnotationType(customAsyncAnnotation);
		}
		bpp.setProxyTargetClass(this.enableAsync.getBoolean("proxyTargetClass"));
		bpp.setOrder(this.enableAsync.<Integer>getNumber("order"));
		return bpp;
	}

}在这个类中它往Spring容器中添加了一个bean对象即:AsyncAnnotationBeanPostProcessor,其他的就是设置一些基本信息,显然核心就是这个类。
下面进入这个类,看看它的继承关系:
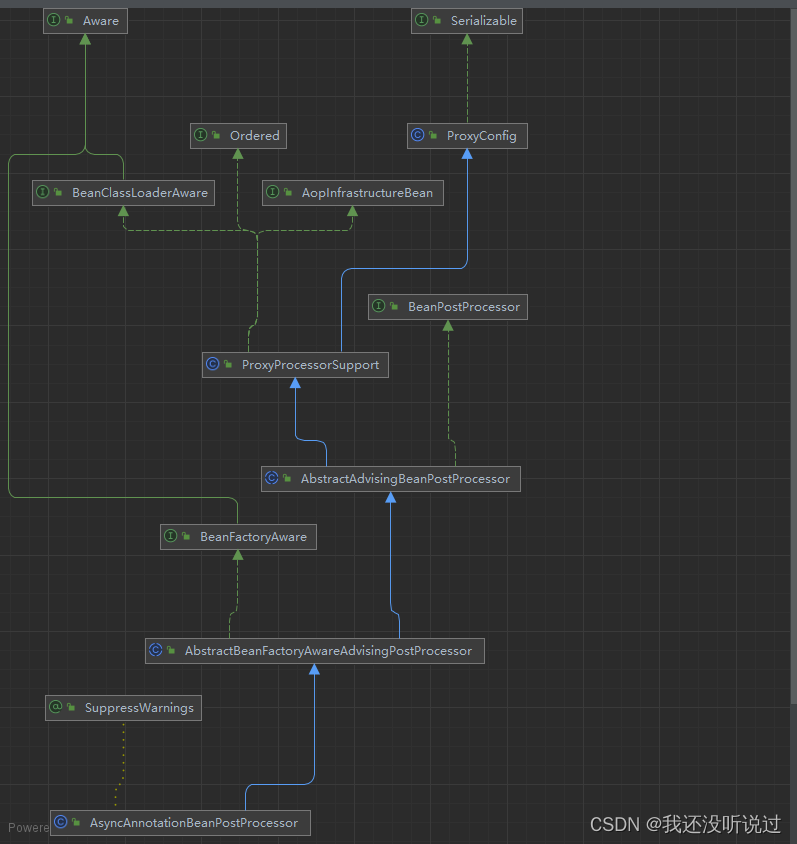
显然AsyncAnnotationBeanPostProcessor继承了AbstractBeanFactoryAwareAdvisingPostProcessor,而AbstractBeanFactoryAwareAdvisingPostProcessor继承了AbstractAdvisingBeanPostProcessor,而AbstractAdvisingBeanPostProcessor实现了BeanPostProcessor,那么就直接说明了AsyncAnnotationBeanPostProcessor就是一个BeanPostProcessor。
既然是一个BeanPostProcessor那么自然就跟Aop联系了,自然能够想到Spring通过注解实现异步处理是基于Aop来实现的,那么只需要找到对应的后置处理逻辑和代理逻辑即可明白它底层的实现。
Spring实现Aop,首先是需要对应的Advisor,里面就包含了对应的pointCut和advice,其中pointCut就是对应的切点,advice对应了代理的逻辑(这里对于SpringAop我就不详细讲述了,如果感兴趣可在评论区留言,我出一篇关于Aop原理的文章)。
找对应的advisor:
通过上面的类关系图可知,AsyncAnnotationBeanPostProcessor它还是实现了BeanFactoryAware,那么自然就会重写对应的setBeanFactory()方法,而对应的advisor逻辑就是在这个方法中添加的,下面看具体源码实现:
	@Override
	public void setBeanFactory(BeanFactory beanFactory) {
		super.setBeanFactory(beanFactory);

		AsyncAnnotationAdvisor advisor = new AsyncAnnotationAdvisor(this.executor, this.exceptionHandler);
		if (this.asyncAnnotationType != null) {
			advisor.setAsyncAnnotationType(this.asyncAnnotationType);
		}
		advisor.setBeanFactory(beanFactory);
		this.advisor = advisor;
	}
这里它就是创建了一个AsyncAnnotationAdvisor对象,进入这个对象,找到对应的构造方法,添加pointCut和advice都是在这个构造方法中添加的:
	public AsyncAnnotationAdvisor(
			@Nullable Supplier<Executor> executor, @Nullable Supplier<AsyncUncaughtExceptionHandler> exceptionHandler) {

		Set<Class<? extends Annotation>> asyncAnnotationTypes = new LinkedHashSet<>(2);
		asyncAnnotationTypes.add(Async.class);
		try {
			asyncAnnotationTypes.add((Class<? extends Annotation>)
					ClassUtils.forName("javax.ejb.Asynchronous", AsyncAnnotationAdvisor.class.getClassLoader()));
		}
		catch (ClassNotFoundException ex) {
			// If EJB 3.1 API not present, simply ignore.
		}
		this.advice = buildAdvice(executor, exceptionHandler);
		this.pointcut = buildPointcut(asyncAnnotationTypes);
	}
先来看添加的advice,即下面这行代码:
this.advice = buildAdvice(executor, exceptionHandler);逻辑就在:buildAdvice(executor, exceptionHandler)这个方法中,进入该方法:
	protected Advice buildAdvice(
			@Nullable Supplier<Executor> executor, @Nullable Supplier<AsyncUncaughtExceptionHandler> exceptionHandler) {

		AnnotationAsyncExecutionInterceptor interceptor = new AnnotationAsyncExecutionInterceptor(null);
		interceptor.configure(executor, exceptionHandler);
		return interceptor;
}发现它创建了一个AnnotationAsyncExecutionInterceptor对象,也就是一个MethodInterceptor,
那么只需要找得对应的invoke()方法即可找到对应的代理逻辑了(SpringAop知识):
而invoke()方法就在它的父类中:
	@Override
	@Nullable
	public Object invoke(final MethodInvocation invocation) throws Throwable {
		Class<?> targetClass = (invocation.getThis() != null ? AopUtils.getTargetClass(invocation.getThis()) : null);
		Method specificMethod = ClassUtils.getMostSpecificMethod(invocation.getMethod(), targetClass);
		final Method userDeclaredMethod = BridgeMethodResolver.findBridgedMethod(specificMethod);

		AsyncTaskExecutor executor = determineAsyncExecutor(userDeclaredMethod);
		if (executor == null) {
			throw new IllegalStateException(
					"No executor specified and no default executor set on AsyncExecutionInterceptor either");
		}

		Callable<Object> task = () -> {
			try {
				Object result = invocation.proceed();
				if (result instanceof Future) {
					return ((Future<?>) result).get();
				}
			}
			catch (ExecutionException ex) {
				handleError(ex.getCause(), userDeclaredMethod, invocation.getArguments());
			}
			catch (Throwable ex) {
				handleError(ex, userDeclaredMethod, invocation.getArguments());
			}
			return null;
		};

		return doSubmit(task, executor, invocation.getMethod().getReturnType());
	}
到这其实就能够明白了,它底层就是创建了一个任务,在这个任务中调用了我们需要执行的方法,并且通过doSubmit()方法将任务提交给线程,从而实现异步执行。
在看添加的pointcut,执行下面这行代码:
this.pointcut = buildPointcut(asyncAnnotationTypes);逻辑就在buildPointcut(asyncAnnotationTypes);方法中:
	protected Pointcut buildPointcut(Set<Class<? extends Annotation>> asyncAnnotationTypes) {
		ComposablePointcut result = null;
		for (Class<? extends Annotation> asyncAnnotationType : asyncAnnotationTypes) {
			Pointcut cpc = new AnnotationMatchingPointcut(asyncAnnotationType, true);
			Pointcut mpc = new AnnotationMatchingPointcut(null, asyncAnnotationType, true);
			if (result == null) {
				result = new ComposablePointcut(cpc);
			}
			else {
				result.union(cpc);
			}
			result = result.union(mpc);
		}
		return (result != null ? result : Pointcut.TRUE);
	}
这里简单理解就是找出加了@Async注解的方法。
至此adivce和pointCut都添加完了。
找对应的后置处理逻辑:
既然是一个beanPostProcessor,那么自然就会实现对应的postProcessAfterInitialization()方法,而对应的后置处理逻辑即在这个方法中:
	@Override
	public Object postProcessAfterInitialization(Object bean, String beanName) {
		if (this.advisor == null || bean instanceof AopInfrastructureBean) {
			// Ignore AOP infrastructure such as scoped proxies.
			return bean;
		}

		if (bean instanceof Advised) {
			Advised advised = (Advised) bean;
			if (!advised.isFrozen() && isEligible(AopUtils.getTargetClass(bean))) {
				// Add our local Advisor to the existing proxy's Advisor chain...
				if (this.beforeExistingAdvisors) {
					advised.addAdvisor(0, this.advisor);
				}
				else {
					advised.addAdvisor(this.advisor);
				}
				return bean;
			}
		}

		if (isEligible(bean, beanName)) {
			ProxyFactory proxyFactory = prepareProxyFactory(bean, beanName);
			if (!proxyFactory.isProxyTargetClass()) {
				evaluateProxyInterfaces(bean.getClass(), proxyFactory);
			}
			proxyFactory.addAdvisor(this.advisor);
			customizeProxyFactory(proxyFactory);

			// Use original ClassLoader if bean class not locally loaded in overriding class loader
			ClassLoader classLoader = getProxyClassLoader();
			if (classLoader instanceof SmartClassLoader && classLoader != bean.getClass().getClassLoader()) {
				classLoader = ((SmartClassLoader) classLoader).getOriginalClassLoader();
			}
			return proxyFactory.getProxy(classLoader);
		}

		// No proxy needed.
		return bean;
	}
处理的大概逻辑是按照对象是否为代理对象分为两段:
如果是代理对象的话:
		if (bean instanceof Advised) {
			Advised advised = (Advised) bean;
			if (!advised.isFrozen() && isEligible(AopUtils.getTargetClass(bean))) {
				// Add our local Advisor to the existing proxy's Advisor chain...
				if (this.beforeExistingAdvisors) {
					advised.addAdvisor(0, this.advisor);
				}
				else {
					advised.addAdvisor(this.advisor);
				}
				return bean;
			}
		}
那么就不需要创建了代理对象了,只需要看当前的这个对象是不是满足pointCut,也就是当前的这个对象里面的方法有没有加@Async注解,如果加了,那么就表示当前这个对象里面的方法需要代理拦截,那么就添加advisor即可。
如果不是代理对象的话:
		if (isEligible(bean, beanName)) {
			ProxyFactory proxyFactory = prepareProxyFactory(bean, beanName);
			if (!proxyFactory.isProxyTargetClass()) {
				evaluateProxyInterfaces(bean.getClass(), proxyFactory);
			}
			proxyFactory.addAdvisor(this.advisor);
			customizeProxyFactory(proxyFactory);

			// Use original ClassLoader if bean class not locally loaded in overriding class loader
			ClassLoader classLoader = getProxyClassLoader();
			if (classLoader instanceof SmartClassLoader && classLoader != bean.getClass().getClassLoader()) {
				classLoader = ((SmartClassLoader) classLoader).getOriginalClassLoader();
			}
			return proxyFactory.getProxy(classLoader);
		}
那么需要创建代理对象,设置advisor,返回代理对象,当执行到加了@Async注解的方法时就会进入invoke()代理逻辑。
至此它底层的原理就分析完了。
3.使用注意点:
当在使用@Async注解的时候,会将方法封装为一个任务提交:
	@Nullable
	protected Object doSubmit(Callable<Object> task, AsyncTaskExecutor executor, Class<?> returnType) {
		if (CompletableFuture.class.isAssignableFrom(returnType)) {
			return CompletableFuture.supplyAsync(() -> {
				try {
					return task.call();
				}
				catch (Throwable ex) {
					throw new CompletionException(ex);
				}
			}, executor);
		}
		else if (ListenableFuture.class.isAssignableFrom(returnType)) {
			return ((AsyncListenableTaskExecutor) executor).submitListenable(task);
		}
		else if (Future.class.isAssignableFrom(returnType)) {
			return executor.submit(task);
		}
		else {
			executor.submit(task);
			return null;
		}
	}
最终执行的就是executor.submit(task)方法,在提交方法的时候它这里有一个策略:
策略就是提交给不同的执行器来执行当前的任务,而在默认的情况下,该任务不会直接提交给线程池,而是提交给SimpleAsyncTaskExecutor,即简单执行器,它的话就是直接new Thread来执行这个任务:
	protected void doExecute(Runnable task) {
		Thread thread = (this.threadFactory != null ? this.threadFactory.newThread(task) : createThread(task));
		thread.start();
	}
这样的话如果在生产中这样使用,很可能就会导致资源紧张,所以还是需要使用线程池:
根据它上面的执行器策略,有线程池的方式,但是需要程序员自己配置,下面给个案例:
首先设置线程池,这里的参数就当案例给的,不是实际生产。
@Configuration
public class AsyncConfig implements AsyncConfigurer {

    @Bean(name = "taskExecutor")
    public Executor taskExecutor() {
        ThreadPoolTaskExecutor executor = new ThreadPoolTaskExecutor();
        executor.setCorePoolSize(5);
        executor.setMaxPoolSize(10);
        executor.setQueueCapacity(25);
        executor.setThreadNamePrefix("Async-");
        executor.initialize();
        return executor;
    }

    @Override
    public Executor getAsyncExecutor() {
        return taskExecutor();
    }

}
当需要使用的时候,直接在Async注解中添加上线程池的beanName即可:
@Component
public class PcsService {


    @Async("taskExecutor")
    public void test(){
        System.out.println("test pcs ~~");
    }
}
这样当提交任务的时候,底层使用到的策略就是线程池的方式。


 1358
1358


 被折叠的 条评论
为什么被折叠?
被折叠的 条评论
为什么被折叠?
 到【灌水乐园】发言


