


文章目录
1.什么是jsp
jsp的全称是java server pages。Java的服务器页面,它的主要作用是代替Servlet程序回传HTML页面的数据。因为Servlet程序回传HTML页面数据是一件非常繁琐的事情,开发和维护成本都很高。
jsp和html页面一样,都是存放在web目录下,访问也跟html页面一样
jsp页面本质上是一个Servlet程序。当我们第一次访问JSP页面时,Tomcat服务器会帮我们把JSP页面翻译成为一个java文件,并且对它进行编译成为.class字节码程序。
2.JSP的page指令和常用脚本
我们先创建一个JSP文件,命名为b.jsp,代码如下
<%@ page contentType="text/html;charset=UTF-8" language="java" %>
<html>
<head>
    <title>Title</title>
</head>
<body>
    b.jsp页面
 </body>
 </html>
jsp头部的page指令:可以修改JSP页面中一些重要的属性或者行为
<%@ page contentType="text/html;charset=UTF-8" language="java" %>
常用属性:
1.language		表示jsp翻译后是什么语言文件,暂时只支持java
2.contentType		表示jsp返回的数据类型是什么
3.pageEncoding		表示当前jsp页面文件本身的字符集
4.import		用于导包,导类
---------用于out输出流-----------
5.autoFlush		设置当out输出流缓冲区满了之后,是否自动刷新缓冲区,默认值是true
6.buffer		设置out缓冲区的大小,默认为8kb
--------------------------------
7.errorPage		设置当jsp页面运行时出错,自动跳转去的路径,这个路径一般以斜杆打头,它表示请求地址为http://ip:port/工程路径/
e.g
<%@ page errorPage="/error.jsp" %>
8.isErrorPage		设置当前jsp页面是否是错误页面,默认为false,如果是true可以获取异常信息
9.session		设置当前jsp页面是否会创建HttpSession对象,默认是true
10.extends		设置jsp翻译出来的java类默认继承谁
声明脚本:
格式:
<%! 声明java代码 %>
作用:可以给jsp翻译出来的java类定义属性和方法甚至是静态代码块,内部类等。
<body>
    b.jsp页面
    <%!
        private Integer id;
        private String name;
        private static Map<String,Object>map;
    %>
    <%!
    static{
        map=new HashMap<String,Object>();
        map.put("key1","value1");
        map.put("key2","value2");
        map.put("key3","value3");
     }
    %>
    <%!
        public int abc(){
            return 12;
        }
    %>
    <%!
        public static class A{
            private Integer id=12;
            private String abc="abc";
        }
    %>
 </body>
3.表达式脚本
格式:<%表达式%>
作用:在jsp页面上输出数据
 <%= 12%><br>
    <%=12.12%><br>
    <%="我是字符串"%><br>
特点:
1.所有表达式脚本都会被翻译到_jspService方法中
2.表达式脚本都会被翻译成为out.print()输出到页面上
3.由于表达式脚本翻译的内容都在jspService()方法中,所以_jspService()方法中的对象都可以直接使用
4.表达式脚本中的表达式不能以分号结束
4.代码脚本和注释
格式:<% java语句 %>
作用:可以在jsp页面中编写我们自己需要的功能(java语句)
    <%
        int i=12;
        if(i==12)
            System.out.println("hello");
        else
            System.out.println("world");
    %>
    <%
        for(int j=0;j<10;j++)
            System.out.println(j);
    %>
    <%
        String username=request.getParameter("username");
        System.out.println("用户名的请求参数值是:"+username);
    %>
结果

特点:
1.代码脚本翻译之后都在_jspService方法中
2.代码脚本由于翻译到_jspService方法中,所以在_jspService()方法中的现有对象都可以直接使用
3.还可以由多个代码脚本组合完成一个完整的Java语句
4.代码脚本还可以和表达式脚本一起使用,如
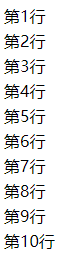
<table>
    <%
        for(int j=0;j<10;j++){
    %>
      <tr>
                <td>第<%=j+1%>行</td>
      </tr>
    <%}%>
    </table>
结果如下
jsp的三种注释
1.html注释
<!--这是html注释-->
2.java注释
//单行java注释
/*多行java注释*/
3.jsp注释
<%--这是jsp注释--%>
jsp注释可以注释掉jsp页面中所有代码
5.jsp九大内置对象和四大域对象
jsp九大内置对象
jsp中的内置对象,值Tomcat在翻译jsp页面成为Servlet源代码后,内部提供的九大对象,叫内置对象
1.request 		请求对象
2.response		响应对象
3.pageContext		jsp上下文对象
4.session		会话对象
5.application		ServletContext对象
6.config		ServletConfig对象
7.out		jsp输出流对象
8.page		指向当前jsp的对象
9.exception		异常对象
jsp四大域对象
四个域对象分别是:
pageContext(PageContext类)	当前jsp页面范围内有效
request(HttpServletRequest类)	一次请求内有效
session(HttpSession类)	一个会话范围有效(打开浏览器访问服务器,直到关闭服务器)
application(ServletContext类)	整个web工程访问内都有效,只有web工程不停止,数据都在
域对象是可以像Map一样存取数据的对象,四个域对象功能一样,不同的是他们对数据的存取范围
我们先创建一个scope.jsp,代码如下
<%@ page contentType="text/html;charset=UTF-8" language="java" %>
<html>
<head>
    <title>Title</title>
</head>
<body>
    <h1>scope.jsp页面</h1>
    <%
    //往四个域中分别保存了数据
        pageContext.setAttribute("key","pageContext");
        request.setAttribute("key","request");
        session.setAttribute("key","session");
        application.setAttribute("key","application");
    %>
    pageContext域是否有值:<%=pageContext.getAttribute("key")%><br>
    request域是否有值:<%=request.getAttribute("key")%><br>
    session域是否有值:<%=session.getAttribute("key")%><br>
    application域是否有值:<%=application.getAttribute("key")%><br>
</body>
</html>
结果如下

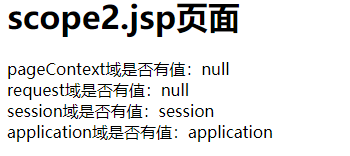
我们创建一个scope2.jsp,代码如下
<%@ page contentType="text/html;charset=UTF-8" language="java" %>
<html>
<head>
    <title>Title</title>
</head>
<body>
    <h1>scope2.jsp页面</h1>
    pageContext域是否有值:<%=pageContext.getAttribute("key")%><br>
    request域是否有值:<%=request.getAttribute("key")%><br>
    session域是否有值:<%=session.getAttribute("key")%><br>
    application域是否有值:<%=application.getAttribute("key")%><br>
</body>
</html>
然后在scope.jsp的代码后面再添加一行代码,进行转发
 <%
        request.getRequestDispatcher("/scope2.jsp").forward(request,response);
    %>
结果如下:

接着我们在浏览栏输入定位到scope2.jsp,结果如下
虽然四个域对象都可以存取数据,但是使用有优先顺序,从小到大的顺序
pageContext==>>request==>>session==>>application
因为存取数据也会占用内存,所以要从小到大
6.jsp中的out输出和response.getWriter输出
response中表示响应,经常用于设置返回给客户端的内容(输出)
out也是给用户做输出使用的
我们创建一个output.jsp,代码内容如下:
<%@ page contentType="text/html;charset=UTF-8" language="java" %>
<html>
<head>
<title>Title</title>
</head>
<body>
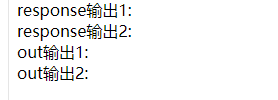
<%
response.getWriter().write("response输出1:<br>");
response.getWriter().write("response输出2:<br>");
out.write("out输出1:<br>");
out.write("out输出2:<br>");
%>
</body>
</html>
结果如下:
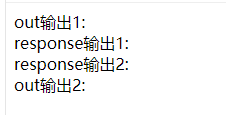
我们修改output.jsp,调换输出顺序
<%@ page contentType="text/html;charset=UTF-8" language="java" %>
<html>
<head>
    <title>Title</title>
</head>
<body>
    <%
      out.write("out输出1:<br>");
       out.write("out输出2:<br>");
        response.getWriter().write("response输出1:<br>");
        response.getWriter().write("response输出2:<br>");

    %>
</body>
</html>
发现结果一样,都是下图:
当jsp页面中所有代码执行完毕后,会做以下两个操作:
1.执行out.flush()操作,把out缓冲区中的数据追加到response缓冲区末尾
2.会执行response的刷新操作,把全部数据写给客户端
我们修改一下output.jsp,代码如下
<%@ page contentType="text/html;charset=UTF-8" language="java" %>
<html>
<head>
    <title>Title</title>
</head>
<body>
    <%
      out.write("out输出1:<br>");
      out.flush();
       out.write("out输出2:<br>");
        response.getWriter().write("response输出1:<br>");
        response.getWriter().write("response输出2:<br>");

    %>
</body>
</html>
结果如下:
由于jsp翻译之后,底层源代码都是使用out来进行输出,所以一般情况下,我们在jsp页面中统一使用out来进行输出,避免打乱页面输出内容的顺序
我们再修改代码如下:
<%@ page contentType="text/html;charset=UTF-8" language="java" %>
<html>
<head>
    <title>Title</title>
</head>
<body>
    <%
        out.write(12);
        out.print(12);
    %>
</body>
</html>
结果如下:
out.write()输出字符没有问题
out.print()输出任意数据都没有问题(都转换称为字符串后调用write输出)
在jsp页面中,我们统一使用out.print()输出
7.jsp常用标签
a)jsp静态包含
我们在webapp目录下创建一个include目录,include目录下创建一个main.jsp和一个footer.jsp
main.jsp代码如下:
<%@ page contentType="text/html;charset=UTF-8" language="java" %>
<html>
<head>
<title>Title</title>
</head>
<body>
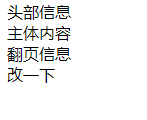
头部信息<br>
主体内容<br>
<%--
<%@ include file=""%>就是静态包含
file属性指定你要包含的jsp页面的路径
地址中第一个斜杆/表示http://ip:port/工程路径/ 映射到代码的web目录
静态包含的特点:
1.静态包含不会翻译被包含的jsp页面
2.静态包含其实是把被包含的jsp页面代码拷贝到包含的位置执行输出
--%>
<%@ include file="/include/footer.jsp"%>
</body>
</html>
footer.jsp代码如下:
<%@ page contentType="text/html;charset=UTF-8" language="java" %>
<html>
<head>
    <title>Title</title>
</head>
<body>
    翻页信息<br>
    改一下
</body>
</html>
运行Tomcat,定位到main.jsp,结果如下:

我们修改footer.jsp的body内容
<body>
    翻页信息<br>
    改一下<br>
</body>
结果如下:
静态包含语法:
<%@ include file=""%>
file属性指定你要包含的jsp页面的路径
地址中第一个斜杆/表示http://ip:port/工程路径/ 映射到代码的web目录
静态包含的特点:
1.静态包含不会翻译被包含的jsp页面
2.静态包含其实是把被包含的jsp页面代码拷贝到包含的位置执行输出
b)动态包含
我们修改main.jsp的代码如下:
<%@ page contentType="text/html;charset=UTF-8" language="java" %>
<html>
<head>
    <title>Title</title>
</head>
<body>
    头部信息<br>
    主体内容<br>
    <%--
        <jsp:include page=""></jsp:include>动态包含
        page属性指定要包含的jsp页面的路径
        动态包含也可以像静态包含一样,把被包含的内容执行输出到包含位置
        动态包含的特点:
        1.动态包含会把包含的页面翻译为java文件
        2.动态包含底层代码使用如下:去调用被包含的jsp页面执行输出
        JspRuntimeLibrary.include(request,response,"/include/footer.jsp",out,false);
    --%>
    <jsp:include page="/include/footer.jsp"></jsp:include>
</body>
</html>
动态包含的特点:
1.动态包含会把包含的页面翻译为java文件
2.动态包含底层代码使用如下:去调用被包含的jsp页面执行输出
3.动态包含还可以传递参数
我们修改main.jsp
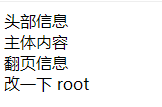
<body>
    头部信息<br>
    主体内容<br>
    <%--
        <jsp:include page=""></jsp:include>动态包含
        page属性指定要包含的jsp页面的路径
        动态包含也可以像静态包含一样,把被包含的内容执行输出到包含位置
        动态包含的特点:
        1.动态包含会把包含的页面翻译为java文件
        2.动态包含底层代码使用如下:去调用被包含的jsp页面执行输出
        JspRuntimeLibrary.include(request,response,"/include/footer.jsp",out,false);
        3.动态包含还可以传递参数
    --%>
    <jsp:include page="/include/footer.jsp">
        <jsp:param name="username" value="bbj"/>
        <jsp:param name="password" value="root"/>
    </jsp:include>
</body>
然后修改footer.jsp
<body>
    翻页信息<br>
    改一下
    <%=request.getParameter("password")%>
</body>
结果如下:
静态包含和动态包含的结果都一样,但是底层实现是不一样的
开发时绝大多数情况使用静态包含
c)jsp标签-转发
格式: <jsp:forward page=""></jsp:forward>请求转发标签,实现请求转发
page设置请求转发的路径
如:
<jsp:forward page="/scope2.jsp"></jsp:forward>
8.jsp练习
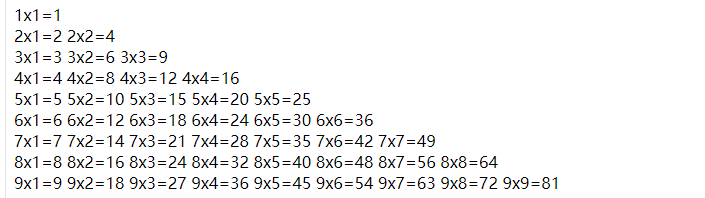
练习1:用jsp在页面输出九九乘法表
代码如下:
<%@ page contentType="text/html;charset=UTF-8" language="java" %>
<html>
<head>
    <title>Title</title>
</head>
<body>
</body>
    <%--练习一:在jsp页面中输出九九乘法表--%>
    <%
        for(int i=1;i<=9;i++){
            for(int j=1;j<=i;j++){
                %>
            <%= i+"x"+j+"="+(i*j)%>
    <%
            }
            %>
            <br>
    <%
        }
    %>
</html>
看起来不太整齐,我们给它加个表格,新代码如下:
<%@ page contentType="text/html;charset=UTF-8" language="java" %>
<html>
<head>
    <title>Title</title>
    <style type="text/css">
        table{
            width:650px;
        }
    </style>
</head>
<body>
</body>
    <%--练习一:在jsp页面中输出九九乘法表--%>
    <h1 align="center">九九乘法表</h1>
    <table align="center">
   <%for(int i=1;i<=9;i++){%>
        <tr>
        <%for(int j=1;j<=i;j++){%>
            <td><%=i+"x"+j+"="+(i*j)%></td>
         <%}%>
        </tr>
   <%}%>
   </table>
</html>
结果如下:

练习2:jsp输出一个表格,里面有10个学生信息
我们先创建一个包,假设命名为com.bjpower,在包里添加一个Student.java类,代码如下:
public class Student {
    private Integer id;
    private String name;
    private Integer age;
    private String phone;
    public Student(){}
    public Student(Integer id,String name,Integer age,String phone){

    }
    public void setId(Integer id){
        this.id=id;
    }
    public Integer getId(){
        return this.id;
    }
    public void setName(String name){
        this.name=name;
    }
    public String getName(){
        return this.name;
    }
    public void setAge(Integer age){
        this.age=age;
    }
    public Integer getAge(){
        return this.age;
    }
    public void setPhone(String phone){
        this.phone=phone;
    }
    public String getPhone(){
        return this.phone;
    }
    public String toString(){
        return "Student{"+
                "id="+id+
                ",name='"+name+"\'"+
                ",age="+age+
                ",phone'"+phone+"\'"+
                "}";
    }
}
然后我们创建一个test2.jsp,代码如下:
<%@ page contentType="text/html;charset=UTF-8" language="java" %>
<%@ page import="java.util.List"%>
<%@ page import="java.util.ArrayList"%>
<%@ page import="com.bjpowernode.Student"%>
<html>
<head>
    <title>Title</title>
    <style>
        table{
            border:1px black solid;
            width:600px;
            border-collapse:collapse;
        }
        td,th{
            border:1px blue solid;
        }
    </style>
</head>
<body>
    <%--练习二:jsp输出一个表格,里面有10个学生信息--%>
    <%
        List<Student>studentList=new ArrayList<Student>();
        for(int i=0;i<10;i++){
            int t=i+1;
            studentList.add(new Student(t,"name"+t,18+t,"phone"+t);
        }
    %>
    <table>
        <tr>
            <td>编号</td>
            <td>姓名</td>
            <td>年龄</td>
            <td>电话</td>
            <td>操作</td>
        </tr>
    <%for(Student student:studentList){%>
       <tr>
            <td><%=student.getId()%></td>
            <td><%=student.getName()%></td>
            <td><%=student.getAge()%></td>
            <td><%=student.getPhone()%></td>
            <td><%=删除修改%></td>
       </tr>
    <%}%>
    </table>
</body>
</html>
结果如下

9.请求转发
实际开发中,练习2的那种方法是很少用的,实际上我们经常会将请求转发和jsp练习在一起来将数据呈现在网页上,还是以练习2为背景,我们创建一个SearchStudentServlet.java,代码如下:
import com.bjpowernode.Student;
import jakarta.servlet.ServletException;
import jakarta.servlet.http.HttpServlet;
import jakarta.servlet.http.HttpServletRequest;
import jakarta.servlet.http.HttpServletResponse;

import java.io.IOException;
import java.util.ArrayList;
import java.util.List;

public class SearchStudentServlet extends HttpServlet {
    @Override
    protected void doGet(HttpServletRequest request, HttpServletResponse response)throws ServletException, IOException{
        //获取请求的参数
        //发sql语句查询学生信息
        //使用for循环生成查询到的数据做模拟
        List<Student>studentList=new ArrayList<Student>();
        for(int i=0;i<10;i++){
            int t=i+1;
            studentList.add(new Student(t,"name"+t,18+t,"phone"+t));
        }
        //保存查询的结果(学生信息)到request域中
        request.setAttribute("stuList",studentList);
        //请求转发到showStudent.jsp页面
        request.getRequestDispatcher("/test/test2.jsp").forward(request,response);
    }
}
配置web.xml,然后修改test2.jsp
<%@ page contentType="text/html;charset=UTF-8" language="java" %>
<%@ page import="java.util.List"%>
<%@ page import="java.util.ArrayList"%>
<%@ page import="com.bjpowernode.Student"%>
<html>
<head>
    <title>Title</title>
    <style>
        table{
            border:1px black solid;
            width:600px;
            border-collapse:collapse;
        }
        td,th{
            border:1px black solid;
        }
    </style>
</head>
<body>
    <%--练习二:jsp输出一个表格,里面有10个学生信息--%>
    <%
       List<Student>studentList=(List<Student>)request.getAttribute("stuList");
    %>
    <table>
        <tr>
            <td>编号</td>
            <td>姓名</td>
            <td>年龄</td>
            <td>电话</td>
            <td>操作</td>
        </tr>
    <%for(Student student:studentList){%>
       <tr>
            <td><%=student.getId()%></td>
            <td><%=student.getName()%></td>
            <td><%=student.getAge()%></td>
            <td><%=student.getPhone()%></td>
            <td><%="删除修改"%></td>
       </tr>
    <%}%>
    </table>
</body>
</html>
运行Tomcat,在搜索栏中运行SearchStudentServlet,结果如下:

10.Listener监听器
1.JavaWeb有三大组件:Servlet程序,Filter过滤器,Listener监听器
2.Listener它是JavaEE的规范,就是接口
3.监听器的作用是:监听某些事物的变化,然后通过回调函数,反馈给客户(程序)去做一些相应的处理。
ServletContextListener它可以监听ServletContext对象的创建和销毁。ServletContext对象在web工程启动的时候创建,在web工程停止的时候销毁。监听到创建和销毁之后都会分别调用ServletContextListener监听器的方法反馈。两个方法分别是:
public interface ServletContextListener extends EventListener{
//在ServletContext对象创建之后马上调用,做初始化
	public void contextInitialized(ServletContextEvent sce);
//在ServletContext对象销毁之后调用
	public void contextDestroyed(ServletContextEvent sce);
}
如何使用ServletContextListener监听器监听ServletContext对象。使用步骤如下:
1.编写一个类去实现ServletContextListener
2.实现其两个回调方法
3.到web.xml中去配置监听器
我们创建一个ServletContextListenerImp1.java,代码内容如下:
import jakarta.servlet.ServletContextEvent;
import jakarta.servlet.ServletContextListener;

public class MyServletContextListenerImp1 implements ServletContextListener {
    @Override
    public void contextInitialized(ServletContextEvent sce){
        System.out.println("ServletContext对象被创建了");
    }
    @Override
    public void contextDestroyed(ServletContextEvent sce){
        System.out.println("ServletContext对象被销毁了");
    }
}
配置web.xml
<listener>
    <listener-class>MyServletContextListenerImp1</listener-class>
  </listener>
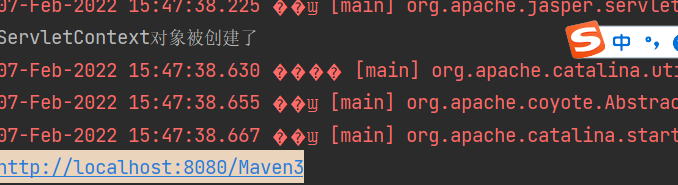
开启Tomcat服务器,然后关闭服务器,结果如下


 5272
5272


 被折叠的 条评论
为什么被折叠?
被折叠的 条评论
为什么被折叠?
 到【灌水乐园】发言


