


Java-多线程入门学习
1.继承Thread类
demo01
Thread1.class
class Thread1 extends Thread{
    private String name;
    public Thread1(String name){
        this.name=name;
    }
    //一定要重写run函数
    public void run(){
        for(int i=0;i<10;i++){
            System.out.println(name+"运行:"+i);
            try{
                sleep((int)Math.random()*10);
            }catch (InterruptedException e){
                e.printStackTrace();
            }
        }
    }
}
主函数:
 public static void main (String args[]) {
       Thread1 thread1=new Thread1("CXY");
       Thread1 thread2=new Thread1("dhi");
       Thread1 thread3=new Thread1("DHY");
       thread1.start();
       thread2.start();
       thread3.start();
    }
Thread的一些常用方法=================
Thread.currentThread().getName();//获取线程名
Thread.currentThread().getPriority();//获取线程优先级
当子线程需要主线程的一些资源时,主线程必须比子线程晚结束,因此要使用到join
未使用join的情况=========================:
class Thread1 extends Thread{
    private String name;
    public Thread1(String name){
        super(name);
        this.name=name;
    }
    public void run(){
        System.out.println(Thread.currentThread().getName()+"线程运行开始!");
        for(int i=0;i<5;i++){
//            System.out.println(name+"运行:"+i);
            System.out.println("子线程"+name+"运行 "+i);
            try{
                sleep((int)Math.random()*10);
            }catch (InterruptedException e){
                e.printStackTrace();
            }
        }
        System.out.println(Thread.currentThread().getName()+"线程运行结束");
    }
      public static void main (String args[]) {
        System.out.println(Thread.currentThread().getName()+"主线程运行开始");
        Thread1 thread1=new Thread1("A");
        Thread1 thread2=new Thread1("B");
        thread1.start();
        thread2.start();
        System.out.println(Thread.currentThread().getName()+"主线程运行结束");
    }
}
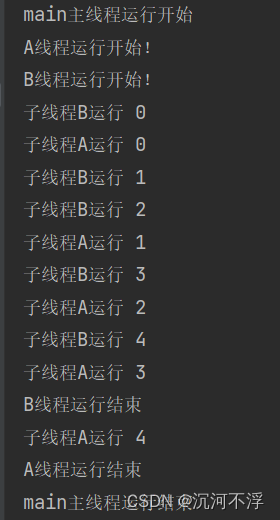
结果如下:

很明显,子线程结束前,主线程就结束了。
使用join===============================
class Thread1 extends Thread{
    private String name;
    public Thread1(String name){
        super(name);
        this.name=name;
    }
    public void run(){
        System.out.println(Thread.currentThread().getName()+"线程运行开始!");
        for(int i=0;i<5;i++){
//            System.out.println(name+"运行:"+i);
            System.out.println("子线程"+name+"运行 "+i);
            try{
                sleep((int)Math.random()*10);
            }catch (InterruptedException e){
                e.printStackTrace();
            }
        }
        System.out.println(Thread.currentThread().getName()+"线程运行结束");
    }
      public static void main (String args[]) {
        System.out.println(Thread.currentThread().getName()+"主线程运行开始");
        Thread1 thread1=new Thread1("A");
        Thread1 thread2=new Thread1("B");
        thread1.start();
        thread2.start();
        try{
        	thread1.join();
        }catch(InteruptedException e){
        	e.printStackTrace();
        }
        try{
        	thread2.join();
        }catch(InteruptedException e){
        	e.printStackTrace();
        }

        System.out.println(Thread.currentThread().getName()+"主线程运行结束");
    }
}
结果如下:
yield():暂停当前正在执行的线程对象,并执行其他线程。
Thread.yield()方法作用是:暂停当前正在执行的线程对象,并执行其他线程。
yield()应该做的是让当前运行线程回到可运行状态,以允许具有相同优先级的其他线程获得运行机会。因此,使用yield()的目的是让相同优先级的线程之间能适当的轮转执行。但是,实际中无法保证yield()达到让步目的,因为让步的线程还有可能被线程调度程序再次选中。
结论:yield()从未导致线程转到等待/睡眠/阻塞状态。在大多数情况下,yield()将导致线程从运行状态转到可运行状态,但有可能没有效果。可看上面的图。
class ThreadYield extends Thread{
    public ThreadYield(String name){
        super(name);
    }
    @Override
    public void run(){
        for(int i=1;i<=50;i++){
            System.out.println(""+this.getName()+"-----------"+i);
            //当i=30时,将CPU时间让掉,让其他线程或者自己的线程执行
            if(i==30){
                this.yield();
            }
        }
    }
    public static void main (String args[]) {
        ThreadYield yt1=new ThreadYield("张三");
        ThreadYield yt2=new ThreadYield("李四");
        yt1.start();
        yt2.start();
    }
}
结果如下:
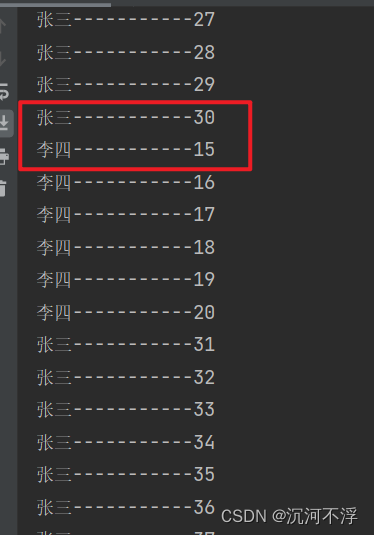
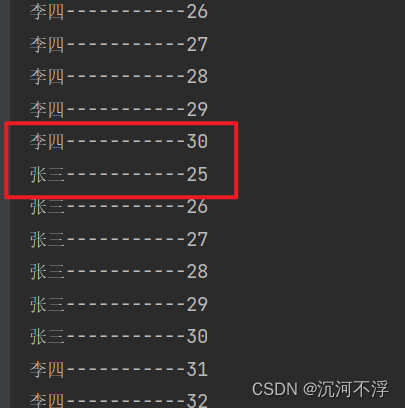
多次测试后,我们可以发现,每次有一个线程到达30时,就会切换把CPU让给另一个线程,当也不是绝对的。
sleep和yeild的区别

线程数据传递方法
1.通过构造函数传递
class MyThread1 extends Thread{
    private String name;
    public MyThread1(String name){
        this.name=name;
    }
    public void run(){
        System.out.println("hello "+name);
    }
    public static void main (String args[]) {
        Thread thread=new MyThread1("world");
        thread.start();;
    }
}
因为是通过构造函数进行传递,所以在线程运行之前数据已经到位,不会造成数据在线程运行后才传入的现象。但是如果数据比较多时,可能要有多个构造函数,比较不方便。
2.通过变量和方法传递
public class MyThread2 implements Runnable
{
private String name;
public void setName(String name)
{
this.name = name;
}
public void run()
{
System.out.println("hello " + name);
}
public static void main(String[] args)
{
MyThread2 myThread = new MyThread2();
myThread.setName("world");
Thread thread = new Thread(myThread);
thread.start();
}
}
建立完对象后,对对象实例逐个赋值,这样可以避免建立太多构造函数
3.通过回调函数传递数据
class Data{
    public int value=0;
}
class Work{
    public void process(Data data,Integer... numbers){
        for(int n:numbers){
            data.value+=n;
        }
    }
}
class MyThread3 extends Thread{
    private Work work;
    public MyThread3(Work work){
        this.work=work;
    }
    public void run(){
        Random random=new Random();
        Data data=new Data();
        int n1=random.nextInt(1000);
        int n2=random.nextInt(2000);
        int n3=random.nextInt(3000);
        work.process(data,n1,n2,n3);
        System.out.println(String.valueOf(n1)+"+"+String.valueOf(n2)+"+"+
                String.valueOf(n3)+"="+data.value);
    }
     public static void main (String args[]) {
        Thread thread=new MyThread3(new Work());
        thread.start();
    }
}
2.继承Runnable类
实际开发中,通常采用Runnable接口来实现多线程,优点如下:
1.避免继承的局限,一个类可以继承多个接口,但类只能继承一个类
2.Runnable接口实现的线程便于资源共享,而通过Thread类实现,各自线程(继承子类创建的线程)的资源是独立的,不方便共享
class MyThread implements Runnable{
    @Override
    public void run(){
        for(int i=0;i<10;i++){
            System.out.println("你好,DHI");
            try{
                Thread.sleep(1000);
            }catch (InterruptedException e){
                e.printStackTrace();
            }
        }
    }
     public static void main (String args[]) {
        MyThread myThread=new MyThread();
        Thread thread=new Thread(myThread);
        thread.start();
    }
}
未使用同步锁时==============
class Run implements Runnable{
    private int count=1;
    @Override
    public void run(){
        for(int i=0;i<20;i++){
            System.out.println(Thread.currentThread().getName()+"运行 "+count++);
        }
    }
    public static void start(){
        Run r=new Run();
        new Thread(r,"线程A").start();
        new Thread(r,"线程B").start();
        new Thread(r,"线程C").start();
    }
    public static void main (String args[]) {
        Run.start();
    }
}
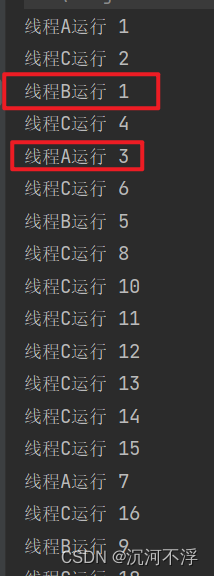
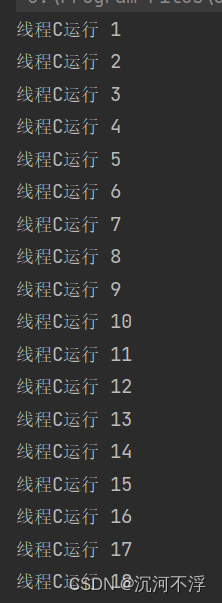
很明显可以看出,这个是线程不安全的,多个线程有可能在同一时间操作变量
同步锁==============
class Run implements Runnable{
    private int count=1;
    @Override
    public void run(){
        synchronized (this){
            for(int i=0;i<20;i++){
                System.out.println(Thread.currentThread().getName()+"运行 "+count++);
            }
        }
    }
    public static void start(){
        Run r=new Run();
        new Thread(r,"线程A").start();
        new Thread(r,"线程B").start();
        new Thread(r,"线程C").start();
    }
    public static void main (String args[]) {
        Run.start();
    }
}
很明显,这样做可以保证线程安全
在举个例子如下:
没同步锁的:
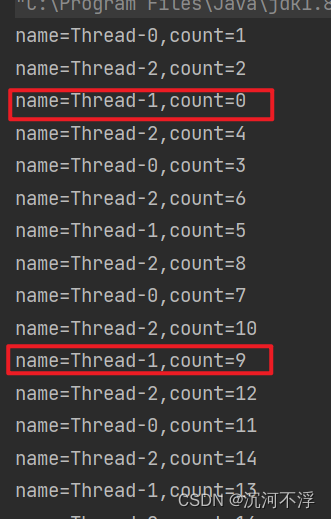
class MyThread implements Runnable{
    private static int count=0;
    @Override
    public void run(){
        for(int i=0;i<10;i++){
            System.out.println("name="+Thread.currentThread().getName()+",count="+count++);
        }
    }
    public static void main (String args[]) {
        MyThread r1=new MyThread();
        MyThread r2=new MyThread();
        MyThread r3=new MyThread();
        Thread t1=new Thread(r1);
        Thread t2=new Thread(r2);
        Thread t3=new Thread(r3);
        t1.start();
        t2.start();
        t3.start();
    }
}
加同步后:
class MyThread implements Runnable{
    private static int count=0;
    @Override
    public void run(){
    synchronized(this){
        for(int i=0;i<10;i++){
            System.out.println("name="+Thread.currentThread().getName()+",count="+count++);
        }
        }
    }
    public static void main (String args[]) {
        MyThread r1=new MyThread();
        MyThread r2=new MyThread();
        MyThread r3=new MyThread();
        Thread t1=new Thread(r1);
        Thread t2=new Thread(r2);
        Thread t3=new Thread(r3);
        t1.start();
        t2.start();
        t3.start();
    }
}
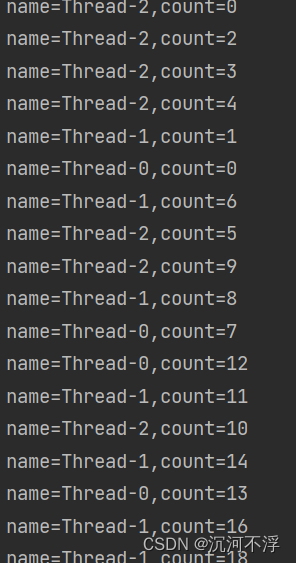
这里还是不同步的?原因是因为同步的对象不是同一个
卖票问题*
class Client implements Runnable{
    private int count=30;
    @Override
    public void run(){
        synchronized (this){
            while(count>0){
                System.out.println(Thread.currentThread().getName()+"卖出了第"+count--+"张票");
            }
        }
    }
    public static void start(){
        Client c=new Client();
        new Thread(c,"线程A").start();
        new Thread(c,"线程B").start();
        new Thread(c,"线程C").start();
    }
}
public class demo {
    public static void main (String args[]) {
        Client.start();
    }
}

参考连接
Java多线程学习(吐血详细整理)
java多线程入门
Java并发编程系列2.0:实现Runnable接口方式实现多线程
java多线程之:实现Runnable接口
3.获取返回值
在刚才的示例中,我们都是通过继承Thread或Runnable的,但是这两者都无法获取返回值,在一些项目中,我们需要获取线程的返回值,这时候就可以使用Callable和Future了
继承Callable后,要实现call接口
public class Main {
static class MyThread implements Callable<Integer>{
private int num;
public MyThread(Integer num){
this.num=num;
}
@Override
public Integer call(){
int result=0;
long start=System.currentTimeMillis();
for(int i=0;i<num;i++){
result+=num;
try{
Thread.sleep(100);
}catch (InterruptedException e){
e.printStackTrace();
}
}
long end=System.currentTimeMillis();
System.out.println("线程"+Thread.currentThread().getName()+"用时:"+(end-start));
return result;
}
}
public static void main(String[]args) {
MyThread thread1=new MyThread(20);
MyThread thread2=new MyThread(30);
MyThread thread3=new MyThread(40);
ExecutorService service= Executors.newFixedThreadPool(3);
long start=System.currentTimeMillis();
try{
//获取结果
Future<Integer>future1=service.submit(thread1);
Future<Integer>future2=service.submit(thread2);
Future<Integer>future3=service.submit(thread3);
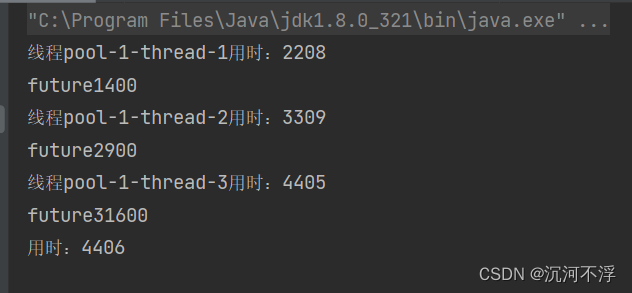
System.out.println("future1"+future1.get());
System.out.println("future2"+future2.get());
System.out.println("future3"+future3.get());
}catch (Exception e){
e.printStackTrace();
}
long end=System.currentTimeMillis();
System.out.println("用时:"+(end-start));
service.shutdownNow();
}
}
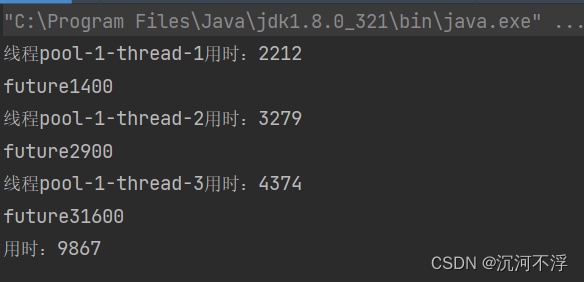
注意,在上面的实例中,当我们使用future.get()时,会先将对应的进行运行完,然后才会继续往下执行,这是上述代码的执行结果
我们将get的顺序修改一下
 public static void main(String[]args) {
        MyThread thread1=new MyThread(20);
        MyThread thread2=new MyThread(30);
        MyThread thread3=new MyThread(40);
        ExecutorService service= Executors.newFixedThreadPool(3);
        long start=System.currentTimeMillis();
        try{
            Future<Integer>future1=service.submit(thread1);
            System.out.println("future1"+future1.get());
            Future<Integer>future2=service.submit(thread2);
            System.out.println("future2"+future2.get());
            Future<Integer>future3=service.submit(thread3);
            System.out.println("future3"+future3.get());
        }catch (Exception e){
            e.printStackTrace();
        }
        long end=System.currentTimeMillis();
        System.out.println("用时:"+(end-start));
        service.shutdownNow();
    }
结果如下
参考文章:JAVA的Callable多线程
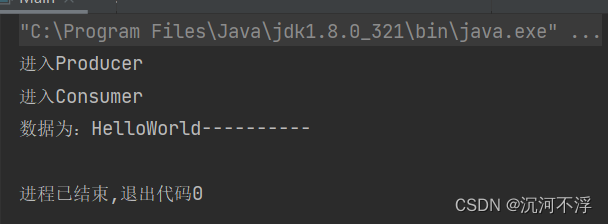
4.线程间通信
线程间可以通过管道来进行通信
public class Main {
    static class Producer extends Thread{
        private PipedWriter pipedWriter;
        private String content;
        public Producer(PipedWriter pipedWriter,String content){
            this.pipedWriter=pipedWriter;
            this.content=content;
        }
        @Override
        public void run(){
                    System.out.println("进入Producer");
            try{
                pipedWriter.write(content);
            }catch (Exception e){
                e.printStackTrace();
            }
        }
    }
    static class Consumer extends Thread{
        private PipedReader pipedReader;
        public Consumer(PipedReader pipedReader){
            this.pipedReader=pipedReader;
        }
        @Override
        public void run(){
                    System.out.println("进入Consumer");
            try{
                char[]sb=new char[20];
                pipedReader.read(sb,0,sb.length);
                System.out.println("数据为:"+new String(sb));
            }catch (Exception e){
                e.printStackTrace();
            }
        }
    }
    public static void main(String[]args){
       PipedWriter pipedWriter=new PipedWriter();
       PipedReader pipedReader=new PipedReader();
       Producer producer=new Producer(pipedWriter,"HelloWorld----------");
       Consumer consumer=new Consumer(pipedReader);
       try{
           pipedWriter.connect(pipedReader);
           producer.start();
           consumer.start();
       }catch (IOException e){
           e.printStackTrace();
       }catch (Exception e){
           e.printStackTrace();
       }
    }
}


 955
955


 被折叠的 条评论
为什么被折叠?
被折叠的 条评论
为什么被折叠?
 到【灌水乐园】发言


