


1,javaScript
//1,js中数据类型
Undefined 未定义 null == Undefined
Boolean 布尔类型 true false
number 数值类型
String 字符串类型
//2,数组声明
//java中
int [] i = {12,3,2}
int x[] = new int[10];
//js中声明数组
const ss = ['张三','李四','王五']
const xx = new Array();
xx[0]='11';xx[1]='11';xx[2]='11';xx[3]='11'
//3,js循环、
for(let i=0; i<ss.length; i++){
console.log("第一种循环方式:"+ss[i])
}
for(const x of xx ){
consol.log("第二种循环方式:"+x);
}
for(const s in xx){
console.log("第三种循环方式:"+s)
}
ss.forEach((v) =>{
console.log("第四种循环方式:"+v)
} )
//4,对象获取
//根据编号获取单个对象 document.getElementById("")
//根据class获取数组 document.getElementByClass"")
//根据name获取数组 document.getElementByName("")
//5,就绪函数
window.onload = ()=>{
}2,Vue了解
Vue是一套用于构建用户界面的渐进式JavaScript框架
Vue是一个无依赖别的js库,直接引入JS文件就可以使用
核心:双向绑定
为什么使用Vue?
1,组件化
将页面的HTML,CSS,JS合并到一个组件中,可以被其他组件或页面引入而重复利用。组件化将一个庞大的工程拆分成组件,重复利用大大提高了开发效率。
2,MVVM双向绑定
用户使视图变化时,变化会通过ViewModel同步到Model数据库
服务器端数据变化,会同步到ViewModel处理,变化同步到View展现给用户
3,响应式 虚拟DOM
对于虚拟DOM,浏览器会将HTML文件转换为JS文件并复制一个额外使用(虚拟)。对于任何更改,虚拟DOM都将复制的JS与原始JS进行比较,只重新加载更改的部分,局部修改到真实DOM
4,生命周期
生命周期:创建 ->挂载 ->更新 ->销毁
Vue优点
1,轻量级 前端框架 搭建简单
2,高性能 虚拟DOM和响应式避免了不必要的全局重新渲染,提升用户体验
3,好上手
4,插件化
5,便于测试
6,运行速度更快
7,视图,数据,结构分离
3,Vue体验
mustache语法
<div id="app">
  <!--{{mustache语法 -胡子语法}}}页面输出-->
  {{name}}<br/>
  <!--点击时进行增值-->
  <button @click="number++">{{number}}</button>
</div>
</body>
</html>
<script type="text/javascript" src="js/vue.global.js"></script>
<script>
  const {createApp, reactive, toRefs} = Vue;
  const app = createApp({
    setup() {
      const data = reactive({
        name:"张佳乐123123",
        number:10
      })
      return {...toRefs(data)}
    }
  }).mount('#app');
</script>
<div>
<span v-once>{{name}}</span> <br>
<span v-text="url">{{url}}</span> <br>
<span v-html="url"></span> <br>
<span v-pre>{{url}}</span>
</div>
<!--mustache语法-->
<script type="text/javascript">
const {createApp,reactive,toRefs} = Vue
const app = createApp({
setup(){
const data = reactive({
name: '李雷',
woman: '韩梅梅',
url: '<a href="https://www.baidu.com">百度一下</a>'
})
return {...toRefs(data)}
}
}).mount('#app')
</script>
<!--输出-->
<span v-once>{{name}}</span> <br> 李雷
<span v-text="url">{{url}}</span> <br> <a href="https://www.baidu.com">百度一下</a>'
<span v-html="url"></span> <br> 百度一下
<span v-pre>{{url}}</span> {{url}}
MVVM模型
M:模型Model data中的数据
V:视图View 模板代码
VM:视图模型 ViewModel Vue实例
MVVM采用:双向数据绑定
View中数据变化将自动反映到Model上,反之,Model中数据变化也将会自动展示在页面上。
ViewModel就是View和Model之间的桥梁。
ViewModel负责把Model中的数据同步到View显示出来,还负责把View的修改同步到Model。
核心思想:关注模型的变化,让MVVM框架利用自己的机制自动更新DOM,数据——视图分离

v-bind使用
<!--V-bind作用:动态绑定属性-->
<div id="app">

  <img v-bind:src="imgURL" alt="">
  <a v-bind:href="aHref">百度一下</a>

</div>

<script src="../js/vue.js"></script>
<script>
  const app = new Vue({
    el:'#app',
    data:{
      imgURL: '../images/01.jpg',
      aHref: 'https://www.baidu.com'
    }
  })
</script>

<!--语法糖写法 vue简化写法 对于V-bind 直接:属性即可-->

<img :src="imgURL" alt="">
<a :href="aHref">百度一下</a>
通过v-bind绑定实现点击小球变大
<!--球样式-->
<style>
  .cs{
    background-color: aqua;
    border-radius: 25px;
    cursor: pointer;
  }
</style>
<body>
  <div id="app">
    <!--球                                                点击方法调用-->
    <div class="cs" :style="{width:w+'px',height:h+'px'}" @click="checkBtn()"></div>
  </div>
</body>
</html>
<script type="text/javascript" src="js/vue.global.js"></script>
<script>
  const {createApp, reactive, toRefs} = Vue;
  const app = createApp({
    setup() {
      const data = reactive({
        w:50,
        h:50,
      })
      <!--点击方法-->
      const checkBtn = () => {
        console.log("3342334234234")
        data.w+=10
        data.h+=10
      }
      return {...toRefs(data),checkBtn}
    }
  }).mount('#app');
</script>
vue语法 if
<div id="app">
  <!--同级判断标签外层加一个标签div用来绑定判断范围-->
  <div>
    <span v-if="score >= 80 && score<90">苹果一个</span>
    <span v-if="score >= 70 && score<80">男子单打</span>
    <span v-if="score >= 60 && score<70">男女双打</span>
    <span v-if="score<60">七匹狼轮冒烟</span>
  </div>

  <!--if else if else 语法-->
  <div>
    <span v-if="score >= 80">优秀</span>
    <span v-else-if="score >60 && score <80">中等</span>
    <span v-else>不合格</span>
  </div>

  <!--v-show也用与做判断 v-if 不符合条件隐藏if标签
  v-show 不符合条件 设置style display为none -->
  <span v-show="score>60">七匹狼</span>
</div>
for循环 循环值绑定
<div id="app">
  <!--循环遍历数组 输出 通过v-model进行绑定 当有相同进行勾选-->
  <span v-for="item in allFruits">
    {{item}}<input type="checkbox" :value="item" v-model="selectFruit">
  </span>

  <!--语法一    变量   下标      遍历数组-->
  <span v-for="(item,index) in allFruits">{{index}} - {{item}}</span>
  <!--语法二    变量   遍历数组-->
  <span v-for="item in allFruits"></span>
</div>
</body>
</html>
<script type="text/javascript" src="js/vue.global.js"></script>
<script>
  const {createApp, reactive, toRefs} = Vue;
  const app = createApp({
    setup() {
      const data = reactive({
        allFruits:['香蕉','榴莲','苹果','鸭梨','荔枝','芒果'],
        selectFruit:['香蕉','荔枝','芒果']
      })
      return {...toRefs(data)}
    }
  }).mount('#app');
</script>
Vue计算属性
计算属性本身是一个function函数,实时监听data中数据变化,并return 一个计算后的新值。
计算属性必须定义在从computed节点中,必须是一个function函数,必须有返回值,必须当普通属性使用
<div id="app">
  <!--计算属性 调用的为属性 不是方法 不需要写() -->
  {{computedChineseName}} <!--输出 有中文-->
  {{isChinese()}}         <!--输出 有中文-->
</div>
</body>
</html>
<script type="text/javascript" src="js/vue.global.js"></script>
<script>
  const {createApp, reactive, toRefs,computed} = Vue;
  const app = createApp({
    setup() {
      const data = reactive({
        name:["dasd","dasdad"]
      })
      //方法
      const isChinese = () => {
        return data.name.length>0?'有中文':'没中文'
      }
      //计算属性
      const computedChineseName = computed( () => {
        return data.name.length>0?'有中文':'没中文'
      } )
      //属性以及方法 在这里需要添加挂载
      return {...toRefs(data),isChinese,computedChineseName}
    }
  }).mount('#app');
</script>
购物车案例
效果图:
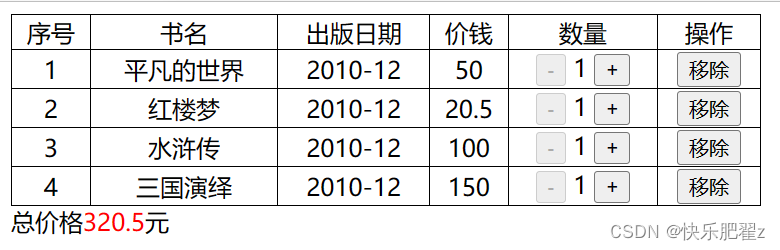 点击按钮时 价格实时变化,表格中没有数据时 显示购物车空
<div id="app">
  <div v-if="books.length>0">
    <table>
      <tr>
        <td>序号</td>
        <td>书名</td>
        <td>出版日期</td>
        <td>价钱</td>
        <td>数量</td>
        <td>操作</td>
      </tr>
      <!--循环遍历数组-->
      <tr v-for="(item,index) in books ">
        <td>{{index + 1}}</td>
        <td>{{item.name}}</td>
        <td>{{item.date}}</td>
        <td>{{item.price}}</td>
        <td>
          <!--当数量小于等于1时 给button按钮添加disabled 隐藏-->
          <button :disabled="item.count<=1" type="button" @click="item.count--">-</button></span>
          {{item.count}}
          <button type="button" @click="item.count++">+</button>
        </td>
        <td>
          <!--点击移除按钮时 调用方法  传入下标-->
          <button type="button" @click="del(index)">移除</button>
        </td>
      </tr>
    </table>
    总价格<span style="color: red">{{total}}</span>元
  </div>

  <div v-if="books.length ==0">
    购物车为空
  </div>
</div>
</body>
</html>
<script type="text/javascript" src="js/vue.global.js"></script>
<script>
  const {createApp, reactive, toRefs,computed} = Vue;
  const app = createApp({
    setup() {
      const data = reactive({
        books: [
          {name: '平凡的世界', date: '2010-12', price: 50, count: 1},
          {name: '红楼梦', date: '2010-12', price: 20.5, count: 1},
          {name: '水浒传', date: '2010-12', price: 100, count: 1},
          {name: '三国演绎', date: '2010-12', price: 150, count: 1},
        ],
      })
      //删除方法
      const del = (index) => {
        //调用splice(传入删除下标以及删除个数)
        data.books.splice(index,1);
      }
      //计算总价 通过计算属性
      const total = computed(() => {
        let number=0;
        //循环遍历数组 价格进行累加 核心双向绑定 当页面进行数量修改时 价格随之变化
        for (const b of data.books) {
          number += b.price * b.count;
        }
        return number;
      })
      return {...toRefs(data),del,total}
    }
  }).mount('#app');
</script>
V-Model使用
radio单选框
<div id="app">
  <!--使用V-model进行双向绑定 传入sex即可判断与value比较 是否为选中-->
  男<input type="radio" name="sex" value="0" v-model="sex">
  女<input type="radio" name="sex" value="1" v-model="sex">
</div>
</body>
</html>
<script type="text/javascript" src="js/vue.global.js"></script>
<script>
  const {createApp, reactive, toRefs} = Vue;
  const app = createApp({
    setup() {
      const data = reactive({
        sex: 1
      })
      return {...toRefs(data)}
    }
  }).mount('#app');
</script>
checkbox 复选框
<div id="app">
  <label for="agree">
    <!--使用V-model进行双向绑定 传入isAgree即可判断 是否选中-->
    <input type="checkbox" id="agree" v-model="isAgree">同意协议
  </label>
  <!--使用disable 传入isAgree即可判断 是否隐藏标签-->
  <button :disabled="!isAgree">下一步</button>
  <br>
  <!--使用V-model进行双向绑定 传入hobbies数组即可判断 来选中-->
  抽烟<input name="hobbies" type="checkbox" value="抽烟" v-model="hobbies"/>
  喝酒<input name="hobbies" type="checkbox" value="喝酒" v-model="hobbies"/>
  烫头<input name="hobbies" type="checkbox" value="烫头" v-model="hobbies"/>
</div>
</body>
</html>
<script type="text/javascript" src="js/vue.global.js"></script>
<script>
  const {createApp, reactive, toRefs} = Vue;
  const app = createApp({
    setup() {
      const data = reactive({
        isAgree: false,
        hobbies:['抽烟','烫头']
      })
      return {...toRefs(data)}
    }
  }).mount('#app');
</script>
select标签
<div id="app">
<!--  通过 V-model 双向绑定 fruit 进行select默认选中下拉列表 -->
  <!--添加multiple="multiple" 标签 v-model双向绑定数组 下拉列表 可以进行多选-->
  <select name="f" v-model="fruit" multiple="multiple">
    <option value="苹果">苹果</option>
    <option value="香蕉">香蕉</option>
    <option value="橘子">橘子</option>
    <option value="榴莲">榴莲</option>
  </select>
</div>
</body>
</html>
<script type="text/javascript" src="js/vue.global.js"></script>
<script>
  const {createApp, reactive, toRefs} = Vue;
  const app = createApp({
    setup() {
      const data = reactive({
        // fruit:'苹果'
        fruit:['橘子','榴莲']
      })
      return {...toRefs(data)}
    }
  }).mount('#app');
</script>
修饰符
<div id="app">
<!--lazy 修饰符 声明当前延迟赋值 当文本框失去焦点时 才会进行双向绑定 才会将view中数据绑定到model中-->
<input type="text" v-model.lazy="message">
<h2>{{message}}</h2>
<!--number修饰符 两个文本框输入两个数值类型 进行计算-->
数字1:<input type="text" v-model.number="number1">
数字2:<input type="text" v-model.number="number2">
我是求和:<h2>{{number1*number2}}</h2>
<!--使用trim 去除前后两端空格 -->
<input type="text" v-model.trim="name">
<h2>{{name}}</h2>
</div>
</body>
</html>
<script type="text/javascript" src="js/vue.global.js"></script>
<script>
const {createApp, reactive, toRefs} = Vue;
const app = createApp({
setup() {
const data = reactive({
message:555,
name:"",
number1:"",
number2:""
})
return {...toRefs(data)}
}
}).mount('#app');
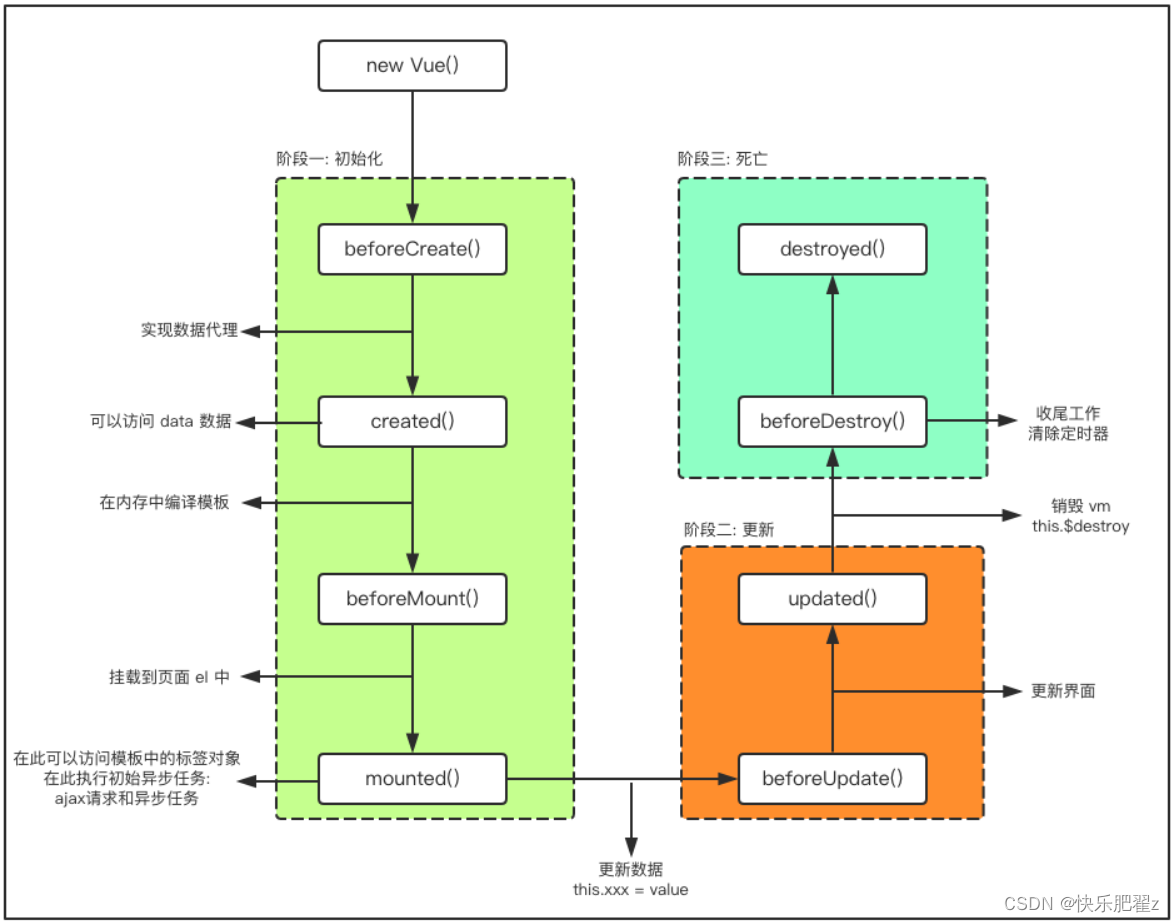
</script>VUE生命周期
vue生命周期:初始化,更新,死亡
这些生命周期过程中会对应若干个钩子函数,这些 函数我们可以定义出来,并且在钩子函数触发时,可以做任何想做的事情。初始化阶段有创建之前, 创建完成,挂载之前和挂载。更新阶段有更新之前,更新,销毁阶段有销毁之前 和销毁。这些钩子函数都可以定义出来。当VUE实例执行到这些函数时,会默认执行函数中你想让执行的内容。这就是一个完整的VUE生命周期
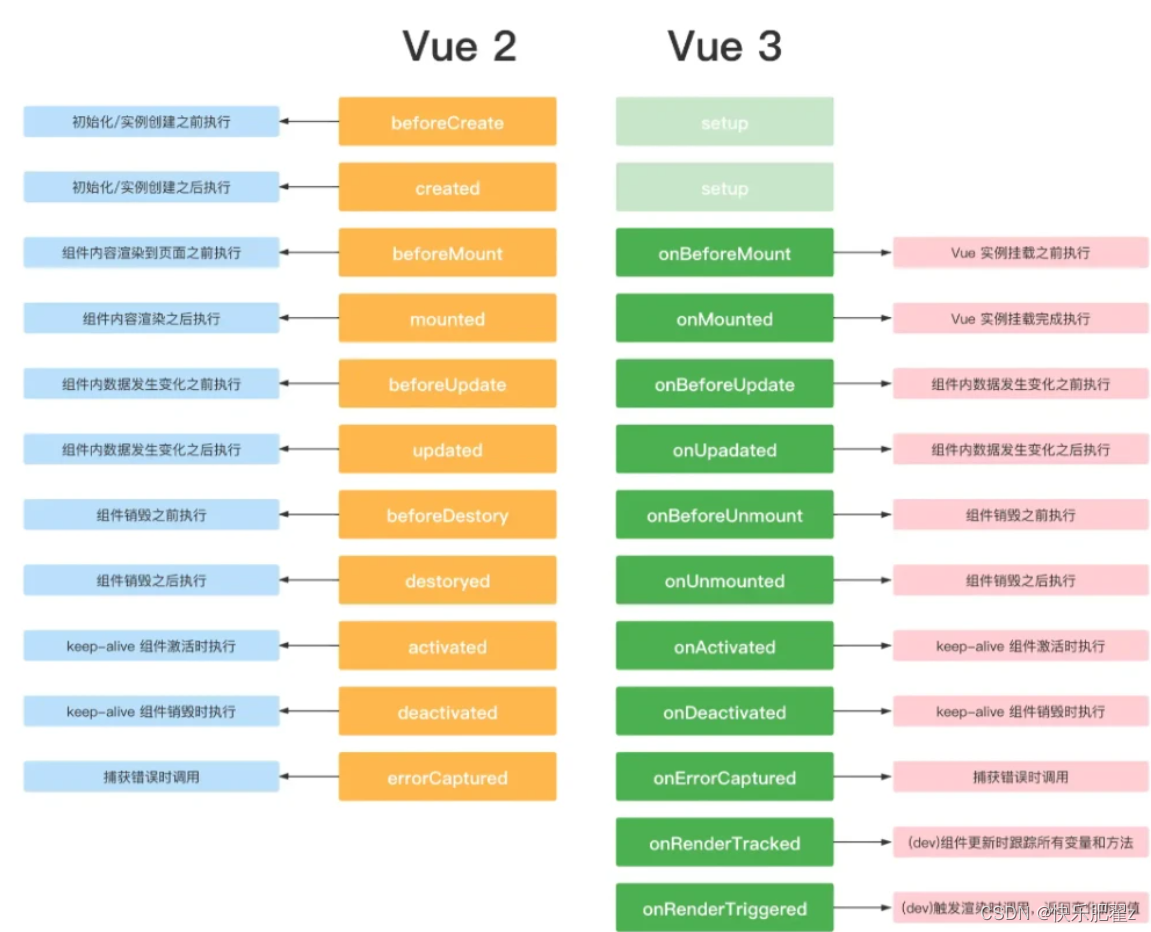
VUE2与VUE3对比
axios使用
<!--js引入-->
<script type="text/javascript" src="js/axios.min.js"></script>
语法
//get请求 查询
axios.get('http://localhost:8080/user').then((res) => {
          //将查询到相应的数据 赋值给data中集合
          data.list = res.data
        })
//修改方法 传参数为data中security 判断返回值 跳转页面
      const ud = () => {
        axios.put('http://localhost:8080/user', data.security).then((res) => {
          if (res) {
            alert("修改成功!")
            location = 'security_list.html';
          } else {
            alert("修改成功!");
            location = 'security_list.html';
          }
        })
      }
 //根据编号查询 查询出来数据 赋值给data中security
      axios.get('http://localhost:8080/user/'+id).then( (res) => {
        data.security = res.data;
      })
修改编写
//修改时,在列表页面根据编号修改,无法请求到后台查询数据再将数据带到页面返回回显。

//使用URL重写将id带到修改页面再进行查询数据回显
//根据请求过来的URL地址 获取携带id
      let searchURL = window.location.search;
      searchURL = searchURL.substring(1, searchURL.length);
      let id = searchURL.split("&")[0].split("=")[1];
      data.security.id = id;
前后台分离项目 后台controller使用restful风格编写
//查询全部 注解getMapping
    @GetMapping
    public List<User> list(){
        return this.userService.list();
    }
    //查询单个 注解getMapping 加一层路径  PathVariable 参数转化
    @GetMapping("/{id}")
    public User user(@PathVariable Long id){
        return this.userService.getById(id);
    }
    //添加对象 PostMapping json格式对象 通过RequestBody 转化为java对象
    @PostMapping
    public Boolean save(@RequestBody User user){
        return this.userService.save(user);
    }
跨域问题
产生跨域问题原因:
1,浏览器限制
2,请求地址域名或端口与大当前访问的域名或端口不一样
3,发送的时异步请求
    import org.springframework.boot.SpringApplication;
    import org.springframework.boot.autoconfigure.SpringBootApplication;
    import org.springframework.context.annotation.Bean;
    import org.springframework.web.cors.CorsConfiguration;
    import org.springframework.web.cors.UrlBasedCorsConfigurationSource;
    import org.springframework.web.filter.CorsFilter;
    /**
     * 跨域过滤器
     *
     * @return
     */
    @Bean
    public CorsFilter corsFilter() {
        UrlBasedCorsConfigurationSource source = new UrlBasedCorsConfigurationSource();
        source.registerCorsConfiguration("/**", buildConfig());
        return new CorsFilter(source);
    }
    private CorsConfiguration buildConfig() {
        CorsConfiguration corsConfiguration = new CorsConfiguration();
        corsConfiguration.addAllowedOrigin("*");
        corsConfiguration.addAllowedHeader("*");
        corsConfiguration.addAllowedMethod("*");
        return corsConfiguration;
    }
安装Vue脚手架
webpack安装
webpack的主要作用是辅助我们解决各个技术的依赖关系,项目完成后帮助我们生成运行包,这也是webpack的主要作用,就如同java项目中的maven
//在cmd dos窗口进行安装


注意:webpack需要依赖node环境,node中有一个npm工具,帮助我们管理npm工具,也是我们需要使用的工具


安装命令:npm install webpack@5.73.0  -g


测试安装是否成功:webpack -v


卸装命令:npm  uninstall webpack webpack-cli  -g
创建项目
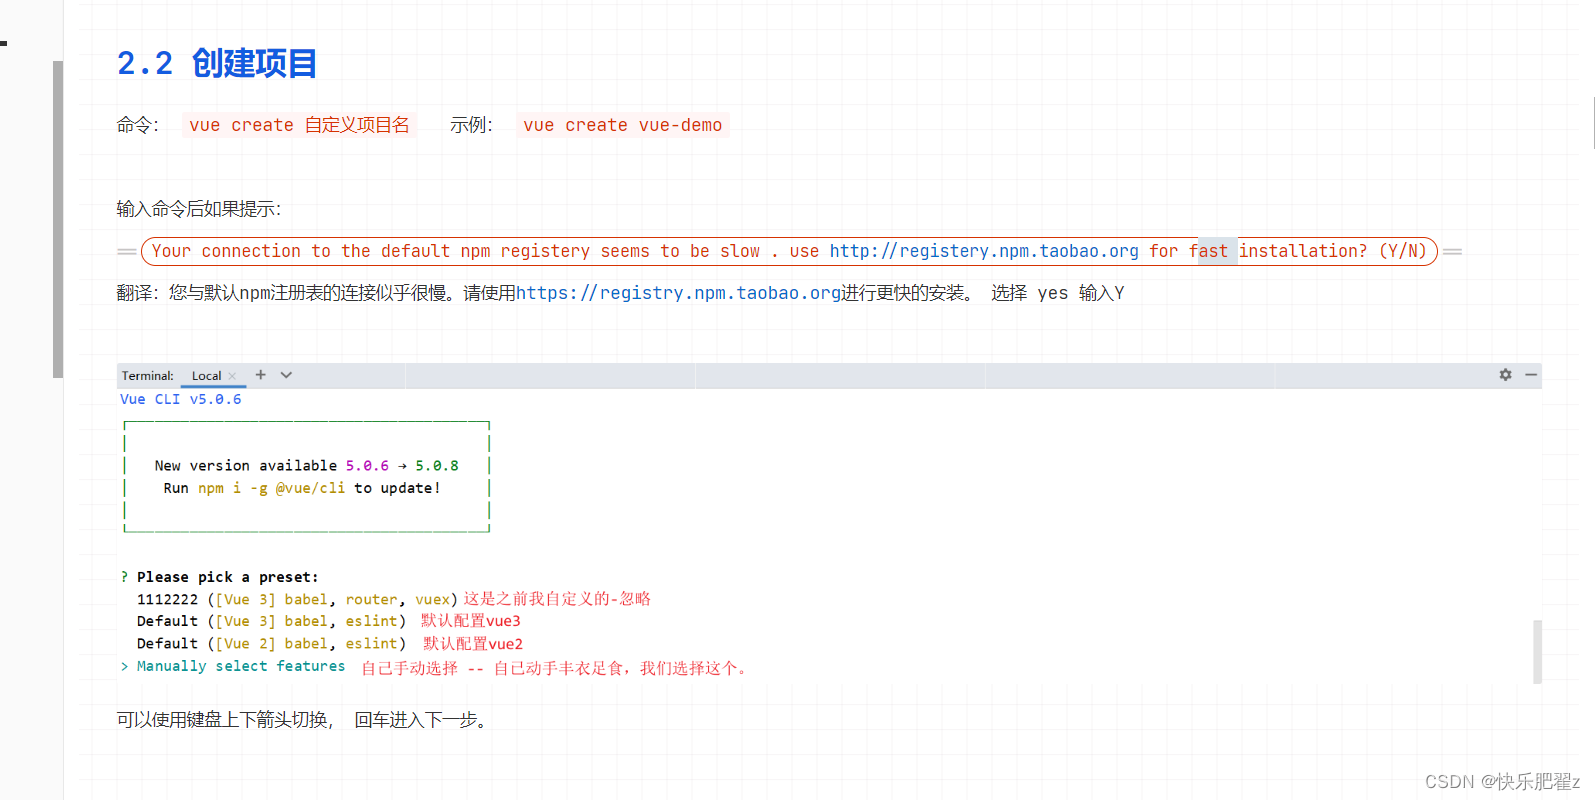
选择功能以及版本

选择路由模式与配置文件存放

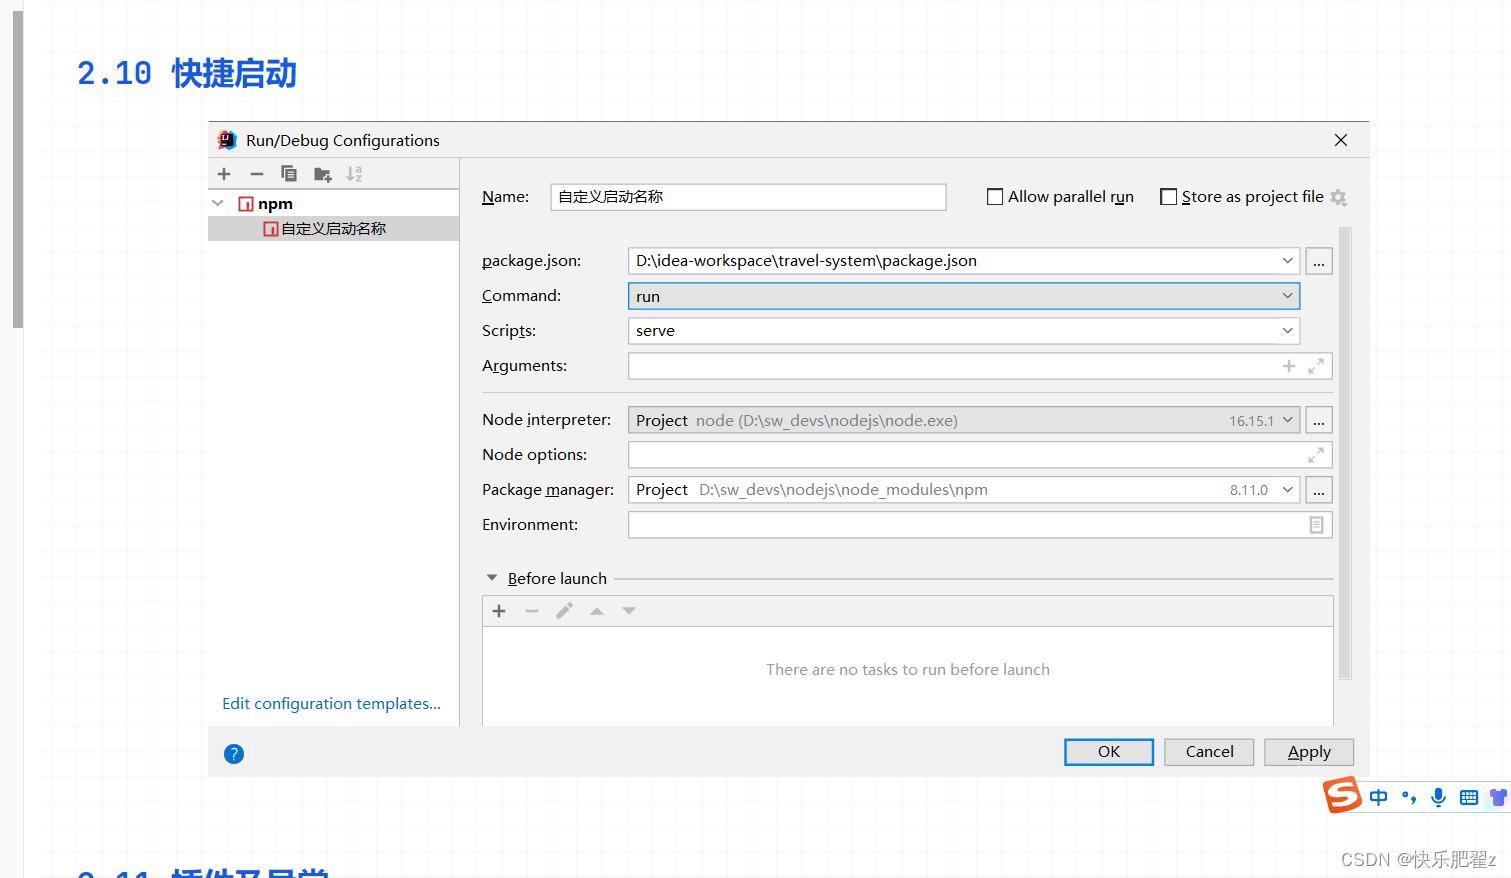
快捷启动
Element-Plus
1,安装
//安装ElementPlue
npm install element-plus --save
//安装axios
npm install axios
//打包
npm run build
2, 在main.js文件中引入elementplus组件
import { createApp } from 'vue'
import App from './App.vue'
import router from './router'
import store from './store'
//element-plus导入
import ElementPlus from 'element-plus'
import 'element-plus/dist/index.css'
//国际化导入
import zhCn from 'element-plus/dist/locale/zh-cn.mjs'

const app = createApp(App)
  app.use(store)
  app.use(router)
  app.use(ElementPlus,{
    locale: zhCn,
  })
  app.mount('#app')
3,通过Element-Plus使用样式
<!--el-table-column为表格列 在页面中显示替换为tr-->
<el-table-column prop="status" label="账号状态" width="100" align="center">
        <!--在表格中对值有操作 使用template 双标签 scope获取全部值 进行判断操作-->
        <template #default="scope">
          <!--三元判断 选择样式-->
          <el-tag :type="scope.row.status === '0' ? 'success' : 'danger'" disable-
             transitions>
            <!--三元判断 选择页面值输出-->
            {{ scope.row.status == 0 ? '正常' : '禁用' }}
          </el-tag>
        </template>
</el-table-column>


<!--表单中数据 单选框操作-->
<el-form-item label="性别">
          <el-radio-group v-model="form.sex">
            <el-radio label="0">男</el-radio>
            <el-radio label="1">女</el-radio>
          </el-radio-group>
</el-form-item>

<!--表单中 时间样式 时间格式转化用value-format="YYYY-MM-DD HH:mm:ss"-->
<el-form-item label="修改时间">
          <el-date-picker
              v-model="form.updateTime"
              type="datetime"
              placeholder="请选择时间:"
              value-format="YYYY-MM-DD HH:mm:ss"/>
</el-form-item>
路由
1,概念
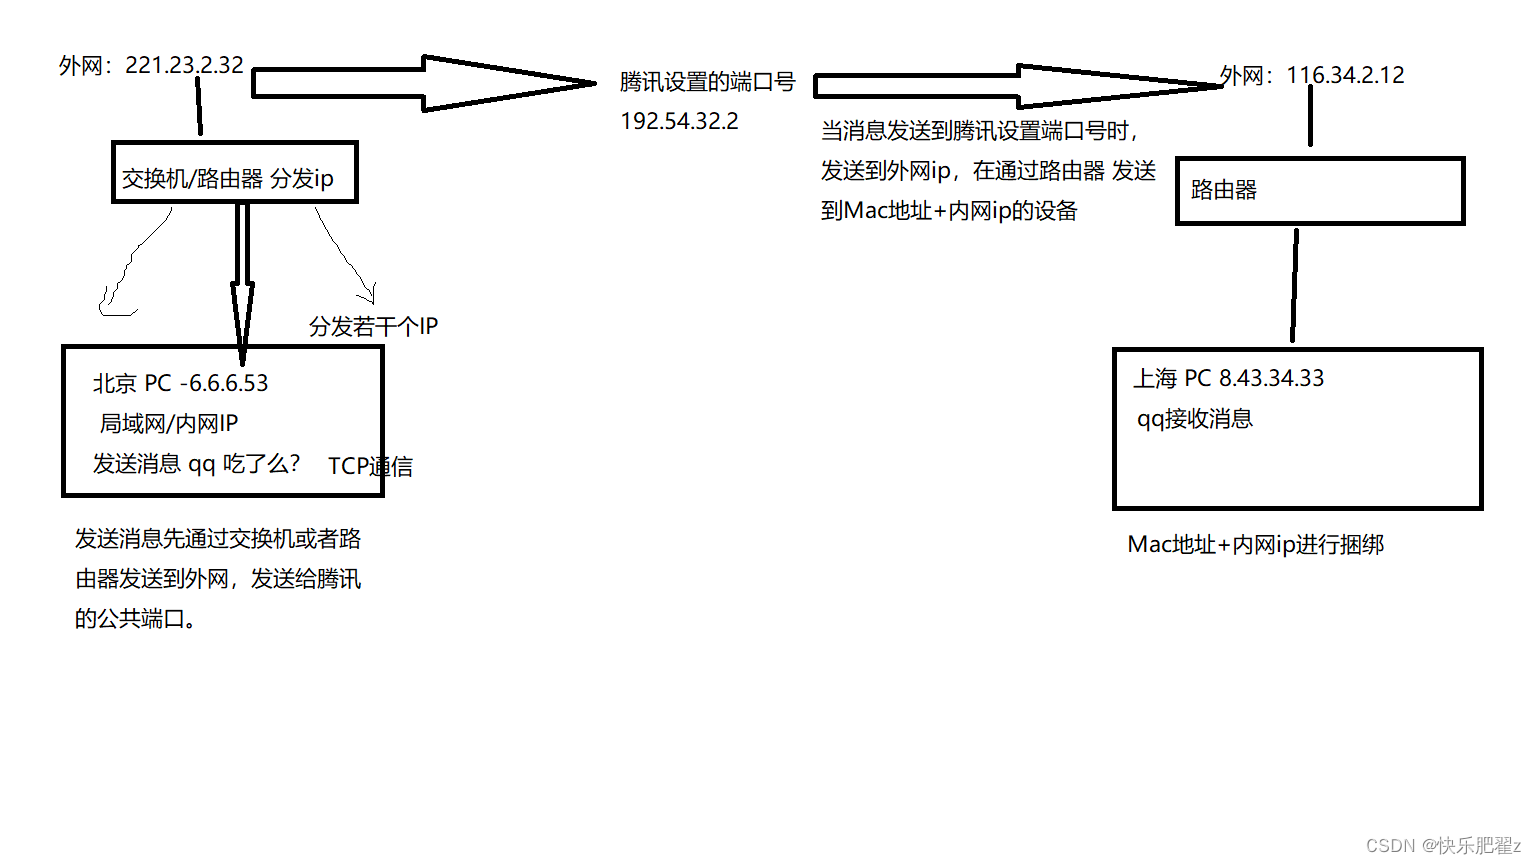
通过互联的网络把信息从源地址传输到目的地址的活动
2,消息发送过程
3, 专业术语
前端渲染:页面加载和渲染过程中只需要浏览器就能做到,例如html页面
后端渲染:加载和渲染网页需要借助后端才能将网页显示出来,例如jsp
前端路由:在新开发模式下,我们希望网页跳转不需要刷新页面,而通过一些特定处理,只要给URL地址就能将网页渲染到制定位置,配置方式就需要使用前端路由。
后端路由:例如servlet中配置的url-pattern springMvc中配置视图解析器
4,路由应用
//1,路由检查 安装router 通过package.json查看
"dependencies": {
    "axios": "^1.3.5",
    "core-js": "^3.8.3",
    "element-plus": "^2.3.3",
    "vue": "^3.2.13",
    "vue-router": "^4.0.3",
    "vuex": "^4.0.0"
  },
//路由使用 在项目router文件夹下index.js文件下
//定义组件 路径 名称 点击时跳转的路径
//两种写法 一种引入vue组件 一种引入vue路径
  {
    path: '/news',
    name: 'News',
    component: () => import('../views/news/News'),
    component: Layout,
    //定义子组件数组 路由嵌套使用
    children: [
      {
        //默认不跳转组件时 显示的组件路径
        path: '',
        component : Welcome
        component: () => import('../views/news/Images')
      },
        //点击跳转时 显示组件路径
      {
        path: 'user',
        component : () => import('@/views/User')
      }
    ]
  }
router-link使用
类似于a链接标签使用
属性
1,tag:tag可以指定router-link之后渲染成什么组件,比如<router-link tag='button'></router-link>,此时就是一个button了;
2,replace:增加replace属性,就相当于replaceState;
3,class:可以为标签增加样式,比如选中的会自动赋值router-link-active;
4,active-class=“active”:选中的;也可以在router组件中配置linkActiveClass: 'active';
<router-view>
该标签会根据当前的路径,动态渲染出不同的组件。
网页的其他内容,比如顶部的标题/导航,或者底部的一些版权信息等会和<router-view>处于同一个等级。
在路由切换时,切换的是<router-view>挂载的组件,其他内容不会发生改变。
  <nav>
    <router-link to="/news"></router-link>
  </nav>
  <router-view></router-view>
hash和history面试题
hash和history都是我们前端路由的一种模式,而Vue默认使用Hash模式,hash模式相比history模式 使用更复杂,还存在一些问题。我们在使用中一般使用history模式。hash只能通过URL传参,history传URL和对象。hash一般用来写小demo,history用来写项目。
前后端分离项目部署
1,后端项目打包 POM中
<build>
        <finalName>app</finalName>
</build>
Maven -> package 打包
2,项目运行指令
cd..
cd..
cd Oracle\shixun\Vue\hdfsq-nginx\nginx-1.22.0
start nginx.exe
cd..
cd..
java -jar app.jar
exit3,前端项目打包
npm run build4,启动Nginx
nginx.conf文件中配置
location / {
root dist;
index index.html index.htm;
try_files $uri $uri/ @router; # 配置使用路由
}
location @router {
# Vue项目路由不是真实存在的,所以需要将请求重写到 index.html 中,然后交给真正的 Vue 路由处理请求资源
rewrite ^.*$ /index.html last;
}
# 请求后端失败
location /api/ {
# 后端的真实接口
proxy_pass http://localhost:8080/;
proxy_redirect off;
proxy_set_header Host $host;
proxy_set_header X-Real-IP $remote_addr;
proxy_set_header X-Forwarded-For $proxy_add_x_forwarded_for;
proxy_set_header Cookie $http_cookie;
# for Ajax
#fastcgi_param HTTP_X_REQUESTED_WITH $http_x_requested_with;
proxy_set_header HTTP-X-REQUESTED-WITH $http_x_requested_with;
proxy_set_header HTTP_X_REQUESTED_WITH $http_x_requested_with;
proxy_set_header x-requested-with $http_x_requested_with;
client_max_body_size 10m;
client_body_buffer_size 128k;
proxy_connect_timeout 90;
proxy_send_timeout 90;
proxy_read_timeout 90;
proxy_buffer_size 128k;
proxy_buffers 32 32k;
proxy_busy_buffers_size 128k;
proxy_temp_file_write_size 128k;
}vue中使用Element列表展示 滚动条不显示解决办法:
<div style="width: calc(100vw - 280px)">


 366
366


 被折叠的 条评论
为什么被折叠?
被折叠的 条评论
为什么被折叠?
 到【灌水乐园】发言


