


提示:文章写完后,目录可以自动生成,如何生成可参考右边的帮助文档
前言
有个实现文件上传的功能需求,组件样式方面可以采用element-plus提供的upload组件,但element仅仅提供了基本的上传功能,具体文件上传到服务器,对接api这些还要自己实现。
一、upload组件代码如下
<template>
  <el-upload
    class="upload-demo"
    drag
    action="https://run.mocky.io/v3/9d059bf9-4660-45f2-925d-ce80ad6c4d15"
    multiple
  >
    <el-icon class="el-icon--upload"><upload-filled /></el-icon>
    <div class="el-upload__text">
      Drop file here or <em>click to upload</em>
    </div>
    <template #tip>
      <div class="el-upload__tip">
        jpg/png files with a size less than 500kb
      </div>
    </template>
  </el-upload>
</template>

<script setup lang="ts">
import { UploadFilled } from '@element-plus/icons-vue'
</script>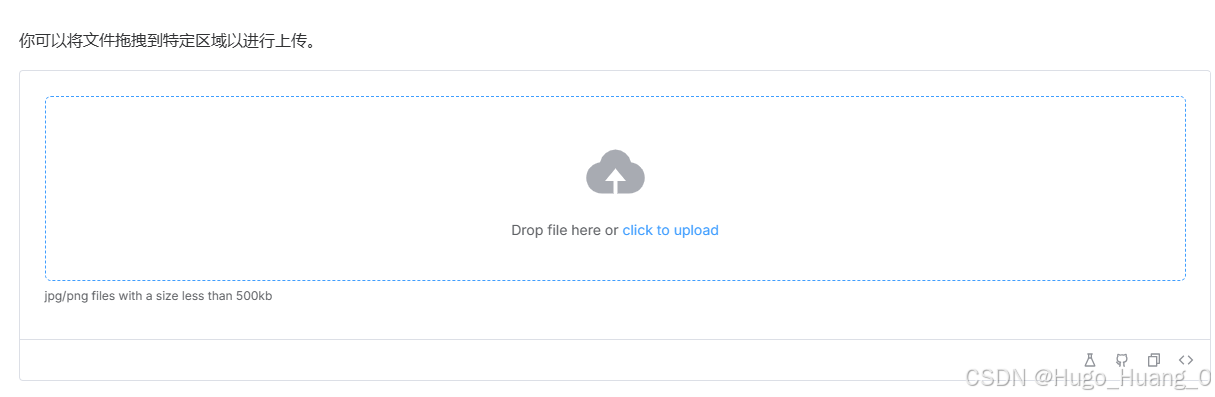
二、基于以上实现自己的需求
1.实现下载模板功能
<template>
<div class="container">
<!-- 弹出层 -->
<el-dialog
v-model="dialogFormVisible"
title="导入工单"
width="500"
draggable
>
<el-upload
class="upload-demo"
drag
action="https://run.mocky.io/v3/9d059bf9-4660-45f2-925d-ce80ad6c4d15"
multiple
>
<el-icon class="el-icon--upload">
<upload-filled />
</el-icon>
<div class="el-upload__text">
将文件拖到此处,或<em>点击上传</em>
</div>
<template #tip>
<div class="el-upload__tip">
只能上传jpg/png文件,且不超过500kb<text style="cursor: pointer;color: #409eff;" @click="uploadTmpl">
下载模板
</text>
</div>
</template>
</el-upload>
<template #footer>
<div class="dialog-footer">
<el-button @click="dialogFormVisible = false">
取消
</el-button>
<el-button type="primary" @click="dialogFormVisible = false">
确认
</el-button>
</div>
</template>
</el-dialog>
</div>
</template>
<script setup lang="ts">
import { ref } from "vue";
import { UploadFilled } from "@element-plus/icons-vue";
import { ApiUploadTemp } from "@/api/permission/myTicket";
import axios from "axios";
const dialogFormVisible = ref(false);
const updateVisible = (newVal:boolean)=>{
dialogFormVisible.value = newVal;
};
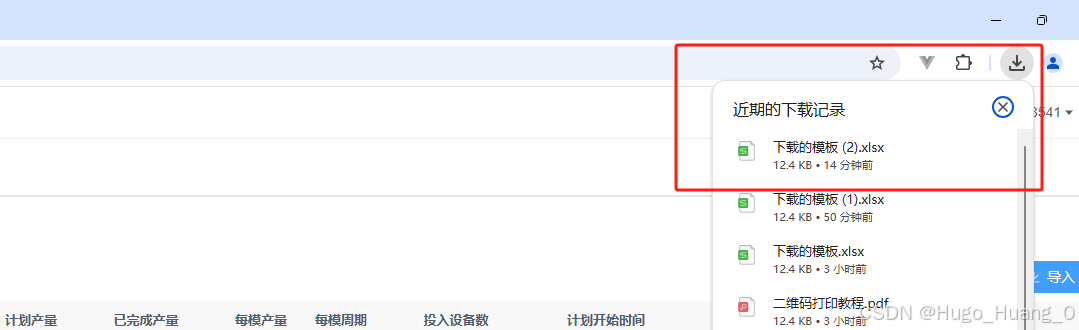
const uploadTmpl = async () => {
const response = await axios({
url: "http://xxxx/1730517650149.xlsx",//服务器返回的模板下载地址路径
method: "GET",
responseType: "blob", // 必须指定为blob类型才能下载
});
const url = window.URL.createObjectURL(new Blob([response.data]));
const link = document.createElement("a");
link.href = url;
link.setAttribute("download", "下载的模板.xlsx");
document.body.appendChild(link);
link.click();
};
defineExpose({updateVisible});
</script>
<style scoped lang='scss'></style>
 2.实现文件导入
<template>
  <div class="container">
    <!-- 弹出层 -->
    <el-dialog
      v-model="dialogFormVisible"
      title="xxx文件导入"
      width="500"
      draggable
    >
      <el-upload
        class="upload-demo"
        drag
        action="后端接口"
        :file-list="fileList"
        :before-upload="beforeUpload"
        :http-request="customHttpRequest"
        multiple
      >
        <el-icon
          class="
        el-icon--upload"
        >
          <upload-filled />
        </el-icon>
        <div class="el-upload__text">
          将文件拖到此处,或<em>点击上传</em>
        </div>
        <template #tip>
          <div class="el-upload__tip">
            只能上传jpg/png文件,且不超过500kb<text style="cursor: pointer;color: #409eff;" @click="uploadTmpl">
              下载模板
            </text>
          </div>
        </template>
      </el-upload>
      <template #footer>
        <div class="dialog-footer">
          <el-button @click="dialogFormVisible = false">
            取消
          </el-button>
          <el-button type="primary" @click="dialogFormVisible = false">
            确认
          </el-button>
        </div>
      </template>
    </el-dialog>
  </div>
</template>

<script setup lang="ts">
import { ref } from "vue";
import { UploadFilled } from "@element-plus/icons-vue";
import { ApiUploadTemp } from "@/api/permission/myTicket";
import axios from "axios";
import { ElMessage } from "element-plus";
import Cookies from "js-cookie";

const dialogFormVisible = ref(false);
const fileList = ref([]);

const updateVisible = (newVal:boolean)=>{
    dialogFormVisible.value = newVal;
};
//模板下载
const uploadTmpl = async () => {
  const response = await axios({
        url: "http://xxx/1730517650149.xlsx",//服务器返回的模板下载地址路径
        method: "GET",
        responseType: "blob", // 必须指定为blob类型才能下载
    });
    const url = window.URL.createObjectURL(new Blob([response.data]));
    const link = document.createElement("a");
    link.href = url;
    link.setAttribute("download", "下载的模板.xlsx");
    document.body.appendChild(link);
    link.click();
};

//文件导入
const beforeUpload = (file:any) => {
  const isXlsx = file.type === "application/vnd.openxmlformats-officedocument.spreadsheetml.sheet";
  const isLt500kb = file.size / 1024 < 500;

  if (!isXlsx) {
    ElMessage({
      message:"上传文件只能是 XLSX 格式!",
      type:"warning"
    });
  }
  if (!isLt500kb) {
    ElMessage({
      message:"上传文件大小不能超过 500KB!",
      type:"warning"
    });
  }
  return isXlsx && isLt500kb;
};
//自定义上传请求
const customHttpRequest = async (options:any) => {
  const formData = new FormData();
  formData.append("file", options.file);
  const token = Cookies.get("Admin-Token");
  try {
    const response = await axios.post(options.action, formData, {
      headers: {
        "Content-Type": "multipart/form-data",
        "Authorization": `${token}`  // 传入token
      },
    });
    options.onSuccess(response.data, options.file);
  } catch (error) {
    options.onError(error);
  }
};

defineExpose({updateVisible});
</script>

<style scoped lang='scss'></style>
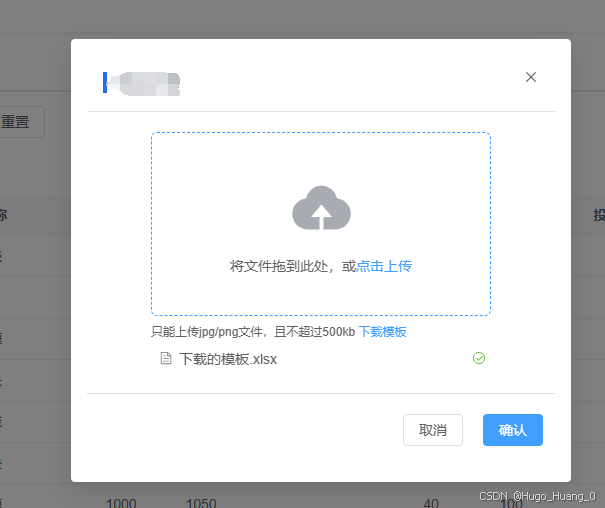
根据以上可以实现文件的导入功能。
总结
以上就是基于element实现的文件上传功能的内容,本文仅仅简单介绍了基本的使用,如果后续还有什么复杂的需求,需要大家去摸索了,这里只是抛砖引玉的作用。大家觉得本文对你有用,请大家点个赞,谢谢!


 1963
1963

 被折叠的 条评论
为什么被折叠?
被折叠的 条评论
为什么被折叠?
 到【灌水乐园】发言


