


目录
单例bean中使用多例bean:ApplicationContext接口的方式
单例bean中使用多例bean:lookup-method方式实现
通常情况下,我们使用的bean都是单例的,如果一个bean需要依赖于另一个bean的时候,可以在当前 bean中声明另外一个bean引用,然后注入依赖的bean,此时被依赖的bean在当前bean中自始至终都是同一个实例。
案例回顾:
public class ServiceA {
}
public class ServiceB {
private ServiceA serviceA;
public ServiceA getServiceA() {
return serviceA;
}
public void setServiceA(ServiceA serviceA) {
this.serviceA = serviceA;
}
}<?xml version="1.0" encoding="UTF-8"?>
<beans xmlns="http://www.springframework.org/schema/beans"
xmlns:xsi="http://www.w3.org/2001/XMLSchema-instance"
xsi:schemaLocation="http://www.springframework.org/schema/beans
http://www.springframework.org/schema/beans/spring-beans-4.3.xsd">
<bean id="serviceA" class="com.example.Bean.ServiceA" scope="prototype"/>
<bean id="serviceB" class="com.example.Bean.ServiceB">
<property name="serviceA" ref="serviceA"/>
</bean>
</beans>@SpringBootTest
class LookupMethodApplicationTests {
@Test
void contextLoads() {
ClassPathXmlApplicationContext context = new ClassPathXmlApplicationContext("applicationContext.xml");
System.out.println(context.getBean(ServiceA.class));
System.out.println(context.getBean(ServiceA.class));
System.out.println("ServiceB中的ServiceA");
ServiceB serviceB1 = context.getBean(ServiceB.class);
System.out.println(serviceB1.getServiceA());
ServiceB serviceB2 = context.getBean(ServiceB.class);
System.out.println(serviceB2.getServiceA());
}
}上面我们定义了两个Bean对象,ServcieA和ServiceB。
serviceA的scope是prototype,表示serviceA是多例的,每次从容器中获取serviceA都会返回 一个新的对象。
而serviceB的scope没有配置,默认是单例的,通过property元素将serviceA注入。
而测试代码中,我们首先是从容器获取两次ServiceA对象
然后又从ServiceB对象中获取两次ServiceA对象
控制台打印:

从图中我们可以看出:我们一开始是从容器中获取的两次ServiceA不是用一个对象,这是理所当然的,因为我们设置了scope="prototype"。但奇怪的是为什么我们从ServiceB中获取两次ServiceA对象,两次获取的居然是同一个对象,这是因为 serviceB是单例的,serviceB中的serviceA会在容器创建serviceB的时候,从容器中获取一个serviceA将其注入到serviceB中,所以自始至终serviceB中的serviceA都是同一个对象。
如果我们希望serviceB中每次使用serviceA的时候serviceA都是一个新的实例,我们怎么实现呢?
我们可以在serviceB中加个方法去获取serviceA,这个方法中我们主动去容器中获取serviceA,那么每次获取到的都是不同的serviceA实例。 那么问题来了,我们如何在serviceB中获取到spring容器呢?
spring中有个接口 ApplicationContextAware :
public interface ApplicationContextAware extends Aware {
    void setApplicationContext(ApplicationContext applicationContext) throws BeansException;
}
上面这个接口有一个方法 setApplicationContext ,这个接口给了自定义的bean中获取 applicationContext的能力,当我们的类实现这个接口之后,spring容器创建bean对象的时候,如果 bean实现了这个接口,那么容器会自动调用 setApplicationContext 方法,将容器对象 applicationContext 传入,此时在我们的bean对象中就可以使用容器的任何方法了。
下面我们就通过 ApplicationContextAware 接口来实现单例bean中使用多例bean的案例。
单例bean中使用多例bean:ApplicationContext接口的方式
public class ServiceA {
}
public class ServiceB implements ApplicationContextAware {
private ApplicationContext applicationContext;
public ServiceA getServiceA() {
return this.applicationContext.getBean(ServiceA.class);
}
@Override
public void setApplicationContext(ApplicationContext applicationContext) throws BeansException {
this.applicationContext=applicationContext;
}
public void say(){
ServiceA serviceA = this.getServiceA();
System.out.println("this:"+this+"\n"+"ServiceA:"+serviceA);
}
}<?xml version="1.0" encoding="UTF-8"?>
<beans xmlns="http://www.springframework.org/schema/beans"
xmlns:xsi="http://www.w3.org/2001/XMLSchema-instance"
xsi:schemaLocation="http://www.springframework.org/schema/beans
http://www.springframework.org/schema/beans/spring-beans-4.3.xsd">
<bean id="serviceA" class="com.example.Bean.ServiceA" scope="prototype"></bean>
<bean id="serviceB" class="com.example.Bean.ServiceB"></bean>
</beans>@SpringBootTest
class LookupMethodApplicationTests {
@Test
void contextLoads() {
ClassPathXmlApplicationContext context = new ClassPathXmlApplicationContext("applicationContext.xml");
System.out.println(context.getBean(ServiceA.class));
System.out.println(context.getBean(ServiceA.class));
System.out.println("ServiceB中的ServiceA");
ServiceB serviceB1 = context.getBean(ServiceB.class);
serviceB1.say();
ServiceB serviceB2 = context.getBean(ServiceB.class);
serviceB2.say();
}
}注意上面代码,ServiceB实现了ApplicationContextAware接口,然后实现了这个接口中的 setApplicationContext方法,spring容器在创建ServiceB的时候会自动调用 setApplicationContext方法。
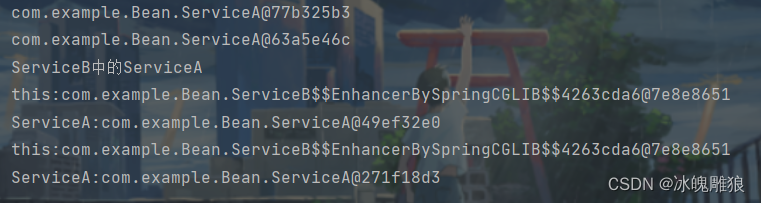
运行后控制台打印:

分析:
- 前两次直接获取的ServiceA为两个不同的对象,这个可以理解,因为是多例
- 第四行和第六行打印的是ServiceB,两次打印的是同一个对象,这也可以理解,因为Spring中的Bean默认就是单例
- 重点再看第五行和第七行,打印了不同的ServiceA对象。这是因为我们每次创建ServiceB对象,虽然是同一个对象,但是每一次创建都会自动调用setApplicationContext方法,然后重新去容器里面找ServiceA对象,并返回。实现了我们说的单例Bean中使用多例Bean
单例bean中使用多例bean:lookup-method方式实现
上面这种方式实现了单例bean中使用多例bean的需求,但是我们需要手动实现spring中的接口 ApplicationContextAware ,此时对spring的api有耦合的作用,我们一直推行高内聚低耦合,所以我们得寻求更好的办法。 能不能有这样的功能,当serviceB中调用getServiceA的时候,系统自动将这个方法拦截,然后去spring 容器中查找对应的serviceA对象然后返回,spring中的lookup-method就可以实现这样的功能。
public class ServiceA {
}
public class ServiceB {
public ServiceA getServiceA() {
return null;
}
public void say(){
ServiceA serviceA = this.getServiceA();
System.out.println("this:"+this+"\n"+"ServiceA:"+serviceA);
}
}<?xml version="1.0" encoding="UTF-8"?>
<beans xmlns="http://www.springframework.org/schema/beans"
xmlns:xsi="http://www.w3.org/2001/XMLSchema-instance"
xsi:schemaLocation="http://www.springframework.org/schema/beans
http://www.springframework.org/schema/beans/spring-beans-4.3.xsd">
<bean id="serviceA" class="com.example.Bean.ServiceA" scope="prototype"></bean>
<bean id="serviceB" class="com.example.Bean.ServiceB">
<lookup-method name="getServiceA" bean="serviceA"></lookup-method>
</bean>
</beans>@SpringBootTest
class LookupMethodApplicationTests {
@Test
void contextLoads() {
ClassPathXmlApplicationContext context = new ClassPathXmlApplicationContext("applicationContext.xml");
System.out.println(context.getBean(ServiceA.class));
System.out.println(context.getBean(ServiceA.class));
System.out.println("ServiceB中的ServiceA");
ServiceB serviceB1 = context.getBean(ServiceB.class);
serviceB1.say();
ServiceB serviceB2 = context.getBean(ServiceB.class);
serviceB2.say();
}
}注意上面的ServiceB的getServiceA()方法,这个方法中返回了一个null对象。
当我们每次调用 serviceB 中的 getServiceA() 方法的时候,这个方法都会被拦截,然后会按照lookup-method元素中bean属性的值作为bean的名称去容器中查找对应bean,然后作为getServiceA的返回值返回,即调用getServiceA方法的时候,会从spring容器中查找 id为serviceA 的bean然后返回。
运行以后控制台打印:

通过lookup-method标签就很方便的就解决了单例Bean中使用多例Bean的问题。
这个地方底层是使用cglib代理实现的,后面有篇文章会详细介绍代理的2种实现。 spring中很多牛的功能都是靠代理实现的。 spring提供的还有一个功能,同样可以可以解决上面单例bean中用到多例bean的问题,也就是下面我们要说的replaced-method。
replaced-method:方法替换
replaced-method:方法替换。比如我们要调用serviceB中的getServiceA的时候,我们可以对serviceB 这个bean中的getServiceA方法进行拦截,把这个调用请求转发到一个替换者处理。这就是replacedmethod可以实现的功能,比lookup-method更强大更灵活。
replaced-method的使用3个步骤
步骤一:定义替换者
自定义一个替换者,替换者需要实现spring中的MethodReplacer接口,看一下这个接口的定义:
public interface MethodReplacer {
    /**
     * @param obj 被替换方法的目标对象
     * @param method 目标对象的方法
     * @param args 方法的参数
     * @return return value for the method
     */
    Object reimplement(Object obj, Method method, Object[] args) throws Throwable;
}
当调用目标对象需要被替换的方法的时候,这个调用请求会被转发到上面的替换者的 reimplement方法进行处理。
步骤二:定义替换者bean
<!-- 定义替换者bean -->
<bean id="" class="" />
步骤三:通过replaced-method元素配置目标bean需要被替换的方法
<bean id="" class="">
    <replaced-method name="" replacer=""/>
</bean>
注意上面的 replaced-method 元素的2个属性:
name:用于指定当前bean需要被替换的方法
replacer:替换者,即实现了MethodReplacer接口的类对应的bean。
当调用了该bean中的name属性对应的方法的时候,就会被拦截,然后转去执行repacer对应的bean中的reimplatement方法
public class ServiceA {
}
public class ServiceB {
public ServiceA getServiceA() {
return null;
}
public void say(){
ServiceA serviceA = this.getServiceA();
System.out.println("this:"+this+"\n"+"ServiceA:"+serviceA);
}
}public class ServiceBMethodReplacer implements MethodReplacer, ApplicationContextAware {
private ApplicationContext applicationContext;
@Override
public Object reimplement(Object o, Method method, Object[] objects) throws Throwable {
return applicationContext.getBean(ServiceA.class);
}
@Override
public void setApplicationContext(ApplicationContext applicationContext) throws BeansException {
this.applicationContext=applicationContext;
}
}<?xml version="1.0" encoding="UTF-8"?>
<beans xmlns="http://www.springframework.org/schema/beans"
xmlns:xsi="http://www.w3.org/2001/XMLSchema-instance"
xsi:schemaLocation="http://www.springframework.org/schema/beans
http://www.springframework.org/schema/beans/spring-beans-4.3.xsd">
<bean id="serviceA" class="com.example.Bean.ServiceA" scope="prototype"></bean>
<bean id="serviceBMethodReplacer" class="com.example.Bean.ServiceBMethodReplacer"></bean>
<bean id="serviceB" class="com.example.Bean.ServiceB">
<replaced-method name="getServiceA" replacer="serviceBMethodReplacer"></replaced-method>
</bean>
</beans>@SpringBootTest
class LookupMethodApplicationTests {
@Test
void contextLoads() {
ClassPathXmlApplicationContext context = new ClassPathXmlApplicationContext("applicationContext.xml");
System.out.println(context.getBean(ServiceA.class));
System.out.println(context.getBean(ServiceA.class));
System.out.println("ServiceB中的ServiceA");
ServiceB serviceB1 = context.getBean(ServiceB.class);
serviceB1.say();
ServiceB serviceB2 = context.getBean(ServiceB.class);
serviceB2.say();
}
}运行后控制台打印:
总结
- lookup-method:方法查找,可以对指定的bean的方法进行拦截,然后从容器中查找指定的 bean作为被拦截方法的返回值
- replaced-method:方法替换,可以实现bean方法替换的效果,整体来说比lookup-method更 灵活一些


 703
703


 被折叠的 条评论
为什么被折叠?
被折叠的 条评论
为什么被折叠?
 到【灌水乐园】发言


