


1 Zabbix 监控 Mysql 主从
1.1 Master 配置
docker pull mysql:5.7

# 配置 mysql 服务端
mkdir -pv /etc/mysql/mysql.conf.d
cat > /etc/mysql/mysql.conf.d/mysqld.cnf <<EOF
[mysqld]
bind-address = 0.0.0.0
port=3306
binlog_format=row
log-bin=/var/lib/mysql/master-bin
log-bin-index=/var/lib/mysql/master-bin.index
server-id = 11
character-set-server=utf8mb4
collation-server=utf8mb4_general_ci
EOF

# 配置 mysql 客户端
mkdir -pv /etc/mysql/conf.d/
cat > /etc/mysql/conf.d/mysql.cnf <<EOF
[mysql]
default-character-set=utf8mb4
EOF

# 创建数据存放目录
mkdir -pv /data/mysql

# 运行 mysql 镜像
docker run -it \
--name mysql_master \
-p 3306:3306 \
-v /etc/mysql/mysql.conf.d/mysqld.cnf:/etc/mysql/mysql.conf.d/mysqld.cnf \
-v /etc/mysql/conf.d/mysql.cnf:/etc/mysql/conf.d/mysql.cnf \
-v /data/mysql:/var/lib/mysql \
-e MYSQL_ROOT_PASSWORD="song123" \
-d mysql:5.7

# 进入容器验证
[root@master4 ~]# docker ps
CONTAINER ID   IMAGE       COMMAND                  CREATED         STATUS         PORTS                                                  NAMES
e4e3b0aa9ced   mysql:5.7   "docker-entrypoint.s…"   7 minutes ago   Up 7 minutes   0.0.0.0:3306->3306/tcp, :::3306->3306/tcp, 33060/tcp   mysql_master
[root@master4 ~]# docker exec -it mysql_master /bin/bash
root@e4e3b0aa9ced:/# mysql -uroot -psong123
mysql: [Warning] Using a password on the command line interface can be insecure.
Welcome to the MySQL monitor.  Commands end with ; or \g.
Your MySQL connection id is 3
Server version: 5.7.35-log MySQL Community Server (GPL)

Copyright (c) 2000, 2021, Oracle and/or its affiliates.

Oracle is a registered trademark of Oracle Corporation and/or its
affiliates. Other names may be trademarks of their respective
owners.

Type 'help;' or '\h' for help. Type '\c' to clear the current input statement.

mysql>
1.2 Slave 配置
docker pull mysql:5.7

# 配置 mysql 服务端
mkdir -pv /etc/mysql/mysql.conf.d
cat > /etc/mysql/mysql.conf.d/mysqld.cnf <<EOF
[mysqld]
bind-address = 0.0.0.0
port=3306
binlog_format=row
log-bin=/var/lib/mysql/master-bin
log-bin-index=/var/lib/mysql/master-bin.index
server-id = 22        # 不能和主机的 ID 相同,否则主从将失效
character-set-server=utf8mb4
collation-server=utf8mb4_general_ci
EOF

# 配置 mysql 客户端
mkdir -pv /etc/mysql/conf.d/
cat > /etc/mysql/conf.d/mysql.cnf <<EOF
[mysql]
default-character-set=utf8mb4
EOF

# 创建数据存放目录
mkdir -pv /data/mysql

# 运行 mysql 镜像
docker run -it \
--name mysql_slave \
-p 3306:3306 \
-v /etc/mysql/mysql.conf.d/mysqld.cnf:/etc/mysql/mysql.conf.d/mysqld.cnf \
-v /etc/mysql/conf.d/mysql.cnf:/etc/mysql/conf.d/mysql.cnf \
-v /data/mysql:/var/lib/mysql \
-e MYSQL_ROOT_PASSWORD="song123" \
-d mysql:5.7

# 进入容器验证
[root@slave4 ~]# docker ps
CONTAINER ID   IMAGE       COMMAND                  CREATED         STATUS         PORTS                                                  NAMES
a458ea6c4da9   mysql:5.7   "docker-entrypoint.s…"   8 seconds ago   Up 6 seconds   0.0.0.0:3306->3306/tcp, :::3306->3306/tcp, 33060/tcp   mysql_slave
[root@slave4 ~]# docker exec -it mysql_slave /bin/bash
root@a458ea6c4da9:/# mysql -uroot -psong123
mysql: [Warning] Using a password on the command line interface can be insecure.
Welcome to the MySQL monitor.  Commands end with ; or \g.
Your MySQL connection id is 2
Server version: 5.7.35-log MySQL Community Server (GPL)

Copyright (c) 2000, 2021, Oracle and/or its affiliates.

Oracle is a registered trademark of Oracle Corporation and/or its
affiliates. Other names may be trademarks of their respective
owners.

Type 'help;' or '\h' for help. Type '\c' to clear the current input statement.

mysql>
1.3 创建有复制权限(replication slave,replication client)的用户账号
# MySQL Master 授权主从账号
[root@master4 ~]# docker exec -it mysql_master /bin/bash -c "mysql -uroot -psong123"
mysql: [Warning] Using a password on the command line interface can be insecure.
Welcome to the MySQL monitor.  Commands end with ; or \g.
Your MySQL connection id is 5
Server version: 5.7.35-log MySQL Community Server (GPL)

Copyright (c) 2000, 2021, Oracle and/or its affiliates.

Oracle is a registered trademark of Oracle Corporation and/or its
affiliates. Other names may be trademarks of their respective
owners.

Type 'help;' or '\h' for help. Type '\c' to clear the current input statement.

mysql> grant replication slave,replication client on *.* to 'repluser'@'172.18.%.%' identified by 'repl123';
Query OK, 0 rows affected, 1 warning (0.01 sec)

mysql> flush privileges;
Query OK, 0 rows affected (0.00 sec)

mysql> show master logs;
+-------------------+-----------+
| Log_name          | File_size |
+-------------------+-----------+
| master-bin.000001 |       622 |
+-------------------+-----------+
1 row in set (0.00 sec)

mysql>
如果 MySQL 主库已经运行一段时间,可以先将主库数据 dump 一份出来,拷贝到从库上并进行数据恢复后,再进行主从同步的配置,这样可以提高主从同步的效率
# Master 机器操作
mysqldump --all-databases  --single_transaction --flush-logs --master-data=2 --lock-tables > /opt/backup.sql

scp /opt/backup.sql  MySQL_BackUP_IP:/opt/
MySQL slave导入数据
# Slave 机器操作
mysql -uroot -psong123 < /opt/backup.sql
1.4 MySQL slave 配置同步
在 MySQL Slave 服务器导入数据开始同步数据,Position位置在sql文件
[root@slave4 ~]# docker exec -it mysql_slave /bin/bash
root@a458ea6c4da9:/# mysql -uroot -psong123
mysql: [Warning] Using a password on the command line interface can be insecure.
Welcome to the MySQL monitor.  Commands end with ; or \g.
Your MySQL connection id is 3
Server version: 5.7.35-log MySQL Community Server (GPL)

Copyright (c) 2000, 2021, Oracle and/or its affiliates.

Oracle is a registered trademark of Oracle Corporation and/or its
affiliates. Other names may be trademarks of their respective
owners.

Type 'help;' or '\h' for help. Type '\c' to clear the current input statement.

mysql> CHANGE MASTER TO MASTER_HOST='172.18.8.77',MASTER_USER='repluser',MASTER_PASSWORD='repl123',MASTER_LOG_FILE='master-bin.000001',MASTER_LOG_POS=622;
Query OK, 0 rows affected, 2 warnings (0.02 sec)

mysql>
开启主从同步
mysql> start slave;
Query OK, 0 rows affected (0.00 sec)
查看主从同步状态
mysql> show slave status\G
*************************** 1. row ***************************
               Slave_IO_State: Waiting for master to send event
                  Master_Host: 172.18.8.77
                  Master_User: repluser
                  Master_Port: 3306
                Connect_Retry: 60
              Master_Log_File: master-bin.000001
          Read_Master_Log_Pos: 622
               Relay_Log_File: a458ea6c4da9-relay-bin.000002
                Relay_Log_Pos: 321
        Relay_Master_Log_File: master-bin.000001
             Slave_IO_Running: Yes    # IO 线程,将 Master 同步过来的二进制日志转换为中继日志
            Slave_SQL_Running: Yes    # SQL 线程,将中继日志在本地完成回放,写入到 Slave 的数据库中,两个状态都为 YES 才表示主从正常
              Replicate_Do_DB:
          Replicate_Ignore_DB:
           Replicate_Do_Table:
       Replicate_Ignore_Table:
      Replicate_Wild_Do_Table:
  Replicate_Wild_Ignore_Table:
                   Last_Errno: 0
                   Last_Error:
                 Skip_Counter: 0
          Exec_Master_Log_Pos: 622
              Relay_Log_Space: 535
              Until_Condition: None
               Until_Log_File:
                Until_Log_Pos: 0
           Master_SSL_Allowed: No
           Master_SSL_CA_File:
           Master_SSL_CA_Path:
              Master_SSL_Cert:
            Master_SSL_Cipher:
               Master_SSL_Key:
        Seconds_Behind_Master: 0
Master_SSL_Verify_Server_Cert: No
                Last_IO_Errno: 0
                Last_IO_Error:
               Last_SQL_Errno: 0
               Last_SQL_Error:
  Replicate_Ignore_Server_Ids:
             Master_Server_Id: 11
                  Master_UUID: 15ed5223-f358-11eb-8573-0242ac110002
             Master_Info_File: /var/lib/mysql/master.info
                    SQL_Delay: 0
          SQL_Remaining_Delay: NULL
      Slave_SQL_Running_State: Slave has read all relay log; waiting for more updates  # 主从复制的状态信息
           Master_Retry_Count: 86400
                  Master_Bind:
      Last_IO_Error_Timestamp:
     Last_SQL_Error_Timestamp:
               Master_SSL_Crl:
           Master_SSL_Crlpath:
           Retrieved_Gtid_Set:
            Executed_Gtid_Set:
                Auto_Position: 0
         Replicate_Rewrite_DB:
                 Channel_Name:
           Master_TLS_Version:
1 row in set (0.01 sec)

mysql>
1.5 Procona监控MySQL
# 插件地址
https://www.percona.com/doc/percona-monitoring-plugins/LATEST/zabbix/index.html

# 安装包下载地址
https://www.percona.com/downloads/

# 安装教程
https://www.percona.com/doc/percona-monitoring-plugins/LATEST/zabbix/index.html#installation-instructions
1.5.1 MySQL Master安装zabbix-agent
[root@master4 ~]# rpm -Uvh https://repo.zabbix.com/zabbix/5.4/rhel/7/x86_64/zabbix-release-5.4-1.el7.noarch.rpm
[root@master4 ~]# yum clean all
[root@master4 ~]# yum install zabbix-agent
[root@master4 ~]# grep -Ev "^#|^$" /etc/zabbix/zabbix_agentd.conf
PidFile=/var/run/zabbix/zabbix_agentd.pid
LogFile=/var/log/zabbix/zabbix_agentd.log
LogFileSize=0
Server=172.18.8.18
StartAgents=5
ServerActive=172.18.8.18
Hostname=172.18.8.77
AllowRoot=1             # 修改zabbix agent启动用户为root
User=root               # 同上
Include=/etc/zabbix/zabbix_agentd.d/*.conf
[root@master4 ~]# grep root /usr/lib/systemd/system/zabbix-agent.service   # 修改zabbix agent启动用户为root
User=root
Group=root
[root@master4 ~]# systemctl daemon-reload
[root@master4 ~]# systemctl enable --now zabbix-agent
[root@master4 ~]# ps -ef|grep zabbix
root      4185     1  0 20:10 ?        00:00:00 /usr/sbin/zabbix_agentd -c /etc/zabbix/zabbix_agentd.conf
root      4186  4185  0 20:10 ?        00:00:00 /usr/sbin/zabbix_agentd: collector [idle 1 sec]
root      4187  4185  0 20:10 ?        00:00:00 /usr/sbin/zabbix_agentd: listener #1 [waiting for connection]
root      4188  4185  0 20:10 ?        00:00:00 /usr/sbin/zabbix_agentd: listener #2 [waiting for connection]
root      4189  4185  0 20:10 ?        00:00:00 /usr/sbin/zabbix_agentd: listener #3 [waiting for connection]
root      4190  4185  0 20:10 ?        00:00:00 /usr/sbin/zabbix_agentd: listener #4 [waiting for connection]
root      4191  4185  0 20:10 ?        00:00:00 /usr/sbin/zabbix_agentd: listener #5 [waiting for connection]
root      4192  4185  0 20:10 ?        00:00:00 /usr/sbin/zabbix_agentd: active checks #1 [idle 1 sec]
root      4194  1405  0 20:10 pts/0    00:00:00 grep --color=auto zabbix
[root@master4 ~]#
1.5.2 MySQL Master安装Percona
# 安装Percona软件包
https://www.percona.com/downloads/percona-monitoring-plugins/LATEST/
[root@master4 ~]# yum -y install percona-zabbix-templates-1.1.8-1.noarch.rpm
[root@master4 ~]# cp /var/lib/zabbix/percona/templates/userparameter_percona_mysql.conf /etc/zabbix/zabbix_agentd.d/
[root@master4 ~]# systemctl restart zabbix-agent

# 创建mysql认证文件
[root@master4 ~]# cat /var/lib/zabbix/percona/scripts/ss_get_mysql_stats.php.cnf
<?php
$mysql_user = 'root';
$mysql_pass = 'song123';
[root@master4 ~]#

# 测试脚本能否获取数据
[root@master4 ~]# grep ^HOST /var/lib/zabbix/percona/scripts/get_mysql_stats_wrapper.sh
HOST=172.18.8.77          # 如果不能运行,请修改 HOST 变量
[root@master4 ~]# /var/lib/zabbix/percona/scripts/get_mysql_stats_wrapper.sh gg
6
[root@master4 ~]#
1.5.3 验证MySQL监控数据
zabbix web 导入 Percona 模板

修改为主动监控模式

添加 Mysql 主机并关联 Percona 模板

Percona 模板中的监控项默认是五分钟收集一次监控项数据,会结合脚本检查 agent 上报错数据的文件的时间戳是否超过五分钟,脚本位置在 /var/lib/zabbix/percona/scripts/get_mysql_stats_wrapper.sh
可以根据需要自行修改
2 自定义脚本监控MySQL
2.1 MySQL slave 安装 zabbix agent
[root@slave4 ~]# rpm -Uvh https://repo.zabbix.com/zabbix/5.4/rhel/7/x86_64/zabbix-release-5.4-1.el7.noarch.rpm
[root@slave4 ~]# yum clean all
[root@slave4 ~]# yum install zabbix-agent
[root@slave4 ~]# grep -Ev "^#|^$" /etc/zabbix/zabbix_agentd.conf
PidFile=/var/run/zabbix/zabbix_agentd.pid
LogFile=/var/log/zabbix/zabbix_agentd.log
LogFileSize=0
Server=172.18.8.18
StartAgents=5
ServerActive=172.18.8.18
Hostname=172.18.8.87
AllowRoot=1
User=root
Include=/etc/zabbix/zabbix_agentd.d/*.conf
[root@slave4 ~]# grep root /usr/lib/systemd/system/zabbix-agent.service   # 修改zabbix agent启动用户为root
User=root
Group=root
[root@slave4 ~]# systemctl daemon-reload
[root@slave4 ~]# systemctl enable --now zabbix-agent
[root@slave4 ~]# ps -ef|grep zabbix
root      4133 10636  0 10:38 pts/0    00:00:00 grep --color=auto zabbix
root     30354     1  0 10:17 ?        00:00:00 /usr/sbin/zabbix_agentd -c /etc/zabbix/zabbix_agentd.conf
root     30355 30354  0 10:17 ?        00:00:00 /usr/sbin/zabbix_agentd: collector [idle 1 sec]
root     30356 30354  0 10:17 ?        00:00:00 /usr/sbin/zabbix_agentd: listener #1 [waiting for connection]
root     30357 30354  0 10:17 ?        00:00:00 /usr/sbin/zabbix_agentd: listener #2 [waiting for connection]
root     30358 30354  0 10:17 ?        00:00:00 /usr/sbin/zabbix_agentd: listener #3 [waiting for connection]
root     30359 30354  0 10:17 ?        00:00:00 /usr/sbin/zabbix_agentd: listener #4 [waiting for connection]
root     30360 30354  0 10:17 ?        00:00:00 /usr/sbin/zabbix_agentd: listener #5 [waiting for connection]
root     30361 30354  0 10:17 ?        00:00:08 /usr/sbin/zabbix_agentd: active checks #1 [idle 1 sec]
[root@slave4 ~]#
2.2 编写脚本监控 MySQL 主从同步及延迟
# 家目录加入 mysql 访问信息,不会再有警告提示
# 警告信息:mysql: [Warning] Using a password on the command line interface can be insecure.
[root@slave4 ~]# cat ~/.my.cnf
[mysql]

host=172.18.8.87
user=root
password=song123
[root@slave4 ~]#

# 监控 MySQL 主从同步及延迟
[root@slave4 ~]# cat /etc/zabbix/zabbix_agentd.d/monitor_mysql.sh
#!/bin/bash
#
USER=root
PASS=song123
HOST=172.18.8.87
CONN="mysql -h$HOST"

Seconds_Behind_Master(){
    NUM=$($CONN -e 'show slave status\G;' | awk '/Seconds_Behind_Master:/{print $2}')
    echo $NUM
}

Master_Slave_Check(){
    #IO=$($CONN -e "show slave status\G;" | awk '/Slave_IO_Running:/{print $2}')
    #echo $IO
    #SQL=$($CONN -e "show slave status\G;" | awk '/Slave_SQL_Running:/{print $2}')
    #echo $SQL
    IO_SQL=$($CONN -e "show slave status\G;" | awk '/Slave_SQL_Running:/ || /Slave_IO_Running:/{print $2}')
    IO_SQL_RESULT=$(echo -n $IO_SQL)

    #if [[ $IO == "Yes" ]] && [[ $SQL == "Yes" ]];then
    if [[ "${IO_SQL_RESULT}" == "Yes Yes" ]];then
       echo 1
    else
       echo 0
    fi
}

main(){
case $1 in
  Seconds_Behind_Master)
    Seconds_Behind_Master;
  ;;
  Master_Slave_Check)
    Master_Slave_Check
  ;;
esac
}

main $1

[root@slave4 ~]# chmod a+x /etc/zabbix/zabbix_agentd.d/monitor_mysql.sh
[root@slave4 ~]# bash /etc/zabbix/zabbix_agentd.d/monitor_mysql.sh Master_Slave_Check
1
[root@slave4 ~]#
2.3 自定义监控项配置
[root@slave4 ~]# cat /etc/zabbix/zabbix_agentd.d/master_slave_check.conf
UserParameter=master_slave_check[*],/etc/zabbix/zabbix_agentd.d/monitor_mysql.sh "$1"
[root@slave4 ~]# systemctl restart zabbix-agent.service
zabbix server测试获取数据
[root@zabbixServer ~]# /apps/zabbix/bin/zabbix_get -s172.18.8.87 -p10050 -k master_slave_check[Master_Slave_Check]
1
[root@zabbixServer ~]#
2.4 自定义模板
创建模板和MySQL主从同步的监控项、触发器和图形添加过程,其他监控项省略
2.4.1 创建模板
Configuration-->Templates-->Create template

2.4.2 添加监控项

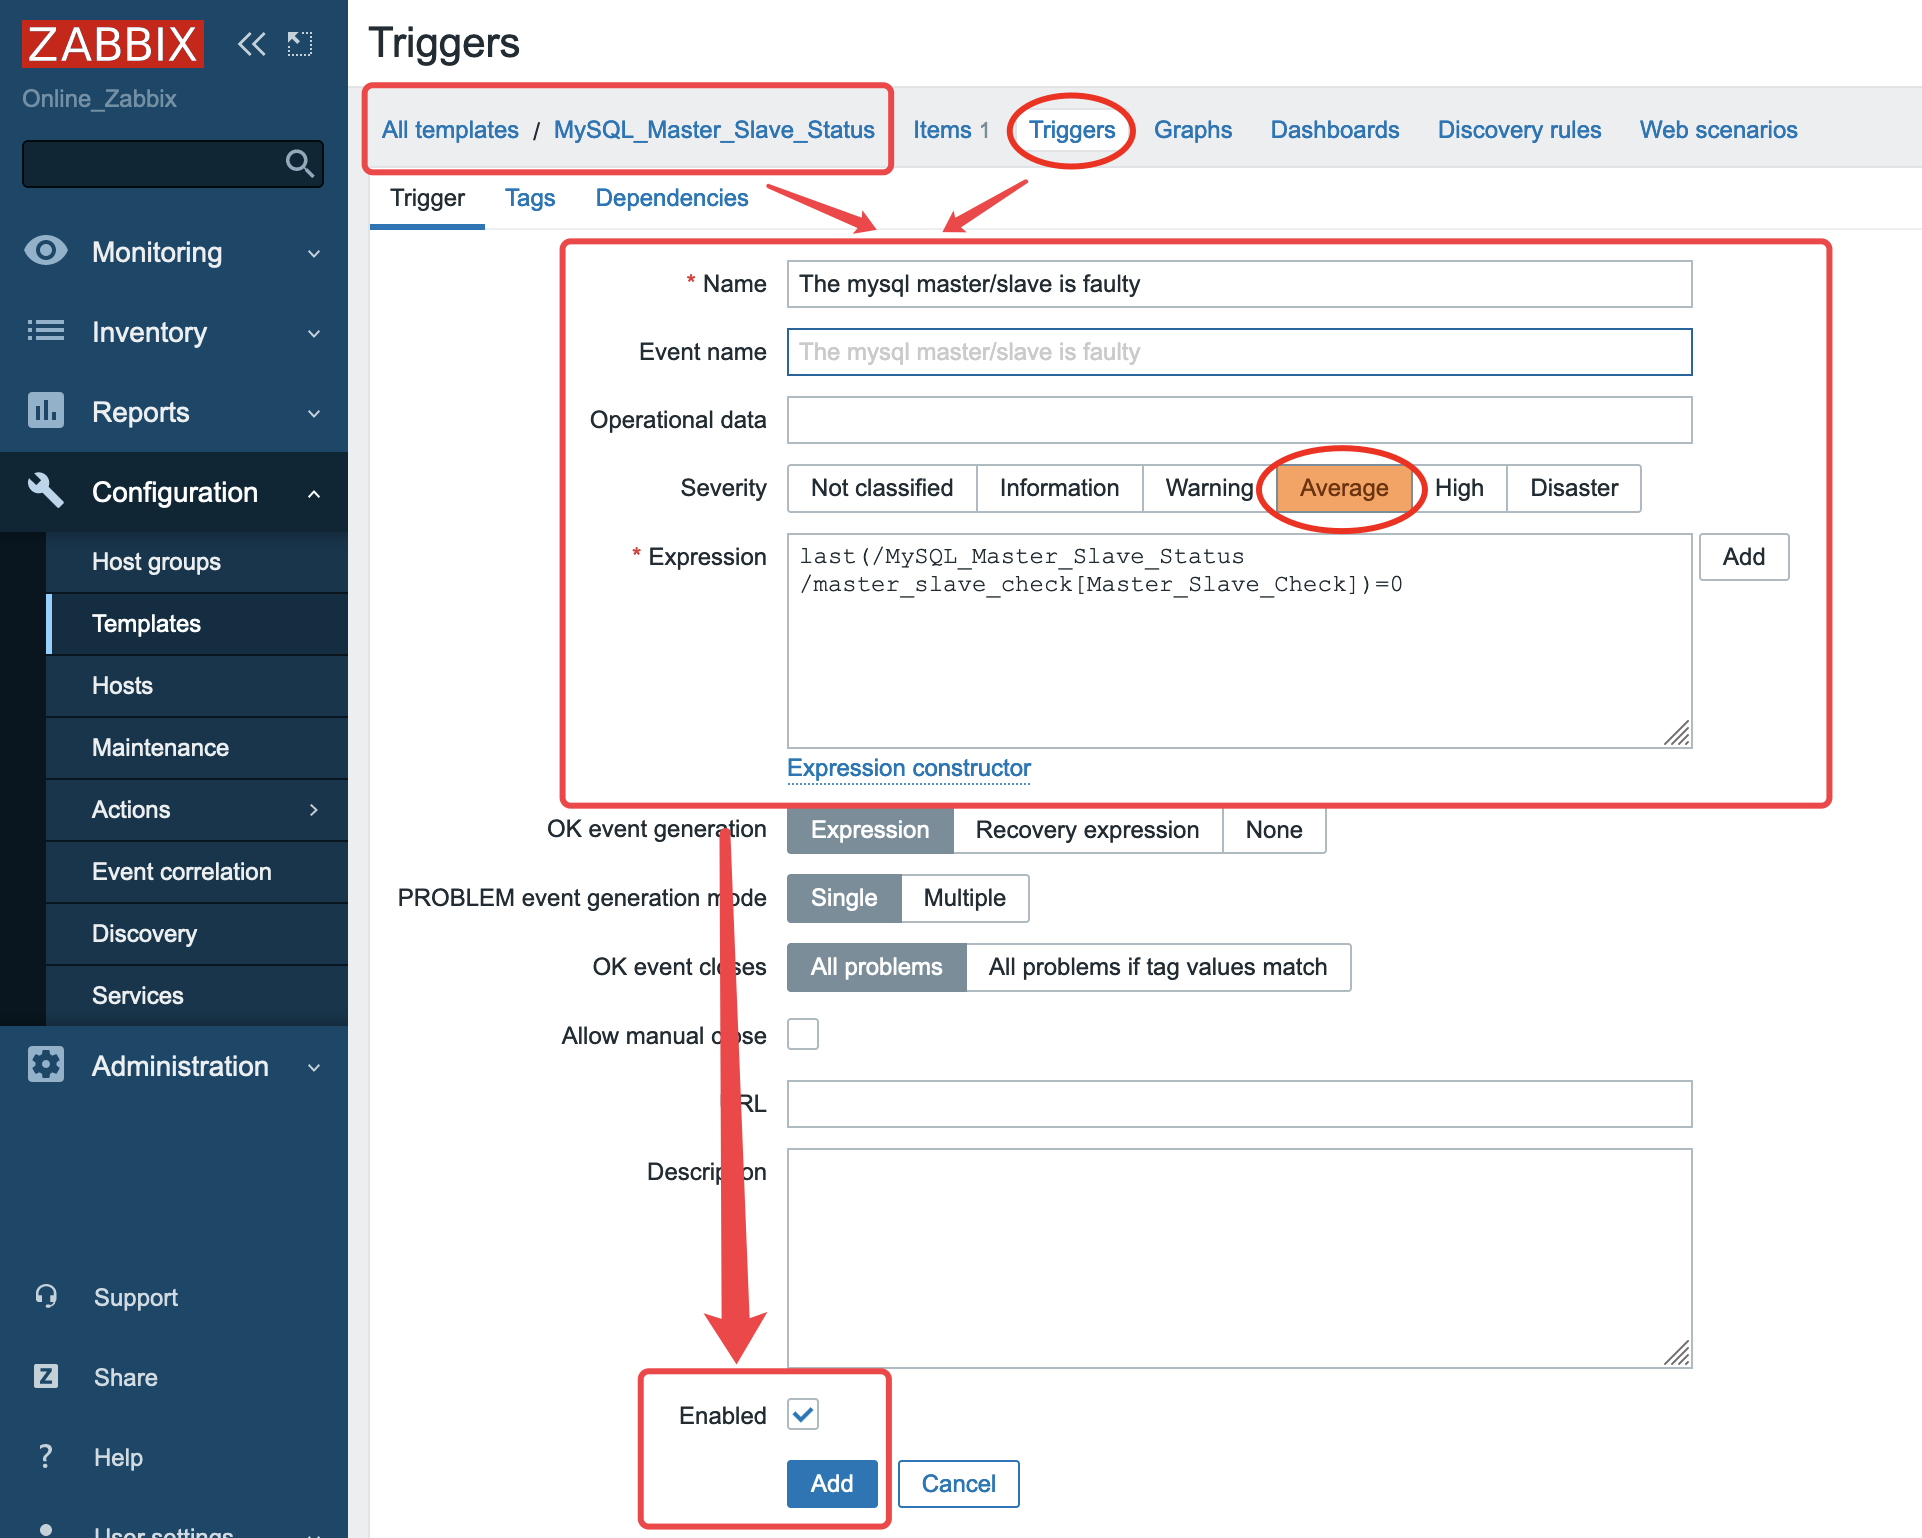
2.4.3 添加触发器
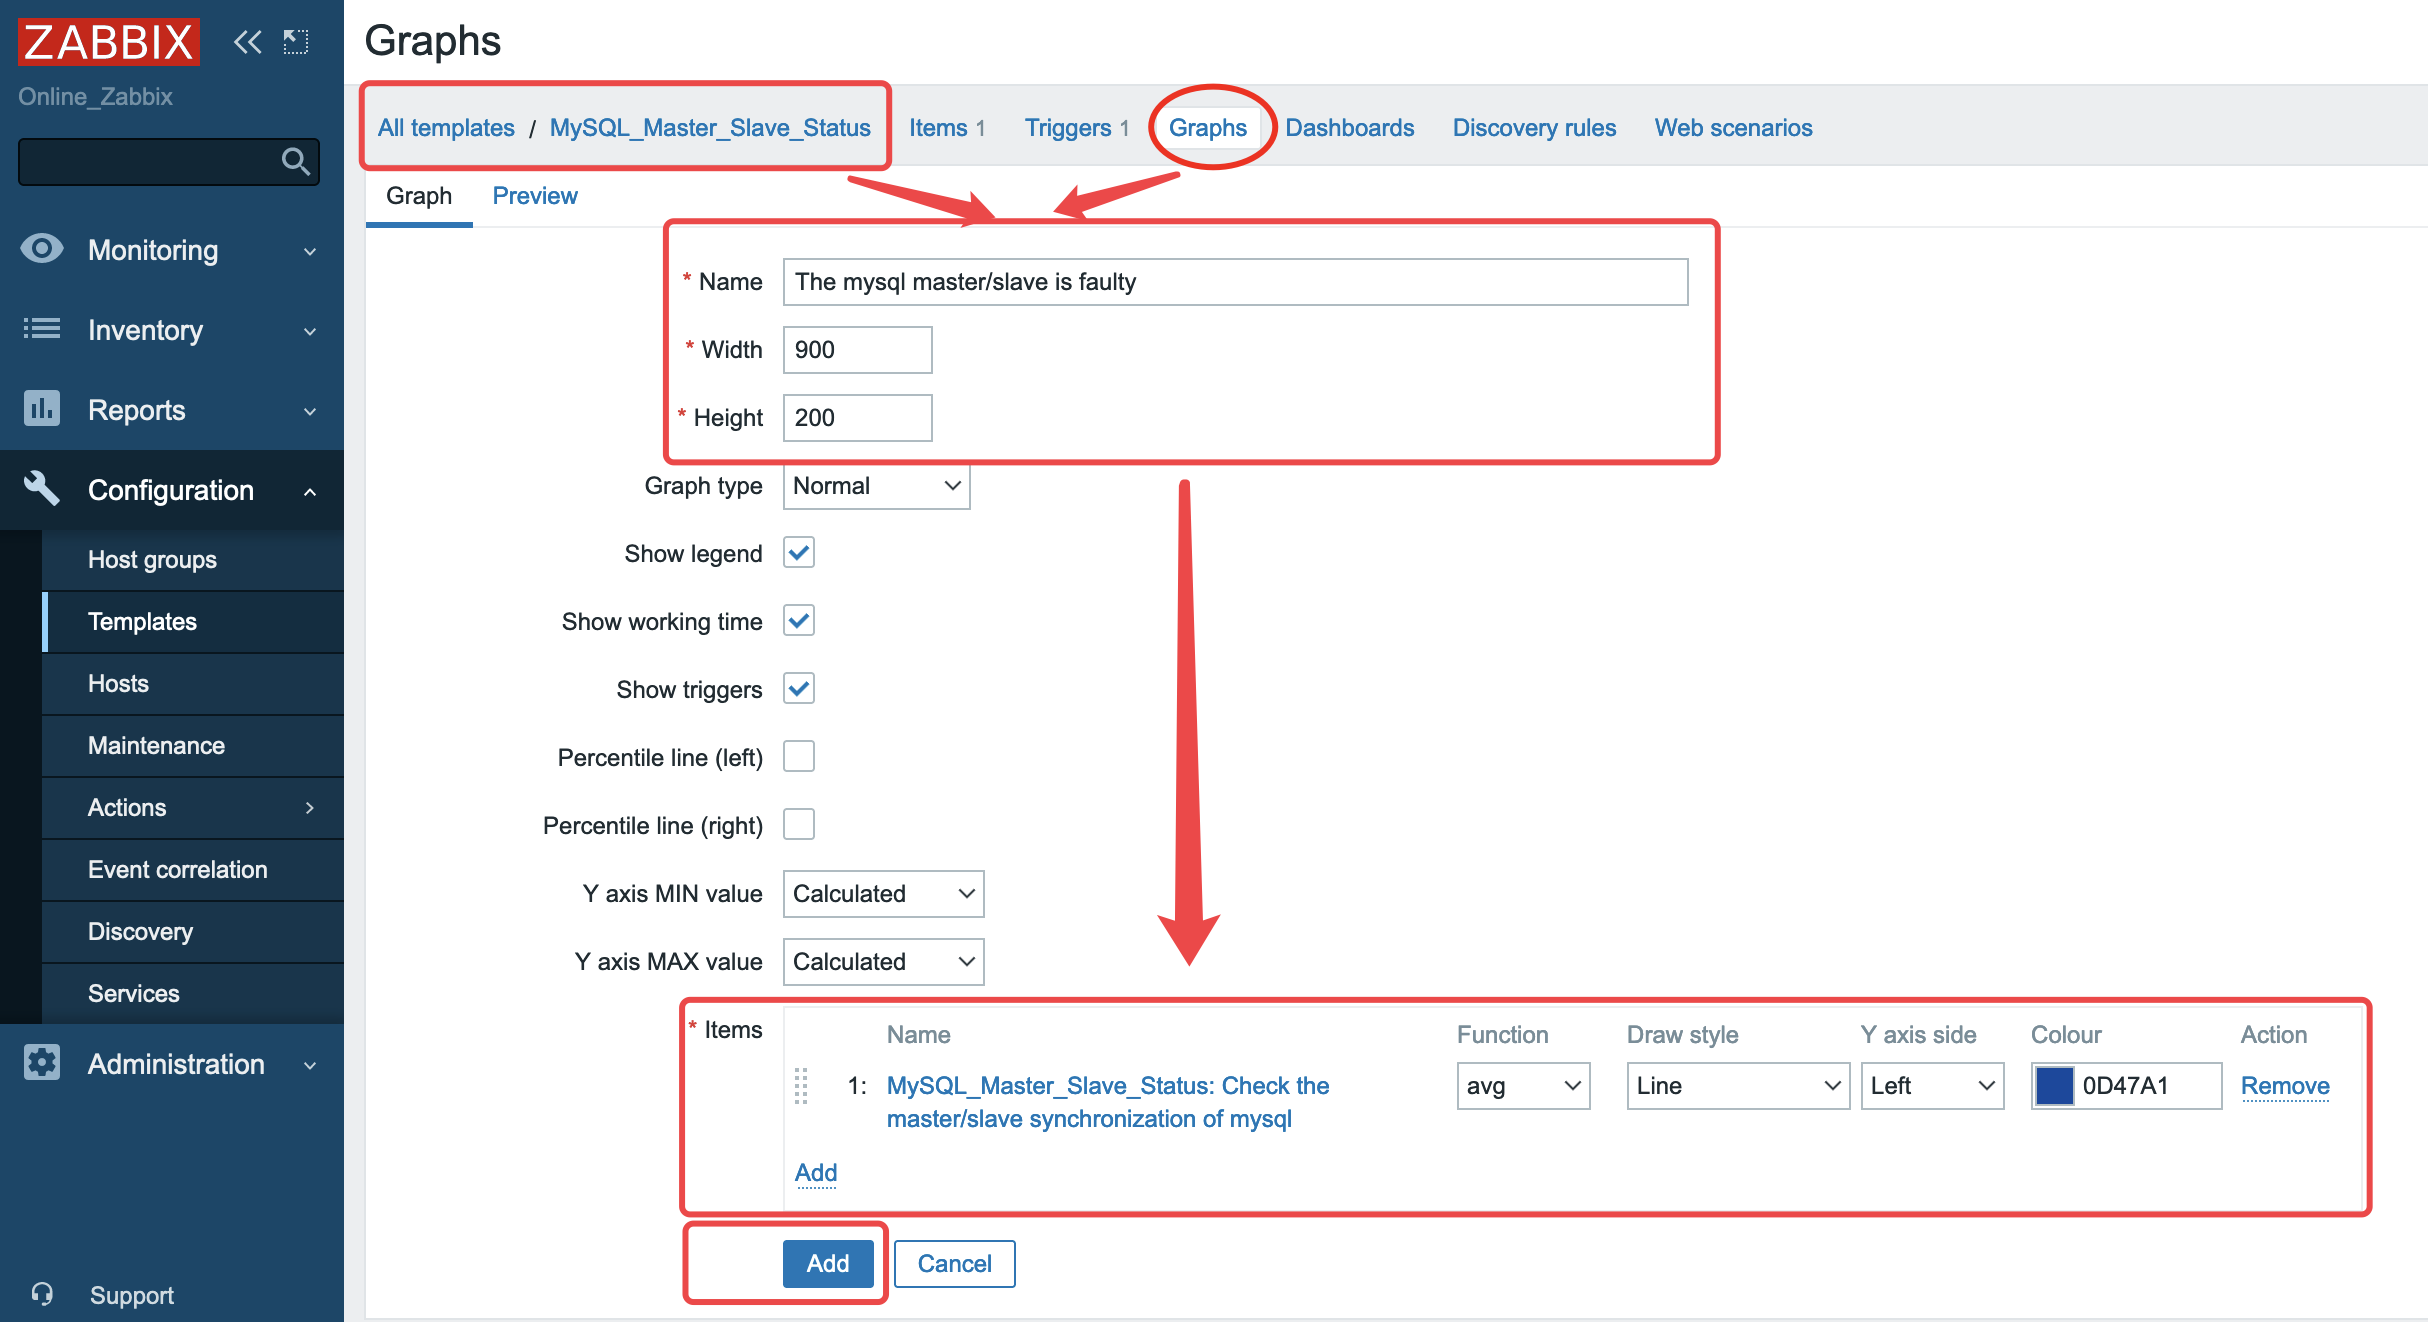
2.4.4 添加图形
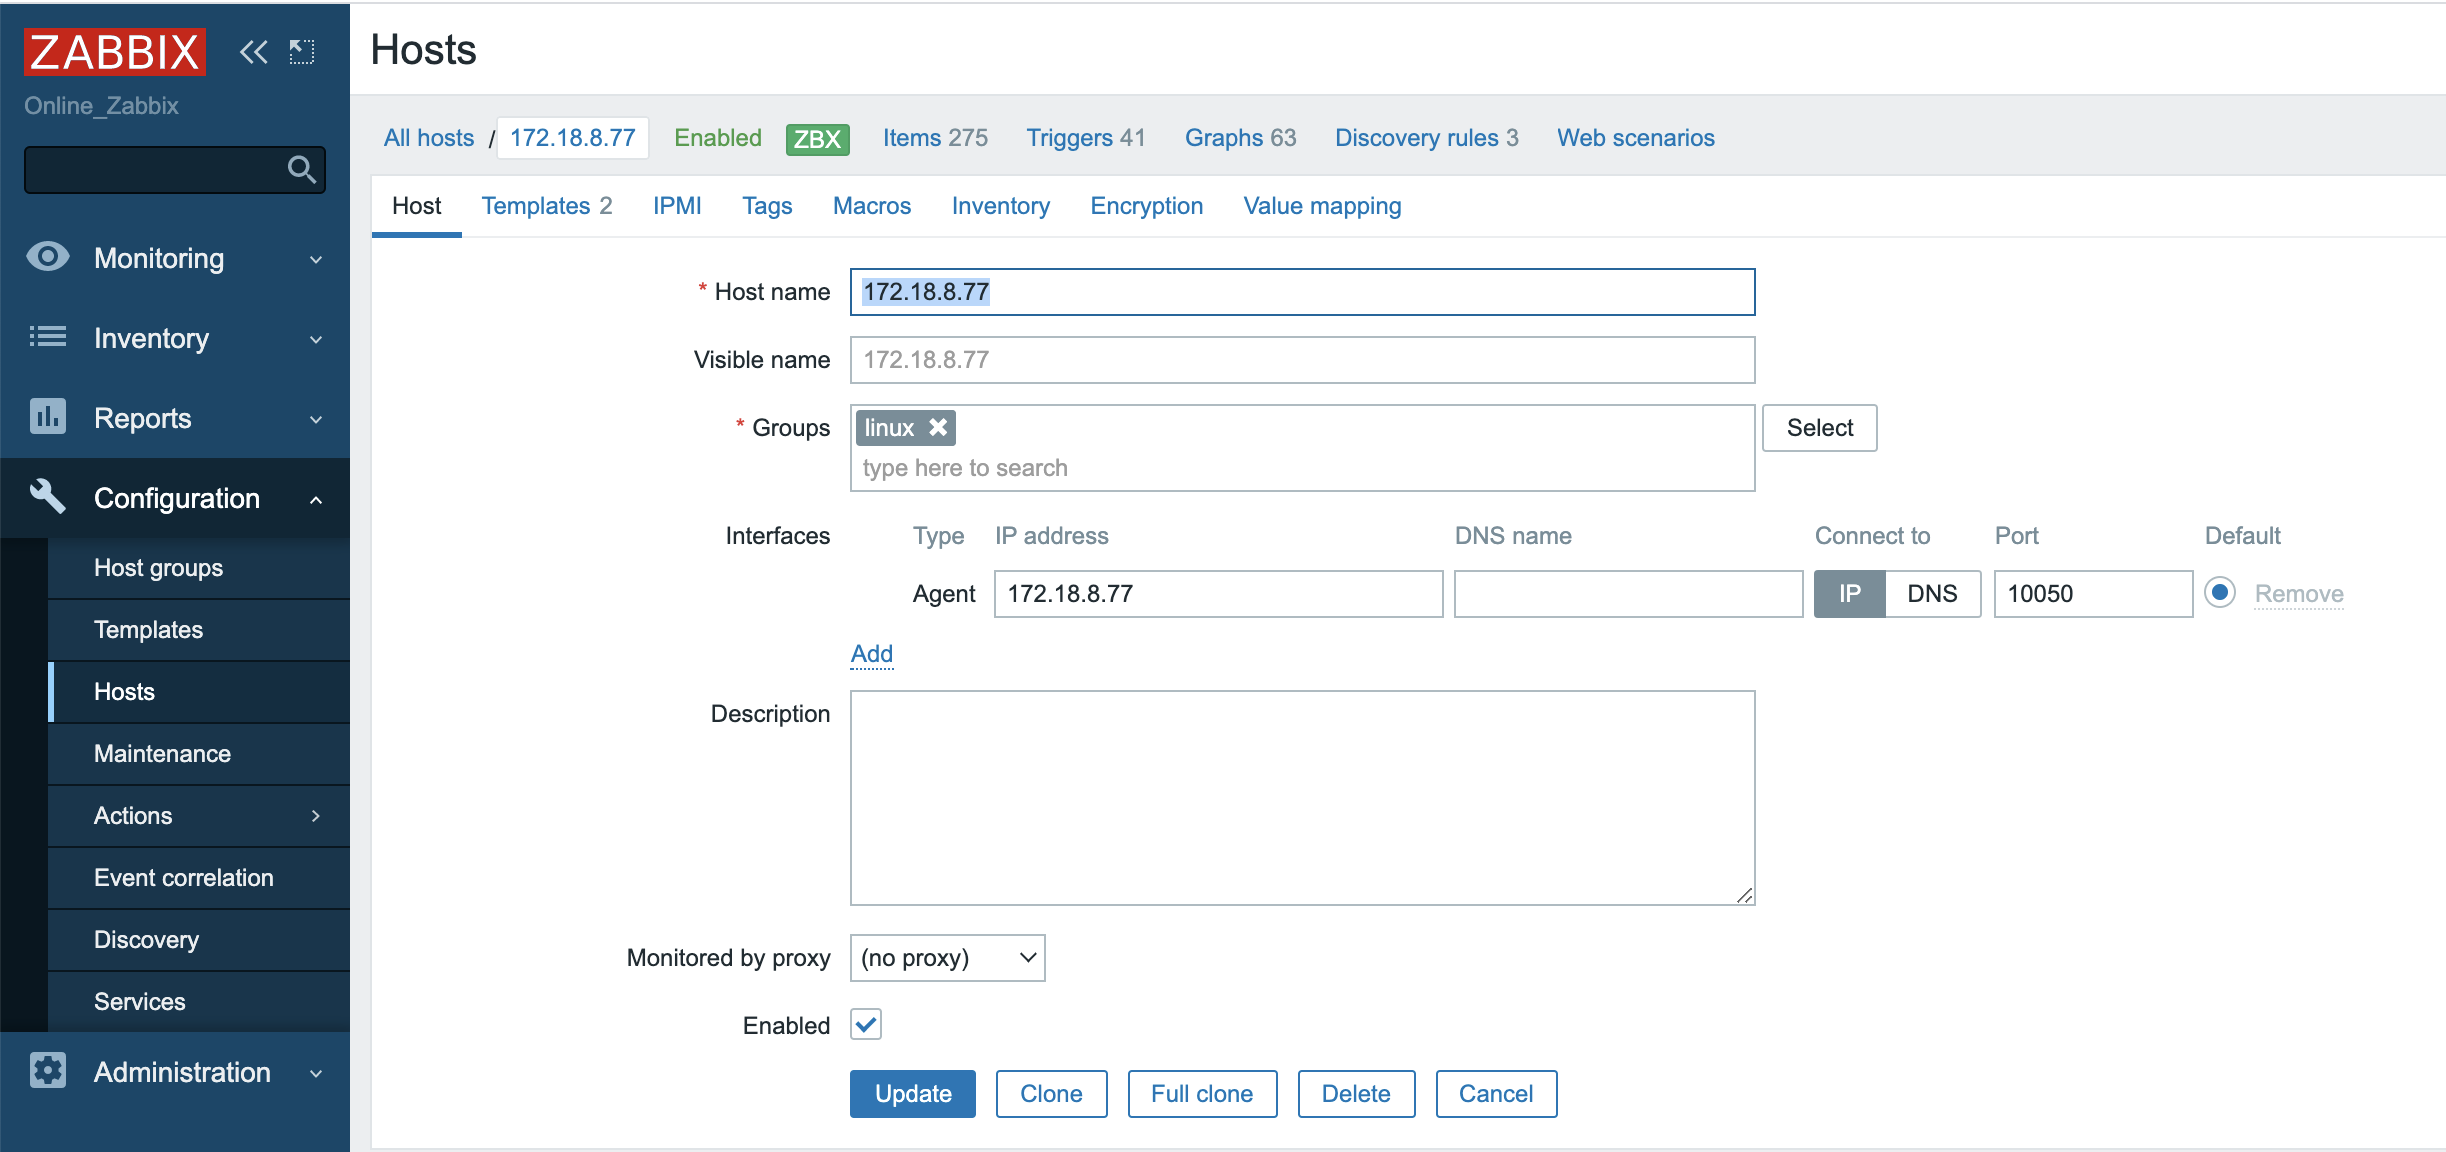
2.4.5 添加主机并关联模板


2.4.6 验证监控数据
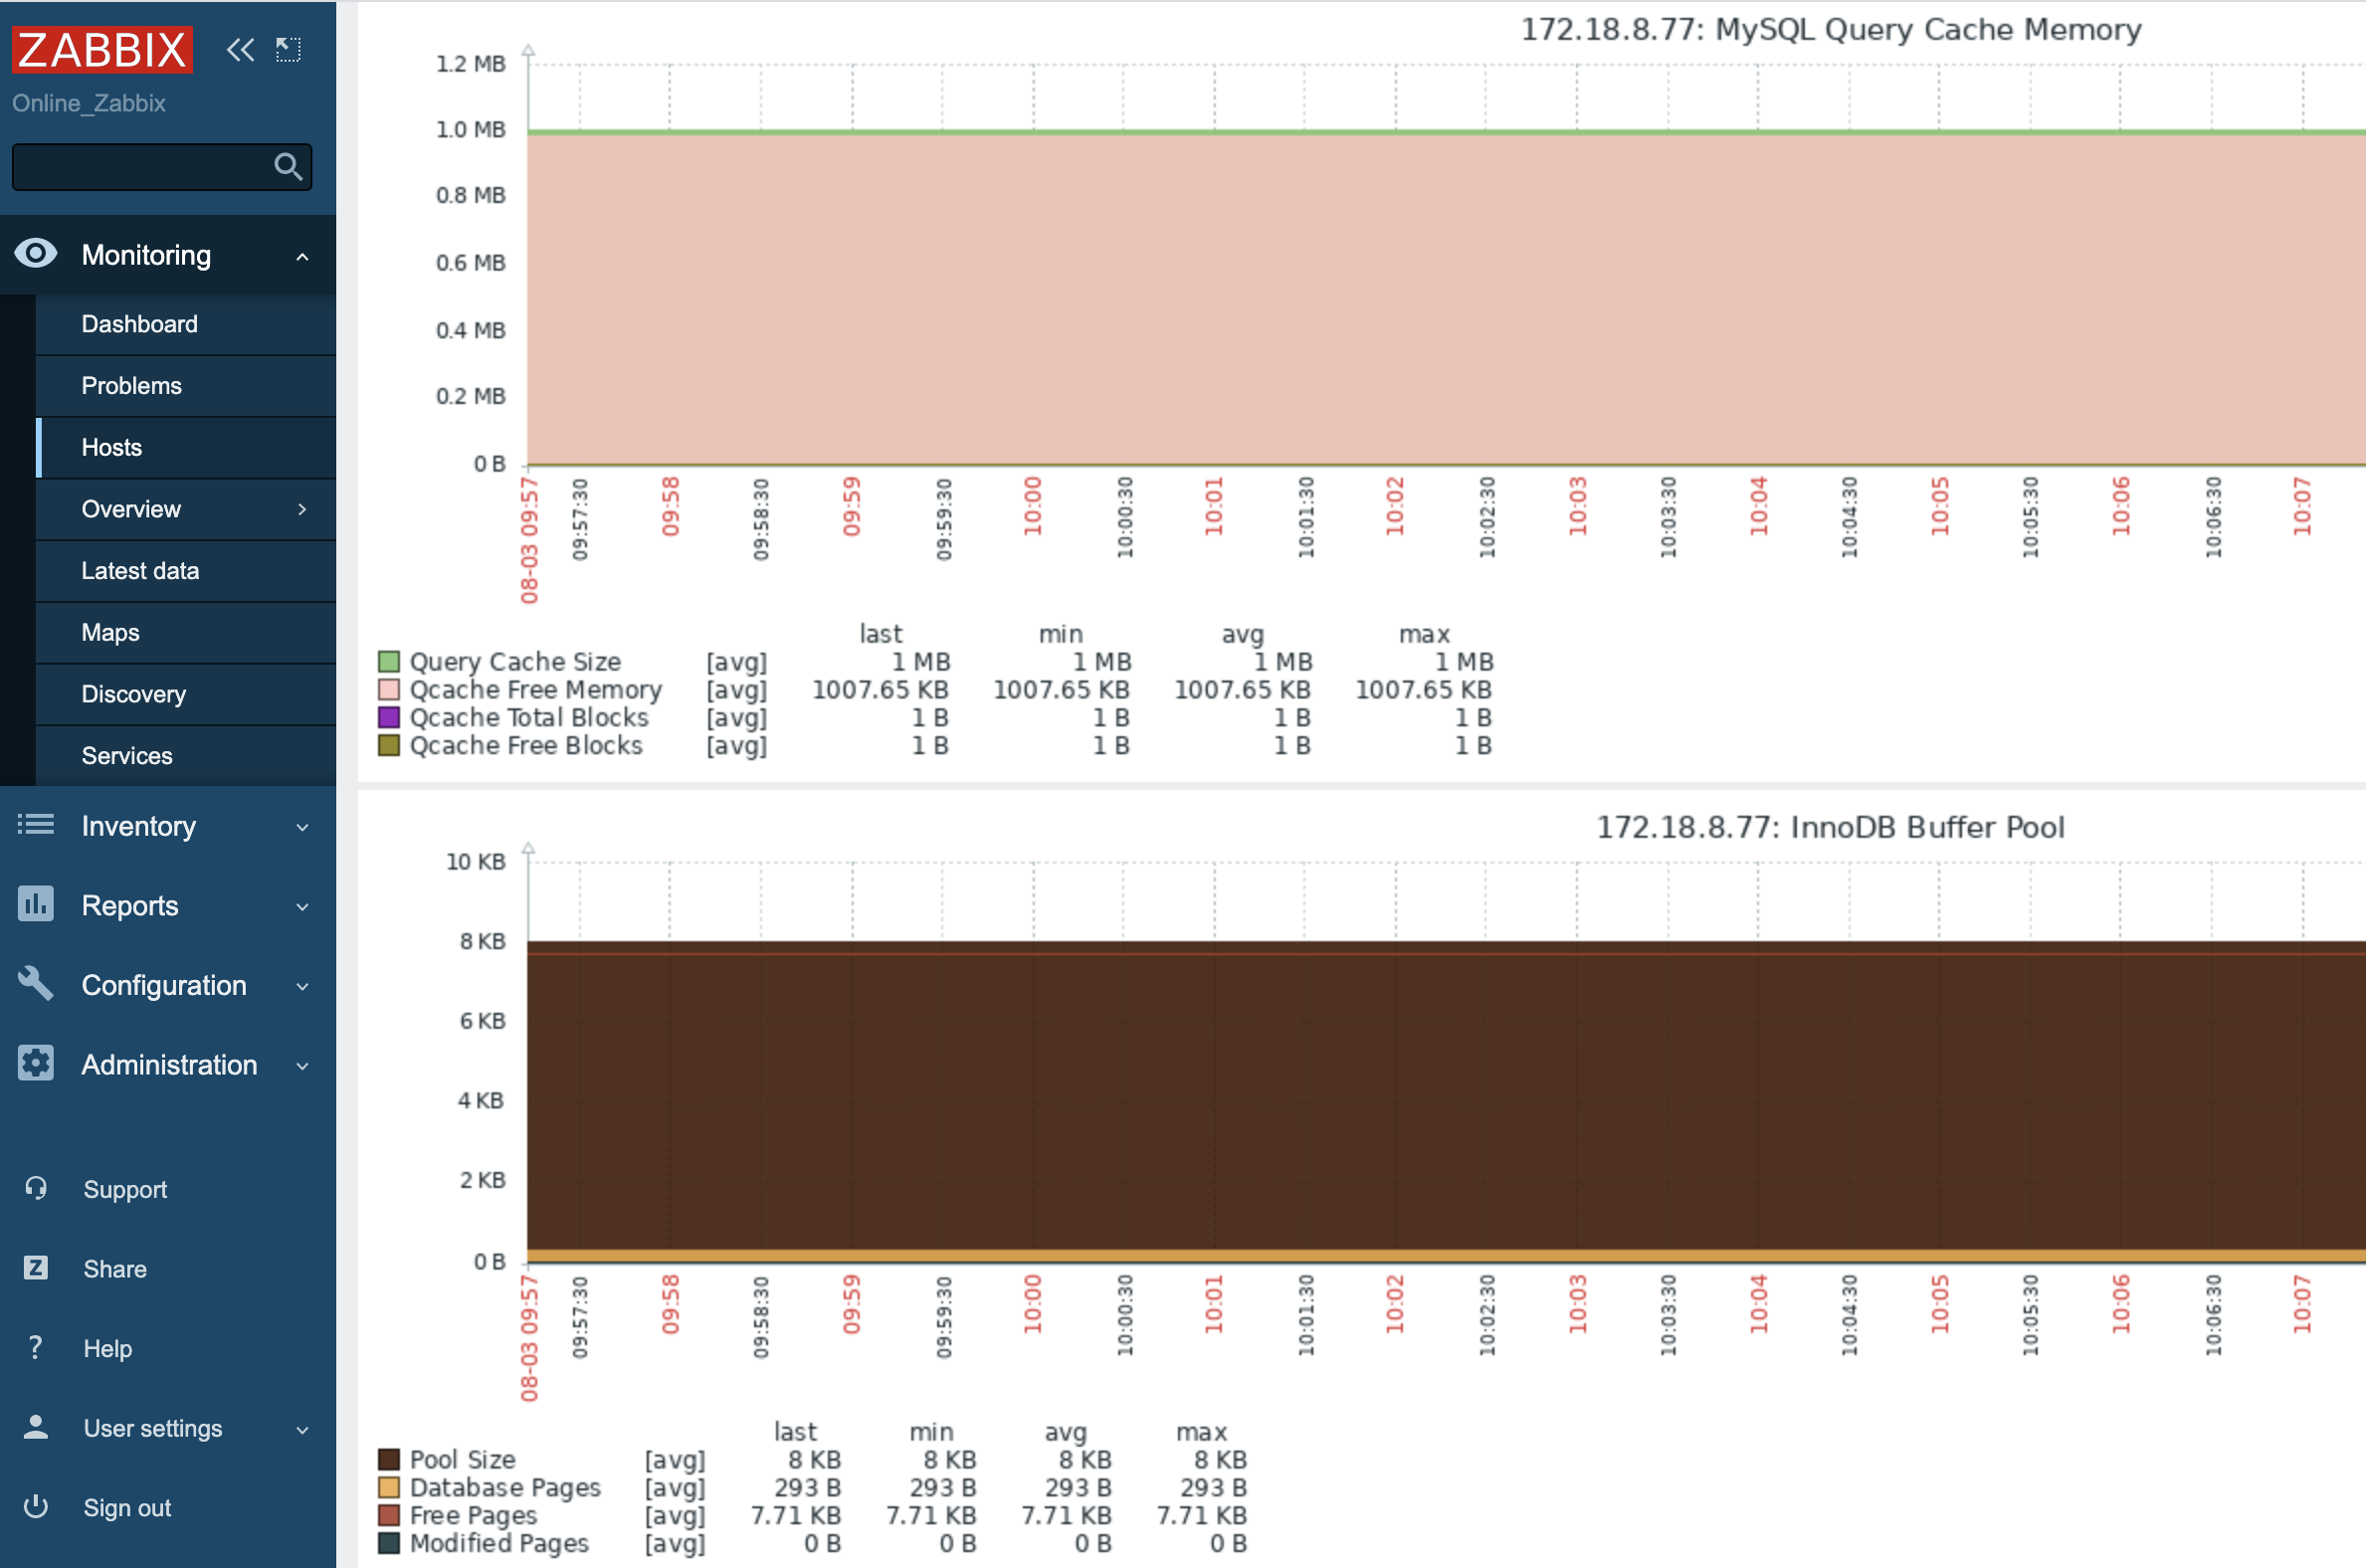
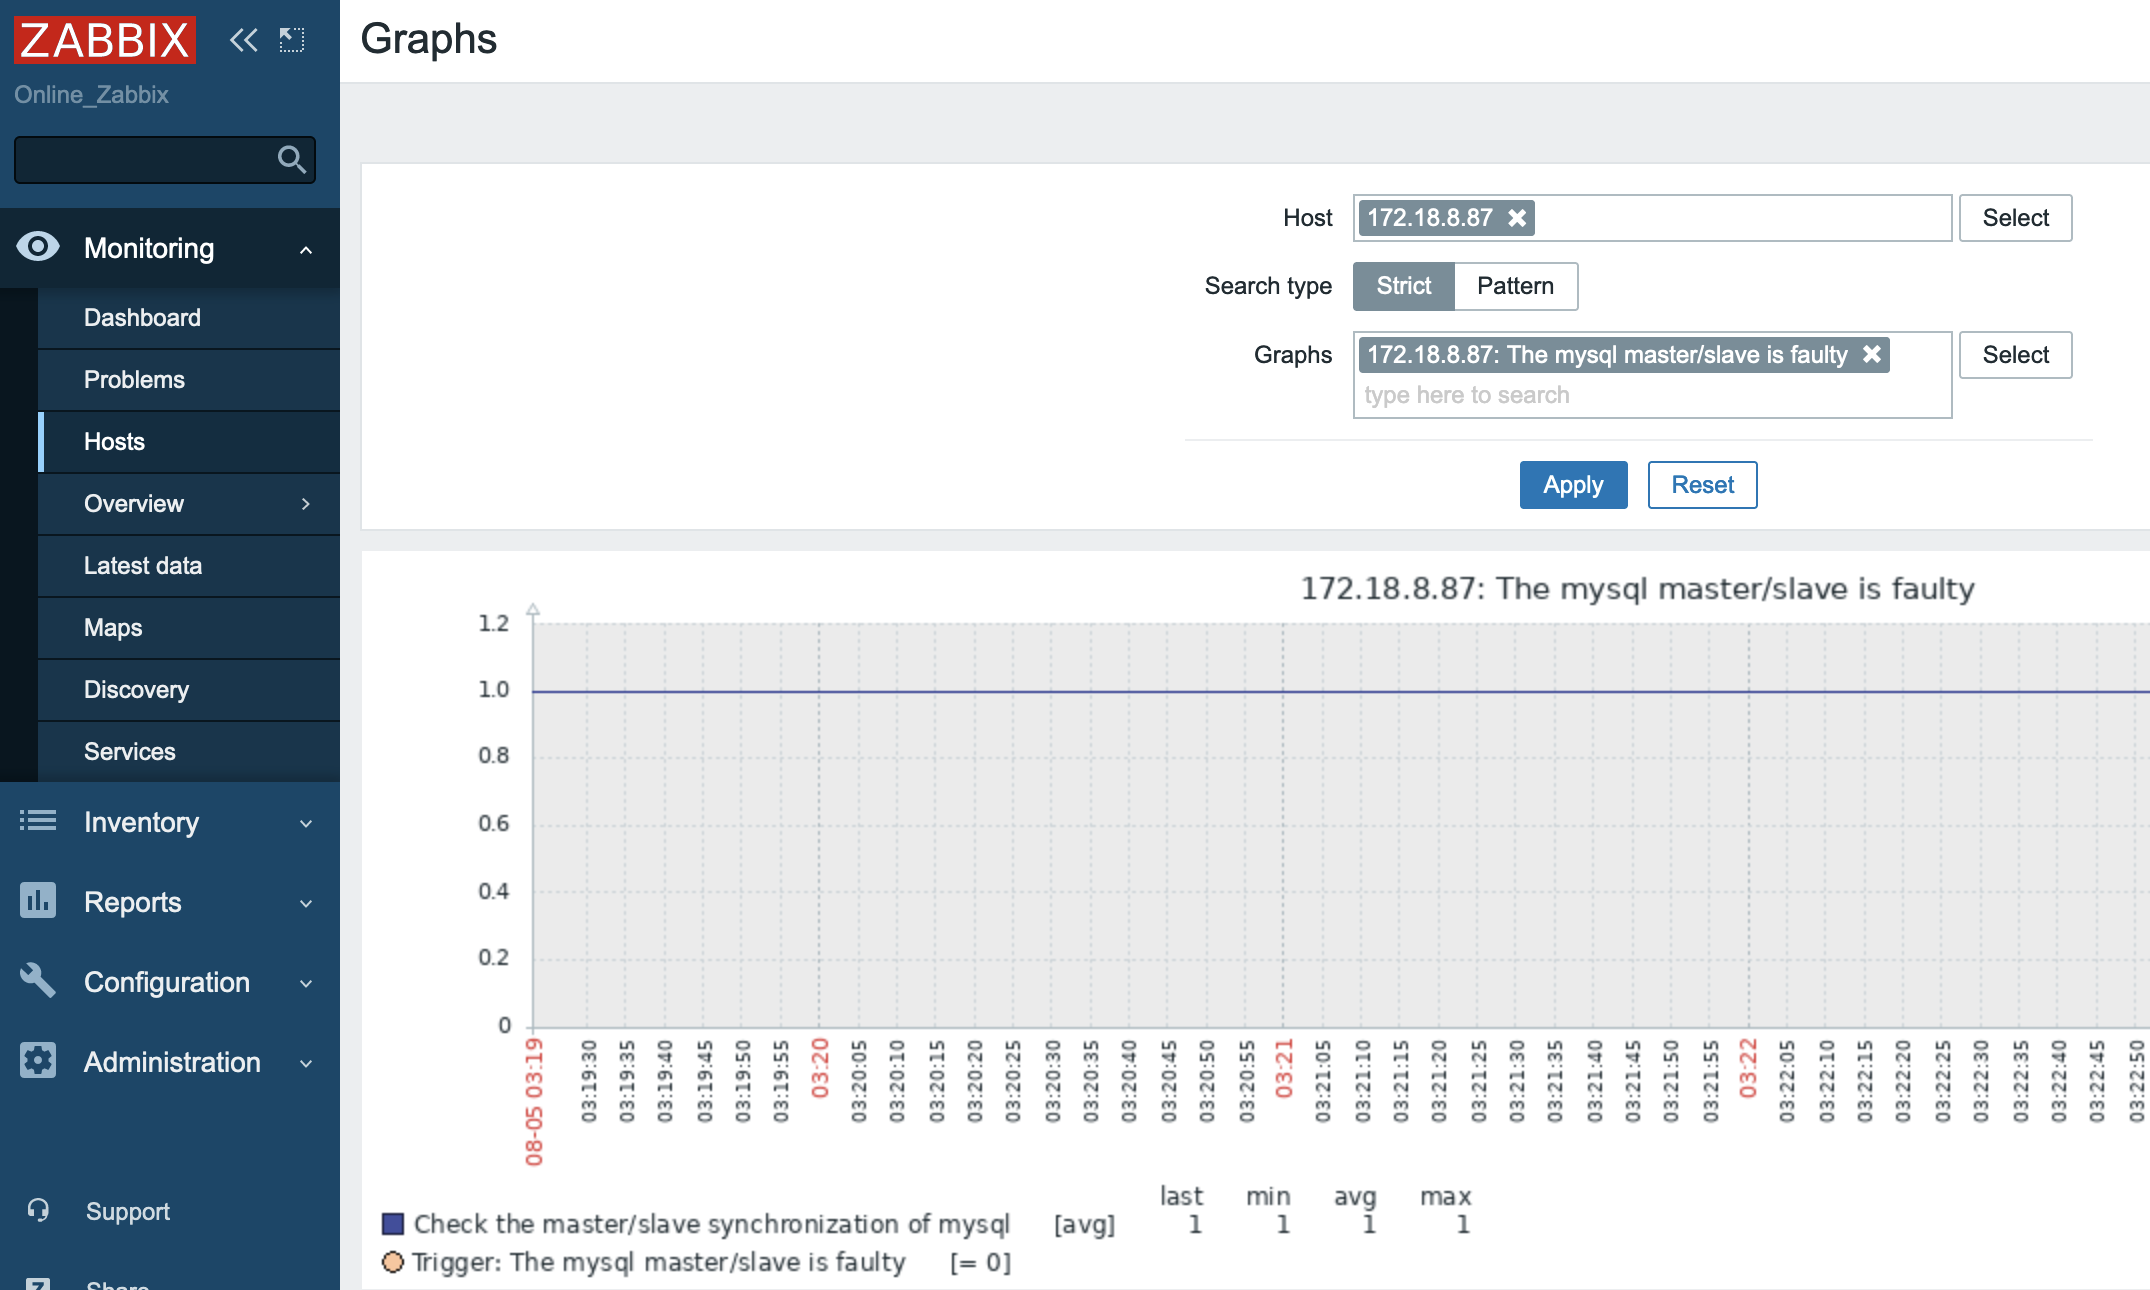
2.4.6.1 主从正常情况图形展示
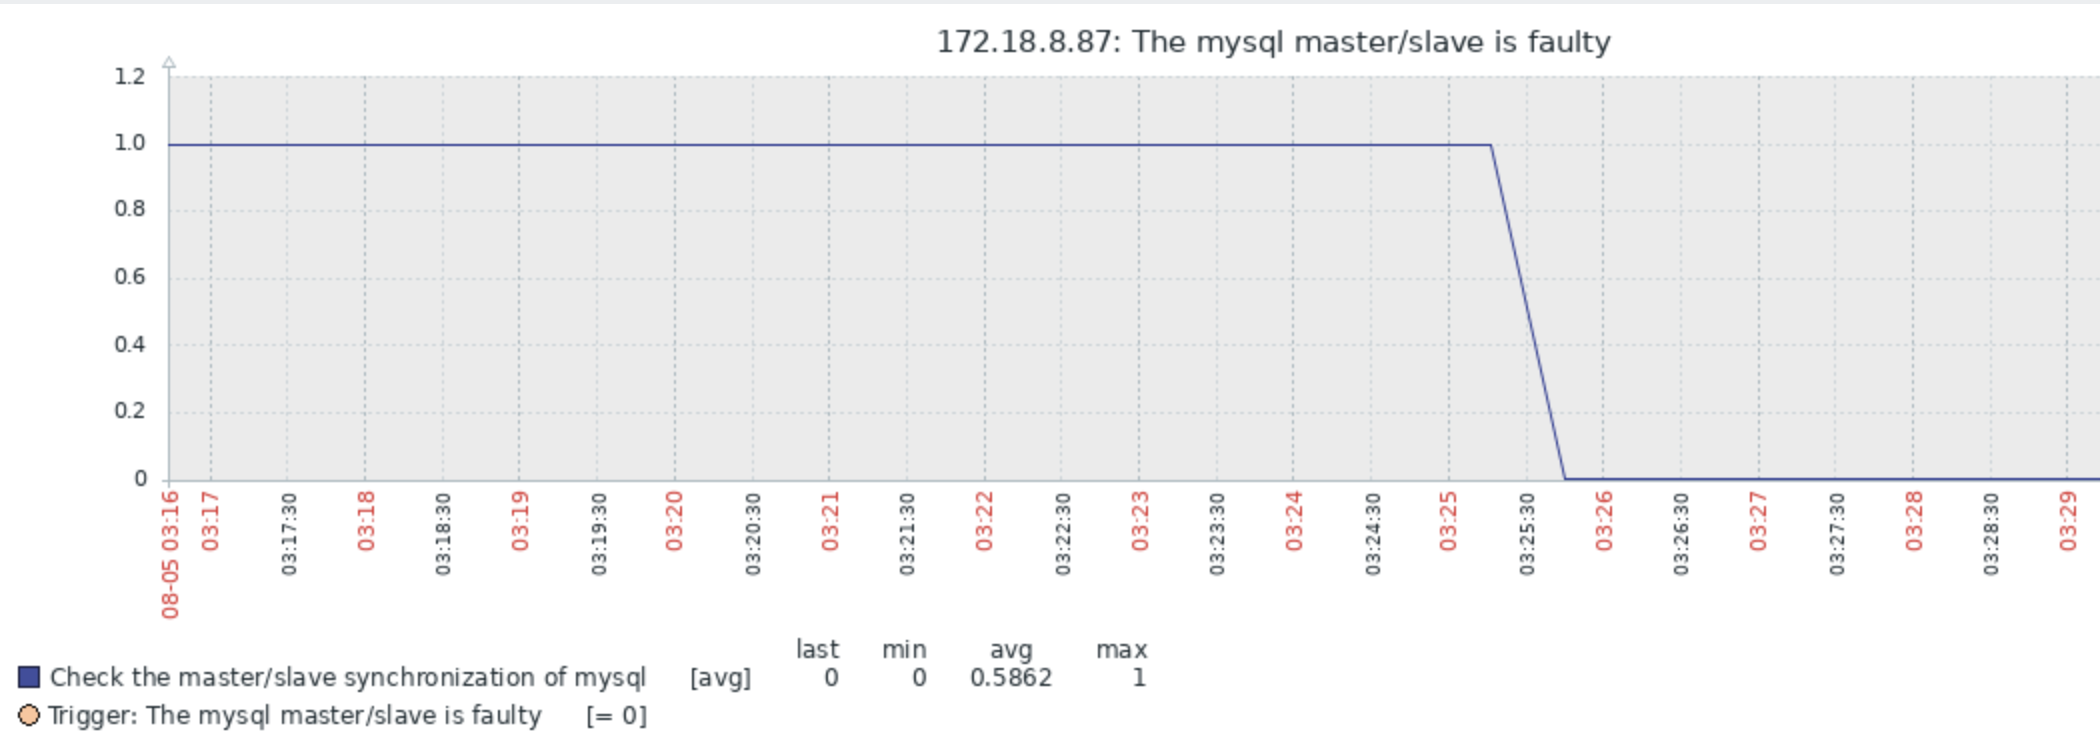
2.4.6.2 主从故障图形展示
2.4.7 验证主从复制触发器报警
2.4.7.1 主从失败后报警

2.4.7.1 主从恢复后报警


 178
178


 被折叠的 条评论
为什么被折叠?
被折叠的 条评论
为什么被折叠?
 到【灌水乐园】发言


