


一、Spring的认知
spring全家桶:spring springmvc springboot springcloud---netflix springcloud-alibaba
解决问题:
1、注册中心:服务的监测问题
2、服务间的调用问题:http方式进行调用,Feign RestTemplate组件
3、服务的降级、熔断问题:并发量达到一定的阈值
4、路由问题:保护了微服务的架构
……
什么是微服务?
特点:
1、每个服务都是一个完整的项目
2、每个项目都要独立的部署在自己的容器中
3、项目之间要能够相互调用(HTTP,RPC)
4、服务之间是独立的,没有依赖关系
5、每个项目可以使用自己的数据库
6、每个项目可以只有一个功能(称为微服务)
二、SpringCloud Eureka注册中心的搭建
1、注册中心的认知
基于微服务的分布式架构,会有很多的服务(项目),每个服务又会搭建集群
问题:
1、如何监测众多的服务是否正常运转
2、服务之间要相互调用,服务列表(服务的地址,端口)的管理是个问题
SpringCloud的Eureka组件就可以解决上述问题
称为注册中心
目前能够完成注册中心职能的微服务框架有如下:
1、SpringCloud-netflix公司 Eureka
2、SpringCloud-alibaba nacos
3、Apache Zookeeper
2、注册中心的搭建
1、创建一个聚合工程 (jar war pom)
一个父工程,在父工程下,创建若干子工程
jar:jar包,供其他项目调用,无法独立运行
war:项目,部署在服务器上,独立运行
pom:父子项目,统一对子工程进行管理,例如,springcloud的版本,就可以在父工程中统一设置
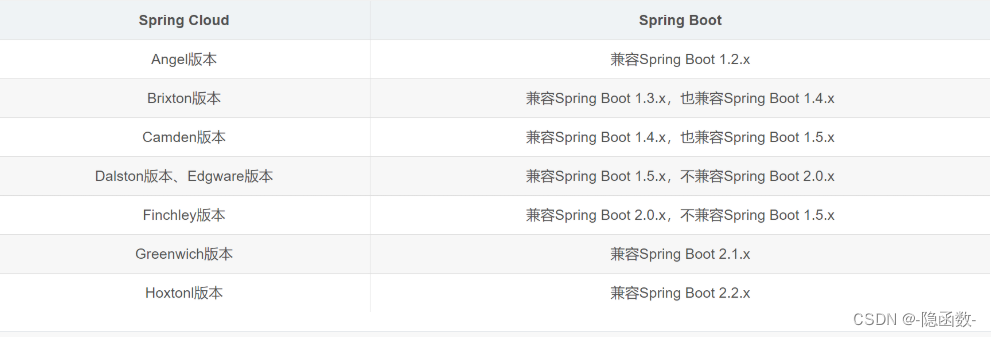
springboot和springcloud的版本要兼容
    <packaging>pom</packaging>
<!--    springboot版本-->
    <parent>
        <groupId>org.springframework.boot</groupId>
        <artifactId>spring-boot-starter-parent</artifactId>
        <version>2.2.6.RELEASE</version>
        <relativePath/> <!-- lookup parent from repository -->
    </parent>
<!--    springcloud版本-->
    <dependencyManagement>
        <dependencies>
            <dependency>
                <groupId>org.springframework.cloud</groupId>
                <artifactId>spring-cloud-dependencies</artifactId>
                <version>Hoxton.SR4</version>
                <type>pom</type>
                <scope>import</scope>
            </dependency>
        </dependencies>
    </dependencyManagement>
2、创建子工程作为注册中心
new--->module--->war
设置为springboot项目
2.1:添加依赖:springboot的依赖,Eureka客户端的依赖
<packaging>war</packaging>
<dependencies>
    <dependency>
        <groupId>org.springframework.cloud</groupId>
        <artifactId>spring-cloud-starter-netflix-eureka-server</artifactId>
    </dependency>

    <dependency>
        <groupId>org.springframework.boot</groupId>
        <artifactId>spring-boot-starter-web</artifactId>
    </dependency>
</dependencies>
2.2:创建启动程序
package com.qf.pdaeureka;

import org.springframework.boot.SpringApplication;
import org.springframework.boot.autoconfigure.SpringBootApplication;
import org.springframework.cloud.netflix.eureka.server.EnableEurekaServer;

@SpringBootApplication
@EnableEurekaServer   //当前程序是Eureka注册中心的服务器,各个微服务就可以进行注册
public class PdaEurekaApplication {
    public static void main(String[] args) {
        SpringApplication.run(PdaEurekaApplication.class,args);
    }
}
2.3:编写注册中的配置文件
application.yml
server:
  port: 8080
eureka:
  instance:
    hostname: localhost
  client:
    register-with-eureka: false  #本注册中心是否向其他注册中心注册  false--不注册   true---注册
    fetch-registry: false  #注册中心之间是否相互拉取、同步数据   false:不拉取
    serviceUrl:
      defaultZone: http://${eureka.instance.hostname}:${server.port}/eureka/   #注册中心的地址,其他微服务必须向注册中心注册
2.4:启动注册中心,进行访问测试
3、创建聚合工程pom项目,使用微服务对项目进行拆分
1、新建申请微服务
2、添加依赖
<packaging>war</packaging>
<dependencies>
    <dependency>
        <groupId>org.springframework.boot</groupId>
        <artifactId>spring-boot-starter-web</artifactId>
    </dependency>
    <dependency>
        <groupId>org.springframework.cloud</groupId>
        <artifactId>spring-cloud-starter-netflix-eureka-client</artifactId>
    </dependency>
</dependencies>
3、创建启动程序
package com.qf.pdaapply;

import org.springframework.boot.SpringApplication;
import org.springframework.boot.autoconfigure.SpringBootApplication;
import org.springframework.cloud.netflix.eureka.EnableEurekaClient;

@SpringBootApplication
@EnableEurekaClient   //是eureka的客户端,可以向eureka注册中心注册
public class PdaApplyApplication {
    public static void main(String[] args) {
        SpringApplication.run(PdaApplyApplication.class,args);
    }
}
4、编写配置文件
server:
  port: 8081
# 指定当前服务向注册中心进行注册的注册地址
eureka:
  client:
    service-url:
      defaultZone: http://localhost:8080/eureka
# 指定当前服务的服务名,作用有两个:监测使用    服务间通过服务名来调用服务
spring:
  application:
    name: APPLYSERVER
5、编写controller
package com.qf.pdaeureka.controller;

import org.springframework.web.bind.annotation.GetMapping;
import org.springframework.web.bind.annotation.RequestMapping;
import org.springframework.web.bind.annotation.RestController;

@RestController
@RequestMapping("/apply")
public class ApplyController {
    @GetMapping("/test")
    public String test(){
        return "test successful!";
    }
}
6、启动申请微服务
测试服务自身
是否注册到注册中心里
【注意】一定先启动注册中心,后启动被调用的服务
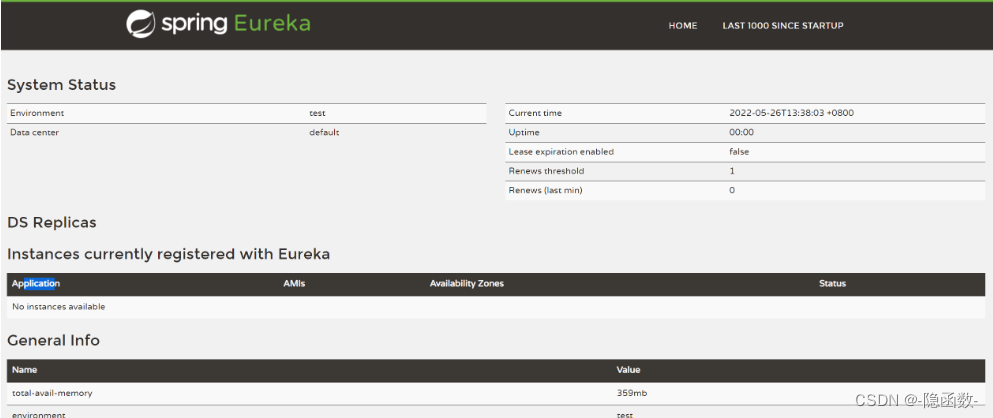
出现如下内容,注册成功!
![]()
微服务1:pda-apply APPLYSERVER 接收入港申请填写的数据
微服务2:pda-applydao APPLYDAOSERVER
供微服务1来调用,接收到微服务1传递的入港申请数据后,添加到数据库中
与mybatis进行整合
创建微服务2 pda-applydao:
整合mybatis
1、pom.xml
<?xml version="1.0" encoding="UTF-8"?>
<project xmlns="http://maven.apache.org/POM/4.0.0"
         xmlns:xsi="http://www.w3.org/2001/XMLSchema-instance"
         xsi:schemaLocation="http://maven.apache.org/POM/4.0.0 http://maven.apache.org/xsd/maven-4.0.0.xsd">
    <parent>
        <artifactId>pad</artifactId>
        <groupId>com.qf</groupId>
        <version>1.0-SNAPSHOT</version>
    </parent>
    <modelVersion>4.0.0</modelVersion>

    <artifactId>pda-applydao</artifactId>
    <packaging>war</packaging>
    <dependencies>
        <dependency>
            <groupId>org.springframework.boot</groupId>
            <artifactId>spring-boot-starter-web</artifactId>
        </dependency>
        <dependency>
            <groupId>org.springframework.cloud</groupId>
            <artifactId>spring-cloud-starter-netflix-eureka-client</artifactId>
        </dependency>
        <dependency>
            <groupId>mysql</groupId>
            <artifactId>mysql-connector-java</artifactId>
            <version>5.0.5</version>
        </dependency>

        <dependency>
            <groupId>com.alibaba</groupId>
            <artifactId>druid-spring-boot-starter</artifactId>
            <version>1.1.10</version>
        </dependency>
        <dependency>
            <groupId>org.mybatis.spring.boot</groupId>
            <artifactId>mybatis-spring-boot-starter</artifactId>
            <version>2.1.2</version>
        </dependency>
    </dependencies>

</project>
2、application.yml
server:
  port: 8082

spring:
  application:
    name: APPLYDAOSERVER
  datasource: #连接池的配置信息
    driver-class-name: com.mysql.jdbc.Driver
    url: jdbc:mysql://localhost:3306/db2105
    username: root
    password: root
    type: com.alibaba.druid.pool.DruidDataSource
mybatis: #mybatis的配置
  configuration:
    map-underscore-to-camel-case: true
  mapper-locations: classpath:mybatis/*.xml
                    classpath:com/qf/pdaapplydao/dao/*.xml
  type-aliases-package: com.qf.springboot2105pro.pojo
eureka:
  client:
    service-url:
      defaultZone: http://localhost:8080/eureka
3、启动程序进行测试
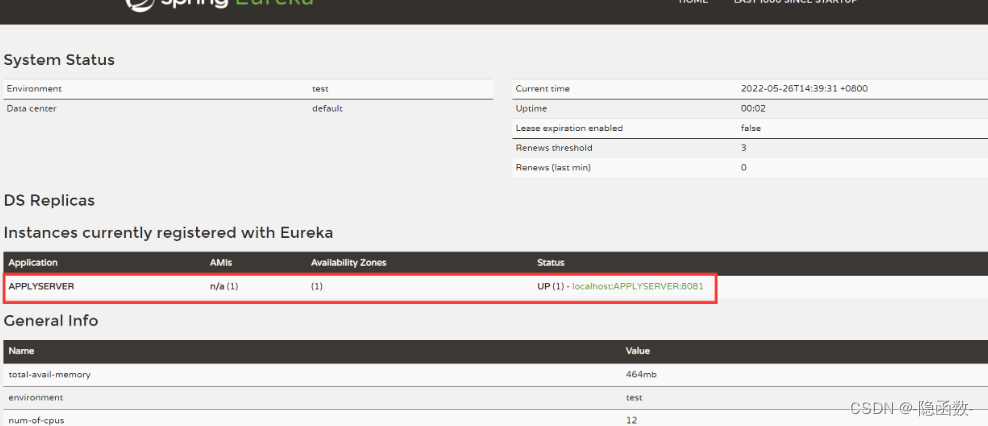
注册成功
![]()
问题:apply 微服务 applydao微服务 都需要入港申请表的实体类
解决方案:新建pda-common程序,是jar 工程
把各个微服务都需要访问的共通资源,放在pda-common项目下,那个微服务需要调用此jar即可
新建一个项目:不是微服务,不能独立运行
pda-common:实体类、工具类等共通资源
是jar工程
<?xml version="1.0" encoding="UTF-8"?>
<project xmlns="http://maven.apache.org/POM/4.0.0"
         xmlns:xsi="http://www.w3.org/2001/XMLSchema-instance"
         xsi:schemaLocation="http://maven.apache.org/POM/4.0.0 http://maven.apache.org/xsd/maven-4.0.0.xsd">
    <parent>
        <artifactId>pad</artifactId>
        <groupId>com.qf</groupId>
        <version>1.0-SNAPSHOT</version>
    </parent>
    <modelVersion>4.0.0</modelVersion>

    <artifactId>pda-common</artifactId>
    <packaging>jar</packaging>
    <dependencies>
        <dependency>
            <groupId>org.projectlombok</groupId>
            <artifactId>lombok</artifactId>
            <version>1.18.2</version>
        </dependency>
    </dependencies>
</project>
三、jar工程实体类的搭建
新建了实体类
package com.qf.pdacommon.pojo;

import lombok.AllArgsConstructor;
import lombok.Data;
import lombok.NoArgsConstructor;
import lombok.ToString;

import java.io.Serializable;
@NoArgsConstructor
@AllArgsConstructor
@Data
@ToString
public class Apply implements Serializable {
    //自增id
    private int id;
    //申请人
    private String applyName;
    //申请时间
    private String applyTime;
    //申请货运公司
    private String applyCompany;
    //申请公司的工商局的注册码
    private String companyISBN;
    //公司法人
    private String  artificialPerson;
    //联系人电话
    private String phone;
    //联系人
    private String contactPerson;
    //货物类型
    private String type;
    //单位
    private String unit;
    //数量
    private int num;
    //计划入港时间
    private String joinTime;
    //运输方式
    private String transportType;
    //入港拍照
    private String papers;
    //申请状态
    private int state;
}
其他微服务,在添加对pda-common的依赖后,就可以复用pda-common里的代码了
<!--        引入自己的jar文件-->
        <dependency>
            <groupId>com.qf</groupId>
            <artifactId>pda-common</artifactId>
            <version>1.0-SNAPSHOT</version>
        </dependency>
四、微服务的调用---RestTemplate
1、基于微服务分布式的调用方式
在基于微服务的分布式中,服务调用的方式有两种:
1、基于RPC---Dubbo
远程过程调用
使用的是Remote Procedure Call Protocol 远程过程调用协议
不需要了解底层网络技术,就像访问本地资源一样去访问远程的服务
2、基于HTTP方式调用---SpringCloud
基于HTTP协议的
2、http概述
什么是HTTP
超文本传输协议(HTTP,HyperText Transfer Protocol)是互联网上应用最为广泛的一种网络协议,是一个基于请求与响应模式的、无状态的、应用层的协议,运行于TCP协议基础之上。
HTTP协议特点
-
支持客户端(浏览器)/服务器模式。
-
简单快速:客户端只向服务器发送请求方法和路径,服务器即可响应数据,因而通信速度很快。请求方法常用的有GET、POST等。
-
灵活:HTTP允许传输任意类型的数据,传输的数据类型由Content-Type标识。
-
无连接:无连接指的是每次TCP连接只处理一个或多个请求,服务器处理完客户的请求后,即断开连接。采用这种方式可以节省传输时间。
-
HTTP1.0版本是一个请求响应之后,直接就断开了。称为短连接。
-
HTTP1.1版本不是响应后直接就断开了,而是等几秒钟,这几秒钟之内有新的请求,那么还是通过之前的连接通道来收发消息,如果过了这几秒钟用户没有发送新的请求,就会断开连接。称为长连接。
-
-
无状态:HTTP协议是无状态协议。
-
无状态是指协议对于事务处理没有记忆能力。
-
HTTP协议通信流程
-
客户与服务器建立连接(三次握手)。
-
客户向服务器发送请求。
-
服务器接受请求,并根据请求返回相应的文件作为应答。
-
客户与服务器关闭连接(四次挥手)。

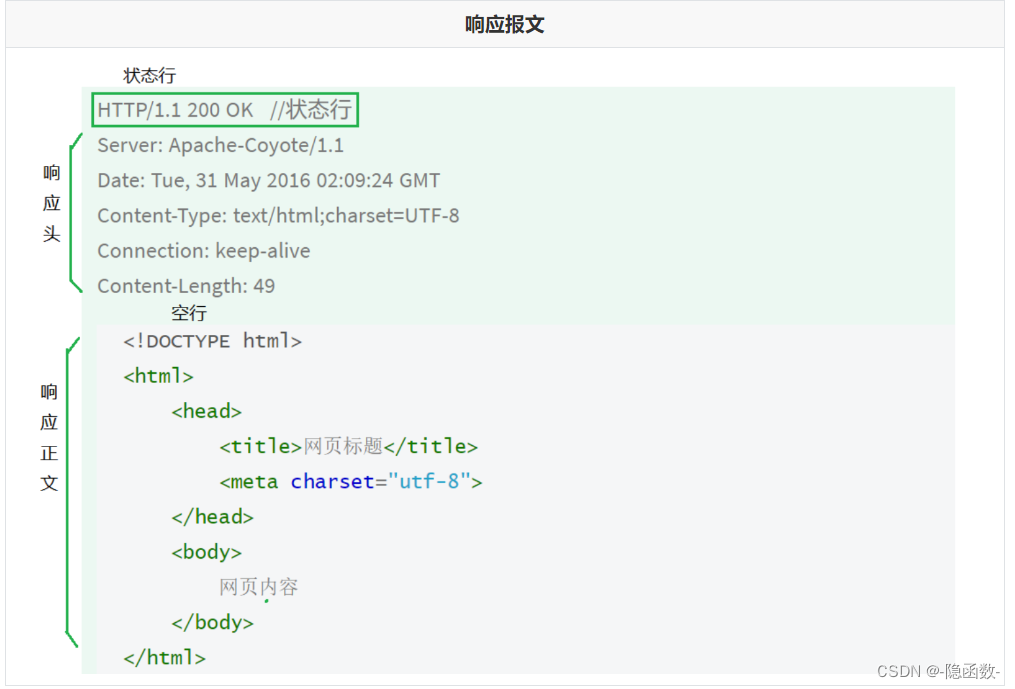
请求报文和响应报文
请求报文
当浏览器向Web服务器发出请求时,它向服务器传递了一个数据块,也就是请求信息(请求报文),HTTP请求信息由4部分组成:
1、请求行 请求方法/地址 URI协议/版本
2、请求头(Request Header)
3、空行
4、请求正文

HTTP响应报文
HTTP响应报文与HTTP请求报文相似,HTTP响应也由4个部分组成:
1、状态行
2、响应头(Response Header)
3、空行
4、响应正文
常见状态码
| 状态代码 | 状态描述 | 说明 |
|---|---|---|
| 200 | OK | 客户端请求成功 |
| 302 | Found | 临时重定向 |
| 403 | Forbidden | 服务器收到请求,但是拒绝提供服务。服务器通常会在响应正文中给出不提供服务的原因 |
| 404 | Not Found | 请求的资源不存在,例如,输入了错误的URL。 |
| 500 | Internal Server Error | 服务器发生不可预期的错误,导致无法完成客户端的请求。 |
3、定义RestTemplate对象
在apply启动类中
package com.qf.pdaapply;
import org.springframework.boot.SpringApplication;
import org.springframework.boot.autoconfigure.SpringBootApplication;
import org.springframework.cloud.client.loadbalancer.LoadBalanced;
import org.springframework.cloud.netflix.eureka.EnableEurekaClient;
import org.springframework.context.annotation.Bean;
import org.springframework.web.client.RestTemplate;
@SpringBootApplication
@EnableEurekaClient //是eureka的客户端,可以向eureka注册中心注册
public class PdaApplyApplication {
public static void main(String[] args) {
SpringApplication.run(PdaApplyApplication.class,args);
}
//定义RestTemplate对象,存放到spring 的bean工厂中
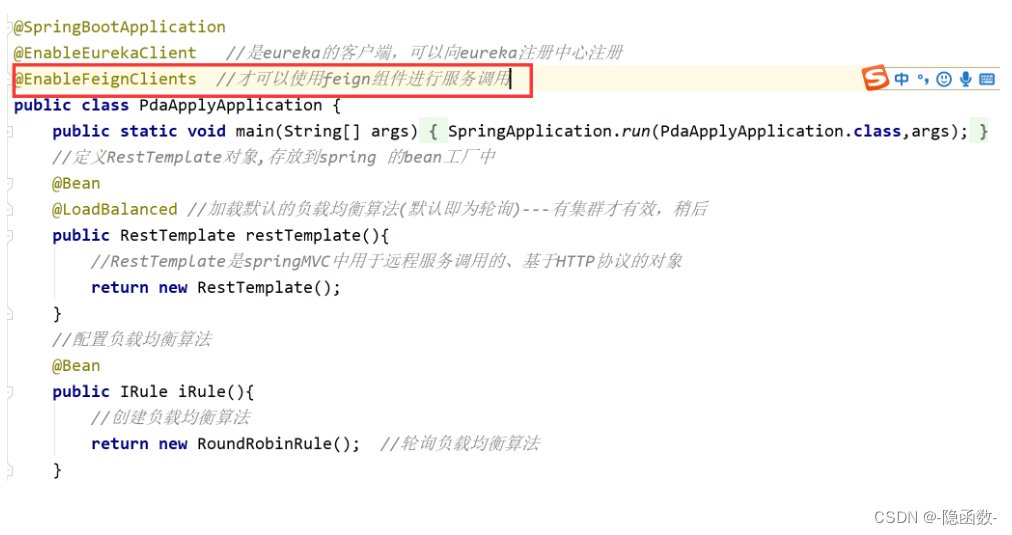
@Bean
@LoadBalanced //加载默认的负载均衡算法---有集群才有效,稍后
public RestTemplate restTemplate(){
//RestTemplate是springMVC中用于远程服务调用的、基于HTTP协议的对象
return new RestTemplate();
}
}在pda-apply微服务的controller中注入该对象
//注入RestTemplate对象
@Autowired
private RestTemplate restTemplate;
在pda-applydao微服务中定义调用的接口-----也就是写controller
package com.qf.pdaapplydao.controller;

import com.qf.pdaapplydao.dao.ApplyDao;
import com.qf.pdaapplydao.service.ApplyDaoService;
import com.qf.pdacommon.pojo.Apply;
import org.springframework.beans.factory.annotation.Autowired;
import org.springframework.web.bind.annotation.*;

@RestController
@RequestMapping("/applydao")
public class ApplyDaoController {
    @Autowired
    private ApplyDaoService applyDaoService;

    @PostMapping("/add")
    //JSON格式传递数据
    public String addApplyDao(@RequestBody Apply apply){
        boolean result=applyDaoService.addApply(apply);
        if(result){
            return "success";
        }else{
            return "failed";
        }
    }
}
在pda-apply微服务中调用pda-applydao这个接口
package com.qf.pdaapply.controller;

import com.qf.pdacommon.pojo.Apply;
import org.springframework.beans.factory.annotation.Autowired;
import org.springframework.web.bind.annotation.GetMapping;
import org.springframework.web.bind.annotation.RequestMapping;
import org.springframework.web.bind.annotation.RestController;
import org.springframework.web.client.RestTemplate;

@RestController
@RequestMapping("/apply")
public class ApplyController {
    //注入RestTemplate对象
    @Autowired
    private RestTemplate restTemplate;
    @GetMapping("/test")
    public String test(){
        Apply apply=new Apply();
        return "test successful!";
    }
    @GetMapping("/add")
    public String addApply(Apply apply){
        System.out.println("即将调用pda-applydao微服务,数据如下:"+apply);
        //1准备调用的微服务的url地址
        //在springcloud中,通过微服务的服务名来调用
        //不能通过IP制定调用某台服务,放着发生单点故障
        //微服务注册到注册中心后,如果是同一服务名,就自动组成集群
        String url="http://APPLYDAOSERVER/applydao/add";

        //调用
        //postForObject() 以post方式调用   getForObject() 以get方式调用
        //抵用此方法后,就会发出HTTP请求
        //参数1:请求微服务的url
        //参数2:传递的值,此处传递的是对象,restTemplate自动将对象转成JSON字符串格式
        //      由于传递的是JSON,所以被调用的微服务要使用@RequestBody,把JSON字符串转为对象
        //参数3:以类对象方式传递,调用微服务后返回值的类型
        String result=restTemplate.postForObject(url,apply,String.class);
        return result;
    }
}
启动微服务进行测试

【说明】增删改的服务调用方式都相同
4、使用RestTemplate进行条件查询调用
1、在pda-applydao微服务中编写查询方法
@GetMapping("/find")
public List<Apply> findByCondition(String applyName,String phone){
    System.out.println("参数applyName:"+applyName);
    System.out.println("参数phone:"+phone);
    //自己构建一个集合
    List<Apply> list=new ArrayList<Apply>();
    Apply apply=new Apply();
    apply.setApplyName("张三");

    Apply apply1=new Apply();
    apply.setApplyName("李四");

    list.add(apply);
    list.add(apply1);
    return list;
}
2、在pda-apply微服务中调用pda-applydao微服务中的条件查询接口
//查询调用
@GetMapping("/find")
public List<Apply> findApplyByCondition(String applyName,String phone){
    //调用的url
    String url="http://APPLYDAOSERVER/applydao/find?applyName="+applyName+"&phone="+phone;
    //get方式调用
    //参数1:调用的微服务的url
    //参数2:返回值的类型
    //接收到的是JSON格式的字符串,RestTemplate把JSON字符串转成List<Apply>集合
    List<Apply> list=restTemplate.getForObject(url,List.class);
    return list;
}
5、注册中心Eureka的相关配置及工作原理
注册中心的安全配置---给注册中心添加账号、密码
任何一个服务不能随意注册到注册中心里,必须提供账号、密码
实现步骤:
在eureka注册中心的pom.xml文件中添加security的依赖
<dependency>
    <groupId>org.springframework.boot</groupId>
    <artifactId>spring-boot-starter-security</artifactId>
</dependency>
在注册中心微服务里编写测试类
package com.qf.pdaeureka.util;
import org.springframework.security.config.annotation.web.builders.HttpSecurity;
import org.springframework.security.config.annotation.web.configuration.EnableWebSecurity;
import org.springframework.security.config.annotation.web.configuration.WebSecurityConfigurerAdapter;
import org.springframework.security.config.annotation.web.configurers.ExpressionUrlAuthorizationConfigurer;
@EnableWebSecurity
public class WebSecurityConfig extends WebSecurityConfigurerAdapter {
protected void configure(HttpSecurity http) throws Exception {
//忽略掉/eureka/** 请求eureka的子目录的url的时候无需提供账号、密码
//如果不编写此配置文件,设置的账号、密码将不生效
http.csrf().ignoringAntMatchers("/eureka/**");
super.configure(http);
}
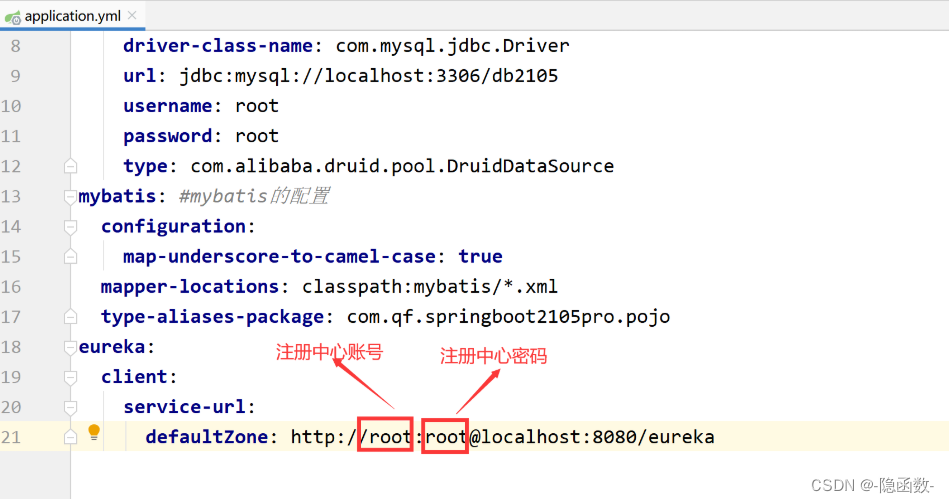
}在注册中心的application.yml配置文件中添加账号、密码
# 指定Eureka注册中心的账号、密码
spring:
  security:
    user:
      name: root
      password: root
配置好注册中心的账号、密码,重启后,微服务将无法注册到注册中心,报错

配置微服务,在注册的时候,提供账号、密码
在其他微服务的application.yml配置文件中
注册中心的高可用
目前的注册中心是一个服务,存在单点故障的风险
搭建注册中心的集群,保证注册中心的高可用
【如果注册中心的服务宕机后,服务之间的调用是否可以完成】
1、如果一个服务在宕机前调用过另一个服务,本地就缓存了所调用服务的服务列表,注册中心宕机后,依然可以调用;
2、如果在注册中心宕机前没有调用过另一个服务,本地没有缓存服务列表,就无法完成服务的调用
搭建Eureka集群
1、采用项目复制,新建一个注册中心
2、如果复制:删除掉imp target文件
3、如果复制:在父工程中,手动添加module
4、如果复制:在复制的项目中,手动改动项目的id
【强调】复制后,会发生粘连现象,改一个项目后,另一个项目也跟着改动
新建一个注册中心的服务
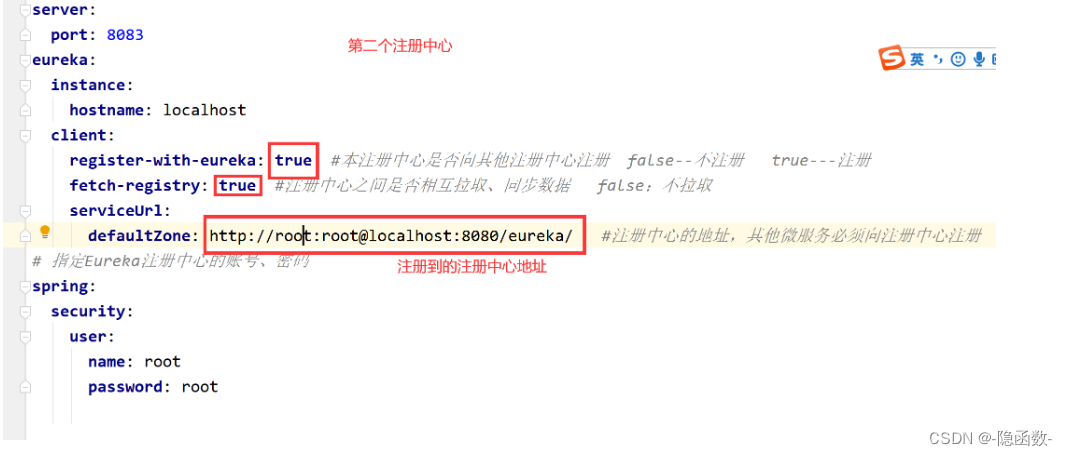
原注册中心也改为true
【注册中心有台服务,各个微服务注册到注册中心的哪台服务上】
配置各个微服务的注册
eureka:
client:
service-url:
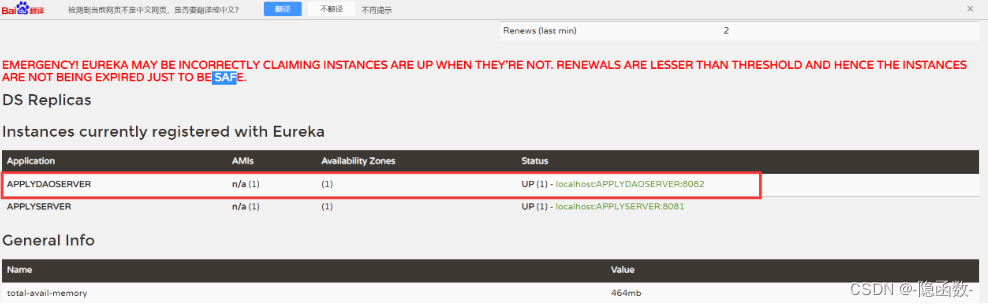
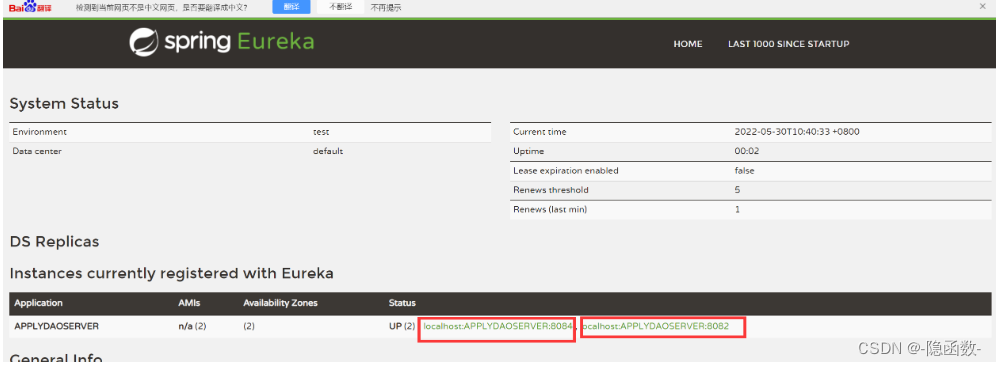
defaultZone: http://root:root@localhost:8080/eureka,http://root:root@localhost:8083/eureka注册中心之间会互相拉取数据
![]()
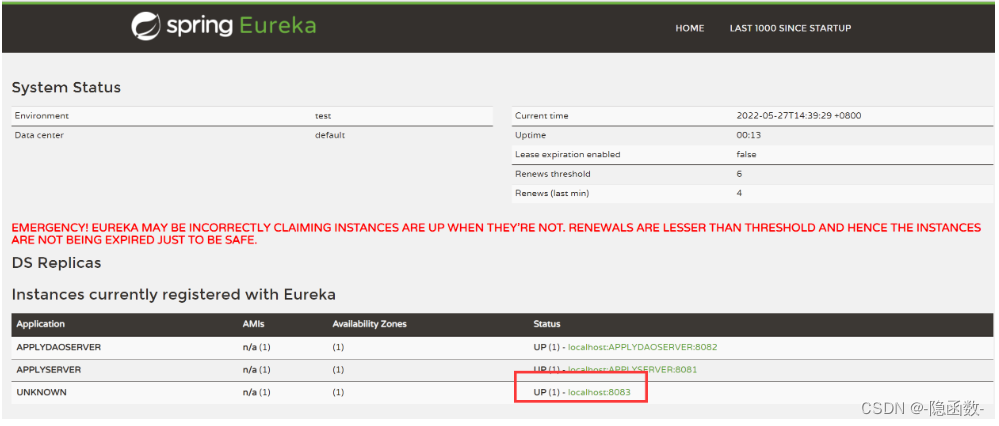
![]()

注册中心的原理
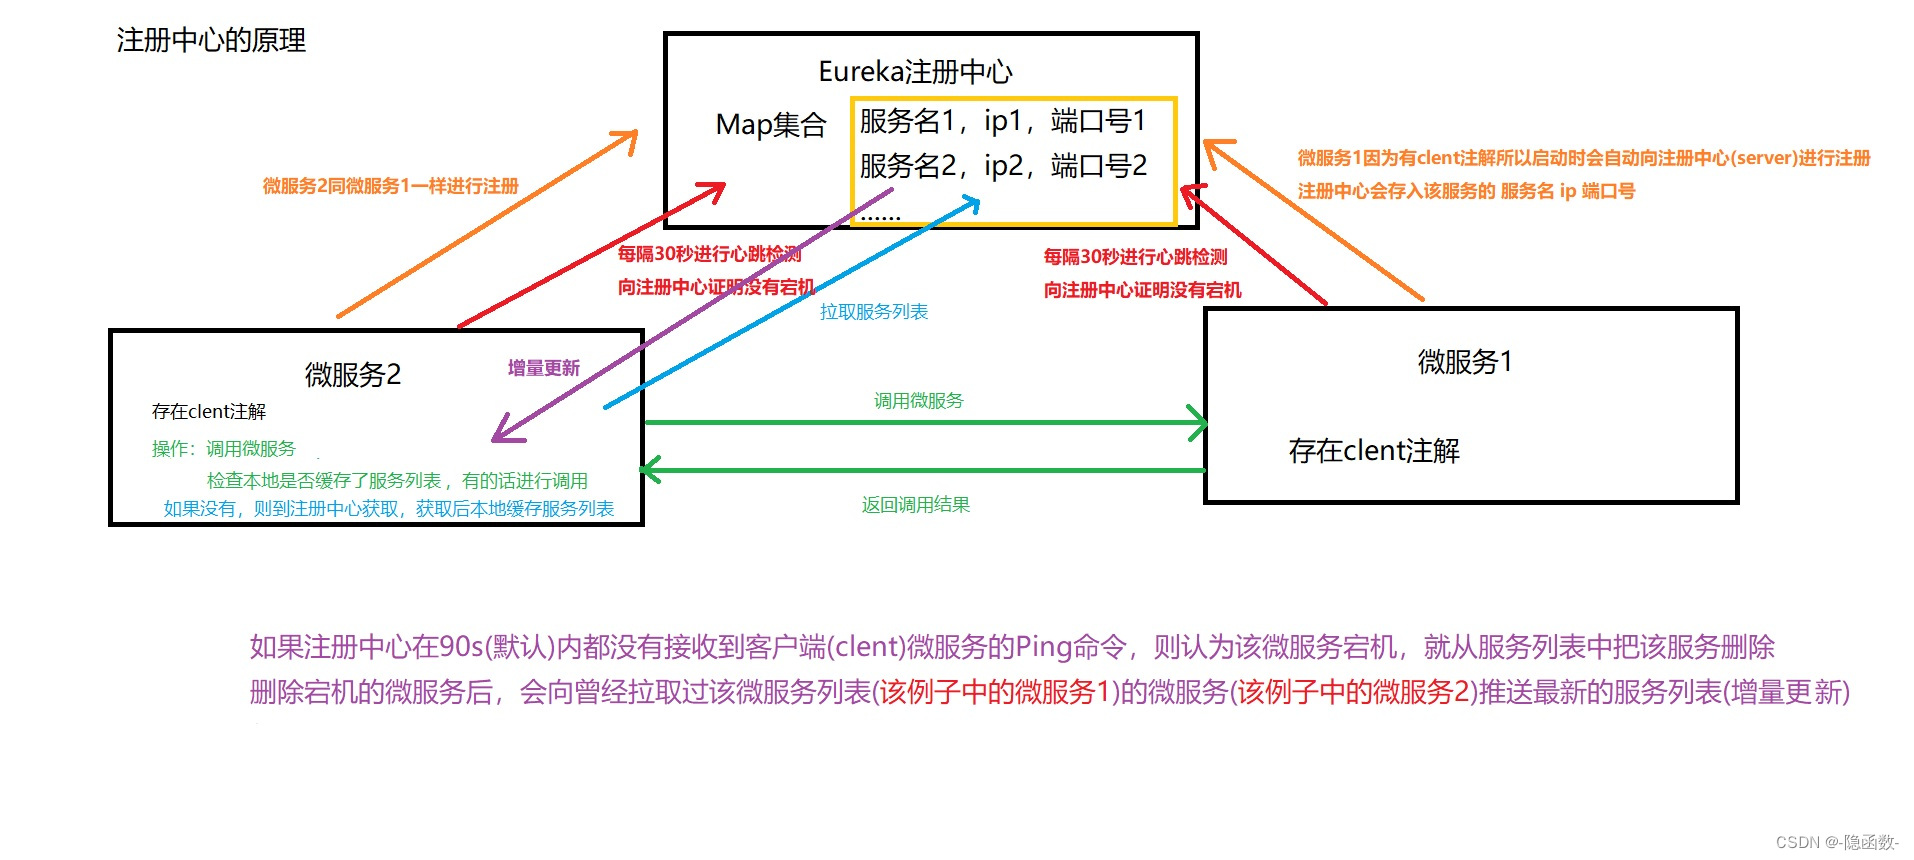
Eureka的配置
EurekaClient启动是,将自己的信息注册到EurekaServer上,EurekaSever就会存储上EurekaClient的注册信息。
当EurekaClient调用服务时,本地没有注册信息的缓存时,去EurekaServer中去获取注册信息。
EurekaClient会通过心跳的方式去和EurekaServer进行连接。(默认30sEurekaClient会发送一次心跳请求,如果超过了90s还没有发送心跳信息的话,EurekaServer就认为你宕机了,将当前EurekaClient从注册表中移除) eureka中进行添加
#针对于Eureka

eureka:
  instance:
    lease-renewal-interval-in-seconds: 30      #心跳的间隔
    lease-expiration-duration-in-seconds: 90    # 多久没发送,就认为你宕机了
EurekaClient会每隔30s去EurekaServer中去更新本地的注册表 谁调用就写到谁里边 apply
#针对于client

eureka:
  client:
    registry-fetch-interval-seconds: 30 # 每隔多久去更新一下本地的注册表缓存信息
Eureka的自我保护机制,统计15分钟内,如果一个服务的心跳发送比例低于85%,EurekaServer就会开启自我保护机制
不会从EurekaServer中去移除长时间没有收到心跳的服务。
EurekaServer还是可以正常提供服务的。
网络比较稳定时,EurekaServer才会开始将自己的信息被其他节点同步过去
eureka中进行添加
eureka:
  server:
    enable-self-preservation: true  # 开启自我保护机制
服务间的负载均衡
为了防止单点故障,保障微服务的高可用,任何微服务都要搭建集群
在SpringCloud中,只要注册到注册中心里的微服务的服务名相同,就自动组成集群
1、组建pda-applydao微服务的集群
项目代码相同,只有启动程序的服务名不同,注册到注册中的服务名相同,自动组建集群

2、有集群后,设计集群负载均衡的问题
在springcloud中,是基于客户端的负载均衡
在pda-apply服务上,配置负载均衡策略
添加ribbon的依赖(能够实现负载均衡)
<dependency>
    <groupId>org.springframework.cloud</groupId>
    <artifactId>spring-cloud-starter-netflix-ribbon</artifactId>
</dependency>
配置负载均衡算法
方式一:注解方式
在启动类xxxApplication中
//配置负载均衡算法
@Bean
public IRule iRule(){
    //创建负载均衡算法
    return new RoundRobinRule();  //轮询负载均衡算法
}
方式二:基于配置方式
在application.yml文件中
APPLYDAOSERVER:
  ribbon:
    NFLoadBalancerRuleClassName: com.netflix.loadbalancer.WeightedResponseTimeRule
【说明】推荐使用配置方式,因为针对不同的微服务,配置不同的负载均衡算法
ribbon所支持的负载均衡算法:
负载均衡策略
-
RandomRule:随机策略
-
RoundRobbinRule:轮询策略
-
WeightedResponseTimeRule:默认会采用轮询的策略,后续会根据服务的响应时间,自动给你分配权重
-
BestAvailableRule:根据被调用方并发数最小的去分配
六、微服务间的Feign调用
配置Feign
Feign:以HTTP方式进行服务的调用
1、添加Feign的依赖----在服务的调用方pda-apply
<dependency>
    <groupId>org.springframework.cloud</groupId>
    <artifactId>spring-cloud-starter-openfeign</artifactId>
</dependency>
2、在启动类中添加注解
3、创建接口
在applydao中编写controller
4、在aply的controller中添加Feign文件夹并编写interface类型的接口
package com.qf.pdaapply.controller.feigns;
import com.qf.pdacommon.pojo.Apply;
import com.qf.pdacommon.pojo.ApplyLogin;
import org.springframework.cloud.openfeign.FeignClient;
import org.springframework.web.bind.annotation.*;
import java.util.List;
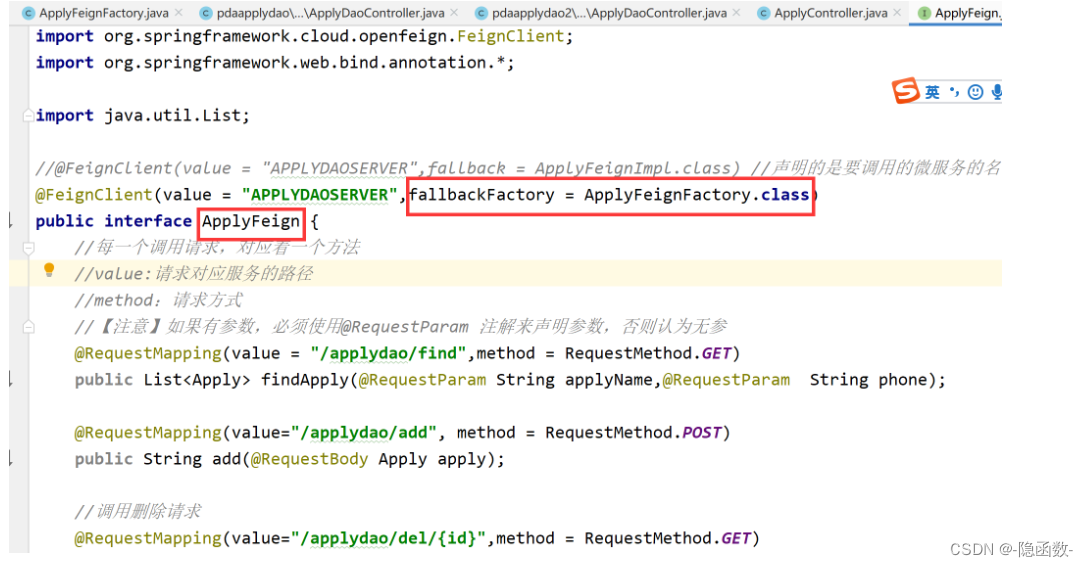
@FeignClient(value = "APPLYDAOSERVER") //声明的是要调用的微服务的名字
public interface ApplyFeign {
//每一个调用请求,对应着一个方法
//value:请求对应服务的路径
//method:请求方式
//【注意】如果有参数,必须使用@RequestParam 注解来声明参数,否则认为无参
//【注意】如果有参数,必须使用@RequestParam 注解来生命参数,否则认为无擦
@RequestMapping(value = "/applydao/findcondation",method = RequestMethod.GET)
public List<Apply> findcondation(@RequestParam String applyName, @RequestParam int state, @RequestParam int page, @RequestParam int limit);
@RequestMapping(value = "/applydao/findApplyPage", method = RequestMethod.GET)
public int findApplyPage(@RequestParam String applyName, @RequestParam int state);
//删除
@RequestMapping(value = "/applydao/deleteapply/{applyId}", method = RequestMethod.GET)
public String deleteApply(@PathVariable("applyId") int applyId);
}
5、在controller中用Feign进行调用
package com.qf.pdaapply.controller;

import com.netflix.hystrix.contrib.javanica.annotation.HystrixCommand;
import com.netflix.hystrix.contrib.javanica.annotation.HystrixProperty;
import com.netflix.hystrix.contrib.javanica.cache.annotation.CacheKey;
import com.qf.pdaapply.controller.feigns.ApplyFeign;
import com.qf.pdaapply.service.ApplyService;
import com.qf.pdacommon.pojo.Apply;
import com.qf.pdacommon.pojo.ApplyLogin;
import org.springframework.beans.factory.annotation.Autowired;
import org.springframework.cloud.openfeign.FeignClient;
import org.springframework.web.bind.annotation.*;
import org.springframework.web.client.RestTemplate;

import javax.annotation.Resource;
import java.util.ArrayList;
import java.util.HashMap;
import java.util.List;
import java.util.Map;

@RestController
@CrossOrigin("*")
@RequestMapping("/apply")
public class ApplyController {

    //注入RestTemplate对象
    @Autowired
    private RestTemplate restTemplate;

    //Feign
    @Resource
    private ApplyFeign applyFeign;

    @Autowired
    private ApplyService applyService;


    //添加进pda-applydao中
    @PostMapping("/addapply")
    public String addApply(Apply apply){

        //1、准备调用的微服务的url地址
        //在springcloud中,通过微服务的服务名来调用
        //不能通过IP指定调用某台服务器,容易发生单点故障
        //微服务注册到注册中心后,如果是同一服务名,就会自动组成集群
        String url = "http://APPLYDAOSERVER/applydao/addapply";

        //调用
        //postForObject() dao的controller中用什么方式请求就用什么方式调用  restful中 post添加 get查询 put修改 delete删除
        //抵用此方法后,就会发出http请求
        //参数1:请求微服务的url
        //参数2:传递的值,此处传递的是对象,restTemplate自动将对象转成JSON字符转
        //       由于传递的是JSON,所以被调用的微服务要使用@RequestBody,把JSON字符串转成对象
        //参数3:以类对象的方式进行传递,调用微服务后返回值的类型 看的是dao的controller中返回值类型是什么
        String result = restTemplate.postForObject(url,apply,String.class);
        return result;
    }

    //查询
    @GetMapping("/findapply")
    public Map findApply(){
        String url = "http://APPLYDAOSERVER/applydao/findapply";

        Map<String,Object> map = new HashMap<String, Object>();
        List<Apply> list = restTemplate.getForObject(url, List.class);
        map.put("code","0");
        map.put("msg","");
        map.put("count",list.size());
        map.put("data",list);
        return map;
    }

    //分页模糊查询
    @GetMapping("/findcondation")
    //hystrix 降级服务
//    @HystrixCommand(fallbackMethod = "findApplyFallBack")

    //线程隔离-----默认的方式
//    @HystrixCommand(fallbackMethod = "findApplyFallBack2", commandProperties = {
//            @HystrixProperty(name="execution.isolation.strategy", value = "THREAD"),
//            @HystrixProperty(name="execution.isolation.thread.timeoutInMilliseconds", value = "1000"),
//            @HystrixProperty(name="execution.timeout.enabled", value = "true")
//    })

//    //线程隔离-----信号流量
//    @HystrixCommand(fallbackMethod = "findApplyFallBack3", commandProperties = {
//            @HystrixProperty(name="execution.isolation.strategy", value = "SEMAPHORE"),
//            @HystrixProperty(name=
//                    "execution.isolation.semaphore.maxConcurrentRequests", value = "100")
//    })


    public Map findcondation(String applyName,int state,int page,int limit){


        String url1 = "http://APPLYDAOSERVER/applydao/findApplyPage?applyName="+applyName+
                "&state="+state;
        String url2 = "http://APPLYDAOSERVER/applydao/findcondation?applyName="+applyName+
                "&state="+state+"&page="+page+"&limit="+limit;

        Map<String,Object> map = new HashMap<String, Object>();
        int count = restTemplate.getForObject(url1,int.class);
        List<Apply> list = restTemplate.getForObject(url2,List.class);
        map.put("code","0");
        map.put("msg","");
        map.put("count",count);
        map.put("data",list);
            return map;

    }

    //feign的分页模糊查询
    @GetMapping("/findcondation2")
    //熔断、断路器
    @HystrixCommand(commandProperties = {
      //启用断路器
      @HystrixProperty(name = "circuitBreaker.enabled", value = "true"),
      //10秒内有10个请求失败,则断路器由关闭状态到打开状态
      @HystrixProperty(name = "circuitBreaker.requestVolumeThreshold", value = "10"),
      //请求失败的百分比
      @HystrixProperty(name = "circuitBreaker.errorThresholdPercentage", value = "70"),
      //断路器由打开状态到半开状态的时间间隔
      @HystrixProperty(name = "circuitBreaker.sleepWindowInMilliseconds",value = "5000")
    })
    public Map findcondation2(String applyName, int state, int page, int limit){
        Map<String,Object> map = new HashMap<String,Object>();

        int count = applyFeign.findApplyPage(applyName,state);
        List<Apply> list = applyFeign.findcondation(applyName, state, page, limit);
        map.put("code","0");
        map.put("msg","");
        map.put("count",count);
        map.put("data",list);
        System.out.println("调用的是fegin");
        return map;
    }


    //feign的分页模糊查询
    @GetMapping("/findcondation3")

    public Map findcondation3(String applyName, int state, int page, int limit){
        Map<String,Object> map = new HashMap<String,Object>();

        int count = applyFeign.findApplyPage(applyName,state);
        List<Apply> list = applyFeign.findcondation(applyName, state, page, limit);
        map.put("code","0");
        map.put("msg","");
        map.put("count",count);
        map.put("data",list);
        System.out.println("调用的是fegin");
        return map;
    }


    //删除
    @GetMapping("/deleteapply")
    public String deleteApply(int applyId){
        return applyFeign.deleteApply(applyId);
    }

    //服务降级后调用的方法
    public Map findApplyFallBack(String applyName, int state, int page, int limit){
        Map<String,Object> map = new HashMap<String, Object>();
        Apply apply = new Apply();
        apply.setApplyName("hystrix服务降级的申请示例者数据");
        map.put("hystrix",apply);
        return map ;
    }

    //线程隔离-----线程池默认的方式后调用的方法
    public Map findApplyFallBack2(String applyName, int state, int page, int limit){
        Map<String,Object> map = new HashMap<String, Object>();
        Apply apply = new Apply();
        apply.setApplyName("hystrix线程隔离---线程池默认的方式 的申请示例者数据");
        map.put("hystrix",apply);
        return map ;
    }


    //线程隔离-----信号流量的方式调用的方法
    public Map findApplyFallBack3(String applyName, int state, int page, int limit){
        Map<String,Object> map = new HashMap<String, Object>();
        Apply apply = new Apply();
        apply.setApplyName("hystrix线程隔离---信号流量的方式 的申请示例者数据");
        map.put("hystrix",apply);
        return map ;
    }

    //请求缓存
    @GetMapping("/findcondation4")
    public List<Apply> findcondation4(String applyName, int state, int page, int limit){
        List<Apply> list = applyService.findcondation4(applyName, state, page, limit);
        List<Apply> list1 = applyService.findcondation4(applyName, state, page, limit);
        return list;
    }

    //测试清楚缓存
    //请求缓存
    @GetMapping("/clearcondation4")
    public List<Apply> clearcondation4(String applyName, int state, int page, int limit){
        List<Apply> list = applyService.findcondation4(applyName, state, page, limit);
        applyService.clearcondation4(applyName, state, page, limit);
        List<Apply> list1 = applyService.findcondation4(applyName, state, page, limit);
        return list;
    }


}
6、启动测试
Feign的微服务调用流程
1、Feign属于HTTP调用
2、HTTP协议的介绍(简介)
3、Feign属于基于接口的调用
4、@EnableFeignClients //才可以使用feign组件进行服务调用 在启动类
5、接口的相关属性介绍
@FeignClient("APPLYDAOSERVER") //声明的是要调用的微服务的名字 接口中
接口中的方法及@RequestMapping注解
6、Feign组件创建HTTP请求对象,设置:协议,请求路径,传递参数
Feign进行微服务调用的传参方式
1、当传递的参数只有一个,或比较少时,建议使用地址传参
被调用的服务中的方法声明 pda-applydao
@GetMapping("/del/{id}")
public String deleteApply(@PathVariable("id") int id){
    System.out.println("接收到要删除的数据主键id="+id);
    //调用service
    boolean result=true;
    if(result){
        return "success";
    }else{
        return "failed";
    }
}
在Feign文件夹下Feign的接口中
//调用删除请求
@RequestMapping(value="/applydao/del/{id}",method = RequestMethod.GET)
public String deleteApply(@PathVariable("id")int id);
在apply 的 controller中调用
@GetMapping("/del")
public String deleteApply(int id){
    return applyFeign.deleteApply(id);
}
2、如果参数较多时,建议使用(@RequestParam)
被调用的服务中的方法声明 pda-applydao
    //分页模糊查询
    @GetMapping("/findcondation")
    public List findcondation(String applyName,int state,int page,int limit){
        System.out.println("开始调用1号服务器");
        System.out.println(applyName + state + page + limit);
        List<Apply> list = applyDaoService.findApplyCondition(applyName, state, page, limit);
        return list;
    }
在Feign文件夹下Feign的接口中
    @RequestMapping(value = "/applydao/findcondation",method = RequestMethod.GET)
    public List<Apply> findcondation(@RequestParam String applyName, @RequestParam int state, @RequestParam int page, @RequestParam int limit);
在apply 的 controller中调用
@GetMapping("/findcondation")
 public Map findcondation2(String applyName, int state, int page, int limit){
        Map<String,Object> map = new HashMap<String,Object>();

        int count = applyFeign.findApplyPage(applyName,state);
        List<Apply> list = applyFeign.findcondation(applyName, state, page, limit);
        map.put("code","0");
        map.put("msg","");
        map.put("count",count);
        map.put("data",list);
        System.out.println("调用的是fegin");
        return map;
    }
3、如果传递对象,需要使用@RequestBody注解
被调用的服务中的方法声明 pda-applydao
正常编写在Feign文件夹下Feign的接口中
@RequestMapping(value="/applydao/add", method = RequestMethod.POST)
public String add(@RequestBody Apply apply);
在apply 的 controller中调用
正常编写【说明】在Feign的接口中网络请求必须使用@RequestMapping注解
Feign的服务降级FallBack
当被调用的服务,比较忙、发生异常等,导致无法正常提供,那么此时当前服务应该返回给用户“托底数据”
此种情况称为服务降级
【注意】服务降级是已经调用了服务(请求已经到达了被调用的服务端),只是服务没有正常返回结果而已
使用Feign组件实现服务降级
降级方式一:
1、创建applyFeign接口的实现类继承ApplyFeign,并在实现类的实现方法中,编写托底数据
package com.qf.pdaapply.feigns;

import com.qf.pdacommon.pojo.Apply;
import org.springframework.stereotype.Component;

import java.util.ArrayList;
import java.util.List;
@Component
public class ApplyFeignImpl implements ApplyFeign {
    @Override
    public List<Apply> findApply(String applyName, String phone) {
        //调用ApplyFeign接口的findApply 降级时
        Apply apply=new Apply();
        apply.setApplyName("申请者示例数据");
        List<Apply> list=new ArrayList<Apply>();
        list.add(apply);
        return list;
    }

    @Override
    public String add(Apply apply) {
        return "无法正常提供服务,请稍后重试";
    }

    @Override
    public String deleteApply(int id) {
        return "无法正常提供服务,请稍后重试";
    }
}
2、在接口的注解中改为
@FeignClient(value = "APPLYDAOSERVER",fallback = ApplyFeignImpl.class)3、开启服务降级,在pda-apply的配置文件application.yml中
#开启服务降级
feign:
  hystrix:
    enabled: true
降级方式二:
托底数据:返回给用户的
能够获取到被调用服务的异常信息
在方式一的基础上进行的(依然需要托底数据的实现类)
1、新建类去实现FallBackFactory<ApplyFein>
package com.qf.pdaapply.controller.feigns;

import feign.hystrix.FallbackFactory;
import org.springframework.beans.factory.annotation.Autowired;
import org.springframework.stereotype.Component;

@Component
public class ApplyFeignFactory implements FallbackFactory<ApplyFeign> {

    //注入托底数据实现对象
    @Autowired
    private ApplyFeignImpl applyFeignImpl;

    @Override
    public ApplyFeign create(Throwable throwable) {
        System.out.println("被调用的服务发生了异常,异常信息如下:"+throwable.getMessage());
        return applyFeignImpl;
    }
}
2、修改ApplyFeign的配置
7、Hystrix的使用
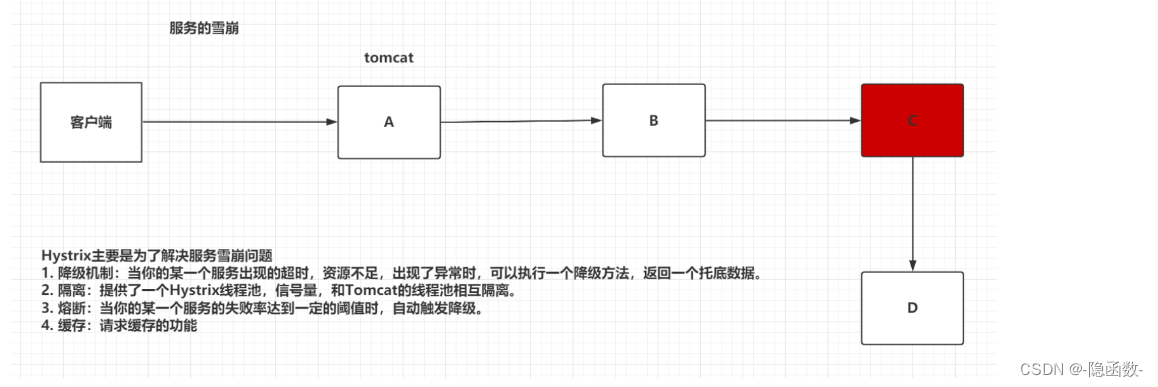
解决服务雪崩的四种方式
服务降级
1、在服务的调用者处添加依赖
<dependency>
    <groupId>org.springframework.cloud</groupId>
    <artifactId>spring-cloud-starter-netflix-hystrix</artifactId>
</dependency>
2、开启Hystrix服务,在启动类中开启
@EnableCircuitBreaker //开启hystrix服务3、在controller中实现降级---在controller中编写降级时调用的方法
//查询调用
@GetMapping("/find")
@HystrixCommand(fallbackMethod = "findApplyFallBack")
public List<Apply> findApplyByCondition(String applyName,String phone){
    //调用的url
    String url="http://APPLYDAOSERVER/applydao/find?applyName="+applyName+"&phone="+phone;
    //get方式调用
    //参数1:调用的微服务的url
    //参数2:返回值的类型
    //接收到的是JSON格式的字符串,RestTemplate把JSON字符串转成List<Apply>集合
    List<Apply> list=restTemplate.getForObject(url,List.class);
    return list;
}
//服务降级后调用的方法
public List<Apply> findApplyFallBack(String applyName,String phone){
    Apply apply=new Apply();
    apply.setApplyName("申请者示例数据---zs");
    List<Apply> list=new ArrayList<Apply>();
    list.add(apply);
    return list;
}
线程隔离
让一个服务的部分线程去请求另一个服务
实现线程隔离有两种方案:
1、Hystrix线程池:默认的方式 ----- findApplyFallBack方法和以前一样不用改变
在Tomcat中把请求服务的线程,从Tomcat转移到Hystrix线程池里的线程中,耽搁的是Hystrix线程池里的线程,tomcat里的线程照样可以调用别的线程
缺点:效率相对较低,需要请求的转移
优点:充分利用tomcat线程
| 配置信息 | name | value |
|---|---|---|
| 线程隔离策略 | execution.isolation.strategy | THREAD |
| 指定超时时间 | execution.isolation.thread.timeoutInMilliseconds | 1000 |
| 是否开启超时时间配置 | execution.timeout.enabled | true |
| 超时之后是否中断线程 | execution.isolation.thread.interruptOnTimeout | true |
| 取消任务后知否 | execution.isolation.thread.interruptOnCancel | false |
//查询调用
@GetMapping("/find")
@HystrixCommand(fallbackMethod = "findApplyFallBack",commandProperties = {
     @HystrixProperty(name = "execution.isolation.strategy",value = "THREAD"),
        @HystrixProperty(name = "execution.timeout.enabled",value ="true"),
        @HystrixProperty(name="execution.isolation.thread.timeoutInMilliseconds",value ="1000" )
})
public List<Apply> findApplyByCondition(String applyName,String phone){
    //调用的url
    String url="http://APPLYDAOSERVER/applydao/find?applyName="+applyName+"&phone="+phone;
    //get方式调用
    //参数1:调用的微服务的url
    //参数2:返回值的类型
    //接收到的是JSON格式的字符串,RestTemplate把JSON字符串转成List<Apply>集合
    List<Apply> list=restTemplate.getForObject(url,List.class);
    return list;
}
2、信号流量 --- feign下调用的是feign
限制Tomcat中线程去请求其他服务的线程的数量
| 配置信息 | name | value |
|---|---|---|
| 线程隔离策略 | execution.isolation.strategy | SEMAPHORE |
| 指定信号量的最大并发请求数 | execution.isolation.semaphore.maxConcurrentRequests | 10 |
@GetMapping("/find2")
@HystrixCommand(commandProperties ={
      @HystrixProperty(name = "execution.isolation.strategy",value ="SEMAPHORE" ),
        @HystrixProperty(name = "execution.isolation.semaphore.maxConcurrentRequests",value = "100")
})
public List<Apply> findApplyByCondition2(String applyName,String phone){
    return applyFeign.findApply(applyName,phone);
}
优点:比Hystrix效率要高,没有做请求的转移
缺点:没有充分利用Tomcat中的线程
3、熔断、断路器
【服务降级、熔断的区别】
断路器的工作原理:
1、当A服务调用B服务时,如果在一段时间内,对B服务的请求失败达到一定的数量,或一定的百分比,断路器打开
2、当断路器打开后,A服务对B服务发出的请求,直接返回
3、当过指定的设置时间后,断路器由打开状态转换到半开状态,放行少量的请求,如果放行的请求,请求成功了,那么断路器关闭,所有请求将到达B服务
4、如果放行的少量请求,依然请求失败,则断路器由半开状态,转为打开状态
5、循环转换
断路器的属性(默认10s秒中之内请求数)
| 配置信息 | name | value |
|---|---|---|
| 断路器的开关 | circuitBreaker.enabled | true |
| 失败阈值的总请求数 | circuitBreaker.requestVolumeThreshold | 20 |
| 请求总数失败率达到%多少时 | circuitBreaker.errorThresholdPercentage | 50 |
| 断路器open状态后,多少秒是拒绝请求的 | circuitBreaker.sleepWindowInMilliseconds | 5000 |
| 强制让服务拒绝请求 | circuitBreaker.forceOpen | false |
| 强制让服务接收请求 | circuitBreaker.forceClosed | false |
//feign的分页模糊查询
    @GetMapping("/findcondation2")
    //熔断、断路器
    @HystrixCommand(commandProperties = {
      //启用断路器
      @HystrixProperty(name = "circuitBreaker.enabled", value = "true"),
      //10秒内有10个请求失败,则断路器由关闭状态到打开状态
      @HystrixProperty(name = "circuitBreaker.requestVolumeThreshold", value = "10"),
      //请求失败的百分比
      @HystrixProperty(name = "circuitBreaker.errorThresholdPercentage", value = "70"),
      //断路器由打开状态到半开状态的时间间隔
      @HystrixProperty(name = "circuitBreaker.sleepWindowInMilliseconds",value = "5000")
    })
    public Map findcondation2(String applyName, int state, int page, int limit){
        Map<String,Object> map = new HashMap<String,Object>();

        int count = applyFeign.findApplyPage(applyName,state);
        List<Apply> list = applyFeign.findcondation(applyName, state, page, limit);
        map.put("code","0");
        map.put("msg","");
        map.put("count",count);
        map.put("data",list);
        System.out.println("调用的是fegin");
        return map;
    }
4、请求缓存
1、在业务逻辑层---pda-apply---service
package com.qf.pdaapply.service.impl;

import com.netflix.hystrix.contrib.javanica.annotation.HystrixCommand;
import com.netflix.hystrix.contrib.javanica.cache.annotation.CacheKey;
import com.netflix.hystrix.contrib.javanica.cache.annotation.CacheResult;
import com.qf.pdaapply.feigns.ApplyFeign;
import com.qf.pdaapply.service.ApplyService;
import com.qf.pdacommon.pojo.Apply;
import org.springframework.beans.factory.annotation.Autowired;
import org.springframework.stereotype.Service;

import java.util.List;
@Service
public class ApplyServiceImpl implements ApplyService {
    @Autowired
    private ApplyFeign applyFeign;
    @Override
    @CacheResult   //缓存此方法的查询结果
    @HystrixCommand(commandKey = "find3")  //使用find3方法里的参数值作为key
    public List<Apply> find3(@CacheKey String applyName, @CacheKey String phone) {
        return applyFeign.findApply(applyName,phone);
    }
}
2、创建缓存过滤器---初始化请求缓存对象---pdaapply---filters
package com.qf.pdaapply.filters;

import com.netflix.hystrix.strategy.concurrency.HystrixRequestContext;

import javax.servlet.*;
import javax.servlet.annotation.WebFilter;
import java.io.IOException;

@WebFilter("/*")
public class HystrixFilter implements Filter {
    public void destroy() {
    }

    public void doFilter(ServletRequest req, ServletResponse resp, FilterChain chain) throws ServletException, IOException {
        //初始化请求缓存
        HystrixRequestContext.initializeContext();
        chain.doFilter(req, resp);
    }

    public void init(FilterConfig config) throws ServletException {

    }

}
【注意】SpringBoot默认不扫描、加载Servlet以及Filter
需要通过注解的配置,让SpringBoot去扫描加载,在启动类中配置如下:---启动类
@ServletComponentScan(basePackages = "com.qf.pdaapply.filters") //通过配置后,扫描过滤器3、修改controller,在一次请求内,多次请求pda-applydao微服务 -----pdaapply-controller
@GetMapping("/find3")
public List<Apply> find3(String applyName,String phone){
    List<Apply> list= applyService.find3(applyName,phone);
    List<Apply> list1=applyService.find3(applyName,phone);
    return list;
}
4、测试成功
清理缓存
//清除缓存
    @Override
    @CacheRemove(commandKey = "findcondation4") //清除findcondation4方法里的参数的key
    @HystrixCommand
    public void clearcondation4(@CacheKey String applyName,@CacheKey int state,@CacheKey int page,@CacheKey int limit) {
        System.out.println("findcondation4方法的请求缓存被清空!");
    }
@GetMapping("/find3")
public List<Apply> find3(String applyName,String phone){
List<Apply> list= applyService.find3(applyName,phone);
//清理缓存
applyService.clearFind3Cache(applyName,phone);
List<Apply> list1=applyService.find3(applyName,phone);
return list;
}8、配置管理Config
微服务个数很多,每个微服务中都有配置文件,对配置文件的维护非常麻烦
Config组件,通过以服务的方式,对其他微服务的配置文件进行统一的管理,
原理:
1、把各个微服务的配置文件移植到Config服务的本地,也可以一直到远程服务器
2、各个微服务在服务启动时,到Config微服务中去获取配置文件

1、新建Config微服务
新建 module2、添加依赖
<packaging>war</packaging>
<dependencies>
    <dependency>
        <groupId>org.springframework.cloud</groupId>
        <artifactId>spring-cloud-config-server</artifactId>
    </dependency>
</dependencies>
3、启动程序
package com.qf.pdaconfig;

import org.springframework.boot.SpringApplication;
import org.springframework.boot.autoconfigure.SpringBootApplication;
import org.springframework.cloud.config.server.EnableConfigServer;
import org.springframework.cloud.netflix.eureka.EnableEurekaClient;

@SpringBootApplication
@EnableEurekaClient
@EnableConfigServer
public class PdaConfigApplication {
    public static void main(String[] args) {
        SpringApplication.run(PdaConfigApplication.class,args);
    }
}
4、pda-config微服务自身的配置文件
两种配置方式
存储在远程仓库
spring:
  cloud:
    config:
      server:
        git:
          basedir: D:\basedir    # 本地仓库的地址
          username: zjw_2301211@126.com    #  远程仓库用户名
          password: z123123   #   远程仓库密码
          uri: https://gitee.com/zhengdaxian/config-resp.git       # 远程仓库地址
直接存储在本地
server:
  port: 8086
spring:
  profiles:
    active: native
  cloud:
    config:
      server:
        native:
          search-locations: classpath:configfile
5、把其他微服务的配置文件一直到pda-config微服务中
在configfile文件夹下,新建配置文件pdaapply-local.yml
把pda-apply微服务的application.yml里的内容,复制到pdaapply-local.yml里
6、在pda-apply微服务中
6.1:删除原先微服务里的配置文件
6.2:新建配置文件bootstrap.yml,引用配置服务的配置文件
# 配置---到配置中心中拉取配置文件
spring:
  cloud:
    config:
      uri: http://localhost:8086
      name: pdaapply
      profile: local
6.3:在当前pda-apply微服务中,添加config-client的依赖
<dependency>
    <groupId>org.springframework.cloud</groupId>
    <artifactId>spring-cloud-config-client</artifactId>
</dependency>
测试即可
一定先启动:注册中心、配置中心
【注意】在配置中心的微服务里,不要引入多于的jar
config服务的jar里包含了springboot的jar
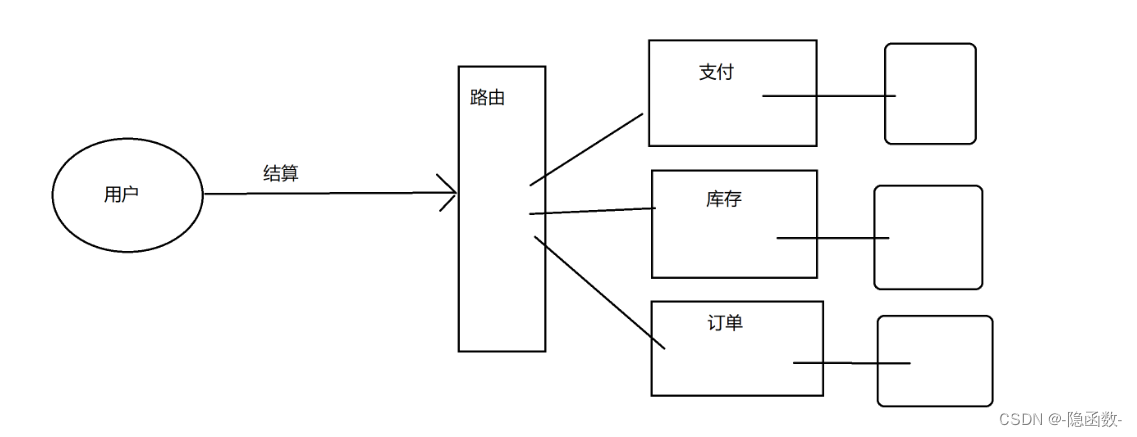
九、路由配置gateway

【路由/网关服务器,是否可以被Nginx服务所替代】
1、使用Nginx暴露了服务的信息
2、微服务太多,Nginx集群维护较为繁琐
1、新建网关微服务
创建 module2、添加依赖
<dependency>
    <groupId>org.springframework.cloud</groupId>
    <artifactId>spring-cloud-starter-netflix-eureka-client</artifactId>
</dependency>
<dependency>
    <groupId>org.springframework.cloud</groupId>
    <artifactId>spring-cloud-starter-gateway</artifactId>
</dependency>
<dependency>
    <groupId>org.springframework.cloud</groupId>
    <artifactId>spring-cloud-starter-netflix-ribbon</artifactId>
</dependency>
3、启动类
package com.qf.pdagateway;

import org.springframework.boot.SpringApplication;
import org.springframework.boot.autoconfigure.SpringBootApplication;
import org.springframework.cloud.netflix.eureka.EnableEurekaClient;

@SpringBootApplication
@EnableEurekaClient
public class PdaGateWayApplication {
    public static void main(String[] args) {
        SpringApplication.run(PdaGateWayApplication.class,args);
    }
}
4、配置文件application.yml
客户端请求什么,去调用对应的服务
server:
  port: 8087
spring:
  application:
    name: GATEWAYSERVER
  cloud:
    gateway:
      routes:  # 配置路由规则
        - id: applyRoutes
          predicates:
            - Path=/apply/**     # apply/add
          uri: lb://APPLYSERVER
        - id: applyDaoRoutes
          predicates:
            - Path=/applydao/**
          uri: lb://APPLYDAOSERVER
eureka:
  client:
    service-url:
      defaultZone: http://root:root@localhost:8080/eureka/


# 配置负载均衡算法
APPLYSERVER:
  ribbon:
    NFLoadBalancerRuleClassName: com.netflix.loadbalancer.WeightedResponseTimeRule
APPLYDAOSERVER:
  ribbon:
    NFLoadBalancerRuleClassName: com.netflix.loadbalancer.WeightedResponseTimeRule
测试:所有的微服务请求都要通过路由服务器进行请求
十、基于微服务的分布式所碰见的问题
1、由于分库、分表,传统的事务失效,需要分布式事务的解决方案
2、传统的锁失效,传统锁只能锁线程,不能锁进程
学习分布式锁(Redis、Zookeeper)
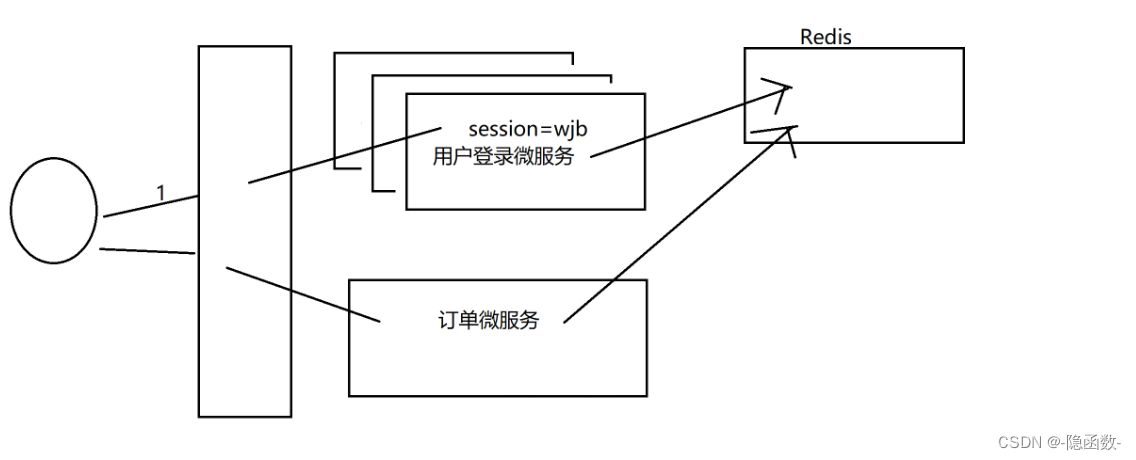
3、session不能共享
4、分表后,分布式主键的问题
十一、Session共享解决方案
1、新建登录的微服务
2、登录验证
3、如果账号、密码正确
写入Redis---有效期,30分钟 key
写入Cookie---key
4、请求其他微服务,从Cookie中读取到key
5、根据key到Redis中获取用户信息
如果获取不到,则直接跳转到登录的微服务
如果获取到,已经登录,更新Redis中key的有效期


 2774
2774


 被折叠的 条评论
为什么被折叠?
被折叠的 条评论
为什么被折叠?
 到【灌水乐园】发言


