


在编程的奇妙世界里,时常会涌现出一些有趣的挑战,比如在半小时内手搓一个动态小游戏。今天,就让我们一同踏入这个充满趣味的旅程,用 Python 打造一款经典的推箱子小游戏。
游戏机制简介
推箱子游戏的规则简单却富有策略性。玩家需要操控游戏中的角色,将箱子推到指定的目标位置。在推动箱子的过程中,要注意不能将箱子推到死角,也不能同时推动多个箱子。整个游戏场景由墙壁、箱子、目标点和玩家角色构成。
实现代码
我们将使用 Python 的pygame库来实现这个小游戏。首先导入所需要的库,
import pygame
import sys
import os
import math
import random
import time
from levels import levels
确保你已经安装了相对于的库。如果没有安装,可以通过以下命令进行安装:
pip install pygame
pip install sys
pip install math
pip install random
pip install time
pip install levels
1. 颜色与常量定义
渐变背景
为了使游戏背景更加生动,采用了渐变效果。通过循环遍历窗口的高度,根据当前行的位置计算出从天空蓝到深海蓝的渐变颜色。并且,利用math.sin函数为背景添加了波浪效果,使得背景看起来更加自然和动态。
# 绘制渐变背景
for i in range(WINDOW_HEIGHT):
    progress = i / WINDOW_HEIGHT
    color = (
        int(GRADIENT_TOP[0] * (1 - progress) + GRADIENT_BOTTOM[0] * progress),
        int(GRADIENT_TOP[1] * (1 - progress) + GRADIENT_BOTTOM[1] * progress),
        int(GRADIENT_TOP[2] * (1 - progress) + GRADIENT_BOTTOM[2] * progress)
    )
    wave = math.sin(i * 0.02 + delta_time) * 5
    pygame.draw.line(screen, color, (wave, i), (WINDOW_WIDTH + wave, i))
云朵绘制
创建了Cloud类来管理云朵的绘制。每个云朵具有随机的初始位置、速度和大小。在游戏循环中,不断更新云朵的位置,当云朵移出屏幕右侧时,将其重新放置到屏幕左侧,实现了云朵在天空中持续飘动的效果。
class Cloud:
    def __init__(self, x, y, speed):
        self.x = x
        self.y = y
        self.speed = speed
        self.size = random.randint(30, 60)
        self.segments = random.randint(3, 5)

    def update(self):
        self.x += self.speed
        if self.x > WINDOW_WIDTH + 100:
            self.x = -100

    def draw(self, screen):
        for i in range(self.segments):
            x_offset = i * (self.size * 0.8)
            cloud_segment = pygame.Surface((self.size, self.size), pygame.SRCALPHA)
            pygame.draw.ellipse(cloud_segment, (255, 255, 255, 100),
                              (0, 0, self.size, self.size))
            screen.blit(cloud_segment, (self.x + x_offset, self.y))

# 初始化云朵
clouds = [Cloud(random.randint(-100, WINDOW_WIDTH),
                random.randint(20, 150),
                random.uniform(0.2, 0.5)) for _ in range(5)]

# 在游戏循环中更新和绘制云朵
for cloud in clouds:
    cloud.update()
    cloud.draw(screen)
2. 游戏元素绘制
地图数据与关卡
游戏关卡数据存储在levels列表中,每个关卡由一个二维列表表示,其中不同的数字代表不同的元素,如 0 为空,1 为墙壁,2 是箱子,3 是目标点,4 是玩家。在游戏初始化时,根据当前关卡索引current_level获取对应的关卡数据,并将其存储在level变量中。
current_level = 0
moves_count = 0
level = [row[:] for row in levels[current_level]]
墙壁绘制
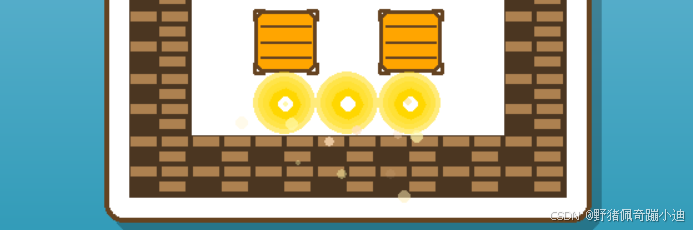
墙壁绘制采用了 3D 效果,使用深木色WALL_DARK和浅木色WALL_LIGHT交替绘制砖块,模拟出立体的墙壁效果。通过计算砖块的位置和大小,在每个墙壁格子内绘制多个砖块,并且为每个砖块添加了边框,增强了立体感。
for y in range(len(level)):
    for x in range(len(level[y])):
        rect = pygame.Rect(x * TILE_SIZE + offset_x, y * TILE_SIZE + offset_y, TILE_SIZE, TILE_SIZE)
        if level[y][x] == 1:  # 墙
            # 3D 效果的墙
            pygame.draw.rect(screen, WALL_DARK, rect)
            brick_height = TILE_SIZE // 4
            for i in range(0, TILE_SIZE, brick_height):
                offset = (i // brick_height % 2) * (TILE_SIZE//2 - 2)
                for j in range(0, TILE_SIZE, TILE_SIZE//2):
                    brick = pygame.Rect(
                        rect.left + offset + j,
                        rect.top + i,
                        TILE_SIZE//2 - 2,
                        brick_height-2
                    )
                    if brick.right <= rect.right and brick.bottom <= rect.bottom:
                        pygame.draw.rect(screen, WALL_LIGHT, brick)
                        pygame.draw.rect(screen, WALL_DARK, brick, 1)
目标点绘制
目标点具有发光脉冲效果和星形图案。利用math.sin函数控制目标点的发光强度和大小,使其产生脉冲闪烁的效果。通过绘制多个不同大小和透明度的圆形,实现了光晕效果。同时,绘制一个八角星形图案和一个白色小圆点,作为目标点的标识。
elif level[y][x] == 3:  # 目标点
    # 发光脉冲效果
    pulse = (math.sin(delta_time * 4) + 1) * 0.5
    glow_size = TILE_SIZE // 2 + pulse * 5

    for i in range(4):
        size = glow_size - i * 4
        alpha = int(128 - i * 32 + pulse * 32)
        glow_surface = pygame.Surface((size * 2, size * 2), pygame.SRCALPHA)
        glow_color = (*GOLD, alpha)
        pygame.draw.circle(glow_surface, glow_color, (size, size), size)
        screen.blit(glow_surface, (rect.centerx - size, rect.centery - size))

    # 星形效果
    points = []
    for i in range(8):
        angle = i * math.pi / 4
        radius = TILE_SIZE // 4 + pulse * 3
        points.append((
            rect.centerx + math.cos(angle) * radius,
            rect.centery + math.sin(angle) * radius
        ))
    pygame.draw.polygon(screen, GOLD, points)
    pygame.draw.circle(screen, WHITE, rect.center, TILE_SIZE//8)
3. 粒子系统与彩蛋
粒子系统
创建了ParticleSystem类来管理粒子效果。在目标点上,以一定概率生成粒子,粒子具有随机的初始位置、速度、颜色和大小。在游戏循环中,不断更新粒子的位置和状态,使其呈现出自然下落的效果。通过绘制半透明的圆形来实现粒子的显示,为游戏增添了动态效果。
class ParticleSystem:
    def __init__(self):
        self.particles = []

    def add_particle(self, x, y, color):
        particle = {
            'x': x,
            'y': y,
            'dx': random.uniform(-2, 2),
            'dy': random.uniform(-2, 2),
            'life': 255,
            'color': color,
            'size': random.uniform(2, 6)
        }
        self.particles.append(particle)

    def update(self):
        for particle in self.particles[:]:
            particle['x'] += particle['dx']
            particle['y'] += particle['dy']
            particle['dy'] += 0.1  # 重力效果
            particle['life'] -= 5
            if particle['life'] <= 0:
                self.particles.remove(particle)

    def draw(self, screen):
        for particle in self.particles:
            color = (*particle['color'], particle['life'])
            pos = (int(particle['x']), int(particle['y']))
            size = int(particle['size'])
            particle_surface = pygame.Surface((size*2, size*2), pygame.SRCALPHA)
            pygame.draw.circle(particle_surface, color, (size, size), size)
            screen.blit(particle_surface, (pos[0]-size, pos[1]-size))

# 初始化粒子系统
particle_system = ParticleSystem()

# 在游戏循环中更新和绘制粒子
particle_system.update()
particle_system.draw(screen)

# 为目标点添加粒子
for y in range(len(level)):
    for x in range(len(level[y])):
        if level[y][x] == 3 and random.random() < 0.1:
            px = x * TILE_SIZE + offset_x + TILE_SIZE//2
            py = y * TILE_SIZE + offset_y + TILE_SIZE//2
            particle_system.add_particle(px, py, random.choice(PARTICLE_COLORS))
彩蛋效果
在第一关中,当玩家操控角色撞墙次数达到 2 次时,触发彩蛋效果。此时,会出现一个大耗子,它会追踪玩家的位置。如果大耗子追上玩家,游戏会重置,回到第一关的初始状态。大耗子的绘制包括身体、眼睛、耳朵和尾巴,并且在大耗子出现时,屏幕会添加阴暗效果,增强游戏的趣味性和神秘感。
# 处理彩蛋效果
if easter_egg_triggered:
    # 更新大耗子位置(追踪玩家)
    player_pos = get_player_pos()
    if player_pos:
        target_x = player_pos[0] * TILE_SIZE + offset_x
        target_y = player_pos[1] * TILE_SIZE + offset_y

        # 降低移动速度,使用更平滑的追踪
        rat_position['x'] += (target_x - rat_position['x']) * 0.01
        rat_position['y'] += (target_y - rat_position['y']) * 0.01

        # 检测是否吃到玩家
        rat_rect = pygame.Rect(rat_position['x'], rat_position['y'], RAT_SIZE, RAT_SIZE)
        player_rect = pygame.Rect(target_x-10, target_y-10, TILE_SIZE+20, TILE_SIZE+20)

        if rat_rect.colliderect(player_rect):
            # 添加延迟效果
            dark_overlay = pygame.Surface((WINDOW_WIDTH, WINDOW_HEIGHT))
            dark_overlay.fill((0, 0, 0))
            for alpha in range(0, 255, 2):
                dark_overlay.set_alpha(alpha)
                screen.blit(dark_overlay, (0, 0))
                pygame.display.flip()
                pygame.time.delay(30)

            # 重置游戏
            easter_egg_triggered = False
            wall_collision_count = 0
            current_level = 0
            reset_level()
            rat_position = {'x': -100, 'y': -100}
            continue

        # 绘制大耗子
        rat_color = (150, 150, 150)  # 灰色
        rat_rect = pygame.Rect(rat_position['x'], rat_position['y'], RAT_SIZE, RAT_SIZE)
        pygame.draw.ellipse(screen, rat_color, rat_rect)  # 身体

        # 眼睛
        eye_color = (255, 0, 0)  # 红色眼睛
        eye_size = 10
        pygame.draw.circle(screen, eye_color,
                         (int(rat_position['x'] + RAT_SIZE * 0.7),
                          int(rat_position['y'] + RAT_SIZE * 0.3)), eye_size)

        # 耳朵
        ear_color = rat_color
        pygame.draw.ellipse(screen, ear_color,
                          (rat_position['x'] + RAT_SIZE * 0.8,
                           rat_position['y'] - RAT_SIZE * 0.2,
                           RAT_SIZE * 0.3, RAT_SIZE * 0.3))

        # 尾巴
        tail_points = [
            (rat_position['x'], rat_position['y'] + RAT_SIZE * 0.5),
            (rat_position['x'] - RAT_SIZE * 0.5, rat_position['y'] + RAT_SIZE * 0.3),
            (rat_position['x'] - RAT_SIZE * 0.7, rat_position['y'] + RAT_SIZE * 0.4)
        ]
        pygame.draw.lines(screen, rat_color, False, tail_points, 4)

        # 添加阴暗效果
        dark_overlay = pygame.Surface((WINDOW_WIDTH, WINDOW_HEIGHT), pygame.SRCALPHA)
        dark_overlay.fill((0, 0, 0, 128))
        screen.blit(dark_overlay, (0, 0))
通过以上步骤,一个功能丰富、画面精美的推箱子小游戏就搭建完成了。从基础的窗口构建到复杂的游戏逻辑和特效实现,每一步都展示了 Python 编程在游戏开发领域的强大能力。
需要完整代码可以联系


 被折叠的 条评论
为什么被折叠?
被折叠的 条评论
为什么被折叠?
 到【灌水乐园】发言


