


1 Bean的配置
如果把Spring看做一个大型工厂,则Spring容器中的Bean就是该工厂的产品。要想使用这个工厂生产和管理Bean,就需要在配置文件中告诉它需要哪些Bean,以及需要使用何种方式将这些Bean装配到一起。
小提示: Bean的本质就是Java中的类,而Spring中的Bean其实就是对实体类的引用,来生产Java类对象,从而实现生产和管理Bean 。
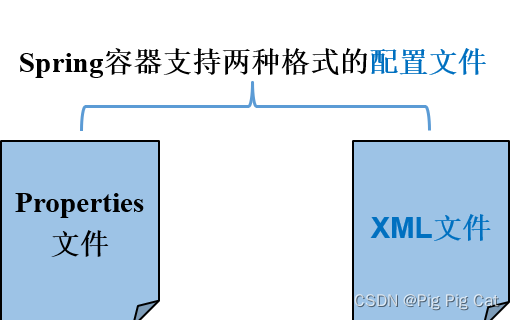
在实际开发中,最常使用的是XML文件格式的配置方式,这种配置方式是通过XML文件来注册并管理Bean之间的依赖关系。
<beans>是XML配置文件的根元素,包含了多个<bean>子元素,每一个<bean>子元素定义了一个Bean,并描述了该Bean如何被装配到Spring容器中。其常用的属性如下表:

小提示:<beans>元素的更多属性
| 属性或子元素名称 | 描述 |
| id | 是一个Bean的唯一标识符,Spring容器对Bean的配置、管理都通过该属性来完成 |
| name | Spring容器同样可以通过此属性对容器中的Bean进行配置和管理,name属性中可以未Bean指定多个名称,每个名称之间用逗号或分号隔开 |
| class | 该属性指定了Bean的具体实现类,它必须是一个完整的类名,使用类的权限定名 |
| scope | 用来设定Bean实例的作用域,其属性有singleton(单例)、prototype(原型)、request、session、global Session、application 和websocket。其默认值为singleton |
| constructor-arg | <bean>元素的子元素,可以使用此元素传入构造参数进行实例化。该元素的index属性指定构造参数的序号(从0开始),type属性指定构造参数的类型,参数值可以通过ref属性或value属性直接指定,也可以通过ref或value子元素指定 |
| property | <bean>元素的子元素,用于调用Bean实例中的setter方法完成属性赋值,从而完成依赖注入。该元素的name属性指定Bean实例中的相应属性名,ref属性或value属性用于指定参数值 |
| ref | <property>、<constructor-arg>等元素的属性或子元素,可以用于指定对Bean工厂中某个Bean实例的引用 |
| value | <property>、<constructor-arg>等元素的属性或子元素。可以用于直接指定一个常量值 |
| list | 用于封装List或数组类型的依赖注入 |
| set | 用于封装Set类型属性的依赖注入 |
| map | 用于封装Map类型属性的依赖注入 |
| entry | <map>元素的子元素,用于设置一个键值对。其key属性指定字符串类型的键值,ref或value子元素指定其值,也可以通过value-ref或value属性指定其值 |
<?xml version="1.0" encoding="UTF-8"?>
<beans
<!-- 表示默认命空间,用于Spring Bean定义 -->
xmlns="http://www.springframework.org/schema/beans"
<!--xsi标准命名空间,指定自定义命名空间的schema文件 -->
xmlns:xsi="http://www.w3.org/2001/XMLSchema-instance"
<!--  用于为每个命名空间指定具体的schema文件-->
xsi:schemaLocation="http://www.springframework.org/schema/beanshttp://www.springframework.org/schema/beans/spring-beans.xsd">
<bean id="" class="">
   ……
</bean>
    ……
</beans>
在配置文件中,通常一个普通的Bean只需要定义id(或name)和class 两个属性即可,定义Bean的方式如下所示:
    <?xml version="1.0" encoding="UTF-8"?>
    <beans xmlns="http://www.springframework.org/schema/beans"
          xmlns:xsi="http://www.w3.org/2001/XMLSchema-instance"
xsi:schemaLocation="http://www.springframework.org/schema/beans
http://www.springframework.org/schema/beans/spring-beans.xsd">
            <bean id="bean1" class="com.itheima.Bean1" />
            <bean name="bean2" class="com.itheima.Bean2" />
    </beans>
小提示:如果在Bean中未指定id和name属性,则Spring会将class属性当作id使用。
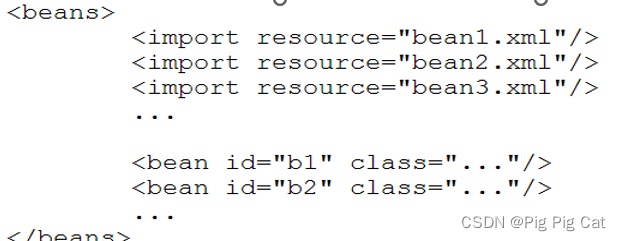
(1)多个配置文件来创建Bean
(2)加载多个配置文件的方法
ApplicationContext contex=new ClassPathXmlApplicationContext(“bean.xml");
②加载多个配置文件
ApplicationContext ctx=new ClassXmlApplicationContext(
new String["bean1.xml", "bean2.xml"]);


ApplicationContext ctx1=new ClassPathXmlApplicationContext("bean1.xml");
ApplicationContext ctx2=new ClassPathXmlApplicationContext("bean2.xml");
ApplicationContext contex=new ClassPathXmlApplicationContext("bean*.xml");
其他:
xml是最常见的spring 应用系统配置源,Spring中的几种容器都支持使用xml装配bean,
包括:
XmlBeanFactory,ClassPathXmlApplicationContext,
FileSystemXmlApplicationContext,
XmlWebApplicationContext。
1.	XmlBeanFactory 引用资源
Resource resource = new ClassPathResource("appcontext.xml");
BeanFactory factory = new XmlBeanFactory(resource);
2.	ClassPathXmlApplicationContext 编译路径
ApplicationContext factory=new ClassPathXmlApplicationContext("classpath:appcontext.xml");
// src目录下的
ApplicationContext factory=new ClassPathXmlApplicationContext("appcontext.xml");
ApplicationContext factory=new ClassPathXmlApplicationContext(new String[] {"bean1.xml","bean2.xml"});
// src/conf 目录下的
ApplicationContext factory=new ClassPathXmlApplicationContext("conf/appcontext.xml");
ApplicationContext factory=new ClassPathXmlApplicationContext("file:G:/Test/src/appcontext.xml");
3.	用文件系统的路径
ApplicationContext factory=new FileSystemXmlApplicationContext("src/appcontext.xml");
//使用了 classpath: 前缀,作为标志, 这样,FileSystemXmlApplicationContext 也能够读入classpath下的相对路径
ApplicationContext factory=new FileSystemXmlApplicationContext("classpath:appcontext.xml");
ApplicationContext factory=new FileSystemXmlApplicationContext("file:G:/Test/src/appcontext.xml");
ApplicationContext factory=new FileSystemXmlApplicationContext("G:/Test/src/appcontext.xml");
4.	XmlWebApplicationContext是专为Web工程定制的。
ServletContext servletContext = request.getSession().getServletContext();
ApplicationContext ctx = WebApplicationContextUtils.getWebApplicationContext(servletContext );
5.	使用BeanFactory
BeanDefinitionRegistry reg = new DefaultListableBeanFactory();
XmlBeanDefinitionReader reader = new XmlBeanDefinitionReader(reg);
reader.loadBeanDefinitions(new ClassPathResource("bean1.xml"));
reader.loadBeanDefinitions(new ClassPathResource("bean2.xml"));
BeanFactory bf=(BeanFactory)reg;
③Web应用启动时加载多个
在web.xml中定义contextConfigLocation参数,加载所有逗号分割的xml。如果没有这个参数,spring默认加载WEB-INF/applicationContext.xml文件。
<context-param>
   <param-name>contextConfigLocation</param-name>
<param-value>
  classpath*:conf/spring/applicationContext_core*.xml,
  classpath*:conf/spring/applicationContext_dict*.xml,
</param-value>
</context-param>
<listener>
<listener-class>
org.springframework.web.context.ContextLoaderListener
</listener-class>
</listener>
classpath:只会到class路径中查找文件。
classpath*:不仅包含class路径,还包括
jar文件中(class路径)进行查找。
利用ServletContextListener实现
④Struts+Spring整合时加载多个
u如果使用struts加载多个spring配置文件,在struts-config.xml里面加这个
<plug-in className="org.springframework.web.struts.ContextLoaderPlugIn">
<set-property property="contextConfigLocation"
value="/WEB-INF/applicationContext.xml,
/WEB-INF/action-servlet.xml,,,,,,,"/>
这个配置的其实也是contextConfigLocation变量
2 Bean的实例化
Bean的实例化有哪些方式?
在面向对象的程序中,想要使用某个对象,就需要先实例化这个对象。同样,在Spring中,要想使用容器中的Bean,也需要实例化Bean。实例化Bean有三种方式,分别为构造器实例化、静态工厂方式实例化和实例工厂方式实例化(其中最常用的是构造器实例化)。
1 构造器实例化
构造器实例化是指Spring容器通过Bean对应的类中默认的构造函数来实例化Bean。构造器实例化的使用步骤如下:
创建Web项目,导入相关Jar包;
创建名为Bean1的Java类;
创建Spring配置文件beans1.xml,并配置Bean1实体类Bean;
<?xml version="1.0" encoding="UTF-8"?>
    <beans xmlns="http://www.springframework.org/schema/beans"
 	xmlns:xsi="http://www.w3.org/2001/XMLSchema-instance" 	xsi:schemaLocation="http://www.springframework.org/schema/beans
  	http://www.springframework.org/schema/beans/spring-beans-4.3.xsd">
           <bean id="bean1" class="com.itheima.instance.constructor.Bean1" />
    </beans>
创建测试类,测试程序。
public class InstanceTest1 {
       public static void main(String[] args) {
     	String xmlPath = "com/itheima/instance/constructor/beans1.xml";
               ApplicationContext applicationContext =
			    new ClassPathXmlApplicationContext(xmlPath);
	Bean1 bean = (Bean1) applicationContext.getBean("bean1");
                System.out.println(bean);
      }
}
2 静态工厂方式实例化
静态工厂是实例化Bean的另一种方式。该方式要求自己创建一个静态工厂的方法来创建Bean的实例。接下来演示静态工厂实例化的使用:
创建名为Bean2的Java类;
创建一个Java工厂类,在类中使用静态方法获取Bean2实例;
   public class MyBean2Factory {
         public static Bean2 createBean(){
              return new Bean2();
         }
   }
创建Spring配置文件beans.xml,并配置工厂类Bean;
<bean id="bean2" class=com/itheima/instance/factory/MyBean2Factory"
factory-method="createBean" />
创建测试类,测试程序。
   public class InstanceTest2 {
         public static void main(String[] args) {
	String xmlPath ="com/itheima/instance/static_factory/beansxml";
 	ApplicationContext applicationContext =
 			         new ClassPathXmlApplicationContext(xmlPath);
 	System.out.println(applicationContext.getBean("bean2"));
         }
  }
3 实例工厂方式实例化
采用直接创建Bean实例的方式,在配置文件中,通过factory-bean属性配置一个实例工厂,然后使用factory-method属性确定使用工厂中的哪个方法。其使用步骤如下:
创建名为Bean3的Java类;
创建一个Java工厂类,在类中使用非静态方法获取Bean3实例;
 public class MyBean3Factory {
          public Bean3 createBean(){
                 return new Bean3();
          }
    }
创建Spring配置文件beans3.xml,并配置工厂类Bean;
<bean id="myBean3Factory" class="com.itheima.instance.factory.MyBean3Factory" />
<bean id="bean3" factory-bean="myBean3Factory" factory-method="createBean" />
创建测试类,测试程序。
public class InstanceTest3 {
       public static void main(String[] args) {
	String xmlPath = "com/itheima/instance/factory/beans3.xml";
	ApplicationContext applicationContext =
                        new ClassPathXmlApplicationContext(xmlPath);
 	System.out.println(applicationContext.getBean("bean3"));
        }
3 Bean的作用域
3.1 作用域的种类
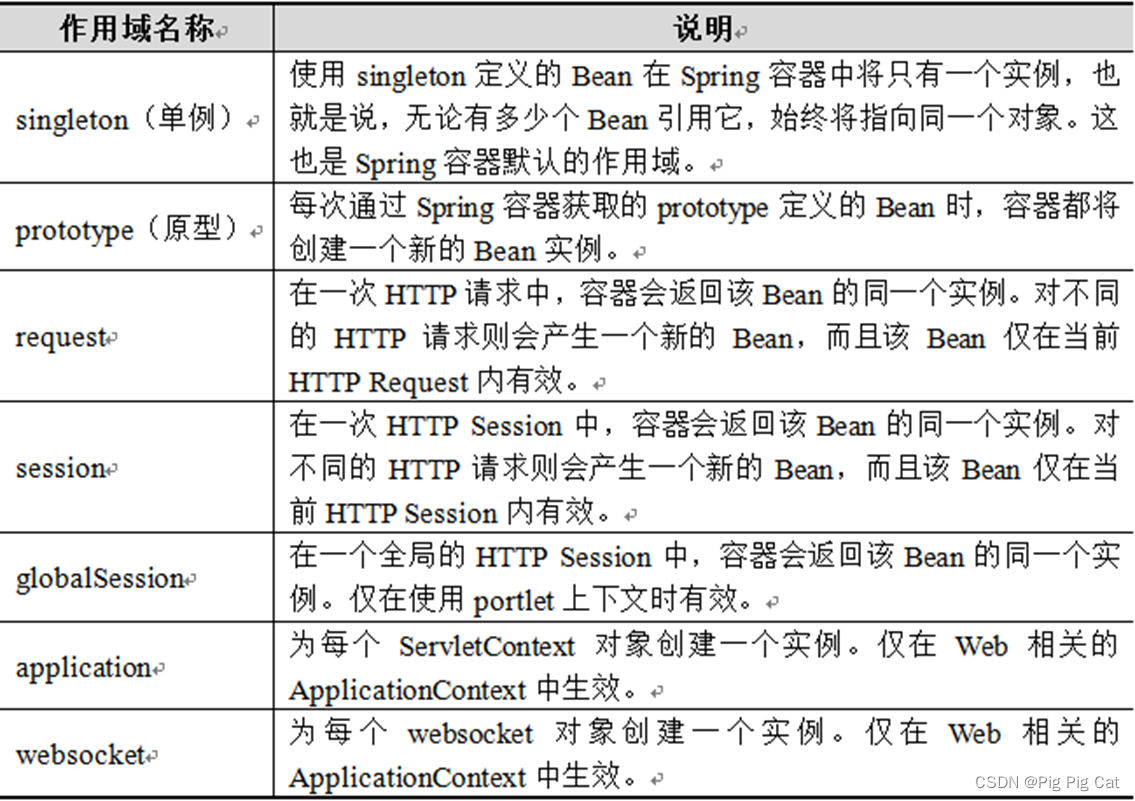
注意:singleton和prototype是最常用的两种作用域。
3.2 singleton作用域
Spring容器默认的作用域,此作用域下,Spring容器只会存在一个共享的Bean实例。对于无会话状态的Bean(如Dao 组件、Service组件)来说, singleton作用域是最理想的选择。
在Spring配置文件中,可以使用<bean>元素的scope属性,将Bean的作用域定义成singleton。
在Spring中如何配置singleton作用域?
<bean id="scope" class="com.itheima.scope.Scope" scope="singleton"/>
3.3 prototype作用域
对需要保持会话状态的Bean(如Struts 2的Action类)应该使用prototype作用域。在使用prototype作用域时,Spring容器会为每个对该Bean的请求都创建一个新的实例。
在Spring中如何配置prototype作用域?
在Spring配置文件中,同样使用<bean>元素的scope属性,将Bean的作用域定义成prototype 。
<bean id="scope" class="com.itheima.scope.Scope" scope=" prototype "/>

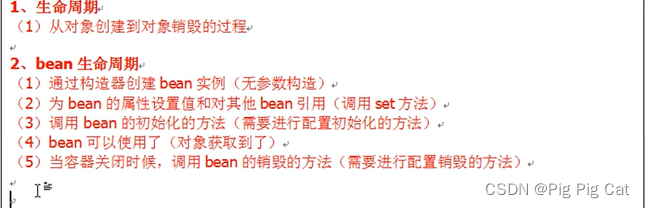
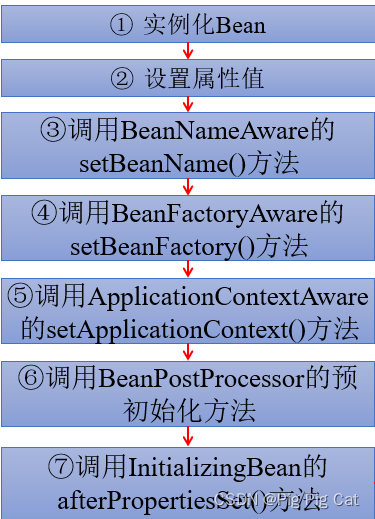
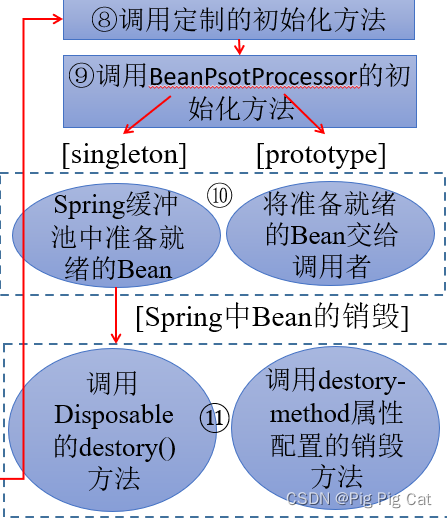
4 Bean的生命周期
了解Spring中Bean的生命周期有何意义?
其意义就在于,可以利用Bean在其存活期间的特定时刻完成一些相关操作。这种时刻可能有很多,但一般情况下,常会在Bean的postinitiation(初始化后)和predestruction(销毁前)执行一些相关操作。
Spring容器可以管理Bean部分作用域的生命周期。说明如下:
singleton作用域:在此作用域下,Spring能够精确的知道该Bean何时被创建,何时初始化完成,以及何时被销毁。
prototype作用域:prototype作用域的Bean,Spring只负责创建,当容器创建了Bean实例后,Bean的实例就交给客户端代码来管理,Spring容器将不再跟踪其生命周期。
5 本讲小结
本讲对Spring的Bean进行了详细讲解,首先介绍了Bean的配置,然后通过案例讲解了Bean实例化的三种方式,最后介绍了Bean的作用域和生命周期。


 903
903


 被折叠的 条评论
为什么被折叠?
被折叠的 条评论
为什么被折叠?
 到【灌水乐园】发言


