


●布局
Ⅰ、 线性布局-LinearLayout
①常用属性:
| 控件属性 | 功能描述 |
| android:orientation | 设置线性布局的朝向,此属性控制控件排列方向,包含两个属性值:vertical(垂直)、horizontal(水平) |
| android:layout_weight | 子控件属性,设置元素所分配的权重,只有在Linearlayout中,该属性才有效,其作用是分配线性布局中的剩余空间到该控件上(注意分割的是剩余空间而不是总空间) |
| android:gravity | 子控件属性,设置自身内部元素的对齐方式 |
| android:layout_gravity | 子控件属性,设置自身相当于父容器的对齐方式 |
② 特点:
- 按照水平(horizontal)或垂直(vertical)方向顺序排列子视图。
- 通过 layout_weight 属性可以让子视图占据剩余空间。
③ 适用场景:
- 简单的顺序排列,如按钮组、表单项等。
④ 使用技巧:
- orientation 属性决定排列方向,水平或垂直。
- 使用 layout_weight 分配子视图的剩余空间。
⑤ 代码演示:
<LinearLayout
    xmlns:android="http://schemas.android.com/apk/res/android"
    android:layout_width="match_parent"
    android:layout_height="match_parent"
    android:orientation="vertical">

    <Button
        android:layout_width="wrap_content"
        android:layout_height="wrap_content"
        android:text="Button 1"/>

    <Button
        android:layout_width="0dp"
        android:layout_height="wrap_content"
        android:layout_weight="1"
        android:text="Button 2"/>

    <Button
        android:layout_width="wrap_content"
        android:layout_height="wrap_content"
        android:text="Button 3  0718yong"/>
</LinearLayout>
Ⅱ、约束布局(ConstraintLayout)
①常用属性:
| 属性名称 | 功能描述 |
| layout_constraintLeft_toLeftOf | 控件的左边与另外一个控件的左边对齐 |
| layout_constraintLeft_toRightOf | 控件的左边与另外一个控件的右边对齐 |
| layout_constraintRight_toLeftOf | 控件的右边与另外一个控件的左边对齐 |
| layout_constraintRight_toRightOf | 控件的右边与另外一个控件的右边对齐 |
| layout_constraintTop_toTopOf | 控件的上边与另外一个控件的上边对齐 |
| layout_constraintTop_toBottomOf | 控件的上边与另外一个控件的底部对齐 |
| layout_constraintBottom_toTopOf | 控件的底边与另外一个控件的上边对齐 |
| layout_constraintBottom_toBottomOf | 控件的底边与另外一个控件的底部对齐 |
| layout_constraintStart_toEndOf | 控件的起始边与另外一个控件的尾部对齐 |
| layout_constraintStart_toStartOf | 控件的起始边与另外一个控件的起始边对齐 |
| layout_constraintEnd_toStartOf | 控件的尾部与另外一个控件的起始边对齐 |
| layout_constraintEnd_toEndOf | 控件的尾部与另外一个控件的尾部对齐 |
| layout_constraintBaseline_toBaselineOf | 控件间的文本内容基准线对齐 |
②特点:
- 通过设置视图之间或视图与父布局之间的约束来定义视图的位置和尺寸。
- 非常灵活,适用于复杂布局。
③适用场景:
- 复杂的UI设计,替代相对布局和其他布局。
④使用技巧:
- 使用 app:layout_constraint... 属性设置视图的约束。
- 通过 ConstraintSet 动态修改约束。
⑤代码演示:
<androidx.constraintlayout.widget.ConstraintLayout
    xmlns:android="http://schemas.android.com/apk/res/android"
    android:layout_width="match_parent"
    android:layout_height="match_parent">

    <Button
        android:id="@+id/button1"
        android:layout_width="wrap_content"
        android:layout_height="wrap_content"
        android:text="Button 1"
        app:layout_constraintTop_toTopOf="parent"
        app:layout_constraintLeft_toLeftOf="parent"/>

    <Button
        android:id="@+id/button2"
        android:layout_width="wrap_content"
        android:layout_height="wrap_content"
        android:text="Button 2"
        app:layout_constraintTop_toTopOf="parent"
        app:layout_constraintLeft_toRightOf="@id/button1"/>

    <Button
        android:id="@+id/button3"
        android:layout_width="wrap_content"
        android:layout_height="wrap_content"
        android:text="Button 3 0718yong"
        app:layout_constraintTop_toBottomOf="@id/button1"
        app:layout_constraintLeft_toLeftOf="parent"/>
</androidx.constraintlayout.widget.ConstraintLayout>
Ⅲ、表格布局(TableLayout)
①特点:
- 以表格形式排列子视图,由行(TableRow)组成,每行可以包含多个视图。
②适用场景:
- 网格布局,如计算器键盘、表单等。
③使用技巧:
TableRow元素定义行,每行包含多个视图。- 通过
layout_span属性合并单元格。
④代码演示:
<TableLayout
    xmlns:android="http://schemas.android.com/apk/res/android"
    android:layout_width="match_parent"
    android:layout_height="match_parent">

    <TableRow>
        <Button
            android:layout_width="wrap_content"
            android:layout_height="wrap_content"
            android:text="Button 1"/>
        <Button
            android:layout_width="wrap_content"
            android:layout_height="wrap_content"
            android:text="Button 2"/>
    </TableRow>

    <TableRow>
        <Button
            android:layout_width="wrap_content"
            android:layout_height="wrap_content"
            android:text="Button 3 0718yong"/>
        <Button
            android:layout_width="wrap_content"
            android:layout_height="wrap_content"
            android:text="Button 4"/>
    </TableRow>
</TableLayout>
Ⅳ、帧布局(FrameLayout)
①特点:
- 简单的布局,所有子视图都放置在布局的左上角,后添加的视图会覆盖之前的视图。
②适用场景:
- 单个视图的显示或视图叠加,如叠加文本在图片上。
③使用技巧:
- 使用
layout_gravity属性设置子视图的对齐方式。
④代码演示:
<FrameLayout
    xmlns:android="http://schemas.android.com/apk/res/android"
    android:layout_width="match_parent"
    android:layout_height="match_parent">

    <Button
        android:layout_width="match_parent"
        android:layout_height="match_parent"
        android:text="Background Button"/>

    <Button
        android:layout_width="wrap_content"
        android:layout_height="wrap_content"
        android:text="Overlay Button 0718yong"
        android:layout_gravity="center"/>
</FrameLayout>
Ⅴ、相对布局(RelativeLayout)
①特点:
- 子视图可以相对于父布局或其他视图的位置来定位,灵活性较高。
②适用场景:
- 需要视图相对定位的场景,如一个视图放在另一个视图的右边或下边。
③使用技巧:
- 使用
layout_align...等属性设置视图的位置关系。 - 避免过多层次的嵌套,以提高性能。
④示例代码:
<RelativeLayout
    xmlns:android="http://schemas.android.com/apk/res/android"
    android:layout_width="match_parent"
    android:layout_height="match_parent">

    <Button
        android:id="@+id/button1"
        android:layout_width="wrap_content"
        android:layout_height="wrap_content"
        android:text="Button 1"/>

    <Button
        android:id="@+id/button2"
        android:layout_width="wrap_content"
        android:layout_height="wrap_content"
        android:text="Button 2"
        android:layout_below="@id/button1"
        android:layout_marginTop="16dp"/>

    <Button
        android:id="@+id/button3"
        android:layout_width="wrap_content"
        android:layout_height="wrap_content"
        android:text="Button 3 0718yong"
        android:layout_toRightOf="@id/button1"
        android:layout_marginStart="16dp"/>
</RelativeLayout>
●实现UI界面交互功能
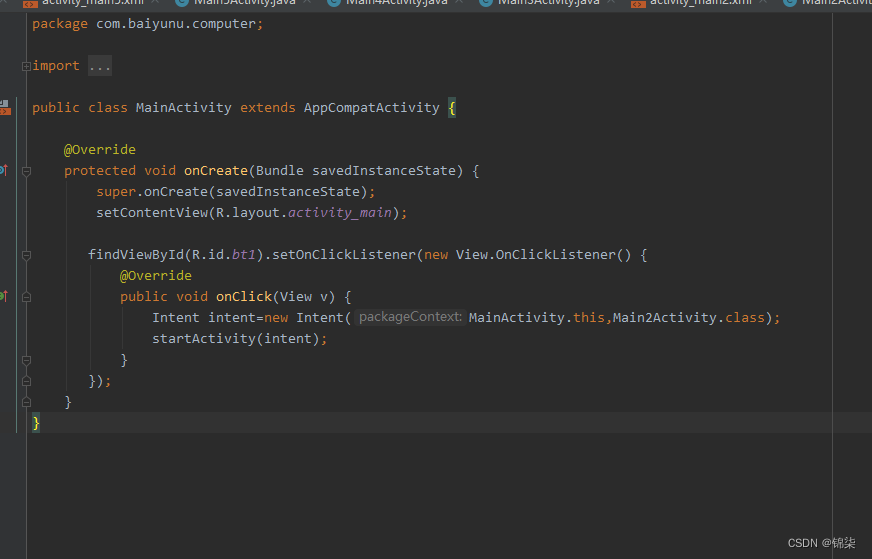
Ⅰ、按钮点击事件(Button Click Event)
①实际案例: 实现一个按钮,当用户点击按钮时显示一条消息。
②实现方法: 使用 setOnClickListener 方法绑定点击事件。
③示例代码:
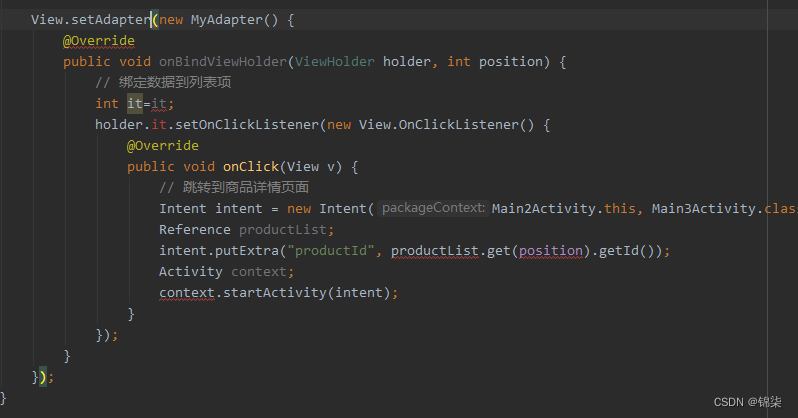
Ⅱ、列表项点击事件(List Item Click Event)
①实际案例: 实现一个列表,当用户点击列表中的某一项时显示该项的内容。
②实现方法: 使用 ListView 的 setOnItemClickListener 方法。
③代码实现:
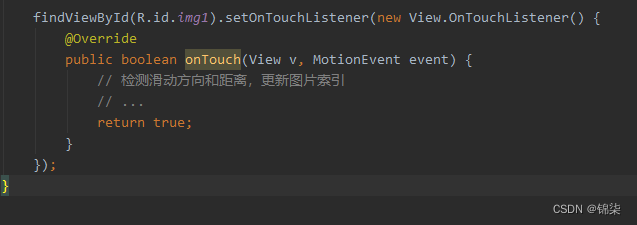
Ⅲ、滑动操作(Swipe Gesture)
①实际案例: 实现一个可以通过滑动手势删除列表项的功能。
②实现方法: 使用 ItemTouchHelper 结合 RecyclerView。
③示例代码:
Ⅳ、菜单项(Menu Item)
①实际案例: 实现一个应用栏菜单,当用户点击菜单项时执行相应操作。
②实现方法: 在 res/menu 目录下定义菜单资源文件,并在 onOptionsItemSelected 方法中处理菜单项点击事件。
③示例代码:
xml部分:
<!-- res/menu/menu_main.xml -->
<menu xmlns:android="http://schemas.android.com/apk/res/android">
    <item
        android:id="@+id/action_settings"
        android:title="Settings"
        android:orderInCategory="100"
        android:showAsAction="never" />
</menu>
Java部分:
@Override
public boolean onCreateOptionsMenu(Menu menu) {
    getMenuInflater().inflate(R.menu.menu_main, menu);
    return true;
}

@Override
public boolean onOptionsItemSelected(MenuItem item) {
    int id = item.getItemId();

    if (id == R.id.action_settings) {
        Toast.makeText(this, "Settings clicked", Toast.LENGTH_SHORT).show();
        return true;
    }

    return super.onOptionsItemSelected(item);
}
Ⅴ对话框(Dialog)
①实际案例: 实现一个对话框,当用户点击按钮时显示一个确认对话框。
②实现方法: 使用 AlertDialog.Builder 创建对话框。
③示例代码:
Button button = findViewById(R.id.button);
button.setOnClickListener(new View.OnClickListener() {
    @Override
    public void onClick(View v) {
        new AlertDialog.Builder(MainActivity.this)
            .setTitle("Confirm")
            .setMessage("Are you sure?")
            .setPositiveButton("Yes", new DialogInterface.OnClickListener() {
                @Override
                public void onClick(DialogInterface dialog, int which) {
                    Toast.makeText(MainActivity.this, "Confirmed", Toast.LENGTH_SHORT).show();
                }
            })
            .setNegativeButton("No", null)
            .show();
    }
});
Ⅵ、学习反思:
学习安卓开发中的UI界面交互功能后,我深刻体会到这些功能对提升用户体验的重要性。必须灵活掌握按钮点击事件、列表项点击事件、滑动操作、菜单项和对话框的实现方法,才能应对不同的开发需求。但是充分的练习实操也不能落下,如何根据实际需求选择合适的实现方式需要再不断地实践中总结,才能灵活运用,关键恰当。
Ⅶ、改进措施:
-
查阅官方文档:定期查阅安卓开发者官方文档,了解最新API和最佳实践。
-
实战项目:参与实际项目开发,将所学知识应用到实际场景中,提升实践能力。
-
代码复用和优化:学习设计模式和最佳实践,重构代码以提高可读性和复用性,确保应用的性能和稳定性。
-
持续练习:通过编写小练习和示例程序来巩固所学知识,提高编程技能。


 1751
1751


 被折叠的 条评论
为什么被折叠?
被折叠的 条评论
为什么被折叠?
 到【灌水乐园】发言


