


SpringMVC5框架的入门学习
一、SpringMVC 概述
SpringMVC也叫Spring web mvc。是Spring框架的一部分,是在Spring3.0后发布的。
SpringMVC的优点:
基于 MVC 架构,功能分工明确。解耦合。容易理解,上手快,使用简单,就可以开发一个注解的 SpringMVC 项目,SpringMVC 也是轻量级的,jar 很小。不依赖的特定的接口和类。作为Spring框架一部分,能够使用Spring的IOC和AOP,方便整合Strtus,MyBatis,Hiberate,JPA 等其他框架。SpringMVC 强化注解的使用,在Controller, Service, Dao 都可以使用注解。方便灵活。使用@Controller 创建处理器对象,@Service 创建业务对象,@Autowired 或者@Resource 在控制器类中注入 Service,在Service 类中注入 Dao。
1、简单上手程序
1)配置pom.xml添加依赖
<project xmlns="http://maven.apache.org/POM/4.0.0" xmlns:xsi="http://www.w3.org/2001/XMLSchema-instance"
  xsi:schemaLocation="http://maven.apache.org/POM/4.0.0 http://maven.apache.org/maven-v4_0_0.xsd">
  <modelVersion>4.0.0</modelVersion>
  <groupId>org.example</groupId>
  <artifactId>springmvc-01</artifactId>
  <packaging>war</packaging>
  <version>1.0-SNAPSHOT</version>
  <name>springmvc-01 Maven Webapp</name>
  <url>http://maven.apache.org</url>

  <repositories>
    <repository>
      <id>repository.spring.milestone</id>
      <name>Spring Milestone Repository</name>
      <url>https://repo.spring.io/milestone</url>
    </repository>
  </repositories>

  <dependencies>
    <dependency>
      <groupId>junit</groupId>
      <artifactId>junit</artifactId>
      <version>3.8.1</version>
      <scope>test</scope>
    </dependency>
    <dependency>
      <groupId>org.springframework</groupId>
      <artifactId>spring-context</artifactId>
      <version>6.0.0-M2</version>
    </dependency>
    <dependency>
      <groupId>org.springframework</groupId>
      <artifactId>spring-aop</artifactId>
      <version>5.3.23</version>
    </dependency>
    <dependency>
      <groupId>org.springframework</groupId>
      <artifactId>spring-webmvc</artifactId>
      <version>5.3.23</version>
    </dependency>
    <dependency>
      <groupId>javax.servlet</groupId>
      <artifactId>javax.servlet-api</artifactId>
      <version>3.1.0</version>
    </dependency>
  </dependencies>
  <build>
    <resources>
      <resource>
        <directory>src/main/java</directory>
        <includes>
          <include>**/*.xml</include>
          <include>**/*.properties</include>
        </includes>
      </resource>
      <resource>
        <directory>src/main/resources</directory>
        <includes>
          <include>**/*.xml</include>
          <include>**/*.properties</include>
        </includes>
      </resource>
    </resources>
  </build>
</project>
2)配置springmvc.xml
<?xml version="1.0" encoding="UTF-8"?>
<beans xmlns="http://www.springframework.org/schema/beans"
       xmlns:xsi="http://www.w3.org/2001/XMLSchema-instance"
       xmlns:context="http://www.springframework.org/schema/context"
       xsi:schemaLocation="http://www.springframework.org/schema/beans http://www.springframework.org/schema/beans/spring-beans.xsd http://www.springframework.org/schema/context https://www.springframework.org/schema/context/spring-context.xsd">

    <!--添加包扫描-->
    <context:component-scan base-package="com.power.cotroller"/>

    <!--添加视图解析器:跳到webapp中-->
    <bean class="org.springframework.web.servlet.view.InternalResourceViewResolver">
        <!--配置前缀-->
        <property name="prefix" value="/admin/"/>
        <!--配置后缀-->
        <property name="suffix" value=".jsp"/>
    </bean>

</beans>
3)配置web.xml
<?xml version="1.0" encoding="UTF-8"?>
<web-app xmlns="http://xmlns.jcp.org/xml/ns/javaee"
         xmlns:xsi="http://www.w3.org/2001/XMLSchema-instance"
         xsi:schemaLocation="http://xmlns.jcp.org/xml/ns/javaee http://xmlns.jcp.org/xml/ns/javaee/web-app_4_0.xsd"
         version="4.0">
    <!--注册springmvc框架,设置用哪个Servlet-->
    <servlet>
        <servlet-name>springmvc</servlet-name>
        <servlet-class>org.springframework.web.servlet.DispatcherServlet</servlet-class>
        <init-param>
            <param-name>contextConfigLocation</param-name>
            <param-value>classpath:springmvc.xml</param-value>
        </init-param>
    </servlet>
    <!--设置拦截Mapping,name要与Servlet一致,一个设置用哪个Servlet,一个拦截请求,用name关联两者-->
    <servlet-mapping>
        <servlet-name>springmvc</servlet-name>
        <!--
            拦截什么样的请求:
            http://localhost:8080/one
            http://localhost:8080/one.jsp
            http://localhost:8080/one.action  (这种)
            <a href="${path}.action">访问</a>
        -->
        <url-pattern>*.action</url-pattern>
        <!--全局匹配:
			<url-pattern>*.action</url-pattern>
		-->
    </servlet-mapping>
</web-app>
4)前端请求
比如我的项目名称是SSM在浏览器中输入为 http://localhost:8080/SSM/index.jsp
${pageContext.request.contextPath}或<%=request.getContextPath()%>取出来的就是/SSM,
<a href="${pageContext.request.contextPath}/demo.action">访问服务器</a>
5)后端响应
@Controller //交给spring创建对象
public class DemoAction {
    /**
     * 以前Servlet规范:doPost、doGet
     *现在:
     * action中的所有功能实现由方法来完成
     * action方法的规范:
     * 1)访问圈钱是public
     * 2)返回值任意
     * 3)方法名随意
     * 4)方法可以没参数,如果有可以任意
     * 5)要使用@RequestMapping注解声明访问路径
     */
    @RequestMapping("/demo.action")//demo.action得到响应
    public String demo(){
        System.out.println("服务器被访问到了");
        return "main"; //可以直接回到/admin/main.jsp
    }
}
二、SpringMVC注解式开发
1、@RequestMapping定义请求规则
1)指定模块名称
 @RequestMapping("/demo.action")
    public String demo()
2)对请求提交方式的定义
@RequestMapping可以处理Get和Post请求
@RequestMapping(value = "/demo.action",method = RequestMethod.GET)
@RequestMapping(value = "/demo.action",method = RequestMethod.POST)
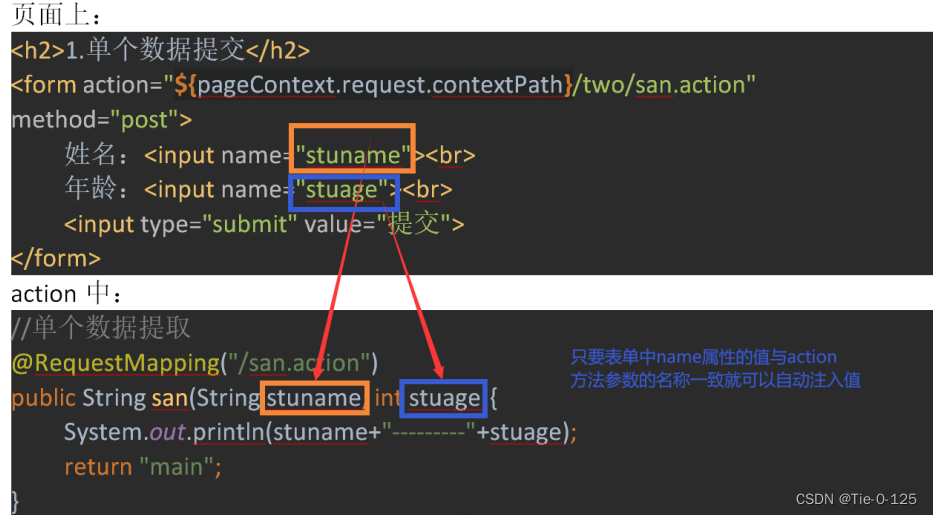
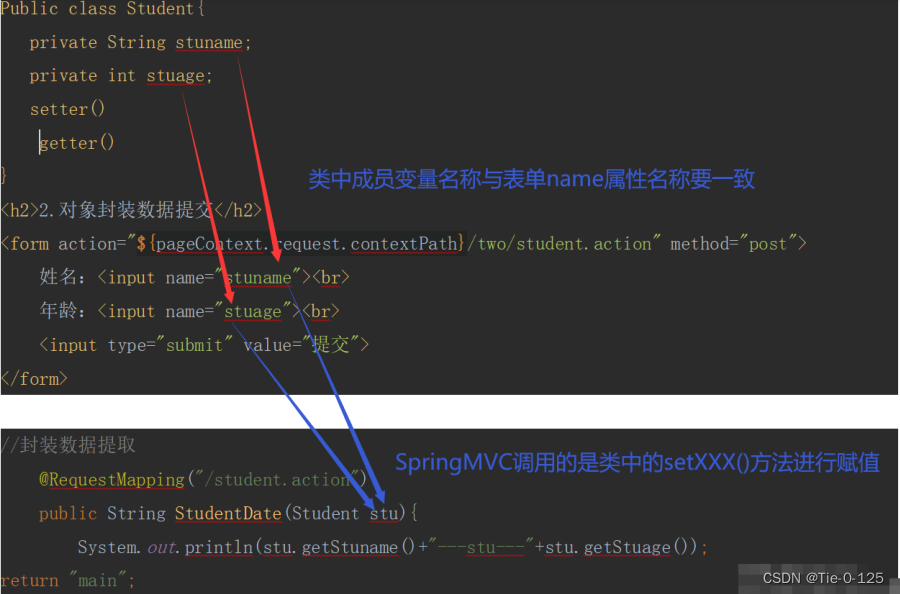
2、五种数据提交的方式
1)单个数据注入
2)对象封装注入
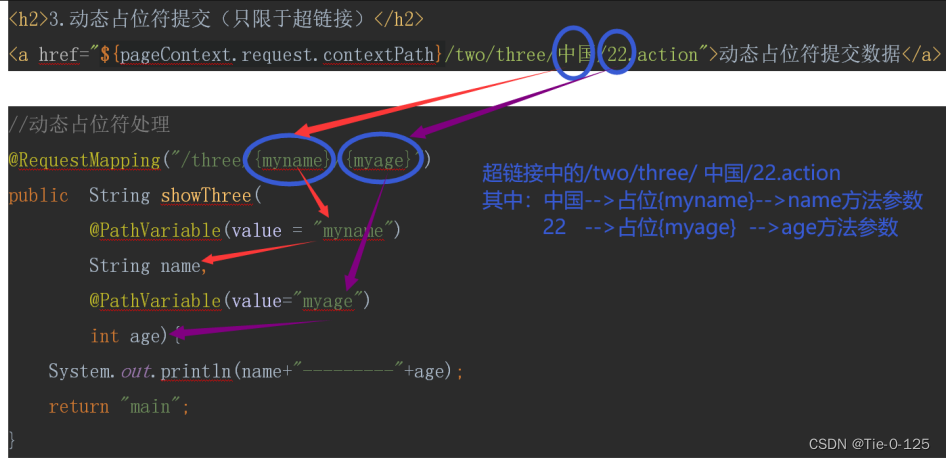
3)动态占位符{ }提交(仅用于超链接)
注意:


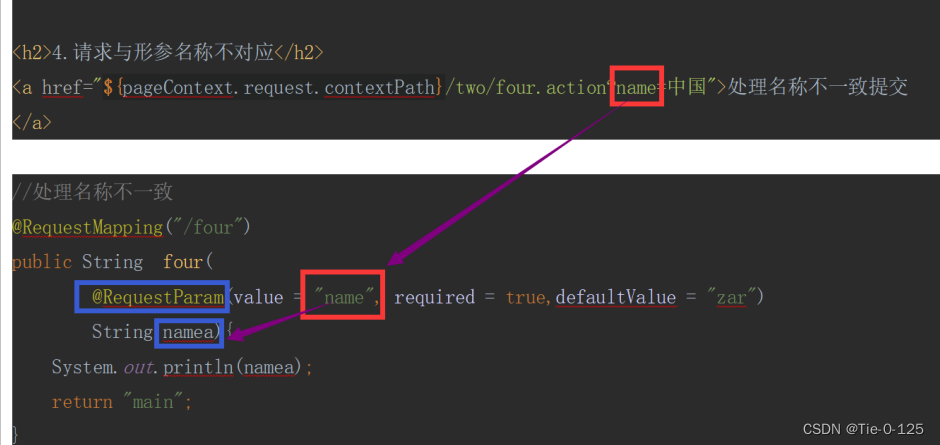
4)请求参数名称与形参名称不一致
5)使用HttpServletRequest对象提取
在方法参数中声明一个request对象,使用request的getParameter()获取表单提交的数据,这样得到的数据还要手工进行数据类型的转换。
public String five(HttpServletRequest request){
int age=new Integer(request.getParameter("stuage"));
String name=request.getParameter("stuname");
System.out.println(age+"*********"+name);
    return "main";
}
3、中文乱码
在web.xml中加入以下代码
<!--注册字符集过滤器:解决post请求乱码的问题-->
    <filter>
        <filter-name>characterEncodingfilter</filter-name>
        <!--spring-web.jar-->
        <filter-class>org.springframework.web.filter.CharacterEncodingFilter</filter-class>
        <!--指定字符集-->
        <init-param>
            <param-name>encoding</param-name>
            <param-value>utf-8</param-value>
        </init-param>
        <!--强制request使用字符集Encoding-->
        <init-param>
            <param-name>forceRequestEncoding</param-name>
            <param-value>true</param-value>
        </init-param>
        <!--强制response使用字符集Encoding-->
        <init-param>
            <param-name>forceResponseEncoding</param-name>
            <param-value>true</param-value>
        </init-param>
    </filter>
        <filter-mapping>
            <filter-name>characterEncodingfilter</filter-name>
        <url-pattern>/*</url-pattern>
</filter-mapping>
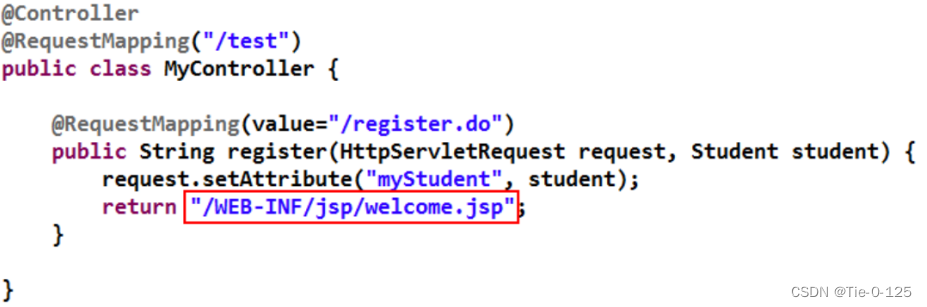
3、处理器方法的返回值
第一种:ModelAndView
若处理器方法处理完后,需要跳转到其它资源,且又要在跳转的资源间传递数据,此时处理器方法返回 ModelAndView 比较好。当然,若要返回 ModelAndView,则处理器方法中需要定义 ModelAndView 对象。在使用时,若该处理器方法只是进行跳转而不传递数据,或只是传递数据而并不向任何资源跳转(如对页面的 Ajax 异步响应),此时若返回 ModelAndView,则将总是有一部分多余:要么 Model 多余,要么 View 多余。即此时返回 ModelAndView 将不合适。较少使用。
第二种:String
返回客户端资源的地址(视图解析器:自动拼接前后缀,还可以屏蔽自动拼接字符串)
等同于
第三种:无返回值void
对于处理器方法返回 void 的应用场景,应用在AJAX 响应处理。
若处理器对请求处理后,无需跳转到其它任何资源,此时可以让处理器方法返回 void。我们SSM整合案例中的分页使用的就是无返回值。
第四种:返回对象Object
处理器方法也可以返回 Object 对象。这个 Object 可以是 Integer,自定义对象,Map,List 等。但返回的对象不是作为逻辑视图出现的,而是作为直接在页面显示的数据出现的。返回对象,需要使用@ResponseBody 注解,将转换后的 JSON 数据放入到响应体中。Ajax请求多用于Object返回值类型。由于转换器底层使用了Jackson 转换方式将对象转换为JSON 数据,所以需要添加Jackson的相关依赖。
4、Ajax
<!--使用ajax要添加jackson依赖-->
<dependency>
      <groupId>com.fasterxml.jackson.core</groupId>
      <artifactId>jackson-databind</artifactId>
      <version>2.9.8</version>
</dependency>
在webapp目录下新建js目录,添加jQuery函数库(去下载jquery.js,然后放在js包下)
<!--添加注解驱动,为了支持ajax请求(注意是mvc的)-->
    <mvc:annotation-driven></mvc:annotation-driven>
导入jQuery、前端请求
<%@ page contentType="text/html;charset=UTF-8" language="java" %>
<%@ page isELIgnored="false"%>
<html>
<head>
    <!--导入jqury-->
    <script src="js/jquery-3.3.1.js" ></script>
</head>
<body>
<a href="javascript:showStu()">访问服务器返回学生集合</a>
<div id="mydiv">等待服务器返回数据</div>
<script type="text/javascript">
    function showStu(){
        //使用jquery封装的ajax()方法发送请求
        $.ajax({
            url:"${pageContext.request.contextPath}/list.action",
            type:"get",
            dataType:"json",
            success:function (stuList){
                var s="";
                $.each(stuList,function (i,stu){
                    s+=stu.name + "----" + stu.age + "<br>";
                });
                //回显数据
                $("#mydiv").html(s);
            }
        })
    }
</script>

</body>
</html>
后端响应:
@Controller
public class StudentListAction {

    @RequestMapping("/list.action")
    @ResponseBody//解析ajax请求,必须要在springmvc.xml中添加文件注解驱动
    public List<Student> stuList(){
        List<Student> students=new ArrayList<Student>();
        Student student1=new Student("一",1);
        Student student2=new Student("二",2);
        Student student3=new Student("三",3);
        students.add(student1);
        students.add(student2);
        students.add(student3);
        //调用json转换工具ObjectMapper进行转换
        return students;//===>springmvc负责转换成json
    }
}
5、SpringMVC的四种跳转方式
默认的跳转是请求转发,直接跳转到jsp页面展示
redirect:,进行一个重定向操作,包括重定向页面和重定向action,
forward:,进行服务器内部转发操作,包括转发页面和转发action。
转发可以携带数据,重定向不能
<a href="${pageContext.request.contextPath}/one.action">请求转发页面(默认)</a><br>
<a href="${pageContext.request.contextPath}/two.action">请求转发action</a><br>
<a href="${pageContext.request.contextPath}/three.action">重定向页面</a><br>
<a href="${pageContext.request.contextPath}/four.action">重定向action</a><br>

@Controller
public class JumpAction {
    @RequestMapping("/one")
    public String one(){
        System.out.println("请求转发页面(默认)");
        //以前的访问方式
        //request.getRequestDispatcher("/admin/main.jsp").forward(request,response);
        //观察地址栏的变化:  http://localhost:8080/one.action
        //return "main"; //默认用视图解析器自动拼接前缀和后缀进行跳转
        return "forward:/admin/user.jsp";//forward:屏蔽前缀和后缀的拼接(请求转发),自己手工构建返回的全部路径+.jsp
    }
    @RequestMapping("/two")
    public String two(){
        System.out.println("请求转发action");
        //观察地址栏的变化:  http://localhost:8080/two.action
        return "forward:/other.action";
    }
    @RequestMapping("/three")
    public String three(){
        System.out.println("重定向页面");
        //观察地址栏的变化  http://localhost:8080/admin/main.jsp
        return "redirect:/admin/main.jsp";//redirect:屏蔽前缀和后缀的拼接(重定向)
    }
    @RequestMapping("/four")
    public String four(){
        System.out.println("重定向action");
        //观察地址栏的变化  http://localhost:8080/other.action
        return "redirect:/other. Action";
    }
}
注意:在请求转发action和重定向action中,先跳到下边的方法中,这个方法在最后跳到main.jsp
@Controller
public class OtherAction {
    @RequestMapping("/other.action")
    public String action (){
        System.out.println("other被访问到了");
        return "main";
    }
}
6、SpringMVC支持的默认参数类型(形参)
1)HttpServletRequest 对象
2)HttpServletResponse 对象
3)HttpSession 对象
4)Model/ModelMap 对象
5)Map<String,Object>对象
@Controller
public class ParamAction {
    @RequestMapping("/param")
    public String param(HttpServletRequest request,
                        HttpServletResponse response,
                        HttpSession session,
                        Model model,
                        ModelMap modelMap,
                        Map map){
        //Map ,Model,ModelMap,request都使用请求作用域进行传值,
        //所以必须使用请求转发的方式进行跳转,否则丢失数据
        Student stu = new Student("张三",22);
        request.setAttribute("requestStu",stu);
        session.setAttribute("sessionStu",stu);
        modelMap.addAttribute("modelMapStu",stu);
        model.addAttribute("modelStu",stu);
        map.put("mapStu",stu);
        return "main"; //切记请求转发跳
       // return "redirect:/admin/main.jsp";//会丢失数据
    }
}
注意:Model,Map,ModelMap都使用的是request请求作用域,意味着只能是请求转发后,页面才可以得到值。
重定向的话只有session的存在,其他的不行
结果:将数据传到前端
${requestStu}
${sessionStu}
${modelMapStu}
${modelStu}
页面1的跳转链接携带数据跳转到页面2


7、日期处理
1)日期注入
需要在springmvc.xml文件中添加mvc:annotation-driven/标签
(1)在方法的参数上使用@DateTimeFormat注解
@RequestMapping("/submitone")
public String submitdateone(
@DateTimeFormat(pattern="yyyy-MM-dd")
        Date mydate){
    System.out.println(mydate);
    return "dateShow";
}
(2)在类的成员setXXX()方法或属性上使用@DateTimeFormat注解
@DateTimeFormat(pattern="yyyy-MM-dd")
public void setDate(Date date) {
this. Date = date;
}
但这种解决方案要在每个使用日期类型的地方都去添加使用@DateTimeFormat注解,比较麻烦,我们可以使用@InitBinder注解来进行类中统一日期类型的处理。
(3)@InitBinder注解解决类中日期问题
@InitBinder
public void initBinder(WebDataBinder dataBinder) {
    SimpleDateFormat sf = new SimpleDateFormat("yyyy-MM-dd");
dataBinder.registerCustomEditor(Date.class, new CustomDateEditor(sf, true));
}
这样在类中出现的所有日期都可以进行转换了。
2)日期显示
(1)JSON中的日期显示
需要在类中的成员变量的getXXX方法上加注解
@JsonFormat(pattern="yyyy-MM-dd HH:mm:ss")
public Date getDate() {
return date;
}
(2)JSP页面的日期显示
需要使用国际化标签,先添加依赖
<dependency>
<groupId>jstl</groupId>
<artifactId>jstl</artifactId>
<version>1.2</version>
</dependency>
前端页面导入国际化的标签库
<%@taglib prefix="fmt" uri="http://java.sun.com/jsp/jstl/fmt" %>

<div id="stulistgood">
<c:forEach items="${list}" var="stu">
<p>${stu.name}--------<fmt:formatDate value="${stu.date}" pattern="yyyy-MM-dd">
</fmt:formatDate></p>
</c:forEach>
</div>
8、<mvc:annotation-driven/>标签的使用
<mvc:annotation-driven/>会自动注册两个bean,分别为DefaultAnnotationHandlerMapping和AnnotationMethodHandlerAdapter。是springmvc为@controller分发请求所必须的。除了注册了这两个bean,还提供了很多支持。
1)支持使用ConversionService 实例对表单参数进行类型转换;
2)支持使用 @NumberFormat 、@DateTimeFormat;
3)注解完成数据类型的格式化;
4)支持使用 @RequestBody 和 @ResponseBody 注解;
5)静态资源的分流也使用这个标签;
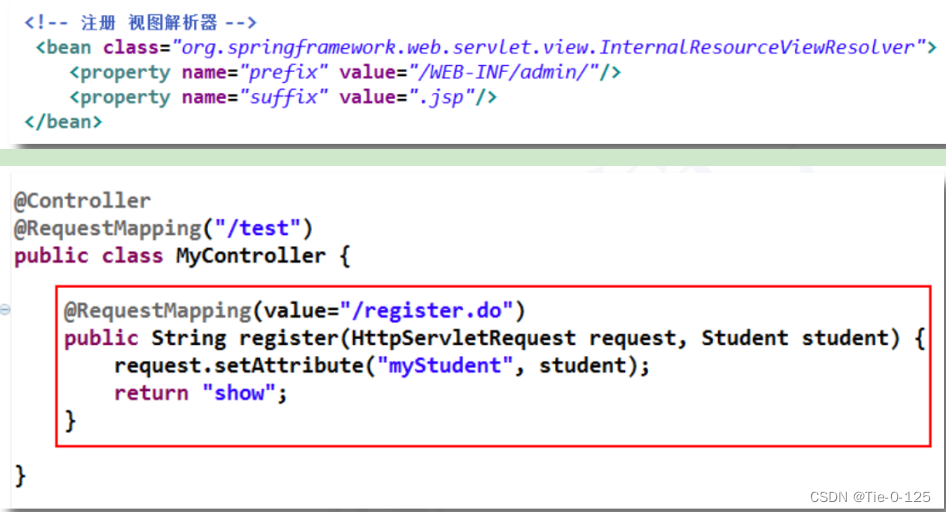
9、资源在WEB-INF目录下
在WEB-INF目录下的动态资源不可以直接访问,必须要通过请求转发的方式进行访问。这样避免了通过地址栏直接对资源的访问。重定向也无法访问动态资源。
@Controller
public class ShowAction {
@RequestMapping("/showIndex")
public String showIndex(){
System.out.println("index.............");
return "index";
}
@RequestMapping("/showMain")
public String showMain(){
System.out.println("main.............");
return "main";
}
@RequestMapping("/showLogin")
public String showLogin(){
System.out.println("login.............");
return "login";
}
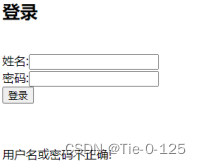
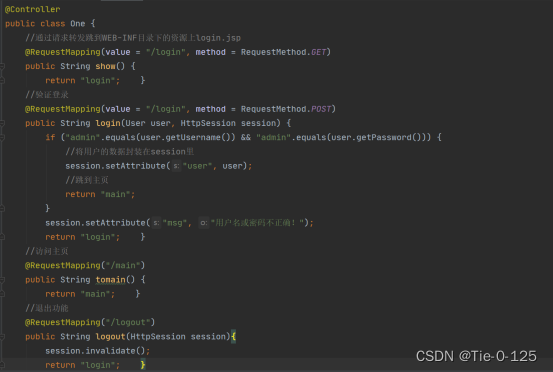
@RequestMapping("/login")
public String login(String name, String pwd, HttpServletRequest request){
if("admin".equals(name) && "123".equals(pwd)){
return "main";
}
request.setAttribute("msg","用户名或密码不正确!");
return "login";
}
}
三、SpringMVC拦截器
SpringMVC 中的 Interceptor 拦截器,它的主要作用是拦截指定的用户请求,并进行相应的预处理与后处理。其拦截的时间点在“处理器映射器根据用户提交的请求映射出了所要执行的处理器类,并且也找到了要执行该处理器类的处理器适配器,在处理器适配器执行处理器之前”。当然,在处理器映射器映射出所要执行的处理器类时,已经将拦截器与处理器组合为了一个处理器执行链,并返回给了中央调度器。
1、拦截器介绍
1)拦截器的应用场景
1、日志记录:记录请求信息的日志
2、权限检查,如登录检查
3、性能检测:检测方法的执行时间
2)拦截器的执行原理
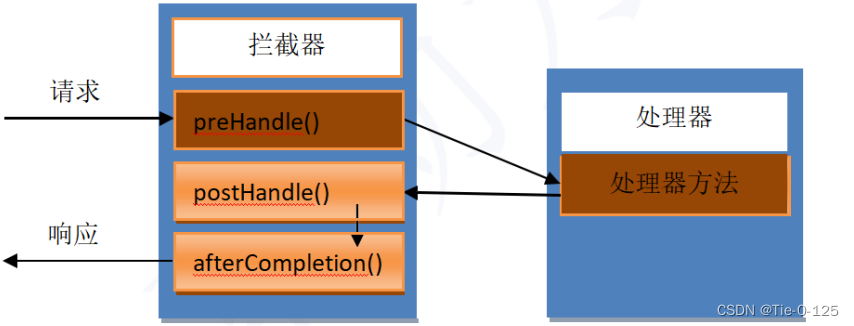
3)拦截器执行的时机
1)preHandle():在请求被处理之前进行操作
2)postHandle():在请求被处理之后,但结果还没有渲染前进行操作,可以改变响应结果
3)afterCompletion:所有的请求响应结束后执行善后工作,清理对象,关闭资源
4)拦截器实现的两种方式
1)继承HandlerInterceptorAdapter的父类
2)实现HandlerInterceptor接口,实现的接口,推荐使用实现接口的方式
2、HandlerInterceptor接口分析
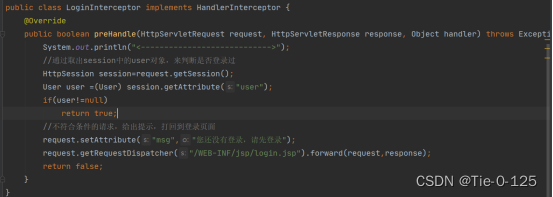
自定义拦截器,需要实现 HandlerInterceptor 接口。而该接口中含有三个方法:
(1)preHandle
该方法在处理器方法执行之前执行。其返回值为 boolean,若为 true,则紧接着会执行处理器方法,且会将 afterCompletion()方法放入到一个专门的方法栈中等待执行。
(2)postHandle
该方法在处理器方法执行之后执行。处理器方法若最终未被执行,则该方法不会执行。由于该方法是在处理器方法执行完后执行,且该方法参数中包含 ModelAndView,所以该方法可以修改处理器方法的处理结果数据,且可以修改跳转方向。
(3)afterCompletion
当preHandle()方法返回 true 时,会将该方法放到专门的方法栈中,等到对请求进行响应的所有工作完成之后才执行该方法。即该方法是在中央调度器渲染(数据填充)了响应页面之后执行的,此时对 ModelAndView 再操作也对响应无济于事。afterCompletion 最后执行的方法,清除资源,例如在 Controller 方法中加入数据等。
3、自定义拦截器实现权限验证
实现一个权限验证拦截器。
1.修改web.xml文件中请求路径
<servlet-mapping>
        <servlet-name>springmvc</servlet-name>
      	<url-pattern>/</url-pattern>
    </servlet-mapping>
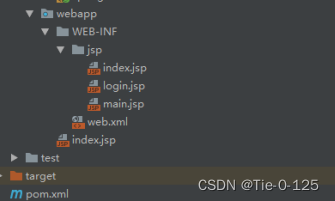
2.将所有的页面放入WEB-INF目录下
3.开发登录action
4.开发拦截器
5.配置springmvc.xml文件
<!--注册拦截器-->
<mvc:interceptors>
    <mvc:interceptor>
        <!--配置拦截的路径(哪些请求被拦截)/**/表都拦截-->
        <mvc:mapping path="/**"/>
        <!--设置放行的请求-->
        <mvc:exclude-mapping path="/login"></mvc:exclude-mapping>
        <mvc:exclude-mapping path="/showLogin"></mvc:exclude-mapping>
        <!--设置进行功能处理的拦截器类-->
        <bean class="com.bjpowernode.interceptor.LoginInterceptor"></bean>
    </mvc:interceptor>
</mvc:interceptors>
四、SSM整合
1、SSM整合后台功能
1)Maven依赖
<project xmlns="http://maven.apache.org/POM/4.0.0" xmlns:xsi="http://www.w3.org/2001/XMLSchema-instance"
  xsi:schemaLocation="http://maven.apache.org/POM/4.0.0 http://maven.apache.org/maven-v4_0_0.xsd">
  <modelVersion>4.0.0</modelVersion>
  <groupId>org.example</groupId>
  <artifactId>smm</artifactId>
  <packaging>war</packaging>
  <version>1.0-SNAPSHOT</version>
  <name>smm Maven Webapp</name>
  <url>http://maven.apache.org</url>


  <!-- 集中定义依赖版本号-->
  <properties>
    <junit.version>4.12</junit.version>
    <spring.version>5.1.2.RELEASE</spring.version>
    <mybatis.version>3.2.8</mybatis.version>
    <!-- mybatis与sprinh的整合-->
    <mybatis.spring.version>1.2.2</mybatis.spring.version>
    <!--mybatis支持的分页插件依赖 -->
    <mybatis.paginator.version>1.2.15</mybatis.paginator.version>
    <mysql.version>8.0.22</mysql.version>
    <!-- slf4j日志依赖-->
    <slf4j.version>1.6.4</slf4j.version>
    <druid.version>1.0.9</druid.version>
    <pagehelper.version>5.1.2</pagehelper.version>
    <!-- jstl依赖(jsp的标准标签库)-->
    <jstl.version>1.2</jstl.version>
    <servlet-api.version>3.0.1</servlet-api.version>
    <!-- jsp依赖-->
    <jsp-api.version>2.0</jsp-api.version>
    <!-- springmvc默认的json转换的依赖工具-->
    <jackson.version>2.9.6</jackson.version>
  </properties>


  <dependencies>
    <dependency>
      <groupId>org.aspectj</groupId>
      <artifactId>aspectjweaver</artifactId>
      <version>1.6.11</version>
    </dependency>

    <dependency>
    <groupId>org.json</groupId>
    <artifactId>json</artifactId>
    <version>20140107</version>
  </dependency>

    <!-- spring -->
    <dependency>
      <groupId>org.springframework</groupId>
      <artifactId>spring-context</artifactId>
      <version>${spring.version}</version>
    </dependency>

    <dependency>
      <groupId>org.springframework</groupId>
      <artifactId>spring-beans</artifactId>
      <version>${spring.version}</version>
    </dependency>

    <dependency>
      <groupId>org.springframework</groupId>
      <artifactId>spring-webmvc</artifactId>
      <version>${spring.version}</version>
    </dependency>

    <dependency>
      <groupId>org.springframework</groupId>
      <artifactId>spring-jdbc</artifactId>
      <version>${spring.version}</version>
    </dependency>

    <dependency>
      <groupId>org.springframework</groupId>
      <artifactId>spring-aspects</artifactId>
      <version>${spring.version}</version>
    </dependency>

    <dependency>
      <groupId>org.springframework</groupId>
      <artifactId>spring-jms</artifactId>
      <version>${spring.version}</version>
    </dependency>

    <dependency>
      <groupId>org.springframework</groupId>
      <artifactId>spring-context-support</artifactId>
      <version>${spring.version}</version>
    </dependency>

    <dependency>
      <groupId>org.springframework</groupId>
      <artifactId>spring-test</artifactId>
      <version>${spring.version}</version>
    </dependency>

    <!-- Mybatis -->
    <dependency>
      <groupId>org.mybatis</groupId>
      <artifactId>mybatis</artifactId>
      <version>${mybatis.version}</version>
    </dependency>

    <dependency>
      <groupId>org.mybatis</groupId>
      <artifactId>mybatis-spring</artifactId>
      <version>${mybatis.spring.version}</version>
    </dependency>

    <dependency>
      <groupId>com.github.miemiedev</groupId>
      <artifactId>mybatis-paginator</artifactId>
      <version>${mybatis.paginator.version}</version>
    </dependency>

    <dependency>
      <groupId>com.github.pagehelper</groupId>
      <artifactId>pagehelper</artifactId>
      <version>${pagehelper.version}</version>
    </dependency>

    <!-- MySql -->
    <dependency>
      <groupId>mysql</groupId>
      <artifactId>mysql-connector-java</artifactId>
      <version>${mysql.version}</version>
    </dependency>

    <!-- 连接池-->
    <dependency>
      <groupId>com.alibaba</groupId>
      <artifactId>druid</artifactId>
      <version>${druid.version}</version>
    </dependency>

    <!-- junit -->
    <dependency>
      <groupId>junit</groupId>
      <artifactId>junit</artifactId>
      <version>4.12</version>
      <scope>test</scope>
    </dependency>

    <!-- JSP相关-->
    <dependency>
      <groupId>jstl</groupId>
      <artifactId>jstl</artifactId>
      <version>${jstl.version}</version>
    </dependency>

    <dependency>
      <groupId>javax.servlet</groupId>
      <artifactId>javax.servlet-api</artifactId>
      <version>3.0.1</version>
      <scope>provided</scope>
    </dependency>

    <dependency>
      <groupId>javax.servlet</groupId>
      <artifactId>jsp-api</artifactId>
      <scope>provided</scope>
      <version>${jsp-api.version}</version>
    </dependency>

    <!-- Jackson Json处理工具包-->
    <dependency>
      <groupId>com.fasterxml.jackson.core</groupId>
      <artifactId>jackson-databind</artifactId>
      <version>${jackson.version}</version>
    </dependency>

    <!-- fastjson-->
    <dependency>
      <groupId>com.alibaba</groupId>
      <artifactId>fastjson</artifactId>
      <version>1.2.28</version>
    </dependency>

    <!-- 文件上传用-->
    <dependency>
      <groupId>commons-io</groupId>
      <artifactId>commons-io</artifactId>
      <version>2.4</version>
    </dependency>

    <dependency>
      <groupId>commons-fileupload</groupId>
      <artifactId>commons-fileupload</artifactId>
      <version>1.3.1</version>
    </dependency>
  </dependencies>

  <!-- 插件配置-->
  <build>
    <plugins>
      <plugin>
        <groupId>org.apache.maven.plugins</groupId>
        <artifactId>maven-compiler-plugin</artifactId>
        <configuration>
          <source>1.8</source>
          <target>1.8</target>
          <encoding>UTF-8</encoding>
        </configuration>
      </plugin>

    </plugins>
    <!--识别所有的配置文件-->
    <resources>
      <resource>
        <directory>src/main/java</directory>
        <includes>
          <include>**/*.properties</include>
          <include>**/*.xml</include>
        </includes>
        <filtering>false</filtering>
      </resource>
      <resource>
        <directory>src/main/resources</directory>
        <includes>
          <include>**/*.properties</include>
          <include>**/*.xml</include>
        </includes>
        <filtering>false</filtering>
      </resource>
    </resources>
  </build>
</project>
2)配置文件
1.applicationContext-mapper.xml
<?xml version="1.0" encoding="UTF-8"?>
<beans xmlns="http://www.springframework.org/schema/beans"
       xmlns:xsi="http://www.w3.org/2001/XMLSchema-instance"
       xmlns:context="http://www.springframework.org/schema/context"
       xsi:schemaLocation="http://www.springframework.org/schema/beans http://www.springframework.org/schema/beans/spring-beans.xsd http://www.springframework.org/schema/context http://www.springframework.org/schema/context/spring-context.xsd">


    <!--    读取jdbc.properties属性文件 -->
    <context:property-placeholder location="classpath:jdbc.properties"></context:property-placeholder>
    <!--    创建数据源-->
    <bean id="dataSource" class="com.alibaba.druid.pool.DruidDataSource">
        <property name="driverClassName" value="${jdbc.driverClassName}"></property>
        <property name="url" value="${jdbc.url}"></property>
        <property name="username" value="${jdbc.username}"></property>
        <property name="password" value="${jdbc.password}"></property>
    </bean>
    <!--    创建SqlSessionFactoryBean-->
    <bean class="org.mybatis.spring.SqlSessionFactoryBean">
        <!--        配置数据源-->
        <property name="dataSource" ref="dataSource"></property>
        <!--        配置MyBatis的核心配置文件 -->
        <property name="configLocation" value="classpath:SqlMapConfig.xml"></property>
        <!--        配置实体类-->
        <property name="typeAliasesPackage" value="com.ssm.pojo"></property>
    </bean>
    <!--    创建mapper文件的扫描器-->
    <bean class="org.mybatis.spring.mapper.MapperScannerConfigurer">
        <property name="basePackage" value="com.ssm.mapper"></property>
    </bean>
</beans>
2.applicationContext-service.xml
<?xml version="1.0" encoding="UTF-8"?>
<beans xmlns="http://www.springframework.org/schema/beans"
       xmlns:xsi="http://www.w3.org/2001/XMLSchema-instance"
       xmlns:context="http://www.springframework.org/schema/context" xmlns:tx="http://www.springframework.org/schema/tx"
       xmlns:aop="http://www.springframework.org/schema/aop"
       xsi:schemaLocation="http://www.springframework.org/schema/beans http://www.springframework.org/schema/beans/spring-beans.xsd http://www.springframework.org/schema/context http://www.springframework.org/schema/context/spring-context.xsd http://www.springframework.org/schema/tx http://www.springframework.org/schema/tx/spring-tx.xsd http://www.springframework.org/schema/aop http://www.springframework.org/schema/aop/spring-aop.xsd">

    <!-- 设置业务逻辑层的包扫描器,目的是在指定的路径下,
     使用@Service注解的类,Spring负责创建对象,并添加依赖-->
    <context:component-scan base-package="com.ssm.service"></context:component-scan>
    <!-- 设置事务管理器-->
    <bean id="transactionManager" class="org.springframework.jdbc.datasource.DataSourceTransactionManager">
        <!-- 配置数据源-->
        <property name="dataSource" ref="dataSource"></property>
    </bean>
    <!--    添加事务的切面-->
    <tx:advice id="myadvice" transaction-manager="transactionManager">
        <tx:attributes>
            <tx:method name="*select*" read-only="true"/>
            <tx:method name="*find*" read-only="true"/>
            <tx:method name="*get*" read-only="true"/>
            <tx:method name="*search*" read-only="true"/>
            <tx:method name="*insert*" propagation="REQUIRED"/>
            <tx:method name="*save*" propagation="REQUIRED"/>
            <tx:method name="*add*" propagation="REQUIRED"/>
            <tx:method name="*delete*" propagation="REQUIRED"/>
            <tx:method name="*remove*" propagation="REQUIRED"/>
            <tx:method name="*clear*" propagation="REQUIRED"/>
            <tx:method name="*update*" propagation="REQUIRED"/>
            <tx:method name="*modify*" propagation="REQUIRED"/>
            <tx:method name="*change*" propagation="REQUIRED"/>
            <tx:method name="*set*" propagation="REQUIRED"/>
            <tx:method name="*" propagation="SUPPORTS"/>
        </tx:attributes>
    </tx:advice>
    <!--    完成切面 + 切入点的织入-->
    <aop:config>
        <aop:pointcut id="mypointcut" expression="execution(* com.ssm.service.*.*(..))"/>
        <aop:advisor advice-ref="myadvice" pointcut-ref="mypointcut"></aop:advisor>
    </aop:config>
</beans>
3.springmvc.xml
<?xml version="1.0" encoding="UTF-8"?>
<beans xmlns="http://www.springframework.org/schema/beans"
       xmlns:xsi="http://www.w3.org/2001/XMLSchema-instance"
       xmlns:context="http://www.springframework.org/schema/context"
       xmlns:mvc="http://www.springframework.org/schema/mvc"
       xsi:schemaLocation="http://www.springframework.org/schema/beans http://www.springframework.org/schema/beans/spring-beans.xsd http://www.springframework.org/schema/context http://www.springframework.org/schema/context/spring-context.xsd http://www.springframework.org/schema/mvc http://www.springframework.org/schema/mvc/spring-mvc.xsd">

    <!--    设置包扫描器-->
    <context:component-scan base-package="com.ssm.controller"></context:component-scan>
    <!--    设置视图解析器   /admin/     main    .jsp  -->
    <bean id="viewResolver" class="org.springframework.web.servlet.view.InternalResourceViewResolver">
        <property name="prefix" value="/admin/"></property>
        <property name="suffix" value=".jsp"></property>
    </bean>
    <!--    设置文件上传核心组件-->
    <bean id="multipartResolver" class="org.springframework.web.multipart.commons.CommonsMultipartResolver">
    </bean>
    <!--    设置注解驱动-->
    <mvc:annotation-driven></mvc:annotation-driven>
    <!--    解决跨域问题-->
    <mvc:cors>
        <mvc:mapping path="/**"
                     allowed-origins="*"
                     allowed-methods="POST, GET, OPTIONS, DELETE, PUT"
                     allowed-headers="Content-Type, Access-Control-Allow-Headers, Authorization, X-Requested-With"
                     allow-credentials="true" />
    </mvc:cors>
</beans>
4.SqlMapConfig.xml
<?xml version="1.0" encoding="UTF-8"?>
<!DOCTYPE configuration
        PUBLIC "-//mybatis.org//DTD Config 3.0//EN"
        "http://mybatis.org/dtd/mybatis-3-config.dtd">
<configuration>
    <!--设置日志输出语句,显示相应的SQL操作语句-->
    <settings>
        <setting name="iogImpl" value="STDOUT_LOGGING"/>
    </settings>

</configuration>
5.jdbc.properties
jdbc.driverClassName=com.mysql.jdbc.Driver
jdbc.url=jdbc:mysql://localhost:3306/ssmuser?useUnicode=true&characterEncoding=utf8
jdbc.username=root
jdbc.password=123
6.在web.xml文件中完成springmvc,spring两个框架的注册
<?xml version="1.0" encoding="UTF-8"?>
<web-app xmlns="http://xmlns.jcp.org/xml/ns/javaee"
         xmlns:xsi="http://www.w3.org/2001/XMLSchema-instance"
         xsi:schemaLocation="http://xmlns.jcp.org/xml/ns/javaee http://xmlns.jcp.org/xml/ns/javaee/web-app_4_0.xsd"
         version="4.0">


    <!--    添加字符编码过滤器-->
    <filter>
        <filter-name>encode</filter-name>
        <filter-class>org.springframework.web.filter.CharacterEncodingFilter</filter-class>
        <init-param>
            <param-name>encoding</param-name>
            <param-value>UTF-8</param-value>
        </init-param>
        <init-param>
            <param-name>forceRequestEncoding</param-name>
            <param-value>true</param-value>
        </init-param>
        <init-param>
            <param-name>forceResponseEncoding</param-name>
            <param-value>true</param-value>
        </init-param>
    </filter>
    <filter-mapping>
        <filter-name>encode</filter-name>
        <url-pattern>/*</url-pattern><!--*/-->
    </filter-mapping>

    <!--    注册SpringMVC框架-->
    <servlet>
        <servlet-name>springmvc</servlet-name>
        <servlet-class>org.springframework.web.servlet.DispatcherServlet</servlet-class>
        <init-param>
            <param-name>contextConfigLocation</param-name>
            <param-value>classpath:springmvc.xml</param-value>
        </init-param>
    </servlet>
    <servlet-mapping>
        <servlet-name>springmvc</servlet-name>
        <url-pattern>/</url-pattern>
    </servlet-mapping>
    <!--    注册Spring框架-->
    <listener>
        <listener-class>org.springframework.web.context.ContextLoaderListener</listener-class>
    </listener>
    <context-param>
        <param-name>contextConfigLocation</param-name>
        <param-value>classpath:applicationContext-*.xml</param-value>
    </context-param>

</web-app>
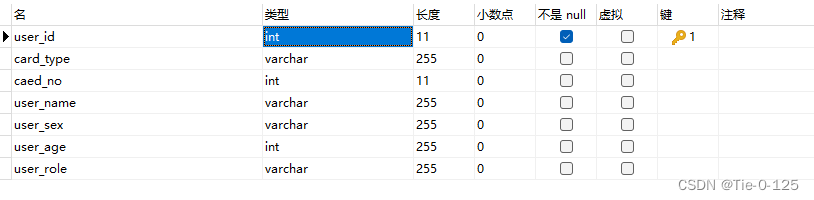
3)Pojo和sql
4)分页公式
select * from user limit (当前页码-1)*每页条数,每页条数


 3546
3546


 被折叠的 条评论
为什么被折叠?
被折叠的 条评论
为什么被折叠?
 到【灌水乐园】发言


