


由于不能使用maven管理,只能导入jar包做实验,最下面有截图展示所用到的jar包,可以自己搜索文档maven导入依赖;
SpringMVC 参数绑定
实验目的:
(1)掌握SpringMVC的基本架构;
(2)掌握控制器类的编写;
(3)掌握参数绑定的实现;
实验要求:
(1) 完成POJO类的创建;
(2) 完成配置文件的编写;
(3) 完成控制器类的编写;
(4) 完成参数的绑定;
实验内容:
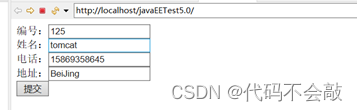
自定义一个person对象,通过在浏览器中输入编号、姓名、电话、地址的信息,实现在控制器中绑定,并完成在控制台中打印输入结果。
有很多种做法,写法不唯一。
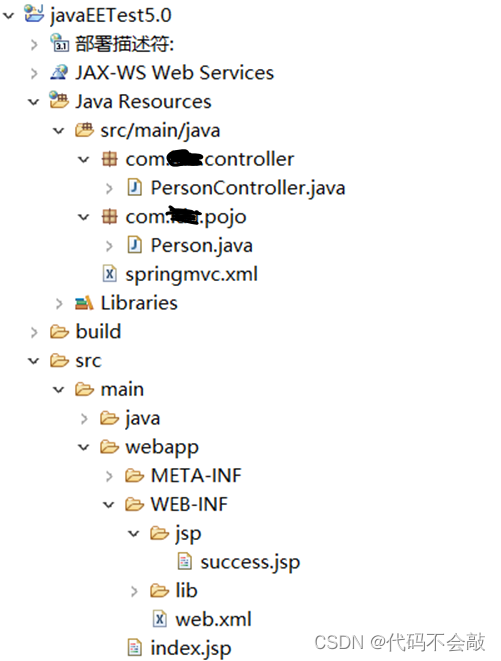
由于配置和代码中含有路径的原因,先展示一下目录:
Person类
public class Person {
	private int id;
    private String name;
    private String phone;
    private String address;

    public int getId() {
        return id;
    }

    public void setId(int id) {
        this.id = id;
    }

    public String getName() {
        return name;
    }

    public void setName(String name) {
        this.name = name;
    }

    public String getPhone() {
        return phone;
    }

    public void setPhone(String phone) {
        this.phone = phone;
    }

    public String getAddress() {
        return address;
    }

    public void setAddress(String address) {
        this.address = address;
    }

    @Override
    public String toString() {
        return "Person{" +
                "id=" + id +
                ", name='" + name + '\'' +
                ", phone='" + phone + '\'' +
                ", address='" + address + '\'' +
                '}';
    }

}
controller类
import org.springframework.stereotype.Controller;
import org.springframework.web.bind.annotation.RequestMapping;
import org.springframework.web.servlet.ModelAndView;

@Controller
@RequestMapping("/test")
public class PersonController {

	@RequestMapping("/one")
	public ModelAndView onePerson(Person person) {
		System.out.println(person);

		ModelAndView modelAndView = new ModelAndView();
		modelAndView.addObject("person", person);
		modelAndView.setViewName("/WEB-INF/jsp/success.jsp");
		return modelAndView;
	}
}
index.jsp
<%@ page language="java" import="java.util.*" pageEncoding="utf-8"%>

<!DOCTYPE HTML PUBLIC "-//W3C//DTD HTML 4.01 Transitional//EN">
<html>
  <head>
    <title>个人信息</title>
  </head>

  <body>
    <form action="${pageContext.request.contextPath }/test/one" method="POST">
    	编号:<input type="text" name="id"><br>
        姓名:<input type="text" name="name"><br>
        电话:<input type="text" name="phone"><br>
        地址:<input type="text" name="address"><br>
        <input type="submit" value="提交">
    </form>
  </body>
</html>
success.jsp(在jsp文件夹下)
<%@ page language="java" import="java.util.*" pageEncoding="utf-8"%>
<!DOCTYPE HTML PUBLIC "-//W3C//DTD HTML 4.01 Transitional//EN">

<html>
<head>
    <title>Title</title>
</head>
<body>
    <h1>恭喜您,完成了实验!</h1>
    <h2>person = ${person}</h2>

</body>
</html>
springmvc.xml配置文件
<?xml version="1.0" encoding="UTF-8"?>
<beans xmlns="http://www.springframework.org/schema/beans"
	xmlns:xsi="http://www.w3.org/2001/XMLSchema-instance"
	xmlns:context="http://www.springframework.org/schema/context"
	xsi:schemaLocation="
        http://www.springframework.org/schema/beans
        http://www.springframework.org/schema/beans/spring-beans.xsd
        http://www.springframework.org/schema/context
        http://www.springframework.org/schema/context/spring-context.xsd">


	<context:component-scan base-package="com.xxx.controller"/>

</beans>
web.xml配置文件
<?xml version="1.0" encoding="UTF-8"?>
<web-app xmlns:xsi="http://www.w3.org/2001/XMLSchema-instance" xmlns="http://xmlns.jcp.org/xml/ns/javaee" xsi:schemaLocation="http://xmlns.jcp.org/xml/ns/javaee http://xmlns.jcp.org/xml/ns/javaee/web-app_3_1.xsd" id="WebApp_ID" version="3.1">

  	<welcome-file-list>
		<welcome-file>index.jsp</welcome-file>
	</welcome-file-list>

	<servlet>
		<servlet-name>springMVC</servlet-name>
		<servlet-class>org.springframework.web.servlet.DispatcherServlet</servlet-class>
		<init-param>
			<param-name>contextConfigLocation</param-name>
			<param-value>classpath:springmvc.xml</param-value>
		</init-param>
		<load-on-startup>1</load-on-startup>
	</servlet>

	<servlet-mapping>
		<servlet-name>springMVC</servlet-name>
		<url-pattern>/</url-pattern>
	</servlet-mapping>

</web-app>
jar包

结果图:


注意:
- 先web.xml中的springmvc前端控制器DispatcherServlet中配置的映射路径/,会覆盖掉tomcat中的default servlet,需要在主配置文件中配置放行静态资源,否则会报错,404。
- 在web.xml中配置注册字符集过滤器或者用json格式传输数据可以解决中文乱码问题。
- 页面出现报错大多数是配置文件和路径不正确导致的。


 234
234


 被折叠的 条评论
为什么被折叠?
被折叠的 条评论
为什么被折叠?
 到【灌水乐园】发言


