


b站链接
介绍
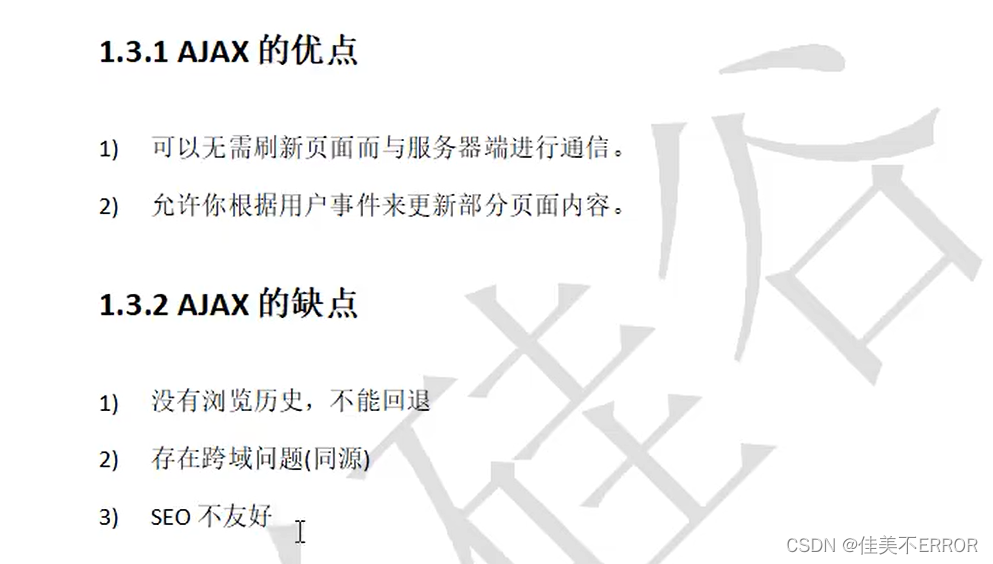
ajax优缺点
http
node.js下载配置好环境
express框架
切换到项目文件夹,执行下面两条命令
有报错,退出用管理员身份打开
或者再命令提示符用管理员身份打开
npm init --yes
npm i  express
请求
    <script>
        //引入express
        const express = require('express');
        //创建应用对象
        const app = express();

        //创建路由规则
        //request对请求报文的封装
        //response是对响应报文的封装
        app.get('/',(request,response)=>{
            //设置响应
            response.send('HELLO EXPRESS');
        });

        //监听端口启动服务
        app.listen(8000,()=>{
            console.log("服务已经启动,8000端口监听中……");
        });
    </script>
ajax请求
<!DOCTYPE html>
<html lang="en">
<head>
    <meta charset="UTF-8">
    <meta name="viewport" content="width=device-width, initial-scale=1.0">
    <title>Document</title>
    <style>
        #result{
            width: 200px;
            height: 100px;
            border: solid 1px #90b;
        }
    </style>
</head>
<body>
   <button>点击发送请求</button>
   <div id = "result"></div>
   <script>
    const btn = document.getElementsByTagName('button')[0];
    btn.onclick=function(){
        // console.log('test');
        //创建对象
        const xhr = new XMLHttpRequest();
        const result = document.getElementById("result");
        //初始化 设置请求方法和url
        xhr.open('GET','http://127.0.0.1:8000/server');
        //发送
        xhr.send();
        xhr.onreadystatechange = function(){
            //判断(服务端返回了所有的结果)
            if(xhr.readyState === 4){
                if(xhr.status >=200 && xhr.status<300){
                    //响应行
                    /* console.log(xhr.status);//状态码
                    console.log(xhr.statusTest);//状态字符串
                    console.log(xhr.getAllResponseHeaders());//所有响应头
                    console.log(xhr.response); */

                    result.innerHTML = xhr.response;
                }else{

                }
            }
        }

    }
   </script>
</body>
</html>
post请求
<!DOCTYPE html>
<html lang="en">
<head>
    <meta charset="UTF-8">
    <meta name="viewport" content="width=device-width, initial-scale=1.0">
    <title>Document</title>
    <style>
        #result{
            width: 200px;
            height: 100px;
            border: solid 1px #90b;
        }
    </style>
</head>
<body>
    <div id="result"></div>
    <script>
        const result = document.getElementById("result");
        //绑定事件
        result.addEventListener("mouseover",function(){
            //创建对象
            const xhr = new XMLHttpRequest();
            //初始化 设置类型与URL
            xhr.open('POST','http://127.0.0.1:8000/server');
            //发送
            xhr.send('1234567');
            //事件绑定
            xhr.onreadystatechange = function(){
                //判断
                if(xhr.readyState === 4){
                    if(xhr.status>=200 && xhr.status<300){
                        //处理服务端返回结果
                        result.innerHTML=xhr.response;
                    }
                }
            }
        })
    </script>
</body>
</html>
//引入express
const express = require('express');
//创建应用对象
const app = express();

//创建路由规则
//request对请求报文的封装
//response是对响应报文的封装
app.get('/server',(request,response)=>{
    //设置响应头  设置允许跨域
    response.setHeader('Access-Control-Allow-Origin','*');
    //设置响应体
    response.send('HELLO EXPRESS');
});
app.post('/server',(request,response)=>{
    //设置响应头  设置允许跨域
    response.setHeader('Access-Control-Allow-Origin','*');
    //设置响应体
    response.send('HELLO AJAX POST');
});

//监听端口启动服务
app.listen(8000,()=>{
    console.log("服务已经启动,8000端口监听中……");
});
设置请求头
//设置请求头
            xhr.setRequestHeader('Content-Type','application/x-www-form-urlencoded');
              xhr.setRequestHeader('name','atguigu');
            //发送
            xhr.send('a=100 & b=200 &c=300');

app.all('/server',(request,response)=>{
    //设置响应头  设置允许跨域
    response.setHeader('Access-Control-Allow-Origin','*');
    //响应头
    response.setHeader('Access-Control-Allow-Hearders','*')
    //设置响应体
    response.send('HELLO AJAX POST');
});
json数据响应
<!DOCTYPE html>
<html lang="en">
<head>
    <meta charset="UTF-8">
    <meta name="viewport" content="width=device-width, initial-scale=1.0">
    <title>Document</title>
    <style>
        #result{
            width: 200px;
            height: 100px;
            border: solid 1px #90b;
        }
    </style>
</head>
<body>
    <div id="result"></div>
    <script>
        const result = document.getElementById("result");
        //绑定事件
        window.onkeydown = function(){

            //创建对象
            const xhr = new XMLHttpRequest();
            //设置响应体数据类型
            xhr.responseType = 'json';
            //初始化 设置类型与URL
            xhr.open('GET','http://127.0.0.1:8000/json-server');
            //设置请求头
            xhr.setRequestHeader('Content-Type','application/x-www-form-urlencoded');
            xhr.setRequestHeader('name','atguigu');
            //发送
            xhr.send();
            //事件绑定
            xhr.onreadystatechange = function(){
                //判断
                if(xhr.readyState === 4){
                    if(xhr.status>=200 && xhr.status<300){
                        console.log(xhe.response);
                        //处理服务端返回结果
                        result.innerHTML=xhr.response.name;
                    }
                }
            }
        }
    </script>
</body>
</html>
//引入express
const express = require('express');
//创建应用对象
const app = express();

//创建路由规则
//request对请求报文的封装
//response是对响应报文的封装
app.get('/server',(request,response)=>{
    //设置响应头  设置允许跨域
    response.setHeader('Access-Control-Allow-Origin','*');
    //设置响应体
    response.send('HELLO AJAX');
});
app.all('/server',(request,response)=>{
    //设置响应头  设置允许跨域
    response.setHeader('Access-Control-Allow-Origin','*');
    //响应头
    response.setHeader('Access-Control-Allow-Hearders','*')
    //响应一个数据
    const data = {
        name:'atguigu'
    };
    //对对象进行字符串转换
    let str = JSON.stringify(data);
    //设置响应体
    response.send(str);
});

//监听端口启动服务
app.listen(8000,()=>{
    console.log("服务已经启动,8000端口监听中……");
});
nodemon
有报错,退出软件用管理员身份打开
npm install -g nodemon
nodemon server.js
ie缓存
<script>
        const btn = document.getElementsByTagName('button')[0];
        const result = document.querySelector('#result');

        btn.addEventListener('click',function(){
            // console.log('test');
            const xhr = new XMLHttpRequest();
            xhr.open("GET",'http://127.0.0.1:8000/ie?t='+Date.now());
            xhr.send();
            xhr.onreadystatechange = function(){
                if(xhr.readyState === 4){
                    if(xhr.status >=200 && xhr.status<300){
                        result.innerHTML = xhr.response;
                    }
                }
            }
        })
    </script>
//引入express
const express = require('express');
//创建应用对象
const app = express();

//创建路由规则
//request对请求报文的封装
//response是对响应报文的封装
app.get('/server',(request,response)=>{
    //设置响应头  设置允许跨域
    response.setHeader('Access-Control-Allow-Origin','*');
    //设置响应体
    response.send('HELLO AJAX');
});
app.all('/server',(request,response)=>{
    //设置响应头  设置允许跨域
    response.setHeader('Access-Control-Allow-Origin','*');
    //响应头
    response.setHeader('Access-Control-Allow-Hearders','*')
    //响应一个数据
    const data = {
        name:'atguigu'
    };
    //对对象进行字符串转换
    let str = JSON.stringify(data);
    //设置响应体
    response.send(str);
});

app.all('/json-server',(request,response)=>{
    //设置响应头  设置允许跨域
    response.setHeader('Access-Control-Allow-Origin','*');
    //响应头
    response.setHeader('Access-Control-Allow-Hearders','*')
    //响应一个数据
    const data = {
        name:'atguigu'
    };
    //对对象进行字符串转换
    let str = JSON.stringify(data);
    //设置响应体
    response.send(str);
});

app.get('/ie',(request,response)=>{
    //设置响应头  设置允许跨域
    response.setHeader('Access-Control-Allow-Origin','*');
    //设置响应体
    response.send('HELLO IE');
});
//监听端口启动服务
app.listen(8000,()=>{
    console.log("服务已经启动,8000端口监听中……");
});
超时与网络异常
 <script>
        const btn = document.getElementsByTagName('button')[0];
        const result = document.querySelector('#result');

        btn.addEventListener('click',function(){
            // console.log('test');
            const xhr = new XMLHttpRequest();

            //超时
            xhr.timeout = 2000;
            //超时回调
            xhr.ontimeout = function(){
                alert("网络异常,请稍后重试")
            }
            //网络异常回调
            xhr.onerror = function(){
                alert("你的网络出现了问题")
            }
            xhr.open("GET",'http://127.0.0.1:8000/delay');
            xhr.send();
            xhr.onreadystatechange = function(){
                if(xhr.readyState === 4){
                    if(xhr.status >=200 && xhr.status<300){
                        result.innerHTML = xhr.response;
                    }
                }
            }
        })
    </script>
app.get('/delay',(request,response)=>{
    //设置响应头  设置允许跨域
    response.setHeader('Access-Control-Allow-Origin','*');
    setImmeout(()=>{
 //设置响应体
 response.send('延时响应');
    },3000);

});
取消请求
<!DOCTYPE html>
<html lang="en">
<head>
    <meta charset="UTF-8">
    <meta name="viewport" content="width=device-width, initial-scale=1.0">
    <title>Document</title>
</head>
<body>
    <button>点击登录</button>
    <button>点击取消</button>
    <script>
        const btns = document.querySelectorAll('button');
        let x =null;

        btns[0].onlick = function(){
            x=new XMLHttpRequest();
            x.open("GET",'http://127.0.0.1:8000/delay');
            x.send();
        }

        btns[1].onlick = function(){
            x.abort();
        }
    </script>
</body>
</html>
请求重复发送问题
<script>
        const btns = document.querySelectorAll('button');
        let x =null;

        btns[0].onlick = function(){
            //判断标识变量
            if(isSending) x.abort();//如果正在发送,则取消该请求,创建一个新请求
            x=new XMLHttpRequest();
            isSending = true;
            x.open("GET",'http://127.0.0.1:8000/delay');
            x.send();
            x.onreadystatechange=function(){
                if(x.readyState === 4){
                    isSending = false;
                }
            }
        }

        btns[1].onlick = function(){
            x.abort();
        }
    </script>
怎么感觉学的迷迷糊糊的……
emo中
我还会回来的……


 574
574


 被折叠的 条评论
为什么被折叠?
被折叠的 条评论
为什么被折叠?
 到【灌水乐园】发言


