


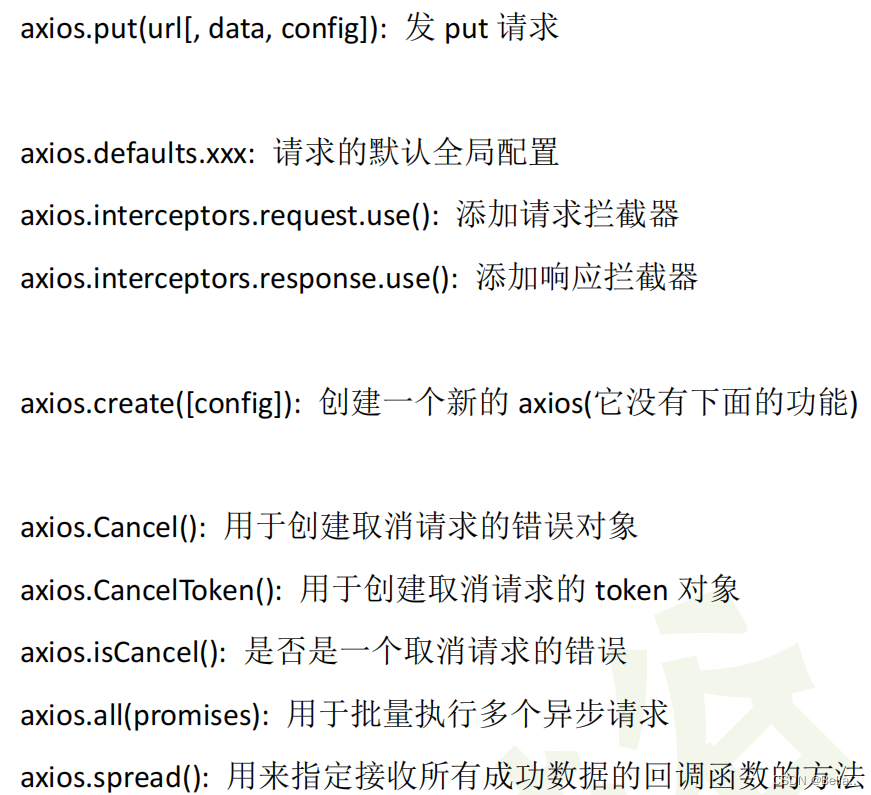
1.axios的基本使用
<!doctype html>
<html lang="en">
<head>
    <meta charset="UTF-8">
    <meta name="viewport" content="width=device-width, user-scalable=no, initial-scale=1.0, maximum-scale=1.0, minimum-scale=1.0">
    <meta http-equiv="X-UA-Compatible" content="ie=edge">
    <title>axios基本使用</title>
    <link crossorigin="anonymous" href="https://cdn.bootcss.com/twitter-bootstrap/3.3.7/css/bootstrap.min.css" rel="stylesheet">
    <script src="https://cdn.bootcdn.net/ajax/libs/axios/0.21.1/axios.min.js"></script>
</head>
<body>
    <div class="container">
        <h2 class="page-header">基本使用</h2>
        <button class="btn btn-primary"> 发送GET请求 </button>
        <button class="btn btn-warning" > 发送POST请求 </button>
        <button class="btn btn-success"> 发送 PUT 请求 </button>
        <button class="btn btn-danger"> 发送 DELETE 请求 </button>
    </div>
    <script>
        //获取所有按钮
        const btns = document.querySelectorAll('button');

        //给第一个按钮绑定事件
        btns[0].onclick = function(){
            //发送 AJAX 请求
            axios({
                //请求类型
                method: 'GET',
                //URL
                url: 'http://localhost:3000/posts/2',
                //then方法指定成功的回调
            }).then(response => {
                console.log(response);
            });
        }

        //添加一篇新的文章
        btns[1].onclick = function(){
            //发送 AJAX 请求
            axios({
                //请求类型
                method: 'POST',
                //URL
                url: 'http://localhost:3000/posts',
                //设置请求体
                data: {
                    title: "今天天气不错, 还挺风和日丽的",
                    author: "张三"
                }
            }).then(response => {
                console.log(response);
            });
        }

        //更新数据
        btns[2].onclick = function(){
            //发送 AJAX 请求
            axios({
                //请求类型
                method: 'PUT',
                //URL 把id为3的张三改成李四
                url: 'http://localhost:3000/posts/3',
                //设置请求体
                data: {
                    title: "今天天气不错, 还挺风和日丽的",
                    author: "李四"
                }
            }).then(response => {
                console.log(response);
            });
        }

        //删除数据
        btns[3].onclick = function(){
            //发送 AJAX 请求
            axios({
                //请求类型
                method: 'delete',
                //URL
                url: 'http://localhost:3000/posts/3',
            }).then(response => {
                console.log(response);
            });
        }

    </script>
</body>

</html>
2. axios其他方式发送请求

    <script>
        //获取按钮
        const btns = document.querySelectorAll('button');

        //发送 GET 请求
        btns[0].onclick = function(){
            // axios()
            axios.request({
                method:'GET',
                url: 'http://localhost:3000/comments'
            }).then(response => {
                console.log(response);
            })
        }

        //发送 POST 请求
        btns[1].onclick = function(){
            // axios()
            axios.post(
                'http://localhost:3000/comments',
                {
                    "body": "喜大普奔",
                    "postId": 2
                }).then(response => {
                    console.log(response);
                })
        }
3. axios请求响应结果的结构
config:配置对象,包括请求类型,请求url,请求体等等数据
data:响应体的结果,axios自动将服务器返回结果做了json解析成了对象,方便对结果处理
hesders:响应的头信息
request:原生的ajax请求对象,request这个属性所保存的是axios在发送请求时所创建的ajax对象(HTMLttpRequest实例对象)
status:响应状态码
statusText:响应的状态字符串
4.axios配置对象详细说明config
url:给谁发送请求
method:请求类型get/post
baseURL:设定url的基础结构,设置url就只需要设置后面的路径(和url结合形成最终的url结果)
transformRequest:对请求的数据进行一个处理,将处理后的结果发送给服务器
transformResponse:对响应的结果做一些改变
hesders:对请求头信息做一个配置,eg:进行身份校验的时候要求在头信息中加入特殊的标识
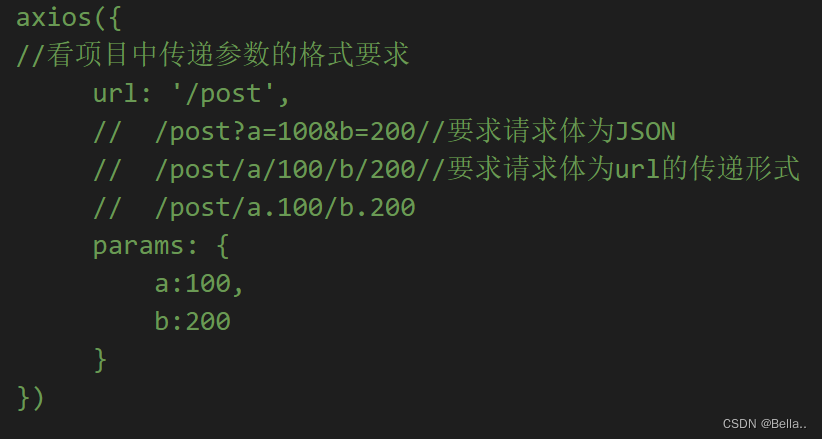
params:设定url参数的,eg:a:100,b:200变成字符串缀到url后面,向服务端发送请求
timeout:超过请求时间就会结束
ResponseType:对响应体结果格式进行设置,服务器返回结果默认值是JSON格式
maxRedirects:最大跳转次数5次,向一个服务发送请求以后跳转,最多5次,node.js里面用的多


 1130
1130


 被折叠的 条评论
为什么被折叠?
被折叠的 条评论
为什么被折叠?
 到【灌水乐园】发言


