


| IP地址 | 主机名 |
|---|---|
| 172.17.8.101 | k8s-master1 |
| 172.17.8.102 | k8s-master2 |
| 172.17.8.103 | k8s-master3 |
| 172.17.8.104 | k8s-harbor |
| 172.17.8.105 | k8s-ha1 |
| 172.17.8.106 | k8s-ha2 |
| 172.17.8.107 | k8s-node1 |
| 172.17.8.108 | k8s-node2 |
| 172.17.8.109 | k8s-node3 |
| VIP:172.17.8.88 |
单主单节点的搭建
1、关闭swap分区
注释/etc/fstab里的swap分区即可;
重启,并free -m查看是否关闭成功
2、优化内核参数
vim /etc/sysctl.conf
net.ipv4.conf.default.rp_filter = 1
net.ipv4.ip_nonlocal_bind = 1
net.ipv4.ip_forward = 1
kernel.core_uses_pid = 1
net.ipv4.tcp_syncookies = 1
net.bridge.bridge-nf-call-ip6tables = 1
net.bridge.bridge-nf-call-iptables = 1
net.bridge.bridge-nf-call-arptables = 1
kernel.msgmnb = 65536
kernel.msgmax = 65536
kernel.shmmax = 68719476736
kernel.shmall = 4294967296
net.ipv4.tcp_window_scaling = 1
net.ipv4.tcp_sack = 1
net.core.rmem_max = 16777216
net.core.wmem_max = 16777216
net.core.netdev_max_backlog = 262144
net.core.somaxconn = 32768
net.ipv4.tcp_max_syn_backlog = 262144
net.ipv4.tcp_syn_retries = 3
net.ipv4.tcp_retries1 = 3
net.ipv4.tcp_retries2 = 15
net.ipv4.tcp_fin_timeout = 1
net.ipv4.tcp_synack_retries = 1
net.ipv4.tcp_syncookies = 1
net.ipv4.tcp_keepalive_probes = 3
3、资源限制
cat /etc/security/limits.conf
root soft core unlimited
root hard core unlimited
root soft nproc 1000000
root hard nproc 1000000
root soft nofile 1000000
root hard nofile 1000000
root soft memlock 32000
root hard memlock 32000
root soft msgqueue 8192000
root hard msgqueue 8192000
* soft core unlimited
* hard core unlimited
* soft nproc 1000000
* hard nproc 1000000
* soft nofile 1000000
* hard nofile 1000000
* soft memlock 32000
* hard memlock 32000
* soft msgqueue 8192000
* hard msgqueue 8192000
4、在master节点和node节点安装docker
[root@k8s-master1:~]#apt-get update -y
[root@k8s-master1:~]#apt install -y apt-transport-https ca-certificates curl software-properties-common
#安装gpg证书
[root@k8s-master1:~]#curl -fsSL https://mirrors.aliyun.com/docker-ce/linux/ubuntu/gpg | sudo apt-key add -
#导入软件源
[root@k8s-master1:~]#sudo add-apt-repository "deb [arch=amd64] https://mirrors.aliyun.com/docker-ce/linux/ubuntu $(lsb_release -cs) stable"
#更新软件源
[root@k8s-master1:~]#apt-get update -y
#查看可安装的docker版本
[root@k8s-master1:~]#apt-cache madison docker-ce docker-ce-cli
#安装docker 19.03.9
[root@k8s-master1:~]#apt install -y docker-ce=5:19.03.15~3-0~ubuntu-bionic docker-ce-cli=5:19.03.15~3-0~ubuntu-bionic
#在docker的启动文件里加上harbor的仓库地址
[root@k8s-master1:~]#sed -Ei 's/^(ExecStart=.*)/\1 --insecure-registry 172.17.8.104/g' /lib/systemd/system/docker.service
[root@k8s-master1:~]# vim /etc/docker/daemon.json
{
 "registry-mirrors": ["https://nmgg13hb.mirror.aliyuncs.com"],"exec-opts": ["native.cgroupdriver=systemd"]
}
[root@k8s-master1:~]#systemctl daemon-reload && systemctl restart docker.service
[root@k8s-master1:~]#systemctl status docker.service
#如果--insecure-registry这命令记不住,可以查帮助
[root@k8s-master1:~]# dockerd --help|grep ins
      --authorization-plugin list               Authorization plugins to load
      --dns-search list                         DNS search domains to use
      --insecure-registry list                  Enable insecure registry communication
验证docker是否安装成功
[root@k8s-master1:~]# docker info
Client:
 Debug Mode: false

Server:
 Containers: 0
  Running: 0
  Paused: 0
  Stopped: 0
 Images: 0
 Server Version: 19.03.15
 Storage Driver: overlay2
  Backing Filesystem: extfs
  Supports d_type: true
  Native Overlay Diff: true
 Logging Driver: json-file
 Cgroup Driver: systemd  ####注意:要和kubeadm的引擎一样
 Plugins:
  Volume: local
  Network: bridge host ipvlan macvlan null overlay
  Log: awslogs fluentd gcplogs gelf journald json-file local logentries splunk syslog
 Swarm: inactive
 Runtimes: runc
 Default Runtime: runc
 Init Binary: docker-init
 containerd version: ea765aba0d05254012b0b9e595e995c09186427f
 runc version: dc9208a3303feef5b3839f4323d9beb36df0a9dd
 init version: fec3683
 Security Options:
  apparmor
  seccomp
   Profile: default
 Kernel Version: 4.15.0-156-generic
 Operating System: Ubuntu 18.04.6 LTS
 OSType: linux
 Architecture: x86_64
 CPUs: 2
 Total Memory: 3.83GiB
 Name: k8s-master1.server
 ID: YNTT:4PVF:QFRF:KWUO:KXXF:6RKE:OOOF:TNJF:LUGA:U3BJ:FE73:KIE7
 Docker Root Dir: /var/lib/docker
 Debug Mode: false
 Registry: https://index.docker.io/v1/
 Labels:
 Experimental: false
 Insecure Registries:
  172.17.8.104  #核对是否是harbor仓库的地址,也可以写域名
  127.0.0.0/8
 Live Restore Enabled: false
 Product License: Community Engine
5、配置kubernetes仓库
master节点和node节点都需要配置
[root@k8s-master1:~]#apt-get update && apt-get install -y apt-transport-https
[root@k8s-master1:~]#curl https://mirrors.aliyun.com/kubernetes/apt/doc/apt-key.gpg | apt-key add -
[root@k8s-master1:~]#cat <<EOF >/etc/apt/sources.list.d/kubernetes.list
deb https://mirrors.aliyun.com/kubernetes/apt/ kubernetes-xenial main
EOF
[root@k8s-master1:~]#apt-get update
6、下载kubeadm、kubectl、kubelet
master节点:
#查看kubeadm的版本
[root@k8s-master1:~]#apt-cache madison kubeadm
#下载kubeadm
[root@k8s-master1:~]#apt install -y kubeadm=1.20.5-00 kubectl=1.20.5-00 kubelet=1.20.5-00
#验证kubeadm的版本
[root@k8s-master1:~]#kubeadm version
#kubectl的bash命令补全
[root@k8s-master1:~]#mkdir /data/script
[root@k8s-master1:~]#apt install bash-completion > /data/script/kube.sh
[root@k8s-master1:~]#apt install bash-completion -y
[root@k8s-master1:~]#source /usr/share/bash-completion/bash_completion
[root@k8s-master1:~]#kubeadm completion bash  > /data/script/kube.sh
[root@k8s-master1:~]#kubectl completion bash  > /data/script/kuctl.sh
[root@k8s-master1:~]#echo "source /data/script/*.sh" >> /etc/profile
[root@k8s-master1:~]#source /etc/profile
node节点:
[root@k8s-master1:~]#apt install -y kubeadm=1.20.5-00 kubelet=1.20.5-00
7、下载镜像(所有的master节点都需安装)
#下载镜像
[root@k8s-master1:~]# cat images_download.sh
#!/bin/bash
#
#********************************************************************
#Author:            wengshiqiang
#QQ:                2923035330
#Date:              2022-05-08
#FileName           images_download.sh
#URL:              https://blog.csdn.net/weixin_58519482
#Copyright (C):     2022 All rights reserved
#********************************************************************
docker pull registry.cn-hangzhou.aliyuncs.com/google_containers/kube-apiserver:v1.20.5
docker pull registry.cn-hangzhou.aliyuncs.com/google_containers/kube-controller-manager:v1.20.5
docker pull registry.cn-hangzhou.aliyuncs.com/google_containers/kube-scheduler:v1.20.5
docker pull registry.cn-hangzhou.aliyuncs.com/google_containers/kube-proxy:v1.20.5
docker pull registry.cn-hangzhou.aliyuncs.com/google_containers/pause:3.2
docker pull registry.cn-hangzhou.aliyuncs.com/google_containers/etcd:3.4.13-0
docker pull registry.cn-hangzhou.aliyuncs.com/google_containers/coredns:1.7.0
#查看镜像是否下载成功
[root@k8s-master1:~]# docker images
8、kubeadm初始化(所有的master都要初始化)
master1初始化
[root@k8s-master1:~]# kubeadm init \
--apiserver-advertise-address=172.17.8.101 \
--control-plane-endpoint=172.17.8.88 --apiserver-bind-port=6443 \
--kubernetes-version=v1.20.5 --pod-network-cidr=10.100.0.0/16 \
--service-cidr=10.200.0.0/16 --service-dns-domain=qiange.cn \
--image-repository=registry.cn-hangzhou.aliyuncs.com/google_containers \
--ignore-preflight-errors=swap
#出现以下的内容
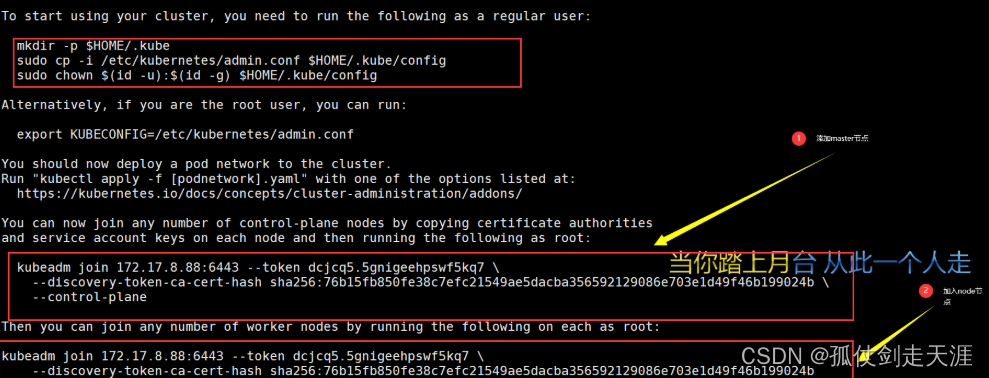
Your Kubernetes control-plane has initialized successfully!
To start using your cluster, you need to run the following as a regular user:
mkdir -p $HOME/.kube
sudo cp -i /etc/kubernetes/admin.conf $HOME/.kube/config
sudo chown $(id -u):$(id -g) $HOME/.kube/config
Alternatively, if you are the root user, you can run:
export KUBECONFIG=/etc/kubernetes/admin.conf
You should now deploy a pod network to the cluster.
Run "kubectl apply -f [podnetwork].yaml" with one of the options listed at:
https://kubernetes.io/docs/concepts/cluster-administration/addons/
You can now join any number of control-plane nodes by copying certificate authorities
and service account keys on each node and then running the following as root:
kubeadm join 172.17.8.88:6443 --token dcjcq5.5gnigeehpswf5kq7 \
--discovery-token-ca-cert-hash sha256:76b15fb850fe38c7efc21549ae5dacba356592129086e703e1d49f46b199024b \
--control-plane
Then you can join any number of worker nodes by running the following on each as root:
kubeadm join 172.17.8.88:6443 --token dcjcq5.5gnigeehpswf5kq7 \
--discovery-token-ca-cert-hash sha256:76b15fb850fe38c7efc21549ae5dacba356592129086e703e1d49f46b199024b
#################################################################################
[root@k8s-master1:~]#mkdir -p $HOME/.kube
[root@k8s-master1:~]#sudo cp -i /etc/kubernetes/admin.conf $HOME/.kube/config
[root@k8s-master1:~]# sudo chown $(id -u):$(id -g) $HOME/.kube/config
#master2和master3也需要执行此步
master2和master3初始化
kubeadm join 172.17.8.88:6443 --token dcjcq5.5gnigeehpswf5kq7 \
--discovery-token-ca-cert-hash sha256:76b15fb850fe38c7efc21549ae5dacba356592129086e703e1d49f46b199024b --control-plane \
--certificate-key  8af0085450865f09c1c4d51b8bbf426acd1654baf25214c724ef184fccf77afc
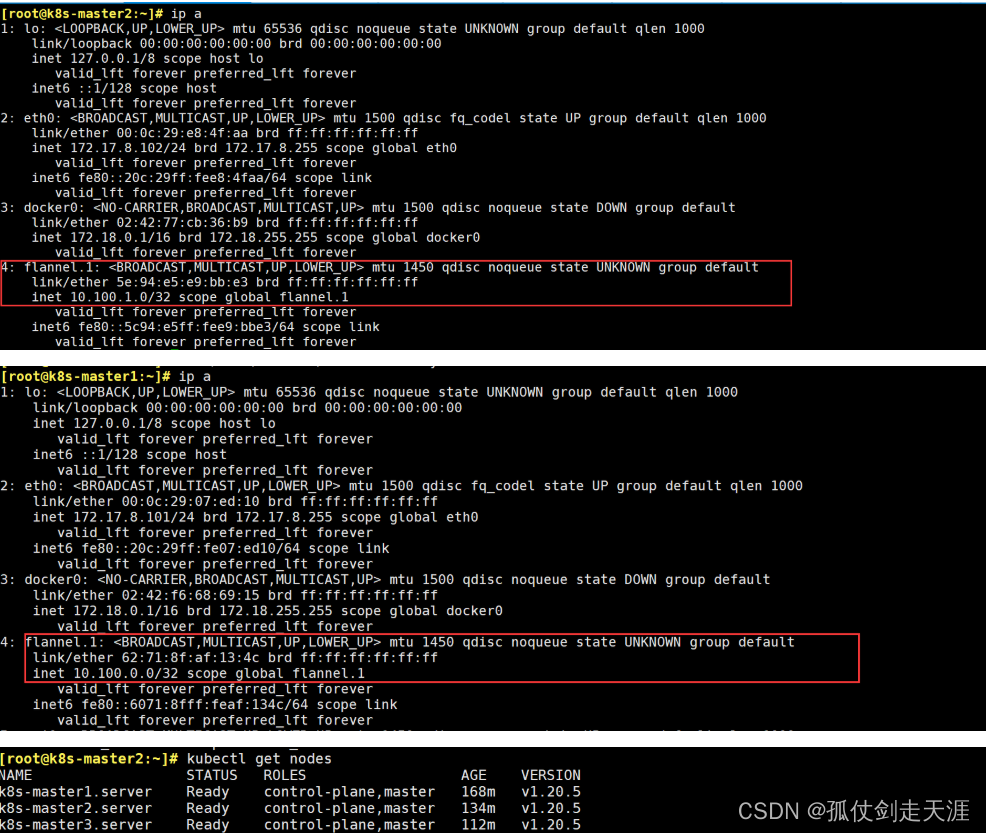
9、配置网络
#https://github.com/flannel-io/flannel/blob/master/Documentation/kube-flannel.yml
到这个网站把kube-flannel.yml拷贝到/data/network目录下
[root@k8s-master1:~]#mkdir /data/network
[root@k8s-master1:~]#cd /data/network
#修改kube-flannel.yml中的“Network" 的IP地址必须与初始化的--pod-network-cidr=10.100.0.0/16地址相同
[root@k8s-master1:~]#vim kube-flannel.yml
修改128行的Network的地址
[root@k8s-master1:~]#kubectl apply -f kube-flannel.yml
echo "source /root/script/*.sh" >> /etc/profile

#把kube-flannel.yml拷贝给master2和master3
[root@k8s-master1:~]#scp /data/network/kube-flannel.yml 172.17.8.102:/data/network/kube-flannel.yml
[root@k8s-master1:~]#scp /data/network/kube-flannel.yml 172.17.8.102:/data/network

#在master2和master3的/data/network路径下执行
[root@k8s-master2:~]#kubectl apply -f kube-flannel.yml
[root@k8s-master3:~]#kubectl apply -f kube-flannel.yml

#执行完这步后master的节点都需要执行systemctl restart kubelet.service,否则不生效
(如果重启服务后一段时间还是没有生成flannel网卡,就重启系统)
10、检查网络是否配置成功
11、node节点加入
[root@k8sk8s-node1:~]#kubeadm join 172.17.8.88:6443 --token dcjcq5.5gnigeehpswf5kq7 --discovery-token-ca-cert-hash sha256:76b15fb850fe38c7efc21549ae5dacba356592129086e703e1d49f46b199024b
[root@k8sk8s-node1:~]#systemctl restart kubelet.service

#其余node节点同上
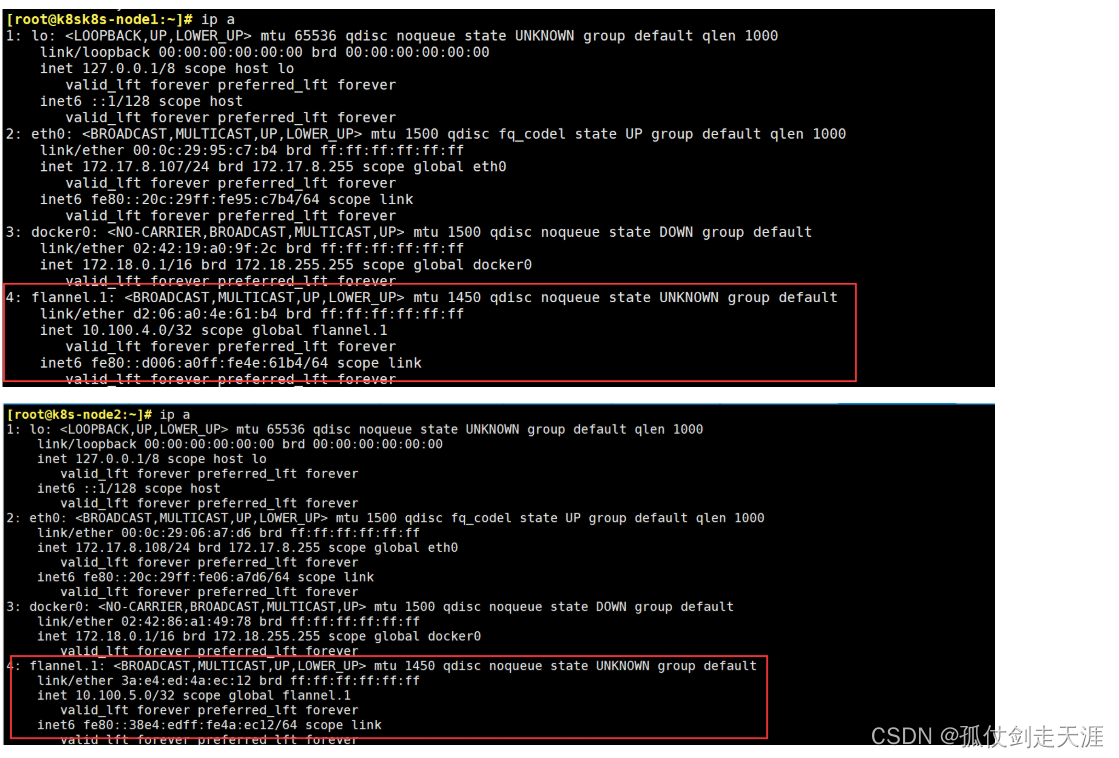
#查看节点的状态
[root@k8s-master1:~]# kubectl get node

12、在master节点创建pod
[root@k8s-master1:~]# kubectl run test-pod1 --image=alpine --command sleep 400000
[root@k8s-master1:~]# kubectl run test-pod2 --image=alpine --command sleep 400000
[root@k8s-master1:~]# kubectl run test-pod3 --image=alpine --command sleep 400000
[root@k8s-master1:~]# kubectl run test-pod4 --image=alpine --command sleep 400000

查看pod的运行情况
[root@k8s-master1:~]# kubectl get pod -o wide

进入运行的pod中测试网络的连通性
[root@k8s-master1:~]# kubectl exec -it test-pod1 sh
![]](https://img-blog.csdnimg.cn/6a4edfbaedb4463597b72fd5ac5a55f0.png)
报错总结:
![[外链图片转存失败,源站可能有防盗链机制,建议将图片保存下来直接上传(img-ohqsCokT-1652002567617)(C:\Users\HP\AppData\Roaming\Typora\typora-user-images\1651996104804.png)]](https://img-blog.csdnimg.cn/1a04505728814d16818bf841181f42d9.png)
#原因:这就是因为锁定的文件会阻止 Linux 系统中某些文件或者数据的访问

sudo rm /var/lib/apt/lists/lock
sudo rm /var/cache/apt/archives/lock
sudo rm /var/lib/dpkg/lock*
sudo dpkg --configure -a
sudo apt updat
reboot
d中测试网络的连通性
[root@k8s-master1:~]# kubectl exec -it test-pod1 sh
[外链图片转存中…(img-p5MV2WKe-1652002567616)]
报错总结:
[外链图片转存中…(img-ohqsCokT-1652002567617)]
#原因:这就是因为锁定的文件会阻止 Linux 系统中某些文件或者数据的访问

sudo rm /var/lib/apt/lists/lock
sudo rm /var/cache/apt/archives/lock
sudo rm /var/lib/dpkg/lock*
sudo dpkg --configure -a
sudo apt updat
reboot


 223
223


 被折叠的 条评论
为什么被折叠?
被折叠的 条评论
为什么被折叠?
 到【灌水乐园】发言


